Auping Aureo User manual

Koninklijke Auping bv
Laan van Borgele 70
Postbus 67
7400 AB Deventer Holland
Tel. +31 570 68 19 11
Fax +31 570 50 12 21
E-mail: [email protected]
Aureo
K2 / Auping Match
NE PAS AFFRANCHIR
NIET FRANKEREN
RÉPONSE PAYÉE
PAYS-BAS
Koninklijke Auping bv
INT. ANTWOORDNUMMER
C.C.R.I. Numéro 3
7400 VB DEVENTER
NE PAS AFFRANCHIR
NIET FRANKEREN
RÉPONSE PAYÉE
PAYS-BAS
Koninklijke Auping bv
INT. ANTWOORDNUMMER
C.C.R.I. Numéro 3
7400 VB DEVENTER
Gebruiksaanwijzing
User manual
Mode d'emploi
Gebrauchsanweisung
Manual de instrucciones
Brugsvejledning
Användarhandbok
Voor België en Luxemburg/
Pour la Belgique et le
G.D. de Luxembourg:
Royal Auping nv/sa
Vlaamse Kaai 55
B-2000 Antwerpen
Tel. +32 3 257 13 47
Fax +32 3 257 19 62
E-mail: [email protected]
Pour la France:
Auping Showroom Northern-
Feather
9, Rue Balard
FR-75015 Paris
Tel. +33 1 45579090
Fax +33 1 45575486
E-mail: infos@northern-
feather.fr
Für Deutschland:
Royal Auping
Postfach 67
7400 AB Deventer Holland
Tel. +31 570 68 19 11
Fax +31 570 50 16 37
E-mail: [email protected]
For Skandinavien:
Royal Auping
Kronprinsensgade 1
Postboks 1141
1010 København K
Danmark
Tel. +45 33 17 94 34
Fax +45 33 13 08 51
E-mail: [email protected]
Para España:
Royal Auping
Avda. Valdemarin 93 -
portal E-1A
28023 Madrid
Tel. +34 913 575 626
Fax +34 913 574 436
E-mail: [email protected]
For other countries, see
www.auping.com
6504090/05-2006
2112 Omslag.pdf - pag.1 May 30, 2006
LET OP !!! Lage resolutie!

Stuur dit formulier terug naar Auping! /Send this warranty card to Auping!/Renvoyez ce
formulaire à Auping!
Vul dit formulier volledig in (in blokletters) en stuur het per omgaande terug naar Auping.
Het geeft u recht op de Auping Kwaliteitsgarantie. Bewaar uw aankooprekening alstublieft.
Complete this card (block capitals, please) and post it to Auping immediately. When Auping receives the card,
your purchase is covered by the Auping warranty. Please retain your purchase invoice.
Remplissez ce document complètement (en lettre capitales) et renvoyez-le par retour à Auping. Il vous
donne droit à la garantie de qualité Auping. Conservez votre bon d’achat s’il vous plaît.
Naam / Name / Nom
Voorletters / Initials / Initiales prénoms M / V* M / F* H / F*
Straat / Street / Rue
Postcode / Postcode / Code postal
Plaats / Town (county) / Localité
Land / Country / Pays
Aankoopdatum / Date of purchase / Date ‘dachat
Naam en vestigingsplaats leverancier / Name and address of supplier / Nom et localité du
détaillant
Ik heb gekocht / I have purchased / J’ai acheté:
Aureo K2/Auping Match*
Graag ontvang ik meer informatie over / Please send me information about / Je désire une
information complémentaire sur:
o
* doorhalen wat niet van toepassing is / delete as applicable
/
biffer ce qui ne convient pas
Bitte unbedingt an Auping zurücksenden! /Retorne este formulario a Auping!/Returnér venligst
denne formular til Auping!/Skicka detta formulär till Auping!
Dieses Formular bitte vollständig ausfüllen (Druckbuchstaben) und umgehend an Auping einschicken. So
bald uns dieses Formular vorliegt, besteht Ihr Anspruch auf die Auping Qualitätsgarantie. Bitte behalten Sie
die Kaufrechnung.
Rellene completamente este formulario en letras mayúsculas y envíelo a vuelta de correo a Auping. Le
dará derecho a la garantía de calidad de Auping. Guarde el recibo de compra.
Udfyld kortet (med blokbogstaver) og returnér venligst det hurtigst muligt til Auping. Produktet er således
dækket af Aupings garanti ved samtidig fremvisning af købskvitteringen.
Fyll i detta formulär fullständigt (var god texta) och skicka det omgående till Auping. Det ger dig rätt till
Aupings kvalitetsgaranti. Spara inköpskvittot.
Name / Apellidos / Efternavn / Namn
Vorname / Nombre / Fornavn / Initialer Frau / Herr* H / M* Hr / Fr* M / K*
Straße / Calle / Adresse / Gata
PLZ / Código postal / Postnummer / Postnummer
Wohnort / Localidad / By / Ort
Land / País / Land / Land
Kaufdatum / Fecha de compra / Købsdato / Inköpsdatum
Name und Anschrift Ihres Händlers / Nombre y lugar de establecimiento del proveedor /
Forretningens navn og adresse / Återförsäljarens namn och filialort
Ich habe gekauft / He adquirido / Jeg har købt / Jag har köpt:
Aureo K2/Auping Match*
Senden Sie mir bitte zusätzliche Information über / Desearía recibir mayor información sobre /
Send mig venligst information om / Jag skulle vilja ha information om:
o
* nichtzutreffendes bitte streichen /
tachar lo que no proceda /
overstreg venligst, hvad der ikke er aktuelt /
stryk över det som
inte är aktuellt
Garantie-Formular
Formulario de garantía
Garantikort
Garantiformulär och användning
Garantieformulier
Warranty card
Formulaire de garantie
2112 Omslag.pdf - pag.2 May 30, 2006
LET OP !!! Lage resolutie!

Wat leest u in deze
gebruiksaanwijzing
• De onderdelen van Aureo.
• Montage van de bedlamp aan de Auping
K2/Match spiraalbodem.
• Bediening van de Aureo.
• Aureo met dimmer.
• Vervangen van de halogeenlamp.
• Vervangen van het vloerlicht.
• Auping garantie.
De onderdelen van uw
Aureo
1. Bedlamp met snoer
2. Transformator-stekker
(ENEC keur).
3. Stang voor automa-
tische verstelling met
beugel.
4. Klemstuk.
5. Verwisselbaar lampen-
kapje.
6. Inbussleutel
(in lampvoet).
7. Lange schroeven voor
montage aan K2/
Match spiraalbodem
type 11 (vlak).
Ombouw naar
andere zijde
van het bed
De Aureo bedlamp is
lever-baar in een rechter-
en linker uitvoering. Het
is mogelijk om de Aureo om te bouwen van de
ene naar de andere zijde van het bed. Wij advi-
seren u hiertoe contact op te nemen met uw le-
verancier/dealer.
Veiligheidsaanwijzingen
• Controleer of de aansluitspanning overeen-
komt met de netspanning in de woning.
• Maak de Aureo bedlamp spanningsloos
voordat u met schoonmaken of het vervan-
gen van de lampen begint. Trek de stekker
uit het stopcontact.
• Zorg ervoor dat het snoer niet bekneld kan
raken.
• Leg het snoer zodanig dat niemand erover
kan struikelen.
• Gebruik de Aureo bedlamp niet als steun
om u aan op te trekken.
• Let op kleine kinderen die op of onder het
bed kunnen spelen.
• Dek de transformator niet af en vermijd
contact met vloer en/of wand.
• Monteer geen sterkere lampen dan voorge-
schreven
Montage van de bedlamp
aan de Auping K2/Match
spiraalbodem
• Plaats het rugdeel van uw K2/Match spiraal-
bodem in de hoogste stand.
• Schuif de lampvoet van onderaf om de zijbuis
van de spiraalbodem, plaats de lampvoet op
een plaats waar deze niet kan worden geraakt
door bewegende delen van de K2/Match spi-
raalbodem.
Let erop dat de lamp, in combinatie met het
bedmodel Auronde, minimaal 3 cm van de
achterwand wordt bevestigd.
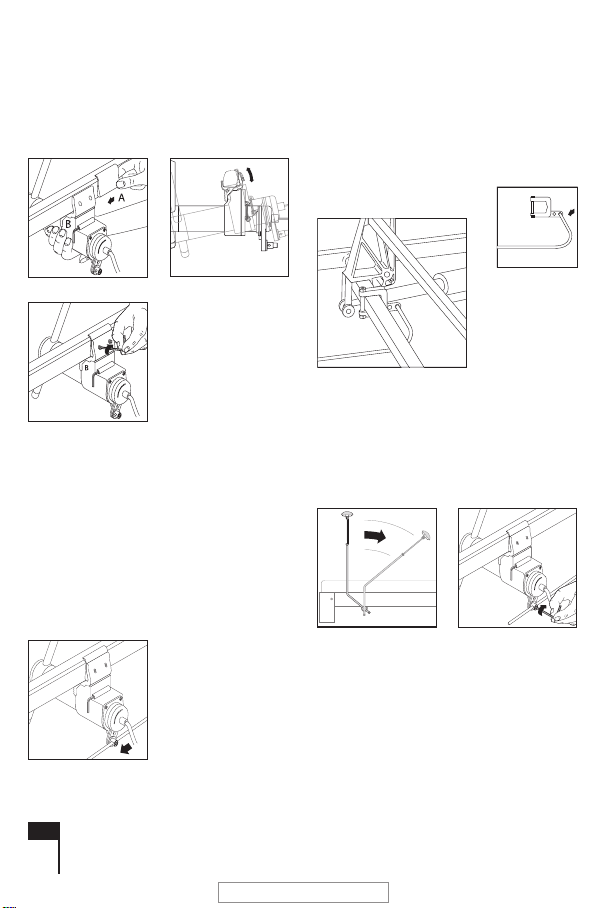
• Schuif het klemstuk A tussen de zijbuis en de
lampvoet B (fig. 1). De lamp blijft nu hangen.
• Stel de lamp verticaal (fig. 2).
• Draai de schroeven aan met de bijgeleverde
inbussleutel (fig. 3).
NL1
1
4
5
7
6
3
2
2112 BinnenW.pdf - pag.1 May 30, 2006
LET OP !!! Lage resolutie!

NL2
Let op: Voor montage van de Aureo aan de
Auping K2/Match spiraalbodem 11 (vlak) moe-
ten de korte schroeven worden vervangen
door de lange schroeven. In dit geval komen
zowel het klemstuk A als hetverticaal stellen
van de lamp te vervallen.
Voorbereiding van uw Aureo
voor automatische verstelling
behalve modellen 11 (vlak) en (3)22 (handver-
stelbaar)*
Plaatsen van de stang in de hefboom (fig.
4)
• Zet het hoofdeinde in de uiterste stand.
• Schuif de stang door het gat van de hef-
boom.
• Draai de inbusbout nog niet vast.
*Wanneer u een ander model K2/Match spi-
raal-bodem bezit, kunt u de Aureo ombouwen
naar handverstelling (zie fig. 7).
Bevestigen van de beugel op de dwarsbuis
(fig. 5)
• De beugel met de bout en moer aandraaien.
Bevestigen van de stang aan de hefboom
• Duw de lampsteel naar het voeteneinde tot
de aanslag (fig. 6a).
• Draai de inbusbout vast (fig. 6b).
• Steek de sleutel in de houder van de lamp-
voet.
Steek de stekker nu in het stopcontact; uw
Aureo bedlamp is klaar voor gebruik.
Ombouw naar handverstelling (fig. 7)
• Heeft u een bedcombinatie waarbij automati-
sche verstelling niet mogelijk is, verwijder dan
de centrale schroef uit de lampvoet.
• Draai de hefboom naar beneden tot boven
het schroefgat.
fig. 3
fig. 2
fig. 1
fig. 4
fig. 5
fig. 6b
fig. 6a
2112 BinnenW.pdf - pag.2 May 30, 2006
LET OP !!! Lage resolutie!

• Herplaats de schroef in de lampvoet en draai
deze goed vast.
Bediening van de Aureo
Het aan- en
uitzetten
De Aureo bedlamp
heeft een dimmer,
waarmee de helder-
heid van de halogeen-
lamp kan worden inge-
steld.
De tiptoetsschakelaar op de steel van de bed-
lamp is tevens de dimmer (zie fig. 8).
• Wanneer u de tiptoets aanraakt, schakelt de
lamp aan en uit.
• Wanneer u de tiptoets vasthoudt, gaat de
lamp feller of zwakker branden.
• Laat u de tiptoets los, dan blijft de bereikte
helderheid van de lamp gehandhaafd.
• Wanneer u de dimrichting wilt omdraaien, laat
u de tiptoets los en houdt u deze daarna
weer vast tot de gewenste helderheid van de
lamp bereikt is.
• Het vloerlicht kan niet worden gedimd.
Het verstellen van
het lampenkapje
Het Aureo lampenkap-
je kan zowel worden
gedraaid als gekan-
teld, om de juiste
lichtrichting in te stel-
len (fig. 9).
Het vloerlampje
Het vloerlampje
brandt altijd en werpt
een licht schijnsel op
de vloer (fig. 10).
Handmatige
verstelling
De Aureo bedlamp kan
handmatig worden ver-
steld door de steel van
de lamp in de gewens-
te stand te plaatsen
(fig. 11).
Vervanging van de
halogeenlamp
• Haal de stekker uit het stopcontact.
• Verwijder het lampenkapje (fig. 12).
• Neem het beschermglaasje van de lampfit-
ting af (fig. 13).
• Trek het lampje uit de fitting.
• Neem een halogeenlamp van 10 Watt/
12 Volt (type G4).
• Raak hem niet direct met de vingers aan.
• Druk het lampje in de fitting (fig. 14), gebruik-
makend van het beschermende omhulsel.
NL3
fig. 7
fig. 8
fig. 9
fig. 10
fig. 11
2112 BinnenW.pdf - pag.3 May 30, 2006
LET OP !!! Lage resolutie!

NL4
• Verwijder het omhulsel.
• Plaats het beschermglaasje en het lampen-
kapje terug.
• Steek de stekker in het stopcontact.
Vervanging van het
vloerlichtlampje
• Haal de stekker uit het stopcontact.
• Trek het kunststof uiteinde uit de lampsteel
(fig. 15).
• Haal de kunststof helften van elkaar
(fig. 16).
• Draai het lampje uit de bajonetfitting
(fig. 17).
• Neem een 24V 2W/4W lampje.
• Draai het lampje in de bajonetfitting.
• Klem de fitting tussen de kunststof helften.
• Duw de bedrading terug in de lampsteel
(fig. 18).
• Schuif het kokertje in de lampsteel.
Mocht u 's nachts hinder ondervinden van het
schijnsel van het continu brandende vloerlicht,
dan kunt u het lampje verwijderen.
fig. 14
fig. 13
fig. 12
fig. 15 fig. 16
fig. 18
fig. 17
2112 BinnenW.pdf - pag.4 May 30, 2006
LET OP !!! Lage resolutie!

Auping Garantie
De merknaam Auping staat borg voor
jaren-lang probleemloos functioneren. Auping
maakt gebruik van hoogwaardige en duurzame
materialen. Elk product wordt met de grootste
zorg gefabriceerd en nauwkeurig gecontro-
leerd voordat het de fabriek verlaat.
Auping geeft levenslange garantie op materiaal-
en fabricagefouten van alle bedbodems (waar-
onder te verstaan: spiraalbodems en stalen
frames) met uitzondering van de motoren,
gasveren en elektronica. Op materiaal- en
fabricage-fouten van laatstgenoemde artikelen
en van matrassen en dekbedden wordt 5 jaar
garantie gegeven op basis van jaarlijkse
afschrijving van 20% van de aankoop-waarde.
Dit houdt in dat, mochten zich materiaal- of
fabricagefouten voordoen, in het eerste jaar
na factuurdatum de volledige kosten van ver-
vanging of reparatie vergoed worden. In de
volgende 4 jaren wordt dit steeds 20% minder.
Op kussens en bedlinnen is de garantietermijn
2 jaar. Op overige artikelen wordt 5 jaar volle-
dige garantie gegeven. De garantietermijn
gaat in op de datum die vermeld staat op
de factuur. Voorwaarde is wel dat onze plaat-
singsinstructies en onderhoudsadviezen
correct gevolgd zijn en dat sprake is van
normaal huishoudelijk gebruik.
Indien zich materiaal- of fabricagefouten voor-
doen, verplicht Auping zich zulke fouten gratis
te herstellen volgens de Auping garantie
voorwaarden. Indien het defect niet hersteld
kan worden, vervangt Auping het product
binnen de garantietermijn zonder kosten door
hetzelfde, of indien niet meer leverbaar, door
een gelijkwaardig product. Uitsluitend Auping
bepaalt of een fout hersteld wordt door
vervanging, reparatie of vergoeding.
Aanspraken op garantie voor gebreken/
beschadigingen ontstaan door ondoelmatig
handelen (bijvoorbeeld door overbelasting),
verkeerd of onoordeelkundig gebruik of door
normale slijtage, worden uitgesloten.
Combinaties met niet-Auping producten
kunnen, afhankelijk van de aard van de klacht,
tot beperkingen in de garantie-aanspraak
leiden.
Een aanspraak op garantie dient eerst door
Auping als gegrond erkend te worden. Bij een
gegronde klacht zal Auping het defecte
product of defecte onderdelen vervangen,
zonder berekening van materiaalkosten, of
tegen gereduceerde kosten in geval van
een garantie op basis van afschrijving.
Afhankelijk van het land waarin aanspraak op
onze garantie wordt gemaakt, omvat deze niet
automatisch de vergoeding van de kosten van
verzending van defecte producten naar de
Auping fabriek of de Auping distributeur voor
onderzoek van de klacht of voor reparatie.
Hetzelfde geldt voor retourzending van
vervangende of gerepareerde producten. De
reparatie zelf is binnen de garantietermijn gratis.
Voorrijkosten worden in rekening gebracht.
Een aanspraak op garantie kan alleen worden
gedaan onder overlegging van de originele
factuur. De garantie is alleen geldig voor de
oorspronkelijke koper. De aan-melding dient te
geschieden bij de Auping dealer bij wie het
product oorspronkelijk werd aangeschaft, ook
indien u inmiddels naar een ander land ver-
huisd bent.
De garantie vervalt, indien het product op enig
moment gedemonteerd of gemonteerd wordt
door personen die daarvoor door Auping niet
als gekwalificeerd zijn aangemerkt, tenzij de
gebruiksaanwijzing ‘do-it-yourself’ montage-
voorschriften bevat en deze nauwkeurig
worden opgevolgd. De Auping garantie geldt
in alle landen waar Auping vertegenwoordigd
is. Auping behoudt zich het recht voor, geen
garantie te verlenen op Auping producten die
naar landen worden gebracht waar Auping
geen vertegenwoordiging heeft.
NL5
2112 BinnenW.pdf - pag.5 May 30, 2006
LET OP !!! Lage resolutie!

GB6
What you will find in this
instruction manual
• Your Aureo components.
• Attaching the bed lamp to the Auping
K2/Match mesh base.
• Operating the Aureo.
• Aureo with dimmer.
• Replacing the halogen bulb.
• Replacing the floor light.
• Auping warranty.
Your Aureo components
1. Bed lamp with cord
2. Transformer plug (with
ENEC certificate)
3. Rod for automatic ad-
justment with bracket.
4. Plastic insert strip.
5. Interchangeable
lampshade.
6. Allen key (in lamp
base).
7. Long screws for
mounting onto K2/
Match mesh base
type 11 (flat).
Conversion of
the lamp to
the opposite
side of the
mesh base
The Aureo bed lamp is
available in a left or right hand version. It is pos-
sible to convert the Aureo from one side of your
bed to the other, although we recommend con-
tacting your dealer if you wish to make this con-
version.
Safety instructions
• Check that the voltage used by the light is the
same as the main voltage in your home.
• Disconnect the Aureo bed light from the
power supply before cleaning or replacing a
light bulb. Remove the plug from the socket.
• Make sure that the cord cannot get trapped.
• Lay the cord so that no one can trip over it.
• Do not use the Aureo bed light as a means of
support to pull yourself up out of bed.
• Be careful with small children who may play
on or under the bed.
• Do not cover the transformer and avoid con-
tact with floor and/or wall.
• Do not fit more powerful bulbs than those
prescribed.
Attaching the bed lamp to
the Auping K2/Match mesh
base
• Place the back section of your K2/Match
mesh base in the most upright position.
• From underneath, slide the lamp base round
the side tube of the mesh base, place the lamp
base at a location where it cannot be touched
by moving parts of the K2/Match mesh base.
Take care, when using the Aureo in combinati-
on with the Auronde bed model, to attach the
bed lamp at a distance of at least 3 cm from
the head end unit.
• Slide the clamp strip A between the side tube
and the lamp base B (fig. 1). The lamp now
remains suspended.
• Adjust the lamp to a vertical position
(fig. 2).
• Tighten the screws with the enclosed Allen
key (fig. 3).
1
4
5
7
6
3
2
2112 BinnenW.pdf - pag.6 May 30, 2006
LET OP !!! Lage resolutie!

Attention: In order to mount the Aureo bed lamp
onto the Auping K2/Match mesh base 11 (flat),
the short screws will have to be replaced by the
long screws. In this case both the clamp strip A
and the vertical adjustment of the lamp are not
required.
Preparing your Aureo for
automatic adjustment
except models 11 (flat) and (3)22 (manually
adjustable)*
Placing the rod in the lever (fig. 4)
• Place the head end in the highest position.
• Slide the rod through the hole in the lever.
• Do not tighten the screw yet.
* If you own a different model K2/Match mesh
base, you can convert the Aureo to manual ad-
justment (see fig. 7).
Attaching the bracket to the cross tube
(fig. 5)
• Tighten the bracket with the nut and bolt.
Attaching the rod to the lever
• Push the lamp stem towards the foot end to
the stopping point (fig. 6a).
• Tighten the screw (fig. 6b).
• Insert the Allen key into the base of the lamp.
Put the plug in the socket; your Aureo bed lamp
is ready for use.
Conversion to manual adjustment (fig. 7)
• If your bed combination does not have the au-
tomatic adjustment feature, remove the cen-
tre screw from the base of the lamp.
• Turn the lever downwards until it is above the
screw aperture.
GB7
fig. 3
fig. 2
fig. 1
fig. 4
fig. 5
fig. 6b
fig. 6a
2112 BinnenW.pdf - pag.7 May 30, 2006
LET OP !!! Lage resolutie!

GB8
• Replace the screw in the lamp base and
tighten.
Operating the Aureo
Turning the light on
and off
The Aureo bed lamp
has a dimmer switch
to regulate the
brightness of the halo-
gen bulb. The silver
touch control on the
stem also acts as the dimmer (see fig. 8).
• To turn the light on, gently press the silver
control switch with your thumb and index fin-
ger.
• To use the dimmer press slightly harder on
the touch control, the light will become
brighter or dimmer.
• If you let go of the touch control, the lamp will
stay at the brightness level you have rea-
ched.
• If you wish to reverse the direction of dim-
ming, let go of the touch control and then
hold it down again until the lamp has
reached the brightness you require.
• The night light cannot be dimmed.
Adjusting the
shade
The shade can be tur-
ned as well as angled
for optimum lighting
(fig. 9).
The floor night
light
The floor night light
shines continuously
and casts a faint light
on the floor (fig. 10).
Manual
adjustment
The Aureo bed lamp
can be adjusted ma-
nually by moving the
lamp stem to the desi-
red position (fig. 11).
Replacing the halogen bulb
• Turn off the power.
• Remove the lampshade (fig. 12).
• Remove the protective glass from the lamp
socket (fig. 13).
• Remove the bulb from the fitting.
• Use a 10 Watt/12 Volt (type G4) halogen
bulb.
• Do not touch the bulb with your fingers.
• Push the bulb into the fitting, using the pro-
tective covering (fig. 14).
fig. 7
fig. 8
fig. 9
fig. 10
fig. 11
2112 BinnenW.pdf - pag.8 May 30, 2006
LET OP !!! Lage resolutie!

• Remove the covering.
• Replace the protective glass and the lamps-
hade.
• Put the plug into the socket.
Replacing the floor light
• Turn off the power.
• Pull the plastic end out of the lamp stem (fig.
15).
• Separate the plastic halves (fig. 16).
• Remove the bulb from the bayonet fitting
(fig. 17).
• Use a 24V 2W/4W bulb.
• Place the new bulb into the bayonet fitting.
• Replace the plastic halves on the fitting.
• Push the wires back into the lamp stem (fig.
18).
• Put the whole fitting back into the lamp
stem.
If the continuously burning floor night light
disturbs you during the night, the bulb may be
removed.
GB9
fig. 14
fig. 13
fig. 12
fig. 15 fig. 16
fig. 18
fig. 17
2112 BinnenW.pdf - pag.9 May 30, 2006
LET OP !!! Lage resolutie!

GB10
Auping Warranty
The Auping brand name is your warranty for
years of use to your full satisfaction of the pro-
duct you have bought. Each Auping product is
composed of high-quality, durable materials
and has been manufactured with utmost care.
It has been thoroughly inspected before it left
the factory.
Royal Auping gives you a lifetime warranty
against material or manufacturing defects in
all its bed bases (i.e. mesh bases and steel
bed frames), except on motors, adjustment
mechanisms and electronic parts. On these
products as well as mattresses and duvets,
there is a 5-year warranty against material or
manufacturing defects, based on an annual
depreciation of 20% of the purchase price.
This means that if any material or manufactu-
ring defects should occur in the first year after
the invoice date, we will reimburse the full
costs of replacement or repair. This will be
reduced each time by 20% in the next four
years. For pillows and bed linen a full 2-year
warranty applies. The warranty period begins
on the date shown on your purchase invoice.
The warranty is granted under the explicit con-
dition that our installation and maintenance
instructions have been observed and that the
product has been subject to normal household
usage.
In the event of material or manufacturing
defects, Royal Auping is obliged to rectify the
defects free of charge according to the Auping
warranty conditions. If the defect cannot be
repaired, Royal Auping will within the warranty
period replace the product free of charge by
an identical product, or, if the product is no
longer manufactured, by a similar replacement
of the same value. Whether a justified claim
will be settled by replacement, by repair or by
compensation remains at Royal Auping’s dis-
cretion.
The Royal Auping warranty does not cover
any claim due to improper use (e.g. due to
overload) or normal wear and tear. If an Auping
product is combined with a product not manu-
factured by Auping, the warranty may be res-
tricted or declared void, depending on the
nature of the claim.
Any warranty claim must first be recognised
as justified, either by the authorised distributor
in claimant’s country, or by Royal Auping.
Royal Auping will supply the parts to rectify the
problem at no material cost to claimant or at
reduced material cost if a warranty on depre-
ciation basis applies. Depending on the coun-
try, the warranty may not automatically include
cost incurred for shipping defective products
to Royal Auping or its authorised distributor
for scrutiny and/or repair, nor for shipping
cost of replacement or repaired product(s)
back to claimant.
Within the warranty period repair itself, how-
ever, will be free of charge.
Any warranty claim must be accompanied by
the original purchase invoice. The warranty is
being granted to the original (first) purchaser
only. Notification of a warranty claim must be
made to the Auping dealer from whom the pro-
duct was originally purchased, even if this is
not in claimant’s present country of residence.
Unless this booklet contains ‘do-it-yourself’
assembly instructions for the product or part
thereof and these have been followed up meti-
culously, the warranty will become invalidated
if the product was at any time disassembled or
reassembled by persons not authorised and
confirmed by Royal Auping to be qualified.
The Auping warranty covers any country
where Royal Auping has representation.
Depending on such country, warranty conditi-
ons may vary; Please consult your local
Auping distributor for details. Royal Auping
reserves the right to exclude cover on any
Royal Auping products which are taken to
countries outside of Royal Auping distribution
channels.
2112 BinnenW.pdf - pag.10 May 30, 2006
LET OP !!! Lage resolutie!

Que trouvez-vouz dans ce
mode d'emploi?
• Les différentes parties de votre Aureo.
• Montage de la lampe de chevet au sommier
K2/Match Auping.
• Commande de la lampe Aureo.
• Aureo avec variateur d’intensité.
• Remplacement de l’ampoule
halogène.
• Remplacement de la veilleuse.
• Garantie Auping.
Les différentes parties de
votre Aureo
1. Lampe de chevet avec
fil électrique
2. Fiche-transfo
(certifié ENEC)
3. Tige avec étrier de
serrage pour le dépla-
cement automatique.
4. Agrafe.
5. Réflecteur orientable.
6. Clé alen (dans le pied
de la lampe).
7. Des longues chevilles
pour montage au
sommier K2/Match
type 11 (plat).
Transformation
de la lampe
pour montage
au côté opposé
du lit
La lampe de chevet Aureo Royal est disponible
pour des modèles à droite et à gauche du lit.
On peut la placer des deux côtés. N’hésitez
pas à demander conseil à votre revendeur.
Conseils de sécurité
• Contrôlez si la tension de raccordement est
conforme à la tension du réseau de
l'habitation.
• Débranchez la lampe de chevet Aureo avant
de commencer à nettoyer ou à remplacer les
ampoules. Enlevez la fiche de la prise.
• Veillez à ce que le cordon ne risque pas
d'être coincé.
• Disposez correctement le cordon pour éviter
tout trébuchement.
• N'utilisez pas la lampe de chevet Aureo pour
vous aider à sortir du lit.
• Soyez vigilant si vous avez des petits enfants
qui jouent sur ou sous le lit.
• Ne pas couvrir le transformateur et éviter
tout contact avec le sol et/ou le mur.
• Ne pas installer de lampe plus puissante que
spécifié.
Montage de la lampe de
chevet au sommier Auping
K2/Match
• Placez le dossier de votre sommier
K2/Match dans sa position la plus haute.
• Glissez le pied de la lampe en dessous du
tube latéral du sommier, placez le pied de la
lampe sur une place où elle ne peut pas être
touchée par des parties en mouvement du
sommier K2/Match.
Veillez à ce que la lampe, en combinaison du
modèle Auronde, se monte à une distance de
min. 3 cm de la tête du lit.
• Glissez l’agrafe A entre le tube latéral et le
pied de la lampe B (fig. 1). La lampe reste
maintenant en position suspendue.
• Réglez la lampe en position verticale
(fig. 2).
• Serrez les vis à fond au moyen de la clé join-
te (fig. 3).
FR11
1
4
5
7
6
3
2
2112 BinnenW.pdf - pag.11 May 30, 2006
LET OP !!! Lage resolutie!
FR12
Attention: Pour le montage de la lampe Aureo
au sommier Auping K2/Match 11 (plat), les pe-
tites chevilles doivent être remplaçées par les
grandes chevilles. Dans ce cas, il ne faut plus
l’agrafe A et le réglage vertical n’est pas plus
nécessaire.
Préparation de votre Aureo
pour le réglage automatique
sauf les modèles 11 (plat) et (3)22 (manuel)*
Placement de la tige dans le levier (fig.
4)
• Placez la tête du lit dans la position extrême.
• Glissez la tige dans le trou du levier.
• Ne serrez pas encore le boulon à fond.
Quand vous avez un autre modèle de sommier
K2/Match, vous pouvez transformer l’Aureo
vers la manuel (fig. 7).
Fixation de l’étrier de serrage sur la tra-
verse
• Serrez à fond l’étrier de serrage avec boulon
et écrou.
Fixation de la tige au levier
• Poussez le bras de lampe vers le pied du lit,
jusqu’a fin de course (fig. 6a).
• Serrez le boulon à pans creux (fig. 6b).
• Fichez la clé dans le tenant du pied de lampe.
Mettez la fiche dans la prise de courant. La
lampe est prête à emploi.
Transformation pour réglage manual (fig.
7)
• Si votre lit n’est past doté de réglage auto-
matique, retirez la vis centrale du pied de
lampe.
• Faites pivoter le levier vers le bas jusqu’à ce
qu’il coïncide avec le trou de vis.
fig. 3
fig. 2
fig. 1
fig. 4
fig. 5
fig. 6b
fig. 6a
2112 BinnenW.pdf - pag.12 May 30, 2006
LET OP !!! Lage resolutie!

• Replacez la vis dans le pied de lampe et ser-
rez-la à fond.
Commande de la lampe Aureo
Allumer /
éteindre
La lampe de chevet
halogène est équipée
d’un variateur d’inten-
sité destiné à régler
son intensité.
L’interrupteur avec
touche à effleurement sur la tige de la lampe
de chevet permet également de régler l’inten-
sité lumineuse (voir fig. 8).
• Effleurer la touche pour allumer ou éteindre
la lumière.
• Appuyer longuement sur la touche pour aug-
menter ou diminuer l’intensité lumineuse.
• Une fois la touche relâchée, la lampe reste à
l’intensité luminieuse réglée.
• Pour changer la direction de réglage de l’in-
tensité lumineuse, relâcher la touche puis
appuyer de nouveau dessus, jusqu’à ce que
l’intensité souhaitée soit atteinte.
• La lumière au sol ne peut pas être tamisée.
Réglage de
l’abat-jour
L’abat-jour peut pivo-
ter ou basculer pour
faire varier la directi-
on de la lumière (fig.
9).
La petite veilleuse
de sol
La petite veilleuse de
sol reste allumée en
permanence (fig. 10).
Réglage manuel
La lampe de chevet
Aureo se règle manu-
ellement en fixant la
tige de la lampe dans
la position souhaitée
(fig. 11).
Aureo avec variateur
d’intensité
• Retirez la fiche-transfo de la prise.
• Enlevez le réflecteur (fig. 12).
• Otez le verre de protection du socket
(fig. 13).
• Sortez l'ampoule du socket.
• Prenez une lampe halogène de 10 watts/ 12
volts (type G4).
• Ne la mettez pas en contact direct avec les
doigts.
• Enfoncez la lampe dans le socket (fig. 14),
en utilisant l’enveloppe protégée.
FR13
fig. 7
fig. 8
fig. 9
fig. 10
fig. 11
2112 BinnenW.pdf - pag.13 May 30, 2006
LET OP !!! Lage resolutie!

FR14
• Retirez l’enveloppe.
• Replacez le verre de protection et le
réflecteur.
• Remettez la fiche dans la prise.
Remplacement de la
veilleuse de sol
• Retirez la fiche-transfo de la prise.
• Tirez l'étui en plastique de l'extrémité du bras
de la lampe (fig. 15).
• Séparez les deux moitiés de l'étui (fig. 16).
• Dévissez la petite ampoule de son socket à
baïonnette (fig. 17).
• Prenez une petite ampoule de 24V 2W/4W.
• Vissez l'ampoule dans le socket baïonnette.
• Replacez le socket entre les deux moitiés de
l'étui.
• Poussez à nouveau les fils dans le bras de la
lampe (fig. 18).
• Glissez l'étui dans le bras de la lampe.
Si, pendant la nuit, la lueur de la lampe allumée
en permanence vous dérange, vous pouvez re-
tirer l'ampoule.
fig. 14
fig. 13
fig. 12
fig. 15 fig. 16
fig. 18
fig. 17
2112 BinnenW.pdf - pag.14 May 30, 2006
LET OP !!! Lage resolutie!

Garantie Auping
Le nom de marque Auping se porte garant
d’un fonctionnement sans problème durant
des années. Auping fait appel à des matériaux
durables et de haute qualité. Chaque produit
est fabriqué et contrôlé avec le plus grand
soin avant de quitter l’usine.
Auping accorde une garantie à vie couvrant
les défauts de matière et de fabrication de
tous les sommiers (comprenant les sommiers
à spirales et les cadres métalliques) à l’exclu-
sion des moteurs, des vérins et de l’électroni-
que. Les défauts de matière et de fabrication
des articles cités plus haut ainsi que des mate-
las et des couettes sont couverts par une
garantie de 5 ans avec une période d’amortis-
sement annuelle de 20% de la valeur d’achat.
Cela signifie que les coûts de remplacement
ou de réparation découlant d’éventuels
défauts de matière ou de fabrication seront
entièrement remboursés durant la première
année suivant la date de la facture. Le montant
des remboursements sera chaque fois réduit
de 20% durant les 4 années suivantes.
Le délai de garantie des coussins et du linge
de lit est de 2 ans.
Les autres articles bénéficient d’une garantie
complète de 5 ans. Le délai de garantie entre
en vigueur à la date mentionnée sur la facture.
La garantie n’est applicable que si nos instruc-
tions de placement et nos conseils d’entretien
ont été observés correctement et qu’un usage
privé normal a été fait de l’article en question.
En cas de défaut de matière ou de fabrication,
Auping s’engage à réparer gratuitement le
défaut en vertu des conditions de garantie
d’Auping. Si le défaut ne peut être réparé,
Auping remplacera gratuitement l’article,
durant la période de garantie, par le même
article, ou si celui-ci n’est plus disponible, par
un article équivalent. La décision de remplace-
ment, réparation ou remboursement d’un
défaut appartient exclusivement à Auping. Il ne
peut être fait appel à la garantie si les
défauts/dégâts sont dus à une utilisation abu
sive (par exemple par surcharge), incorrecte
ou mauvaise ou à une usure normale. Une uti-
lisation combinée à des produits non-Auping
peut dans certains cas, suivant la nature de la
réclamation, entraîner une limitation de la
garantie.
Toute réclamation en garantie doit d’abord
être déclarée fondée par Auping. En cas de
réclamation fondée, Auping remplacera l’arti-
cle ou les composants défectueux sans factu-
rer de coûts de matériels ou moyennant des
coûts réduits dans le cas d’une garantie avec
période d’amortissement. Suivant le pays où il
est fait appel à la garantie, celle-ci ne couvre
pas d’office les frais d’expédition des articles
défectueux vers l’usine d’Auping ou le distribu-
teur d’Auping à des fins d’examen de la récla-
mation ou de réparation. Cette réserve
concerne également les retours d’articles
réparés ou de rechange. La réparation même
est gratuite pendant la durée du délai de
garantie. Les frais de déplacement sont factu-
rés.
Il ne peut être fait appel à la garantie que sur
présentation de la facture originale. Seul le
premier acheteur bénéficie de la garantie. La
revendication en garantie doit être faite auprès
du distributeur d’Auping chez qui l’article a été
acheté à l’origine, même si l’acheteur en ques-
tion habite depuis dans un autre pays.
La garantie est annulée si l’article est démonté
ou remonté à tout moment par des personnes
non qualifiées selon Auping, sauf si la notice
de montage comporte des instructions « à
faire soi-même » et que ces instructions ont
été observées à la lettre.
La garantie d’Auping vaut dans tous les pays
où Auping est représenté. Auping se réserve
le droit de ne pas accorder de garantie pour
des produits d’Auping exportés vers des pays
où Auping n’a pas de représentation.
FR15
2112 BinnenW.pdf - pag.15 May 30, 2006
LET OP !!! Lage resolutie!

D16
Was Sie in dieser
Gebrauchsanleitung finden
• Die Einzelteile Ihrer Aureo Bettleuchte.
• Befestigung der Bettleuchte am Auping
K2/Match Unterfederung.
• Bedienung Ihrer Aureo Bettleuchte.
• Aureo mit Dimmer.
• Auswechseln der Halogenlampe.
• Auswechseln der Bodenlampe.
• Auping Garantie.
Die Einzelteile Ihrer Aureo
1. Bettleuchte mit
Schnur
2. Transformator-stec-
ker (mit ENEC-
Zertifizierung)
3. Stange für automati-
sche Verstellung mit
Bügel.
4. Klemmstück.
5. Auswechselbare
Leuchtenkappe.
6. Sechskantstift-schlüs-
sel (im Fuß der
Leuchte).
7. Lange Schrauben für
Montage and
K2/Match-
Unterfederung Typ
11 (flach).
Umbau zur
gegenüber-lie-
genden
Bettseite
Die Aureo Bettleuchte ist in einer Rechts- und in
einer Linksausführung lieferbar. Man kann die
Aureo von der einen Seite des Bettes auf die an-
dere Seite umbauen. Wir empfehlen Ihnen, sich
dazu mit Ihrem Lieferanten in Verbindung zu set-
zen.
Sicherheitsanweisungen
• Kontrollieren Sie, ob die Anschlussspannung
der Netzspannung in der Wohnung ent-
spricht.
• Bevor Sie mit der Reinigung oder dem
Austausch von Lampen beginnen, ziehen Sie
den Stecker aus der Steckdose.
• Sorgen Sie dafür, dass das Kabel nicht einge-
klemmt werden kann.
• Verlegen Sie das Kabel so, dass niemand da-
rüber stolpern kann.
• Benutzen Sie die Aureo-Bettlampe nicht als
Stütze, um sich daran hochzuziehen.
• Seien Sie vorsichtig bei kleinen Kindern, die
auf oder unter dem Bett spielen können.
• Der Transformator darf nicht abgedeckt wer-
den und eine Berührung mit Boden und/oder
Wand sollte vermieden werden.
• Es sollten nur die empfohlenen Lampen ver-
wendet werden, auf keinen Fall stärkere
Lampen.
Befestigung der Bettleuchte
am Auping K2/Match
Unterfederung
• Stellen Sie das Rückenteil Ihre K2/Match
Unterfederung in den höchsten Stand.
•Schieben Sie den Lampenfuß von unten um
das Seiterohr der Unterfederung. Stellen Sie
den Lampenfuß dort wo er nicht von den be-
weglichen teilen der K2/Match-Unterfederung
berührt werden kann.
•Schieben Sie Klemmstück A zwischen das
Seitenrohr und den Lampenfuß B (Abb. 1).
Die Lampe bleibt jetzt hängen.
• Stellen Sie die Lampe senkrecht (Abb. 2).
• Zum Schluß drehen Sie die Schrauben mit
dem beigefügten Sechskantstift-schlüssel
fest (Abb. 3).
1
4
5
7
6
3
2
2112 BinnenW.pdf - pag.16 May 30, 2006
LET OP !!! Lage resolutie!

Achtung: für Montage der Aureo-Bettleuchte
an K2/Match-Unterfederung Typ 11 (flach)
müssen die kurzen Schrauben mit den langen
Schrauben ausgetauscht werden.
In diesem Fall werden sowohl Klemmstück A,
als auch die Senkrecht-stellung der Lampe auf-
gehebt.
Vorbereitung Ihres Aureo-
Bettleuchtes für automatischer
Verstellung
mit Ausnahme von Typ 11 (flach) und (3)22
(Handverstellung)*
Anbringung der Stange im Hebearm (Abb.
4)
• Das Kopfende des Rahmens in den höchsten
Stand verstellen.
• Die Stange durch das Loch im Hebearm
schieben.
• Den Sechskantbolzen noch nicht festdrehen.
*Wenn Sie enen anderen Typ K2/Match
Unterfederung haben, können Sie die Aureo
auf Handverstellung umstellen (siehe Abb. 7).
Befestigung des Bügels auf der Quer-
stange
• Den Bügel mit Schraube und Mutter fest an-
ziehen.
Befestigung der Stange am Hebearm
• Den Leuchtenstiel bis zum Anschlag in die
Richtung des Fußendes drücken (Abb. 6a).
• Die Innensechskantschraube festschrauben
(Abb. 6b).
• Den Schlüssel in die Halterung des Leuchten-
fuß stecken.
Den Stecker in die Steckdose stecken; Ihre
Bettleuchte ist betriebsfertig.
Umbau auf Handverstellung (Abb. 7)
• Haben Sie ein Bett bei dem ein automati-
sches Verstellen nicht möglich ist, entfernen
Sie die zentrale Schraube aus dem
Lampenfuß.
• Den Hebearm nach unten bis über das
Schraubenloch drehen.
D17
fig. 3
fig. 2
fig. 1
fig. 4
fig. 5
fig. 6b
fig. 6a
2112 BinnenW.pdf - pag.17 May 30, 2006
LET OP !!! Lage resolutie!

D18
• Die Schraube wieder in den Lampenfuß ein-
schrauben und gut festschrauben.
Bedienung der Aureo
Das ein- und
ausschalten
Die Aureo Bettleuchte
hat einen Helligkeits-
regler lieferbar, mit
dem die Helligkeit der
Halogen-lampe einge-
stellt werden kann. Der
Berührungsschalter am Gestänge der
Bettleuchte ist zugleich der Dimmer (siehe Abb.
8).
• Wenn Sie den Schalter berühren, schaltet
sich die Lampe ein oder aus.
• Wenn Sie den Schalter festhalten, dimmt sich
die Lampe heller oder dunkler.
• Lassen Sie den Berührungsschalter los,
bleibt die erreichte Lichtstärke erhalten.
• Wenn Sie die Dimmrichtung umkehren
möchten, lassen Sie den Berührungs-schal-
ter los und halten ihn dann wieder solange
fest, bis die gewünschte Lichtstärke erreicht
ist.
• Die Bodenleuchte läßt sich nicht reglen.
Das Verstellen des
Lampen-schirms
Der Lampen-schirm
kann, um die ge-
wünschte Leucht-
richtung zu erreichen,
sowohl gedreht als
auch gekippt werden
(Abb.9).
Die Boden-lampe
Die Boden-lampe
brennt ständig und
wirft einen Licht-
schein auf den Boden
(Abb. 10).
Verstellen per
Hand
Die Aureo Bettleuchte
kann per Hand ver-
stellt werden, indem
man die Lampen-
stange in die ge-
wünschte Lage bringt
(Abb. 11).
Auswechseln der
Halogenlampe
• Den Stecker aus der Steckdose ziehen.
• Die Leuchtenkappe abnehmen (Abb. 12).
• Das Schutzglas von der Lampenfassung ent-
fernen (Abb. 13).
• Die Lampe aus der Fassung ziehen.
• Benutzen Sie nur Halogenlampen von 10
Watt/12 Volt (Typ G4).
• Nicht direkt mit den Fingern berühren.
• Die Lampe in die Fassung drücken (Abb. 14),
mit Benützung des Schutzbeutels.
fig. 7
fig. 8
fig. 9
fig. 10
fig. 11
2112 BinnenW.pdf - pag.18 May 30, 2006
LET OP !!! Lage resolutie!
Table of contents
Languages:


