Aura Roboclean Splus 114K User manual

USER MANUAL
4635 - 4636


Dear Customer,
Congratulations on your purchase of an
AURA ROBOCLEAN SPLUS.
You have made a great decision for the health of your
family.
We recommend that you read this User Manual thoroughly
and retain it for future reference in order to use your
product as effectively as possible.
By owning this product:
•Youcanremovedustandmitesfromeverycornerofyour
home, as well as furniture such as carpets, sofas, beds
and other materials and surfaces.
•YoucanfreshenupyourhousewithAura’sselectionof
fragrances,
•Youcanrefreshtheairinsideyourhomewiththeionizer
function.
3

Save These Instructions
•Thisapplianceisintendedforhouseholduseonly.Donotuse
outdoors and on wet surfaces.
•Checkwhetheryourpowersupplyconformswiththevoltage
indicated on the technical information label before plugging in
your appliance.
•Usethisapplianceonlyasdescribedinthismanual.Useonly
manufacturer’srecommendedattachments.
•Thisapplianceisprovidedwithdoubleinsulation.Useonly
identical replacement parts. See instructions for Servicing of
Double-InsulatedAppliances.
•Thisappliancedoesnotneedtobeearthed,itcanbeused
safely on every outlet.
•Alwayscheckwhethertheapplianceorpowercordisdamaged
beforeoperatingyourappliance.Ifthereisanydamage,do
notoperateyourapplianceandcontactthenearestAuthorized
Service Provider.
•Donotleavetheappliancepluggedinwhenitisnotinuse.
Turnyourapplianceoffbeforeunpluggingit.Donotpullon
the cord to unplug the unit as this can result in damage to the
outlet and plug.
•Yourapplianceisequippedwithacordrewindingmechanism.
Donotforcefullypushinthecord,donotoperatethis
mechanism when it is not necessary and do not allow children
to play with it. Hold the plug when rewinding onto cord reel.
Keep the plug from rewinding forcefully and uncontrollably by
rmlyholdingontoitwhilerewinding.
•Donotmoveyourappliancebypullingitspowercord.Ensure
that the power cord is not trapped by a door or other objects
andkeptawayfromsharpedgesandhotsurfaces.
•Thepowercordshouldbemonitoredregularly.Anappliance
withadamagedpowercordshouldnotbeused.Ifthepower
cord is damaged, it should be replaced with a specially
prepared cord or cord set procured from the manufacturer or
authorizedserviceprovider.Thisoperationshouldalwaysbe
performedbyanauthorizedserviceprovider.
•Donotallowtobeusedasatoy.Closeattentionisnecessary
when used by or near children.
Please read all instructions before using this appliance.
! WARNING
To reduce the risk of electric shock use indoors use only.
! WARNING
To reduce the risk of re, electric shock, or injury, when using an
electrical appliance, basic precautions should always be followed.
Importantsafetyinstructions
4

•Donothandleplugorappliancewithwethands.
•Donotputanyobjectintoopenings.Donotusewithany
openingblocked;keepfreeofdust,lint,andanythingthatmay
reduceairow.
•Keephair,looseclothing,ngers,andallpartsofbodyaway
from opening and moving parts.
•Useextracarewhencleaningonstairs.
•Donotvacuumanyburningorsmokingobjectssuchas
cigarettes,matchsticks,embersorhotashes.Donotuseyour
appliancetocleanupammableorcombustibleliquidssuchas
fuel or use it anywhere where these materials may be present.
•Neveruseyourappliancetocleanoutareplace,ueorthe
inside of any duct not limited to those as oil, soot, ceramic
powder,lime,plaster,sheetrockdust,etc.
•Neveruseyourappliancetocleanupvolatileortoxic
substances or anywhere near these substances.
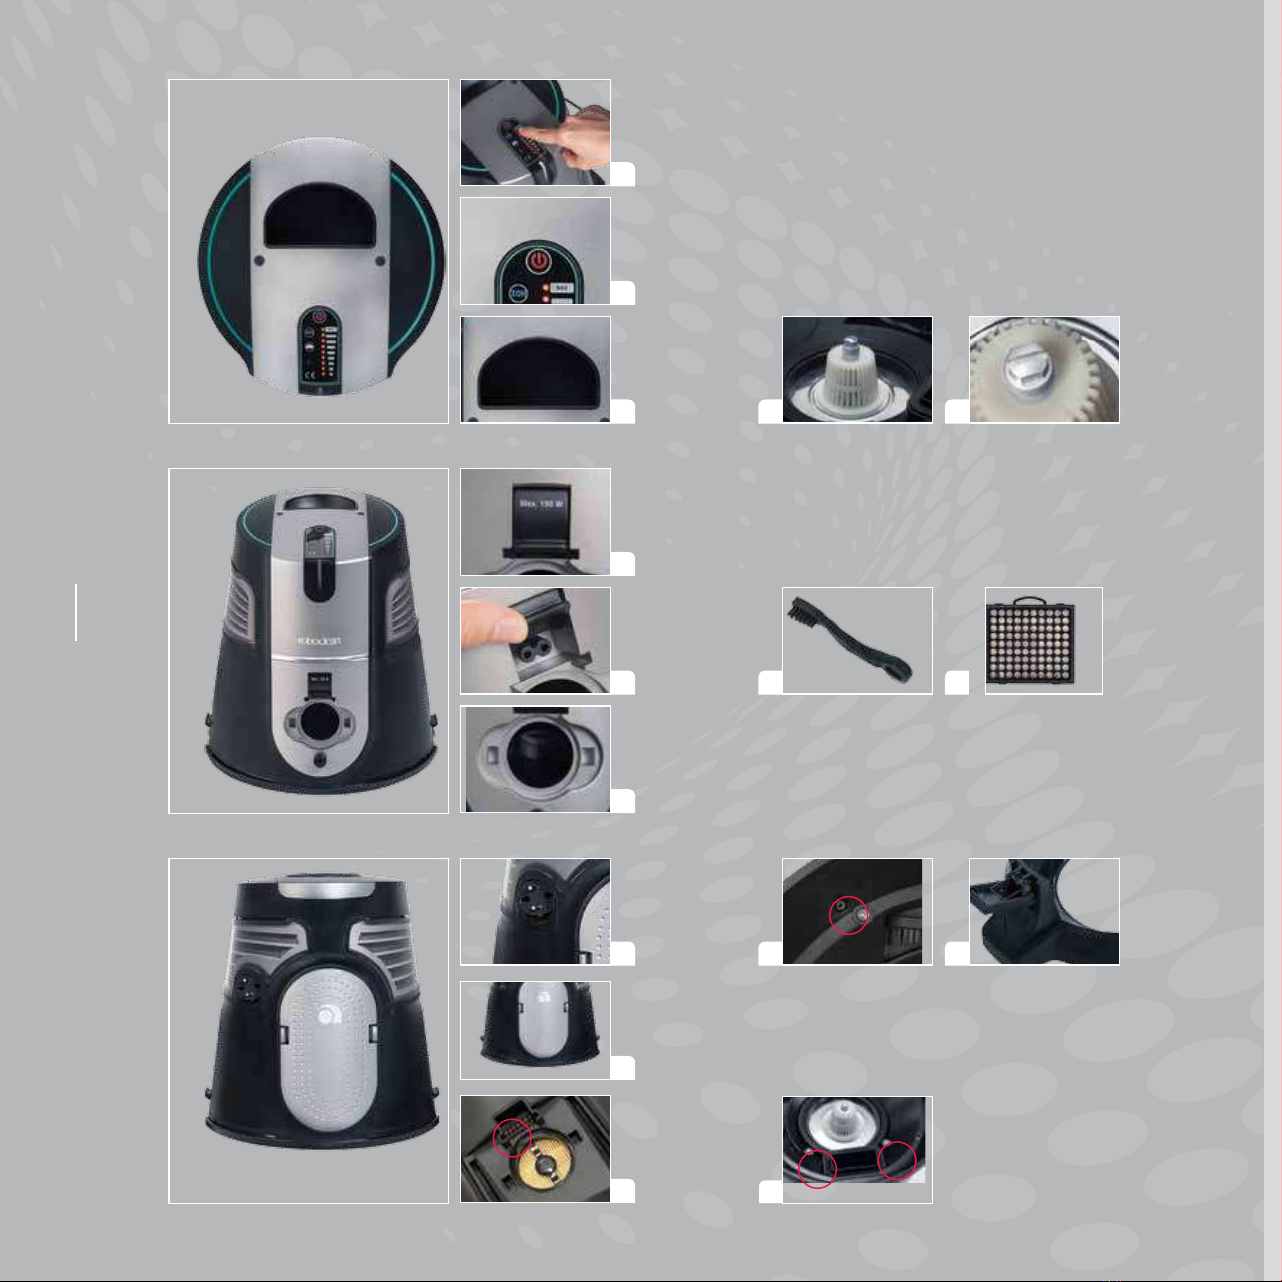
•Alwayscheckwhethertheseparatoronthemotorofyour
appliance is installed correctly in its place after being cleaned.
Neveroperateyourappliancewithouttheseparator,wateror
pollenlter.
•Yourapplianceisequippedwithamotorprotectionthermal
switch that prevents overheating and damage of the Power
Nozzlemotor.Thisfunctionstopsandprotectsthemotorwhen
anobjectgetscaughtinthePowerNozzlebrush,thebrush
isexcessivelydirtyorstrained.Donotworryiftheappliance
suddenlystops;unplugtheapplianceandremovetheobjects
straining the motor and continue using your appliance.
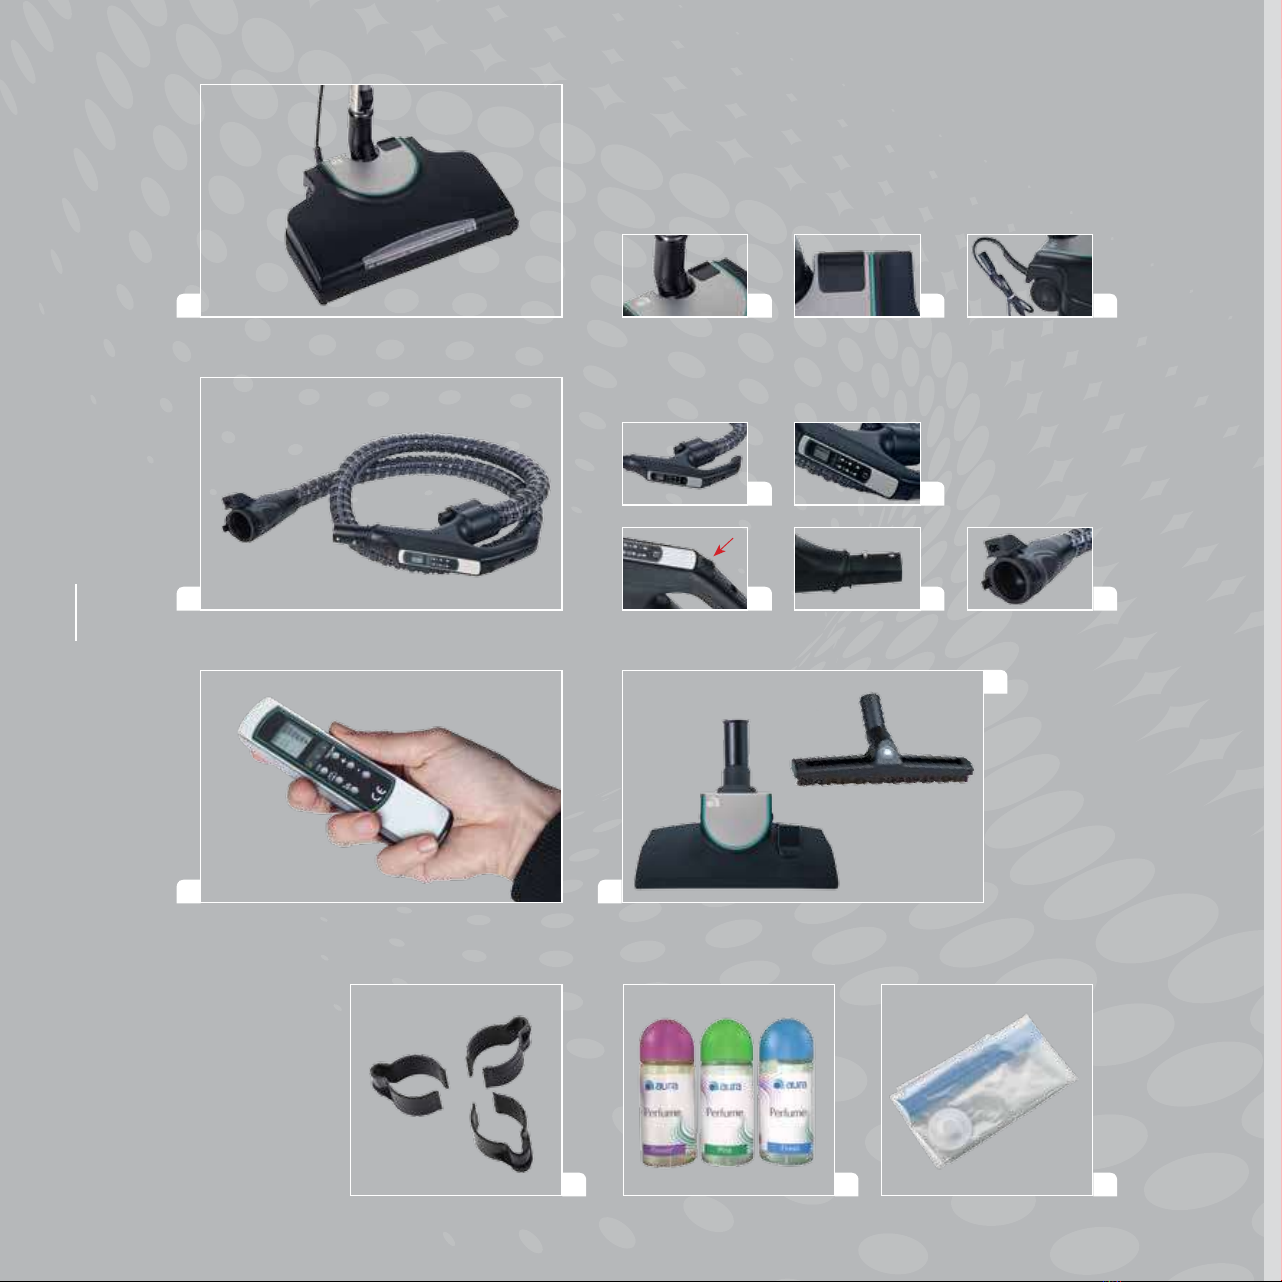
•DonotusethePowerNozzleonwetsurfacesandcleaningup
waterorotherliquids.Onlyuseitforcleaningupdrysurfaces
and objects.
•Alwaysturnoffthisappliancebeforeconnectingor
disconnectingeitherhoseorpowernozzle.
•Alwaysunplugyourappliancebeforecleaningorperforming
maintenanceonit.Turnoffallcontrolsbeforeunplugging.
•Thehosecontainselectricalwires.Donotusewhendamaged,
cut,orpunctured.Avoidpickingupsharpobjects.Donotallow
your vacuum hose to come in contact with water as there is a
live current running through it.
•Theappliancecanbeusedbychildrenagedfrom8years
and above and persons with reduced physical, sensory or
mentalcapabilitiesorlackofexperienceandknowledgeif
they have been given supervision or instruction concerning
useoftheapplianceinasafewayandunderstandthehazards
involved.Childrenshallnotplaywiththeappliance.Cleaning
and user maintenance shall not be made by children without
supervision.
•Donotattempttorepairyourapplianceincaseofafunctional
disorderorifanyadverseconditionissuspected.Contactan
AuthorizedServiceProviderforassistance.
5

6

Suction Motor Power Rate : 900 Watt
Voltage :220-240VAC,50-60Hz
Suction Flow Rate : 200 m3/ h
Suction Pressure : 1900 mmSS (190 mbar)
DirtyWaterBasinCapacity :1.8L
CleanWaterBasinCapacity :3.6L
PowerNozzleMotorPower :150Watt
InsulationClass: :II
Premium features of your
appliance
TECHNICALSPECIFICATIONS
1st Step : 7.500 6th Step : 15.000
2nd Step : 9.000 7th Step : 16.500
3rdStep:10.500 8thStep:18.000
4th Step : 12.000 9th Step : 19.000
5th Step : 13.500
SPEED(rpm)
1Dustbagfree,waterltrationsystemthatretains99.99%ofdustwithitsspeciallydesigned
separator and water basin.
2Uninterruptedsuctionpowerwithitsnon-blockingwaterltrationsystem.
3Special deep cleaning tool with brushed helical cylinder, operating with a electrical motor which is
power of 150 Watts.
4Rich variety of tools designed for different functions suitable for any type of cleaning.
54-in-1appliancewiththefollowingfunctions:ionizer,aromatizer,vacuumcleaneranddeep
cleaner.
6Ergonomicdesign.
7Easysetupandoperation.
7

3
1
2
7
8
4
5
6
9
12 13
1110
1514
16
8

17
18
19
1 TouchscreenControlPanel
2 On/OffButton
3Handle
4 PowerNozzleOutletCover
5 PowerNozzlePowerOutlet
6 SuctionNozzlePort
7 PowerCord
8 RearPanelCover
9 IonOutletChannel
10 Separator
11SeparatorNut
12SeparatorCleaningBrush
13 Pollen Filter
14 Safety Switch Mechanism
15LockingLatches
16 BasinLeds
17 Dolly
18CleanWaterBasin
19DirtyWaterBasin
BODYASSEMBLY
9

1
5
11
2 3 4
12
Alternative
13
6 7
9 10
1614 15
8
10

1PowerNozzle
2PowerNozzleJoint
3JointFixingLatch
4PowerNozzleCord
5TriggerHandle&Hose
6Trigger
7TriggerControlPanel
8ControlSecuringLatch
9TelescopicTubeAdaptor
10HoseAdaptor
11RemoteControl
12CarpetAndHardFloorNozzle
13HardFloorNozzle(Alternative)
14CordRetainingClamp
15 Fragrance Set
16VacuumBag
17TelescopicTube
18UpholsteryTool
19EasyAccessTool
20CircularBrush
21Inator&VacuumingTool
22CreviceTool
ACCESSORYASSEMBLY
ASSEMBLY 17
19
18
20
21
22
11

( ) ON/OFF:Youcanstartorstopyourappliancebytouching
this symbol for 1 second.
Thissymbolwillglowwhiteindicatingitsstandbyposition
when the appliance is plugged in and will glow red during
operation.
( ) SLIDER:Youcansetthesuctionpowerin9different
levelsbymovingyourngerupanddownonthesliderswitch
or you may switch to the desired level by a single touch.
( ) POWERNOZZLE:Youcanactivatethedeepcleaning
function by touching this symbol.
() IONIZER:Youcanactivatetheionizingfunctionby
touching this symbol.
TOUCHSCREENCONTROLPANEL
Installationandoperation
of the Roboclean

You can use the remote control on the trigger
assemblyorseparatefromthetriggerassembly.The
remote should be removed by pulling the remote
control retaining latch towards you.
When you want to place it on its housing again, slide
the front side of the remote into the housing on the
triggerrstandpresstherearsideslightly.
REMOTECONTROLPANEL
ON/OFF
Suction power level
buttons
PowerNozzle
Ionizer
LCDdisplay
13

14

! WARNING
This hose includes electrical connections;
• It should not be used for sucking up water or other liquids.
• It should not be immersed in water for cleaning.
• Hose should be checked regularly and should not be used if
it is damaged.
FILLINGTHEBASINWITHWATER
CONNECTINGTHEVACUUMHOSETOTHEBODY
1 Release the latches on both sides of the appliance.
Separate the main body from the water basin.
2 Fill the dirty water basin with clean water up to the top of the measuring
postinitscenter.Thewateramounttobelledisabout1.8L.(Please
ensurethatthewaterdoesnotexceedtheheightofthemeasuringpost).
! Do not operate the appliance without water.
3Putthewater-lledbasin,intothecleanwaterbasinandplaceitonthe
dolly.
4 Securethebodytothedollywiththelockinglatches.
5Lifttheoutletcoveronthebodyupwardsasshowninthegure.
6Press the hose adaptor on the end of the vacuum hose into latches on the
sides,andsecureitonthebodybypushingitsothattheplugsandlocks
engageeachother.Ensurethatthetabsarelockedbypullingthehose
slightly.
7 Toseparatethevacuumhosefromthebody,presstheclampsonbothsides
of the hose adaptor and pull the hose towards you.
1 2 6
5
15

3 PlugthePowerNozzlecordinto
thedualsocketslotunderthe
trigger arm.
2 Installtheothersideofthe
telescopic tube to the joint part
ofthePowerNozzlesothatthe
lockingpinisengaged.
4 Installthecordretainingclampstothe
telescopictubeequaldistancefromeach
othersothattheyholdthePowerNozzle
cord.Toadjustthelengthofthetelescopic
tube, push the button located at the center
of the tube in the direction of the arrow and
adjust the tube to the desired length.
5 Beforestartingtovacuum,press
the joint retaining latch on the
PowerNozzletoreleasethe
tube from upright position.
1Installthetelescopictubetothe
tube adaptor on the end of the
vacuumhosesothatthelocking
pin is engaged.
Setting up the Power
Nozzle
16

17
! WARNING
• Do not use the Power Nozzle to suck up water or liquids and do not use it on wet surfaces.
• Do not use the Power Nozzle on leather surfaces, carpets made from animal hide, fur or hair, shaggy
carpets, handmade rugs, Aloe Vera mattresses, and carpets made with soft bers.
• It is not recommended to use the Power Nozzle to clean mattresses. It is recommended to clean
mattresses with Roboclean Small Power Nozzle.
• Before using the Power Nozzle on any type of surface such as carpets, rugs, upholstery and mattresses;
read the user and owner care manuals of these products. The Power Nozzle may cause damage on
surfaces that are not suitable to be cleaned with the Power Nozzle.
• In case the Power Nozzle becomes obstructed by bristles, bers and/or other materials; do not attempt
to use it before removing any of these obstructions. Clean the cylinder and resume operation.
• Make sure to unplug your Roboclean before performing any sort of cleaning or maintenance on it.
• Do not let children use your Roboclean device as a toy or operate it without supervision.
1Unplug power cord by pulling it out of its housing.
2Afteradjustingthetothedesiredlengthandhearingitclick,releaseit.Thisactionwilllockthe
cordandpreventitfromgettingpulledbackinitshousing.Theredlineonthecordindicatesthe
endofthecordlength.Donotpullthecordmorewhenyouseethissign.
3Afterallconnectionsareperformed,plugintheapplianceandbringittothestandbyposition.
4Ifyouwantthecordtobepulledbackintoitshousing,slightlypullandreleaseit.Holdthecord
inyourhandtoensurethatitispulledbackintoitshousinginacontrolledmanner.
5Neverletchildrenplaywiththecord.
USAGEANDREWINDINGOFTHEPOWERCORD
USAGEOFTHEPOWERNOZZLE
a. When you want to operate the appliance from the body control panel;
• Activatethesuctionmotorbytouchingthe[ ]On/Offsymbol.
• ActivatethePowerNozzlebytouchingthe[ ] symbol. Press the same button
when you want to stop it.
b. If you want to operate the appliance from the trigger control panel;
•StartthesuctionmotorbypressingtheOn/Offbutton.
•StartthePowerNozzlebytouchingthe[ ] button. Press the same button when
you want to stop it.
WhenyouactivatethePowerNozzle,yourappliancewillbeginoperatingatthemaximum
level automatically.
Afteryouhavecompletedvacuuming,stoptheappliancebypressingtheOn/Offbuttononthe
remotecontrolortouchingthe[ ]On/Offsymbolonthebodyandunplugtheappliance.
Securethetelescopictubebypushingitforwardtobringittotheuprightpositionwhenrequ-
ired.

4 Crevice Brush
Itisusedforcleaningplaceswhicharehard
to reach such as the spaces between central
heating radiators and window edges.
3 Circular Brush
Itisusedfordelicatedustingoperationsthat
willbeperformedonnaturalandarticial
owers,curtains,paintingsanddressesetc.
2 Upholstery Tool
Itisusedforcleaningupholsteredsurfaces
suchasseatsandsofasinparticular.Thanks
to its specially grooved design with openings,
it never wears out your upholstered surfaces.
1 Carpet and Hard Floor Nozzle
Itisusedforthedailysweepingofcarpets,
rugsandhardoors.Youcanadjustthe
length of the brush by pressing the latch on
top of the tool.
Installationandoperationof
other accessories
When you want to use any of the accessories, attach the accessory to the
appliance before plugging it in.
a. When you want to operate the appliance from the body control panel;
•Activatethesuctionmotorbytouchingthe[ ]On/Offsymbol.Youmayset
the suction power in 9 different levels with the slider switch.
b. If you want to operate the appliance from the trigger control panel;
•Startthesuctionmotorbypressingthe[ ]On/Offbutton.Youmay
increaseordecreasethesuctionpowerwiththe(+)and(-)buttons.
Afteryouhavecompletedvacuuming,stoptheappliancebypressingtheOn/Off
buttononthecontrolorbytouchingtheOn/Offsymbolonthebodyandunplug
the appliance.
18

9Vacuum Bag
Youcanperformtherequiredcleaningbyvacuumingfor
3to4minutesbyputtingthingssuchaspillows,quilts,
etc., whose interior parts you cannot be cleaned, into
thisspecialbag.Thus,theinteriorofyouritemswill
become free of dust and mites.
Moreover, you can reduce the volume of your vacuumed
bulkymaterialssuchasquilts,beddingetc.,storethem
in much less space for a longer time.
7Inflator & Vacuuming tool
Youcancleankeyboardsandelectronicsaswellas
inatetoyswiththisspecialtool.
8Perfume Set
Puttheperfumeyoudesireintothesuctionnozzle
port on the body part of your appliance, spray a
few times, and then remove the perfume. Start the
motorandanexcellentfragrancewillaromatize
the air all over your room.
6Easy Access Tool
Itisusedforcleaningplaceswhichareimpossible
to reach such as the spaces behind cupboards,
wardrobesandradiators.Installtheadapterhead
oftheInator&Vacuumingtool(no.21)tothe
telescopic tube to use this tool.
5Crevice tool
Thistoolisespeciallydesignedforcleaningthe
base moulding along walls and the joints of
armchairs and sofas.
19

20
Table of contents
Other Aura Vacuum Cleaner manuals