Aura MaxiVac 114HW User manual

User
Manual
Vacuum Cleaner
with water-based filtration & carpet washing system
Waterfall
System

Thank you for choosing our product. We hope that
Aura Wet Sweeping and Carpet Washing System,
which have been manufactured in modern facilities
and under high-quality standards, will provide the best
solution for your needs. Please read the entire user
manual thoroughly and keep it for future reference.
Dear Customer,

3
Contents
Safety precautions 4
Technical specifications 5
Accessories 6
USAGE 7
-Sweeping 7
-Wet spill vacuuming 8
-Carpet washing with shampoo 9-10
-Blowing 10
Washing process warning and precautions 11
Cleaning and maintenance 11

4
Safety Precautions
Please read before using your appliance!
• This device is designed only for domestic use.
• Before plugging your device in, check that the
mains electricity is suitable for the voltage specified
on the technical information label.
• No grounding is required as your device is fully
insulated. You can safely use it in a groundless
socket.
• Before operating the device, be sure to check the
device or power cord for damage. If there is any
damage, do not operate your device and contact
your nearest Aura Authorized Service.
• Do not leave the device plugged in when it is not
in use. Turn off your device before unplugging.
When removing the plug from the socket, do not
pull the plug by the cable.
• Your device is equipped with an automatic cable
winding mechanism. Do not force the cable to push
in, do not use it unnecessarily and do not let your
children use it as a toy.
• Do not pull or carry the device by its power cable.
Do not allow the cable to be caught by a door. Keep
power cable away from sharp edges and hot
surfaces.
• Power cord should be checked regularly for
damages. The device should not be used with a
damaged cable. If the power cord is damaged, it
must be replaced by an equivalent cord or cord set
available from its manufacturer or service agent.
This operation must be done by an authorized
service.
• Do not vacuum burning, smoking or smoldering
things like cigarettes, matches or hot ashes. Never
use your device to clean flammable liquids such as
gasoline, alcohol, fuels, or where these substances
may be found.
• Never use your device to clean the oil, soot,
chimney dust, ceramic powder, lime dust, gypsum
dust, or to cleaning fireplaces.
• Never use your device to clean volatile and toxic
substances or near these substances.
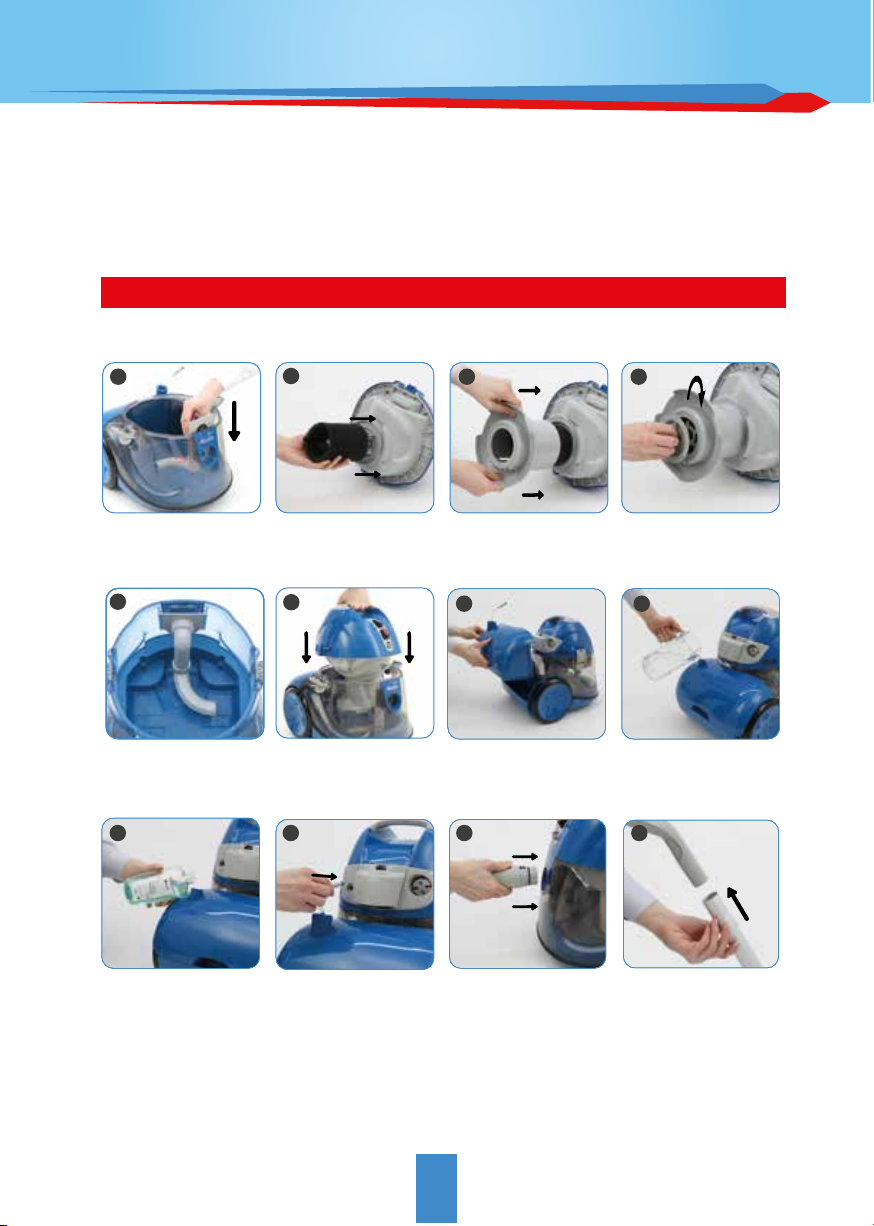
• Always unplug your device before starting
maintenance and cleaning.
• The appliance can be used by children aged from
8 years and above and persons with reduced
physical, sensory or mental capabilities or lack of
experience and knowledge if they have been given
supervision or instruction concerning use of the
appliance in a safe way and understand the hazards
involved. Children shall not play with the appliance.
Cleaning and user maintenance shall not be made
by children without supervision.
• Do not allow your device to be used by children
as a toy or to be operated by children without
supervision. Children should be supervised to
ensure they do not play with the device.
• Do not try to repair the device after
malfunctioning or any other situation you may
suspect. Please contact the Authorized Service.

5
Technical Specifications
114HW - MAXIVAC
1000 Watt
1950 mmSS
220 - 240 V AC, 50/60 Hz
200m3/h
1 - 1,5 L/sec.
Model
Wet/Dry Sweeping
Washing Function
Motor Power (max)
Vacuum
Voltage / Frequency
Air Flow
Water Suction Rate
7 L
8,5 L
12,7 kg
IPX4
II
114RW - TECHNOVAC
1000 Watt
1950 mmSS
220 - 240 V AC, 50/60 Hz
200m3/h
1 - 1,5 L/sec.
3,5 L
6 L
10,8 kg
IPX4
II
Fresh Water Tank Capacity
Dirty Water Tank Capacity
Weight
IP Code
Protection Class

6
Accessories
1- Floor cleaning nozzle, 2- Eliptical brush, 3- Crevice tool, 4- Suction hose, 5- Telescopic tube, 6- Air outlet
filter, 7- Sponge filter, 8- Filter cover, 9- Filter slot, 10- Blowing apparatus, 11- Suction group, 12- Big
washing nozzle, 13- Hard floor rubber, 14- Mini washing nozzle, 15- Washing set spray pipe, 16- Pipe
clamp, 17- Spray trigger, 18- Clean water tank, 19- Suction pipe, 20- Shampoo.
Sweeping & Washing
2 4
7
135
68 9
7
11 12 13 14
10
15
18 19 20
16 17

Usage
Sweeping
• Our vacuum cleaners are equipped with multipurpose accessories and engineered with
economic design for dry sweeping and wet spill vacuuming.
IMPORTANT
NOW, YOUR DEVICE IS READY FOR SWEEPING
Open head unit by
releasing both
securing clips.
Lift head unit from
dirt collection tank.
Attach suction group. Place the sponge filter in
the direction of the arrow.
1 2 3 4
Pull power cable and
insert its plug into the
main power supply.
Press on green button
for power. If machine
is on, the led light will
be illuminated.
Insert handle into end of
telescopic tube
11 1210
9
Place the filter slot in the
direction of the arrow.
Tighten the filter
securing lock clockwise.
Add clean water up to
the level indicated.
Place the head unit and
attach suction hose to
inlet connector.
55
6 7 8
1- The pump switch must NOT be used in any vacuuming mode. Use of the pump without water will
lead to PUMP FAILURE. Only switch the pump on when using your device for carpet washing purpose.
2- It is recommended that all filters be checked and cleaned after each use.
Attach floor cleaning
nozzle to telescopic tube
and lock it in place.

8
Tighten the filter
securing lock
clockwise.
Make sure that the
tank is empty.
Pull power cable and
insert its plug into the
main power supply.
Press on green buttonfor
power. If machine is on,
the led light will be
illuminated.
Place the head unit and
attach suction hose to
inlet connector.
Insert the handle into
end of the telescopic
tube
Attach suction group. Place the filter slot in the
direction of the arrow.
4
5
11
Place the sponge filter in
the direction of the arrow.
3
12
2
Lift the head unit from
the dirt collection tank.
1
8
5 6 7
In the event of a wet spill in your home, your device can be used to remove liquids from
your floor.
Use the following steps convert your device from sweeping mode to wet vacuuming mode.
Wet spill vacuuming
WARNING
NOW, YOUR DEVICE IS READY TO VACUUM WET SPILLS.
Do not use your device to vacuum any hazardous liquids like flammable liquids,
corrosives, acids, oil based liquids, etc...
WARNING
During the vacuuming, if the water level is exceed in the tank, the noise of the device
will be higher. In that case, unplug your device and discharge the water from the tank.
If needed, attach the rubber
to the big/mini washing
nozzle by sliding tool onto
the front of the head.
10
Attach big/mini washing
nozzle to telescopic tube
and lock it in place.
9

9
Make sure that the
tank is empty.
Place the filter slot
in the direction of
the arrow.
Place the sponge
filter in the direction
of the arrow.
Attach suction
group.
Place the head unit on
the dirt collection
tank.
6
Tighten the filter
securing lock
clockwise.
5
3 4
5
Carpet washing with shampoo
AURA is an exceptional carpet cleaner. Clean your carpet or furnitures to keep them
free from harmful allergens, in addition to remove stubborn stains for a healthy home.
Use the following steps to set up your device for carpet or furniture washing.
IMPORTANT
Be sure of that; surfaces to be washed must thoroughly sweeped first.
* DO NOT FILL THE TANK WITH HOT WATER.
Place the head unit and
attach suction hose to
inlet connector.
910 11 12
Pour two caps of
shampoo in to the
clean water tank.
Insert suction pipe into
the tank and attach the
the free end of the
suction pipe to the inlet
port of the head unit.
Insert the handle into
end of the telescopic
tube
8
Fill the tank with
tap water. *
Attach clean water
tank to the rear of the
dirt collection tank.
7
12

10
If needed, attach the
rubber to the big/mini
washing nozzle by
sliding tool onto the
front of the head.
Attach big/mini washing
nozzle to the telescopic
tube and lock it in place.
Attach the spray
trigger to the handle.
Attach the washing set’s tube extension to
the free end of the washing set tube and lock
it by turning.
Attach free end of washing set’s tube extension to
the big/mini washing nozzle. - To attach the tube
extension, insert and turn it clockwise 90 degrees.
- To release, turn it anticlockwise 90 degrees and
remove.
Secure the spraypipe to both
external surfaces of the
telescopic tube and suction hose
by using the securing clamps.
17 18 19 20
Press the trigger's
button to begin spraying
water from big/mini
washing nozzle.
24
In order to use the blowing
feature, remove the cover and
sponge filter on the rear air
outlet duct of your device and
attach the blowing apparatus
(Accessories 10). Turn on the
device by inserting the hose end
into the blowing apparatus. The
blowing feature is ready to use.
First press power on green button. If machine is
on, the led light on the switch will be illuminated.
Then press pump on red button. If pump is on,
the led light on the switch will be illuminated.
22
1 2 3
23
Insert long end of the
washing set’s
spraypipe to the
checkvalve inlet.
21
1613 14 15
NOW, YOUR DEVICE IS READY FOR CARPET WASHING.
Blowing

Cleaning and maintenance
Washing process warnings and precautions
• Surfaces to be washed must thoroughly
sweeped first.
• We strongly recommend that you use Aura
shampoo in your product. You can provide Aura
shampoo from authorized services.
• Other shampoos, cleaning chemicals, foaming
liquid or powder detergents may damage
your device.
• Never run the pump when the water tank is
empty.
• If the water in the tank runs out while the
pump is running, turn off the water pump
immediately.
• Repeat the cleaning process a few times for
very dirty carpets and upholstery.
• Before using your washed items such as
carpets, sofas, etc., let them dry for about
two hours.
• Turn off the on/off switch and unplug the
device. Remove all attacment and suction-hose
from the device.
• Empty the dirty water reservior, wipe with a
cloth to remove dirt, rinse thoroughly with warm
water and allow to dry completely before
storage.
• Remove sponge filter, rinse and allow to dry
completely.
• Rinse and clean all parts and accessorries
thoroughly and allow to dry completely.
• To clean the suction-hose, flush clean by
running hot tap water through it and allow to
dry completely before using again or storage.
After carpet washing and wet
vacuuming
2
1
Lift the head unit from
the dirt collection tank.
To drain remaining water,
turn the head unit sideways
as in the way it is.
4
3
Remove the filter
cover by turning the
lock anticlockwise and
pulling outwards.
Remove the filter slot
in the direction of the
arrow.
56
Remove the sponge
filter in the direction
of the arrow.
Remove the suction
group.
IMPORTANT
Maintenance must be performed by an authorized
service technician.
WARNING
Always unplug the device from the mains power.
Before use start with cleaning and maintenance.

BOSB Mermerciler San. Sit. 7. Cad. No:14 / 34524 Beylikdüzü / İSTANBUL
Tel: +90 212 875 35 62 / Faks:+90 212 875 36 64
Other manuals for MaxiVac 114HW
1
This manual suits for next models
1
Table of contents
Other Aura Vacuum Cleaner manuals