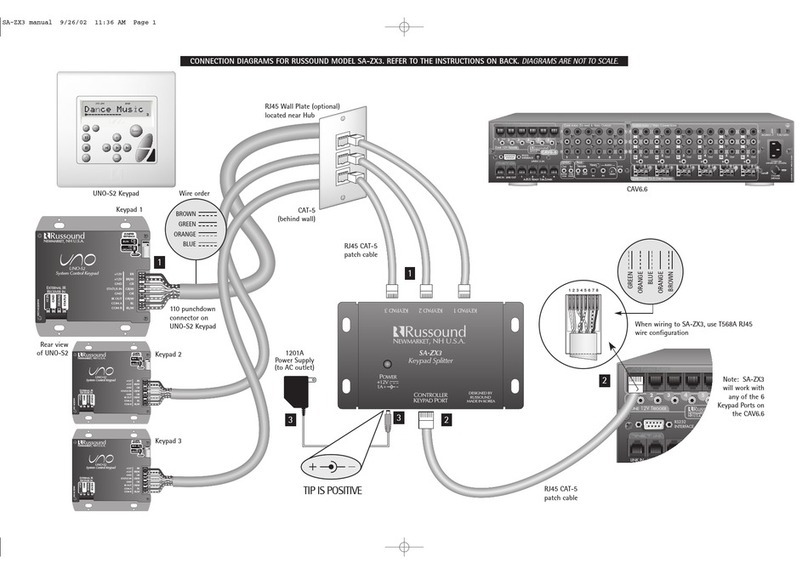
auray ABC Series User manual

Cable Replacement Kit
ABC Series
Owner’s Manual
for ABP Series Aluminum Boom Poles
Introduction
Thank you for choosing Auray.
The Auray ABC series replacement kit
provides a replacement cable for the Auray
ABP series boom pole. Auray’s solderless
design provides a fast and easy solution for
cable replacement.
The high-quality coiled cable features an XLR
connector and an XLR insert connector that
provide secure connections and excellent
signaltransfer.Thiscablealso featuresAuray’s
unique strain relief system that absorbs
tension, secures the cable, and protects the
cable from damage at the edge of the tip exit.
The included Allen key and a small slotted
screwdriver are the only tools needed for this
simple cable replacement procedure that will
assure long-lasting and trouble-free operation
of your ABP boom pole.

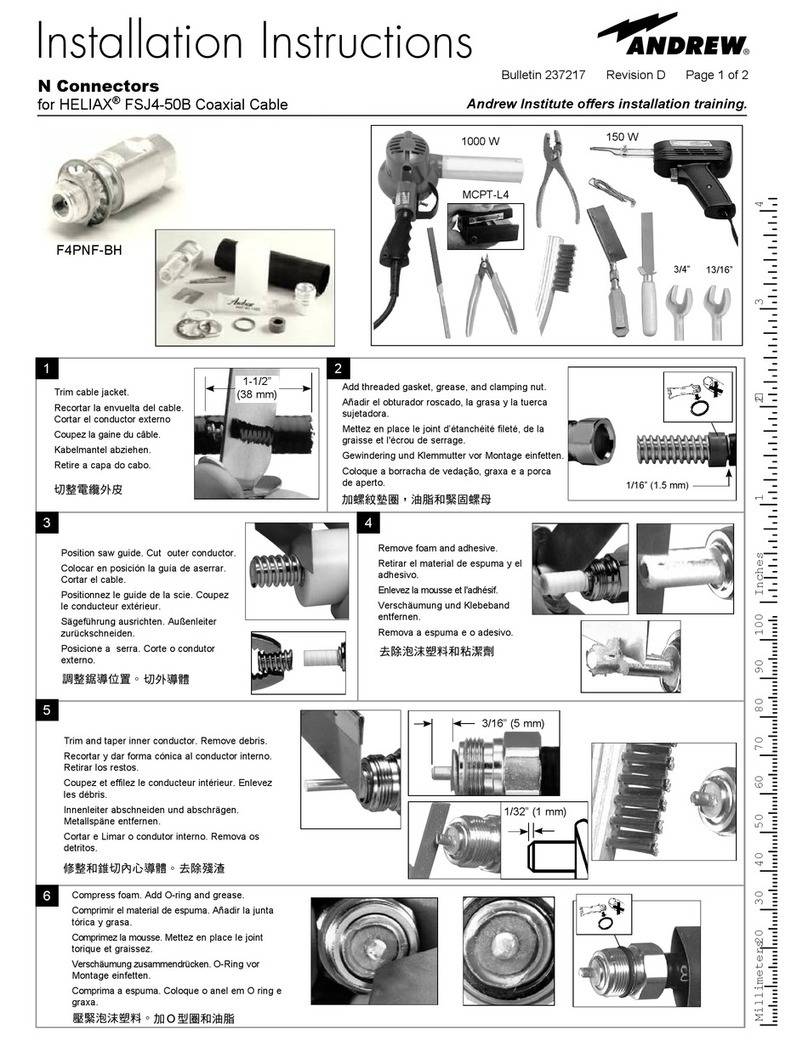
To replace the cable of
the ABP series boom
pole, do the following:
Remove the old cable
1. Remove the rubber
grip from the bottom
housing by peeling it
o, and set it aside. 1
2. Unscrew the bottom
housing from the base
of the boom pole.
3. Locate the screw
hole on the bottom
housing. Using
a small slotted
screwdriver (not
included), loosen the
locking screw of the
XLR insert by turning
it clockwise. 2
4. Remove the XLR
insert connector by
gently pulling it out of
the bottom housing.
5. Use the Allen key to
loosen the set screw
on the tip by turning it
counterclockwise. 3
6. Remove the tip by
unscrewing it. 4
7. Lift the strain relief out
of the tip exit slot. 5
8. Remove the cable
from the boom pole
by pulling it out from
the top of the pole.
XLR connector 1
Coiled cable 2
XLR insert connector 3
Strain relief 4
String 5
1.5 mm Allen key 6
Tool needed: small slotted screwdriver
Overview 1
4
6
2
3
5
Instructions
5
4
1
3
2

Install the replacement cable
1. Holding the boom
pole upright, insert
the cable into the top
of the boom pole 1
and snake it through
the tubing until the
XLR insert connector
is exposed at the
bottom of the pole. 2
Note: If the cable does
not move smoothly
through the tubing, use
the included string: tie
the string to the XLR
connector and drop it
through the tubing from
the top. 3Pull the string
from the bottom of the
boom pole to snake the
cable through the tubing.
Make sure to remove the
string before continuing.
2. Insert the internal
XLR connector
into the bottom
housing by matching
the notch on the
connector with the
slot on the housing.
4
Note: When properly
aligned, the XLR insert
connector will easily
slide into place. Do not
try to force the connector
into the mount. Doing
so could damage the
connector or the mount.
3. Insert the XLR
connector far enough
so that the locking
screw is aligned
with the hole on the
housing. The screw
will be easily visible
through the hole.
4. Tighten the screw with a small
slotted screwdriver by turning it
counterclockwise. 5Tighten the screw
thoroughly so that the connector doesn’t
move inside the housing.
5. Screw the bottom housing onto the boom
pole and replace the rubber grip.
6. Place the strain relief of the cable into the
tip exit slot.
7. Replace the tip by screwing it on, and
secure it by tightening the set screw
with the Allen key.
2
5
4
1
3

This AURAY product is warranted to the original
purchaser to be free from defects in materials and
workmanship under normal consumer use for a period
of one (1) year from the original purchase date or thirty
(30) days after replacement, whichever occurs later.
The warranty provider’s responsibility with respect to
this limited warranty shall be limited solely to repair or
replacement, at the provider’s discretion, of any product
that fails during normal use of this product in its intended
manner and in its intended environment. Inoperability
of the product or part(s) shall be determined by the
warranty provider. If the product has been discontinued,
the warranty provider reserves the right to replace it with
a model of equivalent quality and function.
This warranty does not cover damage or defect caused
by misuse, neglect, accident, alteration, abuse, improper
installation or maintenance. EXCEPT AS PROVIDED
HEREIN, THE WARRANTY PROVIDER MAKES NEITHER
ANY EXPRESS WARRANTIES NOR ANY IMPLIED
WARRANTIES, INCLUDING BUT NOT LIMITED TO
ANY IMPLIED WARRANTY OF MERCHANTABILITY OR
FITNESS FOR A PARTICULAR PURPOSE. This warranty
provides you with specific legal rights, and you may also
have additional rights that vary from state to state.
To obtain warranty coverage, contact the Auray Customer
Service Department to obtain a return merchandise
authorization (“RMA”) number, and return the defective
product to Auray along with the RMA number and proof
of purchase. Shipment of the defective product is at the
purchaser’s own risk and expense.
For more information or to arrange service, visit
www.aurayaudio.com or call Customer Service at
212-594-2353.
Product warranty provided by the Gradus Group.
www.gradusgroup.com
AURAY is a registered trademark of the
Gradus Group. © 2015 Gradus Group LLC.
All Rights Reserved.
One-Year Limited Warranty
GG1
!
Warnings
• Pleasereadandfollowtheseinstructions,
and keep this manual in a safe place.
• Handletheproductwithcare.
• Useonlypartsprovidedbythemanufacturer.
• Makesuretheitemisintactand
that there are no missing parts.
• Donotattempttodisassembleor
repair the equipment—doing so will
void the warranty, and Auray will not
be responsible for any damage.
• Allphotosareforillustrativepurposes.
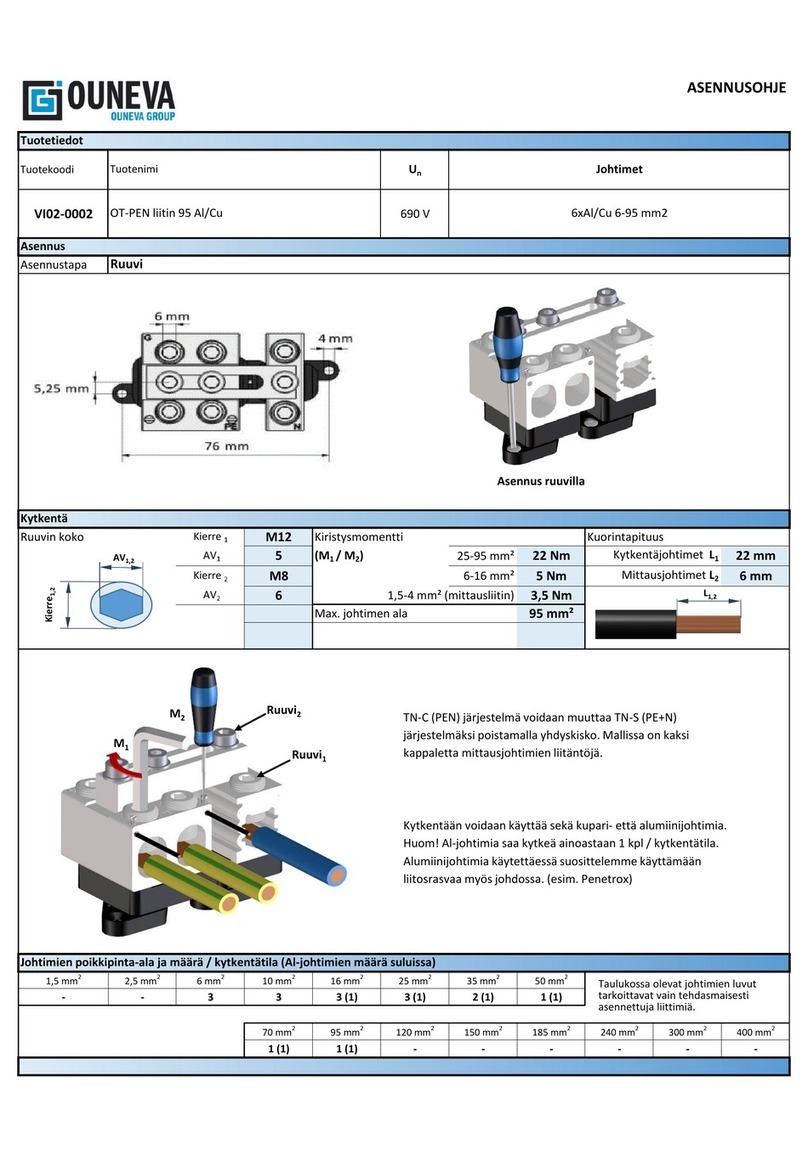
Table of contents