aurum AEC-931BSD User manual
AEC-931BSD
HIGH POWER LED MOTION LIGHT WITH VIDEO CAMERA
INSTRUCTION
Table of contents
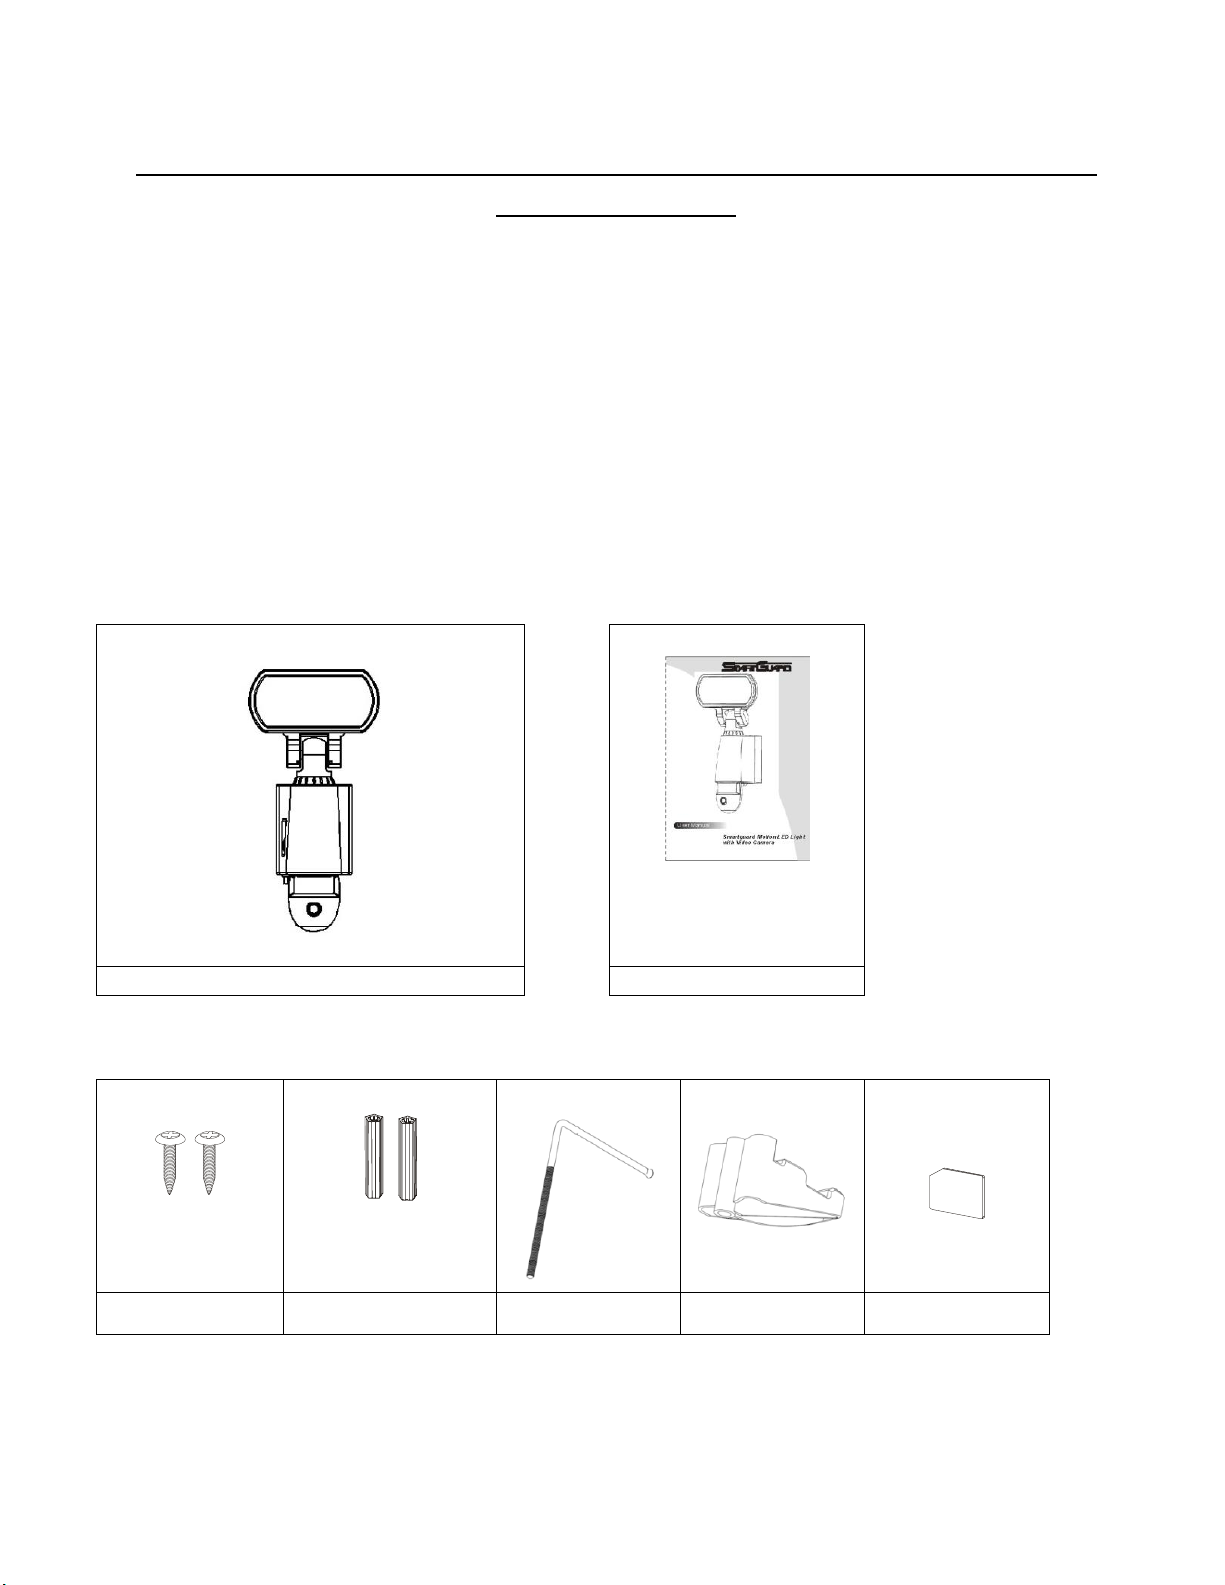
1. Contents of package
2. Smartguard™Motion Light with Video Camera
3. Installation
4. Technical Specifications
Contents of packaging
⚫Smartguard™Motion Light with Video Camera
⚫User Manual
⚫Accessory bag
⚫1 Allen key
○1
○2
Smartguard
User Manual
○3
○4
○5
○6
○7
Screws
x 2
Plastic Masonry plugs
x 2
L bar
(Optional)
Clamp
(Optional)
Micro SD Card
(Optional)

Smartguard™Motion Light with Video Camera overview
Step 1. Insert/remove Micro SD Card :
◼Unscrew the waterproofed cover using provided Allen key , then insert the Micro SD card until it
automatically locks into place.
◼Micro SD card is placed at the bottom of the motion sensor. To remove Micro SD card, please push
in SD once to eject, then pull out.
High power LED
PIR lens
Camera lens

Step2. Installing the Smartguard™Motion Light with Video Camera
IMPORTANT
IF IN ANY DOUBT ABOUT THE INSTALLATION OF THIS PRODUCT, CONSULT A QUALIFIED ELECTRICIAN
- This product must be grounded
- Do not mount the unit against inflammable surfaces
- The motion detector will not operate correctly if it is installed:
Near the outlet of a central heating boiler
Near air conditioning plant
Pointing directly at moving vehicles
Within sight of reflections from moving water
Where other lamps could shine on the detector
BEFORE ATTEMPTING ANY INSTALLATION OR MAINTENANCE, ENSURE THAT THE ELECTRICAL SUPPLY IS
SWITCHED OFF AND THE CIRCUIT FUSES REMOVED OR THE CIRCUIT BREAKER IS IN THE OFF POSITION.
Please make sure the voltage and polarity are correct before connection. Incorrect voltage may cause
electric shock. If you are not sure, please contact your retailer.
Note: It is recommend to mount Smartguard™Motion Light with Video Camera 2.5M above the
ground for optimum performance, do not mount the fixture below 2M. See below figure for details
of performance range.
Detection range: 10M x 160
Installing your Smartguard™Motion Light with Video Camera
1. Place plastic masonry plugs into desired surface aligning holes as shown below. Using an electric
screwdriver, fasten mounting plate directly to surface using screws.
2. Attach the unit to the mounting plate. You will first need to angle the unit back so that the catch at the
top of the mounting plate fits into slot on the back of the unit. Next lower the unit until holes at the
bottom of the mounting plate and unit are flush. Then screw into this hole, tightening carefully.
Please allow 1 minute warm-up time after switching on.
* Push the RESET button after switching on.
Remove plastic lens cover from camera after installation.
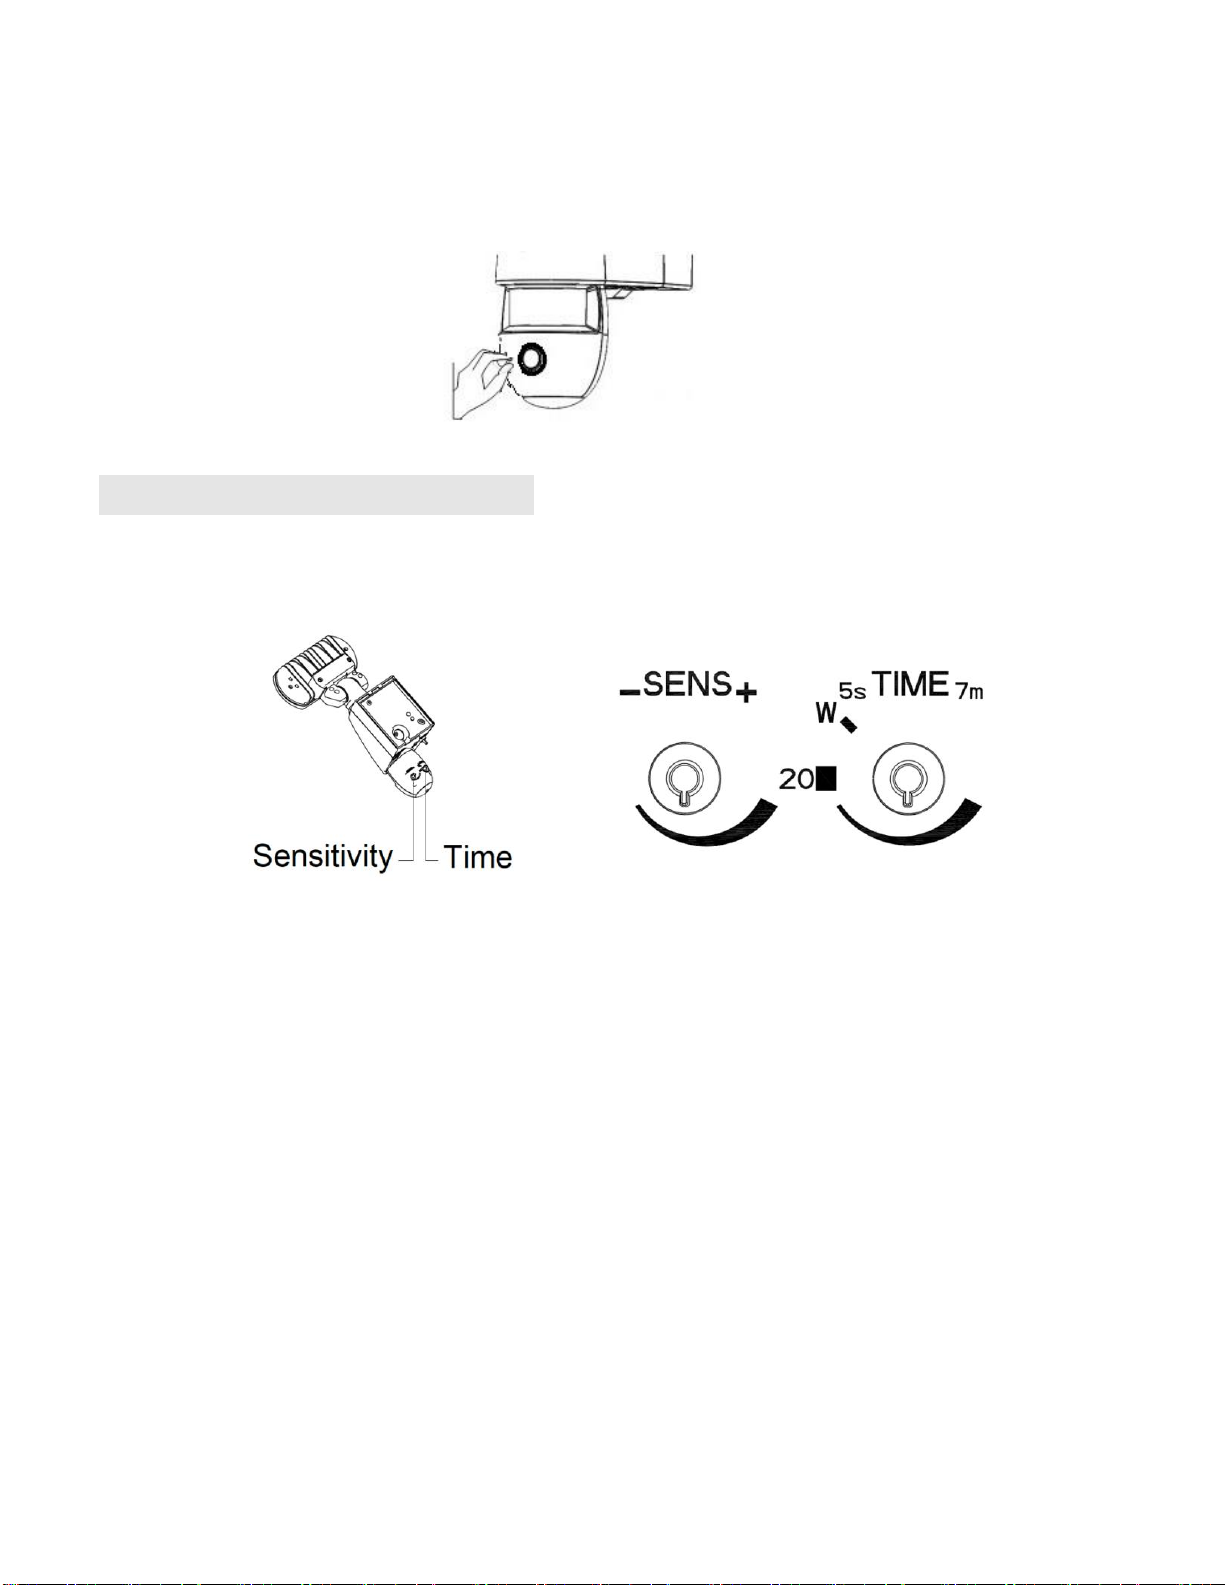
Step 3. Adjusting the Settings
◼Time control:Turn the time control knob to”+”side toincrease the illumination time (7 minutes
max.), turn the control knob to “-“side to reduce the illumination time (5 seconds min.).
◼Sensitivity control:
Adjust the detector range of Passive Infrared Motion Sensor (2M ~ 10M)
◼Selecting working mode:
Mode 1
- Light + camera + speaker: all day detection
- Daytime and nighttime: light, camera and speaker are all in operation
Mode 2
- Light at night + camera all day + speaker in the daytime
- Daytime: light is off, camera is on, speaker is on
- Nighttime: light is on, camera is on, speaker is off.
Mode 3
- Light at night + camera all day + speaker at night
- Daytime: light is off, camera is on, speaker is off.
- Nighttime: light is on, camera is on, speaker is on.
◼Audio mode:for different sound selection
Pre-set default is “silent mode”, push one time for “ding-dong”, push again for “dog barking”.

◼LED indicator:for indicating the function status of the unit by different color LED lights.
1) Red:Micro SD Card is not inserted into the Micro SD slot or the system is malfunctioning.
2) Green:The unit is recording
3) LED off: stand by(Micro SD Card is inserted into the slot), when off/record button is
pressed
Step 4. Set the Data and Time
:
This will allow the security video taken by Smartguard™to display the correct date and time it was
taken.
1. Build the file by following steps:
Open Notepad on computer→ input date and time (ex. 2022-05-08 11:54:00) → input userconfig as the
file name → choose .txt for the format → save the file
2. Users can set up date and time in userconfig.txt by following steps:
A. Input date and time (ex. 2022-05-08 11:54:00), save the file once done
B. Copy userconfig.txt to the root directory of SD card
NOTE: *DON'T delete the original userconfig.txt file stored in date folder just in case you want to change
the time setting again in the future and you can use this same file to do setup.
*DON'T change this file name"userconfig.txt".
C. Insert SD card into the card slot, the date and time will update automatically. Then this file
"userconfig.txt" saved in the root directory will be disappeared automatically.
3. If userconfig.txt is lost, users still can build the file by yourself by following steps:
Open Notepad on computer→ input date and time (ex. 2022-05-08 11:54:00) → input userconfig as the
file name → choose .txt for the format → save the file
Step 5. Viewing video
1. Viewing image by computer through a card reader
◼Open the waterproofed cover on the Smartguard™Motion Light with Video Camera
◼To remove Micro SD card, please push in SD once to eject, then pull out.
◼Put the Micro SD Card into a PC and open any media player to view the video.
◼2 files of 0KB will be generated automatically at once when you remove SD card every time. Insert
the SD card into the product again, files of 0KB will be deleted automatically.
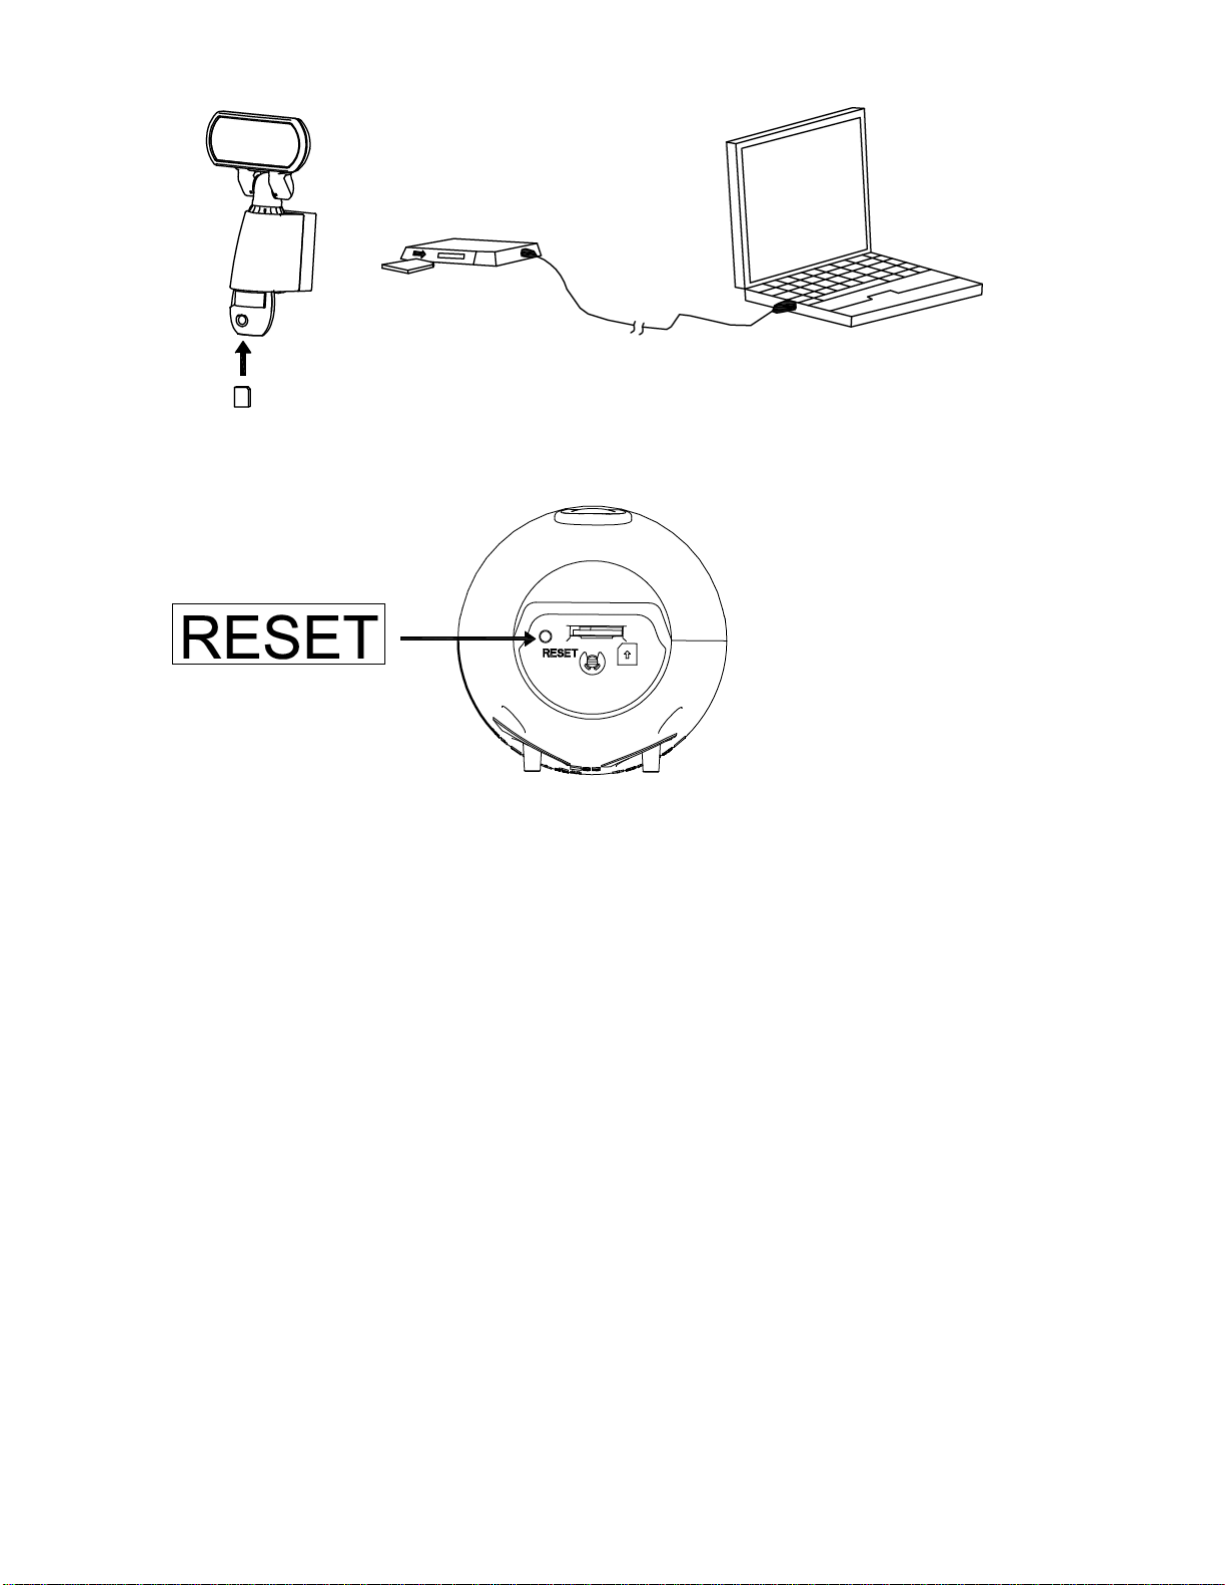
⚫Reset button:Please press Reset button in case of system malfunction
Technical Specifications
1. Features and specification:
◼PIR detection angle 160 Deg and detection range up to 10M
◼Records 20 seconds image recording for image stream:15fps at 1920*1080 Pixels
◼Built in Micro SD Card slot for Micro SD memory card
◼Micro SD Card slot for additional storage, max memory size up to 32G
◼Micro SD Card spec. : FAT
◼Automatic exposure control, white balance and sharpness
◼Auto Date & Time stamp
◼Effective viewing angle:50 deg
◼Effective viewing distance : 8M
◼Image format : AVI File
◼Powered by AC 100V/60Hz
◼Auto light sensor
◼Sensitivity control
◼Floodlight time delay control
Table of contents
Popular Lighting Equipment manuals by other brands


Vision & Control
Vision & Control LDLF30x300-R633/24V/-a Instructions for use

Viabizzuno
Viabizzuno catena Installing instructions

Clevertronics
Clevertronics L10 Lifelight Pro LWPLIFE-PRO-WM Series Installation & maintenance instructions

HYBRYD
HYBRYD CRYSTAL LED Installation and maintenance manual

GAME OF BRICKS
GAME OF BRICKS Loop Coaster 10303 instruction manual

Light Plan
Light Plan LPL2-SS Suspended installation instructions