Autarco MX Mark III Series User manual

Installation and Operation Manual
Solar Inverters MX Mark III series
© Autarco Group B.V.

Contact Information
Autarco Group B.V.
Torenallee 20
5617 BC Eindhoven
The Netherlands
www.autarco.com
info@autarco.com
Other Information
This manual is an integral part of the unit. Please read the manual carefully before installation, operation or
maintenance. Keep this manual for future reference.
Product information is subject to change without notice. All trademarks are recognized as the property of their
respective owners.
© Autarco Group B.V.
All rights reserved.
2 MX Mark III series Inverters

installation and operation manual
Table of Contents
1 Introduction 5
1.1 Read this first 5
1.2 Target Audience 5
1.3 Product versions covered by this document 6
2 Preparation 7
2.1 Safety instructions 7
2.2 Package contents 8
2.3 Internal DC switch 8
2.4 Explanations of symbols on inverter 8
3 Product information 10
3.1 Overview 10
3.2 Product identification 10
3.3 Product overview 11
4 Installation 12
4.1 Safety 12
4.2 Mounting instructions 12
4.3 Safety clearance 13
4.4 Mounting procedure 14
5 Electrical installation 15
5.1 AC connection 15
5.2 DC connections 18
5.3 Inverter commissioning sequence 19
6 Operation 20
6.1 LED indicator lights 20
6.2 Inverter display 20
6.3 Information 21
6.4 Settings 22
6.5 Advanced Settings 23
7 Meter Installation (Optional) 26
7.1 Meter Electrical Connection 26
7.2 Required Inverter Settings 27
8 Monitoring setup and system registration 28
9 Maintenance 28
10 Disposal 28
11 Troubleshooting 29
M-S2.MX-MIII-EN-V0.3 3

installation and operation manual
1 Introduction
1.1 Read this first
This manual contains important information for use during installation and maintenance of the MX-MIII series
Autarco inverter.
To reduce the risk of electrical shock, and to ensure the safe installation and operation of the MX-MIII series
Autarco inverters, the following safety symbols appear throughout this document to indicate dangerous
conditions and important safety instructions.
WARNING! Indicates safety instruction, which if not correctly followed, can result in injury or property
damages.
RISK OF ELECTRIC SHOCK! Indicates safety instructions, which if not correctly followed, could result in
electric shock.
HOT SURFACE! Indicates safety instructions, which if not correctly followed, could result in burns.
1.2 Target Audience
This manual is intended for anyone who uses Autarco MX-MIII series inverter. Before any further action, the
operators must first read all safety regulations and be aware of the potential danger to operate high-voltage
devices. Operators must also have a complete understanding of this device’s features and functions.
ATTENTION! Qualified personnel means a person with valid license from the local authority in:
●Installing electrical equipment and PV power systems (up to 1000 V).
●Applying all applicable installation codes and using Personal Protective Equipment.
●Analyzing and reducing the hazards involved in performing electrical work.
WARNING! Do not use this product unless it has been successfully installed by qualified personnel in
accordance with the instructions in chapter 4 “Installation”.
M-S2.MX-MIII-EN-V0.3 5

1.3 Product versions covered by this document
The main purpose of this user manual is to provide instructions and detailed procedures for installing, operating,
maintaining, and troubleshooting the MX-MIII series of Autarco inverters which includes the following models:
●S2.MX2500-MIII
●S2.MX3000-MIII
●S2.MX3600-MIII
●S2.MX4000-MIII
●S2.MX4600-MIII
●S2.MX5000-MIII
●S2.MX6000-MIII
The “S2.” In the product code means the product is a grid-tied inverter. If the product has an “S” at the end it
comes with integrated DC switches.
The item code or SKU will include an additional number at the end. The final number references the default grid
standard and color of inverter. For example, S2.MX3000-MIII.1 is the 3kW model with Dutch grid standard as
default, integrated DC switch and Autarco blue cover.
Please keep this user manual available at all times in case of emergency.
6 MX Mark III series Inverters

installation and operation manual
2 Preparation
2.1 Safety instructions
DANGER! Do not touch any internal components whilst the inverter is in operation.
DANGER! Do not stand close to the inverter during severe weather conditions such as lighting, etc.
Make sure you completely cover the surface of all PV arrays with opaque (dark) material before wiring
them or make sure the DC circuit breaker or equivalent DC isolator is disconnected.
This is because photovoltaic (PV) arrays create electrical energy when exposed to light, and could cause
a hazardous condition.
The MX-MIII series inverter must only be operated with PV arrays of protection class II, in accordance
with IEC 61730, class A.
WARNING! The PV inverter will become hot during operation; please don’t touch the heat sink or
peripheral surface during or shortly after operation.
NOTICE! Do not directly connect AC output of the inverter to any private AC equipment. The PV inverter
is designed to feed AC power directly into the public utility power grid.
WARNING! The installation, service, recycling and disposal of the inverters must be performed by
qualified personnel in compliance with national and local standards and regulations.
Please contact your dealer to get the information of authorized repair facility for any maintenance or
repairmen.
Any unauthorized actions including modification of product functionality of any form will affect the validation of
warranty service; Autarco may deny the obligation of warranty service accordingly.
M-S2.MX-MIII-EN-V0.3 7

2.2 Package contents
Autarco MX-MIII
series inverter
AC plug
Mounting bracket
+ locking screws
MC4 connector
pairs
S4.MC4F/MC4M
Instruction manual
2.3 Internal DC switch
Please verify whether your Autarco MX-MIII series inverter is equipped with an internal DC switch. This switch
can be found on the bottom of the inverter (see 3.3). If there isn’t an internal DC switch it is important to apply
an external DC disconnector in order to completely disconnect the solar PV module strings from the inverter.
2.4 Explanations of symbols on inverter
10 min.
DANGER - HIGH ELECTRIC VOLTAGE
This device is directly connector to public grid. All work to the inverter shall be carried
out by qualified personnel only. There might be residual currents in inverter for up to
10 minutes because of large capacitors.
ATTENTION
This device directly connected to electricity DC generators and the public AC grid.
DANGER – HOT SURFACES
The components inside the inverter will get hot during operation, DO NOT touch
aluminum housing during operating.
ATTENTION
In case of any work to the inverter, always refer to this manual for detailed product
information.
ATTENTION
This device SHALL NOT be disposed of in residential waste. Please go to Chapter 9
“Recycling and Disposal” for proper treatments.
8 MX Mark III series Inverters

installation and operation manual
CE MARK
This equipment conforms to the basic requirements of the EU guideline governing low
voltage and electromagnetic compatibility.
M-S2.MX-MIII-EN-V0.3 9

3 Product information
3.1 Overview
Autarco MX-MIII series grid tied inverters are state of the art, high efficiency, robust and reliable grid tied
inverters at the best price quality ratio available. They are easy to install and carry a standard 5 year product
warranty which is extendable to 15 years. Our rigorous quality control and testing facilities guarantee Autarco
inverters meet the highest quality standards possible. These inverters are the key to our international track
record of delivering extremely reliable solar power solutions.
Key features:
●Maximum efficiency of 97.7%
●Wide MPPT voltage range
●Low turn off voltage
●High enclosure protection class IP66
●Integrated power export limitation
management.
●Integrated DC arc-fault protection
●Silent design using convection cooling principle
●Standard 5 year product warranty, extendable to 15 years
●Compatible with WiFi, GPRS, 5G, Smart Home and LAN-
cable
For full specifications please see chapter 11 “Product specifications”.
3.2 Product identification
You can identify the inverter by the serial number (S/N) sticker on the side of the inverter. Important electrical
specification can also be found on the label which can be found on the right side of the inverter housing. Do not
remove the label or the serial number as this voids the product warranty.
10 MX Mark III series Inverters

installation and operation manual
3.3 Product overview
M-S2.MX-MIII-EN-V0.3 11

4 Installation
4.1 Safety
DANGER! Do not install the inverter near flammable or explosive items.
WARNING! The installation must be performed by qualified personnel and in compliance with
national and local standards and regulations.
This inverter will be connected to a high voltage DC power generator and AC grid. Inappropriate
installation may also jeopardize the life span of the inverter.
The installation site must have good ventilation conditions. Direct exposure to intense sunshine is not
recommended.
4.2 Mounting instructions
●The inverter is suitable for outdoor and indoor installation.
●Vertical installation is recommended, with a maximum inclination of 15⁰ backwards.
●Make sure the mounting wall is strong enough to hold the weight of the inverter.
●The ambient temperature of installation site should be between -20 ⁰C and +60 ⁰C.
●It is not recommended that the inverter is exposed to the direct sunshine.
●Make sure of ample ventilation at installation site, insufficient ventilation may reduce the performance
of the electronic components inside the inverter and shorten the life span of the inverter.
12 MX Mark III series Inverters

installation and operation manual
4.3 Safety clearance
Caution! Make sure heat sinks are out of reach of children.
Observe the following minimum clearances to walls:
M-S2.MX-MIII-EN-V0.3 13

4.4 Mounting procedure
Step 1 — Mount the wall bracket onto the mounting wall with appropriate screws plugs
Step 2 — Lower the inverter onto the bracket, and secure with the locking screws.
14 MX Mark III series Inverters

installation and operation manual
5 Electrical installation
DANGER! This inverter will be connected to a high voltage DC power generator and AC grid. The
installation must be performed by qualified personnel and in compliance with national and local
standards and regulations
5.1 AC connection
DANGER! Never connect or disconnect the connectors under load.
NOTICE! The AC connection to the electrical distribution grid must be performed only after receiving
authorization from the utility that operates the grid.
NOTICE! Make sure to set the correct grid standard as part of system commissioning, see chapeter
6.6.
The Autarco inverter is equipped with an integrated Residual Current Protective Device (RCPD) and Residual
Current Operated Monitor (RCOM). The RCOM will detect the volume of the leakage current and compare it with
the expected value, if the leakage current exceeds the permitted range, the RCPD will disconnect the inverter
from the AC load.
If regulations in the country of installation stipulate an external Residual Current Device (RCD), you must use a
device with a tripping threshold of 100 mA or more. For the MX-series we recommend to use at least 100 mA.
A type “A” RCD can be used in accordance with our “Manufacturer’s declaration for usage of residual current
devices”. Contact Autarco for advice.
The AC cable used must be dimensioned in accordance with any local and national directives on cable
dimensions which specify requirements for the minimum conductor cross-section. Cable dimensioning factors
are e.g.: nominal AC current, type of cable, type of routing, cable bundling, ambient temperature and maximum
specified line losses.
We recommend 4mm 105 ℃cable with resistance lower than 1.5 ohm.
M-S2.MX-MIII-EN-V0.3 15

Step 1 — Slide the cable glad cap, cable gland body and adapter to the cable.
Step 2 — Strip outer jacket 60mm and strip each cable insolation about 12±1mm.
Step 3 — Insert cable strands into connector socket, and lock the screws. Make sure to fit the ground
wire into the PE hole.
16 MX Mark III series Inverters

installation and operation manual
Step 4 — Fit the adapter, cable gland body and cable glad cap to the connector as per below.
NOTICE! It is important that the AC wires are connected to the right terminals as indicated by the “L”,
“N” and “Earthing” symbols on each AC connector.
In some countries a second protective conductor is required as a matter of principle. In each case,
observe the applicable regulations for the site.
The AC connection to the electrical distribution grid must be performed only after receiving
authorization from the utility that operates the grid.
Always use separate fuses for consumer load. Use dedicated circuit breakers with load switch functionality for
load switching.
The selection of the mains circuit breaker rating depends on the wiring design (wire cross- section area), cable
type, wiring method, ambient temperature, inverter current rating etc. Derating of the circuit breaker rating may
be necessary due to self-heating or if exposed to heat.
S2.MX2500
-MIII
S2.MX3000
-MIII
S2.MX3600
-MIII
S2.MX4000
-MIII
S2.MX4600
-MIII
S2.MX5000
-MIII
S2.MX6000
-MIII
Max. AC current
(A)
13.3
15.7
16
21
23.8
25
27.3
Recommended
fuse type gL/gG or
comparable
automatic circuit
breaker rating (A)
16
20
20
25
35
35
35
DANGER! No consumer load should be applied between the mains circuit breaker and the inverter.
M-S2.MX-MIII-EN-V0.3 17

5.2 DC connections
Please always use the MC4 connectors from the inverter box to connect strings to the inverter.
DANGER! Never connect or disconnect the connectors under load.
MX-MIII series inverters have two MPP trackers. The DC characteristics of each model is shown in the table
below:
Inverter
MPP tracker
Max DC voltage
Max. DC current per MPPT
S2.M2500-MIII
2
550
14A
S2.MX3000-MIII
600V
S2.MX3600-MIII
S2.MX4000-MIII
S2.MX4600-MIII
S2.MX5000-MIII
S2.MX6000-MIII
19A
DANGER! Do not connect the strings with an open circuit voltage greater than the Max DC voltage of
the inverter.
To connect the PV generator to the inverters we use 4mm² or 6mm² PV cable and MC4 connectors. For details on
how to assemble MC4 connector please refer our MC4 connector manual.
DANGER! For protection against electric shock, MC4 connectors must be isolated from the PV array
while being assembled or disassembled.
DC connections must not be unplugged while under load. They can be placed in a no-load state by
switching off the DC/AC converter or breaking the DC circuit interrupter. Plugging and unplugging
while under voltage is permitted.
CAUTION! MC4 connectors are watertight IP67 but cannot be used permanently under water. Do not
lay the MC4 connectors on the roof surface.
If any tools or parts are used in the MC4 connector assembly other than those listed in the MC4
connector manual, neither safety nor compliance with the technical data can be guaranteed.
18 MX Mark III series Inverters

installation and operation manual
5.3 Inverter commissioning sequence
Turn ON
Turn OFF
1. Connect AC side (if not connected yet)
2. Connect DC side (if not connected yet)
3. Switch ON the DC switch
4. Switch ON the AC switch
1. Switch OFF the AC switch
2. Switch OFF the DC switch
NOTICE! Please ensure the correct grid standard is selected for the installation location. See
“Advanced Settings”.
M-S2.MX-MIII-EN-V0.3 19

6 Operation
6.1 LED indicator lights
There are three LED status indicator lights in the front panel of MX-MIII series inverters. The left POWER light
(red) indicates power status of the inverter. The middle OPERATION light (green) indicates the operation status.
The right ALARM light (yellow) indicates the alarm status. Table 3.1 explains their meanings.
Light
Status
Description
POWER (red)
ON
The PV array provides power to the inverter
OFF
The PV array does not provide power to the inverter
OPERATION (green)
ON
The inverter is feeding AC power to the grid
OFF
The inverter is not feeding AC power to the grid
FLASHING
The inverter is initializing
ALARM (yellow)
ON
There is a fault. Refer to the inverter display and chapter 10
of this manual for details
OFF
The inverter is operation normally
When inverter DC switch and AC switch have been turned on the inverter will start initializing. After approx. 3
minutes the inverter will start normal operation with the inverter display showing GENERATING.
6.2 Inverter display
NOTICE! During normal operation, make sure the optional integrated DC switch is switched “on”.
The display content consists of 2 lines. During regular operation the display shows the current power and
operation status alternatively for 10 seconds. Pressing the UP or DOWN buttons will manually cycle through
these two displays. Pressing the ENTER button gives access to the main menu which has four sub menus:
●Information, described in detail in chapter 6.3.
●Settings, described in detail in chapter 6.4.
●Advanced information, described in detail in chapter 6.5.
●Advanced settings, described in details in chapter 6.6.
By pressing UP or DOWN keys you can cycle through these sub menus and click ENTER to go into the submenu.
20 MX Mark III series Inverters
This manual suits for next models
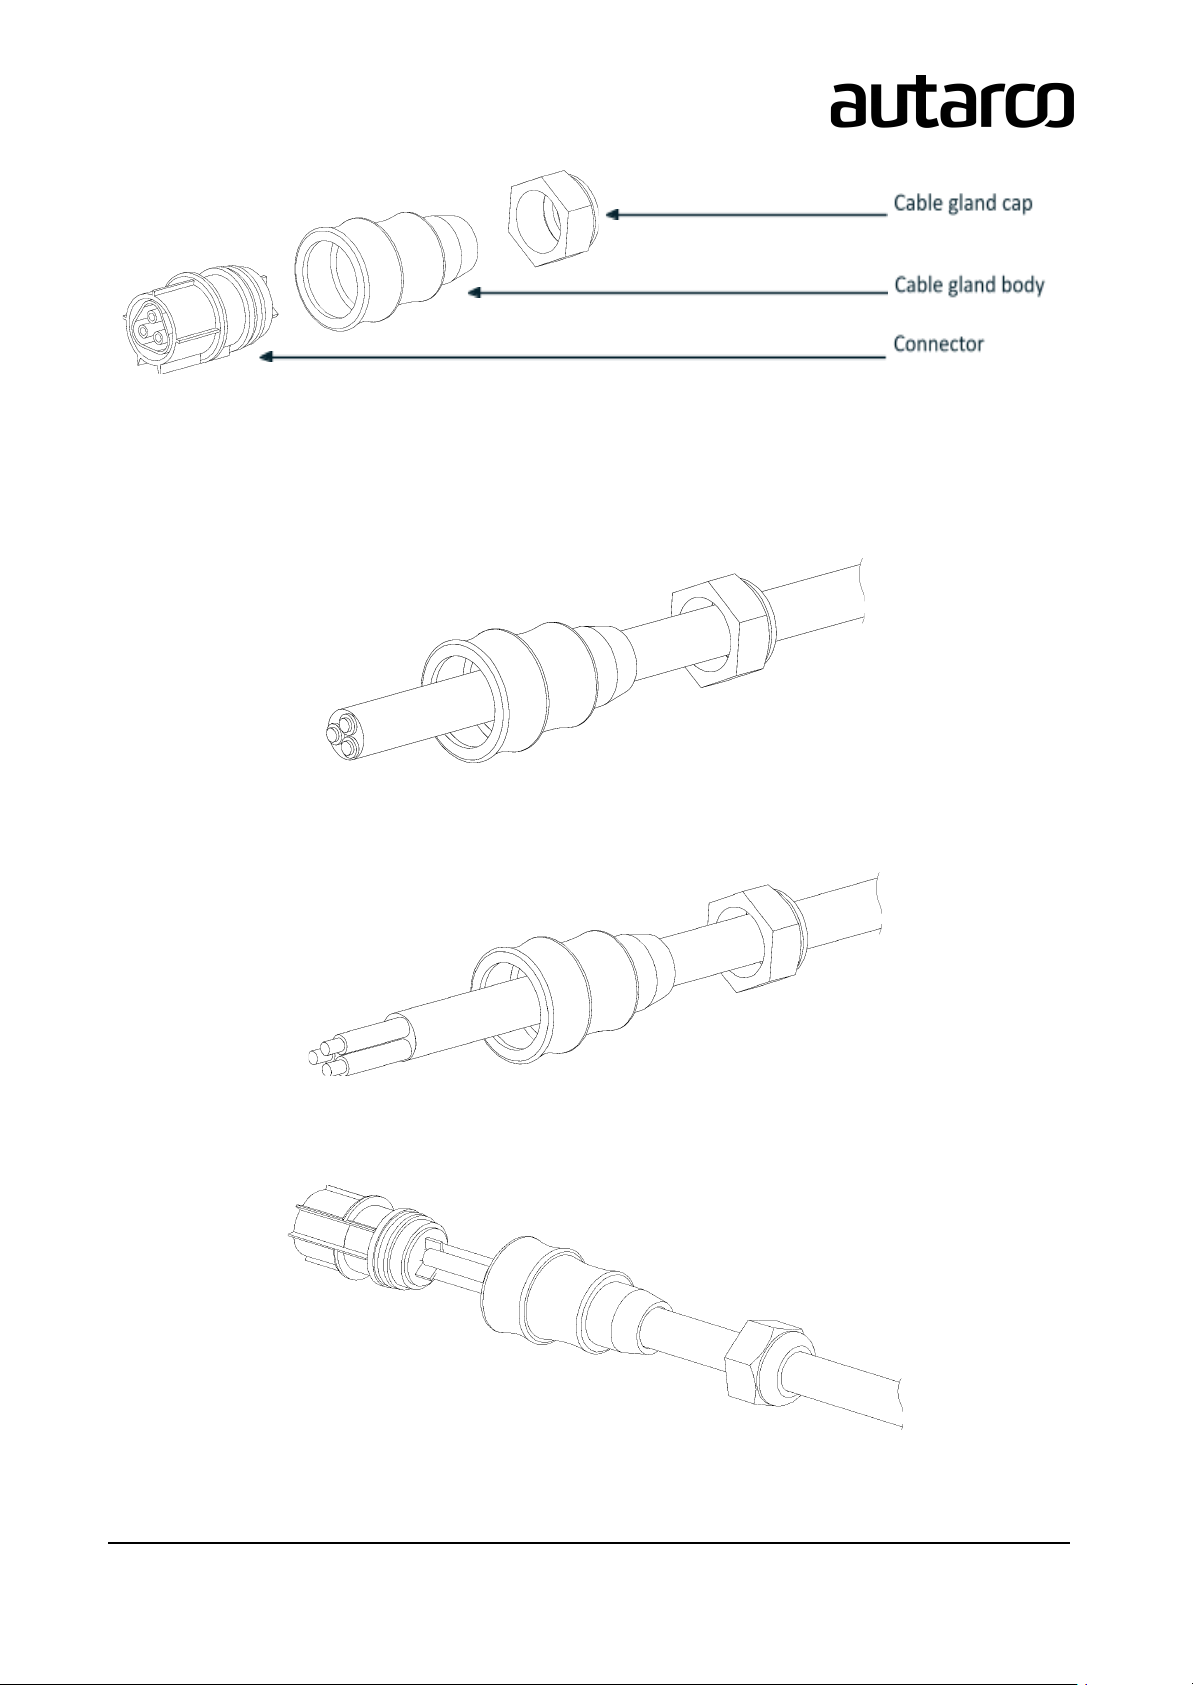
7
Table of contents
Other Autarco Inverter manuals

Autarco
Autarco MH Series User manual

Autarco
Autarco XLX-MII Series User manual

Autarco
Autarco MX3000 User manual

Autarco
Autarco XLX20000S User manual

Autarco
Autarco OX Series User manual

Autarco
Autarco SX Mark III Series User manual

Autarco
Autarco UX-MII-Series User manual

Autarco
Autarco SX700 User manual

Autarco
Autarco 4G-STICK User manual

Autarco
Autarco LH Series User manual