Autel X-Star User manual

Quick Guide
With XI-5S Gimbal

1
INSTALLING THE STARLINK APP
Search for ‘Starlink’ on the App Store or Google Play and install the app for X-Star/X-Star Premium on your mobile device.
Launch the app on your mobile device.
Make sure all the devices are fully charged before use.
IMPORTANT: Please read all provided instructions carefully before use. Pay extra attention to the safety warnings and precautions. Use this
product as instructed to prevent product damage or personal injury. Failure to do so will void the product’s warranty.
Quick Guide| With XI-5S Gimbal

AIRCRAFT FRONT VIEW
1. Propeller
2. Motor
3. Front LED Indicator Light
4. Micro-USB Port
5. 3-axis Camera Gimbal
6. Micro-SD Card Slot
7. Camera
8. Front Sticker
9. Rear LED Indicator Light
10. Aircraft Battery
11. StarpointTM Positioning Module
12. Landing Gear
13. Compass
14. Remote Controller Binding Button
1
2
3
4
5
6
7
8
2
Quick Guide| With XI-5S Gimbal
9
11
13
12
14
10

3
1. Antenna
2. Mobile Device Holder
3. Flight Information Panel
4. Left Command Stick
5. Right Command Stick
6. Strap Hole
7. Motor Starter
8. Take-off/Landing Button
9. Power Button
10. Go Home Button
11. Pause Button
12. Power Port
13. Gimbal Pitch Dial
14. Flight Mode Switch
15. Playback Button
16. Camera Settings Dial
17. Support Stand
18. Shutter Button
19. Record Button
20. CAN-Bus Port
21. Micro-USB Port
22. USB Port
REMOTE CONTROLLER VIEW
1
2
3
4
5
6
78910 11
12
13
14
15
16
17
18 19
20 21 22
Quick Guide| With XI-5S Gimbal

4
The aircraft battery and the remote controller can be
charged simultaneously with the same charger that
includes two connectors.
CHARGING
Quick Guide| With XI-5S Gimbal
1 2
Plug the charger into a power outlet.
Open the cap on the wide square connector
and match the interface inside to that of the
aircraft battery.
Flip over the protector on the Power Port
of the remote controller, and plug the small
circular connector into the Port.
3

5
PREPARING THE REMOTE CONTROLLER
Press and hold the Power Button for 2 seconds to power up the remote controller.
Make sure the Flight Mode Switch on the left side of the remote controller is in the GPS position.
Clamp the mobile device into the mobile device holder and adjust the holder angle for an optimum view.
IMPORTANT: For your safety, please turn on the remote controller before turning on the aircraft.
Quick Guide| With XI-5S Gimbal

6
POWERING UP
Press and hold the aircraft’s Power Button for 3 seconds to turn on the
aircraft. The battery level indicator lights will illuminate and indicate the
current battery level.
91%~100%
76%~90%
66%~75%
51%~65%
41%~50%
26%~40%
16%~25%
1%~15%
0%
Solid green light
Flashing green light
No light
Quick Guide| With XI-5S Gimbal
Remove the gimbal holder from the gimbal before powering on.
Remove the aircraft wrapping from the four arms.

7
CONNECTING YOUR MOBILE DEVICE
NOTE: The WiFi network name (SSID) is labelled on the back side of the remote controller.
Connect your mobile device to the aircraft based on your aircraft model.
When connection has been established between your mobile device and the aircraft, you will see the connection status
bar as Connected on Starlink’s home page.
Connect your mobile device to the remote
controller through a USB cable. The USB port is
located on the back of the remote controller.
For X-Star Premium:
Turn on the WiFi connection on your mobile device,
select X-Star_XXXXXX from the WiFi list, and enter the
default password 99999999.
For X-Star:
X-STAR_XXXXXX
Quick Guide| With XI-5S Gimbal

Front LEDs:
The front LED indicators will illuminate solid red light during flight to help you
identify the direction of the aircraft’s nose.
FAMILIARIZING WITH
THE LED INDICATIONS
8
Solid Light
Slow Flash
Quick Flash
Take a few minutes to familiarize yourself with the LED indications.
The LED indicator lights will light up when the aircraft is turned on.
Either GPS mode or the Starpoint Positioning System is functioning.
The aircraft is warming up with at least 6 satellites available.
The aircraft is warming up with less than 6 satellites available.
Neither GPS mode nor the Starpoint Positioning System is functioning.
The remote controller signal is lost.
Slow flash with one beep when hardware problems are detected.
The compass is experiencing interference.
Front & Rear LEDs:
Rear LEDs:
Low Battery Warning (Battery level is less than 25%).
Critical Low Battery Warning (Battery level is less than 12.5%).
Quick Guide| With XI-5S Gimbal

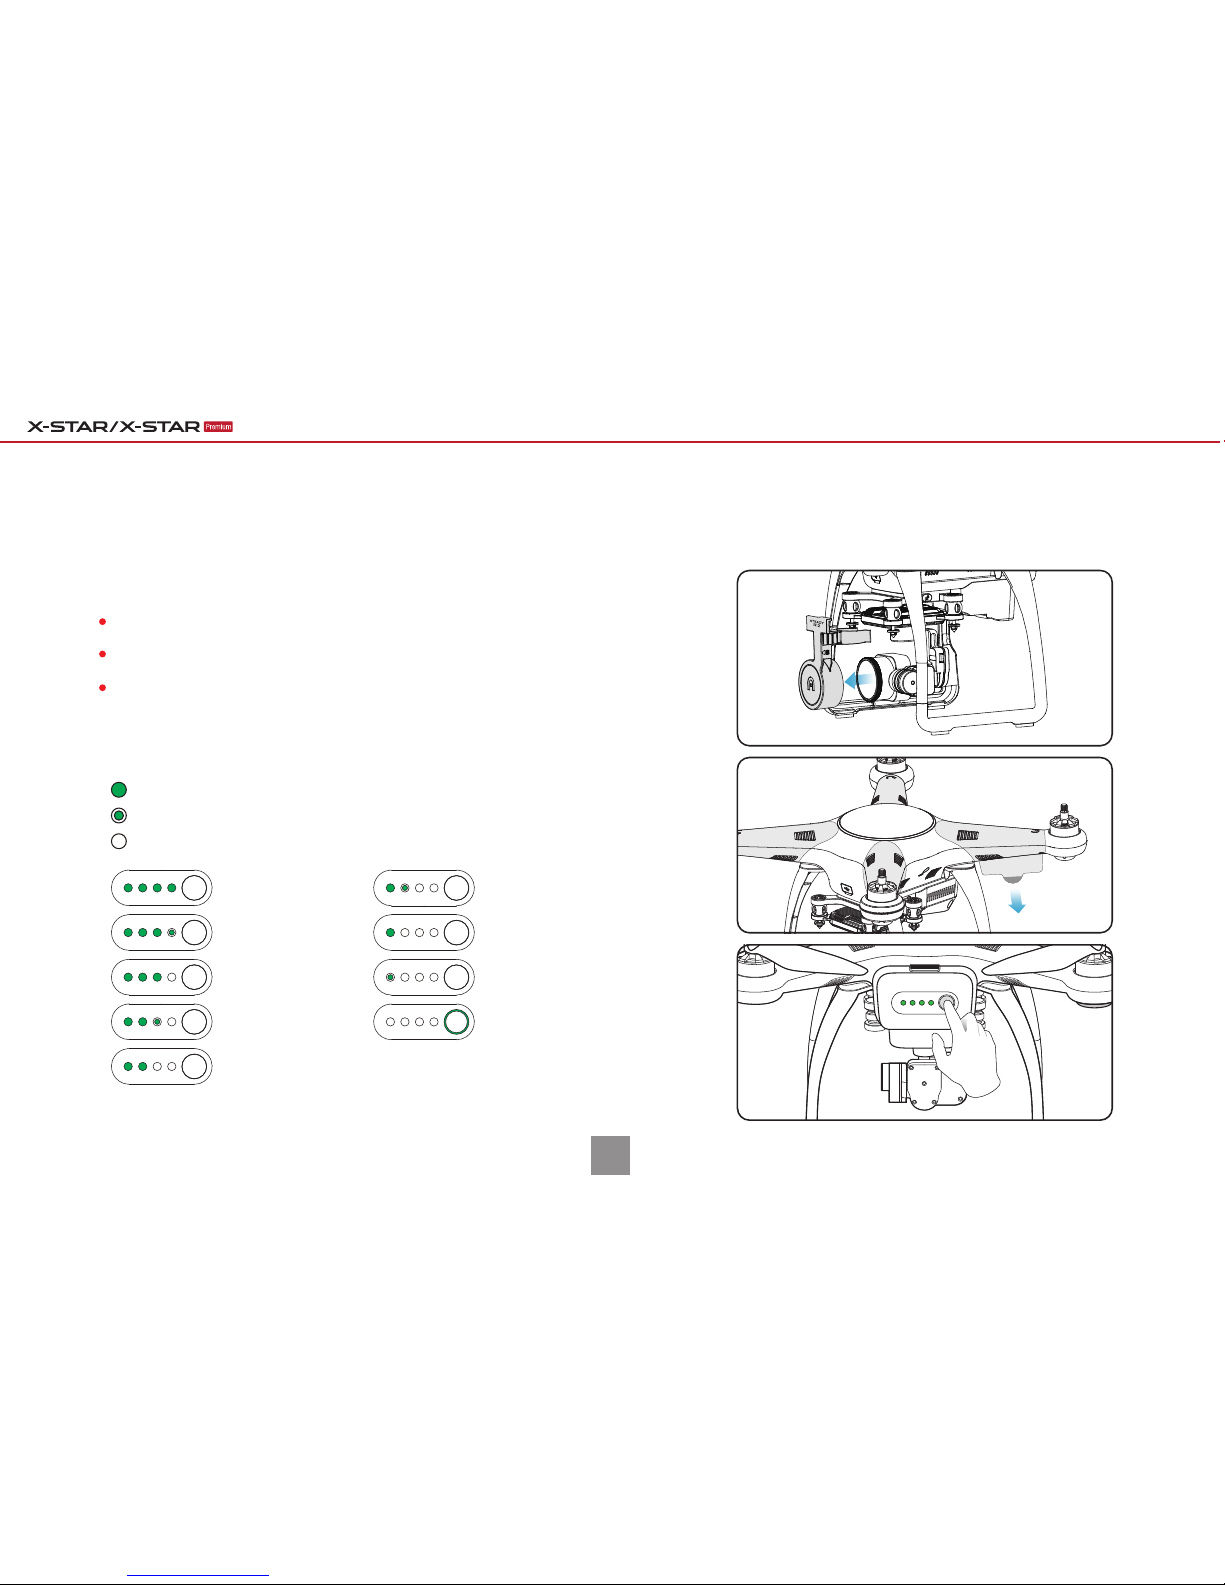
CALIBRATING THE COMPASS
Make sure to calibrate the compass every time you fly in a new location.
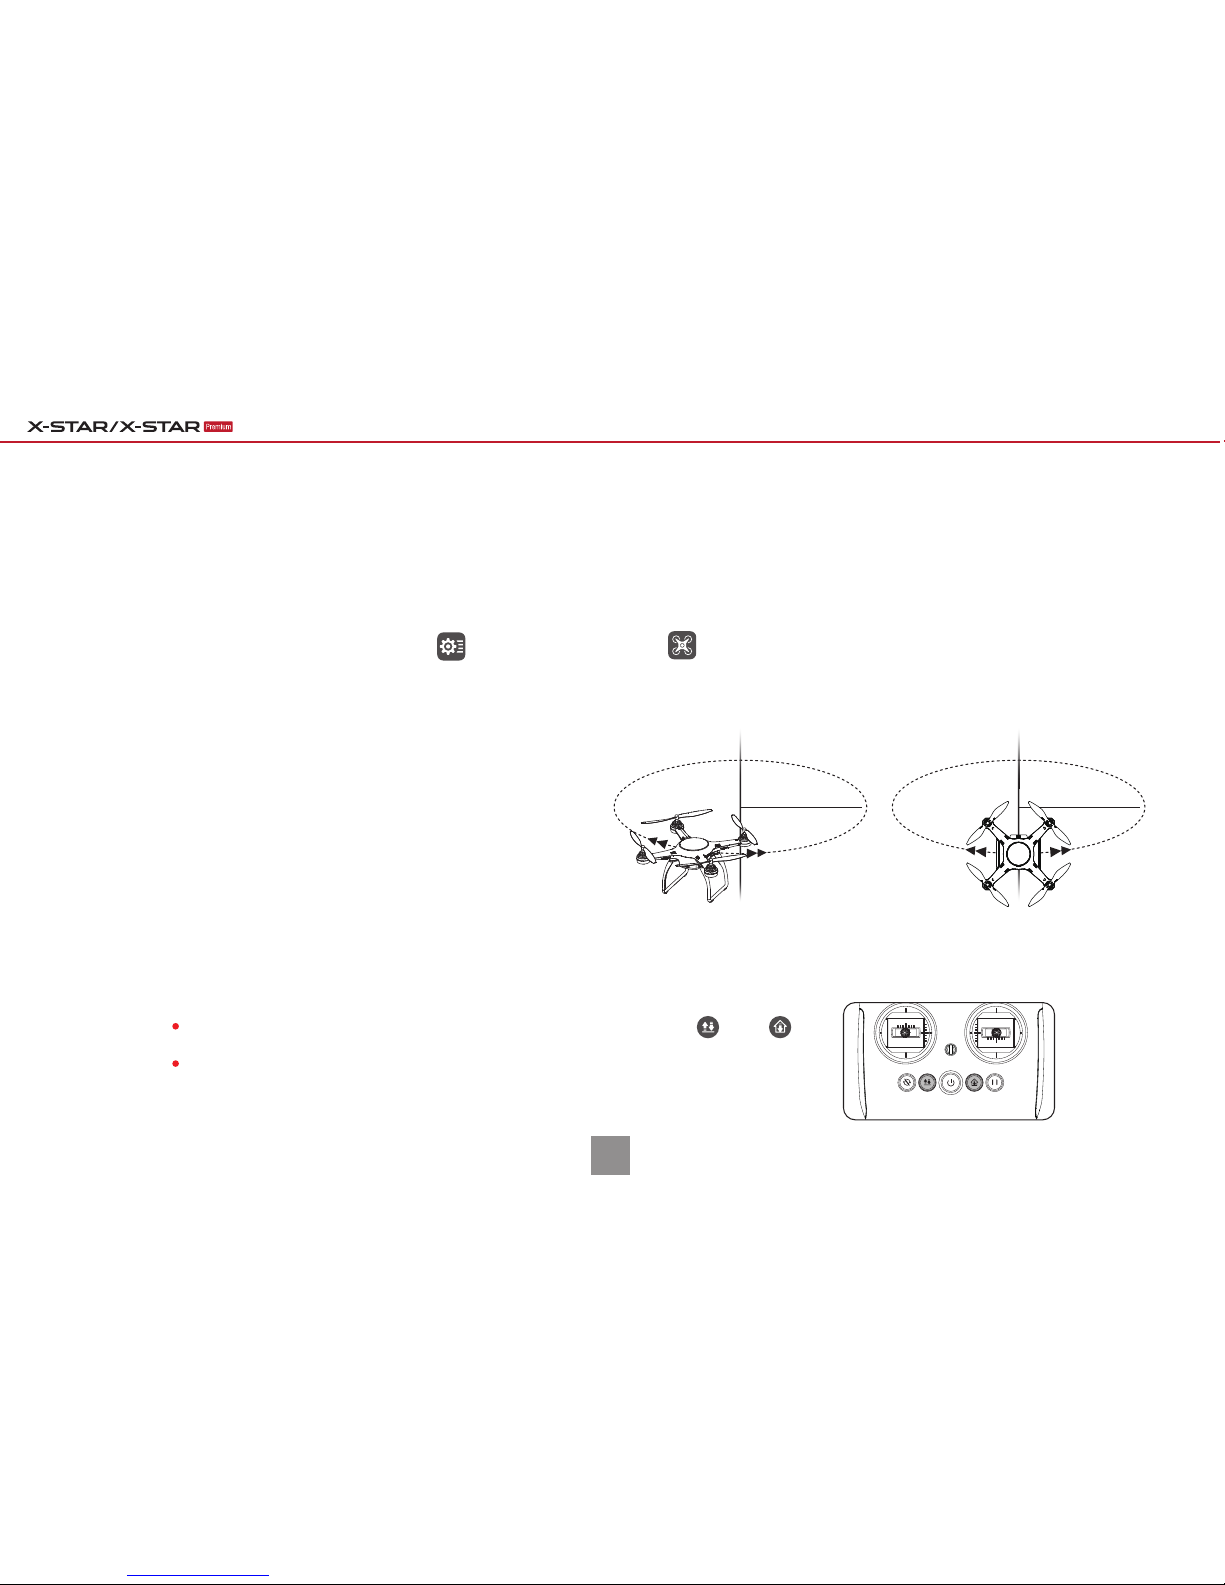
Horizontal Calibration Vertical Calibration
Nose Down
NOTE: You can also start the calibration process with the remote controller by pressing ( ) and ( )
simultaneously for 3 seconds. Then continue to perform steps 2 and 3 to complete the procedure.
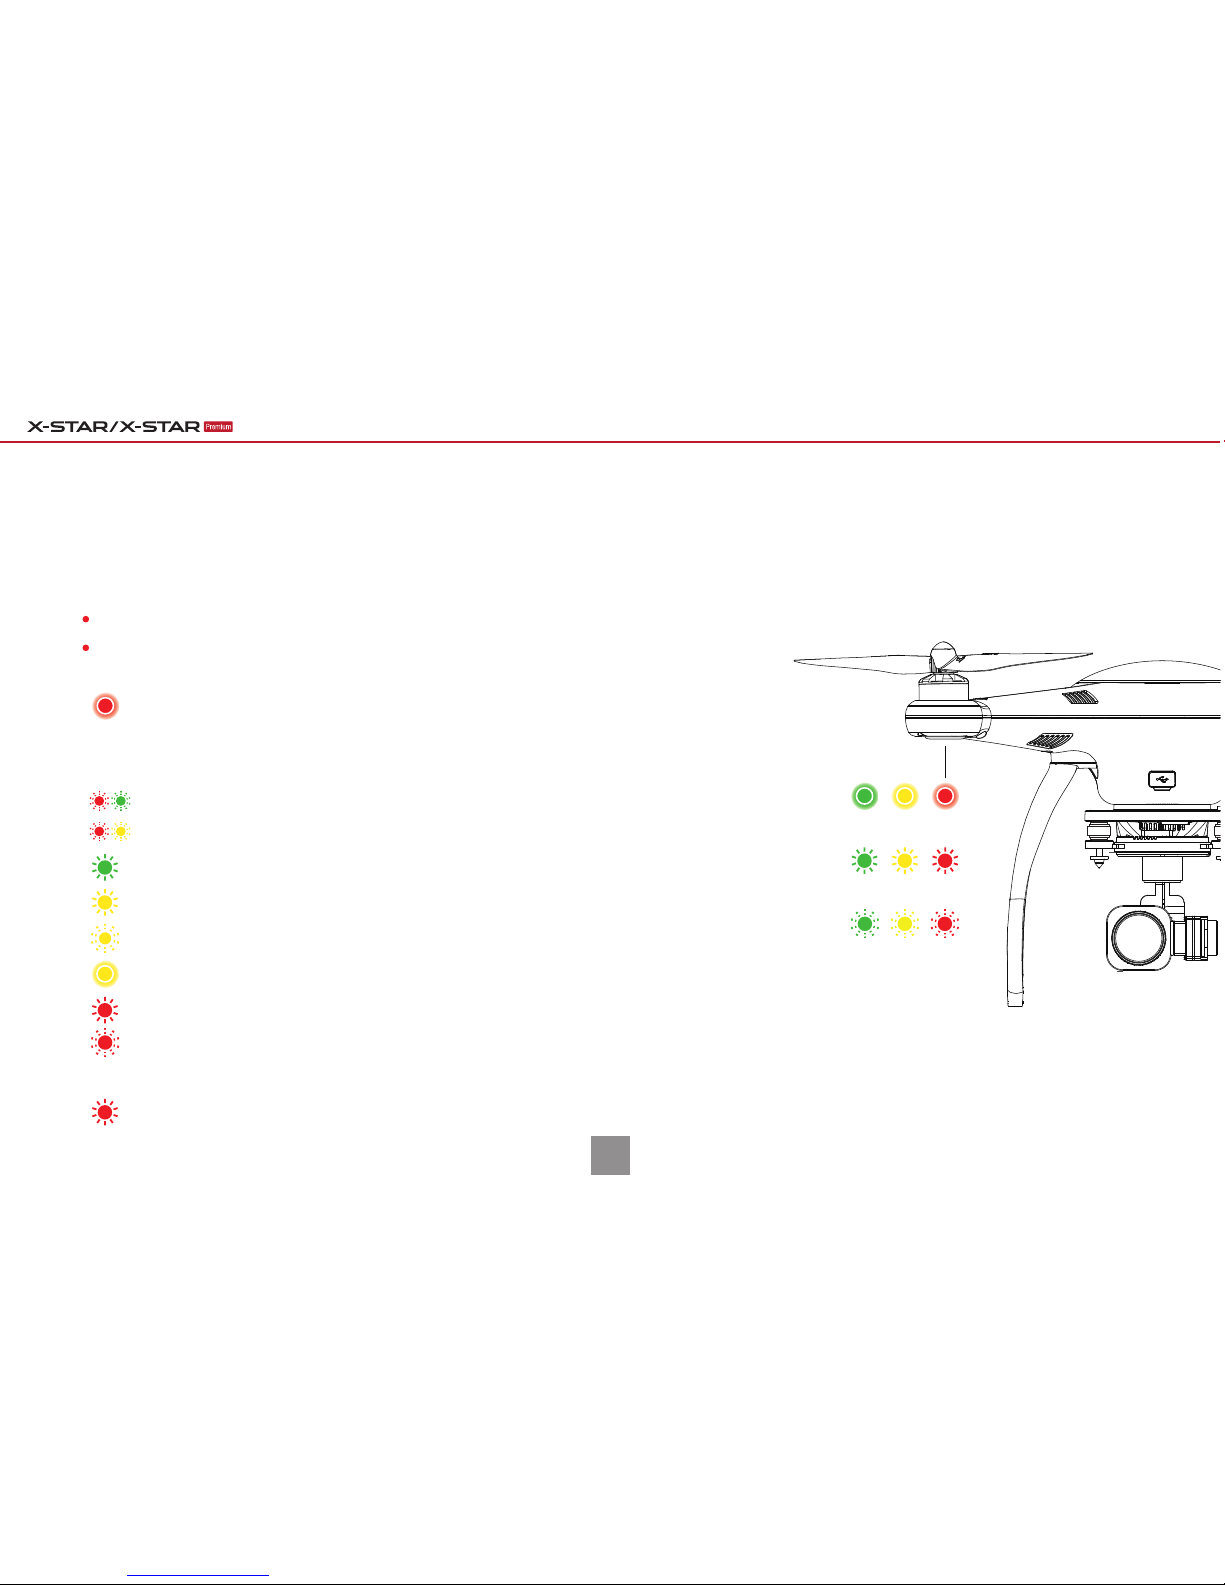
If the calibration is unsuccessful, the 4 LEDs on the aircraft will illuminate solid yellow light.
In this case, repeat the above steps to try again.
Begin calibration with your app: Settings ( ) > Flight Control Settings( ) > Compass Calibration, and follow the on-screen instruc-
tions that help you monitor the calibration status. When the calibration process has been initiated, the 4 LEDs on the aircraft will flash
yellow light.
Hold the aircraft horizontally by its arms and turn around until
the 4 LEDs on the aircraft change into solid green light, which
will switch to a flashing pattern later, ready for the next step.
1
2
Hold the aircraft vertically by its arms with the nose facing
downwards and turn around until the 4 LEDs on the aircraft
turn solid green, indicating that your calibration is successful.
3
9
Quick Guide| With XI-5S Gimbal

10
Match the two propellers with red nuts to the corresponding motors with red paint, and the other two with silver/black nuts
to the unpainted motors.
Fasten the propellers in the direction indicated by the Lock Icon .
NOTE: Ensure every propeller is stably mounted and in good condition. Do not use damaged propellers.
Remove the propellers when the aircraft is not in use.
INSTALLING THE PROPELLERS
Quick Guide| With XI-5S Gimbal

Start the motors in one of the following ways:
MOTOR START-UP AND TAKE-OFF
11
Motor Starter:
Hold for 2s
Both Command Sticks:
Hold toe-in or toe-out for 2s
Left Command Stick (Mode 2):
Push upward
Take off/Landing Button:
Hold for 2s
When the motors start spinning, use one of the following methods to take off the aircraft:
Quick Guide| With XI-5S Gimbal
NOTE: Before takeoff, place the aircraft on a levelled surface and make sure the rear side of the aircraft is facing you.

UNDERSTANDING
COMMAND STICK CONTROLS
12
IMPORTANT: For beginners, it is recommended to move the command sticks lightly and slowly to keep the aircraft flying in a controllable speed.
NOTE: The controls illustrated above are set as the default command stick mode (Mode 2). The left command stick controls aircraft ascent/descent and left/right rotation;
The right command stick controls aircraft forward/backward and left/right sideway movements.
Upward
Left Side Veiw
Ascend
Downward
Left Side Veiw
Descend
Forward
Left Side Veiw
Forward
Nose Rear
Backward
Left Side Veiw
Backward
Nose Rear
Move Left
Rear View
Left
Move Right
Rear View
Right
Rotate Left
Nose Rotates Left
Rotate Right
Nose Rotates Right
Forward/Backward Move Left/RightAscend/Decend Rotate Left/Right
Quick Guide| With XI-5S Gimbal
Right Command StickLeft Command Stick

LANDING AND MOTOR SHUT-DOWN
13
IMPORTANT:
Make sure to land the aircraft on a levelled surface in an open area.
Both Command Sticks:
Hold toe-in for 2s
Left Command Stick (Mode 2) :
Push to the bottom and hold for 2s
Left Command Stick (Mode 2) :
Push downwards gently
Quick Guide| With XI-5S Gimbal
Land the aircraft in one of the following ways:
Take off/Landing Button: Hold for 2s
(Auto mototor shut-down)
When the aircraft reaches the ground, use one of the following methods to shut down the motors:

Aircraft Specifications Aircraft Battery Specifications
Camera Gimbal Specifications
Remote Controller Specifications
Camera Specifications
Hover Precision
Max. Yaw Rate
Max. Inclination Angle
Max. Ascent/Descent Speed
Max. Horizontal Speed
Diagonal Wheelbase
Propeller Size
Video Link Frequency
Receiver Frequency
Flight Modes
Operating Environment Temperature
Storage Temperature
Weight (Battery & Propellers included)
Battery Type
Capacity
Battery Voltage
Charging Environment Temperature
Discharging Environment Temperature
Storage Temperature & Humidity
Operating Current
Input Voltage
Operating Temperature
Weight
Dimensions (Damping device excl.)
Control Accuracy
Max. Angular Velocity
Controllable Range
RF Receiver Operating Frequency
Video Link Frequency
Operating Temeperature
Storage Temperauure
Communication Distance (Open Area)
Operating Current/Voltage
Battery
Power Consumption
Weight (battery included)
5.745 GHz~5.799 GHz
X-Star: 2.412 GHz~2.462 GHz
X-Star Premium: 902 MHz~928 MHz
-20°C~60°C (-4°F~140°F)
Less than 1 month: -10°C~45°C (14°F~113°F)
1~6 months: -10°C~35°C (14°F~95°F)
X-Star - CE: 500 m; FCC: 1000 m
X-Star Premium - FCC: 2000 m
X-Star: 750 mA/3.7 V
X-Star Premium:350 mA/3.7 V (App disconnected)
1400 mA/3.7 V (App connected)
6000 mAh rechargeable Li-lon Battery
X-Star: 2.8 W ; X-Star Premium: 5.2 W
X-Star: 830 g ; X-Star Premium: 840 g
650 mA@12V (Non-video Mode); 760 mA@12V (Video Mode)
12 V
-10°C~50°C
175 g (Camera incl.)
88 mm x 76.5 mm x 80 mm
Pitch: ±0.015° Roll: ±0.015° Yaw: ±0.015°
Pitch: ±300°/S Yaw: ±360°/S
Pitch: 0°~90° Yaw: ±50°
Rechargeable Li-Po battery
4900 mAh
14.8 V
10°C~45°C (50°F~113°F)
-10°C~45°C (14°F~113°F)
Temp: 18°C~28°C (64°F~82.4°F); Humidity: 52~78%
Operating Environment Temperature
Still Photography Modes
Video Recording Modes
Max. Field of View
Supported SD Card Types
File Formats
0°C~40°C (32°F~104°F)
Single shot
Burst shooting: 3/5/7 frames
Auto Exposure Bracketing (AEB): 3/5
Time-lapse
UHD: 4096x2160p 24/25, 3840x2160p 24/25/30
QHD: 2704x1520p 24/25/30/48/50/60
FHD: 1920x1080p 24/25/30/48/50/60/120
HD: 1280x720p 24/25/30/48/50/60/240
SUPERVIEW: 1920x1080p 24/25/30/48/50/60
108°
Micro-SD card
Storage capacity: 4 GB-64 GB
Class level: Class 10 or UHS-1 rating required
FAT32/exFAT
Photo: JPG/DNG/JPG+DNG
Video:MOV/MP4
Horizontal: ±2.5 m; Vertical: ±1 m;
Yaw: 150°/s
GPS Mode: 20°; ATTI Mode: 25°
Ascent: 6 m/s; Descent: 3 m/s
15 m/s
352 mm
9.4”x5.5”
X-Star: 2.412 GHz~2.462 GHz
X-Star Premium: 902 MHz~928 MHz
5.745 GHz~5.799 GHz
GPS, ATTI, IOC
-10°C~45°C (14°F~113°F)
-20°C~80°C (-4°F~176°F)
1.42 kg
Quick Guide| With XI-5S Gimbal

WWW.AUTELROBOTICS.COM
2016 Autel Robotics Co., Ltd. All Rights Reserved.
V1.0.4 / 2016
This manual suits for next models
1
Table of contents
Other Autel Toy manuals
Popular Toy manuals by other brands

Dancing Wings
Dancing Wings LIGHTING EPP instruction manual

Eduard
Eduard Bf-109G/K Access and scribing templates Assembly instructions

Black Horse Model
Black Horse Model Spitfire MK Instruction manual book

Bob's Card Models
Bob's Card Models Gippsland Airvan GA8 quick start guide

Eduard
Eduard OV-1D Mohawk interior quick start guide

Traxxas
Traxxas Spartan 5707 owner's manual