AUTHENTICS KALI Programming manual
KALI
Montageanleitung Spiegelschrank /
Assembling manual mirror cabinet

BENÖTIGTE HILFSMITTEL:
- Bohrmaschine / Akkuschrauber
- Bohrer Ø 8 mm
- Zollstock / Maßband
- Wasserwaage
- Kreuzschlitz-Schraubendreher
- Schlitz-Schraubendreher
- Bleistift
NECESSARY TOOLS:
- drill / cordless electric screwdriver
- drill bit Ø 8 mm
- folding rule / tape measure
- water level
- Phillips head screwdriver
- slot screwdriver
- pencil
Lieferumfang / Included parts
3 x 3 x 4 x 2 x
1 x 1 x
1x
1 x
1 x 1 x
Achtung / Attention:
Bitte beachten Sie die allgemeinen Hinweise auf der Rückseite /
Please note the general information on the reverse side
4 x
Inhaltsverzeichnis / Content
2-3 Lieferumfang und Nutzungsvarianten /
Included parts and variations
4-5 Montage Korpus ohne Steckdose /
Assembling cabinet without electrical socket
6-9 Montage Korpus mit Steckdose /
Assembling cabinet with electrical socket
10-11 Montage Spiegeltür und Böden /
Assembling mirror door and shelves
12 Allgemeine Hinweise /
General informations
2

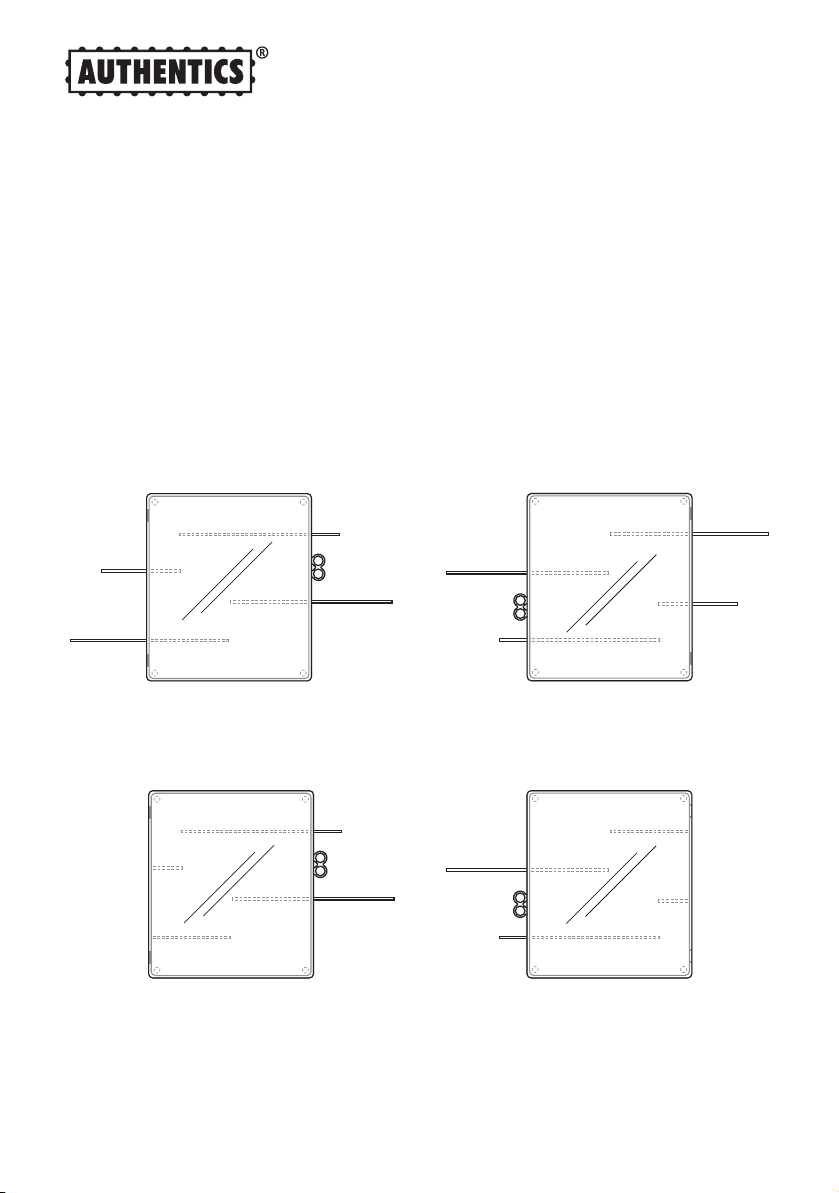
Griff rechts, Tür links angeschlagen /
handle on the right, door attached on
the left
Achtung / Attention:
Nur eine Seite (= Scharnierseite) kann mit den Böden so kombiniert werden, daß diese
plan ist (wichtig z.B. bei Anbringung in Wandnähe) /
Only one side (= hinge side) can be attached to the shelves to form this combination
(important, e.g. for mounting in close proximity to the wall)
Griff links, Tür rechts angeschlagen
(Korpus um 180° gedreht) /
handle on the left, door attached on
the right (body turned by 180°)
Nutzungsvarianten / Variations
B 113 cm
B 81 cm
B 113 cm
B 81 cm
3
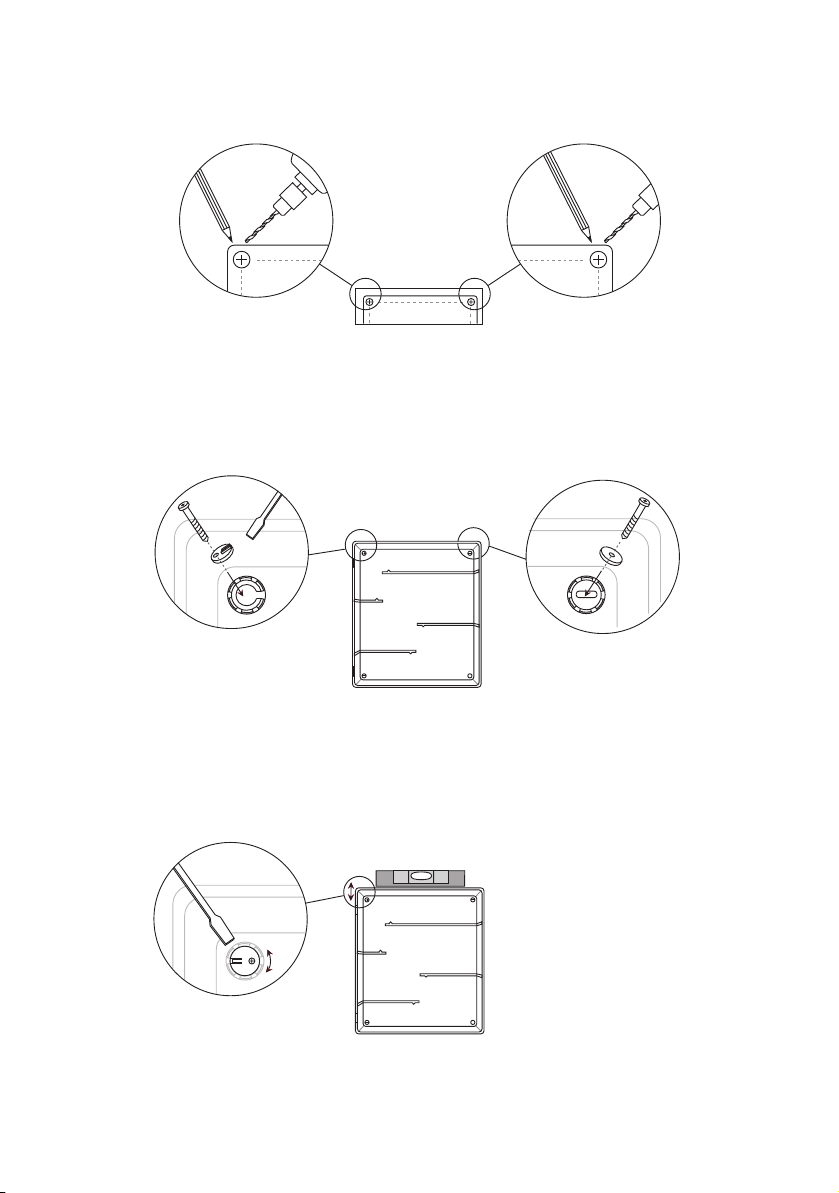
3. Korpus mit Exzenter horizontal ausrichten /
Adjust cabinet horizontally using the cam
2. Korpus mit 2 Schrauben aufhängen (Exzenter
links oben) / Mount the cabinet with 2 screws
(cam top left)
1. Obere Löcher mit Hilfe der Bohrschablone
markieren und bohren / Using the drill
template, mark the upper holes and drill them
Montage Korpus ohne Steckdose /
Assembling cabinet without electrical socket
4

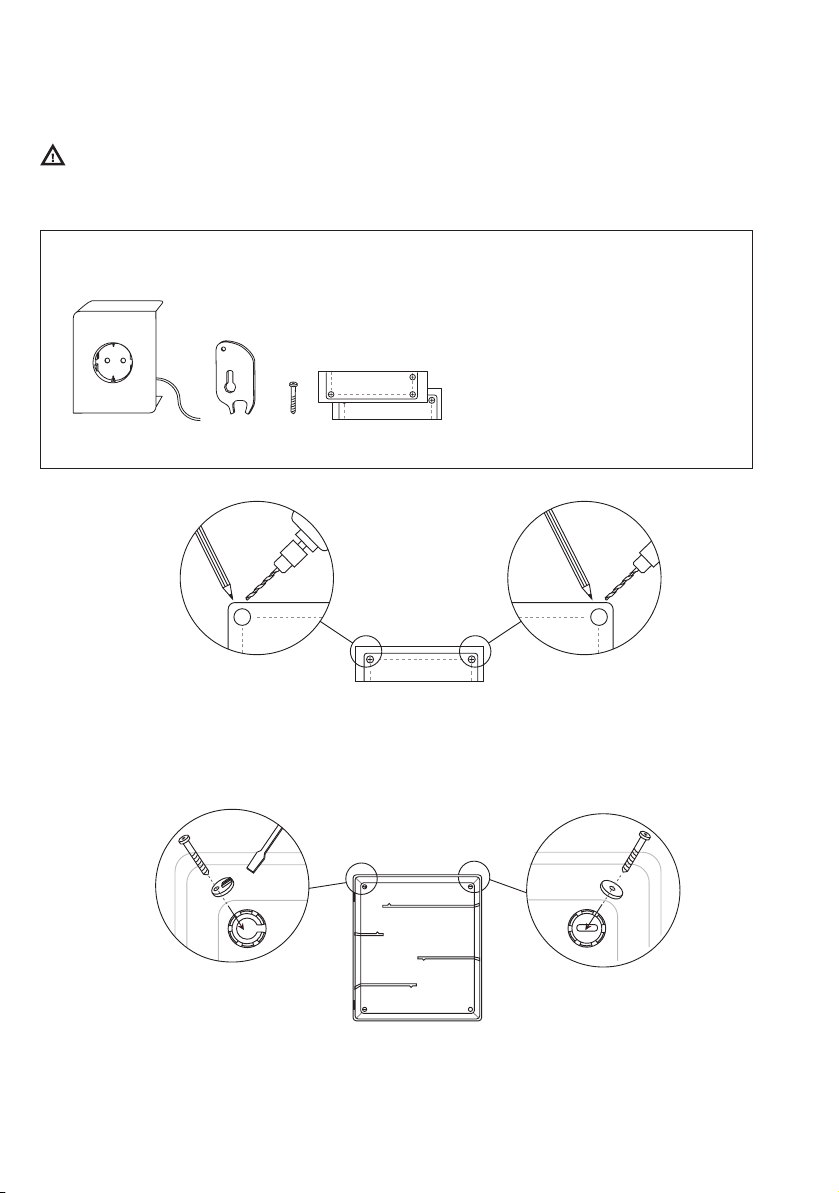
6. Mit dem Einsetzen der unteren 2 Schrauben den Korpus
vertikal ausrichten. Alle 4 Schrauben festziehen und die 4
Abdeckkappen aufsetzen / Adjust the cabinet vertically
with the 2 lower screws. Tighten all 4 screws and fit all
cover caps
4. Die unteren 2 Bohrlöcher markieren, Korpus ab-
nehmen und Löcher bohren / Mark the two lower
holes, remove the cabinet and drill the holes
5. Korpus an oberen Schrauben aufhängen und erneut
horizontal ausrichten / Mount the cabinet with the
upper screws and adjust again horizontally
5
Montage Korpus mit Steckdose /
Assembling cabinet whith electrical socket
2. Korpus mit 2 Schrauben aufhängen (Exzenter
links oben) / Mount the cabinet with 2 screws
(cam top left)
Achtung / Attention:
Hinweis: Steckdose ist Zusatzausstattung /
Advice: Electrical socket is an additional piece of equipment
Lieferumfang / Included parts
Achtung: Steckdose kann nur rechts
unten angebracht werden! /
Attention: Electrical socket can only
be fitted on the bottom right!
1 x 1 x 1 x2 x
Stromanschlüsse bitte nur vom Fach-
mann ausführen lassen! / Connections
for power supply should only be perfor-
med by an electrician!
1. Obere Löcher mit Hilfe der Bohrschablone
markieren und bohren / Using the drill
template, mark the upper holes and drill them
6

3. Korpus mit Exzenter horizontal ausrichten.
Danach Bohrloch unten links markieren /
Adjust cabinet horizontally using the cam.
Then mark the lower hole left
4. Korpus abnehmen, Bohrschablone anlegen und
horizontal ausrichten, Bohrloch unten rechts
markieren und beide unteren Löcher bohren /
Remove the cabinet, use the drill template and
adjust horizontally, mark the lower right hole and
drill both lower holes
5. Schraube (rechts unten) bis auf 3 mm in Wand
schrauben. Zum Prüfen des Abstandes den
Montageadapter anhalten / Tighten the screw in the
wall (bottom right) to 3 mm. Use the mounting
adapter to check the distance
3 mm
7

6. Beim Einsetzen der Steckdose in den Korpus Kabel
durch die Öffnung auf die Rückseite führen / When
mounting electrical socket into the cabinet guide the
socket cable through the opening on the back
7. Mit 2 Schrauben durch die Korpusrückwand Montage-
adapter und Steckdose fixieren, dabei Steckdose von
innen gegendrücken / Attach the mounting adapter
and socket with 2 screws to the body rear panel while
pressing against the socket from the inside
8. Kabel verklemmmen. Strom anschließen. Nur
vom Fachmann ausführen lassen! / Clamp the
cable. Connect the power. Have this work carried
out by an electrician!
8
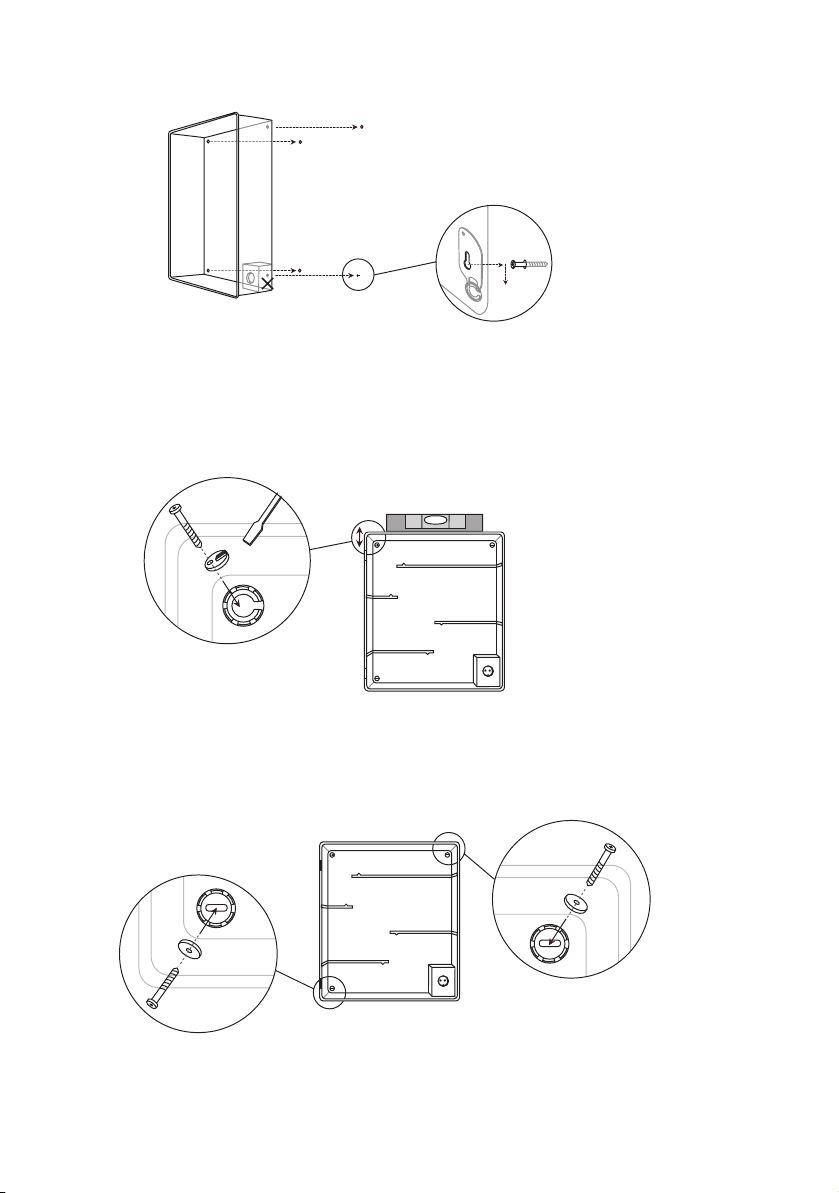
9. Beim Positionieren des Korpus Montageadapter auf
Schraube in der Wand setzen (1) und nach unten
ziehen (2) / When mounting the cabinet, position the
mounting adapter over the screw on the wall (1) and
pull downwards (2)
10. Korpus mit Schraube und Exzenter oben links aufhängen,
horizontal ausrichten und dann festschrauben / Mount
the cabinet with screw and cam top left. Adjust cabinet
horizontally and then tighten screw
1
2
11. Korpus mit den weiteren 2 Schrauben befestigen.
Anschließend alle Abdeckkappen aufsetzen /
Mount the cabinet using the two additional screws.
Fit all cover caps
9
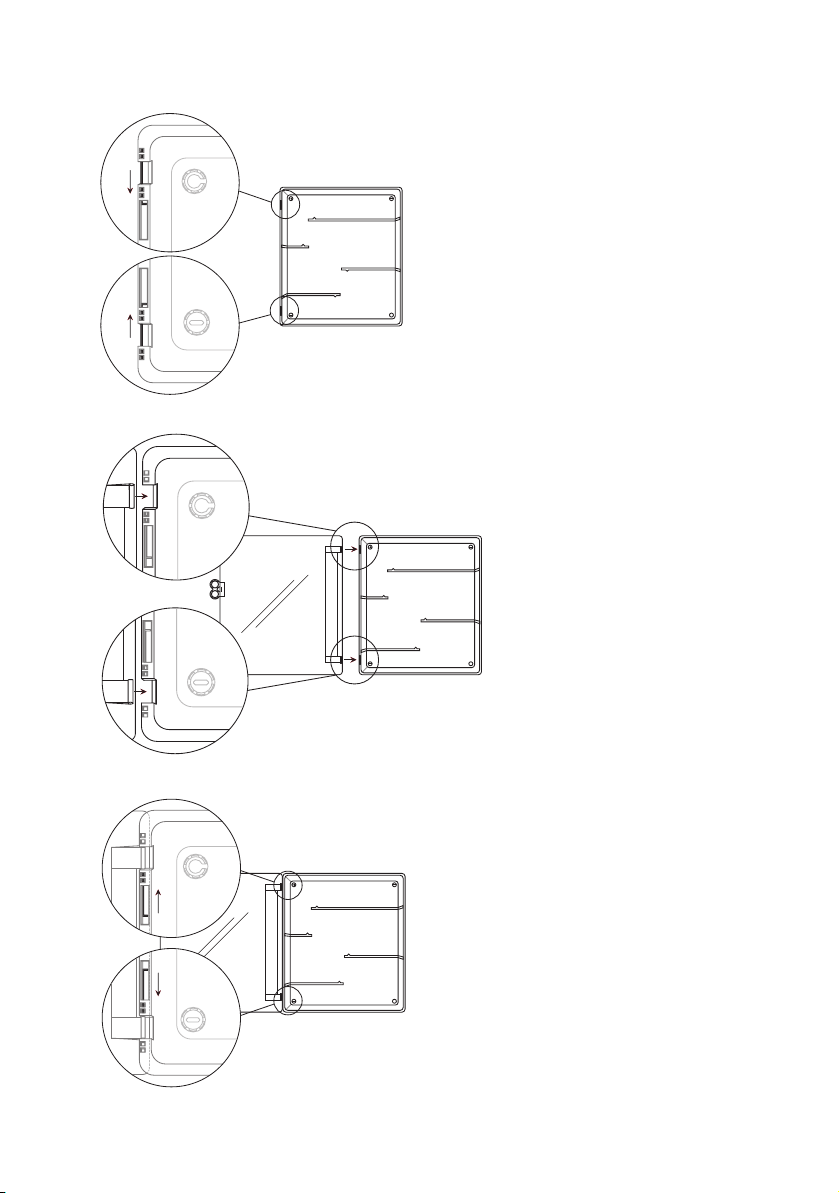
1. Vormontierte Edelstahlbolzen herunter bzw.
hochschieben / Pull down or push up the
preassembled stainless steel bolts
Montage Spiegeltür / Assembling mirror door
2. Spiegeltür einpassen und in Position halten
(2 Personen notwendig) / Fit the mirror door
and hold in place (requires 2 people)
3. Edelstahlbolzen durch die Scharnierhülsen der Spiegel-
tür bis zum Anschlag zurückschieben / Push the stainless
steel bolts back through the hinge sleeves of the mirror
door against the stop
10

Montage Böden / Assembling shelves
4. Achtung: Abdeckkappen unbedingt aufsetzen (Rundung ist
außen). Abdeckkappen arretieren die Edelstahlbolzen und
verhindern ein Herausrutschen des Bolzens /
Attention: Cover caps must be fit (curve facing outward).
The cover caps lock the stainless steel bolt in place and
prevent the bolts from slipping out
1.
2 .
Böden von außen in Führungsschienen bis zum
Anschlag einschieben / Slide the shelves from
the outside into the guide rails against the stop
Die vormontierten Klemmschrauben im Korpus zur Fixierung
der Böden festziehen / Tighten the pre-assembled clamping
screws in the body to anchor the glass shelves
11

Authentics GmbH
Am Ölbach 28 – 33334 Gütersloh
Telefon: + 49 – ( 0 ) 5241 – 94 05-0
Telefax: + 49 – ( 0 ) 5241 – 94 05 – 555
E-Mail: [email protected]
Internet: www.authentics.de
SICHERHEITS – UND GEFAHRENHINWEISE:
Bitte lesen Sie diese Montageanleitung vor der Spiegelschrankmontage sorgfältig durch.
- Montage nur durch fachkundige Personen
- Warnung: Bei fehlerhafter Montage besteht Gefahr!
- Unbedingt prüfen, ob die Wand und die Befestigungsmittel für die Montage geeignet sind
- Das beiliegende Befestigungsmaterial ist nur für massive, tragfähige Wände geeignet
- Dübel sind nicht im Lieferumfang enthalten. Bitte erkundigen Sie sich im Fachhandel nach dem
geeigneten Befestigungsmittel für Ihre Wand
- Nicht ausreichend tragfähige Wände verstärken
- Niveauunterschiede aufgrund von auftragenden Wandbelägen wie z.B. Teilverfliesung
durch geeignete Distanzstücke ausgleichen
- Unebene Wände vor Montage ausgleichen
- Spiegelschrank mit Steckdose muss einen Mindestabstand von 60 cm zur Badewanne / Dusche aufweisen
- Elektroinstallationen dürfen nur vom Elektrofachmann nach DIN VDE 0100 Teil 701 (2002-02 mit Änderung
von 2004-02) durchgeführt werden
- Sicherheitsvorschriften und Normen der jeweiligen Länder sind zu beachten
WICHTIGE INFORMATIONEN:
- Kontrollieren Sie die Verpackung bei Anlieferung auf äußere Beschädigungen
- Überprüfen Sie den Spiegelschrank und das dazugehörige Beschlagset (Schrauben, Abdeckkappen, etc.)
mit der Inhaltsangabe auf Seite 2
- Achtung: Keine Chemikalien, aggressive Fleckenmittel oder Scheuermittel zur Reinigung verwenden
- Reinigung: für den Korpus verwenden Sie am besten ein feuchtes Tuch mit etwas Feinspülmittel,
den Spiegel mit einem feuchten Tuch oder Fensterleder abwischen
- Montageanleitung gut aufbewahren, sie beinhaltet Informationen zur Installation und zur Nutzung
des Spiegelschrankes
SAFETY INFORMATION AND HAZARD WARNINGS:
Please read this assembling instruction carefully before beginning assembly of the mirror cabinet.
- Only knowledgeable persons/professionals should perform the assembly
- Warning: Incorrect assembly could be dangerous!
- It is essential that you check whether the wall and the mounting device are suitable for mounting the cabinet
- The enclosed mounting materials are intended for use only on solid, stable walls
- Wall plugs are not included in delivery. Contact your local specialist dealer to find out which
mounting device is best suited to your wall.
- Walls that are not sufficiently load-bearing must be reinforced
- Compensate for existing level differences due to bulky wall coverings such as e.g. partial tiling with suitable
spacing strips
- Ensure a minimum distance of 60 cm between the mirror cabinet and the bath tub / shower
- Electric installations must only be performed by a professional electrician in accordance with DIN VDE 0100
Part 701 (2002-02 with amendment from 2004-02)
- Observe all safety regulations and standards for the respective country
IMPORTANT INFORMATION:
- Inspect the package upon delivery for any signs of external damage
- Inspect the mirror cabinet and the accompanying fittings (screws, cover caps, etc.) and compare with
the contents list on page 2
- Attention: Do not use any chemicals, aggressive stain removers or scouring agents for cleaning
- Cleaning: To clean the body, use a moist cloth with a small amount of mild detergent; wipe the mirror with a
moist cloth or a chamois leather
- Keep the assembly instructions in a safe place as they contain information about fitting and operating the
mirror cabinet.
13100
KALI Montageanleitung
3/2011
Popular Indoor Furnishing manuals by other brands

Xylem
Xylem BLOX BRIDGE BR-BLOX-12 Series installation instructions

WESTMINSTER
WESTMINSTER ADRIA TOMO125-123 Assembly instructions

Songmics
Songmics VASAGLE KDT080 manual

Flexispot
Flexispot H2S installation guide

Sauder
Sauder OFFICE WORKS AFFIRM 426466 manual

Sauder
Sauder Night Stand 423434 Instruction booklet


