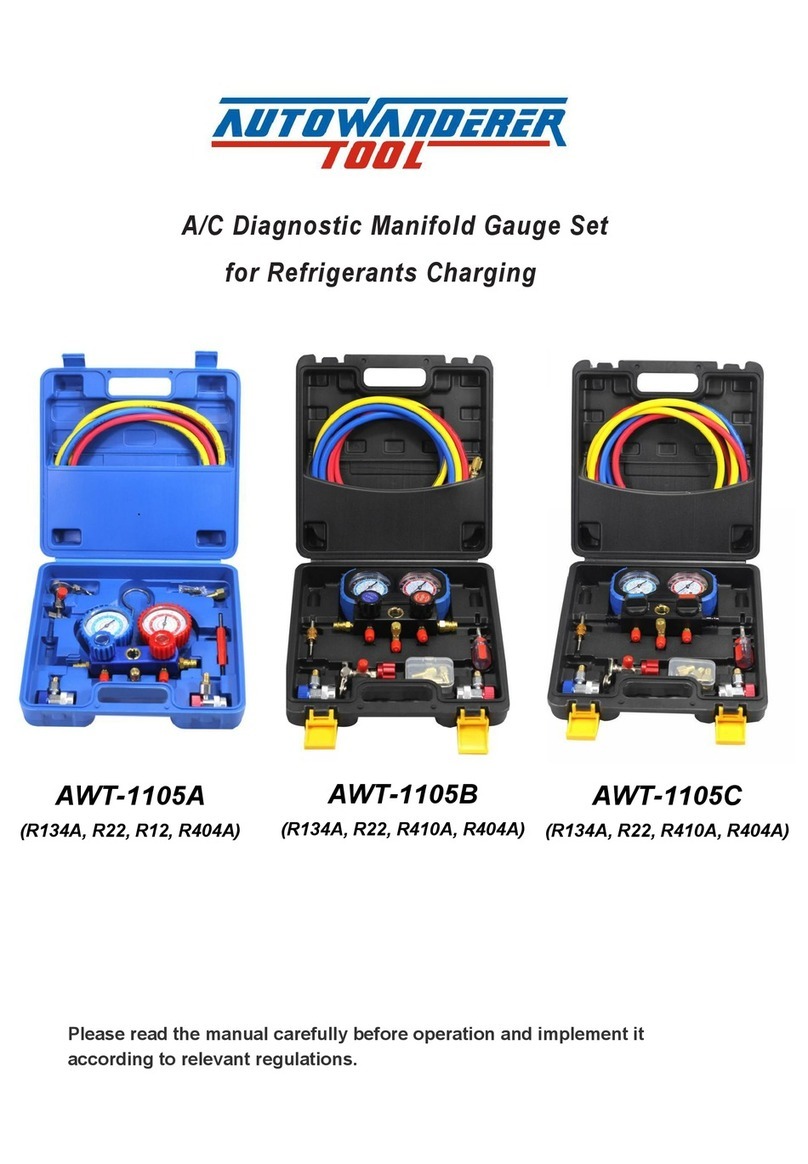
AUTOWANDERER TOOL R-134a R-22 User manual

4 Way A/C Diagnostic Manifold Gauge Set
for Refrigerants Charging
(
R-134a R-22, R-410A, R-404A)
Please read the manual carefully before operation and implement it
according to relevant regulations.

IMPORTANT SAFETY INFORMATION
WARNING!
1. Check the integrity of the product. If the parts are damaged before each
use, do not use them and replace them in time.
2. Always wear ANSI-approved safety goggles,and ensure there are no other
people around who are not wearing safety equipment when using this
product.
3. Keep the work area clean and dry.Cluttered areas invite injuries.
4. Keep children away from this product. Children must never be allowed in
the work area.
5. Do not use this product if you feel unwell or unable to keep your head
clear.
6. Do not use the product when wearing loose clothes and loose jewelry to
prevent being caught by moving parts.
7. Do not use at non-specified purpose.
8. Keep product parts clean and dry when not in use and store in a dry
environment.
9. Do not overreach. Keep proper footing and balance at all times.
10. ONLY USE REFRIGERANT R-134a R-22, R-410A, R-404A WITH THIS
A/C MANIFOLD GAUGE SET.
11. Do not start an engine in an enclosed area (like a garage).
12. A running gasoline engine generates carbon monoxide; carbon monoxide
is a colorless, odorless gas that can cause serious injury and death, if
inhaled.
13. Keep hands away from the moving parts and hot parts of vehicle’s engine.
14. Read and understand all instructions and safety precautions as outlined in
the vehicle manufacturer’s manual for air condition servicing. Only
qualified mechanics that are trained in servicing air conditioning systems

should use this product.
15. When warming up an engine in preparation for checking of the A/C system,
make sure the vehicle’s transmission is placed in “Park” and the
emergency brake is applied.
16. Refrigerant can cause severe frostbite if it comes in contact with skin.
Follow the safety warnings and instructions provided by the refrigerant
manufacturer.
17. Do not disconnect any pressurized hose. Pressurized refrigerant can
cause severe injury.
18. Use caution when opening an air conditioning system line or can of
refrigerant. When checking, always place a towel around the
19. service valves of the air conditioning unit and Red and Blue Couplers (HP
and LP).
20. Keep refrigerant away from excessive heat as pressure in the container
could increase enough to rupture the can.
21. Do not discharge refrigerant into the atmosphere. Capture refrigerant into
an approved recovery container (not included), and then dispose of
properly. Contact your local Hazardous Waste Authority for disposal
guidelines.
22. Only use refrigerant in a manner consistent with the air conditioning
system’s repair manual.

LP: Low Pressure
HP: High Pressure

OPERATION
1. Check the integrity of the product and the accuracy of the gauge needle
(calibrate by adjusting the calibration screw)before using.
2. Connect one end of the Blue Hose to the LP Hose Connector (8) and the
other end to the Blue Coupler (6).
3. Connect one end of the Red Hose to the HP Hose Connector (12) and the
other end to the Red Coupler (7).
4. Connect one end of the Black Hose to the Evacuation Connector (9) and
the other end to the refrigerant recovery system / vacuum pump.
5. Connect Yellow Hose:
A. DIAGNOSTIC CHECK: Connect one end of the Yellow Hose to the
Charging Connector (10) and the other end to the Charge Valve (11) on
that Connector (10).
B. EVACUATION or CHARGING: Connect one end of the Yellow Hose
to the Charging Connector (10) and the other end to the refrigerant
supply with Can Tap.
6. Close LP Manifold Valve (1), HP Manifold Valve (2), Black Evacuation
Valve (3), Yellow Charging Valve(4), both Coupler (6, 7), Can Tap.
7. Attach the Blue Coupler (6) to the suction LP port and the Red Coupler (7)
to the discharge HP port on the A/C system.
1. Turn on the vehicle and allow it to reach normal operating temperature.
Then, turn on the A/C system.
2. Open both Coupler (6, 7).
3. Read the pressure on both of the Gauges and compare to the
manufacturer’s recommended readings.
4. Close both Coupler (6, 7).
5. Turn off the vehicle and the A/C system if dynamic check was done.
PREPARATION OPERATION
DIAGNOSTIC CHECK

1. Turn on the refrigerant recovery system / vacuum pump.
2. Open the Black Evacuation Valve (3), open both Coupler (6, 7), open LP
Manifold Valve (1), HP Manifold Valve (2).
3. Read the amount of vacuum on the Blue LP Gauge.
4. Shut off the refrigerant recovery system / vacuum pump when the vacuum
level reaches the manufacturer’s recommended level.
5. Close the Black Evacuation Valve (3), close both Coupler (6, 7), close
LP Manifold Valve (1), HP Manifold Valve (2).
1. Turn on the vehicle and allow it to come up to normal operating temperature.
Then, turn on the A/C system(about 5-10 minutes).
2. Connect the refrigerant CAN / CYLINDER and open it with Can Tap.
3. Open Blue Coupler (6), open Blue LP Manifold Valve (1).
4. Read the amount of vacuum on the Blue LP gauge, and according to the
value to select the appropriate capacity of refrigerant.
5. Open Yellow Charging Valve (4).
6. Observe the refrigerant filling condition through the Sight Glass (5) and the
Blue LP gauge.
7. Close Blue Coupler (6) when the refrigerant volume is in line with the
manufacturer's recommendations.
8. Close Can Tap,close Yellow Charging Valve (4), close Blue LP Manifold
Valve (1), turn off the vehicle and the A/C system.
Carefully disconnect the Couplers (6, 7) from the A/C system, the hoses may
contain residual refrigerant.
MAINTENANCE
1. Before use, check the components for misalignment, cracks and any other
conditions that may affect the accuracy of the operation.
DO NOT USE DAMAGED EQUIPMENT.
2. Clean with a damp cloth using a mild detergent or solvent.
RECOVERY / EVACUATION
CHARGING
This manual suits for next models
2
Table of contents
Other AUTOWANDERER TOOL Diagnostic Equipment manuals
