AUTOWOEL D330GD User manual

User Manual
Welcome to use FullHD mini dash camera D330GD
[Warning] In order to avoid product loss caused by improper operation,
please read all safety information of operation instructions in this
manual first. And then use this product. For more technical support,
please refer to the "exception handling" section of this manual.
Language: GB - DE - FR - ES - IT

DIRECTORY
English:Deutsche:
Français:
Italiano: More:
Installation video - - - - - - 51
Contact us - - - - - - - - - - - 51
Español:
Appearance - - - - - - - - - 01
Product Instruction - - - - 01
Exception handling - - - - 04
Installation Instruction - - 05
How to use APP - - - - - - 08
Aussehen - - - - - - - - - - - 11
Produktanleitung - - - - - - 11
Ausnahmebehandlung - - 14
Installationsanleitung - - - 15
Verwendung der APP - - - 18
Apparence - - - - - - - - - - 21
Instruction de produit - - 21
Gestion des exceptions - 24
Installation Instruction - - 25
Comment utiliser l'application -28
Aspetto - - - - - - - - - - - - 41
struzioni sul prodotto - - - 41
Gestione delle eccezioni -44
Istruzioni per l'installazione - 45
Come usare l'APP - - - - - 48
Aspecto - - - - - - - - - - - - - 31
Instrucción del producto - 31
Manejo de excepciones - -34
Instrucciones de instalación -35
Cómo utilizar la APLICACIÓN -38
01
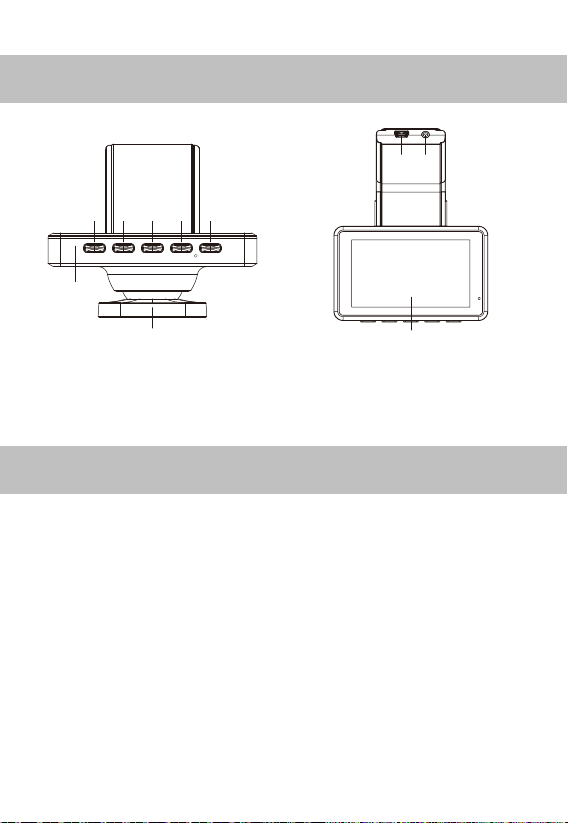
Appearance
⑨
⑦ ⑧
① ② ③
⑥
⑨
④ ⑤
10
Product Instruction
1. File playback
Press "menu" to enter system menu, select the “File playback”, press
"ok" to enter the playback interface.
File Playback Instruction
1) Select the video file to play back and press “ok” to play it.
2) Press Menu button to exit play.
2. WIFI: open / close
3. Satellite Status: Received the GPS signal status
4. GPS on/ off: open / close
5. Speed Unit: km/h / mph
6. Speed remind:
OFF/30mph/35mph/40mph/50mph/55mph/60mph/65mph
①menu ②Up ③On/Off ④Down ⑤OK
⑥Lens ⑦Power ⑧Rear Cam ⑨LCD ⑩MIC
GB

02
8. Clock Setting: Up and Down button change the number, the Ok
button to confirm.
9. Language: English, Deutsche, Rançais, Español, Italiano, Nederlands
7. Time Zone Select: Please select your local time zone
10. Stamp: Date / Off .
Note: the stamp display on the video.
23. Reset Setup: YES / NO
Note: restore all the setting to factory default value
24. Format sd card
Press "menu button" to enter system menu, select the "format SD-card"
Note: Format sd card will clear all the micro card data, and it’s unrecov-
erable.
11. Movie Mode: FHD30 / HD30
12. Exposure: -2 ~ +2
13. LCD Power Save: OFF / 1min / 3min
14. Sound Record: open / close
15. Beep: open / close
16. Volume: 0~10
17. Loop recording: 1min/ 2mins /3mins
18. Time lapes: open / close
19. Protect Level: Off / High/ Middle / Low
20. Parking Monitoring: Off / High/ Middle / Low
21. Delete Files: Delete Normal folder or Event folder
22. Flicker: 50Hz / 60Hz
25. FW Version: AVT004
26. APP Download: Please scan the QR code to download the APP
GB

03
● Loop Recording: Off, 1minute, 2minutes, 3minutes
● Resolution: FHD, HD
● Sound Record: On, Off
● G-sensor: Off, High, Middle, Low
● Language: English, Deutsche, français,Español,italiano,Nederlands
● LCD Save: Off, 1minute, 3minutes
● Date and Time: Press up/down to adjust date and time, and press ok
to confirm
● Volume: press up to increase volume, down to decrease volume, and
press ok to confirm
● Sound: Off, On
● Watermark format: date, close
● Time zone: press up/down to adjust the time zone
● Frequency: 50Hz, 60Hz
● System Reset: Confirm, Cancel
● GPS positioning information: Check current GPS location information
● GPS time setting: Confirm or Cancel
● Speed: km/h / mph
● Speed reminder: optional speed, machine will alarm when driving
speed over the set value
● Delete document: press the ok key to enter to delete the correspond-
ing file
● APP download: Enter by confirm key , and use mobile phone to scan
QR code to download
(If the product relevant functions do not conform to the specification, it
is the upgrade reason.The actual version shall prevail)
GB

Exception handling
04
Display
Video Format
Micro Sd card
Resolution
G-sensor
Audio
3.0 inch IPS
MOV
8GB-64GB Class 10 Micro SD card
Front 1920*1080P +Back 720P
3 Axis G-sensor
Support sound recording and playback
Loop recording
Language
Battery
Power
Temperature
Function
Yes . 1min / 2mins / 3mins
and overwritten by new files.
English, Deutsche, français,Español,italiano, Nederlands
Super capacitor
5V
Operation temperature: -20 °C ~ 60 °C
Storage temperature: -30 °C ~ 80 °C
WIFI, Time lapse, GPS positioning, Parking monitor
Loop recording, Dual recording
If some functions do not work properly, or you have changed
the relevant Settings, try to restart the machine or restore
factory Settings.
● Low battery/Not to save settings/automatic shutdown when car start?
1. Remove the memory card
● Memory card is full?
1. Format memory card.
2. Adjust the "G-sensor" in the machine to a low level and format the
memory card regularly for about a month.
3. Replace the memory card.
GB

Installation instruction
05
● Memory card is wrong?
1. Format memory card.
2. Replace to use new card.
● Please insert SD card/ SD card can not be recognized?
The memory card is damaged/slow/incompatible/no card/please
replace the genuine high speed TF card.
● Black screen/flower screen/flash screen?
1. Restart and test to see if it can be restored.
2. Reset the system.
3. Contact the merchant for repair.
● Breakdown?
1. Restart and test to see if it can be restored.
2. Remove the memory card to test whether the memory card caused
the crash.
3. Reset the system and test.
4. Contact the merchant for repair.
● Don’t start up?
1. Check if the power cable is connected properly.
2. Unplugged memory card to boot and test.
3. Connect the machine to the computer to start the test.
4. Reset the system and test.
Attentions:
1. Power on before installation to check whether all functions of the
machine are normal. Wiring cannot be pulled vigorously. Do not connect
wrong or insert wrong or even reverse connection when connecting the
cable head.
GB

06
2. If the function and display are normal before installation, but abnormal
after installation, it is likely to cause problems during installation. Please
check whether there is a short circuit in the link line, or whether the pin
inserted in the link head is crooked and causes short circuit.
It is strictly forbidden to destroy or privately modify the original line in
the process of loading .If wire is damaged, you must replace a whole
set of new wire to install before power on.
◆ Rear camera installation
Step 1: Fix camera with 3M adhesive
Find a best location, tear off the 3M
adhesive on the rear camera, fix the rear
camera near by the car license plate lamp.
(if you need to adjust the angle, please
attach the rear camera bracket to the rear
camera and tighten it with screws first).
Step 2: Remove the Panel
Remove your trunk's interior panel to
expose the cars rear wiring chambers. Pop
open your trunk and look for a solid interior
panel covering the opposite side of your
license plate mounting area. Then,insert a
trim removal tool or other thin device
behind the panel and pry it off.
Step 3: Snake the cable
Use a trim removal tool to pop out tailgate
trim, then run the cable from outside of the
car into the trunk of your car.
Step 4: Connect the rear cameras power
cable to the extension cable.
After snaking your rear camera's extension
cable, connect the power cable to your rear
camera's extension cord.
GB
07
DVR
RearCamera
Cable arrangement
For safety, make sure you do this while the car is turned off. Lastly, please poke
the red positive bare wire through the positive reverse light wire and then wrap
with an electrical tape.
After connecting the red lead, it will have the reverse assist function.
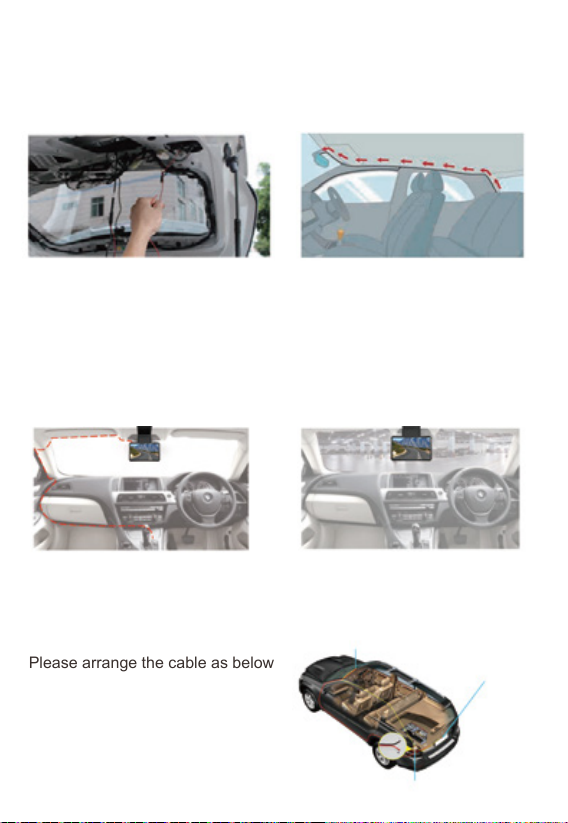
Cable arrangement
Please arrange the cable as below
Step 5: Connecting the red wire with the
reverse light wires.
Reverse light wires are normally located
on the rear side of your car although their
placement may vary so be sure to refer to
your car’s manual. Once spotted, Use a
pair of pliers or wire stripper to peel the
rubber to expose the live wire.
Step 6: Route your rear camera's power
cable to the front of the car.
If you'd like, use a trim removal tool to
pop out the headlining panel directly
above your windshield. Then, run your
cable through the exposed chamber.
Step 7: Power on the dash cam with box
included car charger, don't charge it with
your own chargers.
Step 8: Test the camera to make sure
everything works.
GB
How to use APP
08
IOS Android
①:Please connect the cable ACC B+ and GND before using
②:Please check the connect port carefully
1. You can use the car charger in the package directly.
2. If you want the time lapse function, you need to use a hardwire kit,
Please buy our hardwire kit on Amazon, or contact us to get it.
3. For hardwire kit installation, please follow the instructions or consult a
professional installer.
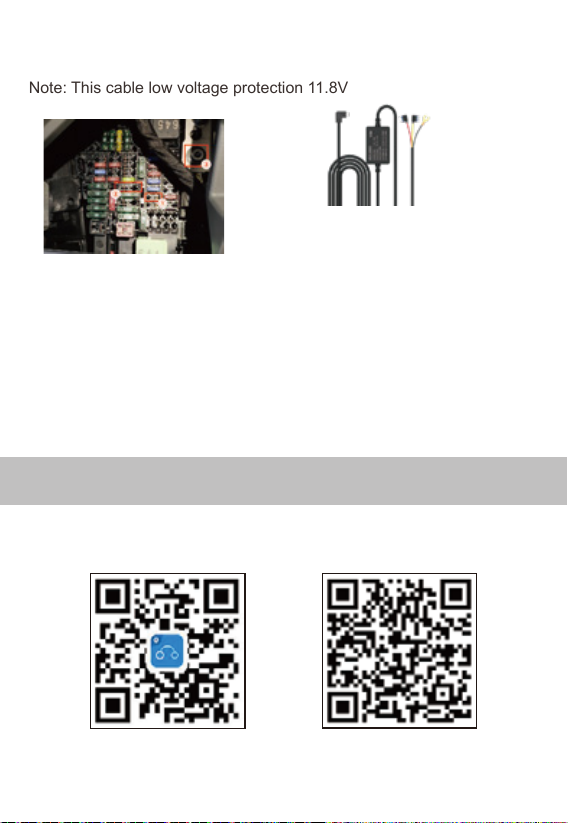
Hardwired kit installation
Note: This cable low voltage protection 11.8V
1. Please scan the QR code to download APP
GB
09
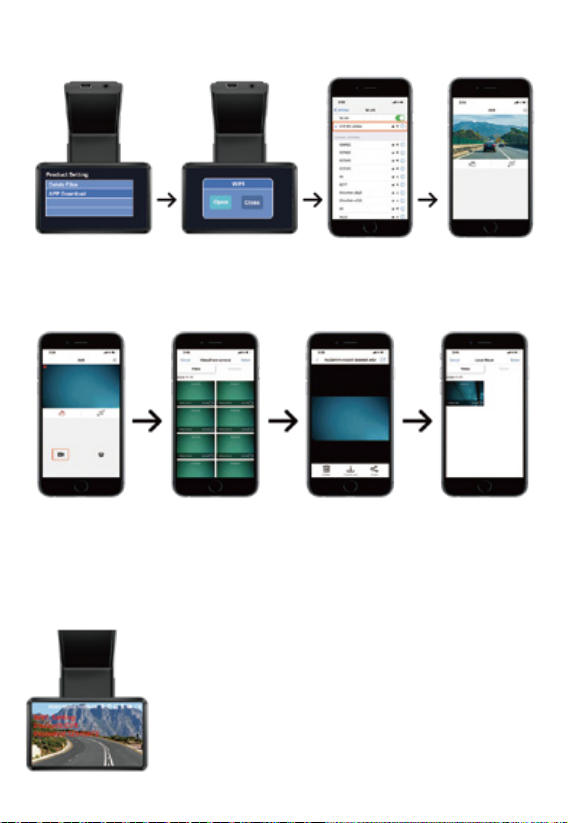
The WIFI signal of each dash cam is inconsis-
tent, the corresponding WIFI information and
password will be displayed on the screen after
the WIFI function is turned on on the dash cam.
4. WIFI Information
1. Open the setting
interdace and download
the APP.
2. Turn on the WIFI
function.
3. Turn on the mobile
WLAN, link the dash
cam WIFI.
4. Turn on the APP,
the connection is
successful.
1. Click the black
camera button in the
APP to open the
recorded video.
2. Click the select
button in the upper
right corner of the
recorded video.
3. Click to download. 4. Open the folder on
the home page of the
APP,you can find
these videos or pictures
in the local file.
2. Connect APP
3. Download local files
GB

10
❶
❷
❹
❻
❸
❺
Note:
1. Note that the rear camera will automatically record after
being inserted into the host, without manual adjustment. If the
screen is not displayed, please switch the screen display mode
2. After WIFI connection and APP operation setting, the screen
of the recorder will display network operation.
3. After connected to the APP, the APP video cannot be
displayed on separate screens, but the recorder screen can.
❶Click the icon in the upper right corner to
enter the recorder settings page
❷Click the icon in the small right corner of the
video to enter full screen mode
❸Click the button to switch between recording
and pause
❹Click the button to switch the front and rear
camera screens
❺Click the button to enter the video playback
❻Click the button to enter the local file
1. On the playback video page, you can see
the normal recorded front and rear camera
videos and emergency locked videos.
2. Click the button in the upper right corner,
you can choose to switch the front and rear
camera screen, download, share and delete
the video.
5. APP Operation
6. Playback Video
GB

11
Aussehen
⑨
⑦ ⑧
① ② ③
⑥
⑨
④ ⑤
10
Produktanleitung
1. Dateiwiedergabe
Drücken Sie "menu", um das Systemmenü aufzurufen, wählen Sie "File
Playback" und drücken Sie "OK", um die Wiedergabeschnittstelle
aufzurufen.
Anweisung zur Dateiwiedergabe
1) Wählen Sie die wiederzugebende Videodatei aus und drücken Sie
„OK“, um sie abzuspielen.
2) Drücken Sie die Menütaste, um die Wiedergabe zu beenden.
2. WIFI: Öffnen / Schließen
3. Satellitenstatus: Erhielt den GPS-Signalstatus
4. GPS ein / aus: öffnen / schließen
5. Geschwindigkeitseinheit: km/h / mph
6. Geschwindigkeit erinnern:
AUS / 30mph / 35mph / 40mph / 50mph / 55mph / 60mph / 65mph
①Menü ②Auf ③Ein/Aus ④Ab ⑤OK
⑥Objektiv ⑦Leistung ⑧Hintere Kamera ⑨LCD
⑩MIC
DE

12
8. Uhreinstellung: Auf- und Ab-Taste ändern die Nummer, die OK-Taste
zur Bestätigung
9. Sprache: English, Deutsche, Rançais, Español, Italiano, Nederlands
7. Zeitzonenauswahl: Bitte wählen Sie Ihre lokale Zeitzone aus
10. Stempel: Datum / Aus.
Hinweis: Die Stempelanzeige im Video
23. Reset-Setup: JA / NEIN
Hinweis: Stellen Sie alle Einstellungen auf den werkseitigen Standardw-
ert zurück
24. Formatieren Sie die SD-Karte
Drücken Sie "Menütaste", um das Systemmenü aufzurufen, und wählen
Sie "SD-Karte formatieren".
Hinweis: Durch das Formatieren der SD-Karte werden alle Mikrokarten-
daten gelöscht und können nicht wiederhergestellt werden
11. Filmmodus: FHD30 / HD30
12. Belichtung: -2 ~ +2
13. LCD-Stromsparmodus: AUS / 1 Minute / 3 Minuten
14. Tonaufnahme: Öffnen / Schließen
15. Piepton: Öffnen / Schließen
16. Volumen: 0 ~ 10
17. Schleifenaufnahme: 1 Minute / 2 Minuten / 3 Minuten
18. Zeitraffer: Öffnen / Schließen
19. Schutzstufe: Aus / Hoch / Mittel / Niedrig
20. Parküberwachung: Aus / Hoch / Mittel / Niedrig
21. Dateien löschen: Normalen Ordner oder Ereignisordner löschen
22. Flimmern: 50 Hz / 60 Hz
25. FW-Version: AVT004
26. APP-Download: Bitte scannen Sie den QR-Code, um die APP
herunterzuladen
DE

13
● Loop-Aufnahme: Aus, 1 Minute, 2 Minuten, 3 Minuten
● Auflösung: FHD, HD
● Tonaufnahme: Ein, Aus
● G-Sensor: Aus, Hoch, Mittel, Niedrig
● Sprache: English, Deutsche, Rançais, Español, Italiano, Nederlands
● LCD-Speicherung: Aus, 1 Minute, 3 Minuten
● Datum und Uhrzeit: Drücken Sie auf / ab, um Datum und Uhrzeit
anzupassen, und drücken Sie zur Bestätigung auf OK
● Lautstärke: Drücken Sie nach oben, um die Lautstärke zu erhöhen,
nach unten, um die Lautstärke zu verringern, und drücken Sie zur
Bestätigung OK
● Ton: Aus, Ein
● Wasserzeichenformat: Datum, schließen
● Zeitzone: Drücken Sie nach oben / unten, um die Zeitzone anzupas-
sen
● Frequenz: 50 Hz, 60 Hz
● System Reset: Bestätigen, Abbrechen
● GPS-Positionsinformationen: Überprüfen Sie die aktuellen GPS-Posi-
tionsinformationen
● GPS time setting: Confirm or Cancel
● Geschwindigkeit:: km/h / mph
● Geschwindigkeitserinnerung: Optionale Geschwindigkeit, Maschine
alarmiert, wenn die Geschwindigkeit über dem eingestellten Wert liegt
● Dokument löschen: Drücken Sie die OK-Taste, um die entsprechende
Datei zu löschen
● APP-Download: Geben Sie den Bestätigungsschlüssel ein und
scannen Sie den QR-Code zum Herunterladen mit dem Mobiltelefon
(Wenn die produktrelevanten Funktionen nicht der Spezifikation
entsprechen, ist dies der Grund für das Upgrade. Die tatsächliche
Version hat Vorrang)
DE

Ausnahmebehandlung
14
Anzeige
Video Format
Micro SD Karte
Auflösung
G-Sensor
Audio
3.0 Zoll IPS
MOV
8GB-64GB Micro-SD-Karte der Klasse 10
Vorderseite 1920*1080P + Rückseite 720P
3-Achsen G-Sensor
Unterstützt Tonaufnahme und wiedergabe
Daueraufnahme
Sprache
Batterie
Leistung
Temperatur
Funktion
Ja . 1min / 2mins / 3mins
and overwritten by new files.
English, Deutsche, français,Español,italiano
Superkondensator
5V
Betriebstemperatur: -20°C~ 60°C
Lagertemperatur: -30 °C ~ 80 °C
WIFI, Zeitraffer, GPS-Ortung, Parkmonitor
Loop-Aufnahme, Dual-Aufnahme
Wenn einige Funktionen nicht ordnungsgemäß funktionieren
oder Sie die entsprechenden Einstellungen geändert haben,
versuchen Sie, den Computer neu zu starten oder die Werk-
seinstellungen wiederherzustellen.
● Batterie schwach / Einstellungen nicht speichern / automatische
Abschaltung beim Autostart?
1. Entfernen Sie die Speicherkarte
● Speicherkarte ist voll?
1. Format Speicherkarte
2. Stellen Sie den "G-Sensor" im Gerät auf einen niedrigen Wert ein und
DE

Installationsanleitung
15
formatieren Sie die Speicherkarte regelmäßig etwa einen Monat lang.
3. Ersetzen Sie die Speicherkarte.
● Speicherkarte ist falsch?
1. Format Speicherkarte.
2. Ersetzen Sie die Karte, um sie zu verwenden.
● Bitte SD-Karte einlegen / SD-Karte kann nicht erkannt werden?
Die Speicherkarte ist beschädigt / langsam / inkompatibel / keine Karte
/ Bitte ersetzen Sie die echte Hochgeschwindigkeits-TF-Karte.
● Schwarzer Bildschirm / Blumenbildschirm / Flash-Bildschirm?
1. Starten Sie neu und testen Sie, ob es wiederhergestellt werden kann.
2. Setzen Sie das System zurück.
3. Wenden Sie sich zur Reparatur an den Händler.
● Nervenzusammenbruch?
1. Starten Sie neu und testen Sie, ob es wiederhergestellt werden kann.
2. Entfernen Sie die Speicherkarte, um zu testen, ob die Speicherkarte
den Absturz verursacht hat.
3. Setzen Sie das System zurück und testen Sie.
4. Wenden Sie sich zur Reparatur an den Händler.
● Nicht starten?
1. Überprüfen Sie, ob das Netzkabel richtig angeschlossen ist.
2. Ziehen Sie die Steckkarte zum Booten und Testen heraus.
3. Schließen Sie das Gerät an den Computer an, um den Test zu
starten.
4. Setzen Sie das System zurück und testen Sie es.
Achtung:
1. Schalten Sie das Gerät vor der Installation ein, um zu überprüfen, ob
alle Funktionen der Maschine normal sind. Die Verkabelung kann nicht
kräftig gezogen werden. Schließen Sie beim Anschließen des
Kabelkopfs keine falsche Verbindung an oder setzen Sie keine falsche
oder sogar umgekehrte Verbindung ein.
DE

16
2. Wenn die Funktion und die Anzeige vor der Installation normal, nach
der Installation jedoch abnormal sind, kann dies zu Problemen während
der Installation führen. Bitte prüfen Sie, ob in der Verbindungsleitung ein
Kurzschluss vorliegt oder ob der im Verbindungskopf eingesetzte Stift
schief ist und einen Kurzschluss verursacht.
Es ist strengstens verboten, die ursprüngliche Leitung während des
Ladevorgangs zu zerstören oder privat zu modifizieren. Wenn das
Kabel beschädigt ist, müssen Sie vor dem Einschalten einen ganzen
Satz neuer Kabel austauschen.
◆ Installation der Rückfahrkamera
Schritt 1: Kamera mit 3M Kleber befestigen
Suchen Sie einen besten Ort, reißen Sie den
3M-Kleber an der Rückfahrkamera ab und
befestigen Sie die Rückfahrkamera in der
Nähe der Autokennzeichenleuchte. (Wenn Sie
den Winkel anpassen müssen, befestigen Sie
bitte die hintere Kamerahalterung an der
hinteren Kamera und ziehen Sie sie zuerst mit
Schrauben fest.)
Schritt 2: Entfernen Sie das Panel
Entfernen Sie die Innenverkleidung Ihres
Kofferraums, um die hinteren Verkabelung-
skammern des Fahrzeugs freizulegen. Öffnen
Sie Ihren Kofferraum und suchen Sie nach
einer soliden Innenverkleidung, die die
gegenüberliegende Seite Ihres Nummern-
schild-Montagebereichs abdeckt. Führen Sie
dann ein Werkzeug zum Entfernen der
Verkleidung oder ein anderes dünnes Gerät
hinter die Verkleidung ein und hebeln Sie es ab.
Schritt 3: Schlängeln Sie das Kabel
Verwenden Sie ein Werkzeug zum Entfernen
der Verkleidung, um die Verkleidung der
Heckklappe herauszuziehen, und führen Sie
das Kabel von außerhalb des Fahrzeugs in
den Kofferraum Ihres Fahrzeugs.
Schritt 4: Schließen Sie das Netzkabel der
hinteren Kamera an das Verlängerungskabel an.
Schließen Sie das Netzkabel an das
Verlängerungskabel Ihrer Rückfahrkamera an,
nachdem Sie das Verlängerungskabel Ihrer
Rückfahrkamera gezogen haben.
DE
17
DVR
Rückfahrkamera
Kabelanordnung
Stellen Sie dies aus Sicherheitsgründen sicher, während das Auto ausgeschaltet
ist. Zuletzt stecken Sie bitte den roten positiven blanken Draht durch den positiven
Rücklichtdraht und wickeln Sie ihn dann mit einem elektrischen Klebeband ein.
Nach dem Anschließen des roten Kabels hat es die Rückwärtsunterstützungs-
funktion.
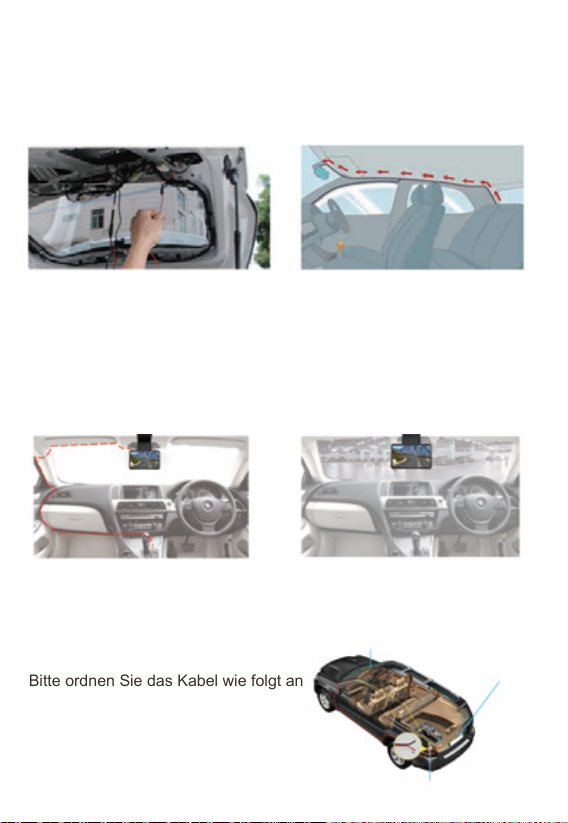
Kabelanordnung
Bitte ordnen Sie das Kabel wie folgt an
Schritt 5: Verbinden des roten Kabels mit den
Kabeln des Rückfahrscheinwerfers.
Rückfahrkabel befinden sich normalerweise auf
der Rückseite Ihres Autos, obwohl ihre
Platzierung variieren kann. Lesen Sie daher
unbedingt das Handbuch Ihres Autos.
Verwenden Sie nach dem Erkennen eine Zange
oder einen Abisolierer, um den Gummi
abzuziehen und den stromführenden Draht
freizulegen.
Schritt 6: Verlegen Sie das Netzkabel Ihrer
Rückfahrkamera zur Vorderseite des
Fahrzeugs.
Wenn Sie möchten, können Sie mit einem
Werkzeug zum Entfernen der Verkleidung
die Dachhimmelverkleidung direkt über Ihrer
Windschutzscheibe herausspringen lassen.
Führen Sie dann Ihr Kabel durch die
freiliegende Kammer.
Schritt 7: Schalten Sie die Dash-Cam mit
dem mitgelieferten Autoladegerät ein.
Laden Sie sie nicht mit Ihren eigenen
Ladegeräten auf.
Schritt 8: Testen Sie die Kamera, um
sicherzustellen, dass alles funktioniert.
DE
Verwendung der APP
18
IOS Android
①:Bitte schließen Sie das Kabel ACC B + und GND an, bevor
Sie es verwenden
②:Bitte überprüfen Sie den Anschluss sorgfältig
1. Sie können das im Lieferumfang enthaltene Autoladegerät direkt
verwenden oder die Stromversorgung übernehmen.
2. Wenn Sie die Parküberwachungsfunktion nutzen möchten, müssen
Sie ein festverdrahtetes Kit verwenden. Kaufen Sie unser festver-
drahtetes Kit bei Amazon oder kontaktieren Sie uns, um es zu erhalten.
3. Befolgen Sie für die Installation des Hardwire-Kits die Anweisungen
oder wenden Sie sich an einen professionellen Installateur.
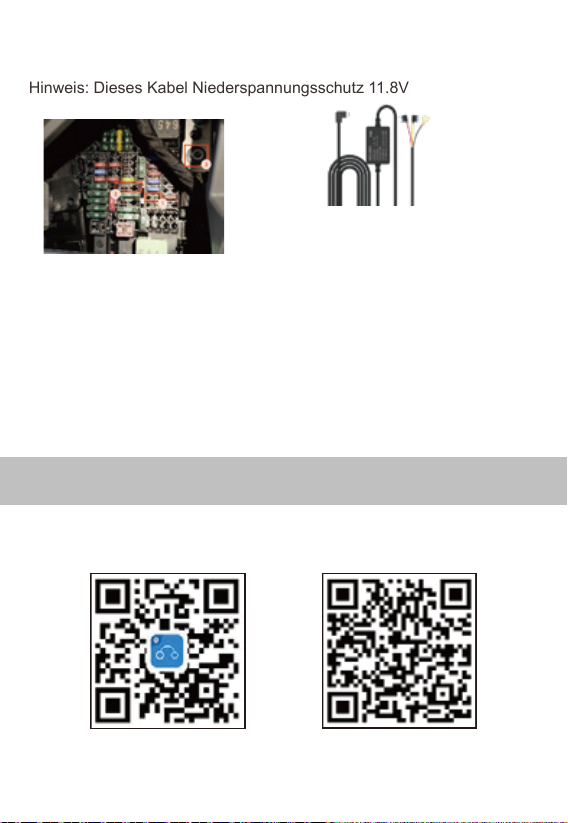
Installation des festverdrahteten Kits
Hinweis: Dieses Kabel Niederspannungsschutz 11.8V
1. Bitte scannen Sie den QR-Code, um die APP herunterzuladen
DE
Table of contents
Languages:


