Avantco F100 User manual

User Manual
www.AvantcoEquipment.com 1
Electric Countertop Fryers
Models: F100, F102
Please read and keep these instructions. Indoor use only.
06/2017
User Manual

User Manual
2 www.AvantcoEquipment.com
WARNINGS
• Unplug cord from outlet when not in use and before cleaning.
• DO NOT move or transport this fryer until fryer oil has cooled completely. Doing so can result in
severe burns.
• Do not use this unit for other than intended use.
• Do not use outdoors.
• Always cook on a firm, dry and level surface.
• High temperature will cause scalding. Do not stand over fryer when operating and do not touch any
part of machine while in operation, other than handle of basket and power controls.
• Do not use unit with a damaged cord or plug, in the event the appliance malfunctions, or has been damaged
in any manner.
• Keep children and animals away from fryer.
• Do not modify unit.
Limited Warranty
All equipment sold under the Avantco trademark and used for commercial purpose is warranted against defects in materials
and workmanship. The warranty runs for six months from the time of purchase and is for the benefit of the original purchaser
only. All other warranties, Expressed or Implied, Statutory or otherwise, including Without Limitation and any implied
warranty of Merchantability or Fitness for Purposes are excluded. The seller shall in no event be liable for direct, indirect, or
consequential damages in connection with Avantco commercial products.
This warranty is not effective if damage occurs due to accident, carelessness, improper installation, lack of proper
set-up, supervision when required, or if the equipment is installed or operated in any manner contrary to the installation
and operating instructions. Work performed by unauthorized personnel or unauthorized service agencies voids this
warranty.
This warranty does not apply to, and Avantco is not responsible for any warranty claims on products sold or used
outside of the contiguous United States. Residential use voids the warranty

User Manual
www.AvantcoEquipment.com 3
Thank you for purchasing and using Avantco's Electric Fryer. Please read this manual thoroughly before using to
understand proper use and function. Safety warnings, cleaning suggestions and electrical recommendations are given
to reduce the risk of damage or injury.
Warning!
Any Incorrect Installation, Alterations, Adjustments And/or Improper Maintenance Can Lead To Prop-
erty Loss And Injury. All Repairs Should Be Done By Authorized Professionals Only.
KEEP ALL FLAMMABLE AND COMBUSTABLE LIQUIDS AWAY FROM PRODUCT.
THIS MACHINE MUST BE PLACED ON A LEVEL SURFACE.
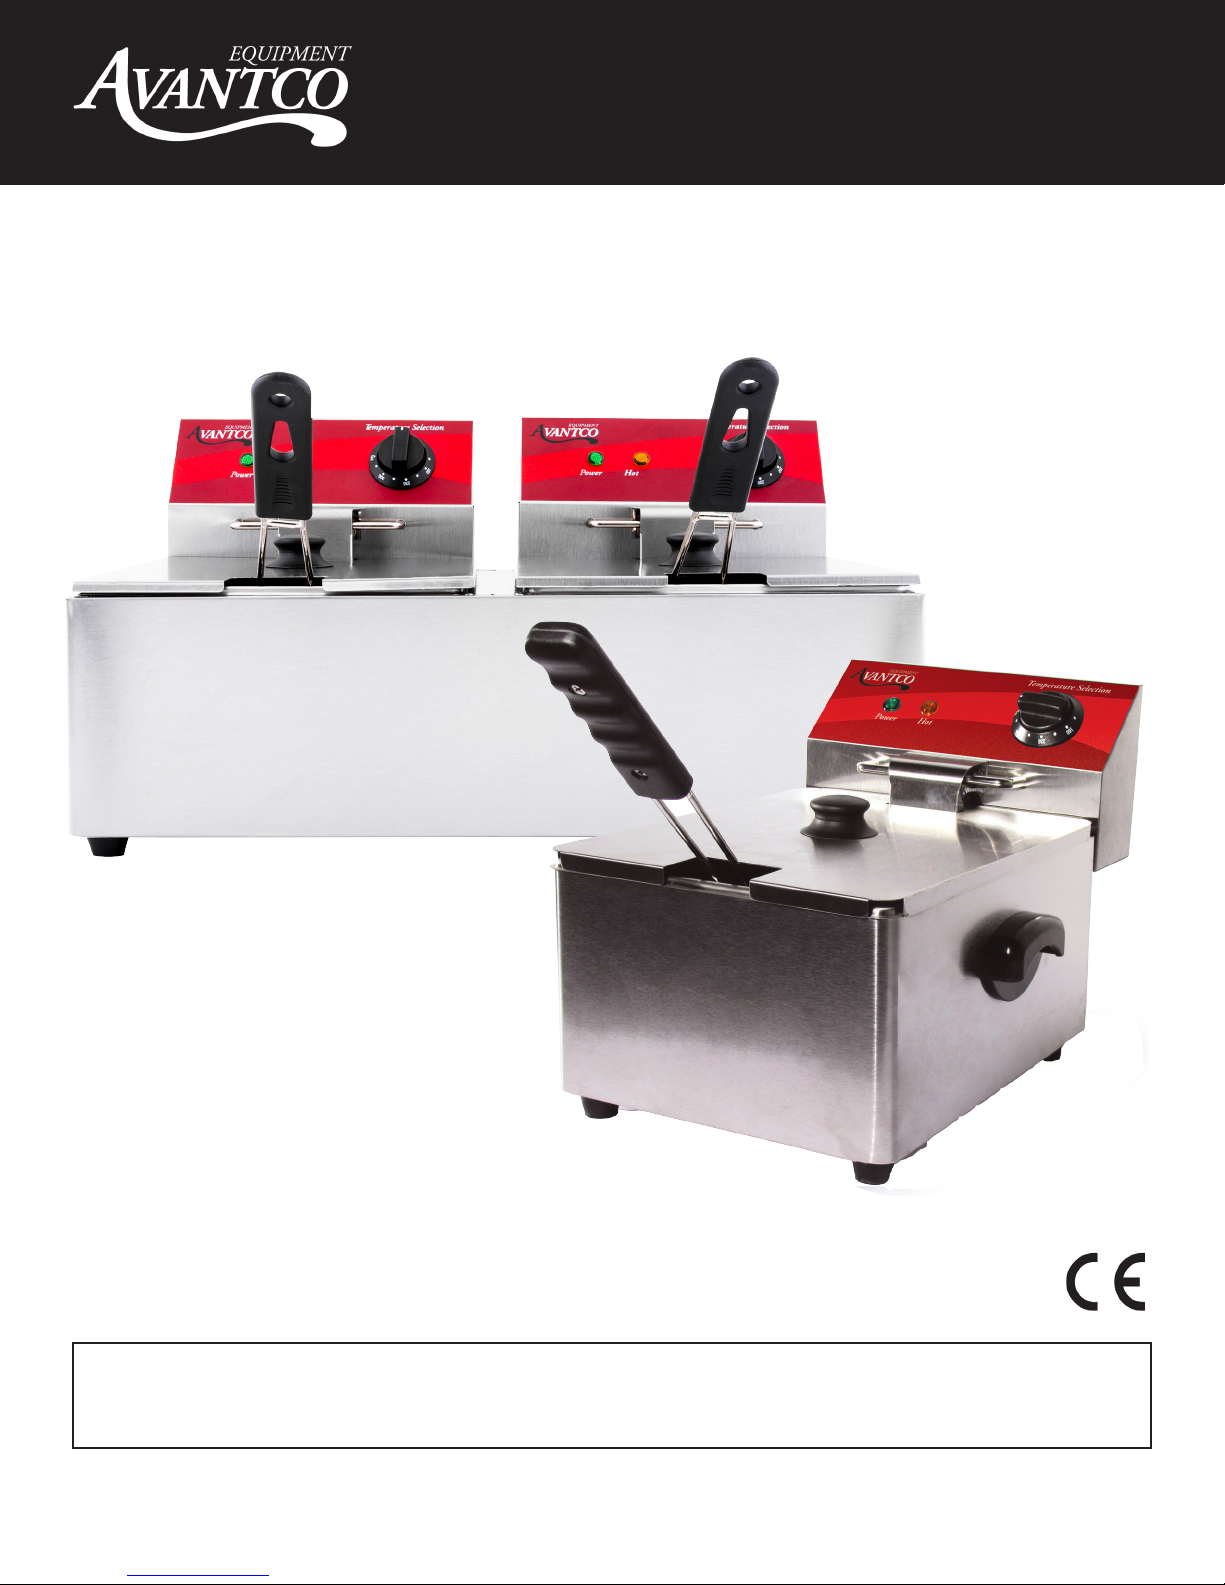
Features of the Fryer
1. The F series electric fryer is offered in 2 different models. One is a 1-tank fryer; another is a 2-tank fryer. The 2-tank
fryer can fry two different kinds of foods at the same time.
2. Oil temperature is regulated by the temperature regulator and includes a yellow (hot light) which cycles on and off to
indicate when desired temperature has been reached.
3. The automatic shut off feature will cut power when the oil has reached maximum allowable temperature. (446°F)
4. An automatic micro-switch is located at the bottom of the electrical enclosure. This will cut power from the electrical
unit if the enclosure is removed without unplugging the power cable.
5. The stainless steel tank has a removable oil insert with calibration marks for oil levels.
6. Heating coils are protected by a stainless panel base at the bottom of the unit.
Basic Information of F Series Fryers
Name Deep Fryer Single 6 Liter Deep Fryer Double 6 Liter (x2)
Model F100 F102
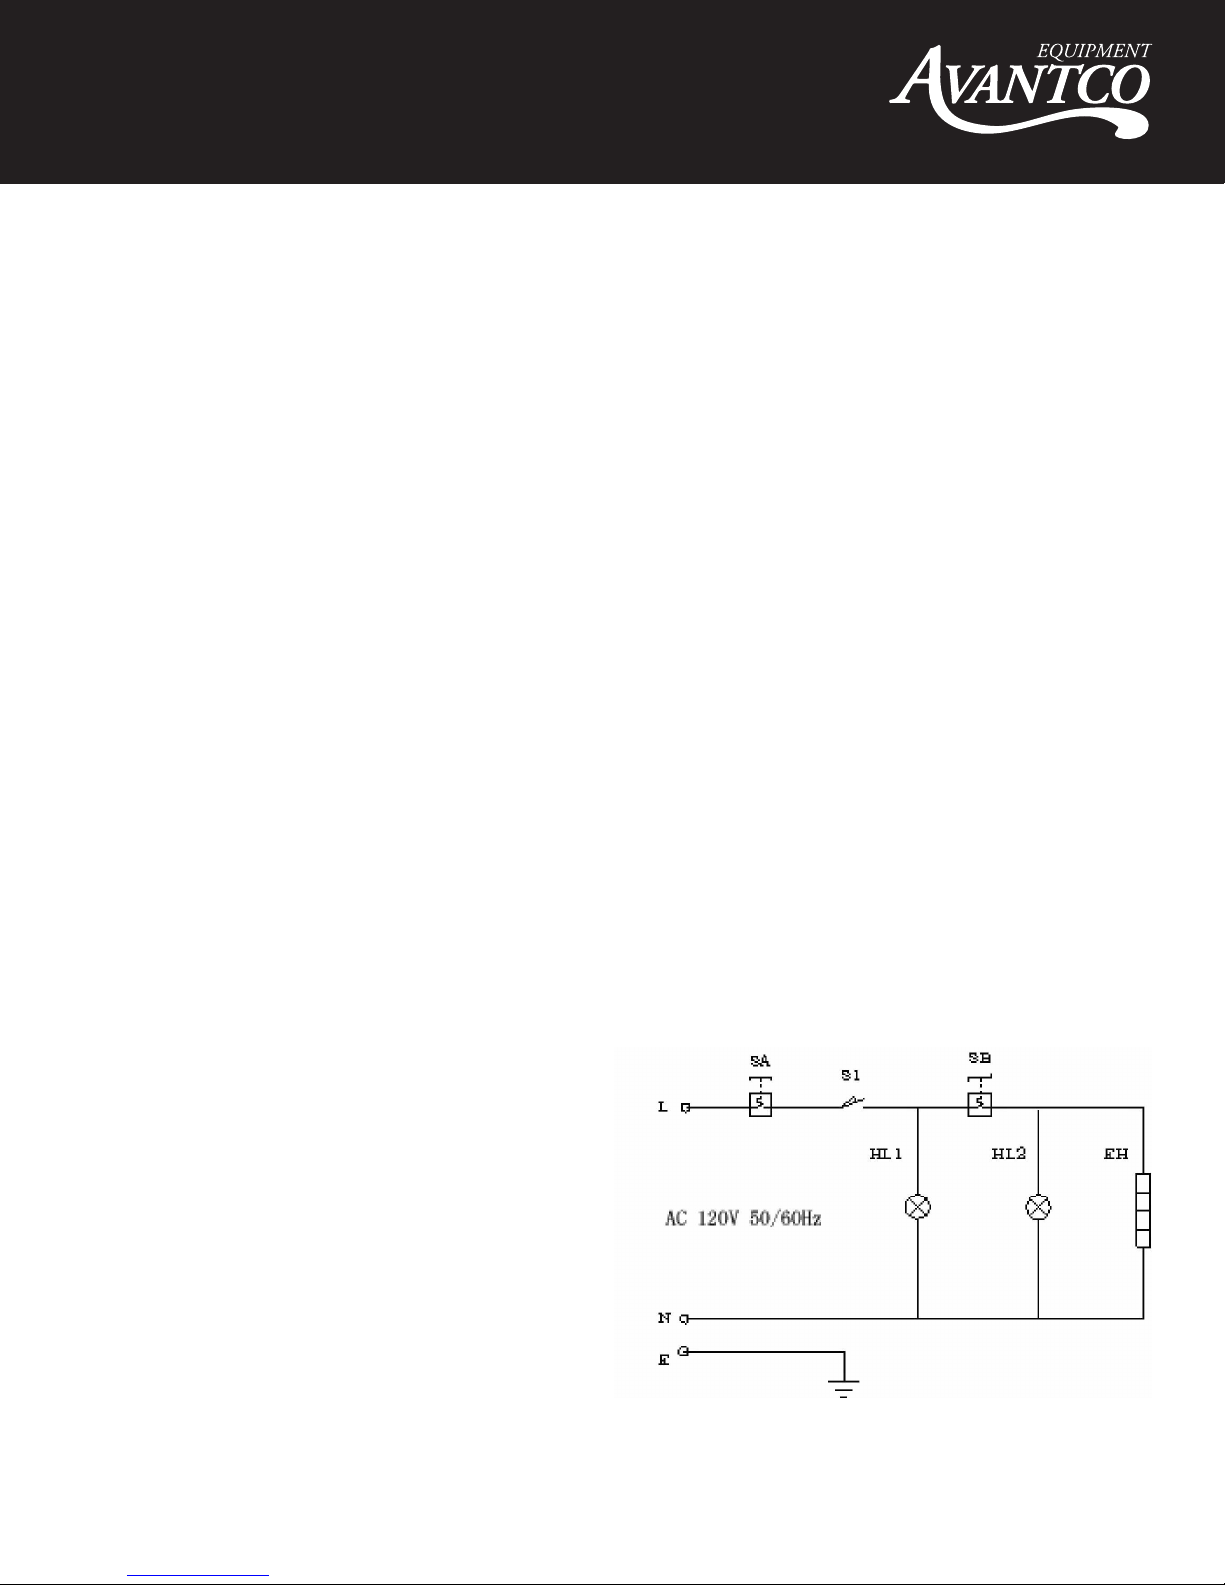
Voltage 120V 50/60Hz 120V 50/60Hz
Power 1750W 2 x 1750W
Number of oil tanks 1 2
Size of oil tanks 9 1/2" x 12" x 6" 9 1/2" x 12" x 6"
Volume 1.5 Gallon 1.5 Gallon (x2)
Number of frying baskets 1 2
Size of frying baskets 7 1/4" x 8 1/4" x 4 1/2" 7 1/4" x 8 1/4" x 4 1/2"
Cooking temperature range 120°F - 370°F 120°F - 370°F
Temperature safety cut-off 446°F 446°F
Overall Dimensions 10 1/2" x 17" x 11 1/2" 21 1/2" x 17" x 11 1/2"

User Manual
4 www.AvantcoEquipment.com
The Maximum Quantity Of Food To Be Placed In The Fryer Should Not Exceed 1.98 lbs/pot
Notes About Food:
• Volume of food should be limited to avoid oil overflowing.
• Foods that do not absorb oil easily should be limited to avoid overflowing.
• Place large foods into the fryer carefully to prevent oil overflow and spatter.
Circuit Diagram
S1 -Micro-switch
SA-Overheat switch
EH-Heater element
HL 1-Power-on indicator
HL 2-Heater-on cycling indicator
SB- Temperature regulator
E: Ground connection
Note: The circuits of the two fryers are identical. The difference is that the two tank fryer has two
separate electrical unit boxes and receptacles.
Instructions for
Fryer Usage
1. Please make sure the power supply you are using is ad-
equate for continual fryer use and voltage is adequate.
The use of a surge protector or circuit breaker is advis-
able.
2. Fill oil receptacle with vegetable oil to between the mini-
mum and maximum levels, allowing for food volume.
3. Make sure the temperature regulator knob is in the
“OFF” position before you plug the machine into an
outlet. Once you plug the machine in, a green “Power
Light” will come on. Then, rotate the temperature regulator knob clockwise to the desired temperature indicated by
the pointer. When the desired temperature has been reached, the yellow "Hot Light" will turn off and cycle, and the
temperature controller will maintain the temperature automatically.
THE MAXIMUM QUANTITY OF FOOD TO BE PLACED IN THE
FRYER SHOULD NOT EXCEED AMOUNT SHOWN
DF-6L/6L-2 1.98 lbs/pot
NOTES ABOUT FOOD:
VOLUME OF FOOD SHOULD BE LIMITED TO AVOID OIL OVERFLOWING
FOO
DS THAT DO NOT ABSORB OIL EASILY SHOULD BE LIMITED TO AVOID
OVERFLOWING
PLACE LARGE FOODS INTO THE FRYER CAREFULLY TO PREVENT OIL
OVERFLOW AND SPATTER
D. Circuit Diagram
S1 -Micro-switch
SA-Overheat switch
EH-Heater element
HL 1-Power-on indicator
HL 2-Heater-on cycling indicator
SB- Temperature regulator
E ±Ground connection
NOTE: THE CIRCUITS OF THE TWO FRYERS ARE IDENTICAL. THE
DIFFERENCE IS THAT THE TWO TANK FRYER HAS TWO SEPARATE
ELECTRICAL UNIT BOXES AND RECEPTICLES.

User Manual
www.AvantcoEquipment.com 5
4. Lift food basket up and away from machine to load food, and carefully place loaded basket into machine to avoid
splash. Gently shake off excess oil from food when removing from tank after frying.
5. The enclosed frying basket is intended to hold small foods such as French fries and onion rings. Large food can be
placed directly into the basket or oil tank.
Cleaning and Maintenance
1. After fryer usage, turn power controller counterclockwise to the “OFF” position Remove plug from power supply. Wait
for oil to cool down before removing tank from outer case. The procedure is as follows:
A. Remove protective panel bottom with large fork or tongs. Do not stick hand into oil.
B. Gently lift up electrical box unit from back of machine. Place in a safe dry place.
2. The micro-switch on the bottom of the electrical box unit will automatically cut off power in case electric plug is not
removed from power supply.
3. Lift oil tank out of outer case and carefully dispose of oil, removing any sludge.
4. Gently wash oil tank with soap and water, dry it thoroughly, and place it back into machine.
5. Always use fresh vegetable oil at every use. Never use old oil.
6. Cover the fryer tank with the night cover after the oil has cooled and the unit is not in use.
WARNINGS
This equipment must be operated by trained cooks
or professionals.
• Do not touch any hot surfaces.
• Do not immerse unit, cord or plug in liquid at any time.
Tough on grease. Tough on carbon. Tempest deep fat
fryer cleaner offers thorough elimination of encrusted
grease and grime.

User Manual
6 www.AvantcoEquipment.com
Troubleshooting
Problem Causes Solution
Indicator light will not turn on and
unit will not heat.
Plug not properly in-
serted.
Reinsert plug.
Micro-switch not closed. Adjust the limit distance of mircro-switch.
Heating indicator is not on, the
temperature is not increasing.
Electric heater tubes is
not properly connected.
Tighten both sides of electric heater.
Heater is defective. Change electric heating tube.
Power indicator is on but the desired
temperature is not reached.
Temperature controller is
burned out.
Change temperature.
Temperature control is normal but
indicator is not on.
Indicator light is burned
out.
Change indicator.
Temperature indicator is on, but
heater tube is not hot.
Temperature limiter has
tripped.
Reset over heating protecting button by hand on
bottom of electrical box.
Temperature can not be controlled. Temperature limiter is out
of order.
Change temperature limiter.
Troubles listed are for reference. If any fault occurs, please discontinue use. Do not attempt to repair
yourself. This will void the warranty.
Transportation and Storage
During transportation, the machine should be careful handled by using the handles at the sides of the unit. The pack-
aged machine should not be stored in the open. It should be put in a ventilated warehouse without corrosive atmo-
sphere and placed right side up.
Daily Check
Before Using
• Make sure machine is on level surface.
• Check to see if power cord is frayed or damaged.
During Use
• Check control panel for damage.
• Check for any electrical smells.
• Check for any strange sounds coming out of machine
• Watch for oil spattering.

User Manual
www.AvantcoEquipment.com 7
Parts List
Parts Diagram # Part Name Replacement Part #
1 Oil Pan 177FPAN
2 Bottom Grate 177FGRATE
3 Fryer Base
4 Fryer Basket with Front Hook 177FBASKET
5 Night Cover 177FCOVER
6 Thermostat 177FTHERM
7 Temperature Knob 177FKNOB
Parts Diagram # Part Name Replacement Part #
8 Green "Power" Light 177PLIGHTGRN
9 Orange "Hot" Light 177PLIGHTORG
10 Temperature Limiter 177FTEMPLIM
11 Microswitch
12 Heating Element 177FELEMENT
13 Power Cord 177FCORD
14 Power Cord Bushing
Parts Diagram
This manual suits for next models
1
Table of contents
Other Avantco Fryer manuals