Avanti 5-Stage ZeroWate User manual

USE AND CARE 1
OWNER’S MANUAL FILTER BOTTLE FOR STANDARD COOLERS
MEASURE AND
TASTE THE
DIFFERENCE!
000

2 USE AND CARE
000
MEASURE AND
TASTE THE
DIFFERENCE!
Bottled
1 2 4
Conventional Filtered
Tap
210
ZeroWater
000
07 6
124
2 1 0
Sample readings may vary. Test for yourself.
“000” =
FDA Standard for TDS
in Puried Water*

USE AND CARE 1
Congratulations on your purchase
of a new ZeroWater®Filter Bottle!
Be prepared to taste the BEST tasting water like never before – we guarantee it!
Your 5-Stage ZeroWater® lters are guaranteed to remove virtually all dissolved
solids from your tap water. To nd out more about Zero Technologies, please visit
www.zerowater.com.
Included in this brochure are simple instructions to help you assemble and maintain
your ZeroWater®Filter Bottle. Now you’ll be able to start converting your own tap
water into ZeroWater®!
IMPORTANT!
Should you experience any diculties with water lters, before returning the
product to the store, please call Customer Service toll free 24 hours a day, 7 days a
week at 1-800-503-2939. Most issues can be resolved with a short phone call to our
trained professionals.
SAFETY PRECAUTIONS
Do not use with water that is microbiologically unsafe or of unknown quality without
proper disinfection before or after the system. Individuals requiring water of specic
microbiological purity should consult their physician. Unless notied otherwise,
municipal water is potable. The contaminants or other substances removed or
reduced by this water treatment device are not necessarily in your water.
PROPER INSTALLATION
Please read all instructions, specications, and precautions before installing and
using your water ltration system.
*Filteredpotabletapwatertestedbyanindependentlab(nottheFDA)tomeetspecicallythewaterqualityrequirements
for using the label“puried”. Compared to water produced by leading gravity fed lters.
Don’t forget to register your ZeroWater®Filter Bottle.
Details are included on the enclosed Registration Card.
www.avantiproducts.com

2 USE AND CARE
IMPORTANT!
Please read before rst use.
If you are using a water cooler with this product, please read this! Our ZeroWater®
Filter Bottle ts most standard water coolers AFTER the splash guard is removed!
If the splash guard is not removed, the oat valve on the ZeroWater®Filter Bottle
will not work and will cause your water to spill!
DIRECTIONS FOR REMOVING THE SPLASH GUARD
If you look into the reservoir you’ll see the splash guard with a spike, used to pierce
a hole in the cap of bulk water containers. Grip the splash guard, turn it counter
clockwise and pull up on it. This should remove the splash guard from the water
cooler. If you have further questions about this process with your particular model,
you may need to refer to your user’s manual. If you still need assistance, please call
our Customer Service number.
Patents: 5,635,063; 6,572,769; 7,276,161; 7,413,663; Additional patents pending.

USE AND CARE 3
Patents: 5,635,063; 6,572,769; 7,276,161; 7,413,663; Additional patents pending.
RECYCLING
Filtering your water through ZeroWater®lters not only improves the taste of your
tap water, it also prevents you from throwing plastic water bottles into the trash and
clogging up landlls. Zero Technologies, LLC is proud to be the only major company
that recycles gravity lter cartridges from U.S. customers.
If you wish to participate in this program, you will need to do a few simple steps
to be sure the lters returned are processed accurately for recycling.
Visit www.zerowater.com/recycling to download a form. Place your used lter into
a sealable plastic bag and be sure it is sealed tightly. Place your used lters and your
completed form in a well packed box and mail to the following address:
Zero Technologies, LLC
4510 Adams Circle
Unit F
Bensalem, PA 19020
Make sure to clearly mark your package
“ATTN: RECYCLING PROGRAM”.
When the lter reaches us, the plastic as well as the materials inside it will be
separated and sent to various facilities for reuse. We are asking customers to pay
for shipping their exhausted lters to us. Additional information on this program,
including discounts on future purchases, can be found at www.zerowater.com/
recycling.
If you have any questions about this program, please call the ZeroWater®
customer service hotline 24 hours a day: 1-800-503-2939

4 USE AND CARE
LID
UPPER CHAMBER
FILTER CARTRIDGE
LOWER CHAMBER
FLOAT VALVE WITH
SOFT WASHER
LOWER CHAMBER
DIVIDER RIM
MAXIMUM
WATER LEVEL
FILTER O-RING

USE AND CARE 5
ZeroWater®Filter Bottle
Use and Care Instructions
Please read before rst use.
INSTRUCTIONS BEFORE INSTALLING CARTRIDGE
AND FIRST USE
1. Clean all plastic components and lter cartridges by washing and rinsing
thoroughlywithwarmwateronly.RinsetheFilterBottlethoroughlywhenwashing
with soap.
2. Note: the Filter Bottle components, lter cartridges and TDS meter are not
dishwasher safe.
3. Discard all plastic bags. This may be a suocation hazard to young children.
ASSEMBLY
1. Takethe lower chamberand placethe lower chamberdivider
rim rmly on the top.The rippled part of the white rim should
be overlapping the lower chamber. If assembled upside
down, there will be leakage. Be sure it ts tightly on the
lower chamber (see ZeroWater®Filter Bottle components
on page 4).
2. Screw oat valve tightly into hole on bottom of lower
chamber (inset A). Do not prop the Filter Bottle on the oat
valve once assembled, as it is fragile and will break.
3. Place the lower chamber on top of your cooler with the
oat valve tting inside the cooler’s reservoir (see Using
Your ZeroWater®Filter Bottle with a Standard Water Cooler
on page 6).
4. Install lter cartridges now, using steps 1 and 2 from
instructions on next page.
5. Place the upper chamber on top of the lower chamber. Be
sure that the lower chamber divider ring is tightly axed
around the lower chamber (see ZeroWater®Filter Bottle
components on page 4).
A

6 USE AND CARE
INSTALLATION OF FILTER CARTRIDGES
1. Remove lter cartridges from packaging.
2. Tightly screw cartridge into hole on bottom side of reservoir to obtain a complete
seal with the o-ring, otherwise your water will not read “000”(see ZeroWater®
Filter Bottle components on page 4).
3. Place upper chamber with attached lter cartridges back onto the lower chamber
divider rim of the lower chamber (see ZeroWater®Filter Bottle components on
page 4).
If new lters are exposed to cold temperatures for prolonged periods, keep lters at
room temperature for several hours before passing water through the rst time.
USING YOUR FILTER BOTTLE WITH A STANDARD
WATER COOLER sold separately
1. Unplug your cooler.
2. Drain all water from the cooler using the spigots and the drain plug in the back
of the cooler. Using a cooler without water in it, when plugged in, can cause it
to smoke and break. Make sure you secure the drain plug when you are nished
draining the cooler.
3. Be sure you have removed the splashguard from the cooler reservoir. Refer to
page (2) for directions.
4. Cleanthereservoirandspigotsbymixing1tablespoonofbakingsodainto1gallon
of hot water and pouring the solution directly into the cooler reservoir.
5. Letsolutionsitforabout30minutesandthendrainthroughspigotsanddrainplug.
6. Flush the cooler with three gallons of plain hot water using same method. Secure
the drain plug. The total capacity of the bottom chamber is three gallons.
7. Do not replace the splashguard or spike xture.
8. Now your cooler is ready for your assembled ZeroWater®Filter Bottle. Add water
before plugging cooler back into electrical outlet (See step 6 under section“Filling
the ZeroWater®Filter Bottle with Tap Water on page 7) .”

USE AND CARE 7
FILLING THE FILTER BOTTLE WITH TAP WATER
1. Remove lid.
2. Slowly ll the upper reservoir with cold tap water. Be careful not to dump water
too quickly into the upper chamber when the lower chamber is empty because
it may tip and spill.
3. Allow water to pass from the upper chamber through the lters to the lower
chamber. Water will be ready to drink in several minutes.
4. Test the water using the TDS meter to conrm a “000” reading.
5. If it doesn’t read “000”, ush the water out and pour new water through.
6. Do not over ll. The rst time you ll your Filter Bottle it will take extra water to ll
the cooler reservoir. When water in the lower chamber reaches the divider rim do
not put any more water in the upper chamber, as it may leak. The upper chamber
is not designed to be a long term reservoir.
Safety Precautions: Do not use with water that is microbiologically unsafe or of
unknownqualitywithoutproperdisinfectionbeforeorafterthesystem.Individuals
requiring water of specic microbiological purity should consult their physician.
Unless notied otherwise, municipal water is potable.

1
2
3
4
5
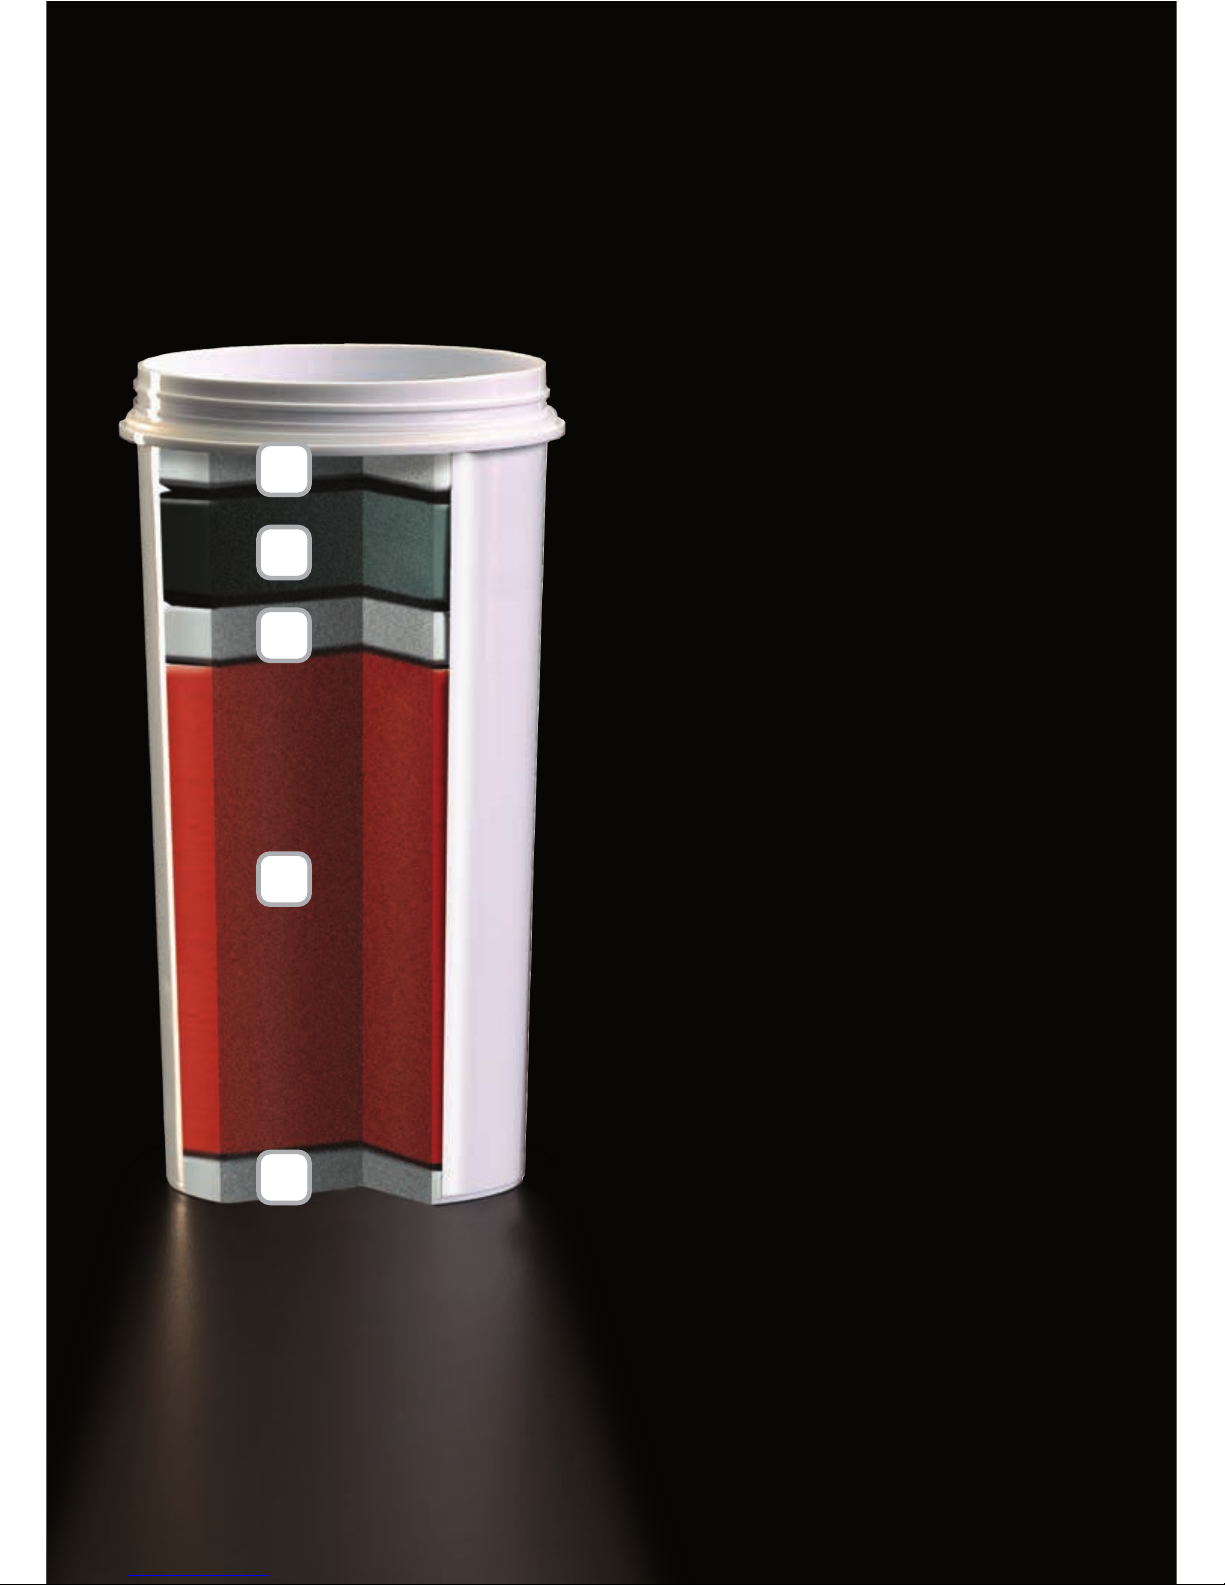
Most conventional carbon lters only lter
certain substances from your water. ZeroWater®
5-Stage Filters remove 99.6% of total dissolved
solids based on an EPA certied lab test, while
conventional 2-Stage Filter remove less than
50%.
STAGE 1
Activated carbon infused micron cloth
STAGE 2
Multi-layer system using activated
carbon and oxidation reduction alloy
STAGE 3
Distributor that maximizes contact time
STAGE 4
Comprehensive ION EXCHANGE array
STAGE 5
Non-woven membrane to remove
ne particles
It is essential to change the lters with
a reading of“006” on the included
TDS meter in order for the product to
continue to perform as represented. The
longevity of the lter may vary based on
local water conditions. Under laboratory
protocols, a single lter was rated for
22.5 gallons in the certication process.
The contaminants or other substances
removed or reduced by this water
treatment device are not necessarily in
all users’ water.
Patented Ion Exchange Filter
* Filtered potable tap water tested by an
independent lab (not the FDA) to meet
specically the water quality requirements
for using the label“puried”. Compared to
waterproducedby leadinggravityfedlters.

USE AND CARE 9
Filter Cartridges
FILTER CARTRIDGE LIFE
How often the cartridge needs to be replaced is determined by how much water you
put through the system and how hard the cartridge has to work to clean the water
you put through it. The more dissolved solids in your water (or the higher your TDS
reading), the shorter the cartridge life. It is essential to change the lters with a
reading of“006” on the included TDS meter in order for the product to continue to
perform as represented. The longevity of the lter may vary based on local water
conditions.Underlaboratory protocols,a singlelterwasratedfor22.5 gallonsinthe
certication process. Store lters at or near room temperature.
REPLACEMENT FILTER CARTRIDGES
Replacement lter cartridges can be purchased in packs of 2, 4 or 8 from your local
retailer. For replacement parts and pricing, call Customer Service toll free 24 hours a
day, 7 days a week at 1-800-503-2939.
TROUBLE SHOOTING
My ZeroWater®Filter Bottle is brand new
but the water doesn’t read “000”?
First, check the reading directly in the lower
chamber. If the water in the lower chamber
does NOT read “000”, either the lower
chamber is not clean, or the lters are not
functioning properly. Try cleaning the lower
chamber and check to see that lters are
installed properly. If the water in the lower
chamber DOES read“000”, your Filter Bottle
is functioning properly and the problem is
an unclean cooler reservoir or spigot. Try
cleaningthecoolerreservoirandspigot again.
The TDS Meter does not turn on.
Remember that you should not dip the meter
too far into the water as it will short circuit.
If you have used the meter according to
instructions, try replacing the batteries.
My lter emits a strong odor.
Test the water that has run through the lter.
Most likely it will read higher than “006”,
which indicates it’s time to replace your lter.
The lower chamber lls slowly.
It takes time to give you high quality water.
We regulate the ow to ensure the water has
enough time to pass through each ltering
stage and be cleaned thoroughly.
My cooler is leaking from the lower chamber
divider rim.
Be sure the lower chamber divider rim is
placed with the correct side up and is seated
tightly to ensure the best seal possible. Do not
overllupperchamberbeyondthecapacityof
the lower chamber. The upper chamber is not
designed to be a long-term reservoir.
Questions or Problems?
Please call our Customer Service Hotline
1-855-634-1282

10 USE AND CARE
Operating the TDS Meter
ALWAYS CHANGE FILTER CARTRIDGE
WHEN TDS METER READS “006”
1. Remove the cap from the end of the
TDS Meter.
2. Push the“ON/OFF” button. The meter
should read “000”.
3. Place the end of the meter in one inch
of water. Do not fully submerge the
TDS Meter; this may short circuit the
battery.
4. Wait a few seconds for the reading
to stabilize. You can read the number
when you remove the meter from the
water.
5. Do not use in hot water.
CHANGING THE TDS METER BATTERIES two 1.5v button cell
1. Use a ngernail to remove the cap at the end that says“TDS”.
2. Replace the old batteries with two new batteries (Battery Type LR44).
3. Replace the cap.
UNDERSTANDING THE TDS METER
The TDS meter helps you put a number on what your taste buds are already telling
you about what’s in your water. It measures for the things in water that can give it
a taste. The higher the reading on the water, the more substances dissolved in your
water.
For a more scientic explanation, it is showing you the total number of detectable
dissolved solids in water. With the push of a button, the electrodes in the bottom
of the tester measure the amount of ions in the water and convert that amount
to a number that displays on the screen. The number represents the amounts of
detectable dissolved solids in parts per million that exist in your water sample.
The meter is primarily used to indicate ZeroWater®lter replacement at 006. It
may also be used as a simple method to compare water quality by displaying
the Total of the Dissolved Solids (TDS) in parts per million only. The meter does
not specify what substances comprise the Total. The meter should not be used
to assess the safety or purity of water, which should only be undertaken by a
qualied laboratory.
ON /OF F
BATTERY
COMPARTMENT
ON/OFF
MAXIMUM
IMMERSION
LEVEL

WARRANTY/REGISTRATION 11
REPLACEMENT FILTER CARTRIDGE WARRANTY
Though replacement lter cartridges do have a 30 day warranty for manufacturing defects,
there is no money back guarantee otherwise. To place a claim for a defective cartridge, you
must rst speak to a customer service representative who will help you trouble shoot any
problems. If a problem is found that may be due to a manufacturing defect, they will then
give you instructions on how to send back the cartridges to be tested by our laboratory.
Depending on whether or not the lab determines the cartridges to be defective, they will
either be replaced or returned to you. Please remember that we do not and cannot warrant
the life of the lter cartridges since there are many variables that aect the life of each
cartridge, including weather, your local treatment facility, consumption rate, etc. We can only
provide estimates based on the experiences of other customers. A shortened cartridge life
alone does not necessarily mean that you have a defective cartridge.

12 USE AND CARE
000
MIDA Y
PRUEBE LA
DIFERENCIA!
Bottled
1 2 4
Conventional Filtered
Tap
210
ZeroWater
000
07 6
124
2 1 0
* Los resultados pueden variar. Pruebe ud. mismo
USO Y CUIDADO 13
“000” =
Estándar del FDA
(Food and Drug Administration)
para TDS (Total de Sólidos Disueltos)
en Agua Puricada*

USE AND CARE 13
¡Felicitaciones por su compra de un nuevo
Botellón con Filtro Zerowater®!
Prepárese para probar el agua con el mejor sabor, como nunca antes lo ha hecho
- se lo garantizamos!
Su sistema de ltro ZeroWater® en 5 etapas está garantizado para remover
virtualmente todos los sólidos disueltos en su agua de grifo. Para averiguar más
sobre Zero Technologies, por favor visite www.zerowater.com
Incluídas con este folleto encontrará unas simples instrucciones para ayudarle
a ensamblar y mantener su Botellón con Filtro ZeroWater®. ¡Ahora ud. podrá
convertir su propia agua de grifo en agua ZeroWater®!
¡IMPORTANTE!
Si encontrara cualquier problema o dicultad con sus ltros de agua, antes
de devolver el producto a la tienda, por favor llame a nuestra línea gratuíta
de Servicio al Cliente, 24 horas al día y 7 días de la semana, al número
1-800-503-2939. La mayoría de los problemas se pueden corregir a través de una
corta llamada telefónica a nuestros profesionales capacitados.
PRECAUCIONES DE SEGURIDAD
Use sólo con agua potable. No use con agua contaminada, microbiológicamente
peligrosa o de procedencia incierta; en ese caso debe desinfectar la unidad antes y
después de usar. Individuos que requieran agua puricada con niveles especícos
de pureza deberán consultar con su doctor. A no ser que su Municipalidad
indique lo contrario, el agua de grifo es potable*. Los contaminantes u otras
substancias removidas del agua o reducidas a través de este aparato de
tratamiento de agua, no necesariamente se encuentran en el agua de su localidad.
INSTALACION CORRECTA
Antes de instalar y usar su Sistema de Filtración de Agua, por favor lea todas las
instrucciones, especicaciones y precauciones en este manual.
*Resultados basados en agua de grifo ltrada y comprobados por un laboratorio independiente (no el FDA -
Food and Drug Administration) para vericar que se cumplen especícamente los requisitos de calidad del agua
necesarios para ser clasicada “Puricada”. Resultados comparados contra ltros que funcionan con gravedad.
No se olvide de registrar su Botellón con Filtro ZeroWater®.
Puede encontrar los detalles en la Tarjeta de Registro que viene incluída.
www.avantiproducts.com
USO Y CUIDADO 13

14 USE AND CARE
¡IMPORTANTE!
Por favor lea antes del primer uso.
¡ Si ud. está usando un Dispensador de Agua con este producto, por favor lea esta
parte! Nuestro Botellón con Filtro ZeroWater® se puede usar con la mayoría de
Dispensadores de Agua estándar. Solamente asegúrese de PRIMERO retirar el
protector contra salpicaduras (Splash Guard) del dispensador de agua y DESPUES
instale el Botellón rellenable. De no retirar el protector contra salpicaduras,
entonces la válvula de ote del Botellón con Filtro ZeroWater® no trabajará
correctamente y además causará que el agua de la botella se derrame fuera del
dispensador.
DIRECCIONES PARA REMOVER EL PROTECTOR CONTRA SALPICADURAS
Si observa el depósito de agua del Dispensador, notará que el protector contra
salpicaduras tiene una púa, la cual se usa para perforar un pequeño agujero en
los botellones grandes de agua. Agarre el protector contra salpicaduras, gírelo
en sentido anti-horario y hale rmemente. Esto permitirá que retire el protector
contra salpicaduras del dispensador de agua. Si tuviera preguntas adicionales
sobre este proceso, por favor lea el manual de instrucciones de su dispensador de
agua. Si después de leerlo necesitara más información o ayuda, por favor llame a
nuestro Centro de Servicio al Cliente.
Patentes: 5,635,063; 6,572,769; 7,276,161; 7,413,663; Patentes adicionales pendientes.
USO Y CUIDADO 14 USO Y CUIDADO 15

USE AND CARE 15
Patentes: 5,635,063; 6,572,769; 7,276,161; 7,413,663; Patentes adicionales pendientes.
RECICLANDO
Al ltrar el agua con los ltros de ZeroWater® no solamente mejora el sabor
del agua del grifo, sino que también evita el desperdicio que representa tirar
las botellas de plástico a la basura y que luego llenan el vertedero de basura
municipal. Zero Technologies, LLC tiene el orgullo de ser la compañía más grande
que recicla los cartuchos de los ltros de gravedad de los usuarios en EEUU.
Si ud. desea participar en este programa, solamente deberá seguir unos simples
pasos para asegurar que los ltros devueltos sean procesados correctamente para
reciclaje. Visite www.zerowater.com/recycling para obtener un formulario. Coloque
el ltro usado dentro de una bolsa plástica con cierre y asegúrese de cerrarla
completa y herméticamente. Coloque los ltros usados y el formulario en una caja
bien empacada y luego envíelos a la siguiente dirección:
Zero Technologies, LLC
4510 Adams Circle
Unit F
Bensalem, PA 19020
Asegúrese de marcar su paquete de esta manera:
“ATTN: RECYCLING PROGRAM”.
Cuando recibamos el ltro, tanto el plástico como los materiales incluídos serán
separados y enviados a diferentes instalaciones. Pedimos a nuestros clientes
que por favor paguen el envío de sus ltros usados. Para obtener información
adicional sobre este programa, incluyendo descuentos para compras futuras, por
favor visite www.zerowater.com/recycling .
Si tuviera preguntas adicionales sobre este programa, por favor llame a la Línea
Directa de Servicio al Cliente de ZeroWater® las 24 horas del día: 1-800-503-2939
USO Y CUIDADO 15

16 USE AND CARE
TAPA
CAMARA SUPERIOR
CARTUCHO DEL FILTRO
CAMARA INFERIOR
VALVULA DE FLOTE CON
ARANDELA SUAVE
BORDE DIVISOR DE LA
CAMARA INFERIOR
NIVEL MAXIMO
DE AGUA
SELLO DEL FILTRO
USO Y CUIDADO 17

USE AND CARE 17
Botellón con Filtro ZeroWater®
Instrucciones de Uso y Cuidado
Por favor lea antes del primer uso.
INSTRUCCIONES DE USO ANTES DE INSTALAR EL FILTRO
Y PRIMER USO
1. Limpie todos los componentes plásticos y cartuchos del ltro, lavándolos y
enjuagándolos completamente con agua tibia solamente. Enjuague el botellón
completamente si lo lava con jabón.
2. Nota: los componentes del botellón, ltros, cartuchos del ltro y medidor TDS
no se deben lavar en máquina lava-platos.
3. Deshágase de todas las bolsas plásticas. Estas representan un peligro de asxia
para niños pequeños.
ENSAMBLAJE
1. Tome la Cámara inferior; encima de ella coloque
rmemente el Borde Divisor. La parte ondulada del borde
blanco debe encajar y quedar sobre la Cámara inferior. Si
lo ensambla de cabeza, entonces causará que el agua de la
botella se derrame hacia afuera. Por tanto, asegúrese que el
borde encaje fuerte y correctamente con la Cámara inferior
(vea los componentes del Botellón con Filtro ZeroWater® en
la página 16).
2. Enrosque rmemente la Válvula de Flote en el agujero
al fondo de la Cámara Inferior (recuadro A). No fuerce el
Botellón y la Válvula de Flote, ya que es frágil y se puede
dañar.
3. Coloque la Cámara Inferior sobre el Dispensador de
Agua, asegurándose que la Válvula de Flote quede dentro
del depósito de agua (vea Usando su Botellón con Filtro
ZeroWater® con Dispensador de Agua Estándar, en la página
18).
4. Ahora instale los cartuchos del ltro, siguiendo los pasos 1
y 2 de las instrucciones en la página siguiente.
5. Coloque la Cámara Superior encima de la Cámara Inferior.
Asegúrese que el Borde Divisor esté rmemente asegurado
en la Cámara Inferior (vea los componentes del Botellón con
Filtro ZeroWater® en la página 16 ).
A
USO Y CUIDADO 17

18 USE AND CARE
INSTALACION DE LOS CARTUCHOS DEL FILTRO
1. Retire del paquete los cartuchos del ltro.
2. Enrosque rmemente los cartuchos en el agujero en el fondo del depósito para
que se selle completamente con el “sello u O-RING”, de otra manera el agua no
podrá leer “000”.
3. Coloque la Cámara Superior con los cartuchos del ltro ya incorporados
y encájela con la Cámera Inferior y el Borde Divisor (Vea Botellón con Filtro
ZeroWater® en la página 16).
Si los ltros nuevos están expuestos a temperaturas frías por un período de
tiempo prolongado, antes de instalarlos deja que los ltros lleguen a temperatura
ambiente unas cuantas horas antes de pasar el agua por primera vez.
USANDO SU BOTELLON DE AGUA CON UN DISPENSADOR
DE AGUA VENDIDO POR SEPARADO.
1. Desenchufe el Dispensador de Agua
2. Drene toda el agua que queda en el Dispensador usando sus grifos y sacando el
remanente destapando el desagüe. No use el dispensador cuando no tiene agua;
si está enchufado y lo usa, puede causar humo y que se malogre. Asegúrese de
volver a taponear el desagüe cuando termine de drenar el dispensador.
3. Asegúrese de retirar el protector contra salpicaduras del depósito de agua del
dispensador. Favor revise la página 14 para las instrucciones.
4. Limpie el depósito de agua y los grifos con una solución de 1 Cucharada
de polvo de hornear mezclado en 1 galón de agua caliente. Vierta la mezcla
directamente en el depósito de agua del dispensador.
5. Espere unos 30 minutos para que la solución actúe y luego drene el
dispensador usando sus grifos y sacando el remanente de agua destapando el
desagüe.
6. Vierta 3 galones de agua caliente usando el mismo método, para enjuagar el
depósito y dispensador. Vuelva a taponear el desagüe. La capacidad de la
Cámara Inferior es de 3 galones.
7. No vuelva colocar el protector contra salpicaduras ni la púa.
8. Ahora su Dispensador está listo para su Botellón con Filtro ZeroWater®. Añada
el agua antes de volver a enchufar el dispensador a la toma eléctrica (vea el
paso # 6 - Llenando su Botellón con Filtro ZeroWater® con agua de grifo en la
página 19.
USO Y CUIDADO 18 USO Y CUIDADO 19
This manual suits for next models
1
Table of contents
Languages:
Other Avanti Water Filtration System manuals
Popular Water Filtration System manuals by other brands

BSVILLAGE
BSVILLAGE Azuro 2m3/h Installation, assembly and operation manual

Kemper
Kemper MiniFill Safe Change Filter Assembly instruction

Filtreco
Filtreco Drum 100 user manual

resideo
resideo Braukmann MiniPlus FF06-AA installation instructions

Watts
Watts IS-OR-NH installation instructions

THERMEx
THERMEx Water filter Installation and user instructions