Avermedia DarkCrysta C874 User manual

English
Deutsch
Français
Italiano
Español
Português
Quick Guide
AVerMedia DarkCrystal
HD Capture Station
C874

European Community Compliance Statement
Class B
This product is herewith confirmed to comply with the requirements set
out in the Council Directives on the Approximation of the laws of the
Member States relating to Electromagnetic Compatibility Directive
2004/108/EC.
Safety- Low Voltage Directive 2006/95/EC
ErP Directive- 2009/125/EC
Disclaimer
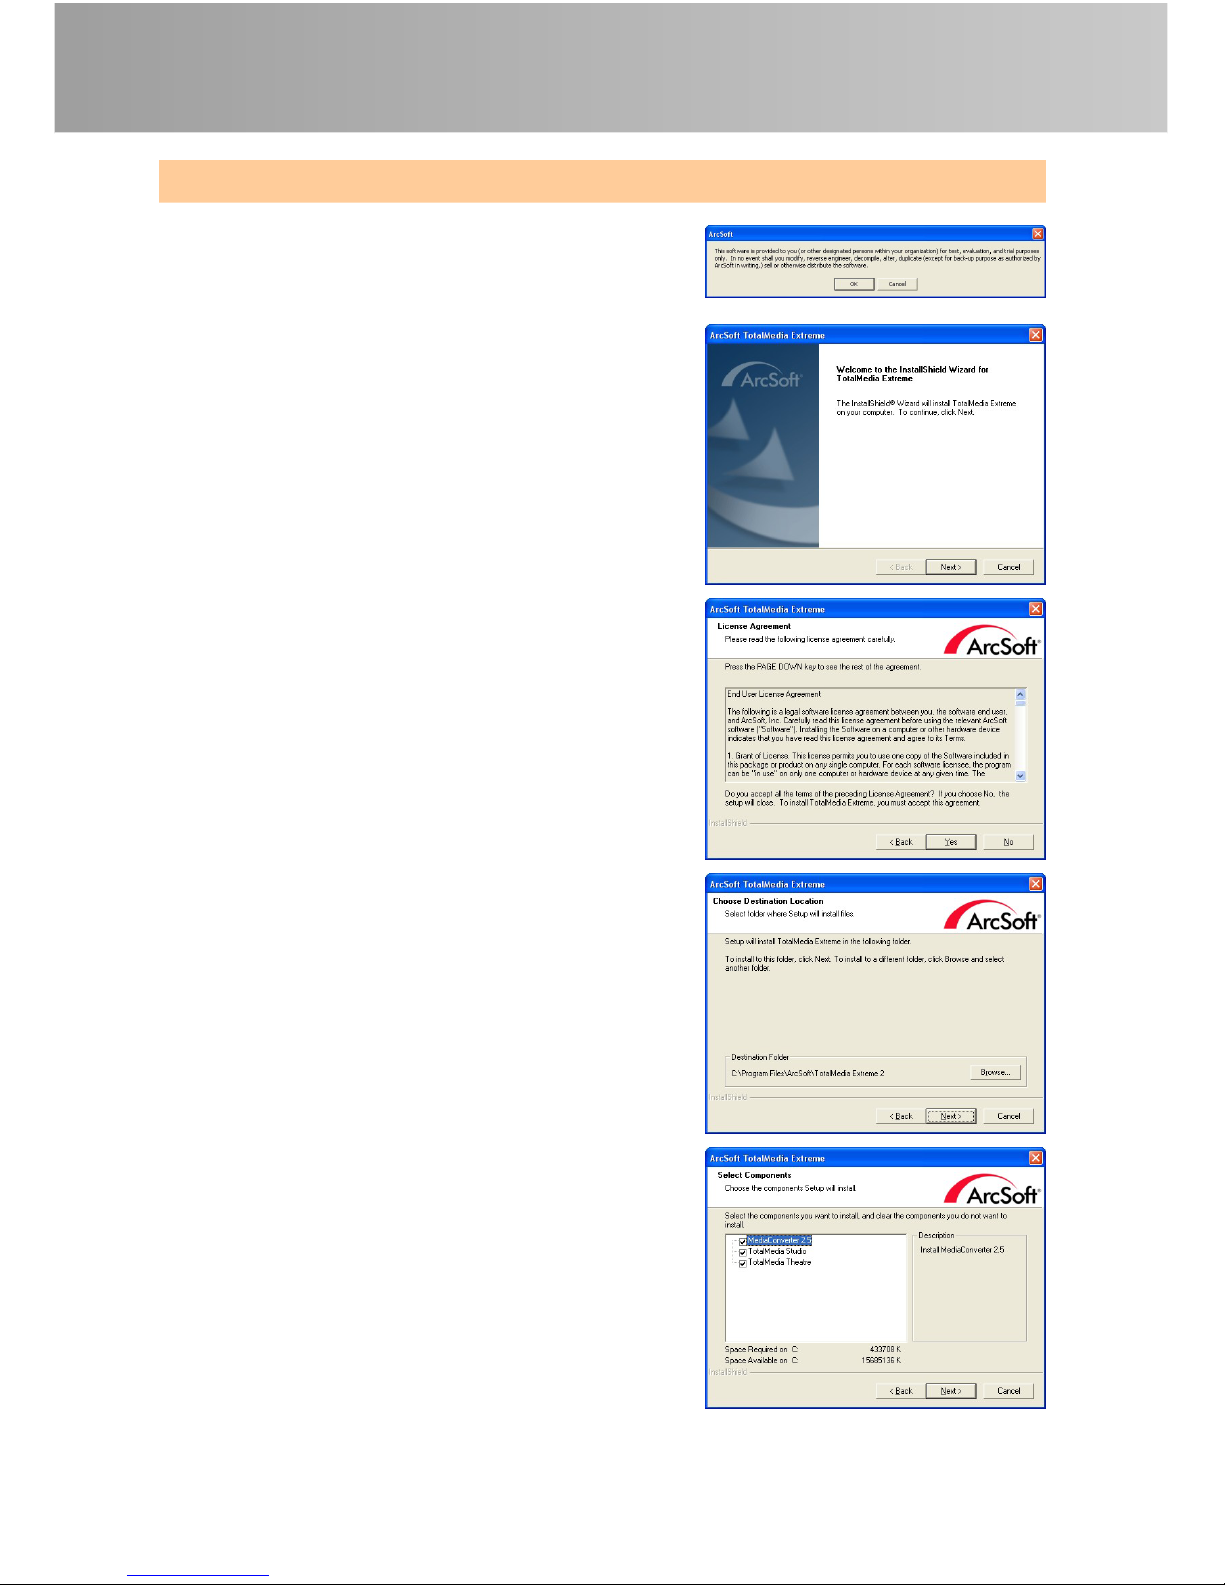
All the screen shots in this documentation are only example images. The images may vary
depending on the product and software version. Information presented in this documentation
has been carefully checked for reliability; however, no responsibility is assumed for
inaccuracies. The information contained in this documentation is subject to change without
notice.
Copyright
©2010 by AVerMedia Technologies, Inc. All rights reserved.
No part of this document may be reproduced or transmitted in any form, or by any means
without the prior written permission of AVerMedia Technologies Inc. AVerMedia Technologies
Inc. reserves the right to modify its models, including their characteristics, specifications,
accessories and any other information stated herein without notice. The official printout of any
information shall prevail should there be any discrepancy between the information contained
herein and the information contained in that printout.
"AVerMedia" is a trademark (or registered trademark) of AVerMedia Technologies, Inc. Other
trademarks used herein for description purpose only belong to each of their companies.
THE MARK OF CROSSED-OUT WHEELED BIN INDICATES THAT THIS PRODUCT MUST
NOT BE DISPOSED OF WITH YOUR OTHER HOUSEHOLD WASTE. INSTEAD, YOU NEED
TO DISPOSE OF THE WASTE EQUIPMENT BY HANDING IT OVER TO A DESIGNATED
COLLECTION POINT FOR THE RECYCLING OF WASTE ELECTRICAL AND ELECTRONIC
EQUIPMENT. FOR MORE INFORMATION ABOUT WHERE TO DROP OFF YOUR WASTE
EQUIPMENT FOR RECYCLING, PLEASE CONTACT YOUR HOUSEHOLD WASTE DISPOSAL
SERVICE OR THE SHOP WHERE YOU PURCHASED THE PRODUCT.

Important Safety Instructions
1.) Read these instructions.
2.) Keep these instructions.
3.) Pay attention to all warnings.
4.) Follow all instructions.
5.) Do not use this apparatus near water.
6.) Clean only with dry cloth.
7.) Install in accordance with the manufacturer’s instructions.
8.) Do not install near any heat sources such as radiators or other apparatus that produce heat.
9.) Equipment must be grounded using an appropriate power cord.
10.) Protect the power cord from being walked on or pinched particularly at plugs.
11.) Only use attachments and/or accessories specified by manufacturer.
12.) Unplug the apparatus during lightning storms or when unused for long periods of time.
13.) Refer all servicing to qualified personnel. Servicing is required when the apparatus does
not operate normally or has been damaged in any way as a result of the following: liquid
spilling or objects falling on the apparatus, the apparatus being exposed to rain or
moisture, apparatus being dropped.
WARNING
To prevent fire or shock hazard do not expose the unit to rain or moisture. Dangerously
high voltages are present inside the unit. Do not open the unit. Refer servicing to
qualified personnel only.

Quick Installation Guide
English-1
1 Package Contents
AVerMedia
DarkCrystal HD
Capture Station Installation CD Quick Installation
Guide USB Cable
Power Adapter Power Adapter
Outlet Module
Component Video
& Stereo Audio
Cable IR Blaster Cable
2 Hardware Installation
2.1 AVerMedia DarkCrystal HD Capture Station Hardware Overview
2.1.1 Connection Ports
S-Video Input Composite / Left & Right Stereo
Audio Input

Quick Installation Guide
English-2
Component / Left & Right Audio
Output
IR Blaster Port
Component / Left & Right Audio
Input
USB Port (Type B)
HDMI Output Power Adaptor Port
2.1.2 Infrared Sensor (for IR Learning)
zWhen using the remote control in IR Learning, aim it at the Infrared Sensor
which is located at the front panel of the unit.
IR Learning works only when you
directly point your Set-Top-Box
Receiver Remote Controller at the
Infrared sensor at close distances
less than 10 cm. Meanwhile, please
place both of them on the flat surface
for better IR Learning performance.
English

Quick Installation Guide
English-3
2.2 Making the Connections

Quick Installation Guide
English-4
Component Video & Stereo
Audio Cable Composite Cable
HDMI Cable Output to TV TV
USB Cable connects to PC TV / LCD Monitor
Power Adaptor & Plug PC / Notebook
IR Blaster Cable Wall Outlet
Component Cable Set-top Box (Front)
RCA Audio Cable Set-top Box (Back) / Camcorder /
VCR/VCD/DVD player
Note
zChoose either + (HD) or (SD) input connection at one time to your set-top
box.
zUse output connection to your TV or LCD monitor only when you want to playback
the programs recorded on your PC/ Notebok with your AVerMedia DarkCrystal HD
Capture Station.
zIt is necessary to use output connections to your TV when you are in IR Learning.
Otherwise, use these connections optionally or when you want to simultaneously watch
the programs is being recorded.
zIn connection, please attach the end of the IR Blaster Cable, at close distances
less than 20 cm, over the infrared sensor on your set-top box.
3 Installing Drivers and the Software Utility
1. Make sure all connections are firm, secure
and correct.
2. Then boot your PC.
3. Place the Installation CD into the CD-ROM
drive.
4. Choose Install Driver to install AVerMedia
DarkCrystal HD Capture Station driver.
5. Install ArcSoft TotalMedia Extreme. (see “A.
Install ArcSoft TotalMedia Extreme” below)
6. Install AVerMedia Scheduler if needed. (see
“B. Install AVerMedia Scheduler” below)

Quick Installation Guide
English-5
A. Install ArcSoft TotalMedia Extreme
1. In the installation main screen, choose
Install ArcSoft TotalMedia Extreme to
install ArcSoft applications. Click OK.
2. When the InstallShield®Wizard appears,
click Next.
3. Read the license agreement and if you
agree to the terms, select Yes.
4. To choose a different destination folder,
click Browse. Then click Next
5. Select the components you want to install.
Then click Next.

Quick Installation Guide
English-6
6. Select a program folder. Click Next. Then
installation begins.
7. You need to restart your computer before
running the software for the first time.
When installation finishes, choose to
restart it now or later. Then click Finish to
exit.
8. For more instructions of how to use
ArcSoft TotalMedia Extreme, please refer
to the user’s manual in the installation CD.
B. Install AVerMedia Scheduler
1. In the installation main screen, choose
Install AVerMedia Scheduler to install
AVerMedia Scheduler application.
When installation completes, click Finish
to exit.

Quick Installation Guide
English-7
2. For more instructions of how to use
AVerMedia Scheduler, please refer to the
section entitled “Using Schedule Record”.
4 Activiating Software Utility
To activate ArcSoft TotalMedia Extreme :
1. Double-click on the ArcSoft TotalMedia Extreme icon on the desktop.
Then choose Record Video, Player, Create Video, or Utilities.
2. Or choose Start ÆPrograms ÆArcSoft TotalMedia Extreme 2 Æ
TotalMedia Extreme 2 / TotalMedia Studio / TotalMedia Theatre / Media
Converter.
To activate AVerMedia Scheduler :
1. Double-click on the AVerMedia Scheduler icon on the desktop.
2. Or choose Start ÆPrograms ÆAVerMedia Scheduler ÆAVerMedia
Scheduler.
3. Another way is to right click on the AVerMedia Scheduler launcher located in
the lower right corner of the screen, and choose Schedule Record.
NOTE : Before using “AVerMedia Scheduler,” you need to go through the IR Learning
process. Please refer to the section entitled “IR Learning Instructions” for more
information.
5 Uninstalling Application and Drivers
To remove ArcSoft TotalMedia Extreme, choose Start ÆPrograms ÆArcSoft
TotalMedia Extreme 2 ÆUninstall ÆOKÆNext ÆOK ÆFinish.
To remove AVerMedia Scheduler, choose Start ÆPrograms ÆAVerMedia
Scheduler ÆUninstall ÆOK ÆFinish.

Quick Installation Guide
English-8
6 IR Learning Instructions
Before using “AVerMedia Scheduler,” you need to go through the IR learning
process, so AVerMedia DarkCrystal HD Capture Station can recognize infrared
command sequence from your set-top box remote control. Once trained, the IR
Learning tool will help AVerMedia DarkCrystal HD Capture Station change
channel on a satellite or cable TV set-top box by transmitting channel number to
the box via an IR blaster cable.
The first time when you activate AVerMedia Scheduler application, the IR
Learning Wizard appears.
1. Make sure you connect all devices via
cables accordingly, plug in the IR Blaster
Cable and power on all devices.
Then click Next.
2. Use your remote control and follow the
instructions on-screen to complete the IR
Learning process. Click Next to continue.
3. Name your cable or Satellite TV set-top
box. Click Next.

Quick Installation Guide
English-9
4. Select how your satellite or cable TV
set-top box shows the channel number.
5. Select the maximum number of digits your
TV set-top box will wait before changing
channels.
6. Select how you change channel.
7. Make sure your remote control aims at the
infrared sensor on your AVerMedia
DarkCrystal HD Capture Station within 10
cm.

Quick Installation Guide
English-10
8. Press all keys listed on-screen in
sequence to see if they all correspond
correctly. Then click Next.
9. Use the on-screen keypad to test the
assigned task and see if all commands
are responded correctly.
10. After testing, choose “All keys are correct”
to proceed, or “Some keys are missing” to
reconfigure the settings.
11. Use the on-screen keypad to test change
channel interval. Set the interval between
numeric keys as Fast, Mediums, Slow or
Custom. Then click Next.

Quick Installation Guide
English-11
12. Now the IR Learning is done. Select the
“Create a recording schedule now!” option
if you want to use “Schedule Record” right
away. Click Finish to close this wizard.
NOTE : If you want AVerMedia DarkCrystal HD
Capture Station to recognize infrared command
sequence from more of your set-top box remote
controls, please right click on the AVerMedia
Scheduler launcher located in the lower right corner of
the screen, and choose Device Manager. Then click
the Add button to go through the IR learning
process again. Here will list all devices you have set
up. Please choose one for scheduled recordings.
7 Using ArcSoft TotalMedia Extreme
A. Recording Video (TotalMedia Extreme 2)
1. Open TotalMedia Extreme 2
main menu.
2. Choose Record Video to
open capture module.
3. Set AVerMedia DarkCrystal
HD Capture Station as your
source.
4. Choose the Video and Audio
input you are using for
recording. Click on Format
settings to adjust the bitrate.
Higher bitrate brings better
video quality of the recording
but more disk space is used.
5. The recordings are saved as
H.264 .TS files
6. Choose a destination folder.
7. Click on the Capture button to
start the recording.

Quick Installation Guide
English-12
B. Playing back your video recordings
1. Click on the Player icon in the TotalMedia Extreme 2 main page. Or choose
TotalMedia Theatre from the Start menu.
2. Click on the folder icon and choose Open media file. Choose the file you want
to play and click Open.
3. Click on the HDMI output button to output HDMI video on your TV or LCD
monitor
C. Converting your video recordings
You can use ArcSoft MediaConverter to convert your AVerMedia DarkCrystal HD
Capture Station captured .TS files into several formats, including iPhone (.MP4),
iPod (.MP4), XBOX 360 (.WMV), PSP (.MP4), PS3 (.MP4), Philips (.WMV),
SanDisk (.MOV) playable formats, etc.
1. Click on the Utilities icon in the TotalMedia Extreme 2 main page. Or choose
Media Converter from the Start menu.
2. Click on the Add File button to select the file to be converted.
3. Select the Manufacturer and Device Model from the drop-down menu.
4. Click the Start button and conversion begins.

Quick Installation Guide
English-13
D. Editing and burning your videos on to a DVD disc
1. Click on the Create
Video icon in the
TotalMedia Extreme 2
main page. Or choose
TotalMedia Studio MV
from the Start menu.
2. Click the Get Media tab
and add a recording.
3. Click the Design tab and
you can customize the
menu screen of the disc.
4. Choose a disc from the
drop-down menu.
5. Then click on the Burn
button.
8 Using AVerMedia Scheduler
With AVerMedia DarkCrystal HD Capture Station, you can use AVerMedia
Scheduler to create a list of preset schedules for recording your favorite TV
programs in ArcSoft TotalMedia Extreme. You can set the date and time to record
the TV program and specify the length of recording.
To run the application, select AVerMedia Scheduler icon on the desktop, choose
AVerMedia Scheduler from the Start menu or click Schedule Record on the main
menu. Then Schedule List dialog box appears.
1 Add a schedule
2 Edit Schedule
3 Delete
4 Delete All
5 Current time
6 Schedule list and info
Recording
Series Recording
Done
Recording Failed

Quick Installation Guide
English-14
8.1 Creating A New Schedule
Click the Add a Schedule button in the Schedule List dialog box. Then
the Add a Schedule dialog box appears for you to configure the recording
settings.
1. Select your video source
2. Type the program name
3. Select the channel with the
numeric keypad
4. Choose the action after
recording:
Exit Application
Standby
Hibernate
Shutdown
5. Select a date
6. Set the start, duration and
end time
7. Saving Info
8. Select the frequency
9. Click the Advance icon for
more setting options.
10.
To change the destination
path, click to choose a
folder.
11.To divide the recording files, enable the Split File option and select the appropriate video file
size, such as CD (650 MB) and DVD (4096 MB). Or you can choose Custom to assign the file
size you want.
12.Click the Bitrate Setting icon to configure the video and audio type.
13.Click Cancel to abort the action.
14.Click Save to add a new schedule.
15.In the Bitrate Setting dialog
box, choose your preferred
Video and Audio type from
the drop down menu.
16.Then click OK to save the
settings and exit the current
dialog box.
17.To abort this operation, click
Cancel.

Kurze Installationsanleitung
Deutsch -1
1 Inhalt der Packung
AVerMedia
DarkCrystal HD
Capture Station Installations-CD Kurze
Installationsanleit
ung USB-Kabel
Netzteil Netzteil
Steckermodul
Component Video
& Stereo Audio
Kabel IR-Blaster Kabel
2 Hardwareinstallation
2.1 Übersicht über AVerMedia DarkCrystal HD Capture Station Hardware
2.1.1 Schnittstellen
S-Video Eingang Composite / Links & Rechts
Stereo Audio Eingang

Kurze Installationsanleitung
Deutsch -2
Component / Links & Rechts
Audio Ausgang
IR-Blaster Schnittstelle
Component / Left & Right Audio
Eingang
USB-Schnittstelle (Typ B)
HDMI Ausgang Netzteil
2.1.2 Infrarot-Sensor (für den IR-Lernmodus)
zWenn Sie die Fernbedienung im IR-Lernmodus verwenden, richten Sie sie
auf den Infrarotsensor, der auf der Vorderseite des Geräts zu finden ist.
Der IR-Lernmodus funktioniert nur, wenn
die Fernbedienung direkt auf den
Infrarotsensor der Set-Top-Box aus einer
geringen Entfernung - weniger als 10
cm - zeigt Legen Sie, für einen
effektiveren IR-Lernmodus beide Teile
auf eine ebne Fläche.
Nel frattempo, posizionare entrambi i
dispositivi su una superficie piatta per
ottenere risultati migliori durante la fase
di apprendimento IR.
Deutsch

Kurze Installationsanleitung
Deutsch -3
2.2 Eine Verbindung herstellen
Other manuals for DarkCrysta C874
1
Table of contents
Languages:
Other Avermedia Recording Equipment manuals