Avid Technology Artist Control User manual

Artist Color User Guide
EuControl v3.0

Legal Notices
© 2013 Avid Technology, Inc., (“Avid”), all rights reserved. This guide may not
be duplicated in whole or in part without the written consent of Avid.
003, 192 Digital I/O, 192 I/O, 96 I/O, 96i I/O, Adrenaline, AirSpeed, ALEX,
Alienbrain, AME, AniMatte, Archive, Archive II, Assistant Station, AudioPages,
AudioStation, AutoLoop, AutoSync, Avid, Avid Active, Avid Advanced
Response, Avid DNA, Avid DNxcel, Avid DNxHD, Avid DS Assist Station,
Avid Ignite, Avid Liquid, Avid Media Engine, Avid Media Processor,
Avid MEDIArray, Avid Mojo, Avid Remote Response, Avid Unity, Avid Unity
ISIS,Avid VideoRAID,AvidRAID,AvidShare,AVIDstripe,AVX,Beat Detective,
Beauty Without The Bandwidth,Beyond Reality,BF Essentials,Bomb Factory,
Bruno, C|24, CaptureManager, ChromaCurve, ChromaWheel,
Cineractive Engine, Cineractive Player, Cineractive Viewer, Color Conductor,
Command|8, Control|24, Cosmonaut Voice, CountDown, d2, d3, DAE,
D-Command, D-Control, Deko, DekoCast, D-Fi, D-fx, Digi 002, Digi 003,
DigiBase, Digidesign, Digidesign Audio Engine, Digidesign Development
Partners, Digidesign Intelligent Noise Reduction, Digidesign TDM Bus,
DigiLink, DigiMeter, DigiPanner, DigiProNet, DigiRack, DigiSerial, DigiSnake,
DigiSystem, Digital Choreography, Digital Nonlinear Accelerator, DigiTest,
DigiTranslator, DigiWear, DINR, DNxchange, Do More, DPP-1, D-Show,
DSP Manager, DS-StorageCalc, DV Toolkit, DVD Complete, D-Verb, Eleven,
EM, Euphonix, EUCON, EveryPhase, Expander, ExpertRender, Fairchild,
FastBreak, Fast Track, Film Cutter, FilmScribe, Flexevent, FluidMotion,
Frame Chase, FXDeko, HD Core, HD Process, HDpack, Home-to-Hollywood,
HyperSPACE, HyperSPACE HDCAM, iKnowledge, Impact, Improv, iNEWS,
iNEWS Assign, iNEWS ControlAir, InGame, Instantwrite, Instinct,
Intelligent Content Management, Intelligent Digital Actor Technology,
IntelliRender, Intelli-Sat, Intelli-Sat Broadcasting Recording Manager, InterFX,
Interplay, inTONE, Intraframe, iS Expander, iS9, iS18, iS23, iS36, ISIS,
IsoSync, LaunchPad, LeaderPlus, LFX, Lightning, Link & Sync, ListSync,
LKT-200, Lo-Fi, MachineControl, Magic Mask, Make Anything Hollywood,
make manage move|media,Marquee,MassivePack,MassivePackPro,Maxim,
Mbox, Media Composer, MediaFlow, MediaLog, MediaMix, Media Reader,
Media Recorder,MEDIArray,MediaServer,MediaShare,MetaFuze,MetaSync,
MIDI I/O, Mix Rack, Moviestar, MultiShell, NaturalMatch, NewsCutter,
NewsView, NewsVision, Nitris, NL3D, NLP, NSDOS, NSWIN, OMF,
OMF Interchange, OMM, OnDVD, Open Media Framework,
Open Media Management, Painterly Effects, Palladium, Personal Q, PET,
Podcast Factory, PowerSwap, PRE, ProControl, ProEncode, Profiler,
Pro Tools, Pro Tools|HD, Pro Tools LE, Pro Tools M-Powered, Pro Transfer,
QuickPunch, QuietDrive, Realtime Motion Synthesis, Recti-Fi,
Reel Tape Delay, Reel Tape Flanger, Reel Tape Saturation, Reprise,
Res Rocket Surfer, Reso, RetroLoop, Reverb One, ReVibe, Revolution, rS9,
rS18, RTAS, Salesview, Sci-Fi, Scorch, ScriptSync,
SecureProductionEnvironment, Shape-to-Shape, ShuttleCase, Sibelius,
SimulPlay,SimulRecord, Slightly Rude Compressor, Smack!, Soft SampleCell,
Soft-Clip Limiter, SoundReplacer, SPACE, SPACEShift, SpectraGraph,
SpectraMatte, SteadyGlide, Streamfactory, Streamgenie, StreamRAID,
SubCap,Sundance, Sundance Digital,SurroundScope,Symphony, SYNC HD,
SYNC I/O, Synchronic, SynchroScope, Syntax, TDM FlexCable, TechFlix,
Tel-Ray, Thunder, TimeLiner, Titansync, Titan, TL Aggro, TL AutoPan,
TL Drum Rehab, TL Everyphase, TL Fauxlder, TL In Tune, TL MasterMeter,
TL Metro, TL Space, TL Utilities, tools for storytellers, Transit, TransJammer,
Trillium Lane Labs, TruTouch, UnityRAID, Vari-Fi, Video the Web Way,
VideoRAID, VideoSPACE, VTEM, Work-N-Play, Xdeck, X-Form, and XMON
are either registered trademarks or trademarks of Avid Technology, Inc. in the
United States and/or other countries.
Bonjour, the Bonjour logo, and the Bonjour symbol are trademarks of Apple
Computer, Inc.
Thunderboltand the Thunderbolt logo are trademarks of Intel Corporation in the
U.S. and/or other countries.
This product may be protected by one or more U.S. and non-U.S. patents.
Details are available at www.avid.com/patents.
Product features, specifications, system requirements, and availability are
subject to change without notice.
Guide Part Number 9329-65299-00 REV B 08/13

Contents iii
Chapter 1. Introduction . . . . . . . . . . . . . . . . . . . . . . . . . . . . . . . . . . . . . . . . . . . . . . . . . . . . . . . . . . . . . . . . . . . . . . . . . . 1
What’s Included . . . . . . . . . . . . . . . . . . . . . . . . . . . . . . . . . . . . . . . . . . . . . . . . . . . . . . . . . . . . . . . . . . . . . . . . . . . 2
System Requirements and Compatibility . . . . . . . . . . . . . . . . . . . . . . . . . . . . . . . . . . . . . . . . . . . . . . . . . . . . . . . . . 2
Registration . . . . . . . . . . . . . . . . . . . . . . . . . . . . . . . . . . . . . . . . . . . . . . . . . . . . . . . . . . . . . . . . . . . . . . . . . . . . . . 2
About This Guide . . . . . . . . . . . . . . . . . . . . . . . . . . . . . . . . . . . . . . . . . . . . . . . . . . . . . . . . . . . . . . . . . . . . . . . . . . 2
About www.avid.com . . . . . . . . . . . . . . . . . . . . . . . . . . . . . . . . . . . . . . . . . . . . . . . . . . . . . . . . . . . . . . . . . . . . . . . 3
Chapter 2. Installation and Setup . . . . . . . . . . . . . . . . . . . . . . . . . . . . . . . . . . . . . . . . . . . . . . . . . . . . . . . . . . . . . . . . . . 5
Unpacking and Elevating Artist Color. . . . . . . . . . . . . . . . . . . . . . . . . . . . . . . . . . . . . . . . . . . . . . . . . . . . . . . . . . . . 5
Installing Software and Hardware . . . . . . . . . . . . . . . . . . . . . . . . . . . . . . . . . . . . . . . . . . . . . . . . . . . . . . . . . . . . . . 7
Chapter 3. Artist Color Surface Controls . . . . . . . . . . . . . . . . . . . . . . . . . . . . . . . . . . . . . . . . . . . . . . . . . . . . . . . . . . . 11
Operational Basics. . . . . . . . . . . . . . . . . . . . . . . . . . . . . . . . . . . . . . . . . . . . . . . . . . . . . . . . . . . . . . . . . . . . . . . . 11
Controls and Displays. . . . . . . . . . . . . . . . . . . . . . . . . . . . . . . . . . . . . . . . . . . . . . . . . . . . . . . . . . . . . . . . . . . . . . 12
Chapter 4. Common Tasks . . . . . . . . . . . . . . . . . . . . . . . . . . . . . . . . . . . . . . . . . . . . . . . . . . . . . . . . . . . . . . . . . . . . . . 17
Using the Soft Knobs . . . . . . . . . . . . . . . . . . . . . . . . . . . . . . . . . . . . . . . . . . . . . . . . . . . . . . . . . . . . . . . . . . . . . . 17
Using the NAV Key. . . . . . . . . . . . . . . . . . . . . . . . . . . . . . . . . . . . . . . . . . . . . . . . . . . . . . . . . . . . . . . . . . . . . . . . 17
Using the Trackballs and Trackwheels. . . . . . . . . . . . . . . . . . . . . . . . . . . . . . . . . . . . . . . . . . . . . . . . . . . . . . . . . . 17
Using the Show Key. . . . . . . . . . . . . . . . . . . . . . . . . . . . . . . . . . . . . . . . . . . . . . . . . . . . . . . . . . . . . . . . . . . . . . . 17
Using the Trackwheel to Jog. . . . . . . . . . . . . . . . . . . . . . . . . . . . . . . . . . . . . . . . . . . . . . . . . . . . . . . . . . . . . . . . . 18
Transport Keys. . . . . . . . . . . . . . . . . . . . . . . . . . . . . . . . . . . . . . . . . . . . . . . . . . . . . . . . . . . . . . . . . . . . . . . . . . . 18
Chapter 5. EuControl . . . . . . . . . . . . . . . . . . . . . . . . . . . . . . . . . . . . . . . . . . . . . . . . . . . . . . . . . . . . . . . . . . . . . . . . . . . 19
Surfaces . . . . . . . . . . . . . . . . . . . . . . . . . . . . . . . . . . . . . . . . . . . . . . . . . . . . . . . . . . . . . . . . . . . . . . . . . . . . . . . 19
Workstations . . . . . . . . . . . . . . . . . . . . . . . . . . . . . . . . . . . . . . . . . . . . . . . . . . . . . . . . . . . . . . . . . . . . . . . . . . . . 21
General . . . . . . . . . . . . . . . . . . . . . . . . . . . . . . . . . . . . . . . . . . . . . . . . . . . . . . . . . . . . . . . . . . . . . . . . . . . . . . . . 22
Preferences . . . . . . . . . . . . . . . . . . . . . . . . . . . . . . . . . . . . . . . . . . . . . . . . . . . . . . . . . . . . . . . . . . . . . . . . . . . . . 22
Assign . . . . . . . . . . . . . . . . . . . . . . . . . . . . . . . . . . . . . . . . . . . . . . . . . . . . . . . . . . . . . . . . . . . . . . . . . . . . . . . . . 23
Layouts . . . . . . . . . . . . . . . . . . . . . . . . . . . . . . . . . . . . . . . . . . . . . . . . . . . . . . . . . . . . . . . . . . . . . . . . . . . . . . . . 23
Soft Keys. . . . . . . . . . . . . . . . . . . . . . . . . . . . . . . . . . . . . . . . . . . . . . . . . . . . . . . . . . . . . . . . . . . . . . . . . . . . . . . 23
Chapter 6. Soft Keys. . . . . . . . . . . . . . . . . . . . . . . . . . . . . . . . . . . . . . . . . . . . . . . . . . . . . . . . . . . . . . . . . . . . . . . . . . . . 25
Command Types . . . . . . . . . . . . . . . . . . . . . . . . . . . . . . . . . . . . . . . . . . . . . . . . . . . . . . . . . . . . . . . . . . . . . . . . . 28
Chapter 7. Using Artist Color with Apple Color. . . . . . . . . . . . . . . . . . . . . . . . . . . . . . . . . . . . . . . . . . . . . . . . . . . . . . 31
Primary In . . . . . . . . . . . . . . . . . . . . . . . . . . . . . . . . . . . . . . . . . . . . . . . . . . . . . . . . . . . . . . . . . . . . . . . . . . . . . . 31
Secondary: Vignette Control . . . . . . . . . . . . . . . . . . . . . . . . . . . . . . . . . . . . . . . . . . . . . . . . . . . . . . . . . . . . . . . . . 32
Color FX . . . . . . . . . . . . . . . . . . . . . . . . . . . . . . . . . . . . . . . . . . . . . . . . . . . . . . . . . . . . . . . . . . . . . . . . . . . . . . . 32
Using Artist Color and Artist Transport. . . . . . . . . . . . . . . . . . . . . . . . . . . . . . . . . . . . . . . . . . . . . . . . . . . . . . . . . . 32
Contents

Artist Color User Guideiv
Chapter 8. Setting IP Addresses . . . . . . . . . . . . . . . . . . . . . . . . . . . . . . . . . . . . . . . . . . . . . . . . . . . . . . . . . . . . . . . . . . 33
Appendix A. EUCON Commands . . . . . . . . . . . . . . . . . . . . . . . . . . . . . . . . . . . . . . . . . . . . . . . . . . . . . . . . . . . . . . . . . 35
Appendix B. Compliance Information. . . . . . . . . . . . . . . . . . . . . . . . . . . . . . . . . . . . . . . . . . . . . . . . . . . . . . . . . . . . . . 39
Environmental Compliance . . . . . . . . . . . . . . . . . . . . . . . . . . . . . . . . . . . . . . . . . . . . . . . . . . . . . . . . . . . . . . . . . . 39
EMC (Electromagnetic Compliance) . . . . . . . . . . . . . . . . . . . . . . . . . . . . . . . . . . . . . . . . . . . . . . . . . . . . . . . . . . . 40
Safety Compliance . . . . . . . . . . . . . . . . . . . . . . . . . . . . . . . . . . . . . . . . . . . . . . . . . . . . . . . . . . . . . . . . . . . . . . . . 41

Chapter 1: Introduction 1
Chapter 1: Introduction
Artist Color is a slim, beautifully-designed, easily-portable color grading media controller that integrates with Apple Color as well
as color applications from Avid®and other manufacturers. With high-resolution trackballs, trackwheels, touch-sensitive Soft
Knobs, and programmable Soft Keys, Artist Color provides unprecedented control over the entire color editing process.
Artist Color can be used as a standalone color grader or with other Artist Series media controllers to form a larger control surface.
Artist Series media controllers include Artist Color, Artist Control, Artist Mix, and Artist Transport.
Artist Color has the following major features:
• Three optical Trackballs to modify color parameters and vignettes
• Three optical Trackwheels to control brightness, vignettes and pan/scan
• Six touch-sensitive Soft Knobs to adjust parameters
• Nine programmable Soft Keys for context-sensitive functionality
• Four dedicated copy/paste Grade keys
• Six high-resolution displays for parameter names and values
• Comprehensive transport and navigation controls
EUCON Ethernet Protocol and EuControl Software
Artist Series media controllers communicate with audio/video applications running on a workstation computer over a 100 Mb/s
Ethernet EUCON™ connection. EUCON is a proprietary, high-speed communication protocol that enables control of virtually ev-
ery application feature.
The EuControl software application finds, links, and communicates information from your computer and your audio or video ap-
plication to all Artist Series controllers on the network. EuControl software must be installed on the workstation computer that runs
the applications before using the Artist media controllers.
Artist Color User Guide2
What’s Included
• Artist Color, with riser brackets
• EuControl software installer disc
• 1 Ethernet Crossover cable
• Power supply
• Artist Color Quick Setup
• Registration Information Card
System Requirements and Compatibility
Avid can only assure compatibility and provide support for hardware and software it has tested and approved.
For compatibility, downloads and Artist Series support, visit www.avid.com/artistsupport
Registration
Review the enclosed Registration Information Card and follow the instructions on it to quickly register your purchase online.
By registering, you become eligible to receive the following:
• Technical support information
• Software update and upgrade notices
• Hardware warranty information
About This Guide
Conventions Used in This Guide
All of our guides use the following conventions to indicate menu choices and key commands:
:
The names of Commands, Options, and Settings that appear on-screen are in a different font. The names of keys on Artist Series
hardware are in bold (such as SEL). The SHIFT key on Artist Series hardware is indicated by bold text, in all-caps (SHIFT) to dis-
tinguish it from references to the Shift key on your computer keyboard.
The following symbols are used to highlight important information:
Convention Action
File > Save Choose Save from the File menu
Control+N Hold down the Control key and press the N key
Control-click Hold down the Control key and click the mouse button
Right-click Click with the right mouse button
User Tips are helpful hints for getting the most from your system.
Important Notices include information that could affect your data or the performance of your system.
Shortcuts show you useful keyboard or mouse shortcuts.
Cross References point to related sections in this guide and other Avid guides.

Chapter 1: Introduction 3
About www.avid.com
The Avid website (www.avid.com) is your best online source for information to help you get the most out of your system.
The following are just a few of the services and features available.
Product Registration
Register your purchase online.
Support and Downloads
Contact Avid Customer Success (technical support); download software updates and the latest online
manuals; browse the Compatibility documents for system requirements; search the online Knowledge Base or join the worldwide
Avid community on the User Conference.
Training and Education
Study on your own using courses available online or find out how you can learn in a classroom setting at
a certified Avid training center.
Products and Developers
Learn about Avid products; download demo software or learn about our Development Partners and their
plug-ins, applications, and hardware.
News and Events
Get the latest news from Avid or sign up for a demo.

Artist Color User Guide4

Chapter 2: Installation and Setup 5
Chapter 2: Installation and Setup
Unpacking and Elevating Artist Color
Unpack the Artist Color, its trackballs, power supply, installation disc, Ethernet crossover cable, and riser brackets.
Artist Color can be elevated or angled using small foldout legs on the bottom of the unit or elevated and angled by attaching the
larger riser brackets. Since both methods require turning Artist Color over, do this before attaching any cables. Turn the unit over
and place it on a soft surface.
Pull out all four of the small foldout legs to moderately elevate the unit; pull out only the back two to angle the unit towards you.
Pull out the metal clips from the same area as the legs and move them until they snap into the legs.
Two larger, detached riser brackets elevate and angle the unit more than the foldout legs. Use moderate force to snap them into the
bottom panel.

Artist Color User Guide6
Removing the Riser Brackets and Installing the Trackballs
To remove the riser brackets:
1Slide the side panels off.
2Press the tabs to release the riser brackets.
3Lift the riser bracket out.
4Unpack the trackballs and place them in their trackball holders.
Attaching Multiple Units
If your system includes more than one Artist Series media controller, you can attach them at their sides to form a single, solid
surface. For instructions, see the Artist Transport User Guide, Artist Mix User Guide, or Artist Control User Guide.

Chapter 2: Installation and Setup 7
Installing Software and Hardware
You must install EuControl software before using Artist Series media controllers.
To install EuControl software and your Artist Series media controller:
1Do one of the following:
• Download the EuControl installer for your computer platform from www.avid.com/artistsupport.After downloading, make sure
the installer is uncompressed (.dmg on Mac or .ZIP on Windows).
• Insert the Installer disc into your computer.
2Double-click the EuControl installer application.
3Follow the on-screen instructions to complete the installation.
4When installation is complete, click Quit (Mac) or Finish (Windows). EuControl will launch automatically and is running when
its icon appears:
• On Mac, the icon is shown in the menu bar.
• On Windows, the icon appears in the System tray (or alongside other Hidden Icons in the lower tool bar if you do not have your
system configured to always show icons in the System tray).
5Shut down your computer.
6Plug one end of the AC power cord into the power adapter and the other into a power outlet. Make sure the AC power cord is
pushed all the way into the adapter.
7Connect the DC output cable from the power adapter to DC In on the left side of the back panel.
If prompted to download a newer version of EuControl software, follow the on-screen instructions.
EuControl icon
DCIn 15V
FOOTSWITCH

Artist Color User Guide8
8Plug one end of the Ethernet crossover cable into the Ethernet jack on the Artist Color back panel.
9Plug the other end of the Ethernet crossover cable into an open Ethernet jack on your computer, router, or Ethernet switch. Note
that connecting directly to the computer may require removing your Internet cable.
If you have a Mac with two Ethernet ports, it is recommended to use Ethernet 1 rather than Ethernet 2. However, if you want to use
Ethernet 2 do the following:
• Go to System Preferences > EUCON.
• Change the Network Interface to Ethernet 2.
• Restart the computer.
An Ethernet router or switch is required to connect multiple Artist Series units such as an Artist Control with one or more Artist
Mix controllers, or to connect units to a local area network.
10 Turn on your router (if applicable), then turn on your computer and wait until it finishes starting up.
Ethernet cable and back panel jack
Artist Color connected directly to computer
Multiple Artist Series units connected using a router
Eucon
ArtistColor
ArtistColor

Chapter 2: Installation and Setup 9
11 Press and release the POWER switch on Artist Color. Do the following, as appropriate for your operating system:
Mac
Wait up to 60 seconds. A lit EuControl icon in the menu bar indicates correct installation.
Windows
Wait up to 60 seconds. A lit EuControl icon appears in the System tray (or, in Hidden Icons if your system is not configured to show
all icons in the System tray).
12 If the lit EuControl icon does not appear, do any of the following:
• See “Surfaces” on page 19 and add Artist Color manually.
• Shut down Artist Color and your computer, then turn them on (computer first, thenArtist Color).
• If your computer is pre-2002 and you are using an Ethernet router or switch, you need to purchase a normal straight-through
Ethernet cable (instead of the crossover Ethernet cable supplied) from a computer store.
• See www.avid.com/artistsupport for the most current troubleshooting information.
13 If you downloaded the latest software from the web, you may need to update the firmware on yourArtist Series controllers. See
“Update Firmware” on page 20 for instructions.
14 Launch your audio or video application (such as Apple Color) and open a session or project.
15 To set up your application to work withArtist Color, see the EUCON Application Setup Guide that you downloaded at the be-
ginning of this section.
Controlling a Second Workstation
Artist Color can control applications running on a second computer, referred to in this guide as a workstation. Most users will not
need to do this because EuControl will be running on the same workstation as the your audio/video applications.
To enable control of a second workstation:
1Do one of the following:
• Download the EuControl installer from www.avid.com/artistsupport onto the second computer. After downloading, make sure
the installer is mounted or uncompressed (.dmg on Mac or .ZIP on Windows).
• Insert the Installer disc into the second computer.
2In the Extras folder, double-click the Install EuCon Workstation installer.
3Follow the instructions to install the EuCon Workstation software.
EuControl icon on Mac
EuControl icon on Windows

Artist Color User Guide10

Chapter 3: Artist Color Surface Controls 11
Chapter 3: Artist Color Surface Controls
Artist Color is a control surface designed for color editing. While most of its controls can be programmed and customized for your
preferences, a few controls are dedicated to a single purpose.
This chapter identifies the default assignments of dedicated surface controls, and explains a few of the programmable controls.
Operational Basics
The most important controls on Artist Color are the three Trackballs and Trackwheels. There are also nine assignable Soft Keys,
six Soft Knobs, Copy/Paste Grade keys, and Transport Controls.
The Soft Key assignments are stored in an Application Set for each application. Apple Color comes with its own Application Set
that lets you start working right away, and this set can be used as a starting point to modify and store your own. You can restore
the default Application Set at any time or create a new one.
The top-most application (also called foreground, or focused application):
• Receives mouse commands and keystrokes
• Is controlled by Artist Color
• Determines Artist Color surface assignments
Artist Color User Guide12
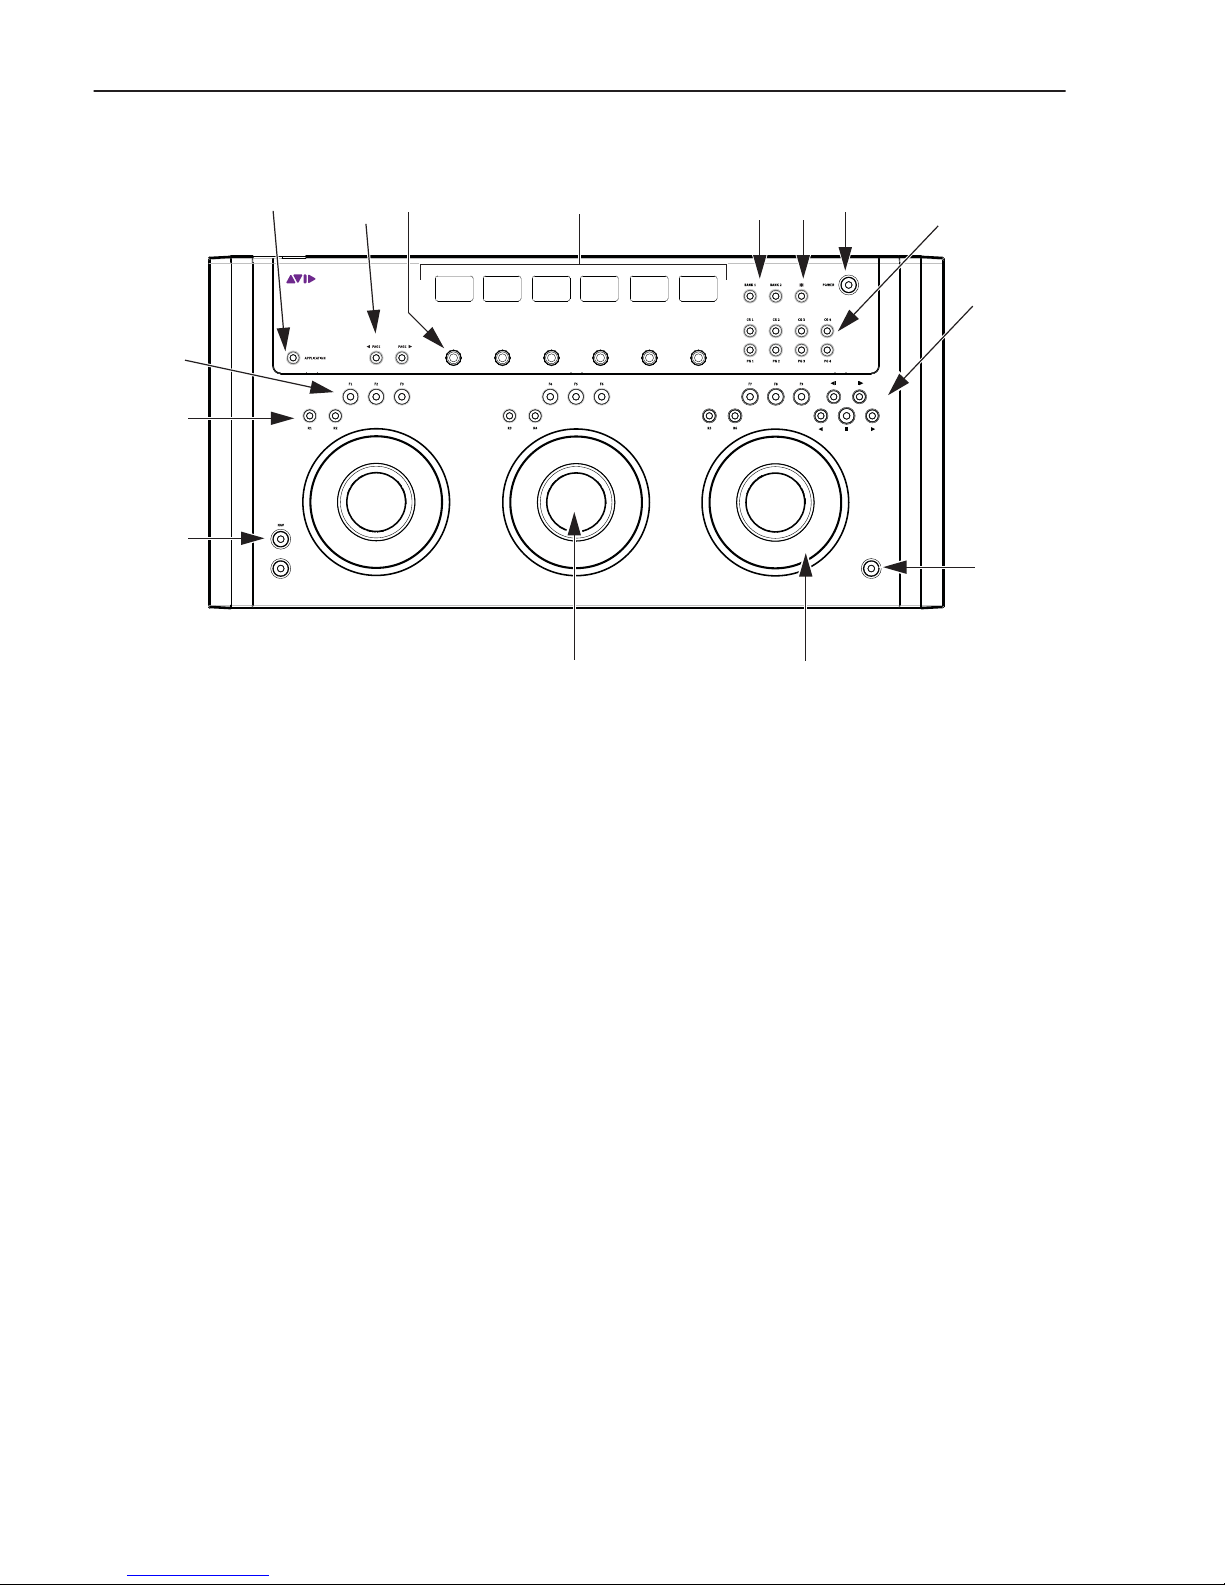
Controls and Displays
1POWER
2SHOW
3SHIFT
4Soft Keys
5Soft Knobs
6RESET Keys
7Transport Keys
8Trackballs
9Trackwheels
10 APPLICATION Key
11 PAGE Keys
12 BANK Keys
13 COPY/PASTE GRADE Keys
14 NAV Key
15 Displays
Artist Color
1
2
3
4
5
6
7
89
10 11 12 13
14
15

Chapter 3: Artist Color Surface Controls 13
POWER
To turn the device on and off:
Press POWER.
SHOW Key
The SHOW key displays the current key assignments.
To show a current key assignment:
1Press and hold the SHOW key.
2Press another key. That key’s function name is shown above the image of that key on-screen in EuControl software.
Locking the Show Key
The SHOW key can be locked to browse multiple key functions.
To lock SHOW:
1Press and release the SHOW key quickly and then press another key to display its assignments.
2Continue browsing in this manner until finished.
3Press and release the SHOW key quickly again when finished to restore normal operation.
SHIFT Key
The SHIFT key accesses a second function for each key, if one has been assigned. Press and hold the SHIFT key and press another
key to access the second function. The SHIFT key can be used in conjunction with the SHOW key to display the second function.
Since this may require holding down three keys, it is useful to lock the SHIFT key.
Locking the Shift Key
The SHIFT key can be locked to access multiple alternate key functions.
To lock SHIFT:
1Press and release the SHIFT key quickly.
2Press another key to access its alternate function. The Shift keys light when locked. Continue in this manner until finished.
3Press and release the SHIFT key quickly again to restore normal operation.
If you have another Artist Series media controller connected to the same instance of EuControl as Artist Color, you can also lock
the SHIFT key by pressing two SHIFT keys down simultaneously. They can be on different devices. Unlock the SHIFT key by
pressing and releasing one quickly on any device.
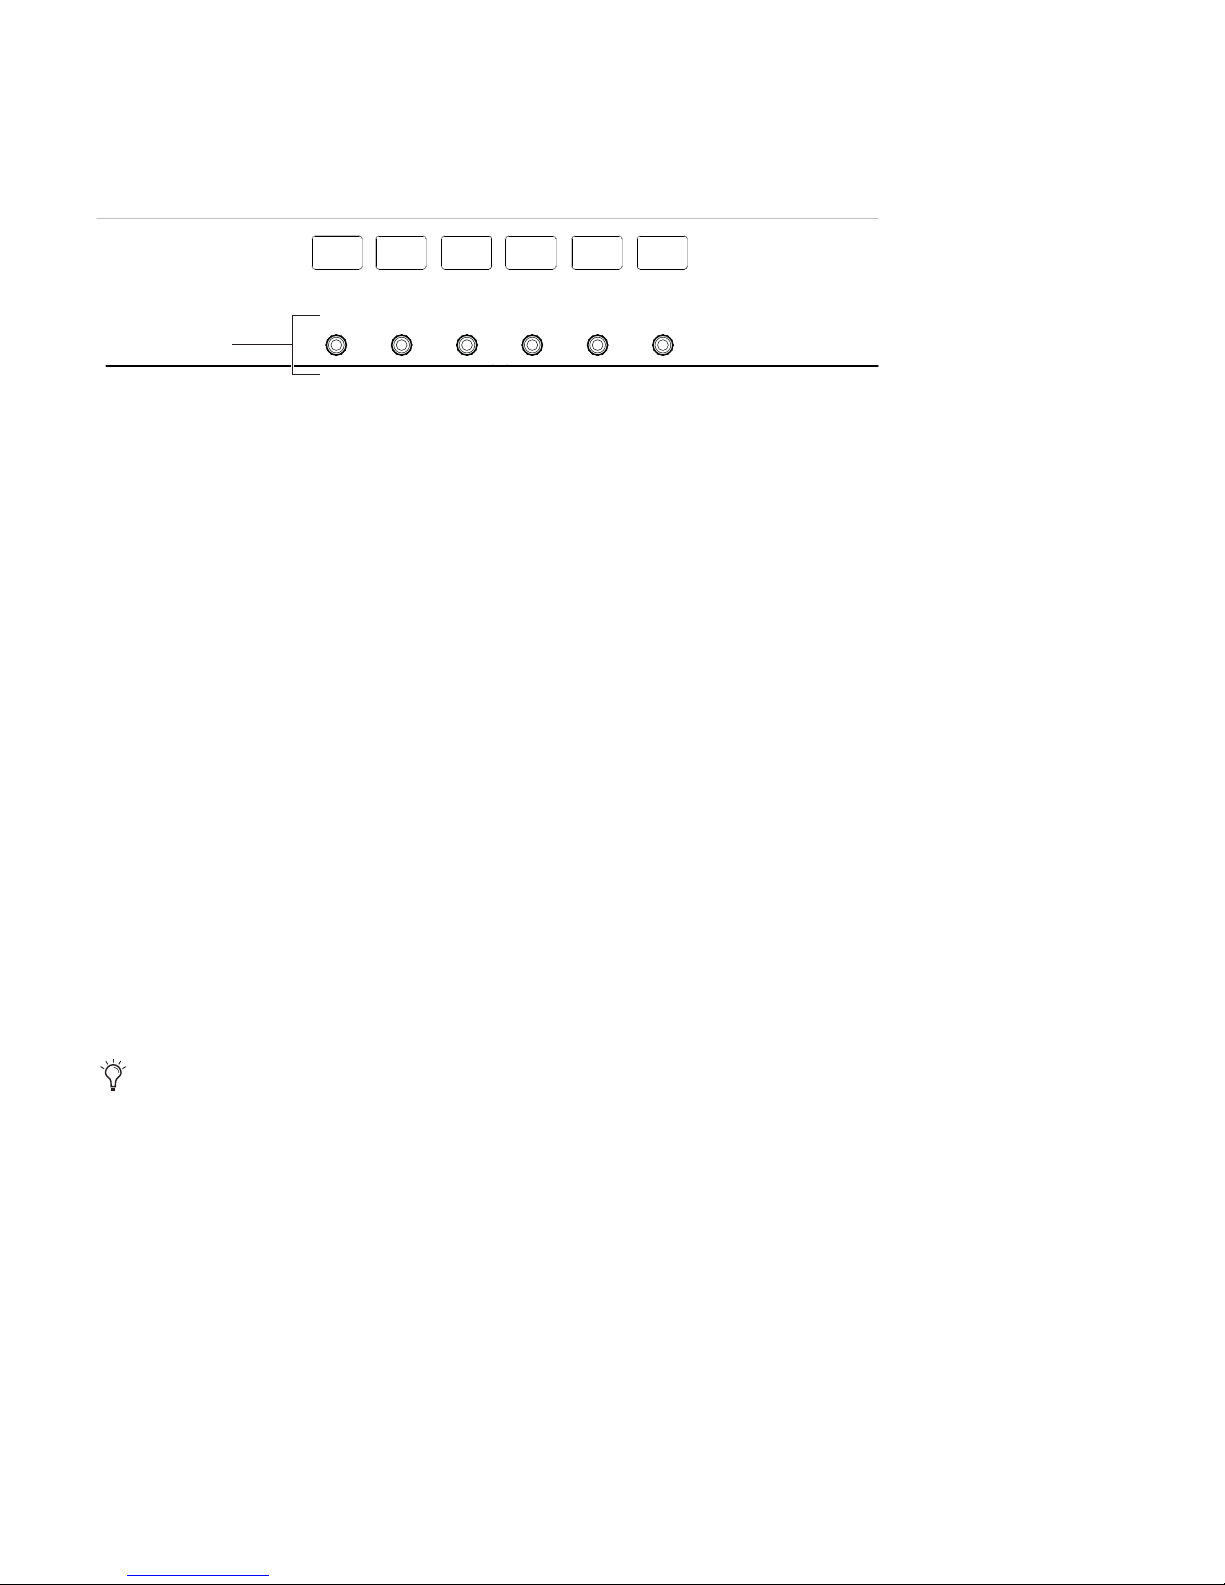
Soft Keys
The Soft Keys are initially factory programmed for each application. The nine Soft Keys can also access nine additional functions
by holding down the Shift key before pressing a Soft Key.
The Soft Keys can be reassigned within each application. To learn how to program the Soft Keys, see Chapter 6, “Soft Keys.”
Soft keys
Artist Color User Guide14
Soft Knobs
The six Soft Knobs are dual-function controls; they can be pressed like a switch, or turned to adjust parameters. Pressing a Soft
Knob can navigate to a room, clear color parameters, and select specific secondary operations.
RESET Keys
Each Trackball/Trackwheel has two RESET keys to restore their default settings. The left key of each group resets that Trackball,
the right resets that Trackwheel.
Transport Keys
The Transport keys are factory programmed for Apple Color. Each Transport Key lights when active. The Transport keys are For-
ward Play, Reverse Play, Stop, and Go To Next/Previous clip.
Trackballs and Trackwheels
Three Trackballs control Hue, Saturation and Brightness for Shadow, Midtone, and Highlight. The right Trackwheel can be reas-
signed to jog through the timeline. (For more information, see Chapter 6, “Soft Keys.”)
Trackball and Trackwheel Sensitivity
Trackball and Trackwheel sensitivity can be adjusted. Increasing the sensitivity changes the assigned parameter faster while de-
creasing it has the opposite effect.
To adjust Trackball and Trackwheel sensitivity:
1Press both PAGE keys simultaneously. The bottom half of the first and second displays show the Trackball and Trackwheel sen-
sitivity values, respectively, while the label is in the top half.
2Move the Trackball up to increase the sensitivity or down to decrease it.
3Move the Trackwheel clockwise to increase sensitivity and counterclockwise to decrease it.
4Press both PAGE keys simultaneously to exit.
APPLICATION Key
The APPLICATION key lets you target different applications.
To toggle between the two most recently used, open applications:
Press the APPLICATION key.
To cycle through all open applications:
Hold down the APPLICATION key and press both PAGE keys.
Artist Color can control Apple Color running on a second computer, referred to in this guide as a workstation.
Trackball and Trackwheel sensitivity can also be adjusted by turning the knobs below the displays.

Chapter 3: Artist Color Surface Controls 15
To control another workstation:
1Use EuControl to create a list of workstations to switch between (see “Workstations” on page 21).
2Press SHIFT + APPLICATION to attach Artist Color to another workstation.
While attached to a second workstation, your computer keyboard and mouse can be configured to control that workstation and not
your primary system.
<PAGE> Keys
Press PAGE> or <PAGE to navigate to parameters that are not displayed on the six displays.
Press both PAGE keys simultaneously to set the Trackball and Trackwheel sensitivity.
BANK Keys
The BANK keys let you access Basic,Advanced,and Vignettesettings depending when in a Primary or Secondary room, as follows:
When in a Primary room, do either of the following:
• Press BANK 1 to select the Basic settings tab.
• Press BANK 2 to select the Advanced settings tab.
When in a Secondary room, do any of the following:
• Press BANK 1 to select the Basic settings tab.
• Press BANK 2 to select Vignette controls.
• Press SHIFT+BANK 1 to select the Advanced settings tab.
Copy/Paste Grade and BANK Keys
The Grade comprises all color correction operations for a clip from all the rooms. The CG1/PG1–CG4/PG4 keys copy the Grade
to four dedicated memory banks in Apple Color. The Copy keys are on top, and the Paste keys are on the bottom. With a clip se-
lected in the timeline, press a Copy key. Select one or more clips in the timeline and press the corresponding Paste key.
NAV Key
In all rooms, press the NAV key to show the room names in the display. Press the PAGE> key to display the Still Store and Render
Queue rooms. Navigate to the desired room by pressing the corresponding Soft Knob.
In a secondary room, press SHIFT+NAV to show six operational tabs on the displays. Select the desired tab by pressing the corre-
sponding Soft Knob.
For more information, see “Trackball and Trackwheel Sensitivity” on page 14.

Artist Color User Guide16
Other manuals for Artist Control
2
Table of contents
Other Avid Technology Dj Equipment manuals

Avid Technology
Avid Technology Artist Mix User manual

Avid Technology
Avid Technology S3L System User manual

Avid Technology
Avid Technology Artist Mix User manual

Avid Technology
Avid Technology Artist Control User manual

Avid Technology
Avid Technology Mbox User manual

Avid Technology
Avid Technology Mbox User manual

Avid Technology
Avid Technology VENUE S3L-X Parts list manual

Avid Technology
Avid Technology Artist Control User manual


