Avid Technology Mbox User manual
MBOX Studio Guide

Legal Notices
© 2022 Avid Technology, Inc., (“Avid”), all rights reserved. This guide may not be duplicated in whole or in part without the written consent of Avid.
For a current and complete list of Avid trademarks visit: www.avid.com/legal/trademarks-and-other-notices.
Bonjour, the Bonjour logo, and the Bonjour symbol are trademarks of Apple Computer, Inc.
Thunderbolt and the Thunderbolt logo are trademarks of Intel Corporation in the U.S. and/or other countries.
This product may be protected by one or more U.S. and non-U.S. patents. Details are available at www.avid.com/patents.
Product features, specifications, system requirements, and availability are subject to change without notice.
This product incorporates JetPLL™ clocking technologies, used under license from Sonopsis. JetPLL™ designs are covered by Sonopsis copyright and/or multiple
patents. The JetPLL™ word and logo are trademarks of Sonopsis. More information can be found at the JetPLL.info website: http://JetPLL.info.
Guide Part Number 9329-66417-00 REV A 11/22

Important
Model: MBOX Studio
Rating: 12vDC, 3.0A
Safety Compliance
This equipment has been tested to comply with safety certifications in accordance with: UL 62368-1 ed.3-2019, CAN/CSA-C22.2 No. 62398-1:19,BS EN
62368-1:2014+A11:2017, EN 62368-1:2014/AC:2015, IEC 62368-1:2018. Avid Technology Inc., has been authorized to apply the appropriate NRTL mark on its
compliant equipment.
Important Safety Instructions
1) Read these instructions.
2) Keep these instructions.
3) Heed all warnings.
4) Follow all instructions.
5) Do not use this equipment near water.
6) Clean only with dry cloth.
7) Do not block any ventilation openings. Install in accordance with the manufacturer’s instructions.
8) Do not install near any heat sources such as radiators, heat registers, stoves, or other equipment (including amplifiers) that produce heat.
9) Protect power cords from being walked on or pinched particularly at plugs, convenience receptacles, and the point where they exit from the equipment.
10) Only use attachments/accessories specified by the manufacturer.
11) For products that are not rack-mountable: Use only with a cart, stand, tripod, bracket, or table specified by the manufacturer, or sold with the equipment. When a cart
is used, use caution when moving the cart/equipment combination to avoid injury from tip-over.
12) Unplug this equipment during lightning storms or when unused for long periods of time.
13) Refer all servicing to qualified service personnel. Servicing is required when the equipment has been damaged in any way, such as power-supply cord or plug is dam-
aged, liquid has been spilled or objects have fallen into the equipment, the equipment has been exposed to rain or moisture, does not operate normally, or has been
dropped.
14) For products that are a Mains powered device: The equipment shall not be exposed to dripping or splashing and no objects filled with liquids (such as vases) shall be
placed on the equipment.
WARNING! To reduce the risk of fire or electric shock, do not expose this equipment to rain or moisture.
Do not defeat the safety purpose of the polarized or grounding-type plug. A polarized plug has two blades with one wider than the other. A grounding type plug has two
blades and a third grounding prong. The wide blade or the third prong are provided for your safety. If the provided plug does not fit into your outlet, consult an electrician
for replacement of the obsolete outlet.
15) For products with a power switch: It should remain accessible after installation.
16) The equipment shall be used at a maximum ambient temperature of 40° C.
LED Safety Notices
Avid hardware might contain LED or Laser devices for communication use. These devices are compliant with the requirements for Class 1 LED and Laser Products and
are safe in the intended use. In normal operation the output of these laser devices does not exceed the exposure limit of the eye and cannot cause harm.


Contents v
Chapter 1. Introduction . . . . . . . . . . . . . . . . . . . . . . . . . . . . . . . . . . . . . . . . . . . . . . . . . . . . . . . . . . . . . . . . . . . . . . . . . . 1
System Requirements and Compatibility Information . . . . . . . . . . . . . . . . . . . . . . . . . . . . . . . . . . . . . . . . . . . . . . . . 3
Conventions Used in Pro Tools Documentation . . . . . . . . . . . . . . . . . . . . . . . . . . . . . . . . . . . . . . . . . . . . . . . . . . . . 3
Resources . . . . . . . . . . . . . . . . . . . . . . . . . . . . . . . . . . . . . . . . . . . . . . . . . . . . . . . . . . . . . . . . . . . . . . . . . . . . . . . 4
Part I Installation
Chapter 2. Installation and Setup . . . . . . . . . . . . . . . . . . . . . . . . . . . . . . . . . . . . . . . . . . . . . . . . . . . . . . . . . . . . . . . . . . 7
Unpack the Box . . . . . . . . . . . . . . . . . . . . . . . . . . . . . . . . . . . . . . . . . . . . . . . . . . . . . . . . . . . . . . . . . . . . . . . . . . . 7
Register MBOX Studio and Activate your Avid Master Account. . . . . . . . . . . . . . . . . . . . . . . . . . . . . . . . . . . . . . . . . 8
Connect Cables . . . . . . . . . . . . . . . . . . . . . . . . . . . . . . . . . . . . . . . . . . . . . . . . . . . . . . . . . . . . . . . . . . . . . . . . . . . 9
Download and Install Pro Tools and MBOX Control Software . . . . . . . . . . . . . . . . . . . . . . . . . . . . . . . . . . . . . . . . . 10
Launch and Configure MBOX Control Software . . . . . . . . . . . . . . . . . . . . . . . . . . . . . . . . . . . . . . . . . . . . . . . . . . . 11
Launch Pro Tools. . . . . . . . . . . . . . . . . . . . . . . . . . . . . . . . . . . . . . . . . . . . . . . . . . . . . . . . . . . . . . . . . . . . . . . . . 12
Configure Pro Tools for MBOX Studio . . . . . . . . . . . . . . . . . . . . . . . . . . . . . . . . . . . . . . . . . . . . . . . . . . . . . . . . . . 12
How to Proceed . . . . . . . . . . . . . . . . . . . . . . . . . . . . . . . . . . . . . . . . . . . . . . . . . . . . . . . . . . . . . . . . . . . . . . . . . . 13
Starting Up and Shutting Down Your System . . . . . . . . . . . . . . . . . . . . . . . . . . . . . . . . . . . . . . . . . . . . . . . . . . . . . 14
Part II Hardware and Software Overview
Chapter 3. MBOX Studio Hardware Overview . . . . . . . . . . . . . . . . . . . . . . . . . . . . . . . . . . . . . . . . . . . . . . . . . . . . . . . 17
MBOX Studio Front Panel. . . . . . . . . . . . . . . . . . . . . . . . . . . . . . . . . . . . . . . . . . . . . . . . . . . . . . . . . . . . . . . . . . . 17
MBOX Studio Top Panel. . . . . . . . . . . . . . . . . . . . . . . . . . . . . . . . . . . . . . . . . . . . . . . . . . . . . . . . . . . . . . . . . . . . 18
MBOX Studio Back Panel . . . . . . . . . . . . . . . . . . . . . . . . . . . . . . . . . . . . . . . . . . . . . . . . . . . . . . . . . . . . . . . . . . . 19
Example Audio Connections . . . . . . . . . . . . . . . . . . . . . . . . . . . . . . . . . . . . . . . . . . . . . . . . . . . . . . . . . . . . . . . . . 20
Chapter 4. MBOX Control Software Overview . . . . . . . . . . . . . . . . . . . . . . . . . . . . . . . . . . . . . . . . . . . . . . . . . . . . . . . 21
Toolbar . . . . . . . . . . . . . . . . . . . . . . . . . . . . . . . . . . . . . . . . . . . . . . . . . . . . . . . . . . . . . . . . . . . . . . . . . . . . . . . . 21
Channel Focus. . . . . . . . . . . . . . . . . . . . . . . . . . . . . . . . . . . . . . . . . . . . . . . . . . . . . . . . . . . . . . . . . . . . . . . . . . . 28
Monitor . . . . . . . . . . . . . . . . . . . . . . . . . . . . . . . . . . . . . . . . . . . . . . . . . . . . . . . . . . . . . . . . . . . . . . . . . . . . . . . . 33
Hardware Input . . . . . . . . . . . . . . . . . . . . . . . . . . . . . . . . . . . . . . . . . . . . . . . . . . . . . . . . . . . . . . . . . . . . . . . . . . 34
Software Input . . . . . . . . . . . . . . . . . . . . . . . . . . . . . . . . . . . . . . . . . . . . . . . . . . . . . . . . . . . . . . . . . . . . . . . . . . . 34
Hardware Output . . . . . . . . . . . . . . . . . . . . . . . . . . . . . . . . . . . . . . . . . . . . . . . . . . . . . . . . . . . . . . . . . . . . . . . . . 34
Preferences . . . . . . . . . . . . . . . . . . . . . . . . . . . . . . . . . . . . . . . . . . . . . . . . . . . . . . . . . . . . . . . . . . . . . . . . . . . . . 35
Part III Using MBOX
Chapter 5. Using MBOX Studio . . . . . . . . . . . . . . . . . . . . . . . . . . . . . . . . . . . . . . . . . . . . . . . . . . . . . . . . . . . . . . . . . . . 40
MBOX Studio Basics . . . . . . . . . . . . . . . . . . . . . . . . . . . . . . . . . . . . . . . . . . . . . . . . . . . . . . . . . . . . . . . . . . . . . . 41
Audio Input and Output. . . . . . . . . . . . . . . . . . . . . . . . . . . . . . . . . . . . . . . . . . . . . . . . . . . . . . . . . . . . . . . . . . . . . 45
Using the Tuner . . . . . . . . . . . . . . . . . . . . . . . . . . . . . . . . . . . . . . . . . . . . . . . . . . . . . . . . . . . . . . . . . . . . . . . . . . 50
Contents

MBOX Studio Guidevi
About Variable-Z . . . . . . . . . . . . . . . . . . . . . . . . . . . . . . . . . . . . . . . . . . . . . . . . . . . . . . . . . . . . . . . . . . . . . . . . . 51
Using MBOX Studio and Pro Tools . . . . . . . . . . . . . . . . . . . . . . . . . . . . . . . . . . . . . . . . . . . . . . . . . . . . . . . . . . . . 52
Using AVID FX. . . . . . . . . . . . . . . . . . . . . . . . . . . . . . . . . . . . . . . . . . . . . . . . . . . . . . . . . . . . . . . . . . . . . . . . . . . 55
Re-Amplification . . . . . . . . . . . . . . . . . . . . . . . . . . . . . . . . . . . . . . . . . . . . . . . . . . . . . . . . . . . . . . . . . . . . . . . . . . 57
Using FX Loops . . . . . . . . . . . . . . . . . . . . . . . . . . . . . . . . . . . . . . . . . . . . . . . . . . . . . . . . . . . . . . . . . . . . . . . . . . 59
Using S/PDIF . . . . . . . . . . . . . . . . . . . . . . . . . . . . . . . . . . . . . . . . . . . . . . . . . . . . . . . . . . . . . . . . . . . . . . . . . . . . 62
Customizing the User Action Buttons 1–4 . . . . . . . . . . . . . . . . . . . . . . . . . . . . . . . . . . . . . . . . . . . . . . . . . . . . . . . 63
Using Talkback . . . . . . . . . . . . . . . . . . . . . . . . . . . . . . . . . . . . . . . . . . . . . . . . . . . . . . . . . . . . . . . . . . . . . . . . . . 64
Using Loopback . . . . . . . . . . . . . . . . . . . . . . . . . . . . . . . . . . . . . . . . . . . . . . . . . . . . . . . . . . . . . . . . . . . . . . . . . . 65
Integrating an External MIDI Device . . . . . . . . . . . . . . . . . . . . . . . . . . . . . . . . . . . . . . . . . . . . . . . . . . . . . . . . . . . 65
Reducing Monitoring Latency . . . . . . . . . . . . . . . . . . . . . . . . . . . . . . . . . . . . . . . . . . . . . . . . . . . . . . . . . . . . . . . . 66
Appendix A. Specifications . . . . . . . . . . . . . . . . . . . . . . . . . . . . . . . . . . . . . . . . . . . . . . . . . . . . . . . . . . . . . . . . . . . . . . 67
Analog I/O . . . . . . . . . . . . . . . . . . . . . . . . . . . . . . . . . . . . . . . . . . . . . . . . . . . . . . . . . . . . . . . . . . . . . . . . . . . . . . 67
Environmental Specifications . . . . . . . . . . . . . . . . . . . . . . . . . . . . . . . . . . . . . . . . . . . . . . . . . . . . . . . . . . . . . . . . 68
Appendix B. Compliance . . . . . . . . . . . . . . . . . . . . . . . . . . . . . . . . . . . . . . . . . . . . . . . . . . . . . . . . . . . . . . . . . . . . . . . . 69
Index . . . . . . . . . . . . . . . . . . . . . . . . . . . . . . . . . . . . . . . . . . . . . . . . . . . . . . . . . . . . . . . . . . . . . . . . . . . . . . . . . . . . . . . . 72
Introduction 1
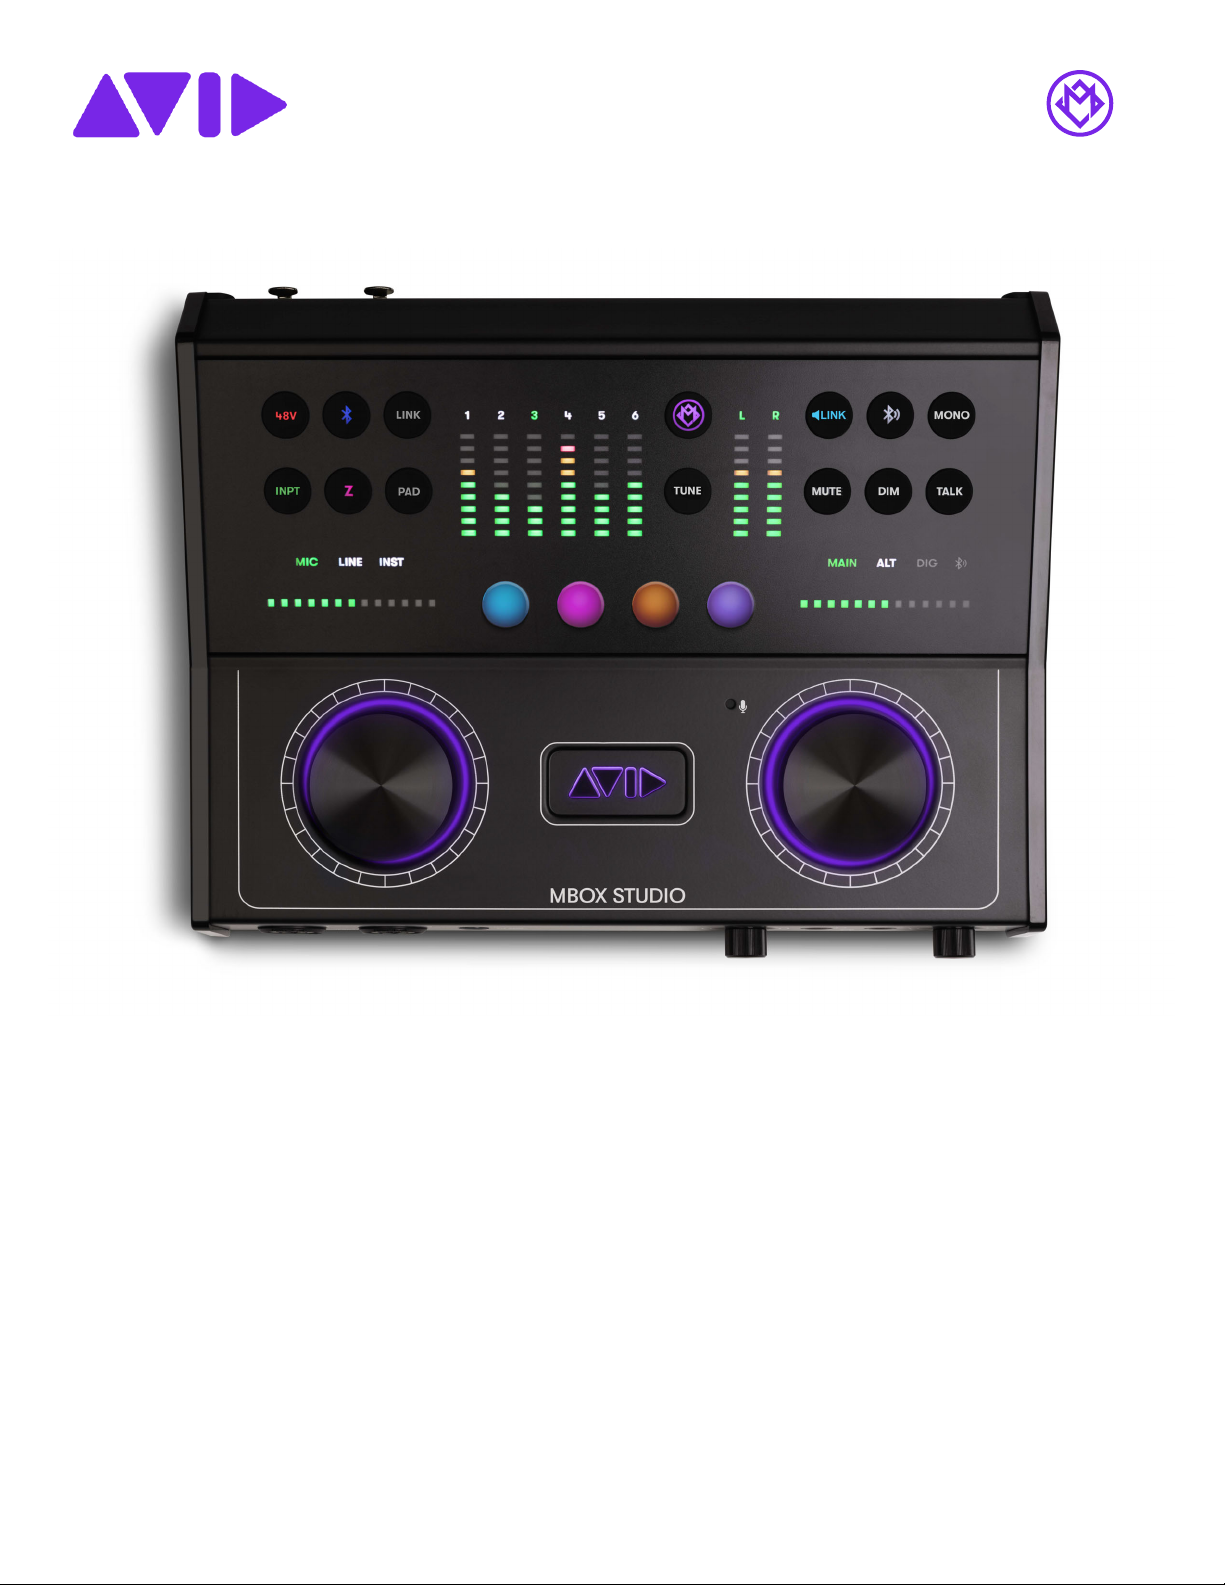
Introduction
Welcome to MBOX™Studio by Avid®. MBOX Studio is a versatile multi-channel audio interface that integrates with Pro Tools®
software and is compatible with third-party audio and MIDI applications that support the Core Audio (Mac) or ASIO (Windows)
standard.
MBOX Studio delivers exceptional audio conversion and fidelity, along with everything you need for tracking, mixing, streaming,
podcasting and more.
MBOX Studio can be controlled using its top panel controls and using the MBOX Control application, and can also function as a
standalone monitor controller.
MBOX Studio Features
• Up to 21 x 22 simultaneous input and output (“I/O”, @ 44.1/48k). Maximum I/O varies with sample rate, as follows:
• 4x XLR/¼-inch TRS Combo Microphone/Line/Instruments Inputs (2 on the back panel, 2 on the front panel), each with:
• High quality microphone preamps
•Variable
Zimpedance circuit to provide more tonal options and compatibility for Mic and Instrument inputs
• Large dual-function (rotate/push) encoder
•Link button to link stereo inputs
•48V phantom power
• HPF (High Pass Filter)
• –10 dB Pad
• Polarity invert
• Soft-Limit
• 9-segment input meters
• Hardware inserts assignable via FX Loops 1–2
• 2x ¼-inch TRS Line inputs
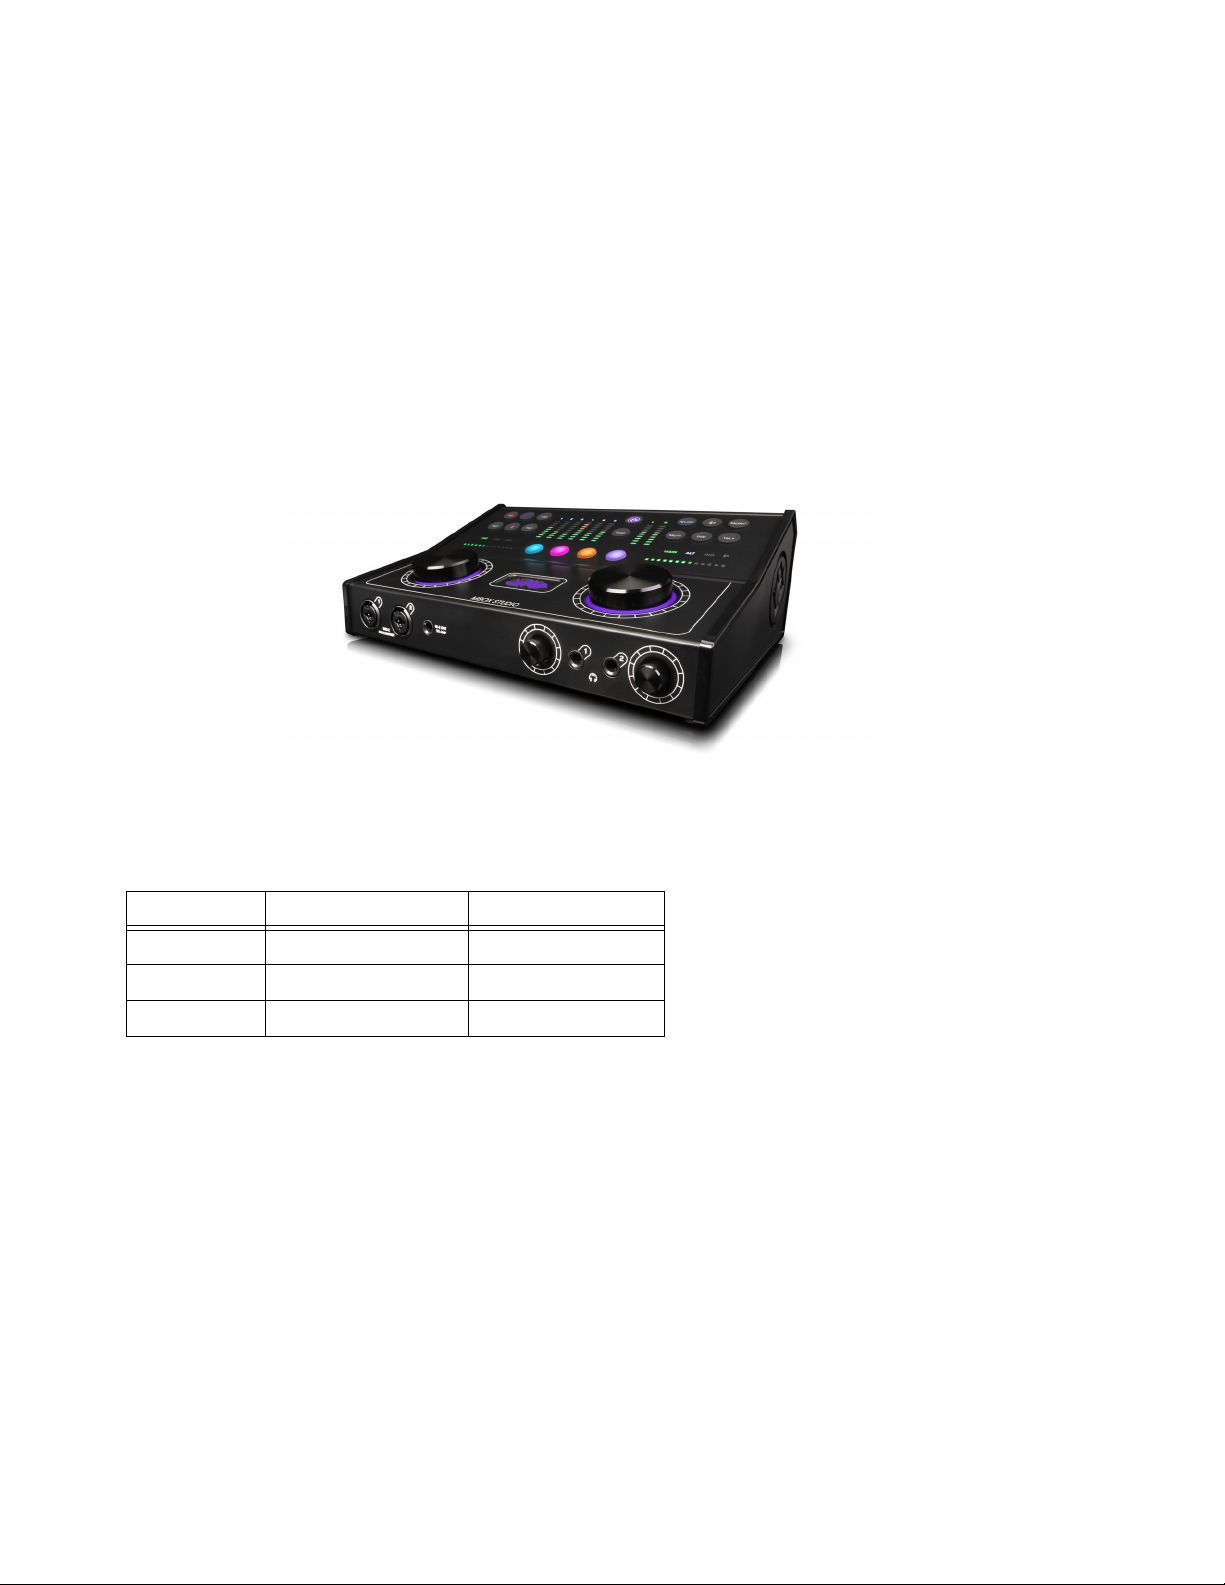
MBOX Studio Max I/O per Sample Rate
Sample Rate Maximum Inputs Maximum Outputs
44.1/48 kHz 21 22
882/96 kHz 17 18
176.4/192 kHz 8 10

Introduction 2
• 4x ¼-inch TRS Line outputs
• L/R Main Monitor outputs
• 1/2 Alt outputs
• 2x ¼-inch TRS effect loops (hardware inserts) with Level and Impedance matching
• 2x ¼-inch TRS outputs
• 2x ¼-inch TRS inputs
• Switchable impedance between “Line” and “Hi-Z/Stomp Box”
• Control Room section
• Large dual-function (rotate/push) encoder to control output levels (rotate) and Speaker Output select Main/Alt (push)
•Mute, Dim, and Mono buttons
• Bluetooth input/output source select button
• Monitor Link Button to link output levels on Main/Alt/Bluetooth
• 4x User Action buttons, color coded with custom color selection (push and push /hold dual functionality)
• Stereo Bluetooth input
• Stereo Bluetooth output
• 1x Coax S/PDIF I/O
• 1x Optical I/O (supports ADAT, SMUX and S/PDIF)
• 8x Pro Tools (or other DAW) software inputs
• 2x ¼-inch headphone outputs with individual mixes and rotary controls
• 1x ¼-inch Hi-Z Out to Amp output for re-amplification
• MBOX button (launches MBOX Control)
• Input channel-based EQ, and Avid Reverb and Delay FX
• Built-in instrument Tuner
• 1x1 MIDI I/O
• 2x Footswitch and/or Expression Pedal inputs
• Low Latency Direct Monitoring (LLM) via MBOX Control
• USB 2.0 Type C Connector
• Supports iOS (compatible with camera kit (not included))
• External 12V Power Supply
• Kensington Security Slot
Included Software, Plug-ins, and Sound Libraries
With your purchase and registration of MBOX Studio, you are entitled to the following:
• Pro Tools Studio software, with 1-year subscription and Standard Avid support contract
• Sibelius Artist software, with 1-year subscription
• Bundled effects and instrument plug-ins from Avid and several Avid Development Partners.
• Sound libraries that include samples for almost all of your music production needs, including sound effects, hits, loops, and phrases
of a wide variety of instruments, a range of tempo options (for rhythmic material), in many different styles.
For complete, detailed information about what you get with MBOX Studio, visit www.avid.com/mbox-support.

Introduction 3
System Requirements and Compatibility Information
MBOX Studio is supported by Pro Tools Artist, Pro Tools Studio, and Pro Tools | Ultimate 2022.9 or later.
For detailed system requirements, visit www.avid.com/mbox-support.
Avid can only assure compatibility and provide support for hardware and software it has tested and approved.
For a complete list of optimizations for your Pro Tools computer, visit: Pro Tools Computer Optimizations.
For complete Pro Tools system requirements and a list of qualified computers, operating systems, hard drives, peripherals, and
third-party devices, visit www.avid.com/compatibility.
Conventions Used in Pro Tools Documentation
Pro Tools documentation uses the following conventions to indicate menu choices, keyboard commands, and mouse commands:
:
The names of Commands, Options, and Settings that appear on-screen are in a different font.
The names of physical controls on Pro Tools | Carbon are in displayed in bold text.
Hyper-links and cross-reference links are displayed in blue text.
The following symbols are used to highlight important information:
Convention Action
File > Save Choose Save from the File menu
Command+N Hold down the Command key and press the N key
Command-click Hold down the Command key and click the mouse button
Right-click Click with the right mouse button
User Tips are helpful hints for getting the most from your Pro Tools system.
Important Notices include information that could affect your Pro Tools session data or the performance of your Pro Tools system.
Shortcuts show you useful keyboard or mouse shortcuts.
Cross References point to related sections in this guide and other Avid documentation.

Introduction 4
Resources
The Avid website (www.avid.com) is your best online source for information to help you get the most out of your Avid system.
Account Activation and Product Registration
Activate your product to access downloads in your Avid account (or quickly create an account if you do not have one). Register your
purchase online, download software, updates, documentation, and other resources.
www.avid.com/account
Support and Downloads
For help with MBOX Studio, visit:
MBOX Studio Learn & Support
Contact Avid Customer Success (technical support), download software updates and the latest online manuals, browse the Compatibil-
ity documents for system requirements, search the online Knowledge Base or join the worldwide Avid user community.
www.avid.com/support
Video Tutorials
Learn how to use MBOX Studio by watching some or all of its video Tutorials.
The Pro Tools Quick Tips series of online videos provide tutorials to help if you are new to Pro Tools.
Pro Tools Quick Tips
You can browse the videos or use the Pro Tools Quick Reference Guide to find and learn exactly what you want.
Training and Education
Study on your own using courses available online, find out how you can learn in a classroom setting at an Avid-certified training center,
or view video tutorials and webinars.
www.avid.com/education
Products and Developers
Learn about Avid products, download demo software, or learn about our Development Partners and their plug-ins, applications, and
hardware.
www.avid.com/products
Avid Store
Visit the Avid store for plug-ins and control surfaces to extend the capabilities of your Pro Tools system.
shop.avid.com

Part I: Installation


Installation and Setup 7
Installation and Setup
Installing and setting up MBOX Studio is simple and involves the following steps:
1Unpack the Box
2Register MBOX Studio and Activate your Avid Master Account
3Connect Cables
4Download and Install Pro Tools and MBOX Control Software (including authorizing your software with iLok License Manager,
and updating MBOX Studio firmware)
5Launch and Configure MBOX Control Software
6Launch Pro Tools
Unpack the Box
Before you get started installing MBOX Studio, unpack the box, which contains the following:
• Welcome card with redemption code, QR code, and serial number
• MBOX Studio Quick Setup Guide
• MBOX Studio audio interface. Be sure to remove the protective plastic covering the top panel.
• External 12V Power Supply with adapters
• USB C-Type Cable
• USB C-Type to USB A-Type Adapter
Keep the Welcome card on hand to register MBOX Studio and access software, sound libraries, and documentation downloads. Set
the cables aside until you are ready to start making cable connections. Remove MBOX Studio from the box and packaging, and
place it on a hard, dry surface.
Proceed to Register MBOX Studio and Activate your Avid Master Account.
Installation and Setup 8
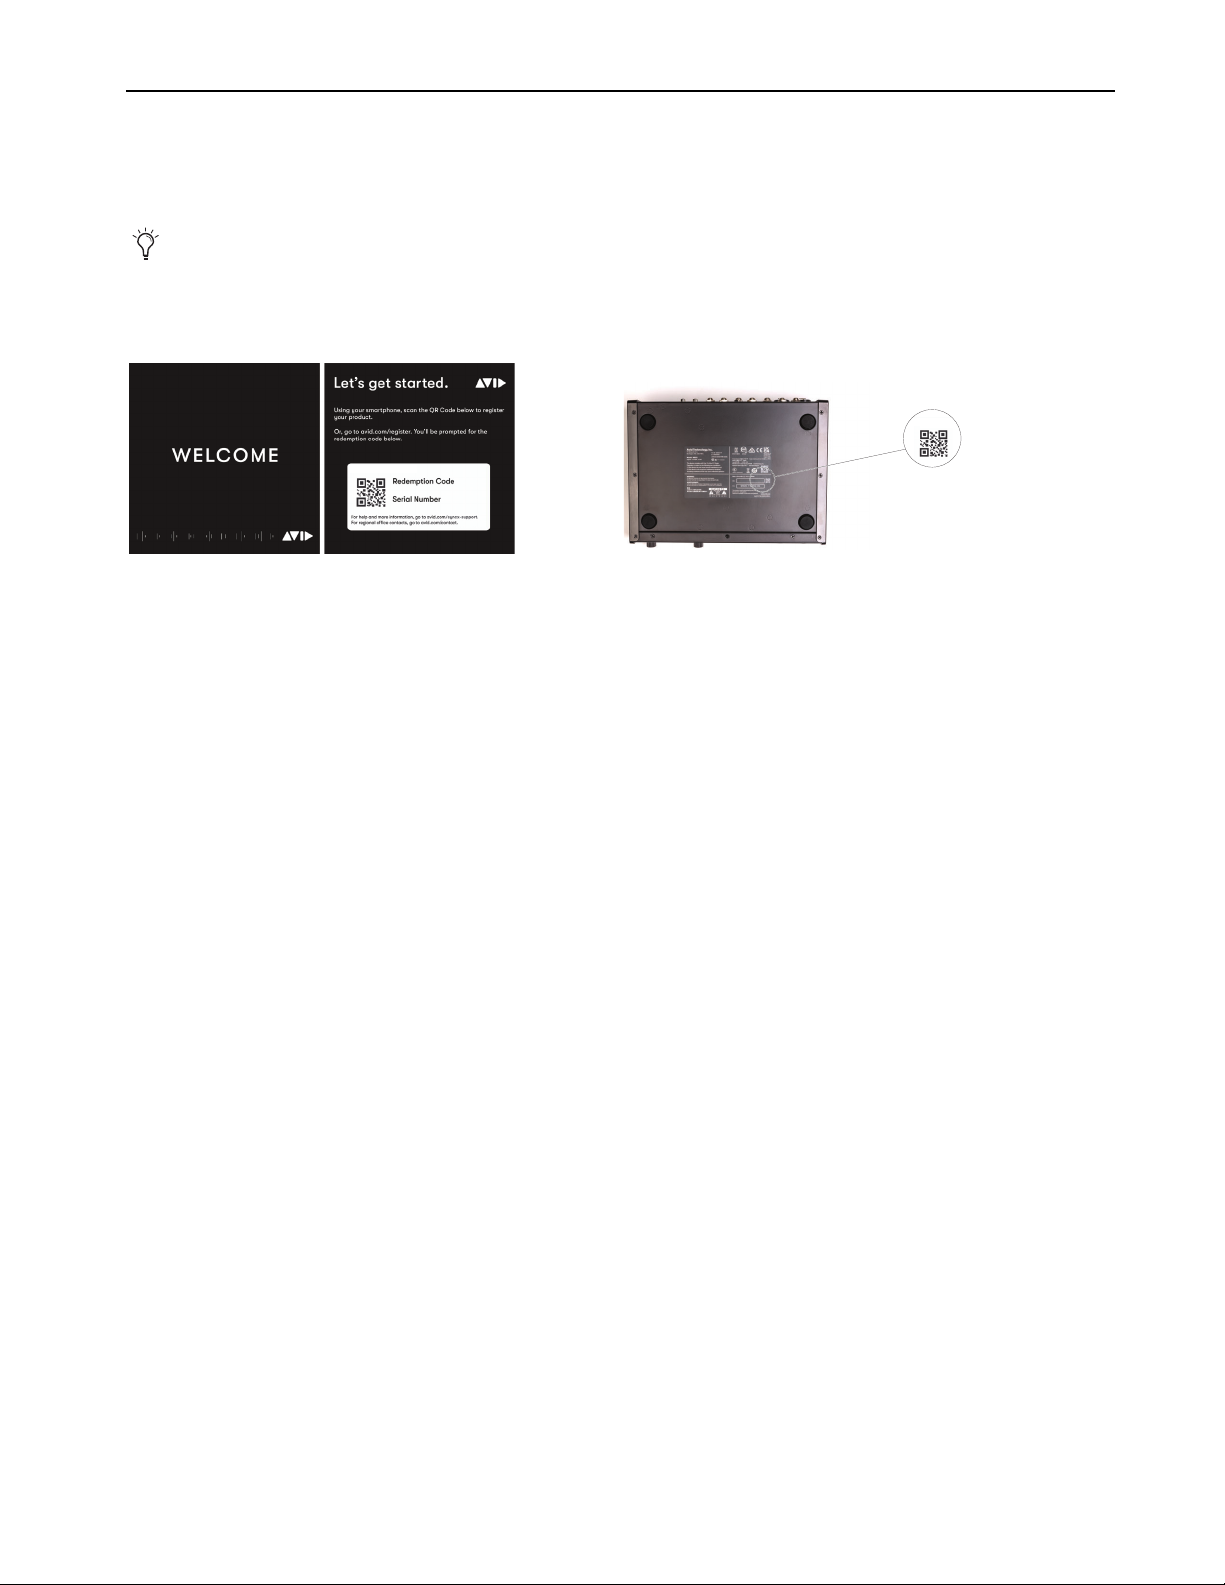
Register MBOX Studio and Activate your Avid Master Account
MBOX Studio includes a Welcome card with a redemption code and a QR code that lets you register the unit. Registering lets you access
software and PDF documentation through your online Avid Master Account. (The QR code is also provided on the underside of the
MBOX Studio unit.)
To register your MBOX Studio unit and access MBOX-related downloads through your Avid Master Account:
1Locate the Welcome card and codes.
2Do one of the following:
• With your mobile device, scan the QR code on the Welcome card, follow the on-screen instructions then continue with the next
step.
•Visithttps://www.avid.com/register and continue with the next step.
3Log in to your Avid Master Account. If you do not already have an Avid Master Account, create a new one and log in.
4Enter the redemption code on the Welcome card and click Register. If you scanned the QR code, your redemption code is entered au-
tomatically.
5Enter the MBOX Studio serial number (it is located on a sticker on the underside of the unit).
6Select your iLok.com account and click Use This Account, or create a new iLok account by following the on-screen instructions.
You are directed to the My Products page for your Avid Master Account.
7Proceed to Connect Cables.
For step-by-step instructions on registration and license options, visit MBOX Registration.
Example Welcome card (shown at left) and location of the serial number and QR code on the unit (shown at right)
MBOX Studio
MBOX
MBOX Studio

Installation and Setup 9
Connect Cables
To install MBOX Studio, make USB and Power Connections as shown below.
• If necessary use the included USB-to-USB-C adapter.
• Choose the power adapter appropriate for your region.
USB and Power Connections
Audio Connections
The following diagrams show example audio connections. Consider making only minimal input and output connections now while you
are completing the installation process, and connecting the rest of your audio equipment later.
Basic Input and Output Connections
Connect a single set of speakers and/or headphones, and a single input source (such as a microphone, electric guitar, or similar). This
will let you play back, listen, and record to confirm a successful installation.
For details about front and back panel connectors and more example diagrams, see Download and Install Pro Tools and MBOX Control
Software.
Minimal audio output and input connections

Installation and Setup 10
Download and Install Pro Tools and MBOX Control Software
Once you have registered MBOX Studio, you can download and install Pro Tools Studio software, including plug-ins, and sound librar-
ies from your Avid Master Account. PDF documentation for MBOX Studio and Pro Tools software is also available through your Avid
Master Account.
Download and Review PDF Documentation
Download and review PDF documentation for MBOX Studio and Pro Tools software from your Avid Master Account. Be sure to con-
sult any Read Me documentation for the latest known issues.
Download and Install Pro Tools and MBOX Control Software
To download Pro Tools and MBOX Control software:
1From the computer where you will be installing Pro Tools Artist, log in to your Avid Master Account (if you are not already).
2Under My Products, locate and click MBOX Studio in the Products list.
3Click the View Software Download Links & Product Details link for your platform (macOS or Windows) to show download links for all
software installers and PDF documentation included with MBOX Studio.
4Download the installers for each of the following:
• MBOX Control installer
• Pro Tools software installer
• Plug-in installer(s) such as Ignition Pack or other, as available.
• Demo Sessions, sound libraries and other content.
5Locate and extract (uncompress) each of the downloaded installers.
6Locate and launch the MBOX Control installer. Follow the on-screen instructions to complete the installation.
7Locate and launch the Pro Tools installer. Follow the on-screen instructions to complete the installation, then restart your computer
when prompted.
8After your computer restarts, install plug-ins and sound libraries download from your Avid Master Account (you can also do this us-
ing the Avid Link desktop application that is installed with Pro Tools).
9Proceed to Power On MBOX Studio.
Power On MBOX Studio
To power on MBOX Studio:
1Press and hold the Power button on the back panel for at least half a second. The encoders and other elements illuminate.
2Proceed to Launch and Configure MBOX Control Software.
If you are an existing customer who already owns an eligible Pro Tools product, you may choose between getting an additional
Pro Tools license or extending the duration of the term of your current product.

Installation and Setup 11
Launch and Configure MBOX Control Software
MBOX Control software lets you configure MBOX Studio hardware settings, signal routing, and many other parameters including the
on-board Avid FX and User Action Button assignments. Preference settings can be saved as MBOX Control User Presets and recalled
at any time to optimize MBOX Studio for different workflows, such as live audio tracking, re-amping, or effects processing.
To configure MBOX Control:
1Make sure you have already installed MBOX Control software.
2Launch MBOX Control by doing the following:
• Double-click the MBOX Control icon in Applications (Mac), or launch MBOX Control from the Start menu (Windows).
3Be sure to update firmware if prompted to do so (for more information see Firmware Update).
4MBOX Control opens in its default view.
5Click the Settings (gear) icon to open MBOX Control Preferences.
6In the Clocking Options section, configure Clock Source and Sample Rate as desired.
• Leave Clock Source set to Internal, or choose the digital I/O ports you want to set as the clock leader.
• Choose a Sample Rate and any other settings as desired. For complete descriptions of all Preference settings, see Preferences.
7Optional: Click the Presets button and save your settings as a custom Preset. For more information, see Presets.
8Leave MBOX Control running and proceed to Launch Pro Tools.
Launching MBOX Control
Update Firmware dialog
MBOX Control default view, and the Settings icon to access MBOX Control Preferences

Installation and Setup 12
Launch Pro Tools
To launch Pro Tools:
1Double-click the Pro Tools icon in the Applications folder or in the Dock (Mac), or choose it from the Start menu (Windows).
2If prompted to Activate your Pro Tools software license, follow the on-screen instructions.
iLok Authorization Using iLok License Manager
Once you have registered MBOX Studio and downloaded and installed software from your Avid Master Account, use iLok License
Manager to authorize iLok Cloud or your physical USB iLok (purchased separately) with your entitlements. When launching Pro Tools
for the first time, you are prompted to Activate your software license using your registered iLok account.
Firmware Update
Required firmware updates are included with MBOX Control software.
Configure Pro Tools for MBOX Studio
When you first launch Pro Tools you see the Dashboard, which lets you create and open Pro Tools Session files, open a Session Tem-
plate, access Getting Started resources, and more. Before creating or opening a session, do the following to configure Pro Tools for
MBOX Studio.
Playback Engine
The Playback Engine (Setup > Playback Engine) lets you adjust Pro Tools performance by changing system settings that affect its ca-
pacity for processing, playback, and recording. In most cases, the default settings for your system provide optimum performance.
For now, use the Playback Engine dialog to confirm communication with MBOX Studio as described below.
To configure Playback Engine:
1If the Dashboard is open, click Cancel to close it (but do not quit out of Pro Tools).
2Choose Setup > Playback Engine.
3Make sure MBOX Studio is the current Playback Engine. If it is not, choose it from the Playback Engine selector.
You can return to the Playback Engine dialog at any time to adjust settings to accommodate large or processing-intensive Pro Tools ses-
sions, or to optimize performance for your computer.
I/O Setup
Like a virtual patchbay, I/O Setup controls let you route physical inputs and outputs on audio interfaces to Pro Tools input and output
channels, create internal mix busses, and more. In most cases, the default settings provide all the signal paths you will need. For now,
visit the I/O Setup dialog to confirm it is configured appropriately for MBOX Studio.
To configure I/O Setup:
1Choose Setup > IO.
Pro Tools application icon
Press and hold the N key when launching Pro Tools to open the Playback Engine dialog. If MBOX Studio is not selected as the
Playback Engine, select it and click OK. Alternatively, you can select MBOX Studio in the Playback Engine after you have
launched Pro Tools (Setup > Playback Engine). For more information, see Playback Engine.

Installation and Setup 13
2Click to view the Input, Output, and Bus tabs to make sure you see MBOX Studio at the top, with signal paths appropriate for your
audio interface in the grid, below.
3If the I/O Setup does not show MBOX Studio, make sure you have selected it as the Playback Engine and try again.
4If any tabs list de-activated signal paths, reset them by doing the following:
• Click to select a tab (such as Inputs).
• Click to select any path Name then press Command+A (Mac)/Control+A (Windows) to select all paths in that tab.
•Click
Delete.
•Click
Default.
• Repeat for the Outputs and Busses tabs.
Default Input paths are created for each hardware and software input.
5Click OK to close the I/O Setup dialog.
6Your MBOX Studio is ready to use with Pro Tools.
How to Proceed
To start learning about MBOX Studio and how to use it, refer to the following sections of this guide:
•MBOX Studio Hardware Overview
•MBOX Control Software Overview
•Using MBOX Studio
I/O Setup Input tab (at left) and Output tab (at right)
Input Output

Installation and Setup 14
Starting Up and Shutting Down Your System
Day-to-Day Power Up and Down
To ensure that the components of your Pro Tools system communicate properly with each other, it is advised that you power them on
in the following order.
Start up your Pro Tools system in this order:
1Make sure all your equipment (including your computer) is off.
2Mute your MBOX Studio monitor speakers and lower the volume of all output devices in your system.
3Turn on any external hard drives.
4Turn on any control surfaces (such as Avid S1).
5Turn on any MIDI interfaces, MIDI devices, or synchronization peripherals.
6Power on MBOX Studio. Wait at least fifteen seconds for it to initialize.
7Turn on your computer.
8Launch Pro Tools or any third-party audio or MIDI applications.
9Unmute your MBOX Studio monitor speakers.
Shut down your Pro Tools system in this order:
1Mute your MBOX Studio monitor speakers and turn off or lower the volume of all output
devices in your system.
2Quit Pro Tools and any other running applications. To quit Pro Tools, choose
Pro Tools > Quit (Mac) or File > Exit (Windows).
3Shut down your computer.
4Turn off MBOX Studio (press and hold the power button for 2 seconds).
5Turn off any MIDI interfaces, MIDI devices, or synchronization peripherals.
6Turn off any control surfaces (such as Avid S1).
7Turn off any external hard drives.
Powering on MBOX Studio
Other manuals for Mbox
3
Table of contents
Other Avid Technology Dj Equipment manuals

Avid Technology
Avid Technology S3L System User manual

Avid Technology
Avid Technology Artist Control User manual

Avid Technology
Avid Technology Artist Control User manual

Avid Technology
Avid Technology Artist Control User manual

Avid Technology
Avid Technology VENUE S3L-X Parts list manual

Avid Technology
Avid Technology Mbox User manual

Avid Technology
Avid Technology Artist Mix User manual

Avid Technology
Avid Technology Artist Mix User manual


