Avid Technology Artist Control User manual

Artist Control User Guide
EuControl v2.6

Legal Notices
This guide is copyrighted ©2011 by Avid Technology, Inc., (hereafter “Avid”), with
all rights reserved. Under copyright laws, this guide may not be duplicated in
whole or in part without the written consent of Avid.
003, 96 I/O, 96i I/O, 192 Digital I/O, 192 I/O, 888|24 I/O, 882|20 I/O,
1622 I/O, 24-Bit ADAT Bridge I/O, AudioSuite, Avid, Avid DNA, Avid Mojo,
Avid Unity, Avid Unity ISIS, Avid Xpress, AVoption, Axiom, Beat Detective,
Bomb Factory, Bruno, C|24, Command|8, Control|24, D-Command, D-Control,
D-Fi, D-fx, D-Show, D-Verb, DAE, Digi 002, DigiBase, DigiDelivery, Digidesign,
Digidesign Audio Engine, Digidesign Intelligent Noise Reduction, Digidesign
TDM Bus, DigiDrive, DigiRack, DigiTest, DigiTranslator, DINR, DV Toolkit,
EditPack, Eleven, EUCON, HD Core, HD Process, Hybrid, Impact, Interplay, LoFi,
M-Audio, MachineControl, Maxim, Mbox, MediaComposer, MIDI I/O, MIX,
MultiShell, Nitris, OMF, OMF Interchange, PRE, ProControl, Pro Tools M-Powered,
Pro Tools, Pro Tools|HD, Pro Tools LE, QuickPunch, Recti-Fi, Reel Tape, Reso,
Reverb One, ReVibe, RTAS, Sibelius, Smack!, SoundReplacer, Sound
Designer II, Strike, Structure, SYNC HD, SYNC I/O, Synchronic, TL Aggro,
TL AutoPan, TL Drum Rehab, TL Everyphase, TL Fauxlder, TL In Tune,
TL MasterMeter, TL Metro, TL Space, TL Utilities, Transfuser, Trillium Lane Labs,
Vari-Fi, Velvet, X-Form, and XMON are trademarks or registered trademarks of
Avid Technology, Inc. Xpand! is Registered in the U.S. Patent and Trademark
Office. All other trademarks are the property of their respective owners.
Bonjour, the Bonjour logo, and the Bonjour symbol are trademarks of Apple
Computer, Inc.
Product features, specifications, system requirements, and availability are
subject to change without notice.
Guide Part Number 9329-65084-00 REV A 05/11
Documentation Feedback
We are always looking for ways to improve our documentation. If you have
comments, corrections, or suggestions regarding our documentation, email us

Contents iii
Contents
Chapter 1. Introduction . . . . . . . . . . . . . . . . . . . . . . . . . . . . . . . . . . . . . . . . . . . . . . . . . . . . . . . . . . . . . . . . . . . . . . . . . . . 1
What’s Included . . . . . . . . . . . . . . . . . . . . . . . . . . . . . . . . . . . . . . . . . . . . . . . . . . . . . . . . . . . . . . . . . . . . . . . . . . . . . . 1
System Requirements and Compatibility . . . . . . . . . . . . . . . . . . . . . . . . . . . . . . . . . . . . . . . . . . . . . . . . . . . . . . . . . . . . . 2
Registration . . . . . . . . . . . . . . . . . . . . . . . . . . . . . . . . . . . . . . . . . . . . . . . . . . . . . . . . . . . . . . . . . . . . . . . . . . . . . . . . . 2
About This Guide. . . . . . . . . . . . . . . . . . . . . . . . . . . . . . . . . . . . . . . . . . . . . . . . . . . . . . . . . . . . . . . . . . . . . . . . . . . . . . 2
About www.avid.com . . . . . . . . . . . . . . . . . . . . . . . . . . . . . . . . . . . . . . . . . . . . . . . . . . . . . . . . . . . . . . . . . . . . . . . . . . . 3
Chapter 2. Setup and Installation . . . . . . . . . . . . . . . . . . . . . . . . . . . . . . . . . . . . . . . . . . . . . . . . . . . . . . . . . . . . . . . . . . 5
Unpacking and Elevating the Artist Control . . . . . . . . . . . . . . . . . . . . . . . . . . . . . . . . . . . . . . . . . . . . . . . . . . . . . . . . . . . 5
Attaching an Artist Control to Additional Units . . . . . . . . . . . . . . . . . . . . . . . . . . . . . . . . . . . . . . . . . . . . . . . . . . . . . . . . . 6
Installing Software and Hardware . . . . . . . . . . . . . . . . . . . . . . . . . . . . . . . . . . . . . . . . . . . . . . . . . . . . . . . . . . . . . . . . . . 7
Chapter 3. Common Tasks . . . . . . . . . . . . . . . . . . . . . . . . . . . . . . . . . . . . . . . . . . . . . . . . . . . . . . . . . . . . . . . . . . . . . . . 11
Fader Strip . . . . . . . . . . . . . . . . . . . . . . . . . . . . . . . . . . . . . . . . . . . . . . . . . . . . . . . . . . . . . . . . . . . . . . . . . . . . . . . . . 12
Inserts . . . . . . . . . . . . . . . . . . . . . . . . . . . . . . . . . . . . . . . . . . . . . . . . . . . . . . . . . . . . . . . . . . . . . . . . . . . . . . . . . . . . 12
Transport Keys and Jog Wheel . . . . . . . . . . . . . . . . . . . . . . . . . . . . . . . . . . . . . . . . . . . . . . . . . . . . . . . . . . . . . . . . . . . 13
Chapter 4. Surface Controls . . . . . . . . . . . . . . . . . . . . . . . . . . . . . . . . . . . . . . . . . . . . . . . . . . . . . . . . . . . . . . . . . . . . . . 15
Power Switch . . . . . . . . . . . . . . . . . . . . . . . . . . . . . . . . . . . . . . . . . . . . . . . . . . . . . . . . . . . . . . . . . . . . . . . . . . . . . . . 16
Shift Key . . . . . . . . . . . . . . . . . . . . . . . . . . . . . . . . . . . . . . . . . . . . . . . . . . . . . . . . . . . . . . . . . . . . . . . . . . . . . . . . . . 16
Fader Strips . . . . . . . . . . . . . . . . . . . . . . . . . . . . . . . . . . . . . . . . . . . . . . . . . . . . . . . . . . . . . . . . . . . . . . . . . . . . . . . . 16
Navigation Controls . . . . . . . . . . . . . . . . . . . . . . . . . . . . . . . . . . . . . . . . . . . . . . . . . . . . . . . . . . . . . . . . . . . . . . . . . . . 17
Knobs . . . . . . . . . . . . . . . . . . . . . . . . . . . . . . . . . . . . . . . . . . . . . . . . . . . . . . . . . . . . . . . . . . . . . . . . . . . . . . . . . . . . 19
Keys . . . . . . . . . . . . . . . . . . . . . . . . . . . . . . . . . . . . . . . . . . . . . . . . . . . . . . . . . . . . . . . . . . . . . . . . . . . . . . . . . . . . . 21
Jog Wheel and Transport Controls . . . . . . . . . . . . . . . . . . . . . . . . . . . . . . . . . . . . . . . . . . . . . . . . . . . . . . . . . . . . . . . . . 21
CONTROL ROOM/MONITOR Knob . . . . . . . . . . . . . . . . . . . . . . . . . . . . . . . . . . . . . . . . . . . . . . . . . . . . . . . . . . . . . . . . . 22
Chapter 5. Touchscreen and Controls . . . . . . . . . . . . . . . . . . . . . . . . . . . . . . . . . . . . . . . . . . . . . . . . . . . . . . . . . . . . . 23
Tracks View . . . . . . . . . . . . . . . . . . . . . . . . . . . . . . . . . . . . . . . . . . . . . . . . . . . . . . . . . . . . . . . . . . . . . . . . . . . . . . . . 24
Soft Key View . . . . . . . . . . . . . . . . . . . . . . . . . . . . . . . . . . . . . . . . . . . . . . . . . . . . . . . . . . . . . . . . . . . . . . . . . . . . . . . 25
Setup Screens. . . . . . . . . . . . . . . . . . . . . . . . . . . . . . . . . . . . . . . . . . . . . . . . . . . . . . . . . . . . . . . . . . . . . . . . . . . . . . . 26
Chapter 6. EuControl. . . . . . . . . . . . . . . . . . . . . . . . . . . . . . . . . . . . . . . . . . . . . . . . . . . . . . . . . . . . . . . . . . . . . . . . . . . . . 29
Surfaces. . . . . . . . . . . . . . . . . . . . . . . . . . . . . . . . . . . . . . . . . . . . . . . . . . . . . . . . . . . . . . . . . . . . . . . . . . . . . . . . . . . 30
Workstations . . . . . . . . . . . . . . . . . . . . . . . . . . . . . . . . . . . . . . . . . . . . . . . . . . . . . . . . . . . . . . . . . . . . . . . . . . . . . . . 31
General . . . . . . . . . . . . . . . . . . . . . . . . . . . . . . . . . . . . . . . . . . . . . . . . . . . . . . . . . . . . . . . . . . . . . . . . . . . . . . . . . . . 33
Preferences . . . . . . . . . . . . . . . . . . . . . . . . . . . . . . . . . . . . . . . . . . . . . . . . . . . . . . . . . . . . . . . . . . . . . . . . . . . . . . . . 34
Assign . . . . . . . . . . . . . . . . . . . . . . . . . . . . . . . . . . . . . . . . . . . . . . . . . . . . . . . . . . . . . . . . . . . . . . . . . . . . . . . . . . . . 35
Layouts . . . . . . . . . . . . . . . . . . . . . . . . . . . . . . . . . . . . . . . . . . . . . . . . . . . . . . . . . . . . . . . . . . . . . . . . . . . . . . . . . . . 36
Soft Keys . . . . . . . . . . . . . . . . . . . . . . . . . . . . . . . . . . . . . . . . . . . . . . . . . . . . . . . . . . . . . . . . . . . . . . . . . . . . . . . . . . 36

Artist Control User Guideiv
Chapter 7. Soft Keys . . . . . . . . . . . . . . . . . . . . . . . . . . . . . . . . . . . . . . . . . . . . . . . . . . . . . . . . . . . . . . . . . . . . . . . . . . . . . 37
Save . . . . . . . . . . . . . . . . . . . . . . . . . . . . . . . . . . . . . . . . . . . . . . . . . . . . . . . . . . . . . . . . . . . . . . . . . . . . . . . . . . . . . . 37
Revert . . . . . . . . . . . . . . . . . . . . . . . . . . . . . . . . . . . . . . . . . . . . . . . . . . . . . . . . . . . . . . . . . . . . . . . . . . . . . . . . . . . . . 37
Restore . . . . . . . . . . . . . . . . . . . . . . . . . . . . . . . . . . . . . . . . . . . . . . . . . . . . . . . . . . . . . . . . . . . . . . . . . . . . . . . . . . . . 38
Section . . . . . . . . . . . . . . . . . . . . . . . . . . . . . . . . . . . . . . . . . . . . . . . . . . . . . . . . . . . . . . . . . . . . . . . . . . . . . . . . . . . . 38
Page . . . . . . . . . . . . . . . . . . . . . . . . . . . . . . . . . . . . . . . . . . . . . . . . . . . . . . . . . . . . . . . . . . . . . . . . . . . . . . . . . . . . . . 38
Plus Key (+) . . . . . . . . . . . . . . . . . . . . . . . . . . . . . . . . . . . . . . . . . . . . . . . . . . . . . . . . . . . . . . . . . . . . . . . . . . . . . . . . . 38
Minus Key (–). . . . . . . . . . . . . . . . . . . . . . . . . . . . . . . . . . . . . . . . . . . . . . . . . . . . . . . . . . . . . . . . . . . . . . . . . . . . . . . . 38
Soft Key Label . . . . . . . . . . . . . . . . . . . . . . . . . . . . . . . . . . . . . . . . . . . . . . . . . . . . . . . . . . . . . . . . . . . . . . . . . . . . . . . 38
Layout. . . . . . . . . . . . . . . . . . . . . . . . . . . . . . . . . . . . . . . . . . . . . . . . . . . . . . . . . . . . . . . . . . . . . . . . . . . . . . . . . . . . . 38
Icon . . . . . . . . . . . . . . . . . . . . . . . . . . . . . . . . . . . . . . . . . . . . . . . . . . . . . . . . . . . . . . . . . . . . . . . . . . . . . . . . . . . . . . 38
Font . . . . . . . . . . . . . . . . . . . . . . . . . . . . . . . . . . . . . . . . . . . . . . . . . . . . . . . . . . . . . . . . . . . . . . . . . . . . . . . . . . . . . . 38
Color . . . . . . . . . . . . . . . . . . . . . . . . . . . . . . . . . . . . . . . . . . . . . . . . . . . . . . . . . . . . . . . . . . . . . . . . . . . . . . . . . . . . . . 38
Command . . . . . . . . . . . . . . . . . . . . . . . . . . . . . . . . . . . . . . . . . . . . . . . . . . . . . . . . . . . . . . . . . . . . . . . . . . . . . . . . . . 39
Jog Wheel Commands . . . . . . . . . . . . . . . . . . . . . . . . . . . . . . . . . . . . . . . . . . . . . . . . . . . . . . . . . . . . . . . . . . . . . . . . . 41
Chapter 8. Setting the IP Address . . . . . . . . . . . . . . . . . . . . . . . . . . . . . . . . . . . . . . . . . . . . . . . . . . . . . . . . . . . . . . . . . 47
Appendix A. Compliance Information . . . . . . . . . . . . . . . . . . . . . . . . . . . . . . . . . . . . . . . . . . . . . . . . . . . . . . . . . . . . . . . 49
Environmental Compliance . . . . . . . . . . . . . . . . . . . . . . . . . . . . . . . . . . . . . . . . . . . . . . . . . . . . . . . . . . . . . . . . . . . . . . 49
EMC (Electromagnetic Compliance) . . . . . . . . . . . . . . . . . . . . . . . . . . . . . . . . . . . . . . . . . . . . . . . . . . . . . . . . . . . . . . . . 49

Chapter 1: Introduction 1
Chapter 1: Introduction
Artist Control, Artist Mix, Artist Transport, and Artist Color comprise the Artist Series family of media controllers. They use a 100
Mbs Ethernet EUCON™ connection to control audio and video applications running on a workstation computer. EUCON is a
high-speed communication protocol and enables control of virtually every application feature.
Each Artist Series media controller can run as a standalone device. Up to four Artist Mix units can be used with one Artist Control
and/or one Artist Transport to create a larger control surface. Artist Series media controllers borrow many features from the
Artist Pro and System 5-MC.
Artist Control supports two types of applications:
• EUCON-aware applications (such as Pro Tools™ 9.0 and higher, Media Composer™, Cubase, Logic Pro, and Nuendo) di-
rectly support the EUCON protocol. They provide the highest level of integration, high-resolution controls, and high-speed
connectivity.
• Non-EUCON-aware applications that support Mackie Control or HUI (such as Pro Tools 8.x and lower, Live, and Reason) can
use many functions but are less integrated than EUCON-aware applications.
Artist Control can also provide some functionality over non-EUCON-aware applications that do not support HUI or Mackie Con-
trol by sending out keystroke commands over EUCON.
EuControl Software
The EuControl software application is responsible for finding, linking, and communicating with all Artist Series controllers on
the network. EuControl must be installed on the computer that runs the applications you want to control before using Artist
Series controllers.
What’s Included
• Artist Control, with riser brackets
• EuControl software installer disc
• 1 Ethernet Crossover cable
• Power supply
• Artist Control Quick Setup
• Registration Information Card
Artist Control User Guide2
System Requirements and Compatibility
Avid can only assure compatibility and provide support for hardware and software it has tested and approved.
For compatibility, downloads, and Artist Series support, visit:
www.avid.com/artistsupport
Registration
Review the enclosed Registration Information Card and follow the instructions on it to quickly register your purchase online.
By registering, you become eligible to receive the following:
• Technical support information
• Software update and upgrade notices
• Hardware warranty information
About This Guide
Conventions Used in This Guide
All of our guides use the following conventions to indicate menu choices and key commands:
:
The names of Commands, Options, and Settings that appear on-screen are in a different font.
The following symbols are used to highlight important information:
Convention Action
File > Save Choose Save from the File menu
Control+N Hold down the Control key and press the N key
Control-click Hold down the Control key and click the mouse button
Right-click Click with the right mouse button
User Tips are helpful hints for getting the most from your system.
Important Notices include information that could affect your data or the performance of your system.
Shortcuts show you useful keyboard or mouse shortcuts.
Cross References point to related sections in this guide and other Avid guides.

Chapter 1: Introduction 3
Hardware Keys on Artist Series Units
The names of keys on Artist Series hardware are in bold (such as SEL).
The SHIFT key on Artist Series hardware is indicated by bold text, in all-caps (SHIFT) to distinguish it from references to the Shift
key on your QWERTY keyboard.
SHIFT and SHIFT Lock
The SHIFT key on Artist Series units is used in conjunction with other keys to access secondary functions that are labeled in blue
above the primary function. Artist Transport provides a single SHIFT key at the bottom-right. Two SHIFT keys are located at the
bottom-left and -right on both Artist Control and Artist Mix.
The following terminology is used to describe SHIFT functions.
Example:
• “Press and hold the SHIFT key then press the AUX key”
is written as
•“PressSHIFT+AUX/GROUP”
How to Use this PDF Guide
The Acrobat PDF version of this manual can be a valuable online resource. These are some useful features of the PDF:
• The Bookmarks on the left serve as a continuously visible table of contents. Click on a subject heading to jump to that page.
Click a +symbol to expand that heading to show subheadings. Click the –symbol to collapse a subheading.
• The Table of Contents provides active links to their pages. Select the hand cursor, allow it to hover over the heading until
it turns into a finger. Then click to locate to that subject and page.
• All cross references are active links. Allow the hand cursor to hover over the reference until it turns into a finger and click
to follow the reference.
• Select Find from the Edit menu to search for a subject.
About www.avid.com
The Avid website (www.avid.com) is your best online source for information to help you get the most out of your system.
The following are just a few of the services and features available.
Product Registration Register your purchase online.
Support and Downloads Contact Avid Customer Success (technical support); download software updates and the latest online
manuals; browse the Compatibility documents for system requirements; search the online Knowledge Base or join the worldwide
Pro Tools community on the User Conference.
Training and Education Study on your own using courses available online or find out how you can learn in a classroom setting at
a certified Pro Tools training center.
Products and Developers Learn about Avid products; download demo software or learn about our Development Partners and their
plug-ins, applications, and hardware.
News and Events Get the latest news from Avid or sign up for a Pro Tools demo.

Artist Control User Guide4

Chapter 2: Setup and Installation 5
Chapter 2: Setup and Installation
Unpacking and Elevating the Artist Control
Unpack Artist Control, its power adapter, AC power cord, Installer disc, Ethernet crossover cable, and riser brackets.
Artist Control can be elevated or angled using small foldout legs on the bottom of the unit or elevated and angled by attaching
the larger riser brackets. Since either method requires turning Artist Control over, it is easier to do this before attaching any cables.
Turn it over and place it on a soft surface.
Pull out all four of the small foldout legs to moderately elevate the unit; pull out only the back two to angle the unit towards you.
Pull out the metal clips from the same area as the legs and move them until they snap into the legs.
Two larger, detached riser brackets elevate and angle the unit more than the foldout legs. Use moderate force to snap them into
the bottom panel as shown.
Artist Control User Guide6
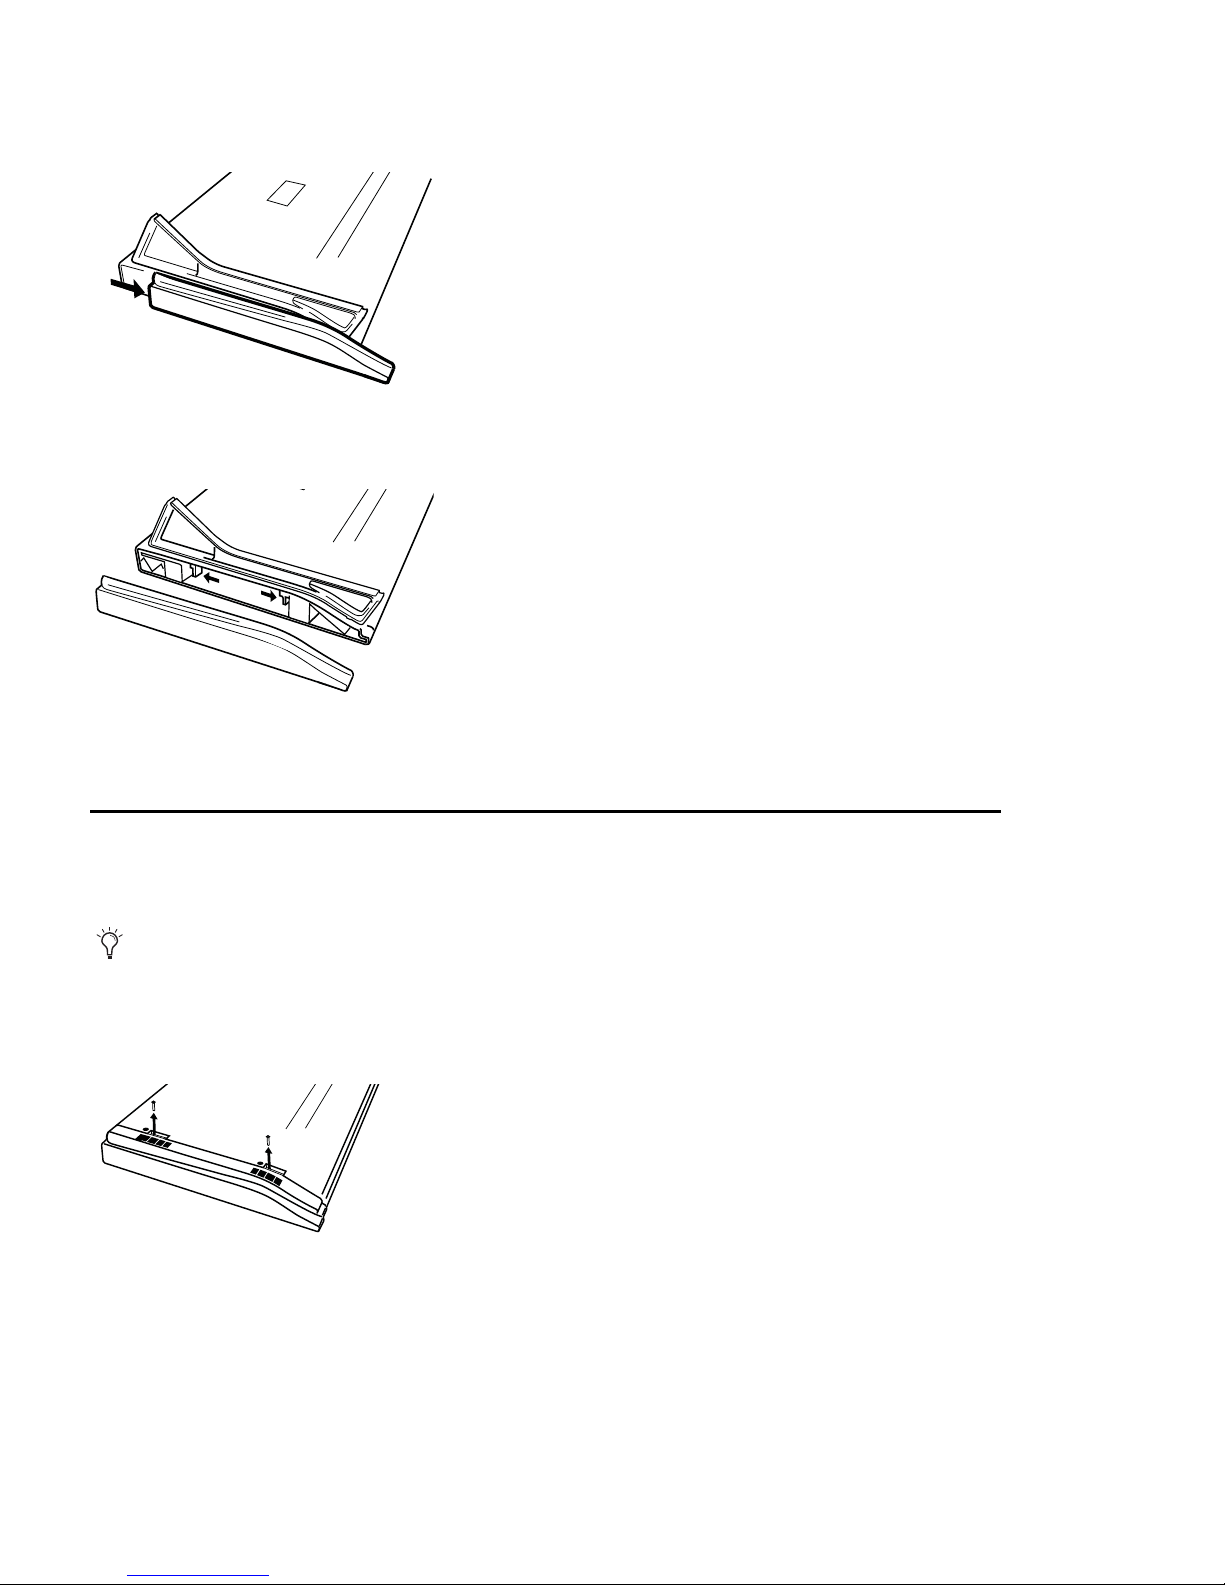
To remove the riser brackets:
1 Slide the side panels off.
2 Press the tabs to release the riser brackets.
3 Lift the riser bracket out of the Artist Control to remove
Attaching an Artist Control to Additional Units
An Artist Control can be physically attached to up to four Artist Mixes and one Artist Transport to form a larger, stable control
surface.
To join an Artist Control to an Artist Mix:
1 On the Artist Control, use a #2 Phillips screwdriver to remove the two silver screws. The screws may be tight, so you may have
to use some force.
If you are using multiple units, see “Surfaces” on page 30 to use EuControl to arrange the units in the desired order.
Removing screws from the bottom panel

Chapter 2: Setup and Installation 7
2 Lift the black plastic connecting part and side panel up and out of Artist Control.
3 On the Artist Mix, remove the side panel on the end where it will attach to Artist Control.
4 Slide the connecting part of Artist Control into Artist Mix to attach them together.
Installing Software and Hardware
You must install EuControl software before using your Artist Series media controller.
To install EuControl software and your Artist Series media controller:
1 Do one of the following:
• Download the EuControl installer for your computer platform from www.avid.com/artistsupport. After downloading, make
sure the installer is uncompressed (.dmg on Mac or .ZIP on Windows).
– or –
• Insert the Installer disc into your computer.
2 Double-click the EuControl installer application.
3 Follow the on-screen instructions to complete the installation.
4 When installation is complete, click Quit (Mac) or Finish (Windows). EuControl will launch automatically and is running when
its icon appears:
• On Mac, the icon is shown in your menu bar.
• On Windows, the icon appears in the System tray (or alongside other Hidden Icons in the lower tool bar if you do not have
your system configured to always show icons in the System tray).
5 Shut down your computer.
Removing connecting part and side panel
Artist Mix and Artist Control attached by connecting at side panel
If prompted to download the most current version of EuControl, follow the onscreen instructions.
Menu bar with EuControl icon (Mac)

Artist Control User Guide8
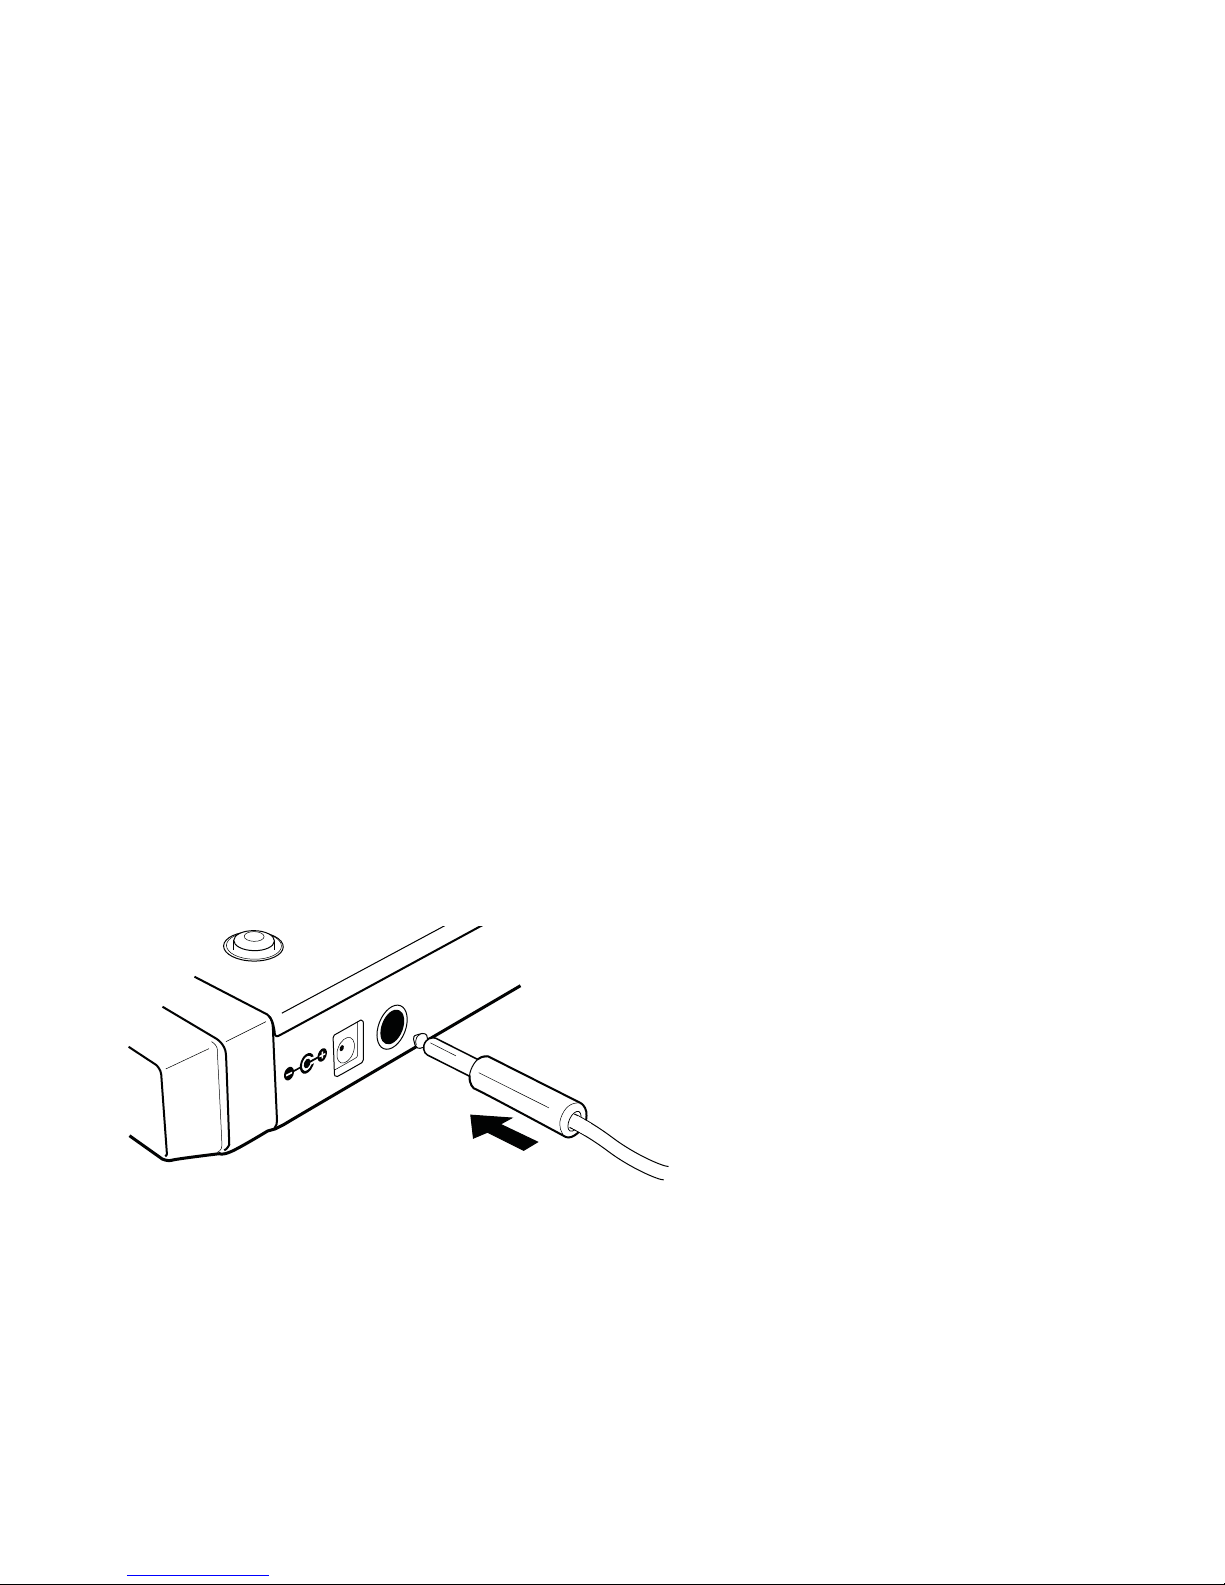
6 Plug one end of the AC power cord into the power adapter and the other into a power outlet. Make sure the AC power cord is
pushed all the way into the adapter.
7 Connect the DC output cable from the power adapter to DC In on the left side of the rear panel.
8 Plug one end of the Ethernet crossover cable into the Ethernet jack (labeled with) on the rear panel of the Artist Control.
Connecting the power adapter
Connecting the power adapter
Ethernet cable and rear panel jack
DC In 15 V
FOOTSWITCH
Eucon

Chapter 2: Setup and Installation 9
9 Plug the other end of the Ethernet crossover cable into an open Ethernet jack on your computer, router, or Ethernet switch.
• Note that connecting directly to the computer may require removing your Internet cable. If you have a Mac with two Ether-
net ports, use Ethernet 1, rather than Ethernet 2.
• An Ethernet router or switch is required to connect additional Artist Mix or other Artist Series unit such as an Artist Trans-
port, or to connect units to a local area network.
10 Turn on your router (if applicable), then turn on your computer and wait until it finishes starting up.
11 Press and release the POWER switch on Artist Control. Do the following, as appropriate for your operating system:
Mac Wait up to 60 seconds. A lit EuControl icon in the menu bar indicates correct installation.
Windows Wait up to 60 seconds. A lit EuControl icon appears in the System tray (or, in Hidden Icons if your system is not con-
figured to show all icons in the System tray).
Artist Control connected directly to computer
Artist Control and one Artist Mix connected using a router
EuControl icon on Mac
EuControl icon on Windows
SOLOSOLO ON ON SOLOSOLO ON ON SOLOSOLO ON ON SOLOSOLO ON ON
Artist Control User Guide10
12 If you did not see the lit EuControl icon, do the following:
• See “Surfaces” on page 30 and add the Artist Control manually.
• Shut down the Artist Control and your computer, then turn them on (computer first, then Artist Control).
• If your Mac is pre-2002 and you are using an Ethernet router or switch, you need to purchase a normal straight-through
Ethernet cable (instead of the crossover Ethernet cable supplied) from a computer store.
• See www.avid.com/artist/support for the most current troubleshooting information.
13 If you downloaded the latest software from the web, you may need to update the firmware on your Artist Series controllers.
See “Update Firmware” on page 31 for instructions.
14 Launch your application (such as Pro Tools, Logic Pro, Cubase, or Digital Performer) and open a session or project.
15 To set up your application to work with Artist Control, see the EUCON Application Setup Guide that you downloaded at the be-
ginning of this section.
Controlling a Second Workstation
Artist Control can control applications running on a second computer, referred to in this guide as a workstation. Most users will
not need to do this because EuControl will be running on the same workstation as the their audio/video applications.
To be able to control a second workstation:
1 Do one of the following:
• Download the EuControl installer from www.avid.com/artistsupport onto the second computer. After downloading, make
sure the installer is uncompressed (.dmg on Mac or .ZIP on Windows).
– or –
• Insert the Installer disc into the second computer.
2 In the Extras folder, double-click the Install EUCON Workstation installer.
3 Follow the instructions to install the EUCON software.
Connecting a Footswitch
The Artist Control has a ¼-in FOOTSWITCH input on the rear panel. The footswitch can be used to punch in and out of record-
ing. Plug the footswitch in before powering on the Artist Control. See “Footswitch” on page 35 for details.
FOOTSWITCH input on rear panel
DC In 15 V
FOOTSWITCH
Chapter 3: Common Tasks 11
Chapter 3: Common Tasks
If you completed the steps in Chapter 2, “Setup and Installation” you are ready to start learning Artist Control. The following
important user interface items and terms are used in tasks:
• The Soft Knobs can be turned like a conventional knob and pressed like a switch to access an additional context-sensitive
function (some do not have a second function).
• The Soft Knobs access a hierarchical menu system. The beginning of the menu system, called the top-level knob set, lets you
choose among eight functions to control with the Soft Knobs.
• The Touchscreen has two rows of six Soft Key labels that correspond to the two rows of physical Soft Keys. Press the
SOFT KEYS <and >page keys to display additional Soft Key labels.
• Press and hold the SHIFT key, found at the bottom-left and -right of Artist Control, to access the functions labeled in blue.
1 Soft Knobs
2 Soft Keys page keys
3 Soft Keys
4 Soft Key labels
Soft Knobs, Soft Keys, and Touchscreen
SOFT KEYS
HOME
END
11
2
4
3

Artist Control User Guide12
Fader Strip
To use the fader strip:
1 Press a fader SEL key on Artist Control.The corresponding track is selected in your application and highlighted on the Touch-
screen.
2 Move the fader up and down.
You are now controlling the level of your track with Artist Control. The top of the Touchscreen displays a level meter and other
track information.
3 Press the PAN Soft Knob to access the Pan knob set.
4 Turn the appropriate Soft Knob to adjust the pan of your application’s audio track. Note that this is not the same knob you
pressed in step 3.
5 Press the NUDGE> key to move all four tracks over one strip. If tracks 1–4 were assigned to strips 1–4, tracks 2–5 are now assigned
to strips 1–4.
6 Press and hold the SHIFT key and press the <BANK key to restore tracks 1–4 to strips 1–4. The SHIFT key accesses the functions
labeled in blue, in this case the HOME function. For convenience, another SHIFT key is located at the bottom-left of Artist Control.
7 Press the BANK> key to shift tracks over four at a time. If tracks 1–4 were assigned to strips 1–4, tracks 5–8 are now assigned to
strips 1–4. The <NUDGE and <BANK keys perform similar operations but in the opposite direction.
Inserts
To control inserts:
1 If tracks 1–4 are not assigned to strips 1–4, press and hold the SHIFT key and press the <BANK key to restore tracks 1–4 to strips
1–4.
2 Add a plug-in on track 1 of your application.
3 Press a fader SEL key.
4 Press the BACK key until the top-level knob set is displayed on the Touchscreen.
5 Press the INSERTS Soft Knob. The names of the plug-ins on that track are distributed across the Soft Knobs.
6 Press the Soft Knob beside the desired plug-in name to select it. The plug-in parameters are distributed across the Soft Knobs.
7 Turn the Soft Knob beside the desired parameter to adjust its value.
8 Press the PAGE keys to access more parameters.
9 Press the BACK key to exit that plug-in.
Fader strip (left); PAGE, NUDGE, and BANK keys (right)
AUTO
REC N
ASSIGN
SEL Y
12
6
0
5
10
20
30
1
CFG
PAGE
BANK
HOME
NUDGE
MIXER
END
BANK
CLOSE
NUDGE
PAGE
CFG
Chapter 3: Common Tasks 13
Transport Keys and Jog Wheel
To use the Transport keys:
Use the PLAY, STOP, FF, and REW buttons to navigate the timeline of the edit window of your application.
To use the Job wheel:
1 Press the JOG key.
2 Spin the Jog Wheel clockwise and counterclockwise to move forward and backward, respectively, on the timeline.
JOG
SHUTTLE
ZOOM HORIZ
ZOOM VERT
REC
REW
FF
STOP
PLAY
JOG
SHUTTLE
ZOOM HORIZ
ZOOM VERT
REC
REW
FF
STOP
PLAY

Artist Control User Guide14
Chapter 4: Surface Controls 15
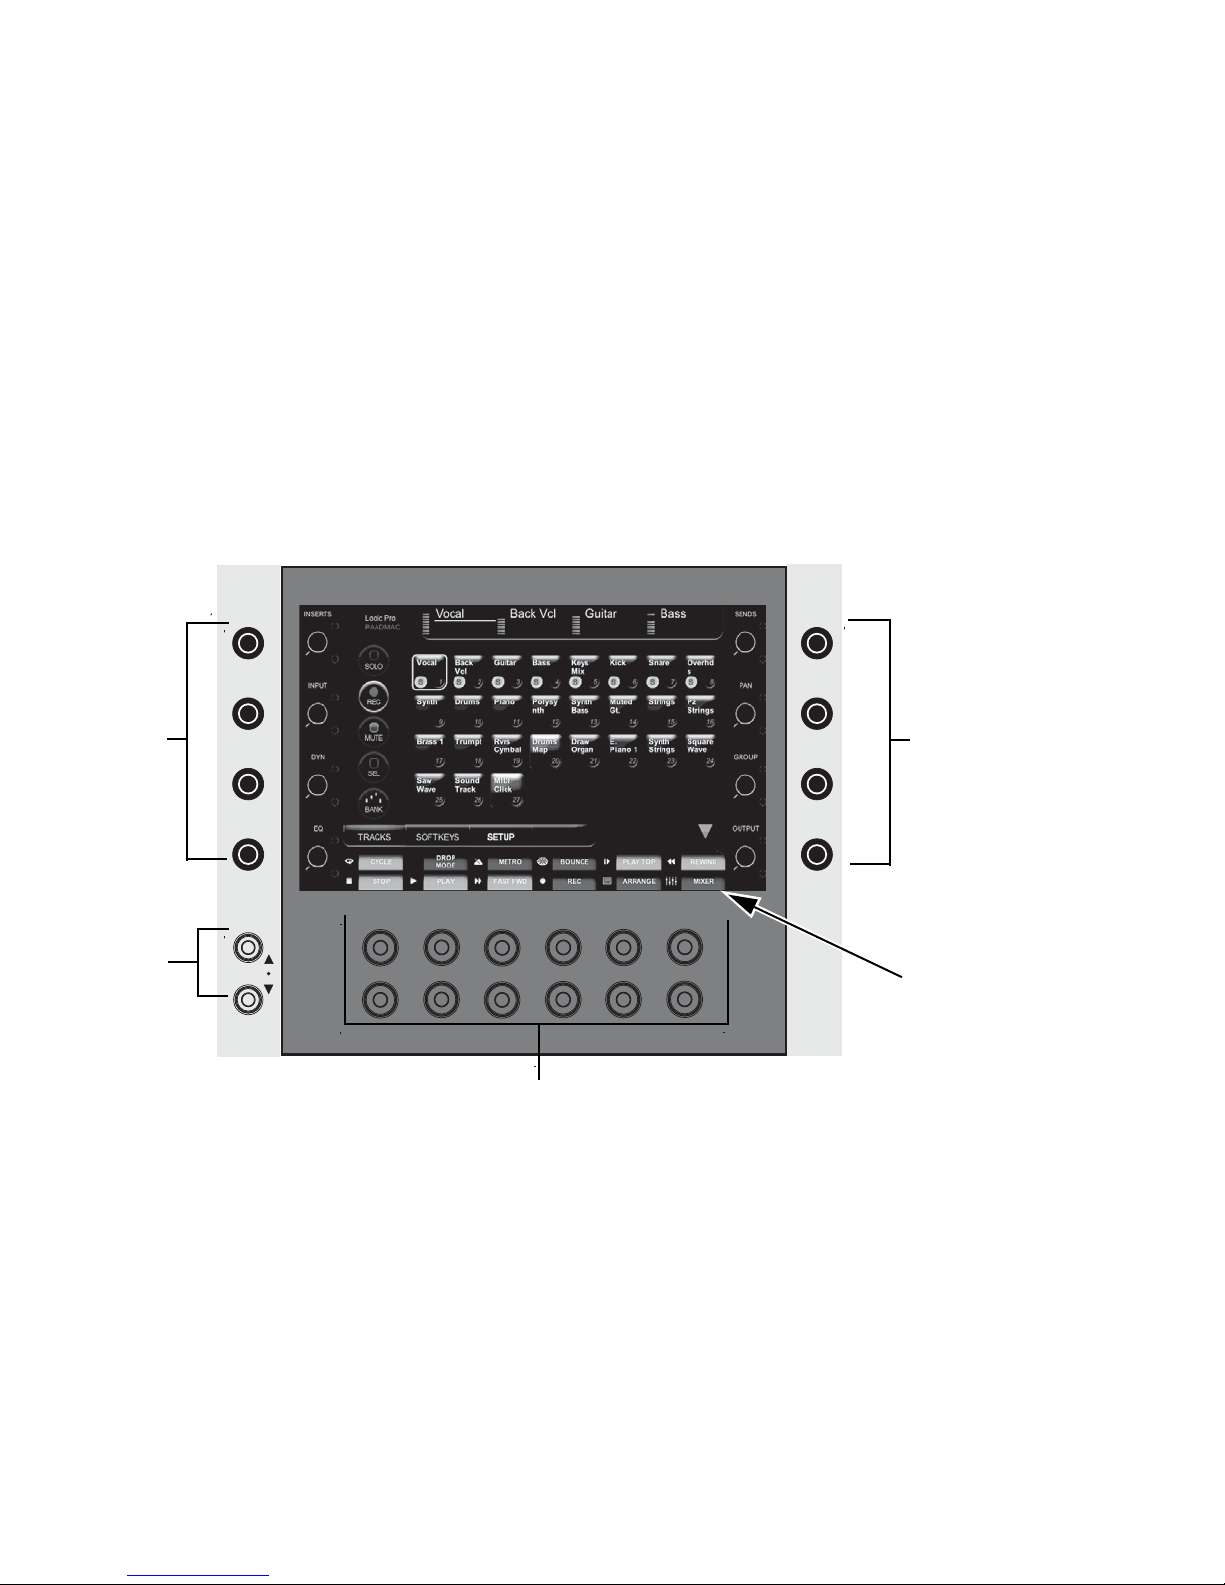
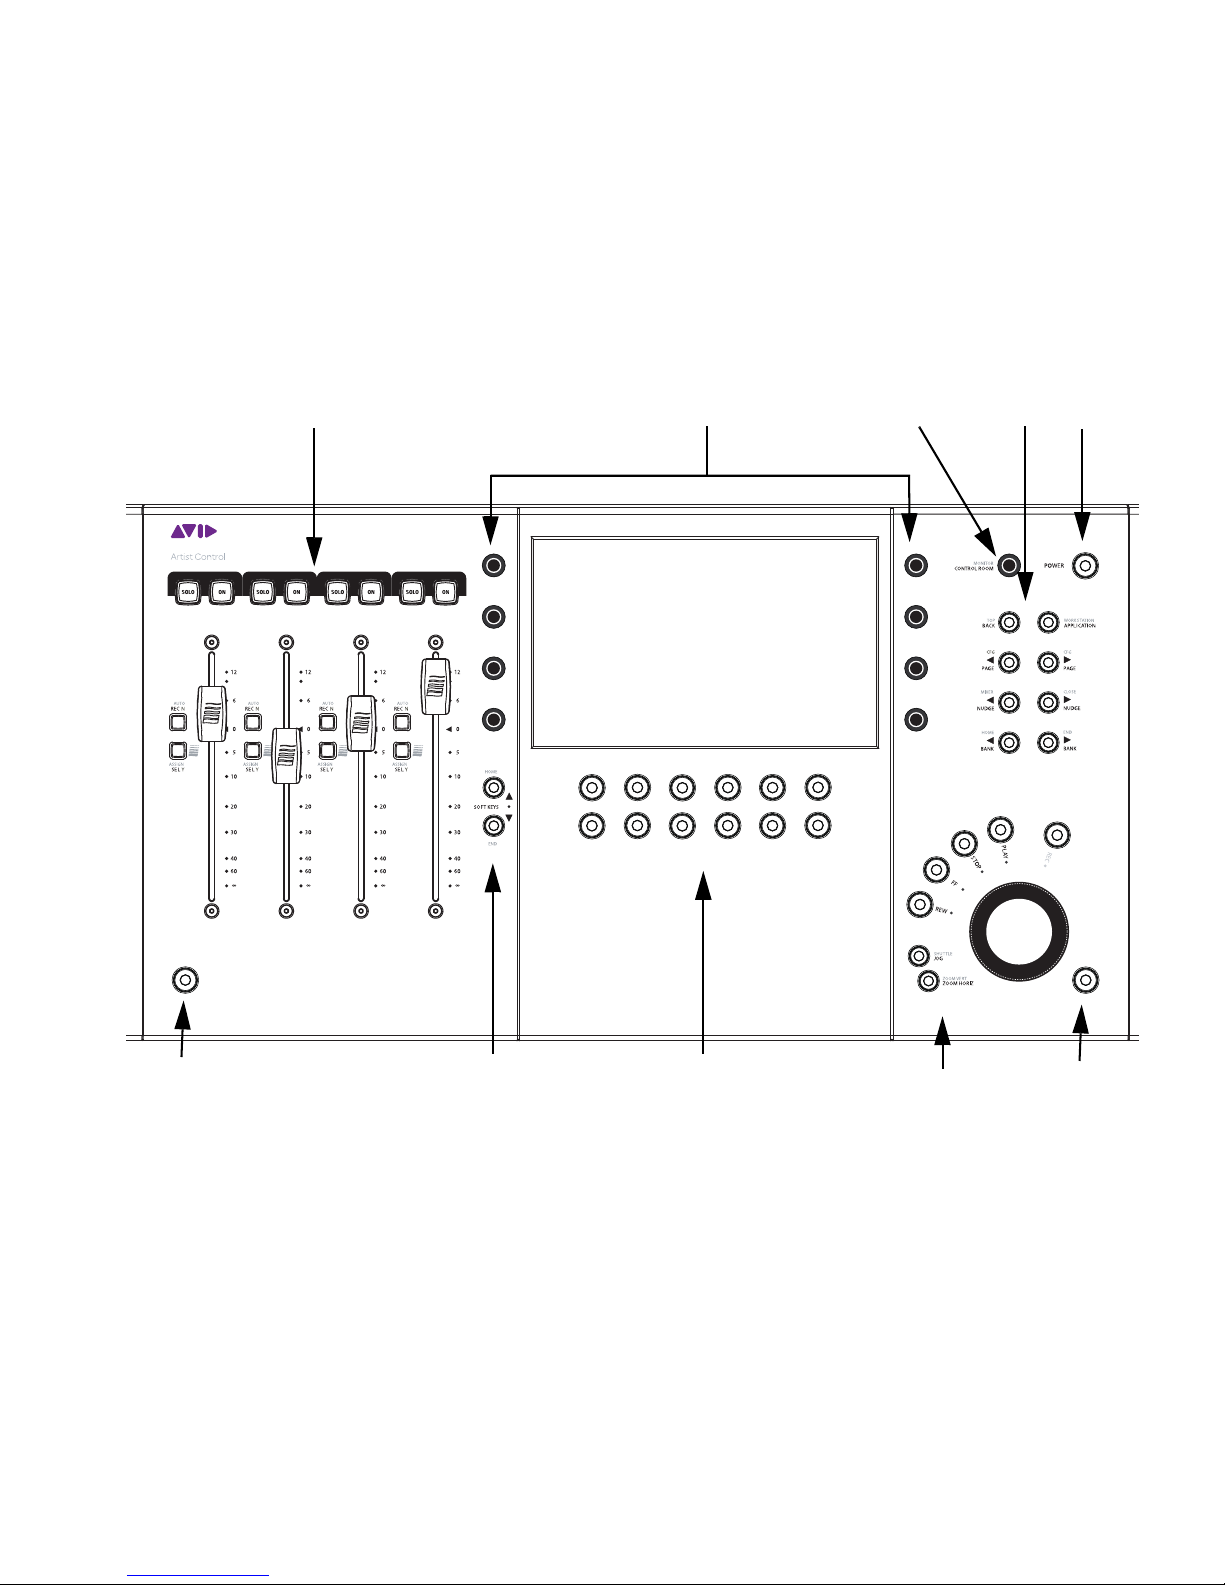
Chapter 4: Surface Controls
Artist Control has four channel strips each with a touch-sensitive fader, eight touch-sensitive knobs surrounding a 7-inch touch-
screen, twelve soft keys, transport switches, a Jog wheel, and various navigation buttons. Artist Control comes with an external
DC power supply. Rear panel jacks include DC power input, RJ-45 Ethernet, and ¼-inch footswitch.
1 Fader Strips
2 Soft Knobs rotary encoders
3 Volume
4 Navigation
5 Power
6 SHIFT
7 Soft Key navigation
8 Soft Keys
9 Transport and Jog Wheel
Surface Controls
1 5
4
3
8
2
6
79
6

Artist Control User Guide16
Power Switch
Press and release the POWER switch to turn Artist Control on/off.
Shift Key
The SHIFT key is used in conjunction with other keys to access the functions labeled in blue above the primary function. Press
and hold the SHIFT key, found at the bottom-left and -right of Artist Control, then press the other key.
Locking the Shift Key
The SHIFT key can be locked to access multiple alternate key functions without holding the SHIFT key down.
To lock the Shift key:
1 Press and release the SHIFT key quickly and then press another key to access its alternate function. Continue in this manner
until finished.
2 Press and release the SHIFT key quickly again to restore normal operation.
If you have another Artist Series controller connected to the same instance of EuControl as Artist Control, you can also lock the
SHIFT key by pressing two SHIFT keys down simultaneously. They can be on different devices. Unlock the SHIFT key by pressing
and releasing one quickly on any device. See “My Surfaces” on page 30 for more information.
Fader Strips
Artist Control provides four fader strips, each with a touch-sensitive fader, to control tracks in an audio or video application.
Fader
The fader controls the track assigned to this strip. It is motorized, so it reflects changes made in the application, such as automa-
tion. It is also touch sensitive, which some applications use when automating.
When the Select by Touch General preference is enabled, touching a fader selects that track in the application and focusses it, just
like pressing the SEL key. (See “Preferences” on page 34.) Holding down the SHIFT key and touching a fader sets it to unity gain.
ON
The track is on (unmuted) when the strip On key is lit and off (muted) when the strip On key is not lit.
Fader strip
SEL
ON
INSERTS
INPUT
CHAN
FLIP
EQ
DYN
AUX
GROUP
PAN
MIX
BACK
TOP
CFG
PAGE
CFG
PAGE
AUTO
REC N
ASSIGN
SELY
12
60
40
6
0
5
10
20
30
8
SOLO ON
Other manuals for Artist Control
2
Table of contents
Other Avid Technology Dj Equipment manuals

Avid Technology
Avid Technology Mbox User manual

Avid Technology
Avid Technology Mbox User manual

Avid Technology
Avid Technology Artist Control User manual

Avid Technology
Avid Technology Artist Mix User manual

Avid Technology
Avid Technology Artist Mix User manual

Avid Technology
Avid Technology S3L System User manual

Avid Technology
Avid Technology VENUE S3L-X Parts list manual

Avid Technology
Avid Technology Artist Control User manual


