Avid Water Systems AFS Series Quick start guide

Avid Water Systems
12630 US Highway33 N
Churubusco, IN 46723
Phone (260) 693-1972 Fax (260) 693-0602
www.avidwatersystems.com AFS Instruction Manual 020312.docx
AFS Series
Iron Filter / Softener System
Installation Instructions and Owner’s Manual

1
This page intentionally left blank.

2
Description of the iron filter / softener system
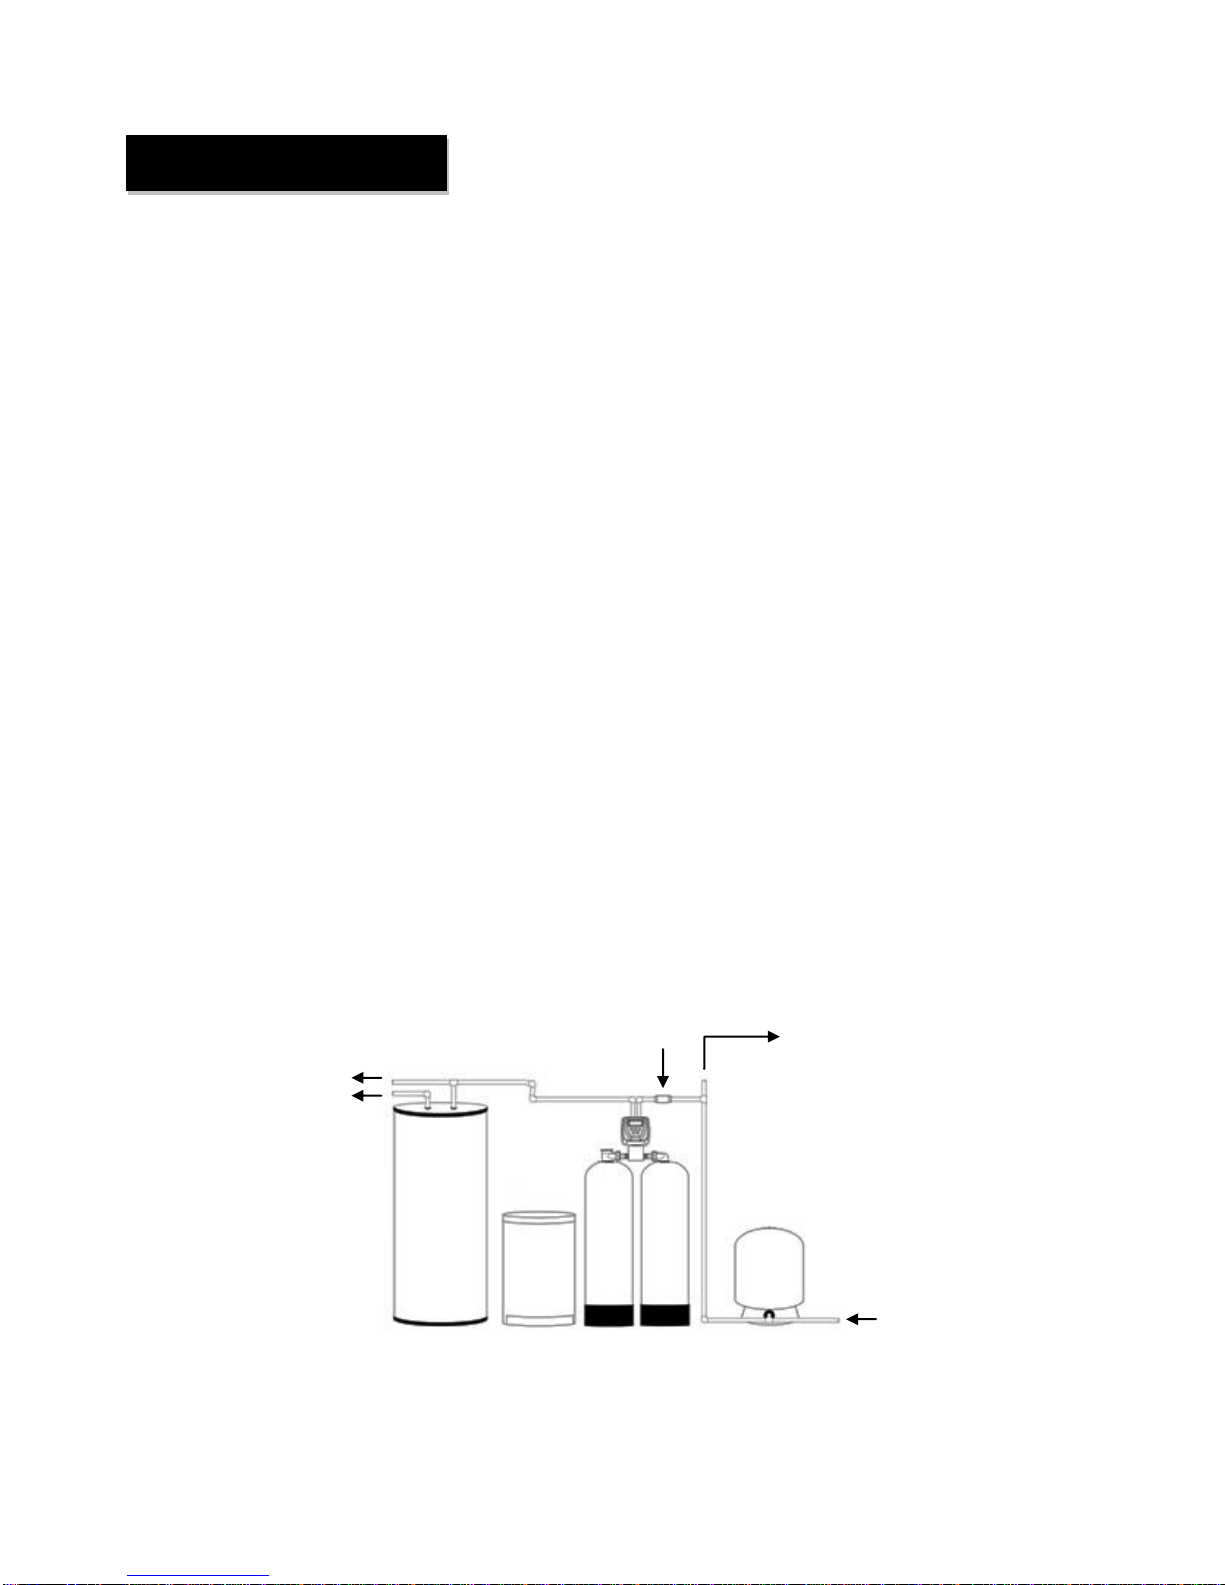
The AFS system includes a filtration tank, softener tank, brine tank, and a backwashing control valve.
Incoming water flows into the control valve and is directed into the filtration tank. Exposure to the air in this tank
will start oxidizing the iron and the filtration media will trap this iron. The water then flows through the back
connector tube and into the softener tank where the water is then softened. The iron-free softened water then
returns to the control valve where it is directed into the service lines.
Periodically the control valve will go through a backwash cycle. This cycle will typically begin at 2:00
A.M. flushing the accumulated iron and hard elements to the drain. Part of this backwashing process includes
an air draw cycle which will replenish the pocket of air in the filtration tank and a brining cycle which recharges
the softening resin in the softener tank. After the backwashing process the unit is now prepared for the next
period of service.
Water Quality
While the AFS filter/softener will perform under a variety of water qualities there are a few things that
need to be considered to ensure satisfactory performance. The water should be tested to determine the
concentration, or levels of the items listed below.
pH - A measurement of the acidity of the water. pH is reported on a scale from 0 to 14. Neutral water
has a pH of 7.0, lower values indicate acidic water. The AFS performs best when the pH is 7.0, or higher. pH
values below 7.0 require a special media blend in the filter in order to elevate the pH for proper iron oxidation.
Iron - A naturally occurring metallic element. Iron concentrations in excess of 0.3 milligrams/liter (mg/l)
combine with oxygen causing orange or red (rust) stains on plumbing fixtures. Iron naturally exists in some
water sources in either clear water (ferrous) state, red water (ferric) state or bacterial form. The AFS iron filter
portion can reduce any of these forms of iron.
Manganese - A naturally occurring metallic element. Manganese concentrations as low as 0.05
milligrams/liter (mg/l) can combine with oxygen to cause dark brown or black staining on fixtures. Additionally,
manganese can cause an odor in the water similar to a “rotten egg” smell. The AFS reduces manganese as
well as iron, however, manganese oxidation requires the pH of the water to be elevated to 8.2 or higher.
Special media might need to be added to elevate the pH of manganese bearing waters.
Tannin - A naturally occurring humic acid. Tannin is an acid caused bywater passing through decaying
vegetation. Coffee and Tea are prime examples of tannin in water. As hot water passes over the coffee beans,
or tea leaves, the tannin is extracted causing color and flavor in the water. Tannin concentrations as low as 0.3
milligrams per liter can cause a yellow discoloration in the water and may interfere with the AFS’s long-term
ability to remove the iron as the media becomes coated with the tannic acid.
Hydrogen Sulfide - A naturally occurring gas. Hydrogen sulfide, more commonly referred to as sulfur
gas, causes a distinct odor similar to “rotten eggs.” Due to its gaseous nature, hydrogen sulfide must be tested
at the well site within 1 minute of drawing the sample. If a water sample has been sitting for a while the sulfur
gas will dissipate and cause the hydrogen sulfide test to be lower than the actual concentration. If sulfur is
present, the filter should be set to backwash more frequently to prevent the gas from building up. The AFS can
typically treat up to 1 to 2 milligrams per liter of sulfur gas.
Preinstallation Instructions

3
Water Supply
Unlike other iron filters that do not use chemicals to oxidize the iron, the AFS iron filter portion does not require
additional plumbing such as solenoid valves, pressure switches or pressure tanks. This filter will function
properly when the water supply is furnished by a jet pump, submersible pump, variable speed (constant
pressure) pump or community water supply. As with all other filter systems, however, it is imperative that the
well pump provides enough flow rate for the filter to adequately backwash. In order to ensure sufficient
backwash flow rate the following pumping rate test should be performed prior to installing the AFS.
1. Make certain no water is being drawn in the house.
2. Open spigot nearest pressure tank.
3. When well pump starts, close spigot and measure time (in seconds) to refill pressure tank (well pump
turns back off). This is Cycle Time.
4. Using a container of known volume, draw water from pressure tank and measure how many gallons
until the pump turns back on again. This is Draw Down.
5. Calculate pumping rate by dividing draw down bycycle time and multiplying by 60.
Draw Down (gallons)
X
60
=
Pumping Rate (gallons per minute)
Cycle Time (seconds)
Example: Draw down is 8 gallons
Cycle time is 65 seconds
Location Considerations
The proper location to install the AFS will ensure optimum filter performance and satisfactory water
quality. The following factors should be considered in selecting the location of this system.
1. The system should be installed after the pressure tank (private well system only).
2. The system should be installed as close as possible (preferably within 15’) to an adequate floor or
laundry drain capable of handling the backwash cycle volume and flow rate (refer to unit
specifications).
3. All water conditioning equipment should be installed prior to the water heater. Water temperatures
exceeding 100°F can damage the internal components of the control valve and filter tank.
4. The system should not be subject to freezing temperatures.
5. Never install a cartridge type filter prior to the AFS. Any cartridge or in-line filter (if desired) should
be installed after the AFS system. This will prevent restricting the water flow and pressure
available for backwash.
6. Appliances requiring extended periods of continuous or high flow water use (i.e. geothermal heat
pumps, swimming pools, lawn irrigation, outside hose bibs, etc.) should bypass the filter and a
spring check valve should be installed on the AFS inlet to prevent backflow from the filter (see
installation diagram Fig. 1).
7. An expansion tank may need to be installed in the line to the water heater in order to allow for
thermal expansion and comply with local plumbing codes.
8 gallons
X
60
=
7.4 gpm (gallons per minute)
65 seconds

4
The manufacturer has set the water treatment unit’s sequence of cycles, cycle times, salt dose, exchange
capacityand gallon capacity. The salt dose refill time has been preset.
The dealer should read this page and guide the installer regarding hardness, day override, and time of
regeneration, before installation:
For the installer, the following must be used:
Set Installer Settings… Hardness (preset to 20 gpg), Day Override (preset to 3 days),
and Time of Regeneration (preset to 2 am).
Read Normal Operating Displays
Set Time of Day
Read Power Loss & Error Display
Water Softeners:
During operation, the normal user displays are time of day, gallons per minute or gallons remaining before
regeneration will occur. Days remaining is an optional display but is not normally used on metered softeners.
Each of these can be viewed by pressing NEXT to scroll through them. When stepping through anydisplays or
programmings, if no buttons are pressed within 5 minutes, the display returns to a normal user display. Any
changes made prior to the 5 minute time out are incorporated.
If desired, two regenerations within 24 hours are possible with a return to the preset program. To do a double
regeneration:
1. Press the REGEN button once, REGEN TODAY will flash on the display.
2. Press and hold the REGEN button for three seconds until a regeneration begins.
Once the valve has completed the immediate regeneration, the valve will regenerate one more time at the
preset time.
The bypass valve is typically used to isolate the control valve from the plumbing system’s water pressure in
order to perform control valve repairs or maintenance. The 1” full flow bypass valve incorporates four positions
including a diagnostic position that allows a service technician to have pressure to test a system while providing
untreated bypass water to the building.
Be sure to install bypass valve onto main control valve, before beginning plumbing or make provisions in the
plumbing system for a bypass.
The bypass body and rotors are glass filled Noryl©and the nuts and caps are glass filled polypropylene. All
seals are self-lubricating EPDM to help prevent valve seizing after long periods of non-use. Internal “O” Rings
can easily be replaced if service is required.
The bypass consists of two interchangeable plug valves that are operated independently by red arrow shaped
handles. The handles identify the direction of flow. The plug valves enable the bypass valve to operate in four
positions.
Preinstallation Instructions Cont.
BYPASS VALVE:

5
1. Normal Operation Position: The inlet and outlet handles point in the direction of flow indicated by the
engraved arrows on the control valve. Water flows through the control valve for normal operation of a
water softener or filter. During the regeneration cycle this position provides regeneration water to the
unit, while also providing untreated water to the distribution system. (Fig. 1)
2. Bypass Position: The inlet and outlet handles point to the center of the bypass. The system is
isolated from the water pressure in the plumbing system. Untreated water is supplied to the building.
(Fig 2)
3. Diagnostic Position: The inlet handle points toward the control valve and the outlet handle points to
the center of bypass valve. Untreated supply water is allowed to flow to the system and to the building,
while not allowing water to exit from the system to the building. (Fig. 3) This allows the service
technician to draw brine and perform other tests withoutthe test water going to the building.
NOTE: The system must be rinsed before returning the bypass valve to the normalposition.
4. Shut Off Position: The inlet handle points to the center of the bypass valve and the outlet handle
points away from the control valve. The water is shut off to the building. The water treatment system
will depressurize upon opening a tap in the building. A negative pressure in the building combined with
the softener being in regeneration could cause a siphoning of brine into the building. If water is
available on the outlet side of the softener it is an indication of water bypassing the system (Fig. 4) (i.e.
a plumbing cross-connection somewhere in the building).

6
GENERAL INSTALLATION & SERVICE WARNINGS
The control valve, fittings and/or bypass are designed to accommodate minor plumbing misalignments. There
is a small amount of “give” to properly connect the piping but the water softener is not designed to support the
weight of plumbing.
Do not use Vaseline, oils, other hydrocarbon lubricants or spray silicone anywhere. A silicone lubricant may be
used on black “O” Rings. This will allow ease of installation and decrease chance of rolling from the bypass and
tank connections. Avoid any type of lubricants, including silicone, on red or clear lip seals.
Do not use pipe dope or other sealants on threads. Teflon®tape must be used on the threads of the 1” NPT
inlet and outlet and on the threads for the drain line connection. Teflon®tape is not used on the nut connections
or caps because “O” Ring seals are used. The nuts and caps are designed to be unscrewed or tightened by
hand or with the special plastic Service Wrench, part # CV3193. If necessarypliers can be used o unscrew the
nut or cap. Do not use a pipe wrench to tighten nuts or caps. Do not place screwdriver in slots on caps and/or
tap with a hammer.
SITE REQUIREMENTS
Water pressure –25-100 psi
Water temperature –33-100oF (0.5-37.7oC)
Electrical –115/120 V, 60 Hz uninterrupted outlet
The tank should be on a firm level surface
Current draw is 0.5 amps
The plug-in transformer is for dry locations only
Water
Heater
AFS System
UntreatedWater
Untreated Waterfor
geothermal heat pumps,
swimming pools, lawn
irrigation, hose bibs etc.
Cold softened/filtered water
Hot softened/filtered water
FIGURE 1: Typical Installation
Spring Check
Valve
INSTALLATION:

7
STEP 1: If media is already loaded in filter tank proceed to Step 4. Otherwise, use the fillport wrench
provided to remove the fillport cap (Refer to Figure 2) by turning it counter-clockwise.
STEP 2: DO NOT REMOVE THE WHITE FILLPORT SCREEN! Use the fill funnel provided and add
the required amount of media (see unit specifications) to the filter tank. Do not overfill the tank.
At least 14” of freeboard (empty space) is required at the top of the media tank to allow for
proper bed expansion during backwash. Any excess media may be saved for future
replenishment.
STEP 3: Clean any media out of the fillport cap threads. Do not reinstall the fillport cap until Step 9.
STEP 4: Place softener tank on right side with inlet/outlet facing left. Place filter tank on left with
inlet/outlet facing right.
STEP 5: Attach the control valve assembly to the front inlet opening of the filter tank and outlet opening
of the softener tank. Attach the straight pipe adapter to the back outlet of the filter tank and
inlet of the softener tank. HAND TIGHTEN UNION NUTSONLY. DO NOT OVERTIGHTEN.
Installation Instructions
Filter Tank
Softener Tank
Fillport Cap
FIGURE 2: Tank Positioning and Fillport Location

8
STEP 6: Shut off water at main supply. Relieve pressure by opening nearest faucet. On private well
systems, turn off power to pump and drain pressure tank. SHUT OFF POWER OR FUEL
SUPPLY TO WATER HEATER.
STEP 7: Cut main supply line as required to fit plumbing to inlet and outlet of bypass valve. DO NOT
PLUMB INLET AND OUTLET BACKWARDS. Piping should support control valve in an
upright position. Do not apply heat to any fitting attached to the bypass or control valve.
STEP 8: Use rigid drain line or polyethylene tubing (NO VINYL TUBING) to run drain line from control
valve discharge fitting to floor drain or sump pit capable of handling the backwash rate of the
filter (refer to specifications and flow rate on page 8). DISCHARGE END OF THE DRAIN
LINE MUST BE FIRMLY SECURED! Failure to properly secure the drain line will result in the
drain line “whipping” and possibly flooding the area causing water damage. There must be an
air gap at the end of the drain line to prevent siphoning of waste water and meet plumbing
code. Total length of drain line should be 15’ or less. AVOID OVERHEAD DRAINS.
STEP 9: Use a garden hose or bucket to fill the media tank with water through the fillport. Ensure
media has been cleaned from fillport threads and installcap securely with wrench provided.
STEP 10: Be sure the control valve is in the “Service” position (refer to programming procedures for
instructions). The bypass valve should be in the “Bypass” position (refer to bypass valve for
instructions). Open main supply valve or turn on power to pump on private well systems.
STEP 11: Open bypass valve ¼ of the way allowing unit to pressurize slowly. It is normal for air to be
trapped in the top part of the aeration tank. Once tanks are pressurized, fully open bypass
valve to the “Service” position.
STEP 12: Set the day override for every third day (refer to programming procedures for instruction).
Ensure that the day override is set so that the filter will not backwash for two more days. This
will allow the filter media time to saturate with water. Subjecting the filter to backwash flow
rates within 24 hours of installation mayflush media to the drain.
STEP 13: Set the current time of day on the timer (note AM and PM) and set the hardness of the water.
STEP 14: Check forleaks and correct as necessary.
STEP 15: Turn power or fuel supply back on to water heater.
Inlet from water supply
Outlet to service

9
1. Set Time of Day:
Time of dayshould only need to be set after extended power outages or when daylight saving time begins or
ends. If an extended power outage occurs, the time of day will flash on and off indicating that the time should
be reset.
STEP 1 -- Press SET CLOCK
STEP 2 -- Current Time (hour): Set the hour of the day using or buttons. AM/PM toggles after
12. Press next to go to step 3.
STEP 3 -- Current Time (minutes): Set the minutes using or buttons. If it is desired to go back up
to the previous step press regen button once. Pressing next will exit Set Clock and return to
the general operating display.
2. Programming:
NOTE: The manufacturer has preset the unit so that the gallons between regenerations will be automatically
calculated after the hardness is entered.
STEP 1 -- Press next and simultaneously for 3 seconds.
STEP 2 -- Hardness: Set the amount of hardness in grains per gallon (default 20) using the or
buttons.The allowable range is from 1 to 150 in 1 grain increments.
Press next to go to step 3. Press regen if you want to exit.
STEP 3 -- DayOverride: The manufacturer has factoryset this at 3 days as the default. This is the
maximum number of days between regenerations. A regeneration initiation will be called
for on that dayeven if a sufficient number of gallons were not used to call for a
regeneration. Set the day override using or buttons (3 is recommended). Press next
to go to step 4. Press regen if you need to return to the previous step.
Programming Procedures for the AFS

10
2. Programming cont’d:
STEP 4 -- Regeneration Hour: Themanufacturer has factory set 2:00 am as the default. This is the
hour of dayfor regeneration and can be reset by using or buttons. “AM/PM” toggles
after 12. The default time is 2:00 a.m. (recommended fora normal household). Press next
to go to step 5. Press regen if you need to return to the previous step.
STEP 5 -- Regeneration Minutes: Set the minutes using or buttons. Press next to exit Installer
Settings. Press regen if you need to return to the previous step. To initiate a manual
regeneration immediately, press and hold the regen button for three seconds. The system
will begin to regenerate immediately. The control may be manuallystepped through the
regeneration cycles bypressing regen.

11
1. General Operation:
When the system is operating, one of the three displays
may be shown. Pressing next will alternate between
displays. One of the displays is always the current time of
day. The second displayshows the current treated water
flow rate through the system in Gallons Per Minute (gpm).
The third displayshows the current volume remaining in
Gallons. Capacity remaining is the gallons that willbe
treated before the system goes through a regeneration
cycle.
The user can scroll between the displays as desired.
If the system has called for a regeneration that will occur at
the preset time of regeneration, the words REGEN TODAY
will appear on the display.
The AFShas an installed watermeter, the word “Softening”
flashes on the display when water is being treated (i.e. water is flowing though the system).
2. Regeneration Mode:
Typically a system is set to regenerate at a time of no water use. If there is a
demand for water when the system is regenerating, untreated water will be
delivered. When the system begins to regenerate, the display willchange to
include information about the step of the regeneration process and the time
remaining for that step to be completed. The system runs through the steps
automatically and will reset itself to provide treated water when the
regeneration has been completed.
3. Manual Regeneration:
Sometimes there is a need to regenerate before the control valve calls for it. This may be needed if a
period of heavy water use is anticipated or when thesystem has been operated without salt.
To initiate a manual regeneration at the preset
delayed regeneration time, press and release regen.
The words “REGEN TODAY” will flash on the display
to indicate that the system will regenerate at the
preset delayed regeneration time.
If you pressed the regen button in error, pressing the
button again will cancel the command.
To initiate an immediate manual regeneration, press
and hold the regen button for three seconds. The
system will begin to regenerate immediately. This command cannot be cancelled.
4. Power Loss:
If the power goes out for less than two hours, the system will
automaticallyreset itself. If an extended power outage occurs, the time
of day will flash on and off which indicated the time of dayshould be
reset. The system will remember all other settings.
Error Message: If the word “ERROR” and a number are alternately
flashing on the display, record the number and contract the dealer for
help. This indicates that the control valve was not ableto function properly.
Operating Displays for the AFS

12
Troubleshooting Guide for the AFS:
1
2
3
4
5
●
●
●
●
●
drive bracket
I. PC board incorrectlyaligned on
defective
H. PC board is damaged or
F. replace or clean drive gear(s)
I. resetPC board onto drive bracket
H. replace PC board
G. reset drive bracket
motor wires broken- failed motor
E. motor gears not fullyengaged -
momentarilyunplug PC board
D. press NEXT and REGENor
E. check motor wiring
D. control set at "on 0"
E. controlset at "NORMAL + on0"
optioninprogramming
obstruction
B. check pistonand spacer stack for
stack assembly
power
C. replace piston(s) and spacer
A. valve has just beenserviced
B. foreign material stuck in valve
C. excessive piston resistance
from PC board.
momentarilyunplug power source
A. press NEXT and REGENfor 3 secs or
B. reconnect to PC board
B. meter cable disconnected
A. put bypass in service position
A. bypass valve inbypass position
A. reset time of day
A. past power outage
E. check withregenerationtime
optioninprogramming
D. check with regenerationtime
C. reset time of regeneration
C. time of regenerant set incorrectly
debris
D. defective meter
C. remove meter and check for
C. restricted/stalled meter turbine
E. replace PC board
D. replace meter
E. defective PC board
B. reset time of day
B. incorrect time of day displayed
B. repair or use working outlet
B. no power at outlet
A. reconnect transformer
A. transformer unplugged
D. replace PC board
D. defective PC board
C. replace transformer
C. defective transformer
C. defective PC board
B. reset time of day
B. power outage
A. use unswitched outlet
A. outlet is on a switch
C. replace PC board
factory
appear contact
If other codes
unable to recognize
"Error" code 1001-
by code #
"Error" followed
"Error" code 1003-
unexpected stall
"Error" code 1002-
start of regeneration
position
to reach next cycle
Timed out trying
motor ran too long
regenerates at
wrong time
of day
Timer does
PROBLEM
CAUSE
CORRECTION
onbackplate
water is
display when
No softening
damaged - missing or broken
F. center drive gear reflector dirtyor
D. pistonnot in home position
flowing
time of day
not display
G. drive bracket incorrectlyaligned
gear
time of day
display correct
Timer does not
Unit

13
6
7
8
9
and off
A. reset time of day
were pressed to reset the valve.
PC board. NEXT and REGEN
flashes on
unplugged from either wall or
A. Power has been out more than
Time of day
two hours. Transformer was
depressed
E. programming error
F. defective PC board
F. replace PC board
E. review programming
but does when
C. clear obstruction
REGEN button is
D. replace meter
D. defective meter
C. obstructed meter turbine
B. reconnect PC board
B. meter disconnected
operating mode
button is
assy.
depressed
D. defective PC board
D. replace PC board
C. replace gear or drive cap assy.
Valve does not
A. bypass valve not in normal
regenerate
automatically
A. see bypass diagrams onpage 5
automatically
B. no power at outlet
B. restore power
when REGEN
C. brokendrive gear or drive cap
A. connect transformer and PC
regenerate
board power
F. brokenpistonretainer
G. brokenmainor regenerant
G. replace main or regenerant
F. replace drive cap assy.
piston
piston
Valve does not
A. transformer unplugged
E. replace gear or drive cap assy.
regeneration
D. defective PC board
D. replace PC board
E. brokendrive gear or drive
Valve stalled in
cap assembly
B. no power at outlet
B. repair outlet or use working outlet
C. defective transformer
C. replace transformer
PROBLEM
CAUSE
CORRECTION
A. motor not operating
A. replace motor

14
1.0
18,000
21,000
32,000
3
10
5
15
7.5
0.27
7.5
9
90
4
1
4
45
5
10
120
10 x 54
18 x 33
43 x 18 x 68
GENERAL REQUIREMENTS: Water Temperature
33°F - 100°F
Water Pressure 25 - 100 psi
Electrical Requirements 110v/60hz
Electrical Current Draw 0.5 amps
Maximum Iron Concentration ≤ 5.0 ppm
Notes: 1
@Minimum Salt Setting (6#/ft3)
SPECIFICATIONS:
UNIT MODEL NUMBER
MEDIA VOLUME (ft3)
CAPACITY (grains)
AFS1054
REGENERATION FLOW RATES (gpm)
@Factory Salt Setting (9#/ft3)
@Maximum Salt Setting (15#/ft3)
SERVICE FLOW RATES (gpm)
Continuous
Peak
PRESSURE LOSS (psi)1
@ Continuous Flow Rate
@ Peak Flow Rate
Brine & Rinse (minutes)
Pressure loss information is approximate. Actual pressure loss may vary depending on water
quality, temperature, gallons used since last regeneration, etc.
Backwash
Brine Draw and Slow Rinse
Rapid Rinse
FACTORY REGENERATION SETTINGS
Brine Fill (# of salt)
Softening (minutes)
Backwash (minutes)
Rapid Rinse (minutes)
Backwash (minutes)
Brine & Rinse (minutes)
Rapid Rinse (minutes)
DIMENSIONS (in.)
Mineral Tank (diameter x height)
Brine Tank (diameter x height)
Overall (length x width x height)
Total Water Used (gallons)

15
Component Parts Breakdown
A
B
C
D
3
1
2
4
5
6
4
5
7
8
9
10
11
12

16
Notes:
1. For complete control valve breakdown see “Control Valve Breakdown”
2. For unit specifications see “Specifications”
Ref #
Part Number
Description
A
CV3105
O-Ring, -215
B
CV3151
Nut, 1” Quick Connect
C
OX-7
Back Tube Adaptor
D
CV3150
Split Ring Retainer
1
AFS1054 VLV ASSYW/BP
Complete Control Valve includes backtube assy
(ref #12) and bypass valve
2
CD1400
Distributor Head
3
CD1220-01
Distributor Head w/Fillport
4
D100S-54
Distributor Tube, 1” x 54”
5
MTP1054N
Mineral Tank, 10” x 54”
6
C05P
½ cubic foot pail Iron Filer Media
7
H10
1 cubic foot bag of Hi-Cap Resin
8
QC20
20 pounds ¼” x 1/8” gravel
9
BT1833ASSY-IFS
18 x 33 Brine Tank, SBV & Salt Platform for AFS
10
BT-OVERFLO
Brine Tank Overflow Elbow
11
BTSG18
18” Salt Grid Platform
12
OX-7 Assembly
Back Tube Assembly, includes 2 each o-rings (A),
quick release nuts (B), and retainers (D) and 1
back tube (C).
Component Parts List

17
Control Valve Breakdown

18
Ref.
PART NO.
DESCRIPTION
A
CV3002CC
Drive Assembly, IM Series
B
CV3186
Power Cord with Transformer, Clack Impression Valve
C
CV3003
Meter and Cable Assembly
D
CV3006
Bypass Valve, IM Series, less I/O fittings
1
CV3175CC-01GR
Gray Front Cover, IM Series
2
CV3107-01
Drive Motor, IM Series
3
CV3108CC
Circuit Board, IM Series Valve
4
CV3004
Drive Cap Assembly
5
CV3135
O-ring, -228
6
CV3011
Piston Assembly, IM Series
7
CV3174
Brine Valve, IM Series
8
CV3005
Seal Cartridge Assembly, IM Series
9
CV3178
Back plate for IM Series valve
10
CV3180
Base o-ring for IM Series valve, -337
11
CV3105
O-ring, -215
12
CV3177-01
Injector screen, IM Series
13
CV3010-1Z
Injector Assembly Plug
14
CV3010-1F
Clack Injector, Dark Blue
15
CV3150
Split Ring Retainer
16
CV3151
Nut, 1" Quick Connect
17
CH4615
Elbow Locking Clip
18
CV3163
O-ring, -019
19
CV3165-01
Refill Flow Control Retainer
20
CH4613
Brine Fitting, 3/8" Tube
21
GL463412
3/4" Female NPT x 1/2" Barb Elbow
22
CV3158-01
Drain Elbow 3/4" Male Assy
23
CV3159-01
DLFC Retainer Assembly
24
CV3162-010
Flow Control Washer, 7.5 GPM
Control Valve Parts List

19
Table of contents
Popular Water Filtration System manuals by other brands

Kemper
Kemper F Installation and operation manual

Lakos
Lakos HTX Series Installation & operation manual

Rain
Rain GRO-475 Installation and operation manual

Zener
Zener IP00 Series instruction manual

Enpress
Enpress CTA0840BBBKP5-04C00 Installation and operation manual

norweco
norweco SINGULAIR GREEN BIO-KINETIC quick start guide