AvonSynth AVS-MIDI-1 User manual

The AVS-MIDI-1
MIDI to CV
Converter
User Guide
Thank you for purchasing from AvonSynth
Congratulations on your purchase of a brand new AvonSynth AVS-MIDI-1
MIDI to CV Converter Module. We trust that it will both serve and
inspire you as you create beautiful music with it for years to come.
In order to get the most out of your module, please ensure that you read
this User Guide in its entirety so that you fully understand all of its
functionality, and that you follow all necessary safety directions during use.
Included in the Box
Page 1 of 7
1 x MIDI to CV Module 1 x 16 pin to 16 pin
flat-cable power cord
4 x M3 Mounting Screws 4 x Nylon Washers
Installation
Step 1: Power your system off. Place the module in your Eurorack-
compatible rack in any convenient position. Affix the module to your
rails using the included mounting screws and nylon washers. Neglecting
to use these washers may result in unnecessary marking of the unit.
Step 2: Triple check the polarity of the power connector before
connecting the power cord to your power supply. Ensure that the -12v
line marked on the back of the module connects to the same end of the
flat-cable that also connects to the -12v line on your power supply. While
AvonSynth modules use shrouded connectors that make this process
safer and more reliable, some systems do not conform to this polarity
standard, so careful checking is always necessary. Connecting the
module with incorrect polarity can result in irreversible damage done to
the module which cannot be covered by warranty.
Step 3: Power up your system and start patching!
www.AvonSynth.com

Features & Specifications
Polyphonic MIDI to CV converter with automatic oscillator tuning capability
MIDI Tuning Standard compatibility for arbitrary scales
4 channels of individual gate, V/OCT, and velocity CV outputs
Independent Mod Wheel and Channel Aftertouch CV Outputs
Automatic polyphony selection based on inserted plug
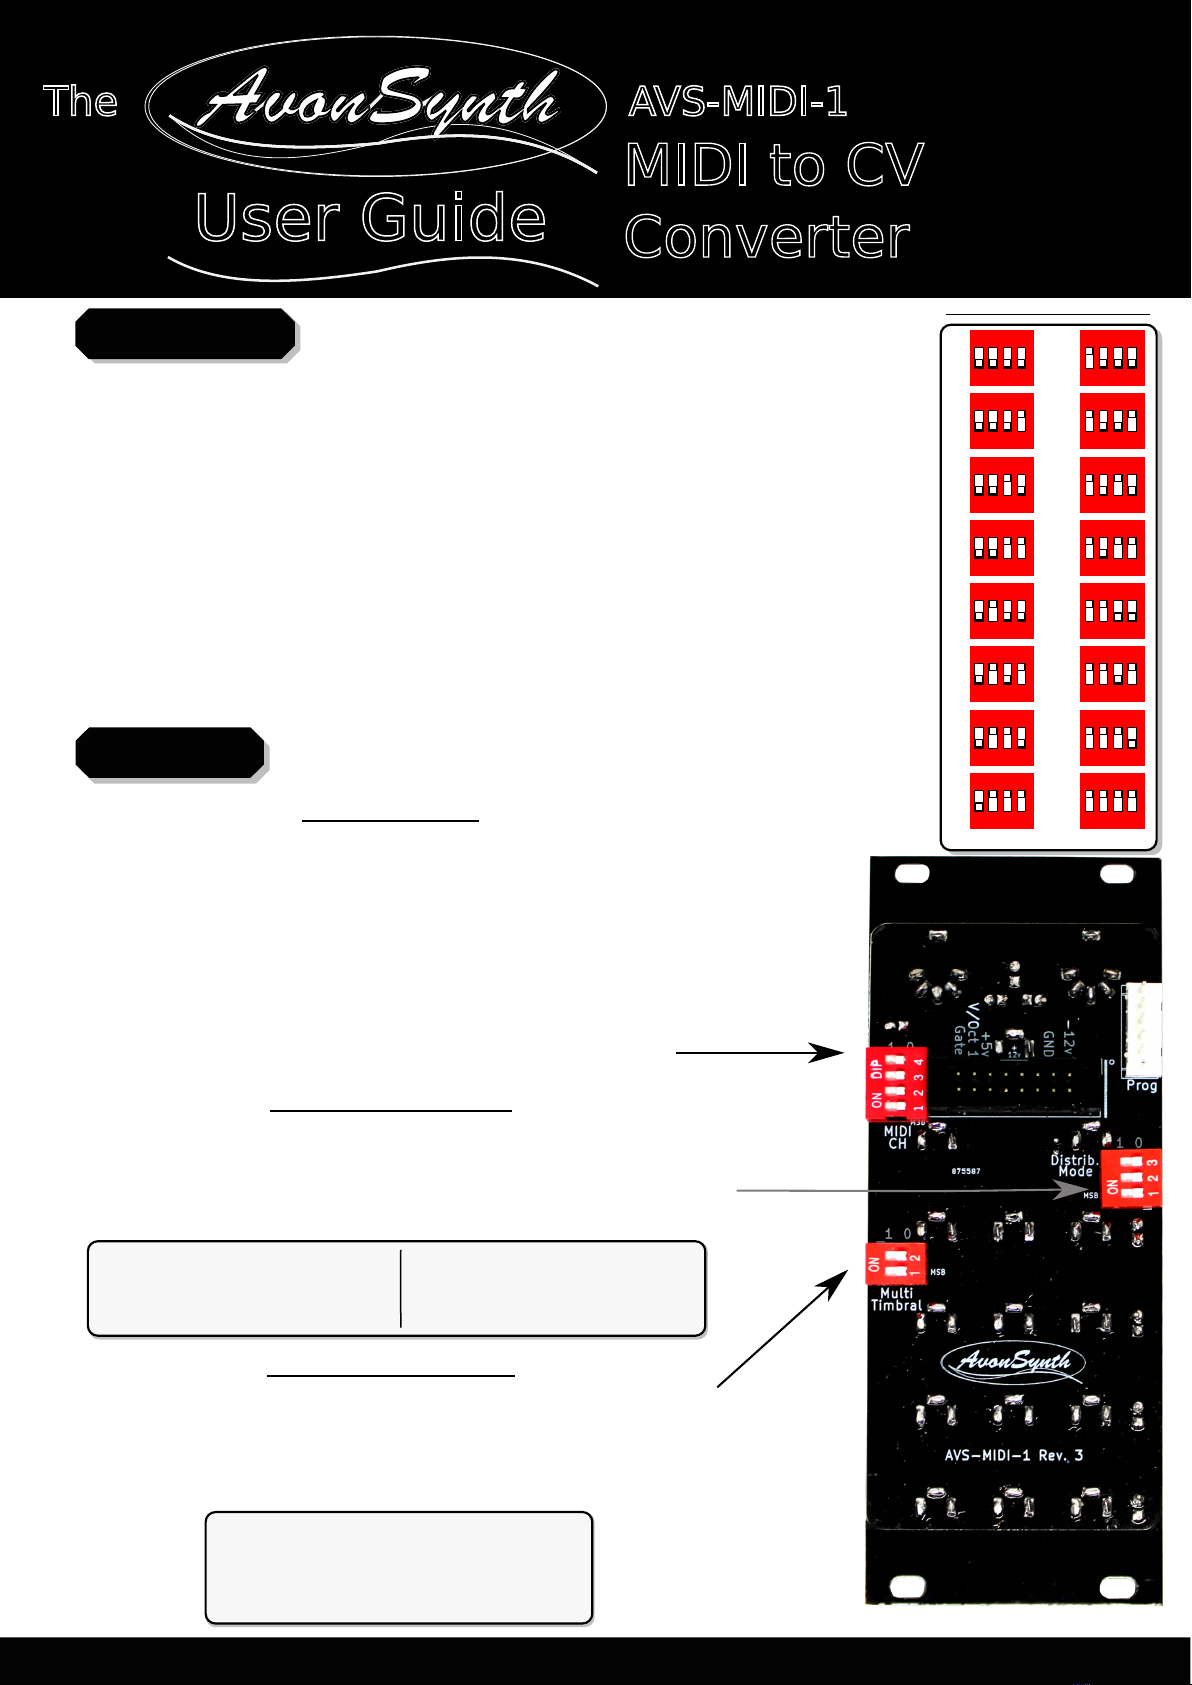
Rear DIP-switch based configuration to choose channel and mode
Manual MIDI CC control of unused channels
Multi-timbral modes with various note-stealing schemes
10 HP wide (50.5mm), 20mm deep
Current consumption: +12V 30ma, -12V 30ma, +5V 15ma
Page 2 of 7www.AvonSynth.com
The AVS-MIDI-1
MIDI to CV
Converter
User Guide
Description of Interface
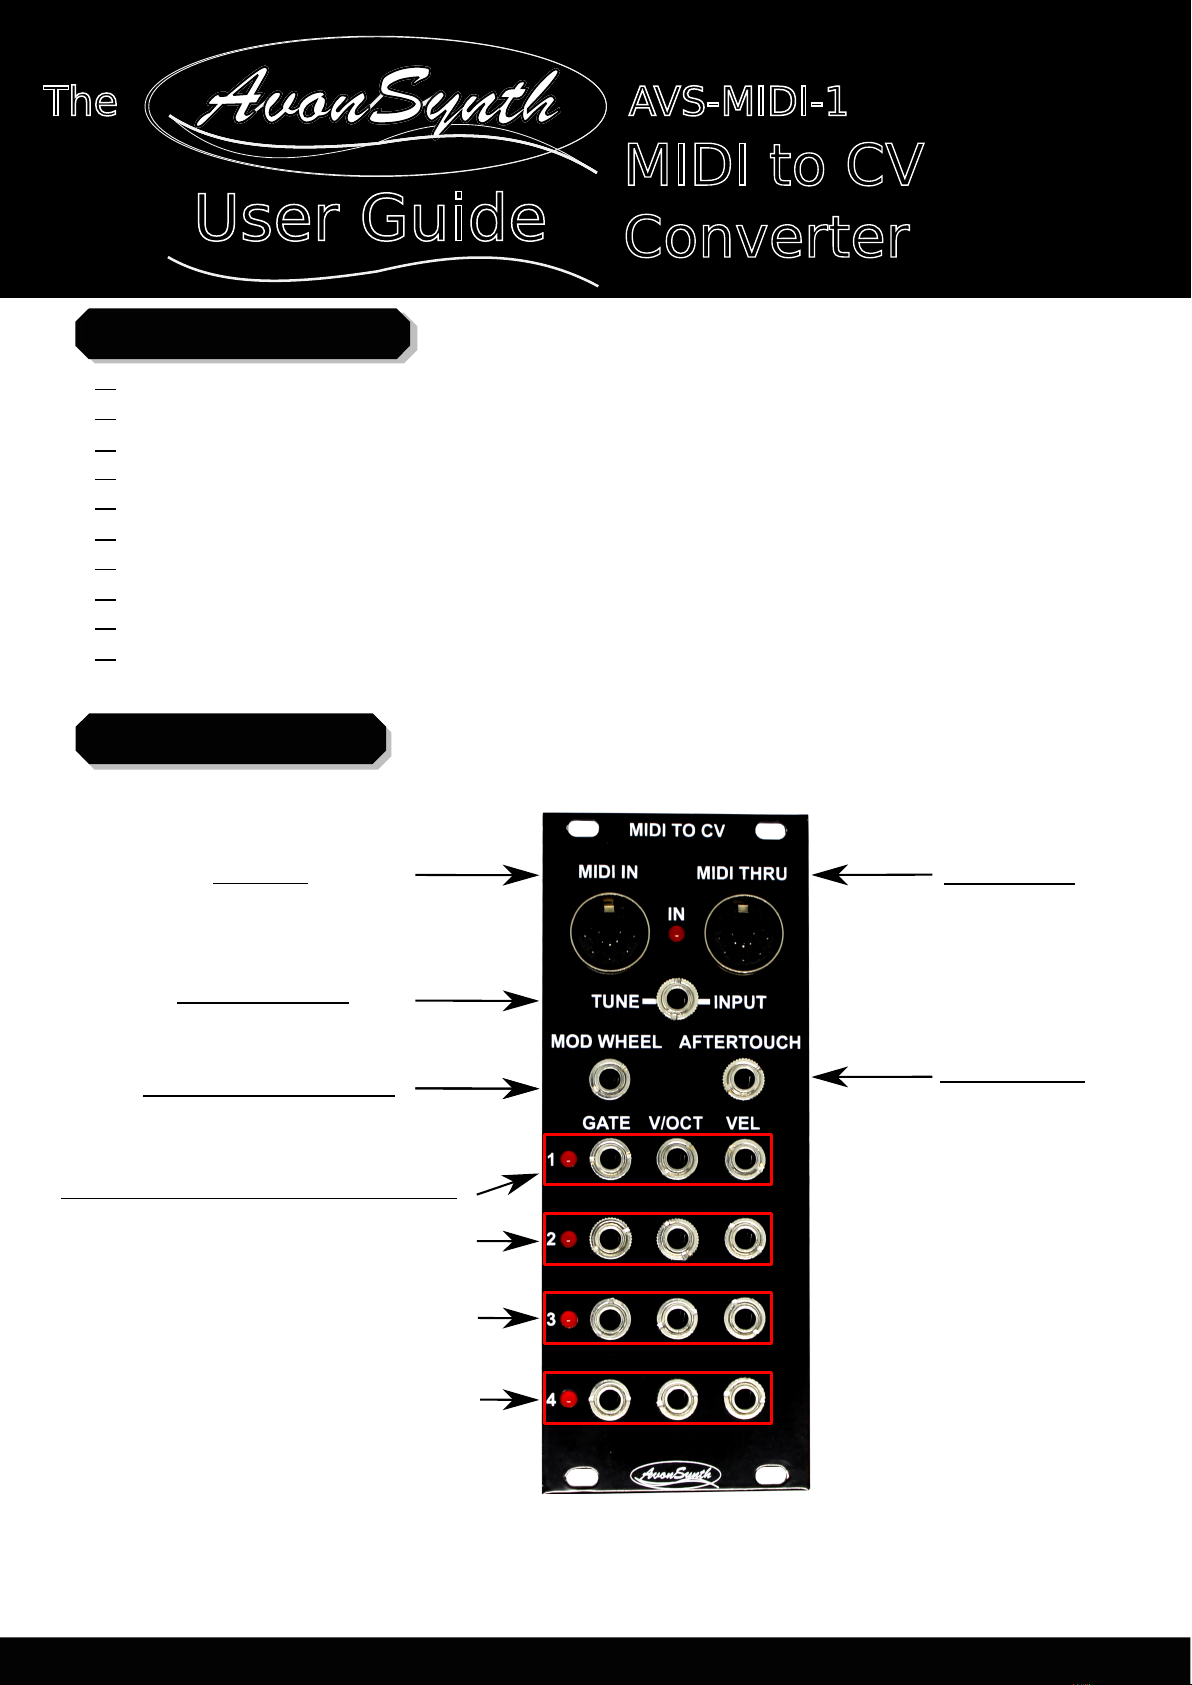
All messages sent to the MIDI In
are buffered and immediately sent
out of the MIDI Thru with no filtering.
This allows the daisy-chaining of
multiple units for larger systems.
MIDI In
Mod Wheel Output Aftertouch
This output sends a 0-10V CV corresponding to Mod
Wheel (CC #1) messages received at the MIDI Input.
Tuning Input
Gate, V/Oct, Velocity Outputs
This output sends a 0-10V CV
corresponding to channel aftertouch
messages received at the MIDI Input.
Connect a simple +/- 5V audio output from the VCO
that you would like to tune. (More info on page 3)
A Note On message received at the MIDI
Input triggers an output event from one
of the 4 channels depending on which note
stealing, multitimbral, and polyphony modes
are selected, and the current state of the
notes. The LEDs light up to indicate
which channel has been activated, and
remain lit while the note is held.
The corresponding gate output is high
at 10V while the note is held, the V/Oct
outputs a CV that corresponds with the
note that has been played, and the
Vel output sends a 0-10V CV corresponding
with the velocity used to play the note.
MIDI Thru
Connect your MIDI controller, sequencer, keyboard
or computer to the MIDI In to control the module.

Tuning Method
Page 3 of 7
www.AvonSynth.com
The value of this set of DIP switches dictates the way in which
notes are distributed when using polyphony. When all of the
available spaces for notes are occupied, this setting indicates
which one of the currently playing notes will be replaced.
The AVS-MIDI-1
MIDI to CV
Converter
User Guide
MIDI Channel
Distribution Mode
Multitimbral Mode
The receiving MIDI channel is set using these DIP switches.
In monotimbral mode, the module only receives messages
addressed to the channel specified by these switches. In
multitimbral modes, extra channels directly above the set
value are utilised (up to 3 extra). Please refer to the chart
shown on the top right of this page to set the desired MIDI
channel number. MIDI Channel 16 acts as OMNI mode for
the unit - receiving messages on all channels.
The multitimbral setting allows the polyphony to be split between
multiple MIDI channels. This allows the unit to be used as either a
single, 4-voice polyphonic controller, or multiple controllers of lesser
polyphony addressed using unique MIDI channels.
MIDI Channel Numbers
There may be times when more precise tuning is required, especially when
utilising several different analogue VCOs in polyphony. To create a custom
tuning for a channel using a VCO, follow these steps :
1. Plug a V/OCT output of the MIDI to CV module to the V/OCT input of the VCO, and
set the VCO's pitch dial to the bottom of the audible range (around 20Hz ideally).
2. The highest number channel with a gate output connected is the chosen channel.
3. Connect an audio output from the VCO to the MIDI to CV tuning input.
4. The tuning routine starts automatically, and its progress is shown by the LEDs.
5. A thorough sweep of all frequencies of the VCO is undertaken, which
can take up to 30 seconds.
Note: If the input is invalid, all LEDs will flash, and tuning will revert to default.
ON DIP
1 2 3 4
ON DIP
1 2 3 4
ON DIP
1 2 3 4
ON DIP
1 2 3 4
ON DIP
1 2 3 4
ON DIP
1 2 3 4
ON DIP
1 2 3 4
ON DIP
1 2 3 4
ON DIP
1 2 3 4
ON DIP
1 2 3 4
ON DIP
1 2 3 4
ON DIP
1 2 3 4
ON DIP
1 2 3 4
ON DIP
1 2 3 4
ON DIP
1 2 3 4
ON DIP
1 2 3 4
1
2
3
4
5
6
7
8
9
10
11
12
13
14
15
OMNI
Rear Settings
1 = Oldest Note is Replaced
2 = Newest Note is Replaced
3 = Highest Note is Replaced
4 = Lowest Note is Replaced
5 = Middle Note is Replaced
6 = No Notes are Replaced
1 = No Multitimbrality
2 = Voices split between 2 channels
3 = Voices split between 3 channels
4 = Voices split between 4 channels

MIDI Implementation Chart
Page 4 of 7
www.AvonSynth.com
The AVS-MIDI-1
MIDI to CV
Converter
User Guide
CC # Function PC # Function
0 Panic Button - clears all notesPanic Button - clears all notes1 Mod wheel control
64 Sustain Pedal > 64 = pressed
101 Ch1 V/Oct Output Manual CV
102 Ch1 Vel Output Manual CV
103 Ch2 V/Oct Output Manual CV
104 Ch2 Vel Output Manual CV
105 Ch3 V/Oct Output Manual CV
106 Ch3 Vel Output Manual CV
107 Ch4 V/Oct Output Manual CV
108 Ch4 Vel Output Manual CV
110 Pitch bend range in semitones (1-24)
Polyphony Selection
The AVS-MIDI-1 continuously detects which Gate Output plugs currently have
patch cables inserted, and uses this information to automatically and dynamically
select the utilised polyphony. The highest numbered Gate Output that has a plug
inserted decides the polyphony used, regardless of whether lower numbered
Gate Outputs have plugs inserted or not.
For example, say multitimbral mode is off, and a cable is inserted into Gate Output
number 3. When receiving notes, the unit will automatically cycle them from the
first to third channels, in a manner according to the selected note distribution mode.
When a channel is not included in the current polyphony setting, the V/Oct and
Velocity outputs are then freed up for manual control via MIDI Continuous Controller
(CC) messages. If no Gate Outputs are plugged in, that means it is possible to
manually control up to 8 CV outputs via CC messages, plus the Mod Wheel and
Aftertouch CVs. Please check the MIDI Implementation Chart below for details on
which CC numbers control these manual outputs, and which Program Change
messages may also be used to choose multitimbral and distribution modes
in session without resetting the unit.
MIDI Tuning Standard (MTS)
To implement a custom scale or tuning, MTS bulk dumps are used. You can use software like
Scala to create your own tunings, or use one of the thousands of available tunings on the
internet. Send your MTS bulk dump as Sysex to the AVS-MIDI-1, and if it is received
successfully, the LEDs will shine one by one from bottom to top. Otherwise, they will all
blink three times to indicated a failed dump. After a dump is received, the uploaded scale
becomes the new scale which the auto-tune function uses to tune VCOs. This means that in
order to use the scale, you must auto-tune your oscillator after uploading the scale.

Page 5 of 7
www.AvonSynth.com
The AVS-MIDI-1
MIDI to CV
Converter
User Guide
Simple Monophonic Voice Example
A standard single-voice example is illustrated below. This example has the AVS-MIDI-1
being controlled by a MIDI device such as a keyboard or sequencer, and playing
a tuned sawtooth wave in a monophonic manner. Once the patch is set up, the
VCO should be set to at least 20Hz (the lowest audible output from the sine wave out)
and the VCO output should be connected to the Tune Input as shown by the purple line.
Once the tuning routine is complete, this patch cable can be removed.
Audio
Output
MIDI
Input
Explanation
In this example, the gate output from the AVS-MIDI-1 triggers the ADSR envelope to
open up when each note is pressed. The envelope then controls the VCA, letting sound
through when notes are played. The V/OCT output controls the pitch of the VCO, which
should be providing 12-TET tuning referenced to A=440Hz if the tuning routine has been
carried out. The VCO output (sawtooth in this case) is sent to the VCA, and the output of
the VCA is sent to your amplifier and speakers (perhaps via a mixer or other equipment).
If you would like softer presses on the keyboard to generate softer notes, you can connect
the VEL output from the AVS-MIDI-1 to also control the VCA, though this is optional. If this
patch is replicated with 4 VCOs, 4 ADSRs, and 4 VCAs, rich 4-note polyphony can be
achieved. The Mod Wheel and Aftertouch outputs can also be used to control various
aspects of the sound such as vibrato amount or filter cutoff.

Page 6 of 7
www.AvonSynth.com
The AVS-MIDI-1
MIDI to CV
Converter
User Guide
Troubleshooting
Issue Potential Solution
No LEDs light on
power up
Ensure that the 16-pin power cable is connected correctly, and
that the 12V, -12V, GND, and +5V lines are active.
I'm playing notes, but
nothing's happening
First, ensure that your MIDI cable is connected to the MIDI Input
of the unit, and that you are seeing indication from the sender
of MIDI that it is being sent correctly.
If the cable is connected, and MIDI messages are being sent
from the source device, the 'IN' LED on the AVS-MIDI-1 blinks
as messages are received.
If the 'IN' LED is blinking, but nothing else is happening, check
that you have selected matching MIDI channels on the source
device and the AVS-MIDI-1 (see page 3). If you set the
AVS-MIDI-1 to 'OMNI' mode, and your problem persists, then it
is likely not MIDI channel related.
Also ensure that you have a patch cable inserted into at least
one Gate output. These outputs are used to select the
polyphony (see page 4) and if no cables are connected to any
Gate outputs, the polyphony selection is zero (no notes). Note
that the other side of the patch cable inserted to a Gate output
need not be connected to anything if gates are not used.
The tuning process is
failing, stalling, or not
tuning the expected
range
Only use simple (ie. sine, triangle, sawtooth, pulse) waves of
analogue VCOs (digital VCOs shouldn't need tuning).
Make sure that the VCO is set to around 20Hz, or the lowest
audible pitch of a sine wave before starting the tuning routine.
Make sure that you've selected the channel by inserting a patch
cable into the gate output of the channel you would like to tune
(with no patch cables in higher numbered channels).
Make sure that the V/OCT output of your selected channel is
connected to the V/OCT input of your VCO, and that no other CVs
that could influence the pitch or other characteristics of the VCO
are used. These can be reconnected after tuning.

Warranty & Support
Page 7 of 7www.AvonSynth.com
Safety Precautions
Please use this module in accordance with the following safety guidelines in order to
maximize the life of the module and ensure warranty from AvonSynth.
This product is covered by AvonSynth's warranty for one year from the manufacturing date.
Within this timeframe, any manufacturing defect will be repaired or replaced by AvonSynth.
Damage caused to the product due to not following the safety precautions above,
unauthorized modification of the hardware, or misuse such as subjecting the unit to reverse
or excessive voltages will void this warranty.
If you have any concerns about your AvonSynth hardware, please get in touch via
info@AvonSynth.com to discuss any issues. We will do our best to assist you in getting your
hardware operating correctly, and if necessary, we will provide an RMA (Return Merchandise
Authorization) to send back the unit for inspection. Any postal costs incurred in this process
will be the responsibility of the customer. Please do not send back merchandise before
receiving this authorization.
o
o
Keep water and other conductive liquids and materials away from this module.
It is not water proof, or even water resistant. Exposure to these can cause
short-circuits that can render the equipment unusable.
Be sure to keep this equipment in an environment with an ambient
temperature above -20 C and below +50 C. Excessively hot or cold
temperatures can be damaging to the electronic circuits used.
Modules with exposed circuit-boards are delicate. Take the utmost care when
handling and transporting this equipment, making sure not to subject it to
excessive forces. Ensure that the module is installed correctly while being
transported and that the original packing materials are used when sending
the module anywhere by post.
The AVS-MIDI-1
MIDI to CV
Converter
User Guide
Table of contents