Award BV60BL User manual

20220124
Wine / Beverage Preservation Technology
INSTRUCTION MANUAL
Thanks for buying one of our Wine or Beverage cabinets. Before use, please read and
follow all safety rules and operating instructions.

1
WARNING
The information in this document is subject to modification without prior notice.
Some models are available in dedicated countries only.
All warranties are void if the appliance is being used for any purpose other than that for
which it was specifically designed. Warranty applies to the wine cabinet only and not to
the content of the wine cabinet.
This appliance can be used by children aged from 8 years and above and persons with
reduced physical, sensory or mental capabilities or lack of experience and knowledge if
they have been given supervision or instruction concerning use of the appliance in a safe
way and understand the hazards involved. Children shall not play with the appliance.
Cleaning and user maintenance shall not be made by children without supervision.
Children should be supervised to ensure that they do not play with the appliance.
Please don't put acidic items, flammable and explosive goods into wine cabinet.
This appliance is intended to be used in household and similar applications such as
–Staff kitchen areas in shops, offices and other working environments;
–Farm houses and by clients in hotels, motels and other residential type environments;
–Bed and breakfast type environments;
–Catering and similar non-retail applications.
DANGER: Risk of child entrapment. Before you throw away your old wine chiller:
- Take off the doors;
- Leave the shelves in place so that children may not easily climb inside;
- When disposing of the appliance, do so only at an authorized waste disposal centre.
R600a WARNINGS
For your safety observe the following recommendations.
This appliance contains a small quantity of R600a refrigerant which is
environmentally friendly, but flammable. It does not damage the ozone layer, nor
does it increase the greenhouse effect.
During transportation and installation, ensure that the tubing of the refrigerant
circuit is not damaged.
Avoid using sharp objects near by the appliances.
Leaking refrigerant can ignite and may damage the eyes.
In the event any damage does occur, avoid exposure to open fires and any device
which creates a spark. Disconnect the appliance from the mains power.
Thoroughly ventilate the room in which the appliance is located for several
minutes.

2
Notify Customer Service for necessary action and advice.
The room you installing the appliance in must be at least 1 cubic metre per 8 grams
of refrigerant. The refrigerant quantity contained in this appliance is listed on the
Rating Plate of the appliance.
It is hazardous for anyone other than an Authorized Service Person to carry out
servicing or repairs to this appliance.
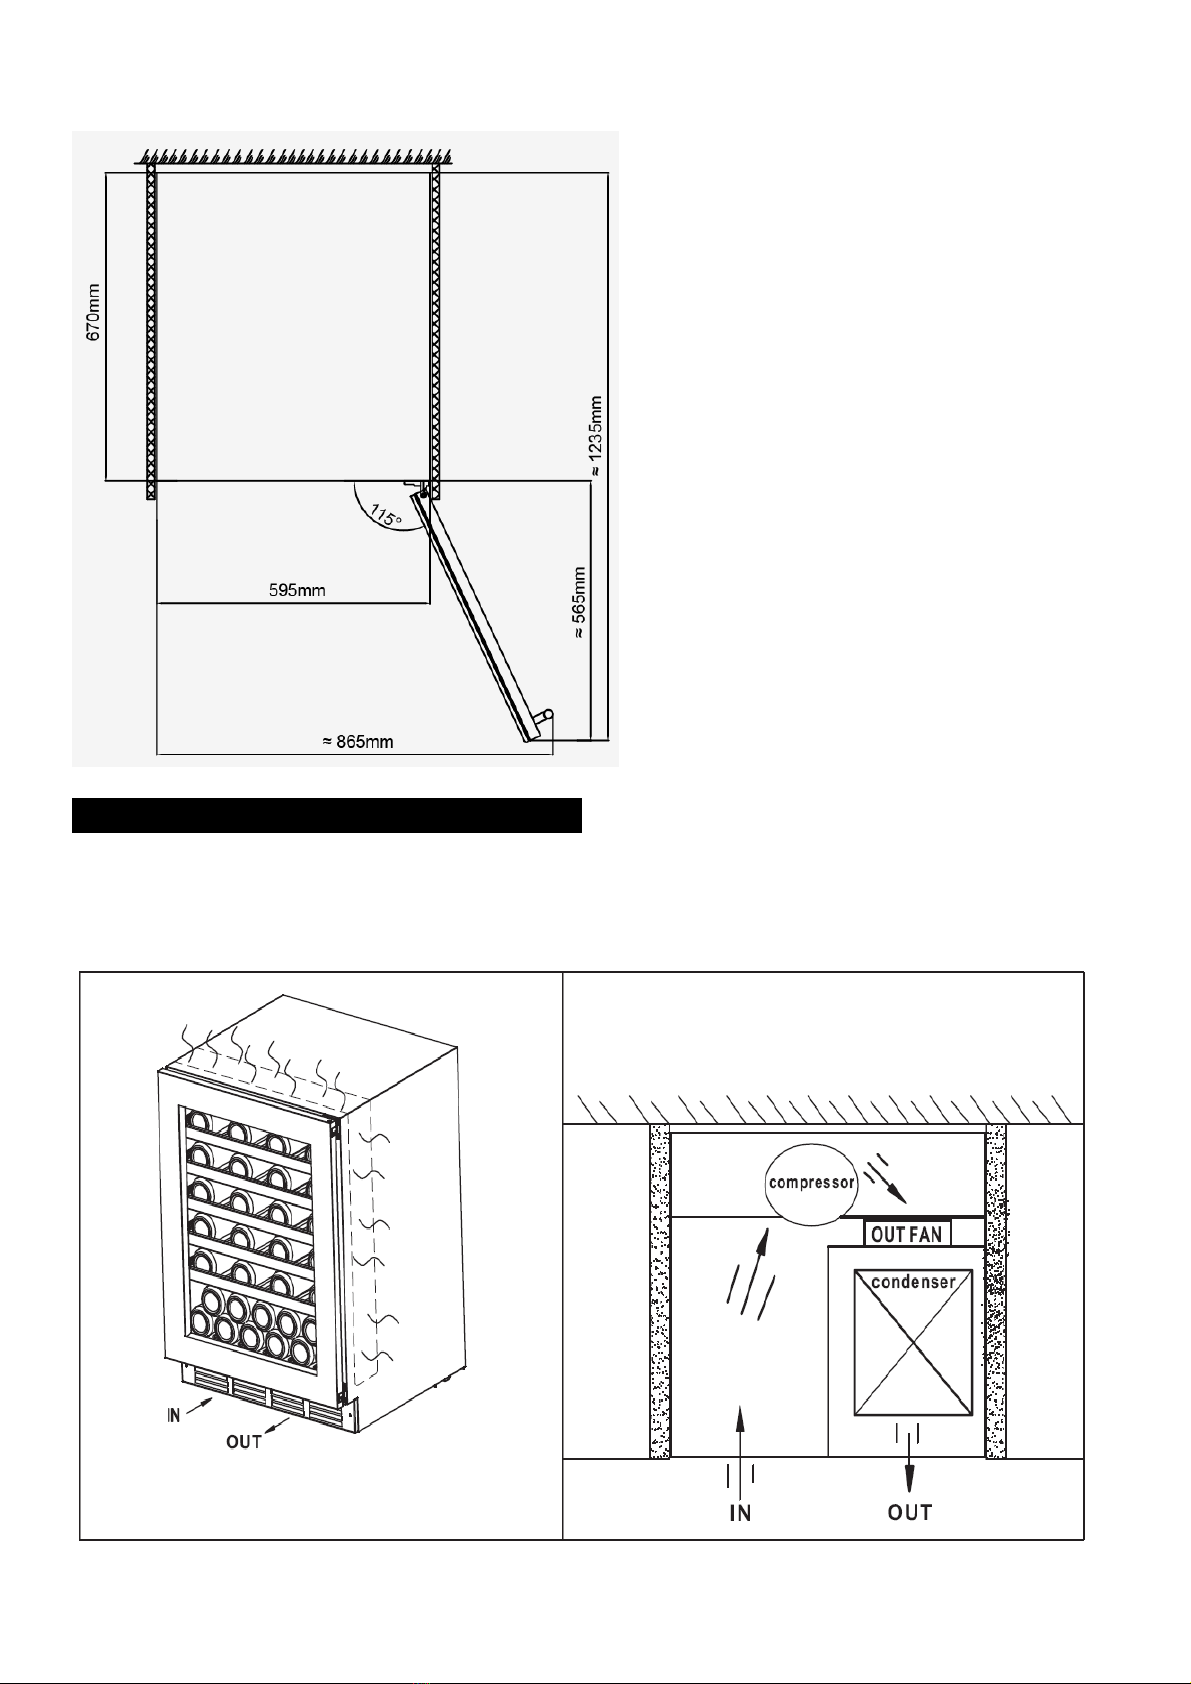
- WARNING: Keep ventilation openings in the appliance enclosure or in the built-in
structure clear of obstruction.
- WARNING: Do not use mechanical devices or other means to accelerate the
defrosting process, other than those recommended by the manufacturer.
- WARNING: Do not damage the refrigerant circuit.
- WARNING: Do not use electrical appliances inside the food storage compartments of
the appliance, unless they are of the type recommended by the manufacturer.
- WARNING: If you are not using the appliance, please unplug the power plug from
the socket or switch off the power supply.
- WARNING: This appliance is not intended for use by persons (including children)
with reduced Physical, sensory or mental capabilities, or lack of experience and
knowledge, unless they have been given supervision or instruction concerning use
of the appliance by a person responsible for their safety;
- WARNING:Children should be supervised to ensure that they do not play with the
appliance;
- WARNING: Do not use extension cords or ungrounded (two prong) adapters;
- WARNING: If the supply cord is damaged, it must be replaced by the manufacturer,
Its service agent or similar qualified person in order to avoid hazard.
Allow 24 hours before switching on the wine cabinet. During this time we
recommend that you leave the door open to clear any residual odors.
BEFORE LOADING & PLUGGING IN THE WINE CABINET
Important: All models without front venting (air opening) are strictly for free
standing only. (See technical chart)
Recommendations:
The location you have selected for your wine cabinet should:
- Be unencumbered and well ventilated;
- Be well away from any heat source and direct sunlight;
- Not be too damp (laundry, pantry, bathroom etc.);
- Have a flat floor;
- Have a standard and reliable electricity supply (standard socket to country standards,
linked to the ground), it is NOT recommended to use a multi-socket or extension lead;
- Have a surge protector fitted to the electrical outlet;

3
- Away from the microwave oven. Certain microwave ovens do not have wave
interference shield. When placed within 1 meter vicinity of the wine cabinet, they may
affect the operation of the wine cabinet.
Wine cabinet should be placed where the ambient temperature is constant (not to hot or
cold). If the temperature is too hot or cold, it will affect the performance of the cabinet.
Grounding instructions:
The wine cabinet must be grounded in case of power leakage. Grounding reduces the risk
of electrical shock. The wine cabinet is equipped with a power cord having an earth wire
and an earthed plug. The wine cabinet plug must be plugged into a grounded electrical
outlet.
Note: In locations where there is frequent lightning, it is advisable to use surge protectors.
Improper use of the earthed plug can result in the risk of electric shock. Consult a qualified
electrician or service person if the grounding instructions are not completely understood.
If the supply cord is damaged, it must be replaced by a qualified person in order to avoid
electrical hazard.
INSTALLING YOUR WINE CABINET
Unpack and remove all of the protection and adhesive strips from the packaging around
and inside the wine cabinet.
The wine cabinet must be positioned such that the plug is accessible. Release the power
cord. Move your wine cabinet to its final location. The wine cabinet should be installed in
a suitable place where the compressor will not be subject to physical contact.
Leveling your wine cabinet: Wine cabinet must be leveled BEFORE loading your wines.
Your wine cabinet is equipped with 4 adjustable feet to facilitate easy leveling. We
recommends that you tighten the back feet to the maximum and adjust the front feet to
level the wine cabinet.
INSTALLATION INSTRUCTIONS FOR BUILT IN WINE CABINETS:
(UNDERBENCH OR IN COLUMN) FRONT VENTING WINE CABINETS ONLY.
1. “Built in” wine cabinets are front venting but are not designed to be fully integrated
behind a joinery door.

4
2. Please follow the installation diagram when installing built-in wine cabinets. No less
than the minimum installation dimension, or it will affect the venting of cabinet.
3. Built-in wine cabinets draw air from right of ventilation frame and expel through left of
ventilation frame under the front door.
4. “Built in” wine cabinets have a power switch located on the control panel so power
point location is not critical.
5. The wine cabinet requires a standard 240 volt/10 amp power point.
6. The power cord is 2.0m in length and is fixed on the right side at the back when looking
from front of cabinet.
7. As with most appliances of today, the wine cabinet has sensitive electronic components
which are susceptible to damage through lightning and electricity supply faults. It is
therefore advised to use a power surge protector to avoid problems of this nature.
8. Air vent on door must be provided for built-in wine cabinets when a wood door
installed.
In Hot climate zone, an air vent or grid, with a minimum ventilation size of 200mm x
40mm MUST be cut out at the rear top of the back partitioning or at the top of either side
of the partitioning, allowing cool fresh air full access to flow into the 30mm gap located at
the rear of the cabinet.
This air vent or grid must not be opened on the same side as other appliances such as
ovens or an area that is sealed and without access to fresh cool air. Failing to comply with
the above specifications will void the WARRANTY.
INSTALLATION DRAWINGS FOR BUILT IN WINE CABINETS:
(UNDERBENCH OR IN COLUMN) FRONT VENTING WINE CABINETS ONLY.
Note: The appliance must be positioned so that the plug is accessible after installed.
DIMENSIONAL DRAWINGS:

5
WCSZ45BL
Installationholedepth575mm
≥
In st allation h ol e he igh t 45 7m m≥
Cabinetpanelthickness≥22mm
Cabine t pan el h o le h eig ht 465mm≥
Coolingairoutletmin200m
c2
Coolingairinletmin200m
c2
Installationholewidth565mm
≥
512mm
555mm
555mm
453mm
590mm
447mm
Cabinetpanelholewidth≥600mm
512mm
555mm
555mm
453mm
590mm
447mm
Installat ion hole height 457mm≥
In stallatio n hole dept h 575m m≥
Ventilation o pening width
≥40mm
Woo d Plate thickness 22mm≥
≥7mm
453mm
Ventilation opening width
≥40mm
In sta llat io n hol e hei gh t 45 7m m≥
Installation Instruction:

6
1.Put the wine cooler into the cabinet, then adjust the wine cooler to make it steady. Open
the door, take out the fixed plate , 2pcs Inner Hexagon Screws ,and Inner Hexagon
Screwdriver from accessory bag , then use the inner hexagon screwdriver to tighten the
fixed plate on the lower left side of wine cooler.
2.Take out 3pcs Phillips screws from accessory bag , use Phillips screwdriver to tighten
the fixed plate on the lower left side of wine cooler(1pcs screw) , then tighten the other
2pcs Phillips screws on the upper door hinge and lower door hinge.
BV60BL, BV60S, WCDZ60BL, WCDZ60S,
WCDZ60INT

7
WCDZ600TS, WCDZ600TBL, BV600TBL
OPEN ANGLE SIZE DRAWINGS:
BV60BL, BV60S, WCDZ60BL, WCDZ60S

8
WCBV60BL
WCDZ60INT

9
WCDZ600TS, WCDZ600TBL, BV600TBL
RADIATOR SYSTEM DESCRIPTION
BV60BL,BV60S,WCDZ60BL,WCDZ60S,WCBV60BL,WCDZ600TS,WCDZ600TBL,
BV600TBL WCDZ60INT Models use side anti-dew tube and Independent cooling
system:

10
WCSZ45BL Models use a rear cooling system.
TURNING ON YOUR WINE CABINET
Plug in and switch on the cabinet by pressing on the power button for a few seconds.
When you use the wine cabinet for the first time (or restart the wine cabinet after having it
shut off for a long time), there will be a few degrees variance between the temperature you
have selected and the one indicated on the LED readout. This is normal and it is due to
the length of the activation time. Once the wine cabinet is running for a few hours
everything will stabilize.
Important: If the unit is unplugged, power is lost, or turned off, wait 3 to 5 minutes
before restarting the unit. The wine cabinet will not start if you attempt to restart before
this time delay.
Operating Noises
To reach the desired temperature settings, our wine cabinets, like all wine cabinets
operating with compressors and fans, may produce the following types of noises. These
noises are normal and may occur as follows:
- Gurgling sound - caused by the refrigerant flowing through the appliance’s coils.
- Cracking/popping sounds - resulting from the contraction and expansion of the
refrigerant gas to produce cold.
- Fan operating sound - to circulate the air within the wine cabinet.
An individual’s perception of noise is directly linked to the environment in which the wine
cabinet is located, as well the specific type of models. Our wine cabinets are in line with
international standards for such appliance. We will always do its utmost to satisfy its
customers but will not retake possession of the goods due to complaints based on normal
operating noise occurrences.

11
LOADING YOUR WINE CABINET
You may load your wine bottles in single or double rows while taking note of the
following: if you do not have enough bottles to fill your wine cabinet, it is better to
distribute the load throughout the wine cabinet so as to avoid “all on top” or “all below”
type loads.
- Do remove or relocate adjustable wooden shelves to accommodate larger type of bottles
or increase the capacity of the cabinet by stacking the bottles up when necessary. (See
removing shelves)
- Keep small gap between the walls and the bottles to allow air circulation. Like an
underground cabinet air circulation is important to prevent mould and for a better
homogeneous temperature within the cabinet.
- Do not over load your wine cabinet to facilitate air circulation.
- Do not stack more than 1.5 rows of standard 0.75L bottles per shelves to facilitate air
circulation
-Avoid obstructing the internal fans (located inside on the back panel of the wine cabinet).
- Do not slide the shelves outwards beyond the fixed position to prevent the bottles from
falling.
- Do not pull out more than one loaded shelf at a time as this may cause the wine cabinet
to tilt forward.
- Do not cover the wooden shelves with alloy foil or other materials, as it will obstruct air
circulation.
- Do not move your wine cabinet while it is loaded with wines. This might distort the body
of the wine cabinet and cause back injury.
TYPES OF REGULATION
Please note that depending on the loading and settings chosen it takes about 24 hours for
the wine cabinet to see the temperature stabilizing.
During this time LED seems to move erratically in particular, it is normal and this process
occurs whenever the setting is modified and/or whenever a large amount of bottles are
added to the cabinet.
Designed to store and mature all wines: red, white and sparkling. These wine cabinets
reproduce the ideal conditions for wine storage, at a constant recommended temperature of
12ºC. They can also be set to provide ideal serving temperature for full enjoyment of the
wine’s qualities. Unless stated by the wine maker on the bottle, we recommends 7ºC for
your champagne, 12ºC for whites and 18ºC for reds. (Refer to “Wine Service
Temperature” recommendation chart)

12
TEMPERATURE SETTINGS
Important: The LED displays by default shows the actual internal air temperature.
In the event of loss of power the unit will return to your preset temperatures when turned
back on.
The electrical board of all models comes with memory function.
It is important to understand that there is a difference between the air temperature inside
the wine cabinet and the actual temperature of the wine: You will need to wait
approximately 12 hours before noticing the effects of temperature adjustment due to the
critical mass within a full wine cabinet.
Once the temperature is set, it is strongly advised not to toy with it or adjust frequently.
The thermostat will maintain the temperature inside the wine cabinet within a +/- 2.5ºC
range. But the thermal inertia of the wine and the glass is such that within this temperature
range, the actual temperature of the wine will only fluctuate 0.5ºC to 1ºC.
WCBV60BL,WCSZ45BL:SINGLE WINDOW DISPLAY BOARD
OPERATING INSTRUCTION:
①Display Window:
Display the measured temperature inside the wine cabinet;
②Temperature Setting / Cycle Icon:
Each time, the temperature inside will drop 1 ℃, until reduced to a minimum, and then a
return to the highest temperature.
Press and hold for 3 seconds, the window to achieve Celsius / Fahrenheit display
conversion
③Lighting / Power Icon:
In standby mode: press and hold for 3 seconds, power is turned on, the machine starts;
When power on, press the icon and hold for 3 seconds, power is off, the machine is off.
Each short touch on this icon: LED lighting on / off

13
BV60BL,BV60S,BV600TBL:SNGLE TEMPERTURE DISPLAY BOARD
OPERATING INSTRUCTION:
①Energy Saving Mode
Press the icon and hold for 3 seconds into the energy-saving mode, press ⑥⑦ out of
energy-saving mode
②ON/OFF Power Icon:
In the standby mode: press and hold for 3 seconds, the power is turned on, the whole
machine starts
In the power-on state: press and hold for 3 seconds, window 4 shows the countdown 3 2 1,
then power is turned off, the machine is turned off (show 3 2 1 process, the hand cannot
leave the button)
③Lighting Icon:
Each short touch on this icon: LED lighting on / off
④Display Window:
Displays the setting temperature
⑤Display Window:
Displays the actual temperature
⑥Temperature Setting Up Icon :
Press one time, In window ④the setting temperature will increase by 1 degree Celsius
(Max. Setting Temperature: 10℃).
⑦Temperature Setting Down Icon :
Press one time, In window ④the setting temperature will decrease by 1 degree Celsius
(Min. Setting Temperature: 2℃).
⑧C/F Temperature Display Conversion Function Icon:
Press and hold for 3 seconds, the window to achieve Celsius / Fahrenheit display
conversion

14
WCDZ60S WCDZ60BL WCDZ600TS:DUAL TEMPERTURE DISPLAY
BOARD OPERATING INSTRUCTION:
①ON/OFF Power Icon:
In the standby mode: press and hold for 3 seconds, the power is turned on, the whole
machine starts
In the power-on state: press and hold for 3 seconds, window 4 shows the countdown 3 2 1,
then power is turned off, the machine is turned off (show 3 2 1 process, the hand cannot
leave the button)
②Temperature Setting Up Icon (Upper Zone) :
Press one time, In window ④the setting temperature will increase by 1 degree Celsius
(Max. Setting Temperature: 20℃).
③Temperature Setting Down Icon (Upper Zone) :
Press one time, In window ④the setting temperature will decrease by 1 degree Celsius
(Min. Setting Temperature: 10℃).
④Window :
Display upper zone temperature.
⑤Window:
Display lower zone temperature
⑥Temperature Setting Up Icon (Lower Zone) :
Press one time, In window ⑤the setting temperature will increase by 1 degree Celsius
(Max. Setting Temperature: 12℃.).
⑦Temperature Setting Down Icon (Lower Zone) :
Press one time, In window ⑤the setting temperature will decrease by 1 degree Celsius
(Min. Setting Temperature: 5℃.).
⑧Lighting Icon:
Each short touch on this icon: LED lighting on / off.

15
⑧C/F Display Conversion Function Icon:
Press and hold for 3 seconds, the window to achieve Celsius / Fahrenheit display
conversion
WCDZ60INT:DUAL TEMPERTURE DISPLAY BOARD OPERATING
INSTRUCTION:
①Power key:
Standby mode: short press the button, the power is switched on, the machine starts
Boot state: the duration of 3 seconds, the window 10 shows the countdown 321, power off,
the whole machine off
②Function setting key:
When you need to set the temperature, please press the function to set the key, by pressing
the ○
4○
5button to achieve the desired temperature
③Lighting button / Celsius Fahrenheit Conversion key:
Every click of the lighting button, LED lights on / off switch between
Boot state, press the button for 3 seconds, the window ⑩○
11 of the temperature display will
be converted between Celsius and Fahrenheit.
④Down key:
When you need to set the temperature, please press the function to set the key ②every
click, the window ⑩of the temperature display will be in the original temperature drop of
1 degrees.
(Max. Setting Temperature: 5℃.).
⑤Up key:
When you need to set the temperature, please press the function to set the key②every
click, the window ○
10 of the temperature display will be in the original temperature rise of
1 degrees.
(Max. Setting Temperature: 20℃.).

16
⑥Child lock:
Boot state, the keyboard does not operate for more than 15 seconds, automatically locked,
continued to press 3 seconds to unlock
⑦Humidification system:
Indicates that the humidification function is activated
⑧Dehumidification system:
Indicates that the dehumidification function is activated
⑨Faulty system:
Indicates that the fault alarm function is activated
⑩Display the current temperature or Set temperature of the upper zone.
⑪Display the current temperature or Set temperature of the down zone.
⑫Humidity display window: Not show.
WINE SERVING TEMPERATURE CHART
All wines mature at the same temperature, which is a constant temperature set between
12ºC to 14ºC. The below chart is an indicative temperature chart to indicate the best
temperature for drinking purposes.
Champagne NV, Sparkling, Spumante 6ºC
Dry White Semillon, Sauvignon Blanc 8ºC
Champagne Vintage, 10ºC
Dry White Chardonnay 10ºC
Dry White Gewürztraminer, Riesling, Pinot grigio 10ºC
Sweet White Sauternes, Barsac, Montbazillac, Ice Wine, Late Harvest 10ºC
Beaujolais 13ºC
Sweet White Vintage: Sauternes… 14ºC
White Vintage Chardonnay 14ºC
Red Pinot Noir, 16ºC
Red Grenache, Syrah 16ºC
Red Vintage Pinot Noir 18ºC
Cabernet & Merlot 20ºC
Chilean, Italian, Spanish, Californian, Argentinean…
Vintage Bordeaux … Room temperature not exceeding 20ºC

17
IMPORTANT INFORMATION ABOUT TEMPERATURE
Your wine cabinet has been designed to guarantee optimum conditions for storing and/or
serving your wines.
Fine wines require long and gentle developments and need specific conditions in which to
reach their full potential.
All wines mature at the same temperature, which is a constant temperature set between
12ºC to 14ºC. Only the temperature of “degustation” (wine appreciation) varies according
to the type of wines (see “Wine Serving Temperature Chart” above). This being said and
as it is for natural cabinets used by wine producers for long period of storage, it is not the
exact temperature that is important, but its consistency. In other words, as long as the
temperature of your wine cabinet is constant (between 12ºC to 14ºC) your wines will be
stored in perfect conditions.
Not all wines will improve over the years. Some should be consumed at an early stage (2
to 3 years) while others have tremendous ageing capability (50 and over). All wines have a
peak in maturity. Do check with your wine merchant to get the relevant information.
DEFROSTING/CONDENSATION/ HYGROMETRY/ VENTILATION
Your wine cabinet is designed with “Auto-cycle” defrost system. During “Off-cycle” the
refrigerated surfaces of the wine cabinet defrost automatically. Defrost water from the
wine cabinet storage compartment drains automatically and part of it goes into a drainage
container, which is located at the back of the wine cabinet next to the compressor. The
heat is transferred from the compressor and evaporates any condensation that has collected
in the pan. Part of the remaining water is collected within the wine cabinet for humidity
purposes.
This system enables the creation of the correct humidity level inside your wine cabinet
required by the natural cork to maintain a long lasting seal.
Notes: The water collected by condensation, is therefore recycled. Under extremely dry
environmental conditions, you may have to add some water into the water container
provided with your wine cabinet.
All units are equipped with a double glazed glass door that has a third internal acrylic
layer to minimize condensation on the glass door.
The wine cabinet is not totally sealed; fresh air admission is permitted through the
drainpipe. Air is circulated through the cabinet by means of a fan/fans and the hollow
shelves.
Notes: During the refrigerating cycle, heat is given off and disperses through the external
surfaces of the wine cabinet. Avoid touching the surfaces during those cycles.

18
ADJUSTABLE WOODEN SHELVES
Shelf installation and taking instruction:
Common wooden shelf:
Shelf taking: According to below instruction drawing to press one side of shelf limit pin①,
extract and remove the shelf from the other side of support bracket②, then take off the
shelf following the arrow mark ③.
Shelf installation will be opposite with shelf taking.
1、”A” is shelf limit pin 2、”B” is shelf
Sliding wooden shelf installation and taking instruction:
Shelf taking: According to below instruction drawing to pull out the shelf to support
bracket ①, press two sides of sliding roller buckles and pull out the shelf following the
arrow mark ②.
Shelf installation: According to below instruction drawing to push in the shelf alignment
with two sides of sliding roller following the arrow mark ③.

19
REVERSIBILITY OF THE DOOR
REMARK:
If your wine cabinet has a lock at the bottom of the door, the door is irreversible and only the door that op
ens to the left or right can be reversed.
Warning: To avoid accidents during the process of changing the door, we recommend that
you get assistance. The glass door is heavy and may cause injury if dropped.
- Depending on to the model and the type of handle your wine cabinet is equipped with,
you may have to rotate the door through 180 degrees.
- Depending on the type of handle your wine cabinet is equipped with, the door may not
be reversible or may require that a left or right opening door be ordered to change the
opening side.
REVERSIBILITY OF THE DOOR
BV60BL,BV60S,WCDZ60BL,WCDZ60S,WCBV60BL,WCDZ600TS,WCDZ600TBL
BV600TBL will use same method to install the door
1. To put the cabinet on open operation place, the door opened to the maximum angle
2. Use small knife(2) to take off the decorative nail (1) on opposite side (Drawing 1);
3. Use the inner six angle screwdriver (Tool 5) to disassemble the screws(4) of drop-proof
device (3), then remove the drop-proof device .(Drawing 1)
4. Hold the door, use six angle screwdriver (Tool 5) to screw out the door shaft core(6)
from the two ends of the top of the door. Take out the door and set aside. (Drawing 2)
5. Discharge the upper and lower door hinge(7)(8) by M5 inner six angle screwdriver
(Tool 5) , then to assemble the door hinge on the opposite side. (Drawing 3 and 4 )
6. Rotate the door 180 degrees, then Install the door on the right side of the cabinet.
(Drawing 5)
7. Finally, install the decorative nail and drop-proof device at the opposite side.
(Drawing 6)
Other manuals for BV60BL
1
This manual suits for next models
10
Table of contents
Popular Wine Cooler manuals by other brands

Miele
Miele KWT 2661 ViS Operating and installation instructions

Frigidaire
Frigidaire FFWC38F6LS Use & care guide

Electrolux
Electrolux E24WC75HPS - Icon - Professional Series 48 Bottle Wine... Specification sheet

camry
camry CR 8068 user manual

Emerson
Emerson FR959 owner's manual

Avintage
Avintage AVI63CSZF Use instruction