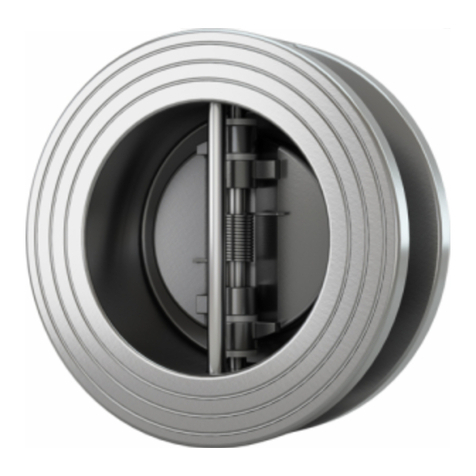
AWS 930 Series User manual

CONTENTS
DISCO CHECK VALVE
Revision status: 03/05/2022 Index number: D0-116
1PREFACE.......................................................................................................................1
1.1 General....................................................................................................................................... 1
1.2 Target group.............................................................................................................................. 1
1.2.1 Personnel qualification.......................................................................................................... 1
1.3 Applicable documents.............................................................................................................. 1
1.4 Warranty..................................................................................................................................... 1
2SAFETY INSTRUCTIONS ..............................................................................................2
2.1 Warnings.................................................................................................................................... 2
2.2 Intended use.............................................................................................................................. 2
2.3 Requirements for the user....................................................................................................... 2
2.4 General safety instructions...................................................................................................... 3
3VALVE DESCRIPTION...................................................................................................5
3.1 Product lines.............................................................................................................................. 6
3.2 Intended use.............................................................................................................................. 7
3.3 Description of function.............................................................................................................. 7
3.4 Pressure test of the valve........................................................................................................ 8
3.5 Scope of delivery ...................................................................................................................... 8
4TYPE PLATE..................................................................................................................9
4.1 Article description breakdown................................................................................................. 9
4.2 Type code ................................................................................................................................ 10
5STORAGE AND TRANSPORT.....................................................................................11
6INSTALLATION............................................................................................................12
6.1 Prepare installation................................................................................................................. 12
6.2 Installation instruction............................................................................................................. 13
7COMMISSIONING, DECOMMISSIONING, MAINTENANCE ........................................16
7.1 Commissioning........................................................................................................................ 16
7.2 Decommissioning.................................................................................................................... 16
7.3 Maintenance............................................................................................................................ 16
7.4 Remove pollutants.................................................................................................................. 16
7.5 Correct malfunctions and defects......................................................................................... 17
8REMOVAL....................................................................................................................18
8.1 Prepare removal...................................................................................................................... 18
8.2 Removal instructions.............................................................................................................. 18
9STORE / REUSE VALVE..............................................................................................18
10 DISPOSAL....................................................................................................................19
11 DECLARATION OF CONFORMITY..............................................................................19

1 PREFACE
Revision status: 03/05/2022 1 Index number: D0-116
1 PREFACE
This operating instruction supports the user in the appropriate, safe and economical use of
the following valves:
Disco check valves of the product line 930, 931, 932, 932-HD and 936
1.1 General
These operating instructions apply to all the above-mentioned valves. To guarantee safe and
smooth use, the entire manual must be read and understood before installation and
commissioning. These instructions are intended to assist the user during installation,
operation, maintenance and removal. In addition to the instructions in this manual, all
applicable accident prevention regulations, safety rules, country-specific or system-specific
regulations and instructions must be observed. These operating instructions are an essential
part of the valve and must be kept available by the operator at the place of use, also for a
later use.
1.2 Target group
This instruction is intended for any person who is involved in work of any kind on the valve. In
particular, the operating instructions are intended for trained and qualified personnel.
1.2.1 Personnel qualification
All work on the valve must be carried out by qualified personnel only. If the personnel do not
have the required qualifications, they have to be trained. This must be ensured by the
operator. Persons without the required knowledge and skills are not permitted to work on the
valve.
1.3 Applicable documents
This includes the corresponding data sheet and the declaration of conformity of the above
mentioned valves. If necessary, these are to be requested from the manufacturer or
downloaded from the website.
1.4 Warranty
AWS Apparatebau Arnold GmbH does not assume any warranty in case the operator or third
parties:
disregard this document.
do not use the valve properly.
should carry out interventions of any kind (conversions, modifications, etc.) on the
valve.
Malfunctions due to pollution or wear of the valve as well as wearing parts (e.g. seals) are
not covered by the warranty.

2 PREFACE
Revision status: 03/05/2022 2 Index number: D0-116
2 SAFETY INSTRUCTIONS
2.1 Warnings
The following warnings are used in this manual. In order to protect you from accidents,
injuries and damage to property, it is important to read and observe these warnings.
DANGER
High risk
Indicates an immediate danger. If not avoided, death or serious
injury will result.
WARNING
Medium risk
Indicates a potentially dangerous situation. If not avoided,
death or serious injury may result.
CAUTION
Low risk
Indicates a potentially dangerous situation. If it is not avoided,
minor or slight injuries may result.
NOTICE
Commandment
Indicates a potentially harmful situation. If not avoided, property
damage may result.
2.2 Intended use
AWS valves may only be used within the approved pressure and temperature limits,
considering chemical and corrosive influences. The valves are not suitable for fluids
containing solids. Intended use includes observing and following the instructions in this
manual. Modifications, conversions or any use of the valve other than the intended use are
considered to be improper use.
2.3 Requirements for the user
It is the responsibility of the planner/installer and operator to ensure that:
the valve is used as described in chapter 2.2 Intended use.
the piping system is properly installed and its proper functioning is regularly checked.
only qualified personnel are used for installation, removal and maintenance.
the valve is only professionally installed if it is in perfect condition.
the operating instruction are taken into account by the personnel.
personnel receive regular instruction in industrial safety and environmental protection
(especially for pressurized pipes).

2 PREFACE
Revision status: 03/05/2022 3 Index number: D0-116
2.4 General safety instructions
The same regulations apply to all valves as to pipeline systems in which they are installed.
The national and international regulations with regard to accident prevention as well as
safety regulations must be observed by the operator.
DANGER
When working on system
System must be switched off and secured against
unauthorized switch-on.
Pipeline must be pressureless to prevent uncontrolled
leakage of the medium.
Pipeline must have cooled down to approx. 20°C.
Medium must be completely removed from the valve
and pipeline.
Contaminated valve must be completely
decontaminated before work is performed.
Valves may only be installed, removed and maintained
by qualified personnel.
DANGER
When operating the system and the valve
In applications with explosion hazard, hot surfaces of
the system and valve parts can be a potential source of
ignition. This danger must be taken into account by the
operator.
WARNING
When working on the system
Any remaining liquid that may leak out during removal
must be collected and disposed of.
WARNING
When operating the system and the valve
Only media may be used which do not damage the
valve and its seals (suitable material pairing).
Otherwise, this can lead to leakage and leaking of the
medium.
When using media with a very low or very high
temperature, burns can occur when touching the
system parts or the valve housing. In this case, these
may only be touched with suitable protective equipment.
This must be done under the responsibility of the
operator of the system.
Pressure surges in the system can cause severe
damage and must be avoided. This is the responsibility
of the operator of the system.

2 PREFACE
Revision status: 03/05/2022 4 Index number: D0-116
CAUTION
Risk of minor injuries
Wear protective gloves during installation, removaly and
maintenance to avoid injuries from cuts on sharp-edged
components.
Always secure the valve adequately during transport,
installation and removal.
NOTICE
Notice of property damage
The valve and the system can be damaged if the valve
is not installed correctly.
Do not subject the valve to pressure surges; otherwise
the valve may be damaged.

3 VALVE DESCRIPTION
Revision status: 03/05/2022 5 Index number: D0-116
Pos.
Name
1
Body
2
Disc
3
Spring cross
4
Spring
5
O-ring1
3 VALVE DESCRIPTION
The illustrations are exemplary for the design of the valves. All further information can be
found in the data sheets of the relevant product line.
The following illustration describes the 932 product line (DN 15-100):
1 Only available in soft-sealing version.
The design of the specified product lines (930/931/932/932-HD/936) differs only slightly from
each other. The illustration lists all the main components of the valves.
Disco check valve 932
DN15 - 100

3 VALVE DESCRIPTION
Revision status: 03/05/2022 6 Index number: D0-116
3.1 Product lines
Product line
Characteristics
930 DN 15-100
From DN 15 to DN 100.
Centring via the outer diameter of the
body.
931 DN 15-100
From DN 15 to DN 100.
Centering via the outer diameter of the
body and via the centering ring if
necessary.
931 DN 125-200
From DN 125 to DN 200.
Centering via the outer diameter of the
body.
932 DN 15-100
From DN 15 to DN 100.
Precise adjusting via centering cams.
Centering cams are provided with a hole
for grounding cable.
Centering cam

3 VALVE DESCRIPTION
Revision status: 03/05/2022 7 Index number: D0-116
Product line
Characteristics
932 DN 125-300
From DN 125 to DN 300.
Centering via grooves or outer diameter of
housing.
932-HD DN 15-100
From DN 15 to DN 100.
High pressure version up to 160bar.
Centering over the outer diameter of the
body.
936
From DN 15 to DN 100.
Plastic version.
Centering over the outer diameter of the
body.
3.2 Intended use
Disco check valves are valves used to prevent backflow in piping systems. AWS check
valves are characterized by their simple design as well as their short face-to-face length
(according to DIN EN 558, series 49 and series 52). They provide an optimal solution where
wafer connections are required. In addition to the standard design, valves can also be
supplied with a wide range of special opening pressures (additional option S07), so that an
extremely wide range of applications can be covered. For further special options, please read
the sales documents.
The above-mentioned check valves are suitable for use in pipeline systems for the transport
of liquid and gaseous fluids, as well as in systems where particularly high requirements are
placed on the material. The valves are not suitable for solids.
3.3Description of function
Disco check valves are medium-controlled backflow preventers and open when the opening
force of the medium is greater than the closing force of the disc. In case of failure (e.g. pump
failure) or backflow of the medium, the valve closes automatically.
grooves

3 VALVE DESCRIPTION
Revision status: 03/05/2022 8 Index number: D0-116
3.4 Pressure test of the valve
The valve is leak-tested at the factory with air or water. Therefore the following warnings
must be observed:
CAUTION
Residues on the valve
Residues of the test medium may still be left on the
contact surfaces of the valve.
Be aware of possible reactions with the operating
medium.
During a system pressure test of the system, the following warning must be observed:
WARNING
Excess pressure of the valve
In a system pressure test of the system, the pressure
must not exceed 1.5 times the max. permissible
pressure PS of the valve.
3.5 Scope of delivery
The valve is supplied ready for installation.
For valves with the add-on option S79, an additional grounding cable is included in the scope
of delivery.

4 TYPE PLATE
Revision status: 03/05/2022 9 Index number: D0-116
①Article description
②Nominal size
③Max. allowable pressure
④Commission number
⑤Flange connection
⑥ Max. medium temperature
⑦ Serial number
⑧Manufacturing date
⑨ Flow direction
⑩CE marking
⑪Number of the notified authority
⑫
Address of the manufacturer
4 TYPE PLATE
A type plate is attached to each valve. The characteristics of the valve are listed on it. The
following illustration shows the structure of such a type plate.
Structure of a 932 disco check valve of the product line 932:
4.1 Article description breakdown
The following breakdown is an example of a standard valve for illustrative purposes.
DN20 PN6-40 ANSI
PS 40 bar Tmax. 250°C
121709-4 S.Nr.: 0083 06/20
0036
D-74676 Niedernhall
932/20/1/T/F1/PN6-PN40
Zimmerbachstraße 51
Disco-RSV932/ 20/ 1/ T/ F1/ PN6- PN40
Material sealing
Design
Nominal size
Type
Max. flange connection
Min. flange connection
Material spring

4 TYPE PLATE
Revision status: 03/05/2022 10 Index number: D0-116
4.2 Type code
The type code of the valves is structured as follows:
DN
Material
Type
Nominal
size
Design
Body
Disc
Spring
cross
Spring
Sealing
930
15 –100
1
1.4408
1.4408
1.4436
F5 = 1.4436
M = Metal
seated
N = NBR
E = EPDM
F = FKM
T = PTFE
DN
Material
Type
Nominal
size
Design
Body
Disc
Spring
cross
Spring
Sealing
931
15 –100
3*
CW617N (2.0402)
1.4301
1.4301
F1 = 1.4401
M = Metal
seated
N = NBR
E = EPDM
F = FKM
T = PTFE
125 –200
9
EN-GJS-400-18-LT
EN-GJS-400-18-LT
1.4408
F1 = 1.4571
9.1
EN-GJS-400-18-LT
1.4308
1.4408
F1 = 1.4571
* Design 3 without PTFE sealing
DN
Material
Type
Nominal
size
Design
Body
Disc
Spring
cross
Spring
Sealing
932
15 –300
1
1.4408
1.4408
1.4408
F1 = 1.4571
M = Metal
seated
N = NBR
E = EPDM
F = FKM
T = PTFE
15 –100
4
CC333G (2.0975)
CC333G (2.0975)
CC333G
(2.0975)
F2 = Hastelloy
C4
15 –100
4.1
CC333G (2.0975)
1.4408
1.4408
F1 = 1.4571
15 –300
5
1.0619, verzinkt
1.4408
1.4408
F1 = 1.4571
15 –300
6
1.4469
1.4469
1.4469
F2 = Hastelloy
C4
15 –300
6.1
1.4469
1.4408
1.4408
F1 = 1.4571
DN
Material
Type
Nominal
size
Design
Body
Disc
Spring
cross
Spring
Sealing
936
15 –100
4
PVC-U
PVC-U
PVC-U
F1 = 1.4571
N = NBR
E = EPDM
F = FKM
T = PTFE
5
PP-H
PP-H
PP-H
F1 = 1.4571
8
PVDF
PVDF
PVDF
F1 = 1.4571

5 STORAGE AND TRANSPORT
Revision status: 03/05/2022 11 Index number: D0-116
5 STORAGE AND TRANSPORT
The valve is delivered in a ready-to-use condition. In the course of storing and transporting
the valve, there are some guidelines that the user must follow in order to guarantee proper
functioning of the valve.
Storage:
The valve must be stored in the original packaging in closed rooms.
During storage, the valve must be protected from harmful influences (e.g. moisture or
dirt).
Valves with sealing elements made of organic materials (e.g. EPDM) must be stored
away from sunlight and UV light to prevent faster aging.
During storage the valve must be protected against mechanical damage. Special
attention must be paid to the protection of the connection and sealing surfaces.
To achieve short storage times, existing stocks should be used first (first in - first out).
In the case of long storage periods, the seals may have aged considerably, which can
lead to malfunctions.
Transport:
During transport, the same guidelines apply as for storage.
When transporting over long distances, the valve must be transported in a suitable
packaging to protect it from mechanical damage and corrosion.
For valves with a large nominal size, that cannot be moved manually, the appropriate
sling must be used.
Only use slings on the body or on the eyebolt of the valve, not on the internal parts.

6 INSTALLATION
Revision status: 03/05/2022 12 Index number: D0-116
6 INSTALLATION
The operator of the system is generally responsible for the dimensioning of the piping and
the installation of the valve. The function can be affected by planning and installation errors.
6.1 Prepare installation
Remove the valve from the packaging.
Check complete valve for transport damage.
Check the mobility of the discs.
In case of damage contact the manufacturer.
Damaged valves / components must not be installed.
DANGER
Incorrectly connected valve
Installation of the valve may only be carried out by
qualified personnel.
Flow direction arrow of the valve must match the flow
direction of the pipeline.
Only valves whose pressure class, chemical resistance,
connection and dimensions correspond to the operating
conditions may be installed.
Valve may only be used within the intended operating
limits.
Pipelines must be emptied and cleaned if necessary.
WARNING
Valve handling
The spring cross is under preload and should only be
released if absolutely necessary. If required, a press
device must be used for this purpose in order to avoid
risks due to high spring forces.
Special attention must be paid to the risk of crushing or
pinching fingers when testing the mobility of the disc.
DANGER
Accident prevention measures before installation
Pipelines of the system must be pressureless.
Ensure that pipelines and valve have cooled down to
lukewarm.
System must be free of hazardous media.
System must be switched off and secured against
switching on again.
If necessary, use the suitable protective equipment.

6 INSTALLATION
Revision status: 03/05/2022 13 Index number: D0-116
WARNING
Hoist for moving large valves
Lifting equipment may only be used by the personnel
instructed in it.
The appropriate sling must be used for the valve.
The lifting capacity of the hoist and sling must be
designed for at least the total weight of the valve.
Ensure that there are no persons under suspended
load.
6.2 Installation instruction
When installing the valve, the following steps must be followed:
Place one washer on each of the flange screws.
Insert two flange screws through the lower flange holes; these can serve as a
support in the installation position with horizontal flow. From the other side, place one
washer and then one nut und the flange screw and tighten them lightly.
Insert the valve between flanges and sealing and place it on the two flange screws.
For large valves that can no longer be moved manually, use a hoist.
Insert a suitable flange joint sealing between the flange and the valve; these are to
be centered with the valve between the flanges.
Insert remaining flange screws into the flange holes.
Place one washer and then one nut on each flange screw and tighten them lightly.
Then center the valve including flange joint sealing between the flanges. The valve is
centered by the flange screws and the respective shape of the valve.
Tighten the flange screws crosswise with the appropriate tightening torque (for guide
values, see table: Tightening torques of the flange connection).
NOTICE
Instructions for installing the valve
The system must be clean and free of contaminants at
the point of installation (flanges). Special attention must
be paid to the sealing surfaces.
It must be ensured that a calming distance of 5 x DN
(see 6.2 Installation instruction; calming distance) is
available before and after the valve.
Do not install directly on the pump flange.

6 INSTALLATION
Revision status: 03/05/2022 14 Index number: D0-116
Tightening torques of the flange connection
The tightening torques given below are to be understood as guide values, as they depend on
various factors, such as the material and strength class of the screws or the used flange
sealing.
*1Refers to swing check valves or piping made of plastic.
*2Refers to swing check valves or piping made of metallic materials.
Screw
Tightening torque [Nm]*
plastic*1
metallic*2
M10
30
30
M12
20
50
M16
35
130
M20
60
250
M24
100
420
M27
600
600
Flange screw
Washer
Sealing
Valve
Flange
Nut

6 INSTALLATION
Revision status: 03/05/2022 15 Index number: D0-116
Centering the product line 931 and 932 DN 15-100
The valve is not
centered.
It must be rotated
in order to be
centered.
Centering cams are in
contact with the flange
screws.
The valve is
centered.
Calming distance
The illustration shows options how the valve
should be installed in vertical and horizontal
flow direction. It shows how the calming
distance of 5 x DN must be realized in order
to guarantee a proper function of the valve.
Installation position without closing spring
The valves can be installed in any position. Excluded are
check valves without closing spring. It must be ensured that
the installation is only carried out in vertical pipelines with
flow direction from bottom to top (see illustration on the
right).
NOTICE
Malfunctions/damage due to incorrect installation position
The valve must be installed in the correct installation
position and properly centered between the two
pipelines.
vertikal
horizontal

7 COMMISSIONING, DECOMISSIONING, MAINTENANCE
Revision status: 03/05/2022 16 Index number: D0-116
7 COMMISSIONING, DECOMMISSIONING, MAINTENANCE
7.1 Commissioning
Before commissioning, compare the operating data and materials of the valve with those of
the piping system. This allows the durability of the system to be checked. In the case of new
systems or repairs, the entire piping system must be rinsed to remove foreign substances
from the system. Before commissioning, ensure that the valve is properly installed and all
connections are properly connected. No work may be carried out on the valve during its
operation.
7.2 Decommissioning
During decommissioning and long downtimes, media that change their aggregate state must
be drained or removed from the system. If necessary, the system must be flushed out.
7.3 Maintenance
AWS disco check valves are maintenance-free. However, they can be checked for function
and safety to avoid unforeseen downtimes. The interval time is to be determined by the
operator.
DANGER
Danger due to work on the system
During operation, no work (e.g. maintenance work) may
be carried out on the valve.
7.4 Remove pollutants
When working on the valve, there is a risk of coming into contact with hazardous substances.
The following warnings must be observed:
DANGER
Danger from contaminants on the valve due to use in
contaminated areas
Work on contaminated valves is only permitted for
qualified personnel.
The valve must be completely decontaminated before
any work is performed on it.
The required protective equipment must always be worn
in the contaminated area. In addition, all safety
measures must be followed when handling the
respective hazardous substances.
Plastic parts may be so heavily contaminated that
cleaning is no longer sufficient.

7 COMMISSIONING, DECOMISSIONING, MAINTENANCE
Revision status: 03/05/2022 17 Index number: D0-116
7.5 Correct malfunctions and defects
Malfunctions or defects may occur during operation. The following table shows possible
causes and the appropriate solution. If malfunctions/defects are not listed, please contact the
manufacturer.
Malfunction/Defect
Cause
Solution
High noise emission
Calming distance too low/not
respected
Install the valve at a suitable
position in order to be able to
maintain the calming distance
Flow rate too low
Select smaller nominal size
No flow present
Valve installed the wrong way
round
Align flow direction arrow with
flow direction
Flow rate too low
Increase pressure or flow rate
Washer jammed
Clean valve
Replace valve
Closing spring too strong, valve
cannot open
Use a weaker closing spring
Leakage rate too high
O-ring damaged
Replace O-ring
Disc deformed
Replace disc
Sealing surface damaged
Rework sealing surface,
replace affected component if
necessary
Sealing surface dirty
Clean the sealing surface
Wear
Replace affected components
Closing spring worn/defective
Replace closing spring
Flange leakage
Flanges not sufficiently braced
Check fasteners and
retighten if necessary
Sealing surface/seal damaged
Rework sealing surface,
replace body if necessary
Sealing surface/seal dirty
Clean sealing surface/seal

9 REMOVAL / STORE / REUSE VALVE
Revision status: 03/05/2022 18 Index number: D0-116
8 REMOVAL
When removing the valve from the pipeline, all previously mentioned warnings and
instructions apply. Pay special attention to chapter 6 Installation and chapter 7
Commissioning, decommissioning, maintenance.
8.1 Prepare removal
Before removal, the following steps must be observed:
Pipelines must be emptied and cleaned if necessary.
Provide collection container if there is a residue of the medium in the pipeline.
Observe applicable warnings and instructions to ensure safe and successful work.
8.2 Removal instructions
The following aspects must be observed during removal:
Loosen nuts of all flange screws.
Completely remove all nuts and washers from the flange screws.
Pull the flange screws out of the flange holes.
For horizontal flow, the lower flange screws can remain inserted to facilitate removal.
Secure valve against falling down.
Remove the valve from the flange using the eyebolt. For large valves, use a hoist and
suitable sling.
Remove the remaining flange screws from the flange holes.
Place the valve on a suitable surface.
9 STORE / REUSE VALVE
After the removal, the valve can be stored or used in another system.
The following guidelines must be observed:
There must be no residues of the medium in the valve.
Make sure that the valve is in perfect condition before reusing it.
Valve must be designed for the given operating conditions when reused.
In case of storage, the information in chapter 5 Storage and transport must be taken
into account.
NOTICE
Environmental pollution due to residues
Ensure that the valve is free of residues of the medium
before disposal or storage.
All materials are to be disposed of properly in
accordance with applicable regulations.
This manual suits for next models
10
Table of contents
Other AWS Control Unit manuals
Popular Control Unit manuals by other brands

Bosch
Bosch ISM 1 installation instructions

Emerson
Emerson Asco Bio-Pure Installation, operation and maintenance manual

National Instruments
National Instruments FieldPoint FP-AO-210 operating instructions

Accton Technology
Accton Technology EM4601-SX-SC Quick installation guide

Bticino
Bticino LN4570CWI quick start guide

GESTRA
GESTRA NRR 2-2e Installation and service instructions