AXC TRUEBRAKE G25 User manual

TrueBrake Installation Manual (March 2022 - Document v2.21)
© Aeroxcraft Ltd 2022
TrueBrake Logo and AXC SIM Logo are registered trademarks of Aeroxcraft Ltd. Logitech the Logitech logo and other Logitech marks are owned
by Logitech and may be registered.
*Aeroxcraft Ltd will not be held responsible for any damage to your Logitech pedals, steering wheel or invalidation of your Logitech Warranty.
www.axc-sim.com
Installation Manual
(Applicable to TrueBrake v1, v2, v2.1, v2.2)
For Logitech Pedals

TrueBrake Installation Manual (March 2022 - Document v2.21)
© Aeroxcraft Ltd 2022
TrueBrake Logo and AXC SIM Logo are registered trademarks of Aeroxcraft Ltd. Logitech the Logitech logo and other Logitech marks are owned
by Logitech and may be registered.
*Aeroxcraft Ltd will not be held responsible for any damage to your Logitech pedals, steering wheel or invalidation of your Logitech Warranty.
Introduction
Read these instructions in full before starting to install
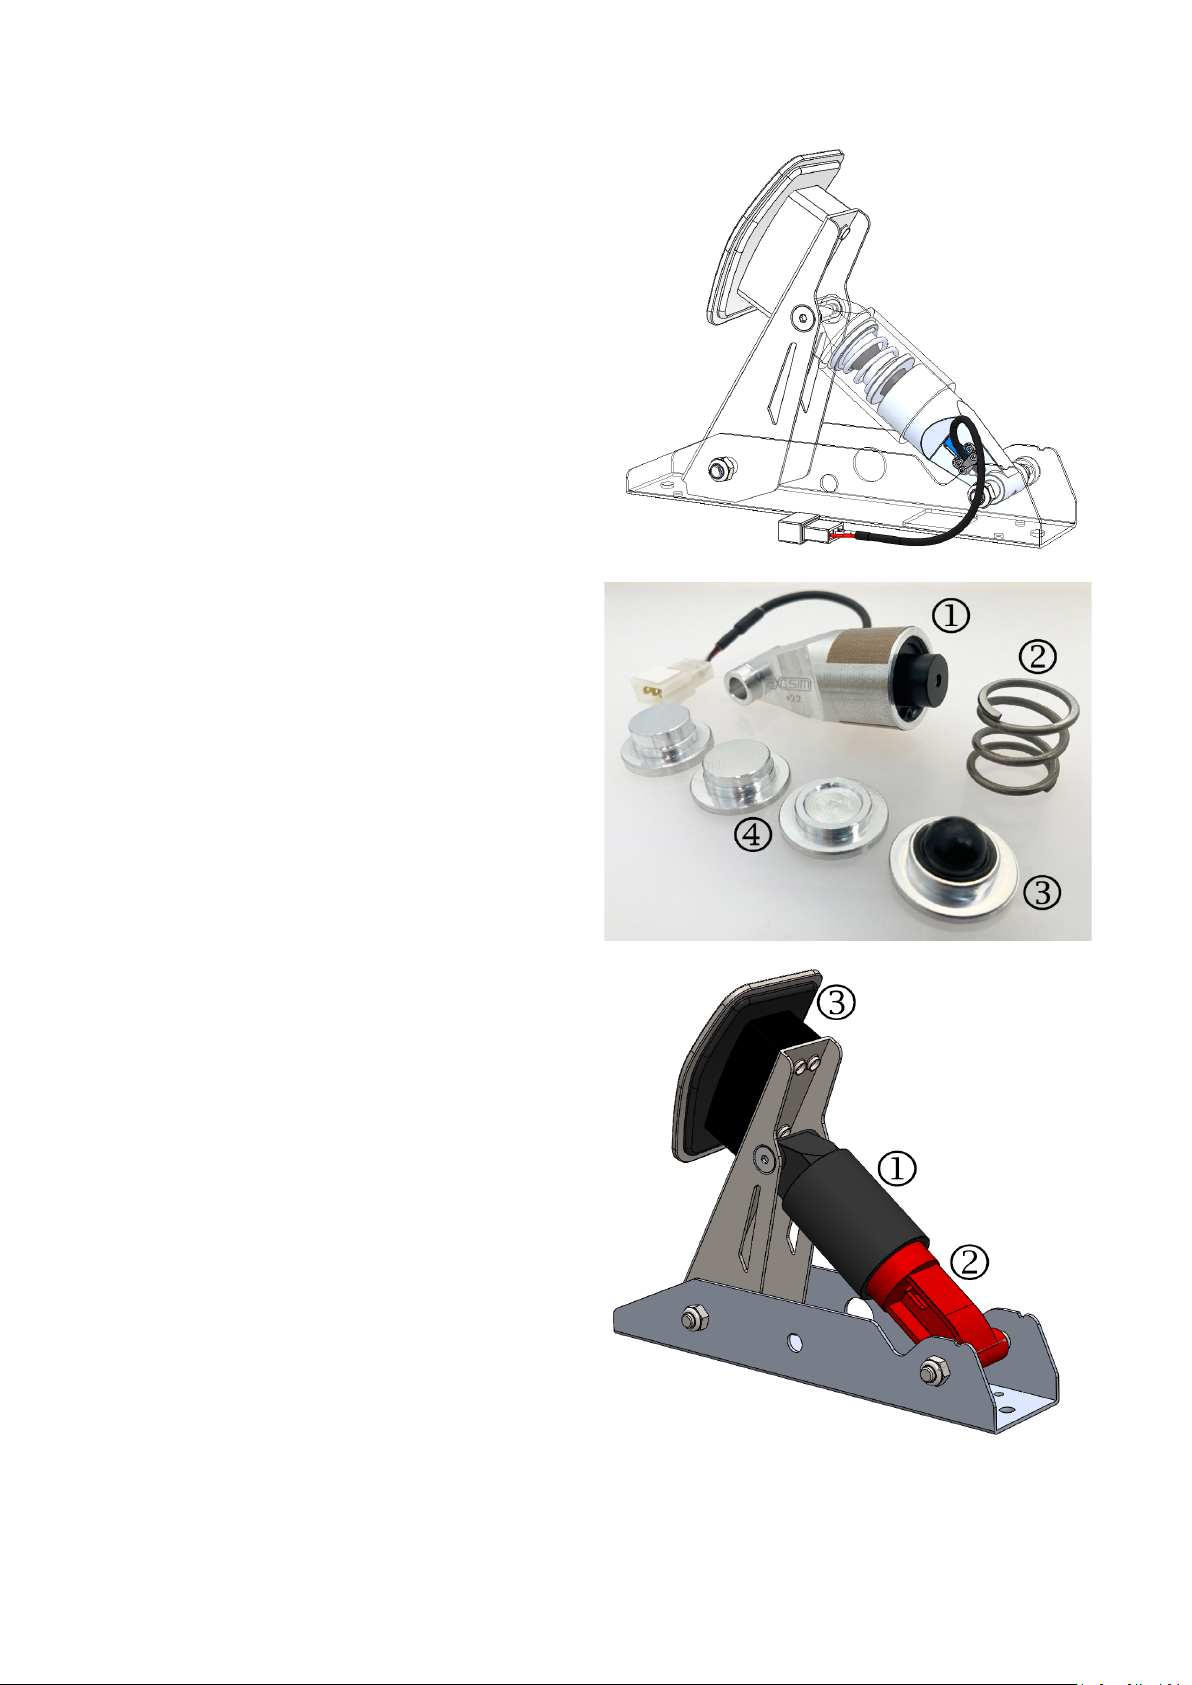
TrueBrake
.
Make sure you have all the
correct tools.
Take notes and photos
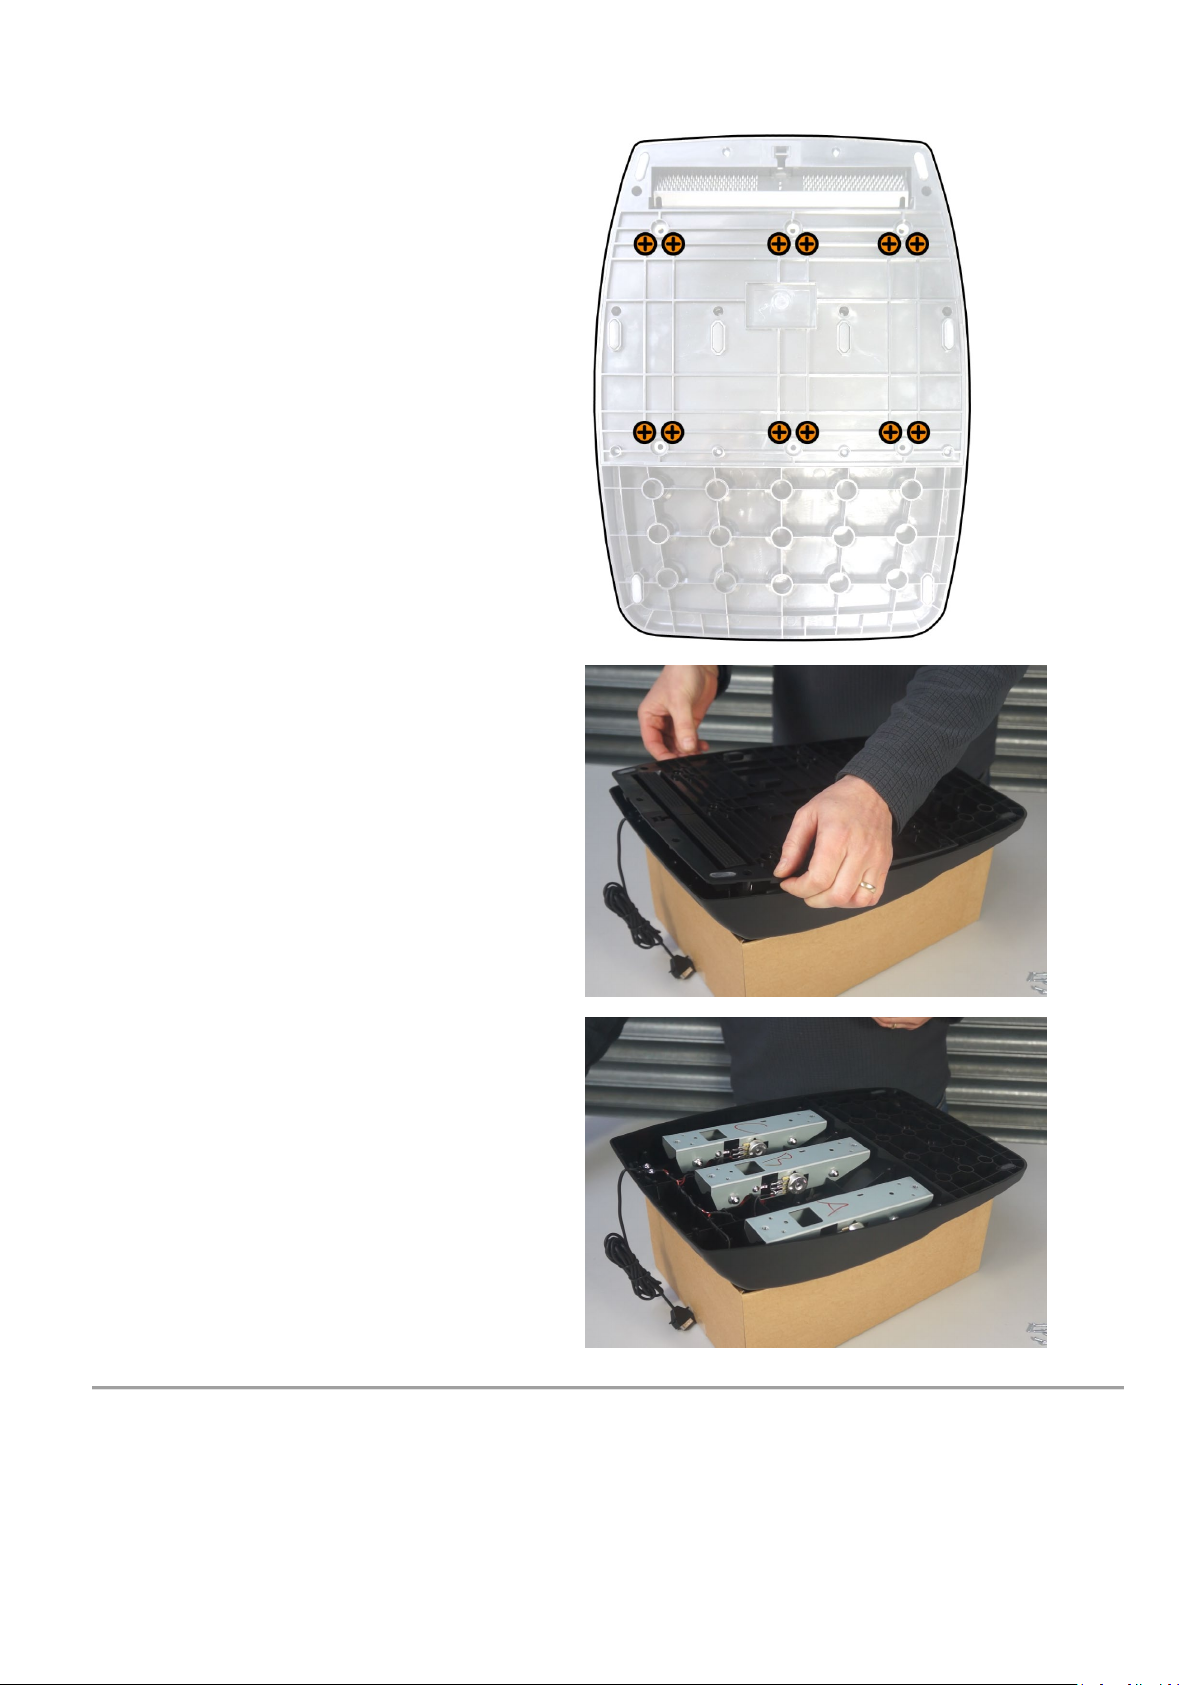
during disassembly that you
can refer to when re
-assembling the pedals.
Do not over
-tighten screws as you can strip the
threads.
If you are under 18 years old seek the help of a
responsible and competent adult.
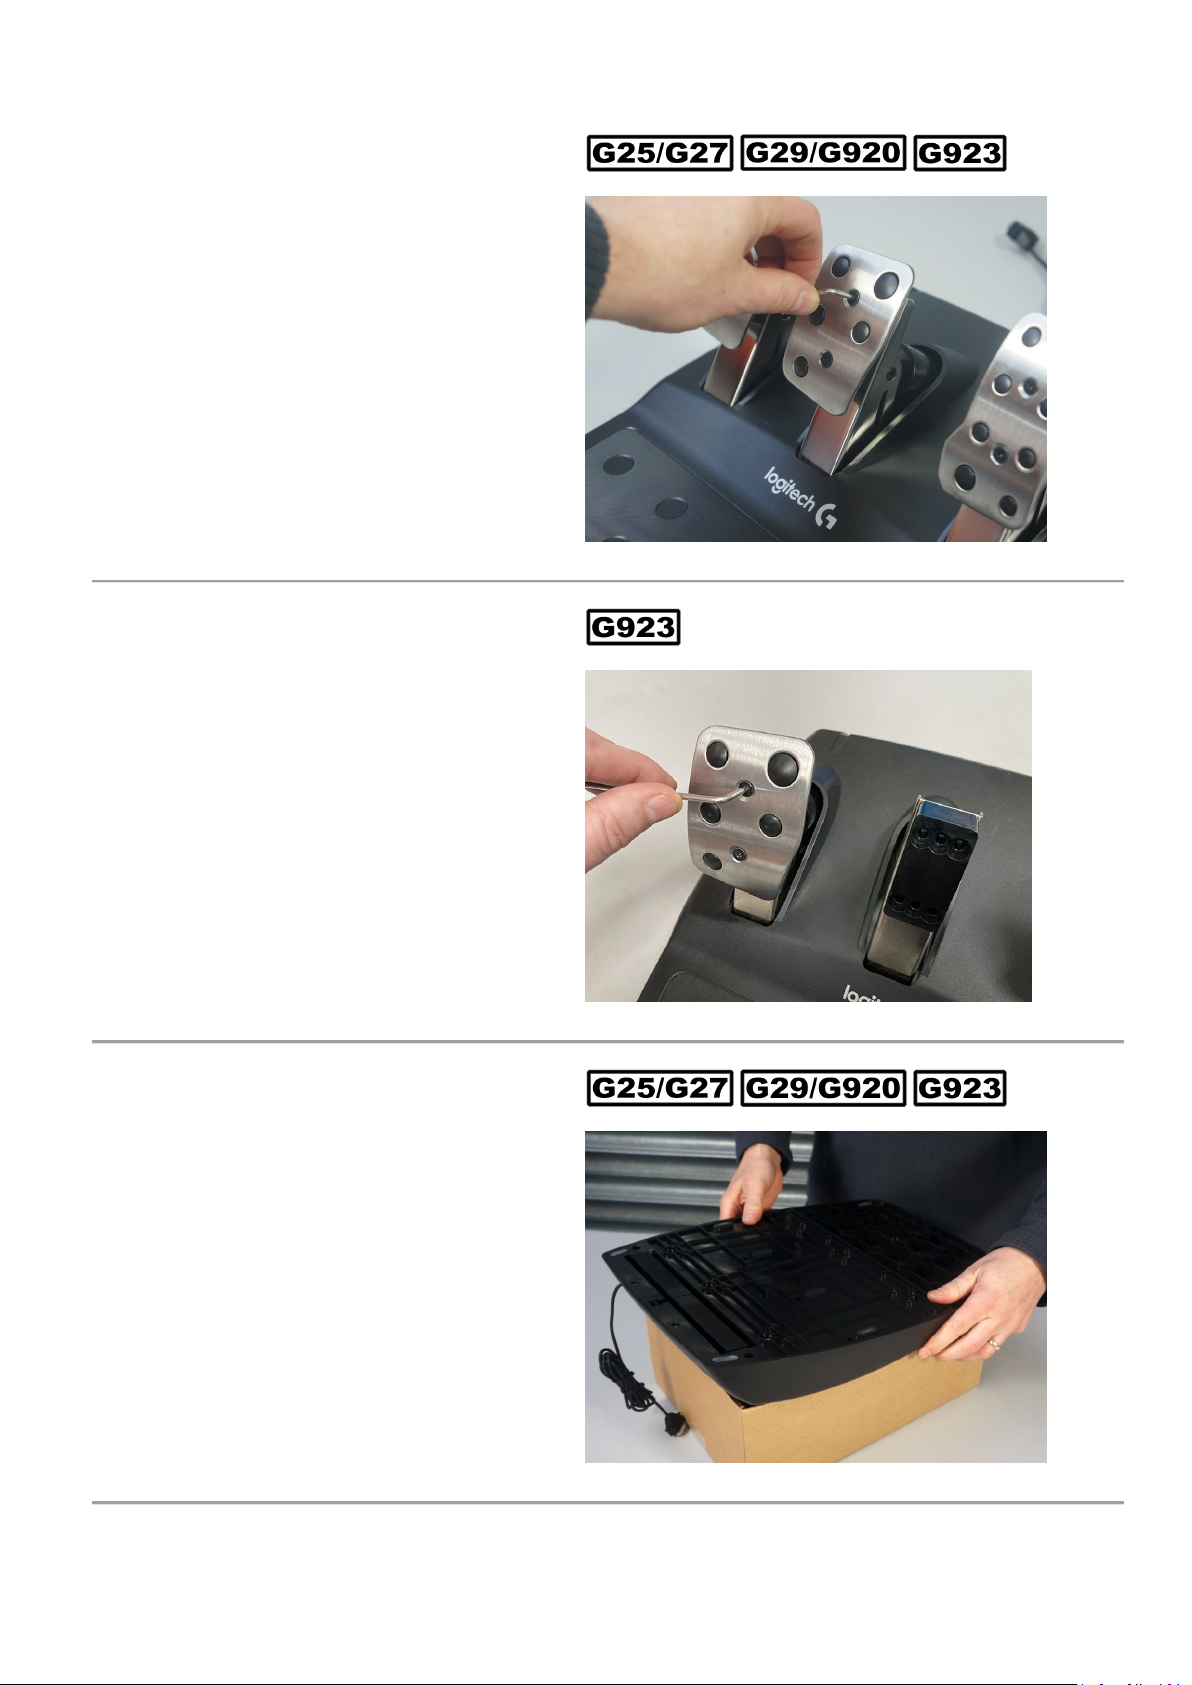
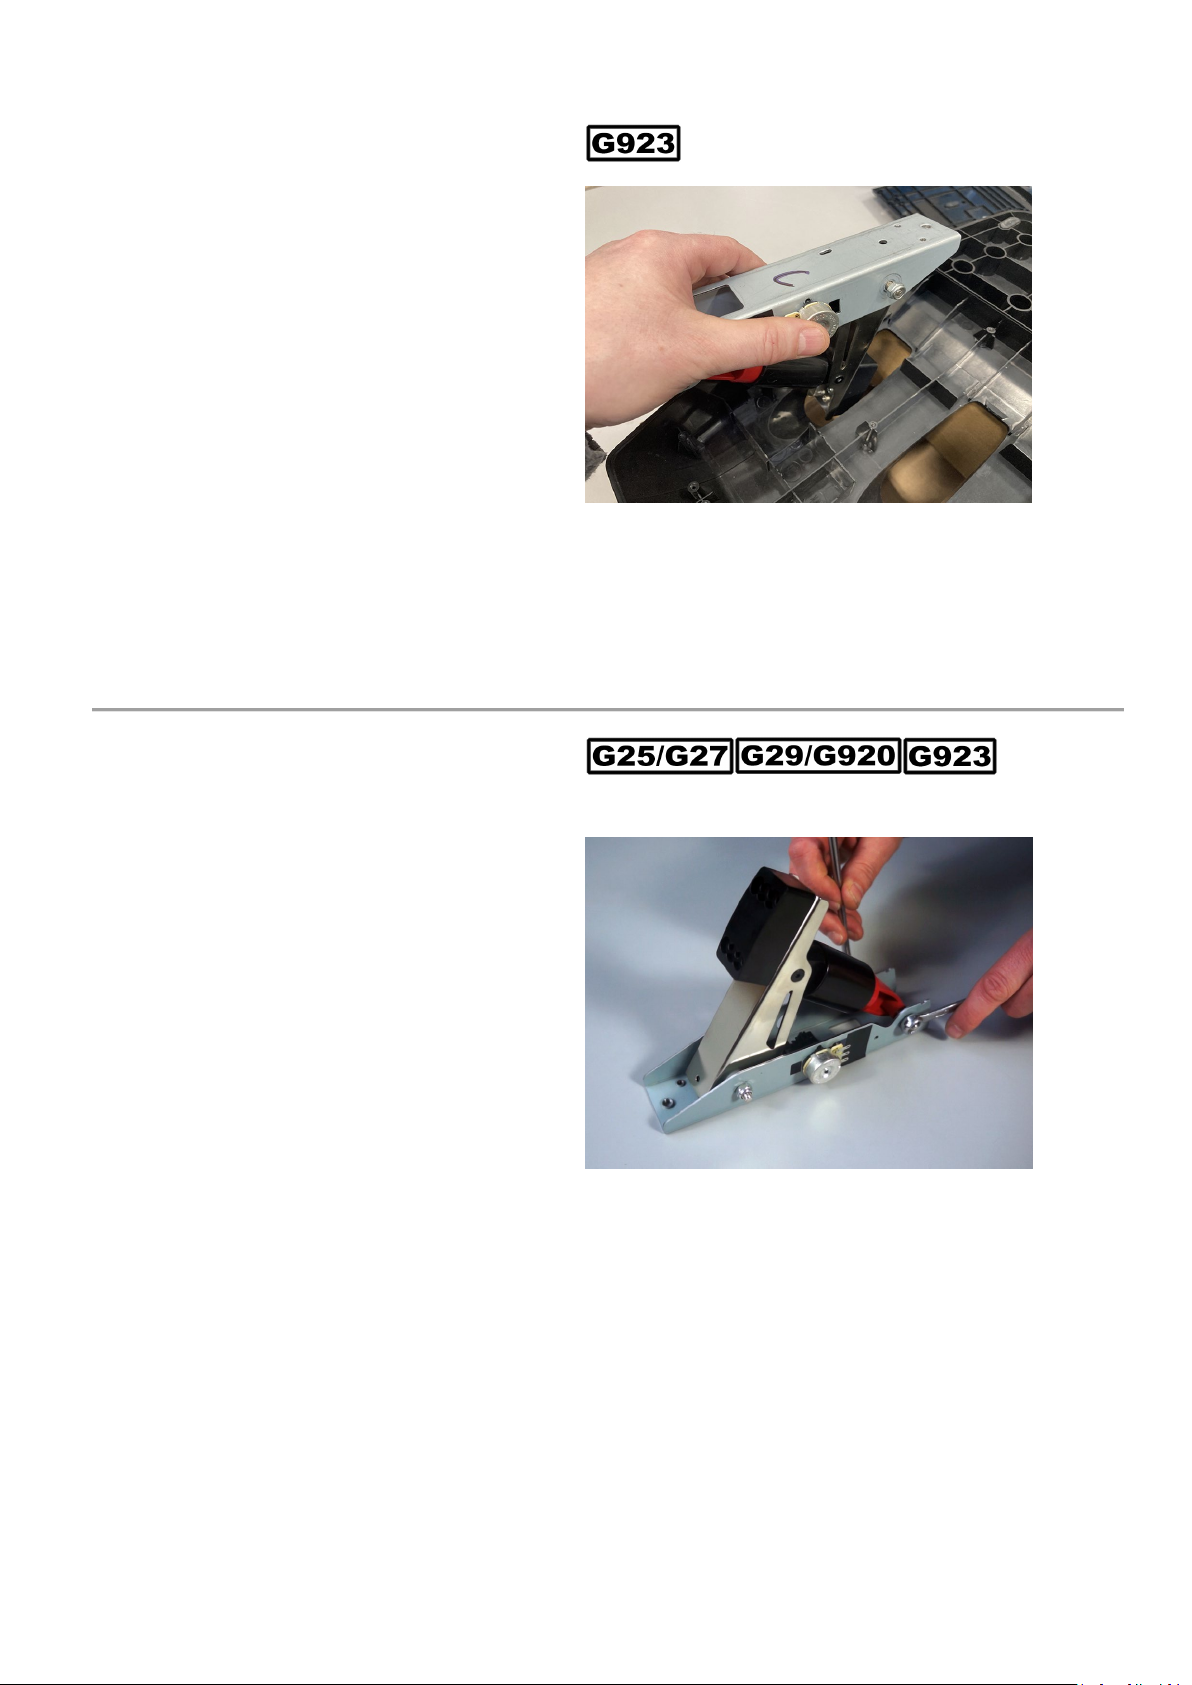
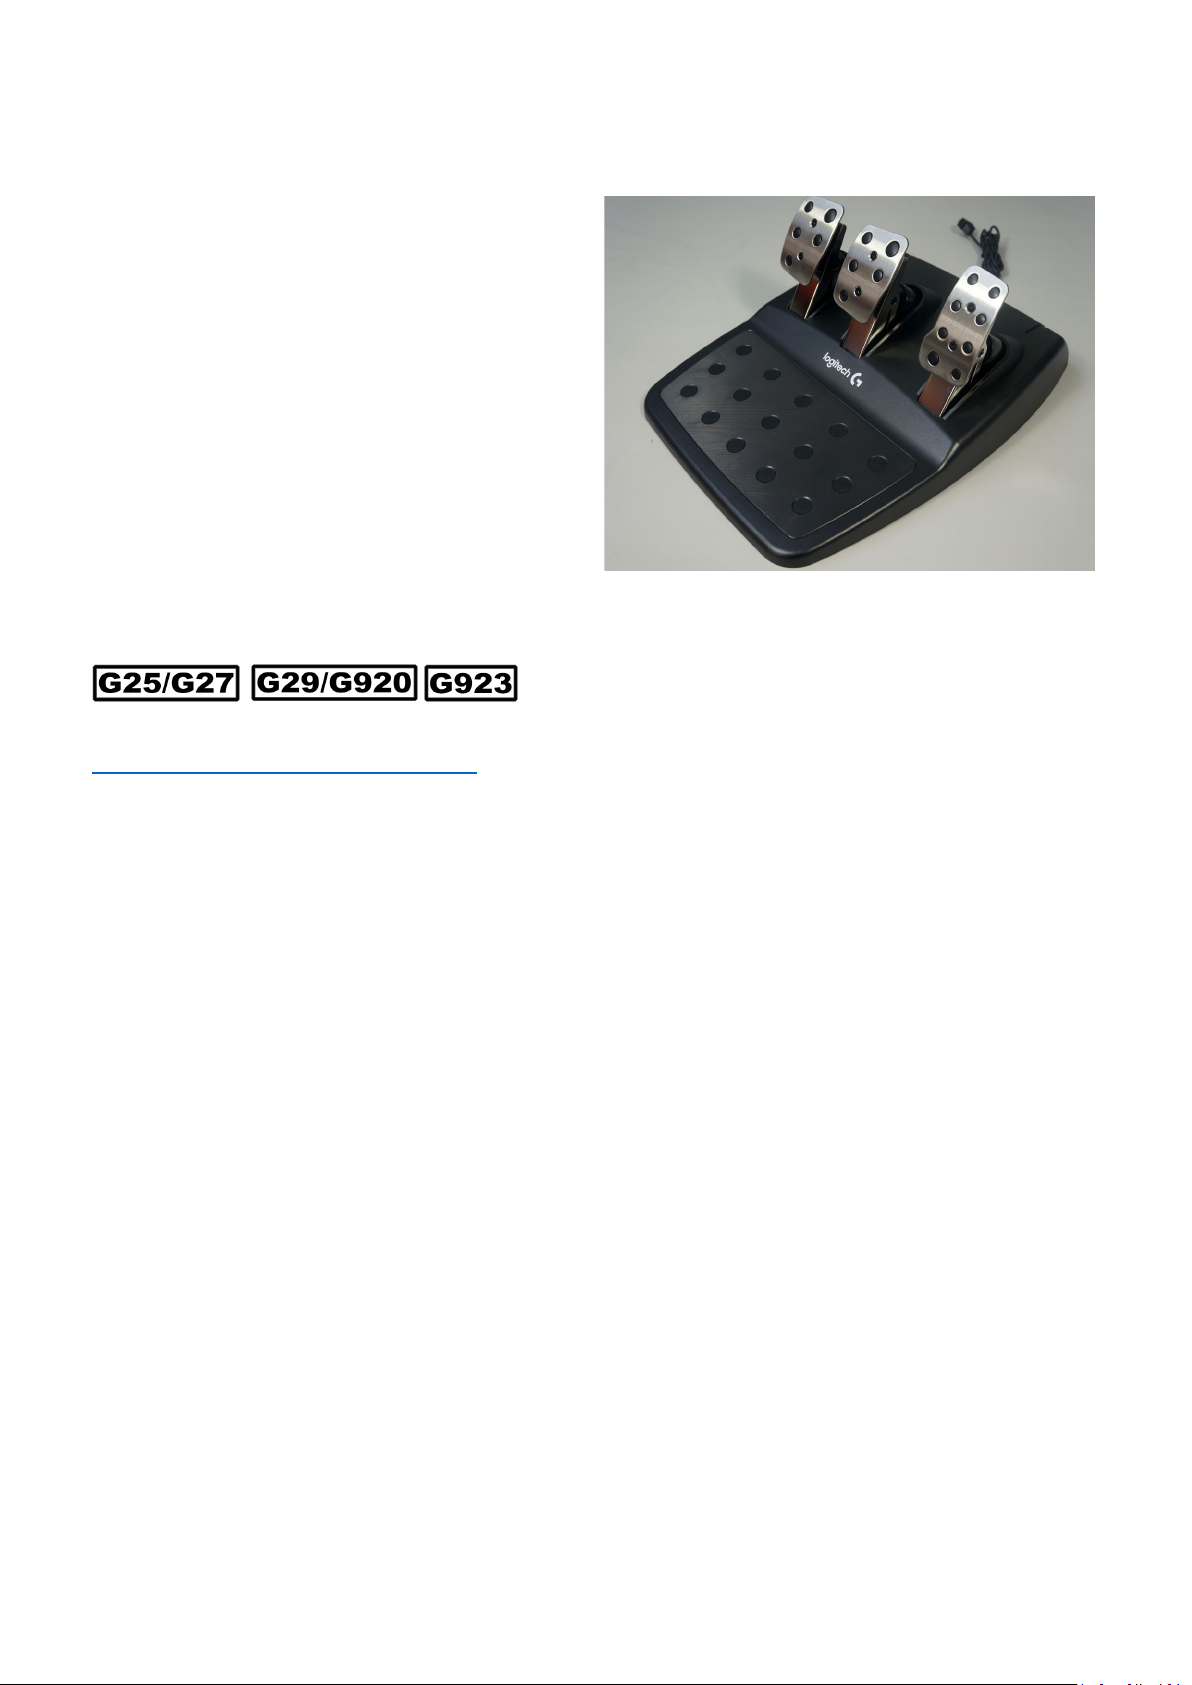
Logitech G29 / G920 Pedals
Follow the steps required for your model of pedals.
Look out for the symbols:
If you need assistance, see:
https://www.axc
-sim.com/support-tickets/
AXC SIM (Aeroxcraft Ltd) will not be held responsible for any damage to your Logitech pedals, steering wheel or
invalidation of your Logitech Warranty
caused by you installing TrueBrake. If you disagree with this statement
then do not install this component and return it to AXC SIM for a full refund.

TrueBrake Installation Manual (March 2022 - Document v2.21)
© Aeroxcraft Ltd 2022
TrueBrake Logo and AXC SIM Logo are registered trademarks of Aeroxcraft Ltd. Logitech the Logitech logo and other Logitech marks are owned
by Logitech and may be registered.
*Aeroxcraft Ltd will not be held responsible for any damage to your Logitech pedals, steering wheel or invalidation of your Logitech Warranty.
These instructions will show you how to install the
TrueBrake
unit to your Logitech Pedal set, as shown
opposite.
TrueBrake consists of four parts:
1. TrueBrake Unit
2. Pedal Return Spring
3. Dome
4. Spacers (3 sizes)
Stock Logitech Parts:
1. Upper Spring Housing
2. Lower Spring Housing
3. Foot Pad

TrueBrake Installation Manual (March 2022 - Document v2.21)
© Aeroxcraft Ltd 2022
TrueBrake Logo and AXC SIM Logo are registered trademarks of Aeroxcraft Ltd. Logitech the Logitech logo and other Logitech marks are owned
by Logitech and may be registered.
*Aeroxcraft Ltd will not be held responsible for any damage to your Logitech pedals, steering wheel or invalidation of your Logitech Warranty.
Tools required:
#1 Phillips screwdriver (PH1)
#2 Phillips screwdriver (PH2)
5mm hex key
2.5mm hex key
Long Nose Pliers
10mm spanner or adjustable wrench

TrueBrake Installation Manual (March 2022 - Document v2.21)
© Aeroxcraft Ltd 2022
TrueBrake Logo and AXC SIM Logo are registered trademarks of Aeroxcraft Ltd. Logitech the Logitech logo and other Logitech marks are owned
by Logitech and may be registered.
*Aeroxcraft Ltd will not be held responsible for any damage to your Logitech pedals, steering wheel or invalidation of your Logitech Warranty.
1a – Remove brake foot pad
Remove the 2 hex screws and the foot pad from the
brake pedal.
1b – Remove clutch foot pad
G923 ONLY
Remove the 2 hex screws and the foot pad from the
clutch pedal.
2 – Support the assembly
Invert the pedal assembly and support with a
cardboard box.

TrueBrake Installation Manual (March 2022 - Document v2.21)
© Aeroxcraft Ltd 2022
TrueBrake Logo and AXC SIM Logo are registered trademarks of Aeroxcraft Ltd. Logitech the Logitech logo and other Logitech marks are owned
by Logitech and may be registered.
*Aeroxcraft Ltd will not be held responsible for any damage to your Logitech pedals, steering wheel or invalidation of your Logitech Warranty.
3 – Remove bottom cover
Remove the 2 small screws (PH1) that are under the
carpet gripper
, as shown.
Remove the 12 small screws (PH1), as shown in
diagram
.

TrueBrake Installation Manual (March 2022 - Document v2.21)
© Aeroxcraft Ltd 2022
TrueBrake Logo and AXC SIM Logo are registered trademarks of Aeroxcraft Ltd. Logitech the Logitech logo and other Logitech marks are owned
by Logitech and may be registered.
*Aeroxcraft Ltd will not be held responsible for any damage to your Logitech pedals, steering wheel or invalidation of your Logitech Warranty.
Remove the 12 large screws (PH2) shown in
diagram
.
Remove the bottom cover.
Take notice of how the wiring loom is arranged and
attached to the plastic moulding.
You need to put
the wires back in the correct places later.
Also notice e
ach pedal unit is marked in the factory
with the letters
A, B, C.
A) Accelerator
B) Brake
C) Clutch

TrueBrake Installation Manual (March 2022 - Document v2.21)
© Aeroxcraft Ltd 2022
TrueBrake Logo and AXC SIM Logo are registered trademarks of Aeroxcraft Ltd. Logitech the Logitech logo and other Logitech marks are owned
by Logitech and may be registered.
*Aeroxcraft Ltd will not be held responsible for any damage to your Logitech pedals, steering wheel or invalidation of your Logitech Warranty.
4a – Remove brake pedal unit
CAUTION: The wires are very thin and easily
damaged. Do not
disconnect the connectors by
pulling
the wires.
R
emove the screw (PH2) that secures the black
ground wire
.
CAUTION: The wires are very thin and easily
damaged.
Do not disconnect the connectors by
pulling
the wires.
Use
long nosed pliers to carefully disconnect the
spade connectors
from the potentiometer.
You can now remove the brake pedal unit from the
main
assembly.

TrueBrake Installation Manual (March 2022 - Document v2.21)
© Aeroxcraft Ltd 2022
TrueBrake Logo and AXC SIM Logo are registered trademarks of Aeroxcraft Ltd. Logitech the Logitech logo and other Logitech marks are owned
by Logitech and may be registered.
*Aeroxcraft Ltd will not be held responsible for any damage to your Logitech pedals, steering wheel or invalidation of your Logitech Warranty.
4b – Remove clutch pedal unit
G923 Only.
Repeat step
s in 4a for the clutch pedal.
CAUTION: The wires are very thin and easily
damaged. Do not
disconnect the connectors by
pulling
the wires.
Remove the screw (PH2) that secures the black
ground wire.
Use long nosed pliers to carefully disconnect the
spade connectors from the potentiomet
er.
You can now remove the clutch pedal unit from the
main assembly.
5 – Remove lower spring housing
(brake pedal)
Remove the nut and bolt that secures the brake
pedal
lower spring housing.

TrueBrake Installation Manual (March 2022 - Document v2.21)
© Aeroxcraft Ltd 2022
TrueBrake Logo and AXC SIM Logo are registered trademarks of Aeroxcraft Ltd. Logitech the Logitech logo and other Logitech marks are owned
by Logitech and may be registered.
*Aeroxcraft Ltd will not be held responsible for any damage to your Logitech pedals, steering wheel or invalidation of your Logitech Warranty.
Remove the brake pedal lower spring housing,
spring and rubber b
lock (if fitted).
6 – Remove white part
The G29 and G920 brake pedal has a white plastic
part that must be removed.
Remove the part with a long screwdriver…

TrueBrake Installation Manual (March 2022 - Document v2.21)
© Aeroxcraft Ltd 2022
TrueBrake Logo and AXC SIM Logo are registered trademarks of Aeroxcraft Ltd. Logitech the Logitech logo and other Logitech marks are owned
by Logitech and may be registered.
*Aeroxcraft Ltd will not be held responsible for any damage to your Logitech pedals, steering wheel or invalidation of your Logitech Warranty.
…so it looks like this.
7
– Swap Brake and Clutch Upper
Spring Housing
G923 ONLY
The upper spring housing on the G923 brake pedal
has longer Y shaped fins
than other models. This can
interfere with the operation of TrueBrake.
Swap the
upper spring housings between the clutch and brake
pedal. This does not affect the operation of the
clutch pedal.

TrueBrake Installation Manual (March 2022 - Document v2.21)
© Aeroxcraft Ltd 2022
TrueBrake Logo and AXC SIM Logo are registered trademarks of Aeroxcraft Ltd. Logitech the Logitech logo and other Logitech marks are owned
by Logitech and may be registered.
*Aeroxcraft Ltd will not be held responsible for any damage to your Logitech pedals, steering wheel or invalidation of your Logitech Warranty.
Remove the upper spring housings on the clutch and
brake pedal units
.
Swap the upper brake housings. The one with the
short
est Y shaped fins needs to be on the brake
pedal
unit.
Install the Upper Spring Housings to the pedal units.

TrueBrake Installation Manual (March 2022 - Document v2.21)
© Aeroxcraft Ltd 2022
TrueBrake Logo and AXC SIM Logo are registered trademarks of Aeroxcraft Ltd. Logitech the Logitech logo and other Logitech marks are owned
by Logitech and may be registered.
*Aeroxcraft Ltd will not be held responsible for any damage to your Logitech pedals, steering wheel or invalidation of your Logitech Warranty.
Install clutch unit back into pedal housing and
connect the
red, green and black wires.
8 - Install TrueBrake
TrueBrake consists of four parts:
1. TrueBrake Unit
2. Pedal Return Spring
3. Dome
4. Spacers (3 sizes)
The three sizes of spacers adjust the pedal travel
before the pedal engages with the
TrueBrake.
Choose the size you prefer.
Insert the dome into the upper spring housing.
The “Y” shaped cut out should line up with the
“Y”
shaped fins
inside the housing.

TrueBrake Installation Manual (March 2022 - Document v2.21)
© Aeroxcraft Ltd 2022
TrueBrake Logo and AXC SIM Logo are registered trademarks of Aeroxcraft Ltd. Logitech the Logitech logo and other Logitech marks are owned
by Logitech and may be registered.
*Aeroxcraft Ltd will not be held responsible for any damage to your Logitech pedals, steering wheel or invalidation of your Logitech Warranty.
Insert the spring, spacer and TrueBrake Unit into the
upper spring housing
.
Install the lower nut and bolt to secure the
TrueBrake in place.
Test the feel of the pedal. It is easier to change your
mind now
about the spacer options!

TrueBrake Installation Manual (March 2022 - Document v2.21)
© Aeroxcraft Ltd 2022
TrueBrake Logo and AXC SIM Logo are registered trademarks of Aeroxcraft Ltd. Logitech the Logitech logo and other Logitech marks are owned
by Logitech and may be registered.
*Aeroxcraft Ltd will not be held responsible for any damage to your Logitech pedals, steering wheel or invalidation of your Logitech Warranty.
The inside of your brake pedal should now look like
this cutaway picture.
9 – Re-install Brake Pedal Unit
Install the brake pedal unit back into the main pedal
housing
. Connect the red, white and black wires to
the
corresponding wires in the TrueBrake connector.
Secure the black ground wire with it’s screw (PH2).

TrueBrake Installation Manual (March 2022 - Document v2.21)
© Aeroxcraft Ltd 2022
TrueBrake Logo and AXC SIM Logo are registered trademarks of Aeroxcraft Ltd. Logitech the Logitech logo and other Logitech marks are owned
by Logitech and may be registered.
*Aeroxcraft Ltd will not be held responsible for any damage to your Logitech pedals, steering wheel or invalidation of your Logitech Warranty.
Use the double-sided adhesive tape to attach the
connector to the
black plastic moulding.
Secure the cables to their attachment points.
Ensure the cable exits the main pedal assembly as it
is intended.

TrueBrake Installation Manual (March 2022 - Document v2.21)
© Aeroxcraft Ltd 2022
TrueBrake Logo and AXC SIM Logo are registered trademarks of Aeroxcraft Ltd. Logitech the Logitech logo and other Logitech marks are owned
by Logitech and may be registered.
*Aeroxcraft Ltd will not be held responsible for any damage to your Logitech pedals, steering wheel or invalidation of your Logitech Warranty.
10 – Install Bottom Cover
Install the bottom cover.
Install the 2x screws (PH1) under the carpet gripper,
as shown opposite.

TrueBrake Installation Manual (March 2022 - Document v2.21)
© Aeroxcraft Ltd 2022
TrueBrake Logo and AXC SIM Logo are registered trademarks of Aeroxcraft Ltd. Logitech the Logitech logo and other Logitech marks are owned
by Logitech and may be registered.
*Aeroxcraft Ltd will not be held responsible for any damage to your Logitech pedals, steering wheel or invalidation of your Logitech Warranty.
Install the 12x screws (PH1) shown opposite.
Install the 12x screws (PH2) shown opposite.

TrueBrake Installation Manual (March 2022 - Document v2.21)
© Aeroxcraft Ltd 2022
TrueBrake Logo and AXC SIM Logo are registered trademarks of Aeroxcraft Ltd. Logitech the Logitech logo and other Logitech marks are owned
by Logitech and may be registered.
*Aeroxcraft Ltd will not be held responsible for any damage to your Logitech pedals, steering wheel or invalidation of your Logitech Warranty.
11a – Install Brake Pedal Foot Pad
11b – Install Clutch Pedal Foot Pad
G923 ONLY

TrueBrake Installation Manual (March 2022 - Document v2.21)
© Aeroxcraft Ltd 2022
TrueBrake Logo and AXC SIM Logo are registered trademarks of Aeroxcraft Ltd. Logitech the Logitech logo and other Logitech marks are owned
by Logitech and may be registered.
*Aeroxcraft Ltd will not be held responsible for any damage to your Logitech pedals, steering wheel or invalidation of your Logitech Warranty.
Finished!
Some PS4 and Xbox games may need to be
recalibrated in the games. There are no calibration
settings on the
consoles themselves.
If you’re using your Wheel and Pedals with a PC
then you will need to recalibrate the pedals in the
Windows Control Panel.
If you are using the Pedals with a Leo Bodnar cable
on a PC then download the calibration software
from their
website.
If you need any assistance, please log a support
ticket at https://www.axc-sim.com/support-tickets/
Have Fun!!
This manual suits for next models
4
Table of contents
Other AXC Video Gaming Accessories manuals