Axon Body 2 User manual

Axon Body 2 Camera
User Manual
Model AX1001 and AX1019
IMPORTANT SAFETY INSTRUCTIONS
Read all warnings and instructions. Save these
instructions.
The most up-to-date warnings and instructions are
available at www.axon.com
MMU0057 Rev: I

Contents
i
Chapter 1: Introduction................................................................................................... 1
What Is the Axon Body 2 Camera System?........................................................................................1
Maximum Video Length ......................................................................................................................1
Important Safety and Health Information.........................................................................................1
Additional Reading....................................................................................................................................1
Chapter 2: Getting to Know Your Axon Body 2 Camera ......................................2
Accessories..................................................................................................................................................4
Parts .........................................................................................................................................................5
Assembly and Use................................................................................................................................5
Chapter 3: Recording with the Axon Body 2 Camera .......................................... 6
Operating Modes.......................................................................................................................................6
BUFFERING Mode (Turning on the Camera)................................................................................6
EVENT Mode (Starting Recording) .................................................................................................7
Muting Audio Recording .........................................................................................................................7
Adding Markers to Recorded Video ....................................................................................................8
Battery Status............................................................................................................................................8
Configuring Your Axon Camera ............................................................................................................8
Stealth Mode (Turning On or O Camera Lights, Sounds, and Vibrations).......................8
Adjusting Audio Prompt Volume ....................................................................................................9
Turning On or O Camera Lights ..................................................................................................10
Turning On or O Camera Vibrations........................................................................................... 11
Using Axon View................................................................................................................................. 12
Pairing Your Axon Body 2 Camera with a Smart Device........................................................ 12
Other Settings..................................................................................................................................... 12
Chapter 4: Notification Reference Tables............................................................... 13
Audio Prompts ......................................................................................................................................... 13
LED Status................................................................................................................................................. 14
Operation LED .................................................................................................................................... 14

ii
Axon Body 2 Camera User Manual
Function LED ...................................................................................................................................... 14
Battery LED in the Field .................................................................................................................. 14
Battery LED in an Axon Dock ........................................................................................................ 15
Status LED ........................................................................................................................................... 15
Chapter 5: Axon Signal Operations..........................................................................16
Chapter 6: Care and Maintenance............................................................................. 17
Cleaning the Axon Body 2 Camera.................................................................................................... 17
Charging the Battery ............................................................................................................................. 17
Camera Internal Clock ...................................................................................................................... 17
Camera Storage....................................................................................................................................... 17
Chapter 7: Troubleshooting.........................................................................................19
Technical Support ................................................................................................................................... 19
Warranty Policy ....................................................................................................................................... 19
Warnings.................................................................................................................................................... 19
Radio Waves ............................................................................................................................................. 19
Declaration of Conformity ................................................................................................................... 21
Compliance Marks .................................................................................................................................. 21

1
Chapter 1: Introduction
What Is the Axon Body 2 Camera System?
The Axon Body 2 is a camera system incorporating an audio and video recording device. This
camera is designed for use in tough environmental conditions encountered in law enforcement,
corrections, military, and security activities. The Axon Body 2 camera is designed to record events
for secure storage, retrieval, and analysis via Axon Evidence (Evidence.com) or Axon Commander
services. The recorded events are transferred to your storage solution via the Axon Dock, or by
using Evidence Sync software installed on a Windows computer.
The Axon Body 2 camera has 2 operating modes designed to accommodate the needs of law
enforcement, corrections, security, and the military. The default mode, or BUFFERING mode, pro-
vides pre-event buering to capture activities that occur prior to the user activating the EVENT
mode. In addition, the Axon View application enables playback of footage on a smart device for
review prior to storing the data.
Maximum Video Length
The maximum length of an Axon camera recording is 4 hours. In situations where an Axon camera
is in Event mode for more than 4 hours, the current video recording stops at 4 hours and a new
video recording will start.
Important Safety and Health Information
Read, understand, and follow all warnings and instructions before using this product. The most
up-to-date warnings and instructions are available at www.axon.com.
Additional Reading
This manual explains how to operate the Axon Body 2 camera hardware. Other manuals cover
additional aspects of the Axon Body 2 system. These documents are available at help.axon.com.
If you have an Axon Dock, see the Axon Dock Quick Start Guide for how to transfer information
and recharge your camera.
Detailed instructions for using Axon cameras and other Axon products with Evidence Sync are
available in the Evidence Sync User Manual.
For instructions on using Axon cameras with a smart device, see the Axon View for Android De-
vices User Manual or the Axon View for iOS Devices User Manual.
The Axon Academy website explains how to register for and use the Axon Evidence (Evidence.
com) website, configure settings, install Evidence Sync software, assign personnel to cameras,
recharge your camera, and transfer video from an Axon device to a computer. Visit academy.axon.
com.

2
The Axon Body 2 camera includes physical controls to enable video and audio capture while pro-
viding visual, audible, and vibration notifications of the Axon Body 2 camera’s state of operation.
Pressing buttons causes the Axon Body 2 camera to emit audio alerts (beeps) to indicate system
actions. See Chapter 4: Notification Reference Tables for more information.
Operation LED
Shows the camera’s current operating mode.
Operating Mode Operation LED
Recording OR
Recovering interrupted video*
Blinking red
Buering Blinking green
Booting up/powering down OR
Error state**
Solid red
*When the Function LED also is blinking red.
** When the Function LED also is solid red.
Status LED
Bottom ViewTop View
Function LED Operation LED
Connection Socket
Function Button
Lens
Power Switch
On/Off Indicator
Speaker
Dual-Channel Microphone
EVENT Button
Battery LED
Front View
Battery Status Button
Chapter 2: Getting to Know Your Axon Body 2
Camera

Chapter 2: Getting to Know Your Axon Body 2 Camera 3
Axon Body 2 Camera User Manual
Function LED
Shows when certain functions are enabled.
Function Enabled Function LED
Mute (no audio capture) Blinking blue
Camera error*Solid red
Bluetooth feature is booting up Solid blue
Connecting to Axon ViewXL (Axon Fleet only) Blinking magenta
Connected to Axon ViewXL (Axon Fleet only) Solid magenta
*Use the power switch to turn the camera o and on.
Connection Socket – Used for data transfer and recharging.
Power Switch – Turns the camera’s power on or o.
On/O Indicator – When the camera’s power is turned on, the red portion is exposed. When the
camera power is turned o, the red portion is covered from view.
Speaker – Provides audio notifications.
Function Button – Used in device pairing, to mute the device, and to add markers to the video as
it is recorded.
EVENT Button – Used to start and stop recording. Double-press to start recording. Press and
hold for 3 seconds to stop recording.
The camera might take several additional seconds to close out of the video when it is powered o
before stopping an event.
Battery Status Button – When pressed, the Battery LED momentarily lights up to indicate the
remaining battery capacity.
Battery LED
The camera can be configured so the Battery LED shows the same operating mode information
as the Operation LED. In BUFFERING mode both the Operation and Battery LEDs will blink green,
and in EVENT mode both will blink red.
In the field, when the Battery Status Button is pressed, the Battery LED lights up to indicate the
remaining battery capacity for approximately 10 seconds and then resumes displaying the EVENT
mode, if configured.
Battery Capacity or Function Battery LED
Battery capacity is 40–100 percent* Green
Battery capacity is 20–39 percent* Yellow
Battery capacity is less than 20 percent* Red
BUFFERING mode (if configured) Blinking green
EVENT mode (if configured) Blinking red
* When the Battery Status button is pressed.

Chapter2: GettingtoKnowYourAxonBody2Camera 4
Axon Body 2 Camera User Manual
When an Axon Body 2 camera is in an Axon Dock, the Battery LED displays the battery’s charge
status.
Battery Charge Battery LED
Fully charged (capacity greater than 98 percent) Green
Charging in progress (capacity is 20–98 percent) Yellow
Charging in progress(capacity less than 20 percent) Red
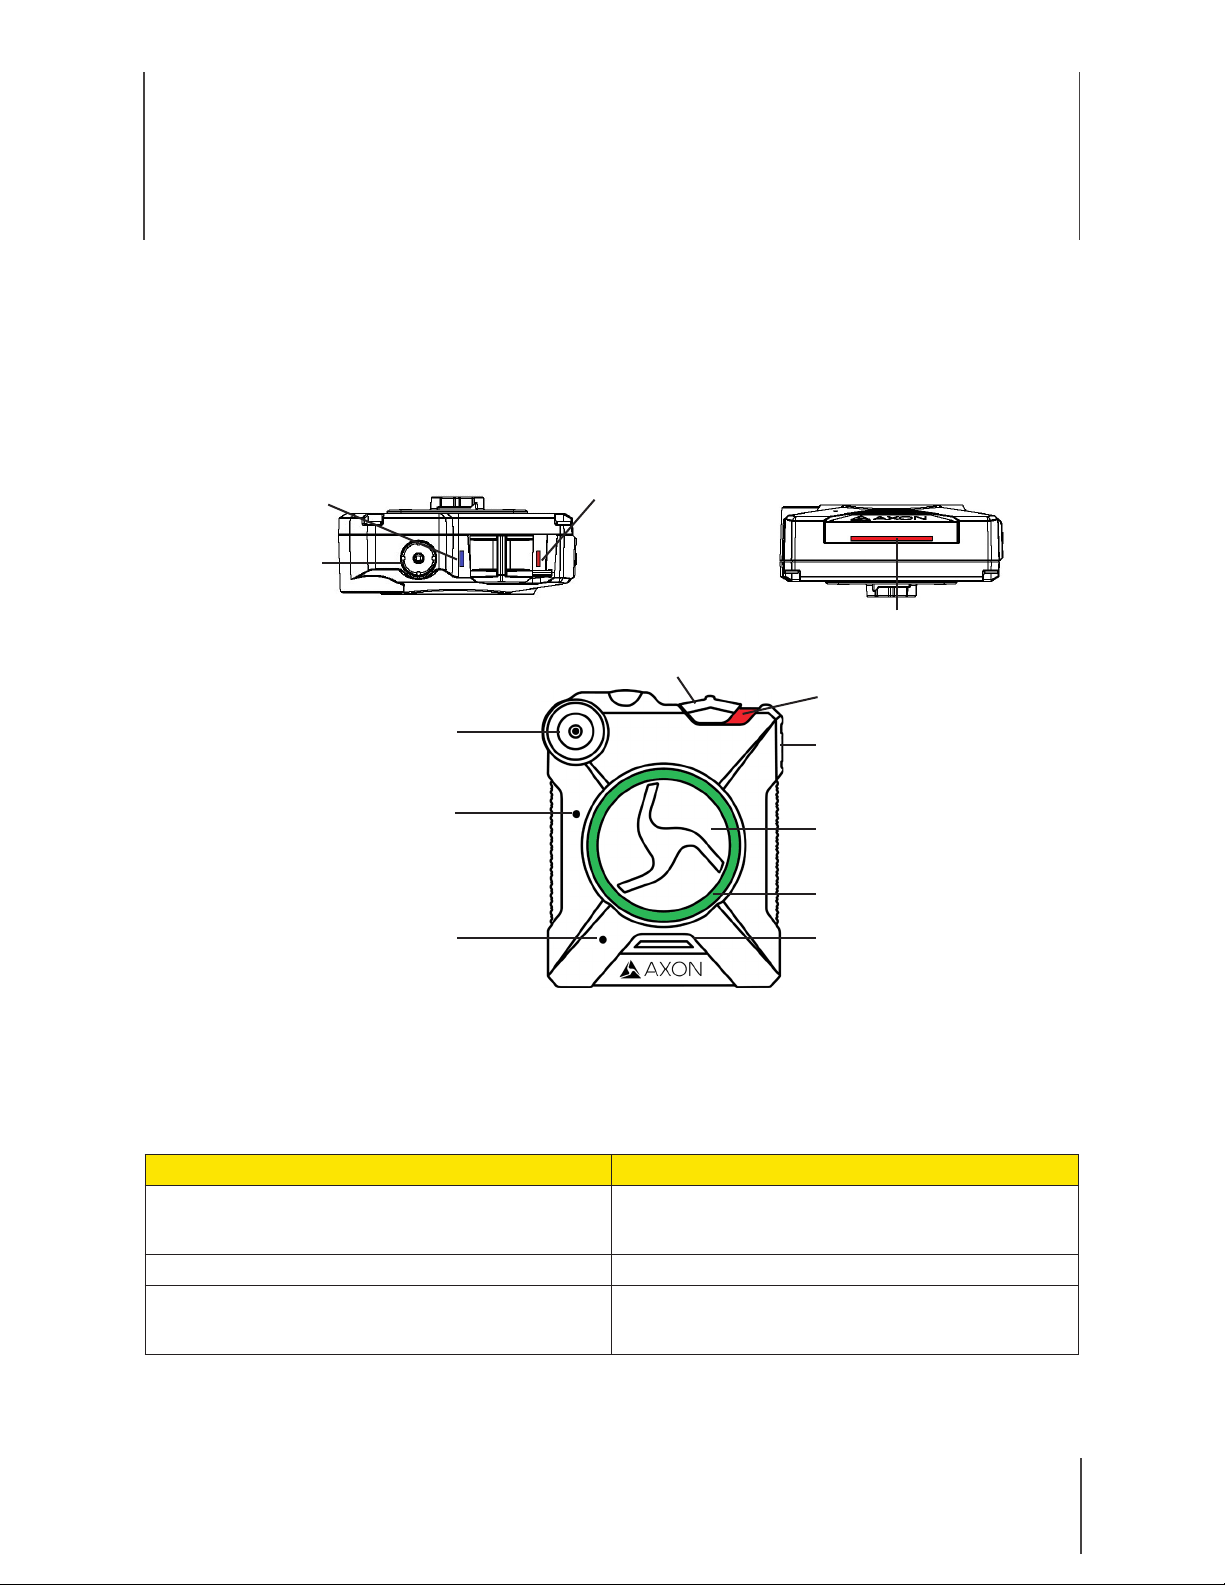
Dual-Channel Microphone – For audio recording.
Status LED
When you plug your camera into the Axon Dock, the camera status LED displays the device
status.
Device Status Status LED
Initial connection (momentary) Solid red (for 20 seconds or fewer)
In queue awaiting upload Solid yellow
Device ready (all videos uploaded successfully) Solid green
Device not assigned, agency mismatch, cam-
era set in the oine mode, or device error
Blinking red
Uploading data Blinking yellow
Firmware update, internal battery charging,
extremely low battery, or memory full
Blinking red and yellow – DO NOT remove the
camera from the Axon Dock
Transfer error, device re-trying to transfer Blinking green and yellow
Possible network error. Verify Axon Dock is reg-
istered and refer to the Troubleshooting chap-
ter of the User Manual or go to help.axon.com.
Blinking red, yellow, and then green (cycling all
colors)
Axon Dock has no communication with the
camera. Verify the Axon Dock core and bays
are seated properly. Contact Axon Technical
Support if not resolved.
LED o
Lens – The camera lens.
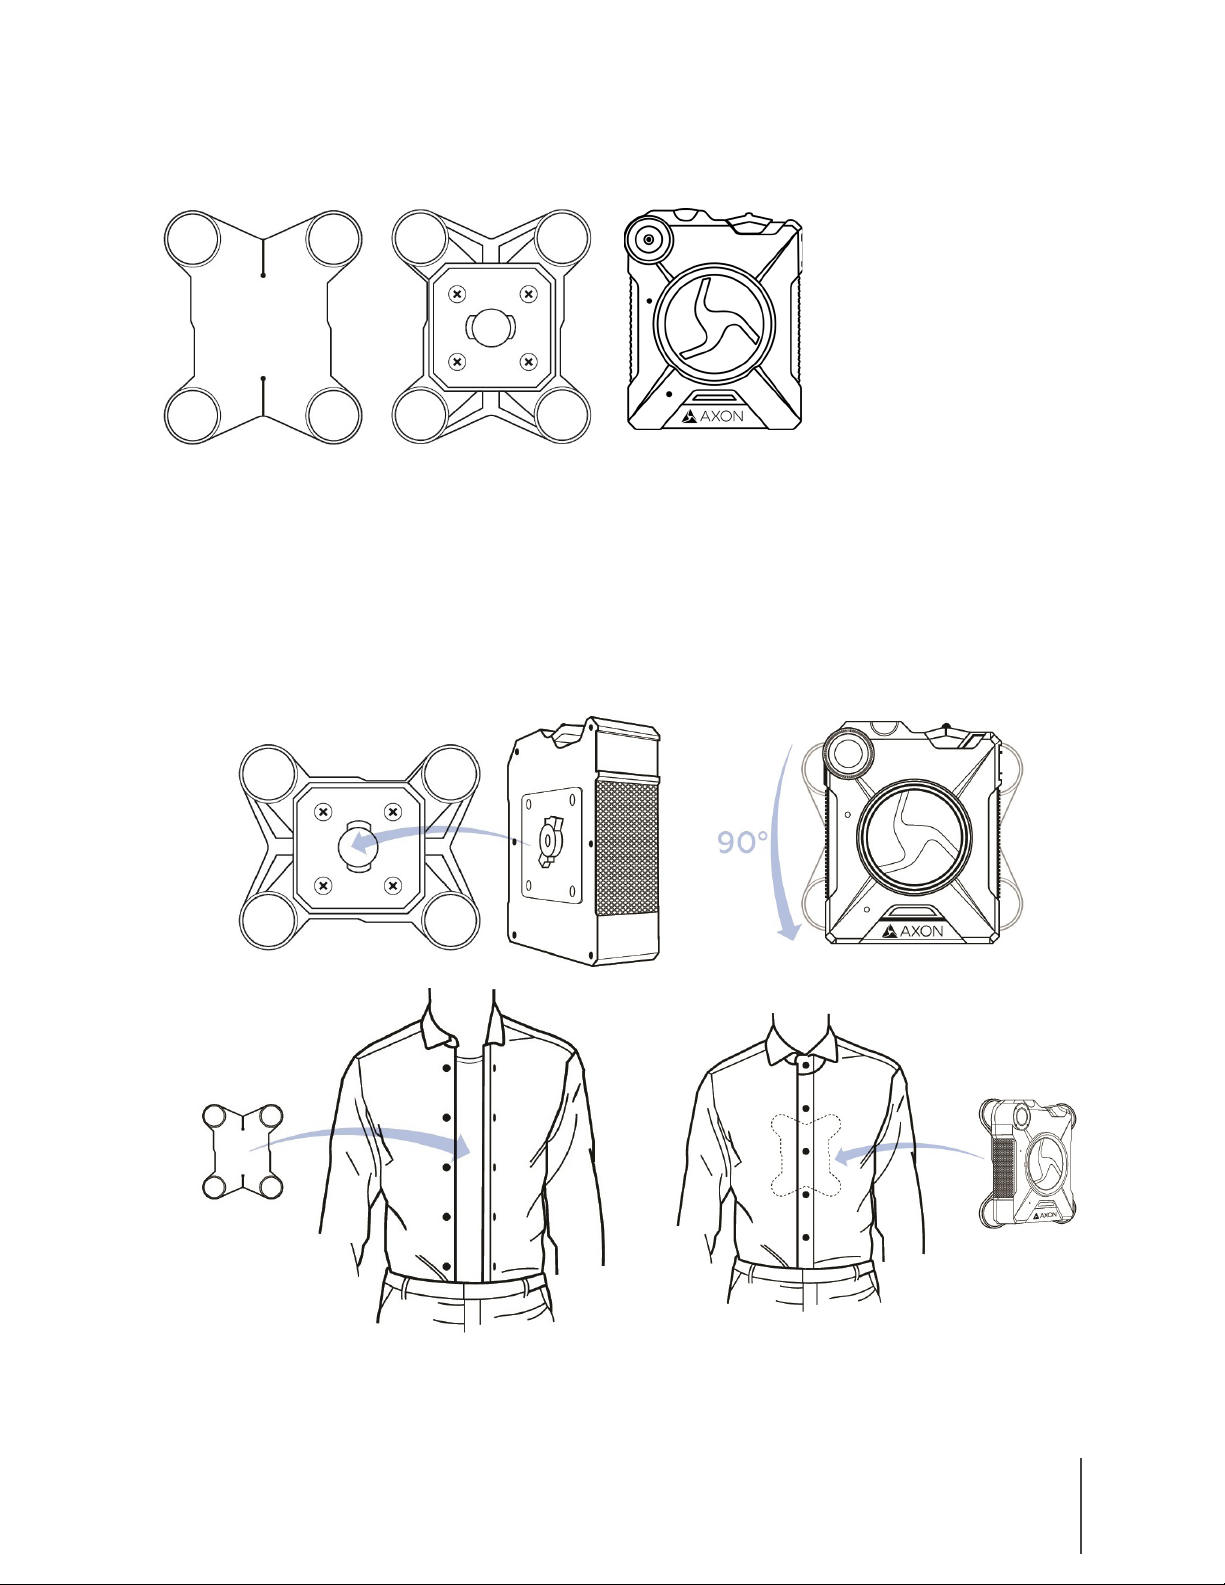
Accessories
The Axon Body 2 camera is designed to work with the new Axon RapidLock mounting system.
The Axon RapidLock mounting system consists of the attachment piece (called the key) on the
camera and the various mounting options including the attachment receiver (called the lock). To
engage the Axon RapidLock, insert the key of the camera into the lock of the mount and turn it
90 degrees counterclockwise (when you are looking straight at the mount). To release the camera
from the mount, turn the camera 90 degrees clockwise.
The various mounts that use this system can be used with a wide variety uniforms, and holds the
camera to your shirt, patrol vest, jacket, or belt.
You can find other mounting options on www.axon.com.

Chapter 2: GettingtoKnow Your Axon Body 2Camera 5
Axon Body 2 Camera User Manual
Parts
Assembly and Use
Read Important Safety and Health Information (Chapter 1) before performing these steps.
1 Insert the key on the back of the Axon Body 2 camera into the lock.
2 Twist the Axon RapidLock mount counterclockwise, 90 degrees.
3 Place the magnetic back underneath the shirt, patrol vest, or whatever you are using.
4 Hold the back in place, and place the Axon RapidLock mount over the back. Magnetic at-
traction will hold the camera in place.
When you are wearing the camera, you can use the Axon View application’s live streaming feature
to determine whether your camera is capturing the view you intended.
1 2
3 4
Back Lock Camera

6
Chapter 3: Recording with the Axon Body 2
Camera
Before using an Axon Body 2 camera, ensure it is fully charged and properly configured. See
Charging the Battery (Chapter 6) for more information.
Operating Modes
The Axon Body 2 camera has 2 operating modes:
1 BUFFERING (turning on the camera and starting pre-event buering)
2 EVENT (event recording)
BUFFERING Mode (Turning on the Camera)
1 Move the Power Switch on the camera to the On position.
When the camera turned on, the Operation LED will be solid red, and it takes a few
seconds to boot up and enter BUFFERING mode. When BUFFERING begins:
• The Operation LED on the camera will blink green.
• The camera will be capturing video, but no audio, and will not record to permanent
memory while in BUFFERING mode.
• Buered video duration is 30 seconds by default (00:00:30).
When you activate the EVENT mode, the buered video (not audio) captured directly
before the event, up to 30 seconds, will be saved and attached to the event in permanent
memory. This feature is intended to capture the video of an incident just before your
activation of EVENT mode.

Chapter 3: Recording with the Axon Body 2 Camera 7
Axon Body 2 Camera User Manual
With default settings, the system does not capture audio in BUFFERING mode, so anything
recorded in that mode will be video-only. BUFFERING mode starts only after the Axon Body 2
camera is turned on. The system does not record when the camera is turned o.
Notes:
• An agency can turn o the BUFFERING mode. If your agency has deactivated the BUFFERING
mode, your Axon system will operate the same way as described in this manual, but the
camera will not record anything until you double-press the EVENT button.
• An agency can extend the BUFFERING mode’s duration to 2 minutes total (00:02:00).
• An agency can configure the BUFFERING mode so it records audio as well as video.
EVENT Mode (Starting Recording)
1 When you need to record, quickly double-press the EVENT button on the camera.
The system now records audio as well as video. The “buered” video directly preceding the
event will be saved and attached to the event recording. Remember, with default settings,
the buered video will not contain audio. The moment you double-press the EVENT
button, both video and audio will be recorded from the camera and GPS coordinates (if
the system is paired to a GPS-capable smart phone) will be recorded. This will continue
throughout the duration of the recording until you end the recording.
The camera provides you with indications that it is recording in EVENT mode:
• At the start of an event and every 2 minutes during an event, the system will beep
twice.
• The Operation LED on top of the camera will blink red.
2 To stop recording and return to BUFFERING mode, press and hold the EVENT button for
approximately 3 seconds. The system will beep once (with a long tone).
3 To end a recording and turn o the system, move the on/o switch to the o position.
When you end a recording with the on/o switch you will not go into BUFFERING mode;
instead the system will turn o completely.
Note: An event not recorded by the camera cannot be played back or downloaded to your
computer.
Muting Audio Recording
If your organization’s administrator has configured your Axon system to do so, you can use
the Function button to disable audio recording during an event. This feature may be useful in
sensitive situations.
1 Press and hold the Function button for 3 seconds to mute the audio capture.
The Function LED will blink blue while the camera is muted.
2 Press and hold the Function button another 3 seconds to re-enable the audio recording.

Chapter 3: Recording with the Axon Body 2 Camera 8
Axon Body 2 Camera User Manual
Adding Markers to Recorded Video
The Function button can also be used to add a marker to recorded video that will show when
the video is replayed on Axon Evidence (Evidence.com) or Axon Commander and documented in
the audit trail for the device. Markers are most useful for documenting a moment that you want
to jump to quickly when re-playing the video.
To add a marker to a video while you are recording:
• Press and release the Function button within 1 second.
Battery Status
In the field, when the Battery Status Button is pressed, the Battery LED lights up to indicate the
remaining battery capacity for approximately 10 seconds.
Battery Capacity Battery LED
Battery capacity is 40–100 percent Green
Battery capacity is 20–39 percent Yellow
Battery capacity is less than 20 percent Red
Configuring Your Axon Camera
During normal operation an Axon Body 2 camera uses lights, sounds (audio prompts),
and vibrations (haptic feedback) to notify you of the camera status. These indicators and
notifications are normally managed by your organization, but can be configured to allow you to
change the setting for your assigned camera. Check with your organization’s Axon administrator
to learn which configuration settings you can change.
The following table lists where each configuration setting can be changed.
Setting Camera Axon View Axon View XL
(Axon Fleet 2)
Axon
Evidence
Evidence
Sync
Axon
Commander
Stealth Mode Yes Yes Yes Yes Yes Yes
Volume No Yes Yes Yes Yes Yes
Vibration No Yes Yes Yes Yes Yes
Indicator Lights No Yes No Yes Ye s Yes
Stealth Mode (Turning On or O Camera Lights, Sounds, and Vibrations)
For some situations, you may wish to turn o the LED lights, sounds (audio prompts), and
vibrations (haptic feedback) on your Axon camera. Turning o all the indicators and notifications
is also known as stealth mode.
If allowed by your organization, there are several ways you can enter and exit stealth mode.
Entering Stealth Mode using the Axon Body 2 Camera Battery Status button:
• While the camera is on, press and hold the Battery Status button for 10 seconds.

Chapter 3: Recording with the Axon Body 2 Camera 9
Axon Body 2 Camera User Manual
Exiting Stealth Mode using the Axon Body 2 Camera Battery Status button:
• While the camera is on and in stealth mode, press and hold the Battery Status button for 10
seconds.
Entering and Exiting Stealth Mode using Axon View:
Go to help.axon.com or see the Axon View for Android Devices User Manual or the Axon View for
iOS Devices User Manual for detailed information about using Axon View.
• Your Axon Body 2 camera must be turned on and paired with your mobile device. Open Axon
View app on your mobile device and go to Settings. Tap the switch to the right of the Stealth
Mode to change the setting.
Entering and Exiting Stealth Mode using Axon View XL (Axon Fleet 2):
Go to help.axon.com or see the Axon View XL Operations Guide for detailed information about
using Axon View XL.
• Your Axon Body 2 camera must be turned on and paired with Axon View XL. In Axon View XL
go to Settings. Tap the switch to the right of the Stealth to change the setting.
Turning On or O Stealth Mode using Axon Evidence:
Go to help.axon.com or see the Axon Evidence.com User and Administrator Reference Guide for
detailed information about changing device settings.
Note: The updated settings will not take eect until the next time the camera is docked.
• Sign in to your Axon Evidence account and go to the Device Profile page for your Axon Body 2
camera. In the Settings section, select the On or O setting for Stealth. Save the new setting.
Turning On or O Stealth Mode using Evidence Sync:
Go to help.axon.com or see the Evidence Sync User Manual for detailed information about
changing device settings.
• Connect your Axon Body 2 camera to the Evidence Sync application. Sign in to Evidence Sync
and go to the Device Settings tab for your camera. Select the On or O setting for Stealth
Mode. Save the new setting.
Turning On or O Stealth Mode using Axon Commander:
Go to help.axon.com or see the Axon Commander User and Administrator Guide for detailed
information about changing device settings.
Note: The updated settings will not take eect until the next time the camera is docked.
• Sign in to the Axon Commander client and go to User Device Settings. Select your Axon Body
2 camera and then select the On or O setting for Stealth Mode. Apply the new setting.
Adjusting Audio Prompt Volume
During normal operation, Axon Body 2 cameras emit beeping sounds, called audio prompts, to
notify you of the camera status.
If allowed by your organization, there are several ways you can adjust camera audio prompt
volume.

Chapter 3: Recording with the Axon Body 2 Camera 10
Axon Body 2 Camera User Manual
Adjusting Audio Prompt Volume using Axon View:
Go to help.axon.com or see the Axon View for Android Devices User Manual or the Axon View for
iOS Devices User Manual for detailed information about using Axon View.
• Your Axon Body 2 camera must be turned on and paired with your mobile device. Open Axon
View app on your mobile device and go to Settings. Tap Volume and select the volume level.
The camera beeps once at the volume that you tapped, or if you tapped O, the camera does
not beep.
Adjusting Audio Prompt Volume using Axon View XL (Axon Fleet 2):
Go to help.axon.com or see the Axon View XL Operations Guide for detailed information about
using Axon View XL.
Your Axon Body 2 camera must be turned on and paired with Axon View XL. In Axon View XL go
to Settings. Select the appropriate Volume to change the setting. The camera beeps once at the
volume that you tapped, or if you tapped O, the camera does not beep.
Adjusting Audio Prompt Volume using Axon Evidence:
Go to help.axon.com or see the Axon Evidence.com User and Administrator Reference Guide for
detailed information about changing device settings.
Note: The updated settings will not take eect until the next time the camera is docked.
• Sign in to your Axon Evidence account and go to the Device Profile page for your Axon Body 2
camera. In the Settings section, select the appropriate Speaker Volume Configuration setting.
Save the new setting.
Adjusting Audio Prompt Volume using Evidence Sync:
Go to help.axon.com or see the Evidence Sync User Manual for detailed information about
changing device settings.
• Connect your Axon Body 2 camera to the Evidence Sync application. Sign in to Evidence Sync
and go to the Device Settings tab for your camera. Select the appropriate Speaker Volume
setting. Save the new setting.
Adjusting Audio Prompt Volume using Axon Commander:
Go to help.axon.com or see the Axon Commander User and Administrator Guide for detailed
information about changing device settings.
Note: The updated settings will not take eect until the next time the camera is docked.
• Sign in to the Axon Commander client and go to User Device Settings. Select your Axon Body
2 camera and then select the appropriate Speaker Volume setting. Apply the new setting.
Turning On or O Camera Lights
During normal operation, Axon cameras use the LED lights to show the camera status.
For some situations, you may wish to turn o the LED lights for your camera. If allowed by your
organization, there are several ways you can turn o and on the camera lights.
Turning On or O Camera Lights using Axon View:
Go to help.axon.com or see the Axon View for Android Devices User Manual or the Axon View for

Chapter 3: Recording with the Axon Body 2 Camera 11
Axon Body 2 Camera User Manual
iOS Devices User Manual for detailed information about using Axon View.
• Your Axon Body 2 camera must be turned on and paired with your mobile device. Open
Axon View app on your mobile device and go to Settings. Tap the switch to the right of the
Indicator Lights to change the setting.
Turning On or O Camera Lights using Axon Evidence:
Go to help.axon.com or see the Axon Evidence.com User and Administrator Reference Guide for
detailed information about changing device settings.
Note: The updated settings will not take eect until the next time the camera is docked.
• Sign in to your Axon Evidence account and go to the Device Profile page for your Axon Body 2
camera. In the Settings section, select the On or O setting for Indicator Lights. Save the new
setting.
Turning On or O Camera Lights using Evidence Sync:
Go to help.axon.com or see the Evidence Sync User Manual for detailed information about
changing device settings.
• Connect your Axon Body 2 camera to the Evidence Sync application. Sign in to Evidence Sync
and go to the Device Settings tab for your camera. Select the On or O setting for Indicator
Lights. Save the new setting.
Turning On or O Camera Lights using Axon Commander:
Go to help.axon.com or see the Axon Commander User and Administrator Guide for detailed
information about changing device settings.
Note: The updated settings will not take eect until the next time the camera is docked.
• Sign in to the Axon Commander client and go to User Device Settings. Select your Axon Body
2 camera and then select the On or O setting for Indicator Lights. Apply the new setting.
Turning On or O Camera Vibrations
During normal operation, Axon Body 2 cameras emit beeping sounds, called audio prompts, and
vibrations (haptic feedback) to notify you of the camera status.
For some situations, you may wish to turn o the vibrations for your camera. If allowed by your
organization, there are several ways you can turn o and on the camera vibrations.
Turning On or O Vibration using Axon View:
Go to help.axon.com or see the Axon View for Android Devices User Manual or the Axon View for
iOS Devices User Manual for detailed information about using Axon View.
• Your Axon Body 2 camera must be turned on and paired with your mobile device. Open
Axon View app on your mobile device and go to Settings. Tap the switch to the right of the
Vibration to change the setting.
Turning On or O Vibration using Axon View XL (Axon Fleet 2):
Go to help.axon.com or see the Axon View XL Operations Guide for detailed information about
using Axon View XL.
Your Axon Body 2 camera must be turned on and paired with Axon View XL. In Axon View XL go

Chapter 3: Recording with the Axon Body 2 Camera 12
Axon Body 2 Camera User Manual
to Settings. Tap the switch to the right of the Vibration to change the setting.
Turning On or O Vibration using Axon Evidence:
Go to help.axon.com or see the Axon Evidence.com User and Administrator Reference Guide for
detailed information about changing device settings.
Note: The updated settings will not take eect until the next time the camera is docked.
• Sign in to your Axon Evidence account and go to the Device Profile page for your Axon Body
2 camera. In the Settings section, select the On or O setting for Vibration. Save the new
setting.
Turning On or O Vibration using Evidence Sync:
Go to help.axon.com or see the Evidence Sync User Manual for detailed information about
changing device settings.
• Connect your Axon Body 2 camera to the Evidence Sync application. Sign in to Evidence Sync
and go to the Device Settings tab for your camera. Select the On or O setting for Vibration.
Save the new setting.
Turning On or O Vibration using Axon Commander:
Go to help.axon.com or see the Axon Commander User and Administrator Guide for detailed
information about changing device settings.
Note: The updated settings will not take eect until the next time the camera is docked.
• Sign in to the Axon Commander client and go to User Device Settings. Select your Axon Body
2 camera and then select the On or O setting for Vibration. Apply the new setting.
Using Axon View
Go to help.axon.com or see the Axon View for Android Devices User Manual or the Axon View for
iOS Devices User Manual for information about using Axon View.
Pairing Your Axon Body 2 Camera with a Smart Device
For instructions on using Axon cameras with a smart device, go to help.axon.com or see the
Axon View for Android Devices User Manual or the Axon View for iOS Devices User Manual.
Other Settings
Your organization’s Axon administrator can further configure your Axon Body 2 system with
these features:
• Pre-event buer of up to 2 minutes
• Axon Signal-enabled Bluetooth wireless technology
• Wi-Fi to pair your Axon Body 2 camera to the Axon View application
• Video quality

13
Chapter 4: Notification Reference Tables
Audio Prompts
The Axon Body 2 camera emits beeping sounds called audio prompts to notify you of the system
status. These audio prompts usually occur after you perform an action with the camera. These
audio prompts are accompanied by a vibration that matches the beeps.
Operating Mode Audio Notification Haptic Notification
(Vibration)
Powering on or o One beep Once
Recording an event Two beeps (every 2
minutes)
Twice (every 2
minutes)
The device is ending an event and returning to
BUFFERING mode One long beep Once, long duration
Low battery notifications:
•
Camera in BUFFERING mode and battery has
power for 20 minutes or less
•
Camera in EVENT (recording) mode and battery
nearly discharged (the camera will shut down
within a few minutes)
Four quick beeps
(every 20 seconds)
Four times, quickly
(every 20 seconds)
Camera memory is full (the camera will not record) Three beeps Three times
Camera internal clock is not set OR
Error state *
Five quick beeps
(every 20 seconds )
Five times, quickly
(every 20 seconds)
* When the Operation and Function LEDs are also solid red.

Chapter 4: Notification Reference Tables 14
Axon Body 2 Camera User Manual
LED Status
Operation LED
The Axon Body 2 camera’s operation LED displays the current operating mode.
Operating Mode Operation LED
Recording OR
Recovering interrupted video*
Blinking red
Buering Blinking green
Booting up/powering down OR
Error state**
Solid red
*When the Function LED also is blinking red.
** When the Function LED also is solid red.
Function LED
The Axon Body 2 camera’s function LED displays when certain functions are enabled.
Function Enabled Function LED
Mute (no audio capture) Blinking blue
Camera error*Solid red
Bluetooth feature is booting up Solid blue
Connecting to Axon ViewXL (Axon Fleet only) Blinking magenta
Connected to Axon ViewXL (Axon Fleet only) Solid magenta
*Use the power switch to turn the camera o and on.
Battery LED in the Field
The camera’s battery LED displays the battery’s remaining capacity, when the device is being
used or when charging.
Battery Capacity Battery LED
Battery capacity is 40–100 percent Green
Battery capacity is 20–39 percent Yellow
Battery capacity is less than 20 percent Red
BUFFERING mode (if configured) Blinking green
EVENT mode (if configured) Blinking red

Chapter 4: Notification Reference Tables 15
Axon Body 2 Camera User Manual
Battery LED in an Axon Dock
When an Axon Body 2 camera is in an Axon Dock, the Battery LED displays the battery’s charge
status.
Battery Charge Battery LED
Fully charged (capacity greater than 98 percent) Green
Charging in progress (capacity is 20–98 percent) Yellow
Charging in progress(capacity less than 20 percent) Red
Status LED
When you plug your camera into the Axon Dock, the camera status LED displays the device status.
Device Status Status LED
Initial connection (momentary) Solid red (for 20 seconds or fewer)
In queue awaiting upload Solid yellow
Device ready (all videos uploaded successfully) Solid green
Device not assigned, agency mismatch, camera
set in the oine mode, or device error
Blinking red
Uploading data Blinking yellow
Firmware update, internal battery charging,
extremely low battery, or memory full
Blinking red and yellow – DO NOT remove the
camera from the Axon Dock
Transfer error, device re-trying to transfer Blinking green and yellow
Possible network error. Verify Axon Dock is
registered and refer to the Troubleshooting
chapter of the User Manual or go to help.axon.
com.
Blinking red, yellow, and then green (cycling all
colors)
Axon Dock has no communication with the
camera. Verify the Axon Dock core and bays
are seated properly. Contact Axon Technical
Support if not resolved.
LED o

16
Chapter 5: Axon Signal Operations
Axon Body 2 cameras are compatible with Axon Signal technology. However, your organization’s
Axon administrator must configure Axon Signal in Axon Evidence for it to work.
When it is active, Axon Signal technology can transmit a signal that allows your Axon Body 2
camera to transition from BUFFERING to EVENT mode automatically. When your camera starts
recording, you will see, hear, and feel all the normal start recording notifications.
Axon Signal technology transmissions only allow cameras to start recording. Axon Signal
technology does not transmit a signal to end recording. The camera must be stopped manually.
Axon Signal technology cannot turn an Axon system on. If the Axon Body 2 camera is turned o,
the camera will not record, even if a device equipped with Axon Signal technology transmits a
signal.
Devices equipped with Axon Signal technology have a signal range of approximately 30 feet (9.1
meters) and can be purchased separately from the Axon Body 2 camera.

17
Chapter 6: Care and Maintenance
Cleaning the Axon Body 2 Camera
Use a soft, damp cloth to clean the surface of the Axon Body 2 camera. Do not use harsh cleaners
or solvents.
Do not immerse the Axon Body 2 camera in water or cleaning solutions.
If the Axon Body 2 camera lens becomes dirty, use a lens blower brush to clean it and then wipe
it with a soft cloth if necessary.
You may moisten the cloth with isopropyl alcohol.
• Do not use ammonia-based or similar type window cleaners on the camera lens.
• Do not place the lens under running water or apply jets of water to the camera lens.
Charging the Battery
A fully charged camera battery should provide enough power for approximately 12 hours of normal
operation. Recharging a battery after a 12-hour use can take up to 9 hours if you are recharging
your Axon Body 2 camera from Axon Dock. Recharging could take considerably longer if you are
recharging from a computer.
If the battery depletes significantly during use, you will hear 4 quick tones and vibrations, if
enabled, repeating every 20 seconds. This message indicates that less than approximately 20
percent of the battery capacity remains.
Always recharge a depleted battery as soon as reasonably possible. You can use an Axon Dock
or computer to charge the battery. Using a non-Axon approved wall charger may degrade device
performance and will void the warranty.
If the Axon Body 2 camera is to be stored for a long time, the Battery LED should be yellow when
you put the camera in storage. After an Axon Body 2 camera has been stored 6 months, the
camera should be run until the battery is depleted and then the battery should be recharged.
Camera Internal Clock
Axon Body 2 cameras should be regularly placed in an Axon Dock or connected to Evidence Sync
to update the camera’s internal clock.
Camera Storage
Axon on-ocer cameras should not be stored in environments where the temperature is likely to
exceed 95 °F (35 °C) (such as under direct sunlight, near heaters, or in a vehicle in extremely hot
weather) or exposed to temperatures below −4 °F (−20 °C).
Other manuals for Body 2
6
This manual suits for next models
2
Table of contents
Other Axon Digital Camera manuals