Ayrton ARCALINE2 3G User manual

USER MANUAL
Keep this manual for future needs
V 2.0 08.2011
ENGLISH FRANÇAIS

2USER MANUAL

3
USER MANUAL
Summary
Introduction
Safety instructions
Operating conditions
Presentation
Dimensions
Top view
Front view
Side view
Removable floor stand
Description
Installation
Assembling the floor stands
Fixing the clamps on the Arcaline2 3G
Orientation of unit
Installation of diffuser filters on the Arcaline2 3G
Connections
Installation layout
DMX Protocol
DMX protocol for the Arcaline2 3G full version colour
DMX protocol for the Arcaline2 3G CTC version
Special functions
Control
Adjustable parameters
Information parameters
Setting the Arcaline2 3G using the DMX RDM
controller
Technical specifications
Optics
Light source
Colours
Frost, diffusion
Dimmer, Strobe
Software functions
Control
Power supply
Cooling system
Construction
Installation
Parameters for use
Compliance
Weight
Product codes
Accessories
Product care and maintenance
Cleaning
Monitoring
Software updates
Warranty
4
4
5
6
7
7
7
7
7
8
8
8
8
9
9
9
11
12
12
12
12
13
13
13
13
15
15
15
16
16
16
16
16
16
16
16
16
16
17
17
17
17
17
17
17
17
18
Sommaire
Introduction
Instructions de sécurité
Conditions d’utilisation
Présentation
Dimensions
Vue de face
Vue de profil
Vue de côté
Pied de sol amovible
Description
Installation
Montage des pieds de sol
Montage de colliers sur l’Arcaline2 3G
Orientation de l’appareil
Installation de filtres diffuseurs dans l’Arcaline2 3G
Connexions
Principe d’installation
Protocole DMX
Protocole DMX de l’Arcaline2 3G version full color
Protocole DMX de l’Arcaline2 3G version CTC
Fonctions spéciales
Contrôle
Paramètres modifiables
Paramètres d’information
Paramétrage de l’Arcaline2 3G via contrôleur
DMX RDM
Caractéristiques techniques
Optique
Source
Couleurs
Frost, diffusion
DImmer, Strobe
Fonctions logicielles
Contrôle
Alimentation
Refroidissement
Construction
Installation
Paramètre d’utilisation
Conformité
Poids
Codes produits
Accessoires
Entretien et maintenance
Nettoyage
Surveillance
Mise à jour du logiciel
Garantie
20
20
21
23
23
23
23
24
24
24
24
24
25
25
25
26
27
28
28
29
29
30
30
31
32
33
33
33
33
33
33
33
33
33
33
33
33
34
34
34
34
34
34
34
34
35
35

4USER MANUAL
ENGLISH |
Introduction
We would like to thank you for the trust you have placed in us
by choosing the AYRTON ARCALINE2 3G projector.
WARNING !
This product is not designed for household use.
You now own a professional multi-option luminaire. Before
using your luminaire, please ensure that your unit was not
damaged during transport. Should this be the case, do
not use this product and contact your AYRTON dealer
immediately.
For your own safety and that of others, please read this user
manual carefully before using this device for the first time.
Anyone involved in the installation, use or maintenance of
the ARCALINE2 3G must:
Be duly qualified and authorised to carry out this type
of work.
Follow the instructions in this user manual carefully.
Please take the time to read this manual in full before installing
and using your unit, in order to familiarise yourself thoroughly
with the user terms and all the information available on this
product.
Once you have familiarised yourself with this user manual, we
recommend that you keep a copy for further reference.
All the information contained in this user manual is subject to
change without prior notice.
AYRTON reserves the right to amend and improve any
aspect of the products in its range in the future, without the
obligation to integrate said modifications into any products
sold previously.
Safety instructions
Before installing and using the ARCALINE2 3G projector,
please read the safety instructions and precautions for use
outlined below carefully.
WARNING !
Risk of electric shock
Exercise caution when handling, this unit
requires high voltage, which may result in the
risk of electric shock.
Your ARCALINE2 3G projector has left our factories in perfect
working order. However, if you detect a fault, you are kindly
requested to contact your AYRTON dealer immediately
before using the device.
The manufacturer cannot be held liable for any damage
caused by non-compliance with safety, installation or
assembly instructions contained in this manual, or by any
modification to your unit.
Failure to comply with the safety, installation or assembly
instructions, or any modifications to the ARCALINE2 3G
projector shall lead to the warranty becoming null and void.
Check that the power supply voltage does not exceed
the maximum authorised voltage.
Check that your electrical installation is compliant with
the standards in force.
Your ARCALINE2 3G’s connection requires the use
of the optional EASYBOX 3G connecting box and
hybrid power cables that are specifically designed and
marketed by AYRTON. You should use the original power
cables designed and produced by AYRTON with your
ARCALINE2 3G
Ensure that the cable(s) connected to your ARCALINE2
3G are not damaged by cuts, splices or crushing of any
type.
Handle the power cable with extreme caution if it is
connected to the mains.
Your ARCALINE2 3G complies with Class 1 safety
standards.
Make sure that the unit is properly connected to earth.
The ARCALINE2 3G earth connection involves earthing
the EASYBOX 3G power supply unit, which is required for
your projector to function properly.
Ensure that your ARCALINE2 3G is disconnected from
the mains before handling the projector.
The installation and electrical connection must be carried
out by an approved installer. AYRTON cannot accept any
liability in the event that the projector is installed by an
unqualified technician.
Never pull the power cable to unplug your ARCALINE2
3G! Unscrew the connector’s locking ring from the power
cable until it is fully released, then gently pull on the
connector to unplug the cable.
Never connect or disconnect the power cable on your
ARCALINE2 3G with wet hands.
Never allow objects or liquids to enter into your
ARCALINE2 3G when installing the diffuser filters.
You notice odours given off by your ARCALINE2 3G
when it is started up for the first time. This is normal and
should become less noticeable after a few minutes of
use.
INTRODUCTION | SAFETY INSTRUCTIONS

5
USER MANUAL
| ENGLISH
WARNING !
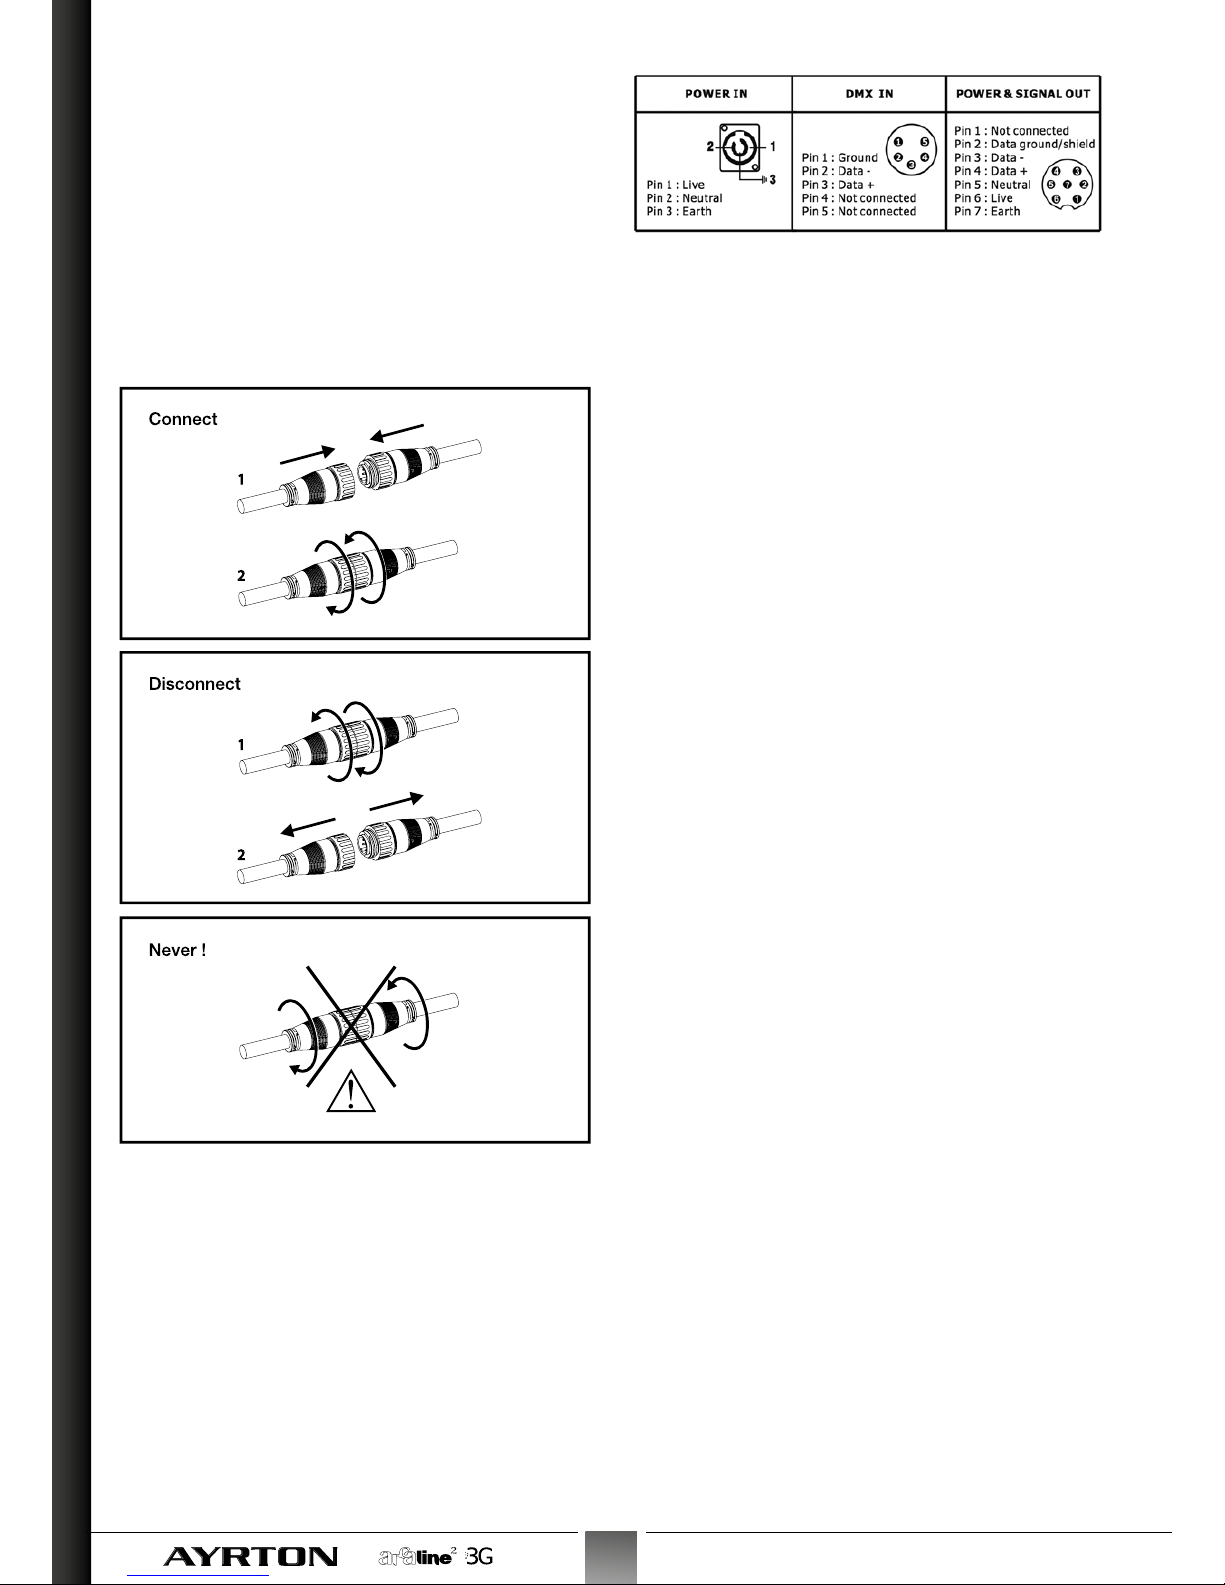
Never connect or disconnect the hybrid power
cable from your ARCALINE2 3G if the cable is
still powered on!
This could produce electric arcs that damage your
ARCALINE2 3G and require its repair. Make sure you cut the
power to your ARCALINE2 3G by removing the plug from
the EASYBOX 3G connecting box before connecting or
disconnecting your ARCALINE2 3G.
WARNING !
Projector using class 2 led sources
(En60625-1 : 1994)
This device uses multiple high-power (CLASS 2) LED (Light
Emitting Diode) light sources.
Never look directly at the light source when it is lit; never
stand directly in the device’s beam close up.
Always ensure the power is disconnected when installing,
dismantling or replacing the device to prevent any risk of glare
and to avoid any harm to your eyes.
WARNING !
The projector gets very hot quickly when used
Never handle or adjust the projector when has been on for
more than 10 minutes in order to prevent any risk of burns.
Some parts of the projector can reach high temperatures,
particularly the body/radiator. Switch the projector off and
wait until it cools down before handling it.
Operating conditions
Your ARCALINE2 3G is a linear luminaire fitted with multiple
LED (Light Emitting Diode) light sources for use in professional
environments (architectural lighting, event lighting, television,
theatre, museums, etc).
The ARCALINE2 3G luminaire has a protection index of IP65.
It may be used both indoors and outdoors.
Under no circumstances should it ever be partially or fully
immersed in water, even if only temporarily.
Condensation may develop on your ARCALINE2 3G in the
following cases:
Immediately after the heating is switched on.
In a misty or very humid location.
When the device is suddenly brought from a cold
environment into a hot environment, or vice versa.
In these cases, wait until the device has returned to ambient
temperature in the room in which it was located before use.
When your ARCALINE2 3G has been opened (for the
installation of a diffuser filter kit, for example), the ambient
air humidity trapped in the unit may lead to the formation
of condensation within the unit during its next use. This
condensation should rapidly disperse when used, since the
unit is fitted with a pressure balance system for the removal
of moisture.
Do not shake your ARCALINE2 3G during installation or use.
Never move the ARCALINE2 3G by pulling it by one of its
cables. Handle it by gripping the body of the device.
The choice of location for installing your ARCALINE2 3G is
very important :
Do not expose it to a heat source.
Do not install it in the vicinity of flammable materials.
Ensure that dust or other fragments do not gather around
the body of the unit, as this may affect the optimal cooling
and impair its proper operation.
The ARCALINE2 3G must be installed outside the reach
of the general public and anyone not authorised to work
on the device.
It is recommended to keep a minimum distance of 0.2 m
between the surface of the light output and the lit object.
The ARCALINE2 3G is capable of produced a mixed lighting
effect if the surface to be lit is very close to the unit (up to
approximately 50 centimetres). Depending on the case at
hand, the use of specific diffuser filters may be required for
this and are available as an accessory.
Due to the nature of the cooling system (natural convection),
make sure you never prevent air from flowing freely around
the body of the device. Allow for a minimum free space of
0.2 m around your ARCALINE2 3G to facilitate the cooling
process.
The ARCALINE2 3G can only be installed in a ground pit
or any other confined space under certain conditions.
The luminaire cools itself by means of natural convection;
therefore in this type of installation it will be necessary to
install a specially-designed forced ventilation system, which
allows air to flow around the device or devices. The air must
be constantly renewed; the use of a closed circuit is not
possible. Failure to comply with these constraints may cause
irreparable damage or premature wear to the ARCALINE2 3G
for which the manufacturer AYRTON cannot be held liable.
SAFETY INSTRUCTIONS | OPERATING CONDITIONS

6USER MANUAL
ENGLISH |
Please consult your AYRTON dealer for further information on
this type of installation.
Do not place anything on top of the ARCALINE2 3G. Under
no circumstances must it be installed in such a way that it
enables a person, vehicle or ant object to move over or stand
on the projector.
Never project or allow hard, heavy or blunt objects to fall on
your ARCALINE2 3G, not to mention any objects made of
glass or porcelain (bottles, crockery, balls, etc). The projector
is made up of solid materials such as extruded aluminium
and tempered glass, which makes it highly resistant, but not
unbreakable. Any hard materials such as steel or glass that
fall on the unit are likely to break or cause damage to the
glass or body of the unit. AYRTON cannot be held liable for
any breakages of the unit glass or body, which is not included
in the warranty.
The ambient temperature in the location where your
ARCALINE2 3G is installed must not exceed Ta = 40°C.
Warning :
The temperature of the glass surface of your ARCALINE2 3G
is likely to reach 45°C, depending on its use. The temperature
of the aluminium body of the device is likely to reach 80°C.
Make sure that the setting in which you intend to install the
projector is compatible with this temperature.
The supply voltage required by the ARCALINE2 3G projector
is 110 to 230V AC. Make sure that the setting in which you
intend to install your projectors is compatible with this.
Check that the support on which you fix your ARCALINE2 3G
is able to handle the weight of this device safely, i.e., 7.9 kg,
including all of the required safety coefficients.
Do not use your ARCALINE2 3G before familiarising yourself
with these recommendations and do not authorise work to
be carried out on it by unqualified personnel.
When transporting your ARCALINE2 3G, it is strongly
recommended that you use the original packaging.
Should your ARCALINE2 3G not be used for a long period of
time, disconnect the device from the mains.
Your ARCALINE2 3G must not be thrown away with the
rubbish, it must be recycled. Please consult the legislation in
force in your country on recycling electronic devices.
WARNING !
The “series” connection of the power supplies
On the arcaline2 3g (input and output connections to
the mains of the connected units) is limited, for safety
reasons.
The maximum authorised quantity is :
8 Arcaline2 3g projectors on the same mains circuit
In 230v ac
Or
4 Arcaline2 3g projectors on the same mains circuit
In 110v ac.
(Electric circuit protected by a 10-amp circuit breaker)
Presentation
The ARCALINE2 3G is a waterproof linear luminaire (protection
index IP65) with the very latest generation, high performance
LED type light sources (Light Emitting Diodes).
The unit is controlled remotely via a DMX512 type external
control signal.
This projector is available in two versions with different LED
sources, each adapted to a specific type of lighting :
Full Colour Version :
This projector integrates 4-colour multi-chip LEDs : Red,
Green, Blue and White.
It is a projector with coloured light, operating on the
principle of additive colour mixing with white light, which
allows for a the oretical range of colour rendering of 4.2
billion colours.
CTC Version :
This projector integrates 4-colour multi-chip LEDs
combining Cold White (7000°K) and Warm White
(2700°K) sources.
It is a projector with variable white light, which allows for
a colour temperature range adjustable from 2700°K to
7000°K.
The ARCALINE2 3G is a luminaire that is approximately 1
metre in length, and combines a total of 64 LED light sources
in 16 groups.
Depending on the version of the unit (Full Colour or CTC),
it requires 2 to 11 DMX circuits for control by an external
control system emitting a DMX512 signal (see further down
in this manual for details).
For setting its parameters (DMX address, DMX operating
modes and various options), the ARCALINE2 3G requires
OPERATING CONDITIONS | PRESENTATION

7
USER MANUAL
| ENGLISH
the use of an RDM-type DMX controller (Remote Device
Management). The RDM DMX protocol is a universal standard
that is widely available today.
There are a wide range of RDM DMX controllers on the market
that are available from various manufacturers (AYRTON does
not market RDM DMX controllers).
It is worth noting that an RDM DMX controller is only necessary
to modify the parameters of the ARCALINE2 3G. To control
the projector, a light console or any type of standard DMX
controller will suffice.
The ARCALINE2 3G consists of an aluminium body in which
an internal sliding channel carries all of the unit’s internal
electronics as well as the unit’s light sources, and two
aluminium end shields at each end in which the hybrid power
supply cables and the
DMX512 signal are housed. The input cable is placed at
one end of the unit, and the output cable is located at the
opposite end.
The hybrid cables that are connected to the unit are fitted
with specific over-moulded connectors, which allow for the
“series” connection of several units. The cables exiting the
unit are approximately 50 centimetres in length.
One accessory that is not supplied is essential to the
connection of a series of units is the EASYBOX 3G. This
adapter receives the mains power on the one end (using a
NEUTRIK’s PowerCon plug) and on the other hand, the DMX
signal (via a 5-pin XLR 5 socket connector) and is connected
to the first ARCALINE2 3G in a line using a hybrid connector.
The AYRTON hybrid cables come in various lengths and are
also available as accessories.
The diffuser filters are available as accessories and are sold
separately. They allow you to modify the shape or angle of
the beam projected by the ARCALINE2 3G. These filters are
to be installed inside the unit, which will therefore need to be
opened (see process further down in this manual).
Dimensions
Top view
Front view
Side view
Removable floor stand
PRESENTATION | DIMENSIONS

8USER MANUAL
ENGLISH |
Description
1 - Body of the unit
2 - Glass
3 - Lateral flank input side
4 - Lateral flank output side
5 - Input cable
6 - Output cable
7 - LED matrix no. 1 (input cable side)
8 - LED matrix no. 2 (output cable side)
3 - Lateral flank input side
9 - Removable casing covering the lateral flank
10 - Clamping screw for the bracket
11 - Support screw for the removable end shield (2 screws)
12 - Bracket
13 - Removable floor stand
14 - Floor stand screw (size M10, head “H”)
16 - Device Label
17 - Window specifying the model reference and the unit
serial number
18 - Window specifying the Identifier Number (ID) of the unit
Installation
Assembling the floor stands
The ARCALINE2 3G projector is supplied with two
unassembled stands, which enable the projector to be
placed on a flat support and, where necessary, to fix it to said
support using screws (not supplied).
These stands are to be fixed to the unit’s adjustable brackets,
using the screws and nuts supplied, as shown in the following
assembly diagram :
1 - M10 screw with hexagonal head
2 - Stand
3 - M10 Locknut
Note :
A 17-mm open-ended spanner is required for this operation
(not supplied)
The stands may be installed on the unit in two different ways,
in order to allow different directional settings for the projector
(see below in this manual)
Fixing the clamps on the
ARCALINE2 3G
In the event that the unit is to be fixed to a tubular structure,
the stands supplied with the ARCALINE2 3G can be replaced
with tube clamps and fixed to the unit by corresponding
screws/nuts (clamps and hardware not included). The centre-
to-centre distance on the tube clamps will be 962 mm.
The following illustration shows an ARCALINE2 3G fitted with
tube clamps :
DESCRIPTION | INSTALLATION

9
USER MANUAL
| ENGLISH
Orientation of the unit
The floor stands can be installed in two different ways.
It is therefore possible to obtain two types of directional
settings on the unit, as shown in the following diagrams :
Installation of the diffuser filters on the
ARCALINE2 3G
The ARCALINE2 3G can be fitted with specially-designed
diffuser filters, enable the angle of the unit’s beam to be
adjusted, depending on the application for which it is
intended.
WARNING !
Only use original ayrton filters in the ARCALINE2 3G.
The ARCALINE2 3G has an internal filter holder to house the
diffuser filters.
These specially-designed diffuser filters are manufactured by
AYRTON and are available in several versions, depending on
the diffusion Angle required.
They come in the form of a kit with two 2 translucent plates,
each covering half of the projector’s LED groups.
In order to install the filters, each plate must be inserted into
the unit on one end, and both sides of the projector must
therefore be opened.
Details of the filters installation :
Unscrew the two HEX screws (number 1) with the help
of a 2.5 mm hex key
Remove the removable casing (number 2)
Unscrew the two screws (number 3) using a Philips
head screwdriver
Remove the plate (number 4) covering access to the
filter housing, as well as its waterproof seal (number 5)
Take a filter and remove the protective films stuck to
each side. From then on take care to hold the filter by the
edges and avoid touching the sides
Insert the filter fully into the housing provided for this
purpose (see diagram below), making sure the granular
side of the filter faces the glass on the unit
Replace the plate (number 4) covering access to the
filter housing and its waterproof seal (number 5), then
screw the parts in place by tightening the two Philips head
screws (number 3)
Place the removable casing (mark 2) and fix to the unit
by tightening both HEX screws (number 1)
Repeat this procedure to install the second filter on the
other side of the unit
Connections
The ARCALINE2 3G is equipped with two cables fitted with
hybrid connectors (1 cable is located at either end of the
projector).
The cable fitted with a male connector is the unit’s input cable.
The cable fitted with a female connector is the unit’s output
INSTALLATION

10 USER MANUAL
ENGLISH |
cable.
The mains supply to the unit and its control by DMX protocol
run through a single cable, thanks to the use of hybrid cables
and connectors.
The ARCALINE2 3Gs are designed to be connected “in
series”, i.e., they can be connected one after the other.
The hybrid connectors installed on the ARCALINE2 3G cable
are watertight, to be sealed with a threaded locking ring.
Make sure they are connected as follows:
Warning!
The connector’s locking rings must always be tightened
securely when two connectors are connected in order to
guarantee the watertightness and reliability of the electrical
connection.
A connection box is required to connect a series of
ARCALINE2 3G, this accessory is the EASYBOX 3G. The
connection details for the EASYBOX 3G unit are specified in
the following diagram :
Warning!
The EASYBOX 3G unit is supplied with a NEUTRIK
POWERCON mains supply connector, without cable. It is
the responsibility of the installer to provide and fit this supply
cable, which must be fitted with the correct mains plug for
their country, while respecting the following colour codes for
the cable wiring :
BROWN WIRE = LIVE
BLUE WIRE = NEUTRAL
GREEN/YELLOW WIRE = EARTH
The DMX cable used to transfer the DMX512 control signal
to the EASYBOX 3G connection box that supplies your
ARCALINE2 3G must comply with EIA 422A & EIA 485
standards. Only use shielded twisted pair cable. Do not
use microphone cable, which does not allow for reliable
transmission over long distances. For lengths exceeding 300
metres, it is recommended that you use a line amplifier.
Connect the DMX cable from your DMX controller to the DMX
IN base in the EASYBOX 3G connection box that supplies
your ARCALINE2 3G(s).
The DMX IN base of the EASYBOX 3G unit is the 5-pin XLR
type.
The wiring for the pins in the XLR base is as follows :
1 – DMX GND
2 – DATA (-)
3 – DATA (+)
4 – NoT connectED
5 – NoT connectED
The EASYBOX 3G connection box does not have a DMX
output, since the DMX 512 standards prohibits star type
wiring of the DMX 512 signal, only line cabling of the various
DMX receptors (particularly the ARCALINE2 3G).
If you have to use more than one line consisting of one or
more ARCALINE2 3Gs, or other units controlled in DMX with
your DMX controller, it will be necessary to use a DMX splitter,
which will enable you to obtain several identical, yet separate,
DMX512 lines from one DMX512 line.
The use of this unit also has the advantage of protecting the
INSTALLATION

11
USER MANUAL
| ENGLISH
various DMX lines obtained through electrical insulation, thus
greatly limiting the damage that may be caused in the event
of damage to one of the units in the DMX chain.
This type of unit is offered by a large number of manufacturers
specialised in the management of the DMX 512 signals.
In order to ensure the reliable transmission of DMX data, it is
imperative to cap off the DMX 512 line with a specific AYRTON
end-of-line DMX cap. This is installed on the last ARCALINE2
3G in the line (AYRTON product code: 025398U).
If, however, you do not use this accessory, make sure you
install the original sealing cap that came with the unit on the
output connector of the last ARCALINE2 3G in the line.
Installation layout
Your ARCALINE2 3G cannot function alone.
Its use requires an EASYBOX 3G connection box (AYRTON
product code: 075130U) and specific AYRTON cables of
various lengths.
The use of an external controller providing a control signal in
DMX512 format is also required.
The ARCALINE2 3Gs are connected together through the
use of specially-designed AYRTON cables, the output of the
preceding ARCALINE2 3G being connected to the input of
the next.
The electrical power supply to the unit is transmitted through
the EASYBOX 3G connection box.
The DMX 512 control signal is also transmitted through the
EASYBOX 3G connection box.
The following diagram illustrates the connection of a series of
ARCALINE2 3Gs :
The ARCALINE2 3G is fitted with an internal universal power
supply, and therefore will work in 110V AC, 208V AC or 230V
AC.
However, the electric current necessary for the units depend
on the mains voltage level. It will therefore be necessary to
adapt the number of ARCALINE2 3Gs that are connected in
series on the same line, depending on the voltage level and
the length of cable used.
The line that consists of several ARCALINE2 3Gs cannot
exceed 10 A.
The table below will indicate the number of ARCALINE2 3Gs
that can be connected to the same EASYBOX 3G connection
box, depending on usage conditions :
MAINS
SUPPLY
VOLTAGE
NUMBER OF ARCALINE2 3G CONNECTED
IN SERIES ON THE SAME POWER LINE
230 V AC 8 MAX.
110 V AC 4 MAX.
In any case, do not exceed a length of 50 meters between
EASYBOX 3G and ARCALINE2 3G in the same line made
with several devices connected in series.
Never connect the EASYBOX 3G unit and therefore your
ARCALINE2 3G, to a dimmer switch, as this may cause
damage to the units !
The EASYBOX 3G unit (and therefore your ARCALINE2 3G)
must be connected to earth.
It is recommended that you install a specially-designed
AYRTON end-of-line DMX cap, fitted with a 120-Ohm
resistance, on the last ARCALINE2 3G in the line. The
AYRTON product code for this accessory is : 025398U.
If, however, you do not use this accessory, make sure you
install the original sealing cap that came with the unit on the
output connector of the last ARCALINE2 3G in the line.
WARNING !
Never connect or disconnect a cable that
connects the line consisting of several
ARCALINE2 3GS without first switching off the
power supply to the easybox 3G connection
This golden rule is particularly important for the ARCALINE2
3G, as it may result in damage to the products.
The optional EASYBOX 3G connection box is delivered
without a power supply cable.
A lockable and removable PowerCON plug (NEUTRIK
trademark) is supplied with the EASYBOX 3G unit in order to
enable the installer to adapt a power cable fitted with a male
mains plug that complies with your country’s standards. See
INSTALLATION

12 USER MANUAL
ENGLISH |
the previous paragraph for details on the production of this
mains supply cable.
In order to switch on your ARCALINE2 3G, it must first be
connected as described above. Then turn the PowerCON
plug on the EASYBOX 3G unit to the right to turn on the
power to your ARCALINE2 3G.
To cut the power to your ARCALINE2 3G, pull the unlocking
strip upward on the PowerCON plug, then turn the plug to the
left. Then remove the plug from the EASYBOX 3G connection
box. Your ARCALINE2 3G is now turned off.
DMX protocol
DMX protocol for the ARCALINE2 3G
full color
THE FULL COLOUR ARCALINE2 3G can be configured in 6
different DMX MODES, requiring 4 to 11 DMX channels for
its control.
The DMX mode that best suits the needs of the user can be
selected by means of the RDM DMX controller.
ARCALINE2 3G FULL COLOR
DMX MODE
Quantity of DMX channels used
MODE 1
4 ch
MODE 2
5 ch
MODE 3
7 ch
MODE 4
8 ch
MODE 5
9 ch
MODE 6
11 ch
Channel Function
RED (Section 1) 111
GREEN (Section 1) 222
BLUE (Section 1) 333
WHITE (Section 1) 444
RED (Section 2) 555
GREEN (Section 2) 666
BLUE (Section 2) 777
WHITE (Section 2) 888
RED (General) 111
GREEN (General) 222
BLUE (General) 333
WHITE (General) 444
STROBE 5 9
COLOUR MACRO 6 10
DIMMER 5 7 9 11
DMX protocol for the CTC version
ACRALINE2 3G
THE CTC ARCALINE2 3G can be configured in 6 different
DMX MODES, with 2 to 7 DMX channels required for its
control.
The DMX mode that best suits the needs of the user can be
selected by means of the DMX RDM controller.
ARCALINE2 3G CTC
DMX MODE
Quantity of DMX channels used
MODE 1
2 ch
MODE 2
3 ch
MODE 3
5 ch
MODE 4
4 ch
MODE 5
5 ch
MODE 6
7 ch
Channel Function
WARM WHITE (Section 1) 111
COOL WHITE (Section 1) 222
WARM WHITE (Section 2) 333
COOL WHITE (Section 2) 444
WARM WHITE (General) 111
COOL WHITE (General) 222
STROBE 3 5
COLOUR TEMPERATURE 4 6
DIMMER 3 5 5 7
Special functions
‘‘Strobe’’ function
The strobe effect on the light emitted by the device at variable
speeds. The control of this function is proportional.
The strobe speed increases in accordance with the DMX
value sent on the relevant DMX channel.
The following table indicates the speeds obtained for every
5% of the value of the DMX channel.
STROBE Channel
DMX Values STROBE SPEED
(flashs per second)
% 0-255
< 6% 0-15 OFF
6% 16 0,89
10% 26 1,08
15% 38 1,28
20% 51 1,51
25% 64 1,72
30% 77 2
35% 89 2,27
40% 102 2,63
45% 115 2,94
50% 128 3,33
55% 140 3,84
60% 153 4,54
65% 166 5
70% 179 6,25
75% 191 7,14
80% 204 10
85% 317 12,5
90% 230 16,5
95% 242 25
98-100% 250-255 OFF
‘‘Colour macro’’ function
Pre-programmed colour variation over the entire colour
INSTALLATION | DMX PROTOCOL

13
USER MANUAL
| ENGLISH
spectrum at variable speeds. This function is only available
on units in the FULL COLOUR version.
The control of this function is proportional.
The projection order of the colour macro, which changes in
a fade-in-fade-out sequence (progressive mixing of colours),
corresponds to the following cycle :
RED
MAGENTA
YELLOW GREEN
BLUE CYAN
The variation speed of the colour macro increases in
accordance with the DMX value sent on the relevant DMX
channel.
The following table indicates the speeds obtained every 5%
of the value of the relevant DMX channel :
COLOUR MACRO
Channel DMX Values COLOUR MACRO SPEED
% 0-255
< 3% 0-7 OFF
3% 8 37 min
5% 13 35 min 51 sec
10% 26 32 min 53 sec
15% 38 30 min 9 sec
20% 51 27 min 11 sec
25% 64 24 min 13 sec
30% 77 21 min 15 sec
35% 89 18 min 31 sec
40% 102 15 min 33 sec
45% 115 12 min 36 sec
50% 128 9 min 38 sec
55% 140 6 min 54 sec
60% 153 3 min 56 sec
65% 166 1 min 8 sec
70% 179 32 sec
75% 191 13,7 sec
80% 204 9 sec
85% 217 5 sec
90% 230 2,88 sec
93-100% 238-255 2,16 sec
‘‘Dimmer’’ function
Manages the general intensity of the light emitted by the
device.
The control of this function is proportional.
DMX Value DIMMER ‘‘INVERTED’’ DIMMER ‘‘NORMAL’’
0% OPEN CLOSED
From 0% to 100%
Variation Proportional Closing Proportional Opening
100% CLOSED OPEN
The dimmer can be parameterised with the use of an DMX
RDM controller.
‘‘Colour temperature’’ function
Function allowing the COLOUR temperature (°K) to be varied
proportionally on a single channel of the light emitted by the
unit, from the lowest to the highest colour temperature.
This function is only available on CTC-version units.
DMX channel at 0: WARM WHITE (2700°K)
DMX channel at 50%: WARM WHITE + COLD WHITE
DMX channel at 100%: COLD WHITE (7000°K)
The colour temperature of the light emitted by the projector
increases with the DMX value sent on the relevant DMX
channel.
Control
The ARCALINE2 3G is designed to be controlled by a signal
in compliance with the USITT DMX512 protocol only.
Light consoles or other computer interfaces delivering
this type of control signal can therefore be used with the
ARCALINE2 3G.
The parameterisation of the DMX address, the DMX operating
mode and a number of the ARCALINE2 3G options, requires
the use of a DMX controller supporting the RDM standard.
This luminaire does not have Stand Alone mode.
Adjustable parameters
The following parameters can be consulted and adjusted
by means of a DMX controller that complies with the RDM
(Remote Device Management) standard :
DMX ADRESS
Choice of address of the unit’s first control channel
DMX MODE
Choice of the number of DMX channels required to run
the unit
LUMINOSITY MODE
Choice of “ENTERTAINMENT” or “ARCHITECTURAL”
mode
The “Entertainment” mode enables you to get the very
best out of the unit’s power capacity, depending on
DMX PROTOCOL | CONTROL

14 USER MANUAL
ENGLISH |
outdoor temperature conditions.
When the ARCALINE2 3G is cold, the available power is
at a maximum.
If the temperature increases too much, the ARCALINE2
3G will automatically reduce its power to guarantee its
thermal regulation. This mode is recommended for
temporary events where the ARCALINE2 3G’S power
consumption must be optimal.
The “Architectural” mode guarantees stability of the unit’s
luminous flux, in return for a lower luminous flux than in
“Entertainment” mode. This mode is recommended in the
context of fixed installations of the ARCALINE2 3G, where
the consistency of the flux is important. It is also advisable
to use this mode in the event that the ARCALINE2 3G is
often used at values close to 100% of its power output.
CONSTANT COLOUR MODE
Activation or non-activation of this mode, which ensures
consistency of adjusted colours.
This menu allows to adjust the consistency of the colours
generated by the ARCALINE2 3G. This mode makes
it possible to avoid the phenomenon of gradual colour
deterioration generally observed on sealed projectors
fitted with LED light sources, which occurs when the
device heats up.
The effects are as follows :
CONSTANT COLOUR ON mode : In this Mode, the
device’s internal software automatically compensates
for the phenomenon of the deterioration of the
colorimetry, which occurs when the projector becomes
hot during use, thus preserving the colours set when
cold. In return, when the CONSTANT COLOUR mode
is activated, the device’s general luminosity is likely to
decrease. This mode is recommended when the device
is designed to light an area in a preset colour (or with a
slow change of colour) together with other projectors of
the same type for a long period. By nature, this mode
is particularly suited to the constraints of architectural
lighting.
CONSTANT COLOUR OFF mode : The function
is deactivated and no temperature-dependent
compensation of colorimetry is activated. The quantity
of light available with the ARCALINE2 3G is at a
maximum when this function is deactivated. However,
the nature of the colours configured on the device is
likely to deteriorate when the device heats up (this is
because the Red LEDs significantly lose efficiency as
their temperature increases). This traditional mode is
recommended for event lighting and the majority of
temporary lighting applications, where the maximum
quantity of available light is preferred.
DIMMER
Choice of the dimmer’s operating mode, Normal Mode
or Reversed.
Information parameters
The following parameters can only be consulted by means of
a DMX controller that complies with the RDM (Remote Device
Management) standard and cannot be modified :
UNIT MODEL
Name of the fixture
SOFTWARE VERSION
Software version installed into the fixture
TEMPERATURE
Current internal temperature of the fixture
TIMER
Total lifetime of the fixture
DEFAULT VALUES
Factory preset of the fixture
Setting the ARCALINE2 3G
with DMX RDM controller
The parameters of the ARCALINE2 3G can be set remotely by
a controller that complies with the DMX RDM (Remote Device
Management) standard, through DMX512 wire connections.
A variety of DMX RDM controllers are available from most
manufacturers of lighting consoles and DMX tools. AYRTON
does not market DMX RDM controllers.
The following table indicates the commands accessible by a
DMX RDM controller :
(the shaded lines represent the parameters that can be set
by the user)
CONTROL | SETTING THE ARCALINE2 3G WITH DMX RDM CONTROLLER

15
USER MANUAL
| ENGLISH
Parameter ID DISCOVERY SET
command
GET
command Value ARCALINE2 3G
Function Description
DISC_UNIQUE_BRANCH X0x0001
Discovery processDISC_MUTE X0x0002
DISC_UN_MUTE X0x0003
DEVICE_INFO X0x0060
RDM version =V1.0, Model ID
Product category, Software version
DMX 512 footprint, DMX 512
personality
DMX 512 Start address
Sub device count = 0,
Sensor count = 1
SUPPORTED_PARAMETERS X0x0050 All commands listed in this document
SOFTWARE_VERSION_LABEL X0x00C0
Vx.y.z
where :
x = version, y = release and z = beta
DMX_START_ADDRESS X X 0x00F0 from 1 to 512
IDENTIFY_DEVICE X X 0x1000 light ON or OFF the device
DEVICE_MODEL_DESCRIPTION X0x0080 Arcaline2-RGBW
MANUFACTURER_LABEL X0x0081 Ayrton
DEVICE_LABEL X0x0082 Arcaline2-RGBW
SENSOR_DEFINITION X0x0200
Sensor type TEMPERATURE
unit type CENTIGRADE
range min value=0,
range max value=110
normal min value=40
normal max value=85
‘‘ambiant temperature’’
SENSOR_VALUE X0x0201 present value = current temperature
(record not possible)
DMX_PERSONALITY X X 0x00E0
Number of DMX Channels required :
(DMX Mode)
Personnality 01 = 4 ch
Personnality 02 = 5 ch
Personnality 03 = 7 ch
Personnality 04 = 8 ch
Personnality 05 = 9 ch
Personnality 06 = 11 ch
DMX_PERSONALITY_DESCRIPTION X0x00E1 show the actual DMX 512 footprint
PRODUCT_DETAIL_ID_LIST X0x0070 product type LED
SLOT_INFO X0x0120 slot type PRIMARY
label ID = COLOR_WHEEL
SLOT_DESCRIPTION X0x0121 indicate the slot function
DEFAULT_SLOT_VALUE X0x0122
indicate the slot default value = 0
except for Dimmer
(value is 255 if dimmer is Normal)
PARAMETER_DESCRIPTION X0x0051 show manufacturer specific Parameters
ID (PID)
USER_PID_DIMMER_MODE X X 0x8001 0 = Normal dimmer
1 = Inverted dimmer
USER_PID_LIGHT_MODE X X 0x8002 0 = Entertainment Light Mode
1= Architectural Light Mode
USER_PID_CST_COLOR_MODE X X 0x8003 0 = Constant Color Mode OFF
1 = Constant Color Mode ON
Important :
The communication between the DMX RDM controller and
the ARCALINE2 3G, which takes place through the existing
DMX line, is bi-directional.
ItisthereforeimportantthatnoDMXBooster/Splitterbeinserted
between the DMX RDM controller and the ARCALINE2 3G,
as this type of device is typically uni_directional, and would
prevent the functioning of the DMX RDM protocol.
Certain DMX line boosters/splitters are now compatible with
DMX RDM and are therefore bi-directional.
To be on the safe side, it is preferable to connect the DMX
RDM directly to the DMX line wiring for the ARCALINE2 3G in
order to set their parameters.
Projector’s ID number
It is worth noting that the detection and sorting of AYRTON
projectors such as the ARCALINE2 3G by a RDM DMX
(Remote Device Management) controller is achieved via the
unit’s ID number. This is the number displayed on the RDM
DMX controller to identify the selected device.
The display of the unit’s number on the RDM DMX controller
will be in the following format :
4179-0000XXXX
Details of this number from an RDM tool:
4179 is the specific AYRTON manufacturer code
XXXX is the ID number of the ARCALINE2 3G
(hexadecimal value)
This ID number appears on a label on all AYRTON projectors.
On the ARCALINE2 3G, this label is located on the unit’s
body on the output end plate.
It is highly recommended to leave this label where it is on
the unit in order to facilitate the setting of parameters on the
ARCALINE2 3G with the help of a DMX RDM controller.
Similarly, as part of an permanent installation comprising
several ARCALINE2 3Gs, it is recommended that the installer
notes down the respective ID numbers on the set-up plan for
the projectors for each of the installed units, and to file this
plan to facilitate any subsequent work on this installation.
Technical specifications
Optics
High-efficiency PMMA secondary optics
Opening angle of the beam: 10° x 40°
Light source
16 high-power “multi-chip”4-colour LEDs
64 sources in total integrated into the unit
FULL COLOUR model : 16 RED sources + 16 GREEN
sources + 16 BLUE sources + 16 “Neutral” WHITE sources
CTC model: 32 WARM WHITE sources (2700°K) + 32 COLD
WHITE sources (7000°K)
Estimated lifespan of LEDs: 50,000 hours
SETTING THE ARCALINE2 3G WITH DMX RDM CONTROLLER | TECHNICAL SPECIFICATIONS

16 USER MANUAL
ENGLISH |
Colours
Mixing system of Red, Green, Blue and White colours on the
FULL COLOUR model
Mixing system of Warm White and Cold White colours on
CTC model
14.2 billion colours on FULL COLOUR model
65536 nuances of white on the AWW model
Automatic colour variation variable speed effect on the FULL
COLOUR model
Colour temperature variation proportional channel on the
CTC model
Frost, diffusion
Optional 13° diffuser filter available (spot-like light beam)
Optional 33°x13° horizontal diffuser filter available (elliptic light
beam)
Dimmer, strobe
Electronic dimmer switch for the perfect light adjustment from
0 to 100% without colour variation
White or colour strobe effect with speed adjustment from 1 to
25 flashes per second
Software functions
DMX addressing of the projector and its optional parameters
through the standard DMX RDM controller
Integrated hourly counter, information available through
standard DMX RDM controller
Temperature display, information available through standard
DMX RDM controller
Control
Control of the device through DMX 512 protocol
DMX 512 Input / Output via watertight hybrid connectors with
7 contacts
Choice of 4, 5, 7, 8, 9 or 11 DMX 512 circuits on FULL
COLOUR model, parameters can be set through a standard
RDM DMX controller
Choice of 2, 3, 5, 4, 5 or 7 DMX 512 circuits on CTC model,
parameters can be set through a standard RDM DMX
controller
Power supply
Electronic supply with PFC active
110 to 240 Volts – 50-60Hz
Power 100 Watts
Leakage current generated by the device: 0.8 mA
Power supply input/output through watertight hybrid
connecters with 7 contacts
Cooling system
Natural convection, with parameter control thermal adjustment
Protection against temperatures excesses
Free air circulation around the unit must be guaranteed, do
not enclose the unit
Construction
Body in extruded aluminium
Front glass in tempered glass
End shields in moulded aluminium fitted with a cable gland
External hardware in stainless steel (black finish)
1 adjustable bracket at each end of the unit, for connection
to a floor stand (included)
2 floor stands come included with the unit
Removable internal slider channel support the electronics
and light sources
IP65 protection index
Exterior finish : black (Carbon)
Installation
2 adjustable brackets, designed to connect to clamps (not
included), or floor stands (included)
2 stands supplied with the unit
Parameters for use
Operating positions : all
(device on floor or fixed to a support)
Maximum permitted ambient temperature (aT max) :
40°C (104°F)
Minimum permitted ambient temperature (aT min) :
-5°C (23°F)
Minimum usage distance : 0,2m (8 inches)
Do not enclose the unit, allow free air circulation on all sides
TECHNICAL SPECIFICATIONS

17
USER MANUAL
| ENGLISH
PRODUCT CARE AND MAINTENANCE | UPDATING THE SOFTWARE
Compliance
UE (CEM) : EN 50081-1, EN 50082-1
UE (electrical safety) : EN 60598-1, 60598-2-17
Weight
7,9 Kg
Product codes
023640 : ARCALINE2 3G 10°x40° FULL COLOR Carbon
023610 : ARCALINE2 3G 10°x40° CTC Carbon
Accessories
075130U : EASYBOX 3G connection box
077210U : 7-contact Hybrid cable
length 1 metre for units in the 3G series
077220U : 7-contcat Hybrid cable
length 2 metres for units in the 3G series
077250U : 7-contcat Hybrid cable
length 5 metres for units in the 3G series
077260U : 7-contcat Hybrid cable
length 10 metres for units in the 3G series
077270U : 7-contcat Hybrid cable
length 25 metres for units in the 3G series
077283U : 7 pin Male Y power data Adapter
077285U : Adapter Y Mains/DMX to Female
7-contact hybrid connector for series 3G
025398U : Sealing plug, DMX 120 Ohms (end of line)
for unites in the 3G series
077299U : Simple sealing plug for hybrid output
connector (units in the 3G series)
Product care and
maintenance
The care and maintenance of your ARCALINE2 3G projector
must be carried out by a qualified person who is authorised
to perform this type of work. Your ARCALINE2 3G requires
regular maintenance, the frequency of which essentially
depends on the environment and the conditions of use.
Intensive use in a dusty environment or an environment with a
lack of air circulation around the device may lead to operational
breakdowns, which may in turn lead to overheating and
damage that is not covered by the warranty.
WARNING!
Disconnect the power cable before
carrying out any work.
Cleaning
It is essential that you clean your ARCALINE2 3G on a regular
basis. In fact, dust and other residue that accumulates on the
body and glass of the device may reduce its light efficiency
and affect its operational performance.
Disconnect the power cable from the mains supply.
Blow compressed air to clean off the dust particles
that have accumulated on and between the cooling fins
located at the rear of the device’s body
Clean the device glass with a moist cloth. Where
necessary, use a product designed for cleaning windows.
Monitoring
Your installation must be inspected on a regular basis by an
approved body. Furthermore, you must have the following
checked by a qualified person each year :
The projector fastening system must be correctly
installed with no traces of corrosion.
The support on which the projector is installed must be
free of any deformation or traces of corrosion.
The mechanical parts must not show any signs of wear.
The electrical cables must not show any traces of wear,
cuts or splicing.
Updating the software
Your ARCALINE2 3G is designed to accommodate future
developments.
Its software can be updated and allows you to benefit from
the latest developments without having to open the unit.
This step requires the return of the device to your dealer, who
is the only one authorised to carry out this update.

18 USER MANUAL
ENGLISH |
Warranty
The AYRTON ARCALINE2 3G projector is guaranteed
against all manufacturing faults for a period of one (1) year
commencing on the date of purchase of the unit.
This warranty does not include repair to shock damage or
any damage caused to the unit by abusive use, or any use
that does not comply with this user manual.
Similarly, surface blemishes caused by normal wear of the
unit are not covered by the warranty.
Any modification to the device shall invalidate the warranty.
AYRTON cannot be held liable for the quality and compliance
of the installation of this product, which is the sole responsibility
of the installer.
Glass breakage on the ARCALINE2 3G, as well as damage
caused to other materials or persons that results are not
included under the warranty.
Only surface blemishes that are discovered immediately after
unpacking and before use will be covered by the warranty,
provided they are reported to your AYRTON dealer upon
unpacking the device
WARRANTY

19
USER MANUAL
| ENGLISH
Notes
________________________
________________________
________________________
________________________
________________________
________________________
________________________
________________________
________________________
________________________
________________________
________________________
________________________
________________________
________________________
________________________
________________________
________________________
________________________
________________________
________________________
________________________
________________________
________________________
________________________
________________________
________________________
________________________
________________________
________________________
________________________
________________________
________________________
________________________
________________________
________________________
________________________
________________________
________________________
________________________
________________________
________________________
________________________
________________________
________________________
________________________
________________________
________________________
________________________
________________________
________________________
________________________
________________________
________________________
________________________
________________________
________________________
________________________
________________________
________________________
________________________
________________________
________________________
________________________
________________________
________________________
________________________
________________________
________________________
________________________
________________________
________________________
________________________
________________________

20 MANUEL D’UTILISATION
FRANÇAIS |
Introduction
Nous vous remercions de la confiance que vous nous
accordez en choisissant le projecteur AYRTON ARCALINE2
3G.
ATTENTION !
Ce produit ne convient pas à un usage domestique.
Vous êtes en possession d’un luminaire d’éclairage
professionnel aux possibilités multiples. Avant sa mise en
service, assurez-vous que votre appareil n’a pas subi de
dommage pendant son transport. Si tel était le cas, abstenez-
vous d’utiliser ce produit et contactez votre revendeur
AYRTON immédiatement.
Pour votre propre sécurité et celle d’autrui, veuillez lire
attentivement ce manuel d’utilisation avant la première mise
en service de cet appareil.
Toute personne impliquée dans l’installation, l’utilisation ou
la maintenance de l’ARCALINE2 3G doit :
Être qualifiée et habilitée à effectuer ce type d’intervention.
Respecter précisément les instructions de ce manuel
d’utilisation.
Veuillez prendre le temps de lire entièrement et attentivement
ce manuel avant toute installation et utilisation de cet appareil,
afin d’acquérir une parfaite connaissance des conditions
d’utilisation et de toutes les informations concernant ce
produit.
Lorsque ce manuel d’utilisation sera parfaitement assimilé,
nous vous recommandons de conserver cet exemplaire pour
toutes consultations ultérieures.
Toutes les informations présentes dans ce manuel d’utilisation
sont susceptibles de modifications sans préavis.
AYRTON se réserve le droit de modifier et d’améliorer en
tous points les produits de sa gamme au cours du temps,
ceci sans devoir intégrer ces modifications dans les produits
vendus précédemment.
Instructions de sécurité
Avant toute installation et utilisation du projecteur ARCALINE2
3G, veuillez lire attentivement les instructions de sécurité et
les précautions d’utilisation mentionnées ci-dessous.
ATTENTION !
Risque de choc electrique
Soyez prudent lors des manipulations, cet appareil
nécessite une tension élevée qui peut engendrer
un risque de choc électrique.
Le projecteur ARCALINE2 3G a quitté nos usines en parfait
état de fonctionnement. Toutefois, si vous constatiez un
défaut, vous êtes prié de contacter immédiatement votre
revendeur AYRTON avant son utilisation.
Le fabricant ne peut-être tenu pour responsable des
dommages causés par le non-respect des instructions de
sécurité, d’installation ou de montage contenues dans ce
manuel, ou par toute modification de cet appareil.
Le non-respect des instructions de sécurité, d’installation
ou de montage ainsi que la modification du projecteur
ARCALINE2 3G entraînera la nullité de la garantie.
Vérifiez que la tension d’alimentation ne soit pas supérieure
à la tension maximale autorisée.
Vérifiez que votre installation électrique soit conforme aux
normes en vigueur.
Le raccordement de votre ARCALINE2 3G nécessite
l’emploi d’un boîtier de raccordement EASYBOX 3G optionnel
et de câbles d’alimentation hybrides spécialement conçus
et commercialisés par AYRTON. Vous ne devez utiliser que
des câbles d’alimentation d’origine conçus et fabriqués par
AYRTON avec votre ARCALINE2 3G.
Dans tous les cas, assurez-vous que le ou les câbles reliés
à votre ARCALINE2 3G ne soient pas endommagés par des
entailles, des épissures ou par un quelconque écrasement.
Manipulez ces câbles d’alimentation avec une extrême
prudence s’ils sont reliés au secteur.
Votre ARCALINE2 3G est conforme aux normes de sécurité
de classe 1.
Vous devez obligatoirement raccorder l’appareil à la Terre.
Le raccordement à le Terre de l’ARCALINE2 3G nécessite
la mise à la Terre du boîtier d’alimentation EASYBOX 3G,
nécessaire au fonctionnement de votre projecteur.
Assurez-vous que l’alimentation électrique votre ARCALINE2
3G est coupée avant toute intervention sur ce projecteur.
INTRODUCTION | INSTRUCTIONS DE SÉCURITÉ
Table of contents
Languages: