Baader Planetarium DIAMOND STEELTRACK BDS-NT User manual

Instruction manual
for all Baader Diamond Steeltrack®(BDS) focusers
BAADER PLANETARIUM
Zur Sternwarte 4 •D-82291 Mammendorf •Tel. +49 (0) 8145 / 8089-0 •Fax +49 (0) 8145 / 8089-105
www.baader-planetarium.com •kontakt@baader-planetarium.de •www.celestron.de
G
M
B
H
– EN ver. 07/2019 –

2© Baader Planetarium GmbH | 2019 3
Instruction manual: Baader Diamond Steeltrack®
Dear Customer,
Thank you for the purchase of a Baader Diamond
Steeltrack®(BDS) Focuser. In this manual (valid for all
three BDS-Versions) we explain the functions of these
high-quality focusers. Please read the instructions
carefully. Wrong handling may void the warranty.
Technical Data for
all BDS focusers
Drive System:
• True diamonds form a micro-geared high precision drive system never ac-
complished before
• In comparison to conventional crayford or rack & pinion drives, this micro-ge-
ared movement has zero backlash, zero cogging, and zero exure
• Diamond Steeltrack®2" focusers lift a payload of 6 kg (13 lbs) straight up,
without slipping and without excessive bearing preload (bearing preload can
be increased further if necessary)
• Bearing system utilizes unbreakable Instrument Grade Roller-Bearings ins-
tead of simpler Ball Bearings – handles higher loads with greater rigidity and
accuracy. No Teon-pads anywhere
• 1:10 Stainless Steel ne-focus mechanism, ready for attachment of the opti-
onal Diamond Steeldrive temperature-compensating motor drive system
• Detachable drive block assembly is reversible for right hand or left hand -
ne-focus operation and for attaching the Steeldrive II motor block
• Shortest possible mechanical design achieves optimum balance between
focuser height (backfocus) and rigidity requirements
• Zero shift locking knob to precisely stop any movement without affecting
optical axis adjustment
Focusing Drawtube:
• Each bearing individually adjustable for pre-
cise alignment of mechanical vs. optical axis
• Ultra-hard subzero coated bearing races –
precision milled and much harder than anodizing or
stainless steel
• Oversized 55 mm inner clear diameter, to prevent vignet-
ting, with anti-reection knife-edge bafes
Clamping System:
• S58 Dovetail ring-clamp built into focusing tube for ac-
cepting optional T-2 / M48 / M68 and other S58 direct-
thread adapters to enable direct thread connection of ac-
cessories and cameras without 2" clamp
• 2" eyepiece clamp with hardened bronze clamp ring
(length of clamp: 12.5 mm / ½") included as standard
• Optionally available: 2" Baader S58 Clicklock®-clamp
(# 2956258) w. integrated S58 dovetail (added length:
16mm / 5/8 inch)
• Two auxiliary threads (M60x1 and
M55x0,75) cut into the RT & NT
focusing-tube for attachment
of dedicated eld atteners
or focal reducers/correctors
Table of Contents
Technical Data for all BDS ............................................................................... 2
BDS-RT: Scope of Supply & Dimensions ........................................................ 4
BDS-SC: Scope of Supply & Dimensions ........................................................ 6
BDS-NT: Scope of Supply & Dimensions ........................................................ 8
Diamond Steeltrack®drive block .................................................................. 10
Switch left-hand / right hand ......................................................................... 11
Adjusting drawtube to optical axis ................................................................ 12
BDS-RT: Accessory mounting........................................................................ 14
All BDS: Optional Steeldrive II motor focuser + accessories ......................... 15
Maintenance, Warranty and Disclaimer.......................................................... 16
BDS Diamond
pressure plate
Imaging with
BDS-RT, BBHS Mirror
and Morpheus 76°
BDS-NT with
Pushx Adapter
BDS-SC and Skyris

4© Baader Planetarium GmbH | 2019 5
Instruction manual: Baader Diamond Steeltrack®
BDS-RT: Dimensions
All measurements in mm
BDS-RT (# 2957210 | 80 mm focus travel)
Baader Diamond Steeltrack®for Refractors
Features
1. M68 x 1atelescope adapter
2. Ø 88 x 7 mm dovetail to adapt
various telescope adapters.
To access, M68 telescope
adapter must be removed by
loosening 6 x M5 screws
3. Integrated 2" standard clamp
4. 6 x M2,5 headless setscrews. Loosen with included
1.3 mm Allen wrench to detach the integrated 2" stan-
dard clamp, and to mount the optional 2" BDS S58 Clicklock®Clamp
(#2956258), respectively T-2, M48 or M68 adapters (#2957202, -04, -06)
5. 5 x M5 screws for M5 threads to mount accessories (see page 14)
6. Adjustment screws: 4x headless setscrews, 2x rounded cap screws
(instructions see page 12/13)
7. Engraved index scale: 0 – 80 mm, 1 mm steps
1
2
3
4
6
6
7
5
BDS-RT
top view
(not visible)
BDS-RT
side view
with optional
S58 ClickLock
with optional
M48 adapter

6© Baader Planetarium GmbH | 2019 7
Instruction manual: Baader Diamond Steeltrack®
BDS-SC/HD (# 2957220 | 30 mm focus travel)
Baader Diamond Steeltrack®for Schmidt-Cassegrains
Features
1. Adapter for mounting onto 2" UNC
threads such as Celestron SC/HD or
Meade telescopes
2. Adapter for mounting onto Celestron
3,3" threads such as Celestron C11 /
C14 telescope. To access the thread,
adapter #1 has to be removed
3. Ø 88 x 6 mm dovetail to adapt various
telescope adapters. To access, remove
2"/3.3" adapter by loosening 6 x M5 screws)
4. Integrated 2" standard clamp
5. 6 x M2,5 headless setscrews. Loosen with included 1.3 mm Allen wrench
to detach the integrated 2" standard clamp, and to mount the optional 2"
BDS S58 Clicklock®Clamp (#2956258), respectively T-2, M48 or M68 ad-
apters (#2957202, -04, -06)
6. Adjustment screws: 4x headless set screws, 2x rounded cap screws
(instructions see page 12/13)
7. Engraved index scale: 0 – 30 mm, 1 mm steps
1
2
3
5
4
6
7
BDS-SC
top view
BDS-SC
side view
(not visible)
BDS-SC/HD: Dimensions
All measurements in mm
with optional
M48 adapter
with optional
S58 ClickLock
measurements
with and without
3.3“/2“ reducer

8© Baader Planetarium GmbH | 2019 9
Instruction manual: Baader Diamond Steeltrack®
BDS-NT (# 2957230 | 40 mm focus travel)
Baader Diamond Steeltrack®for
Newtonian telescopes
Features
1. Baader VersaBase for perfect t onto most tube
diameters (≥ 200mm Ø)
2. Square POM-washers with radius
3. 2x 1.5mm strip-shims (Spacers) – can be ad-
ded or removed depending on tube diameter.
4. Radial V2A sliding bolts
5. Ø 88 x 5 mm dovetail to adapt various teles-
cope adapters. To access, VersaBase must be
removed by loosening screws (see #9)
6. Integrated 2" standard clamp
7. 6 x M2,5 headless setscrews. Loosen with
included 1.3 mm Allen awrench to detach the
integrated 2" standard clamp, and to mount
the optional 2" BDS S58 Clicklock®Clamp
(#2956258), respectively T-2, M48 or M68 ad-
apters (#2957202, -04, -06)
8. Recessed area allows the use of very short 1¼" reducers, e.g.
Baader Pushx adapter (#2408151) with 1mm optical height
9. Focuser can be removed and/or rotated on VersaBase by loosening 8x hex screws
M4 (two screws on each side)
10. Adjustment screws: 4x headless set screws, 2x rounded cap screws (instructions
see page 12/13)
11. Engraved index scale: 0 – 40 mm, 1 mm steps
1
8
5
Technical drawing of Baader VersaBase can be found at the
download-section on: www.baader-planetarium.com/en/bds-nt
BDS-NT mounting instructions in 9 steps:
www.youtube.com/watch?v=6_51YPcFPvQ
7
6
2
3
4
9
10
11
BDS-NT
top view
BDS-NT
side view
(not visible)
BDS-NT: Dimensions
All measurements in mm
with optional
M48 Adapter
with optional
S58 ClickLock

10 © Baader Planetarium GmbH | 2019 11
Instruction manual: Baader Diamond Steeltrack®
Diamond Steeltrack®drive block
(Example: BDS-RT Diamond Steeltrack®)
Changing drive block for left-hand use
(Example: BDS-RT Diamond Steeltrack®)
1
6 6 7
4
2
5
1. Tension brake: This screw works as brake for the diamond-coated drive axis.
There is a rotary-bearing mounted brake-pad between drive axis and screw.
This way, no pressure is applied onto the steel-plate which might otherwise
cause tipping when the screw is tightened. BDS are rigid and slip-proof; they
don’t need a locking screw which presses onto tube or drive plate. Because
of this construction motor focusers can be used any time, without risking
tipping of the image plane.
2. Pressure screw: Adjusts the contact pressure between the diamond-co-
ated axis and the steel-plate. By factory default, it holds up to 6 kg lifting
force. You can tighten it further, but then the focuser will not run as smooth-
ly. This 6-kg-setting was chosen for photographic use. You can untighten it
for visual use to make the focuser even more smooth-running.
3. Screws for factory-setting of the optical axis. You should not change
these settings. For further information see page 12/13
4. M6 sealing screws: These screws have no function; you can remove them
to attach additional accessories.
5. Attachment screws connecting the reduction gear unit with the BDS-bo-
dy. To switch left/right-hand use, see page 11
6. Coarse focuser: One turn equals approx. 22 mm of movement
7. Fine focuser: One turn equals approx. 2 mm of movement
3 .1
3.2
Lay the focuser horizontally on a at table. Open and remove only the four
marked screws (see also #5 on page 10) with a 2.5 mm metric Allen wrench.
Now lift the whole drive block assembly gently. Make sure that the focuser
doesn´t slip away. Rotate the drive block by 180° and put it carefully back in
place. Then put the screws back in place and tighten them carefully with the
long side of the Allen wrench using only two ngers. Extensive force on the
screws may destroy the threads. Afterwards check the alignment and if the
focuser runs as smooth as before.
For Dos and Don’ts, please see also alignment instructions (page 12/13)

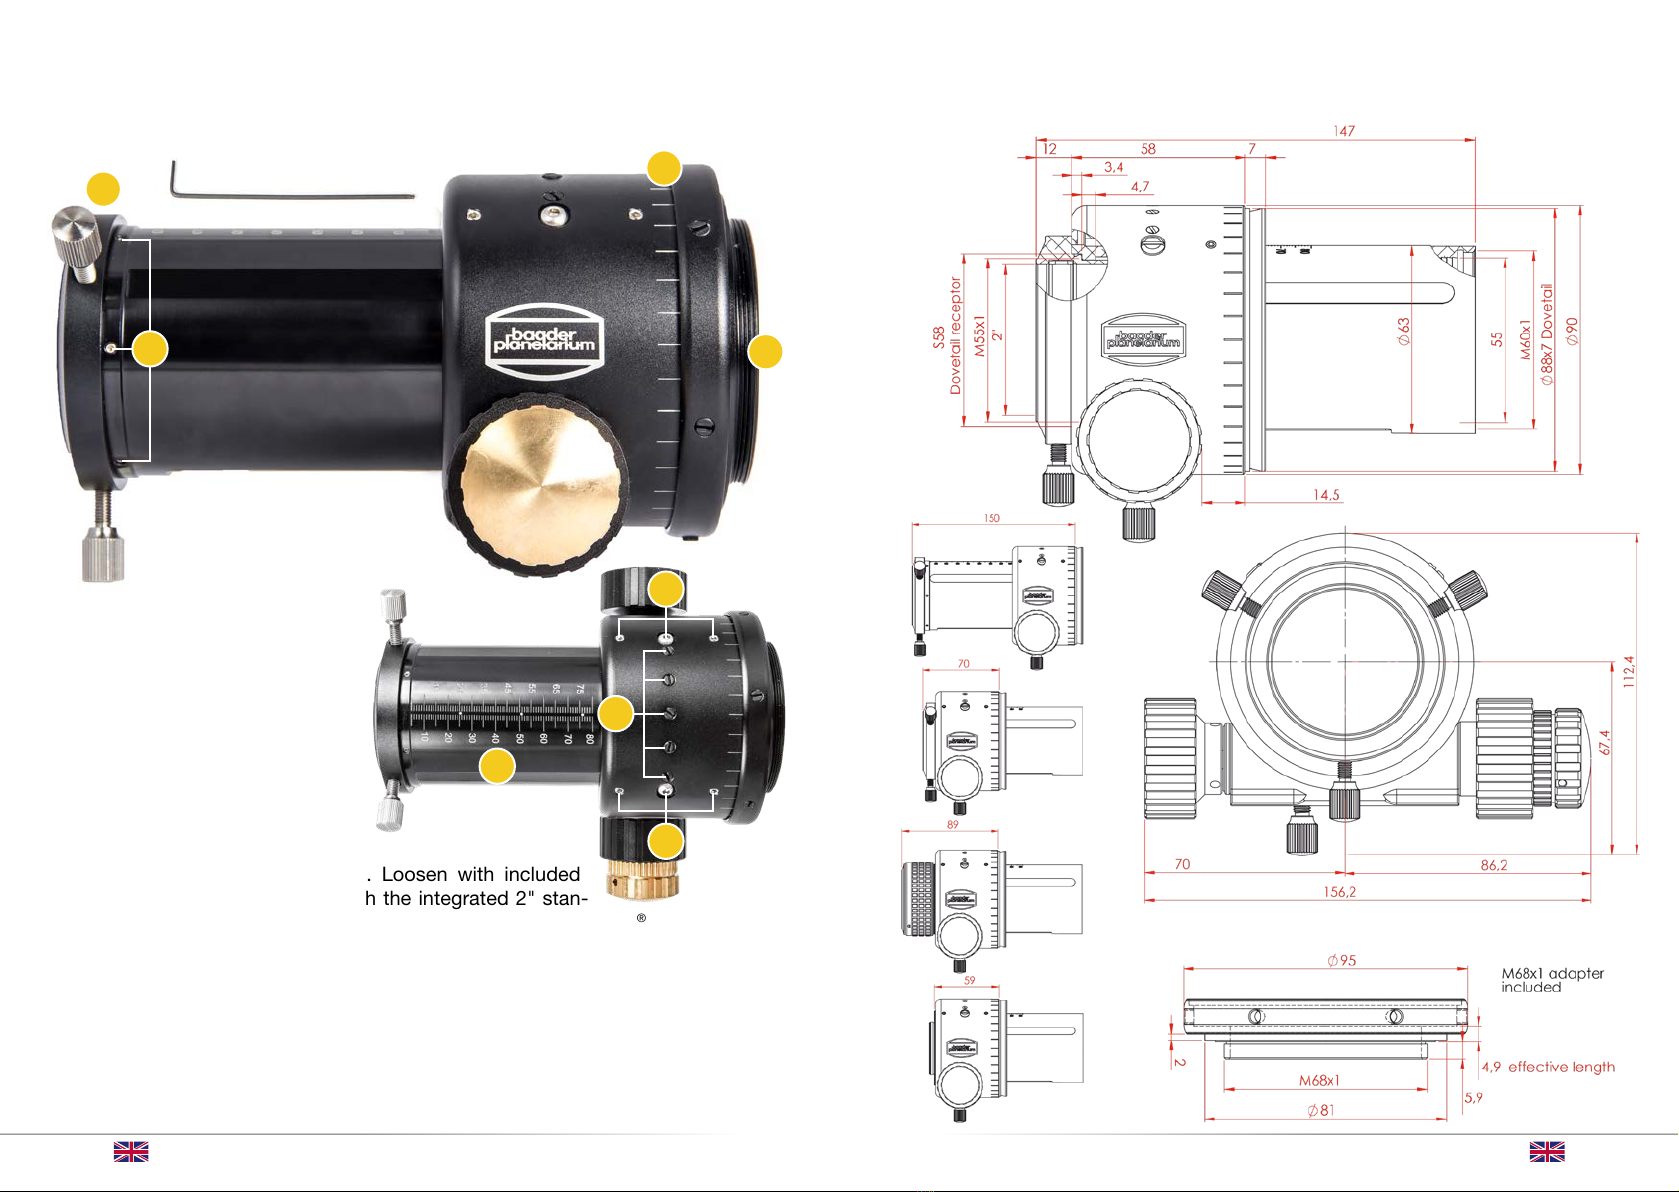
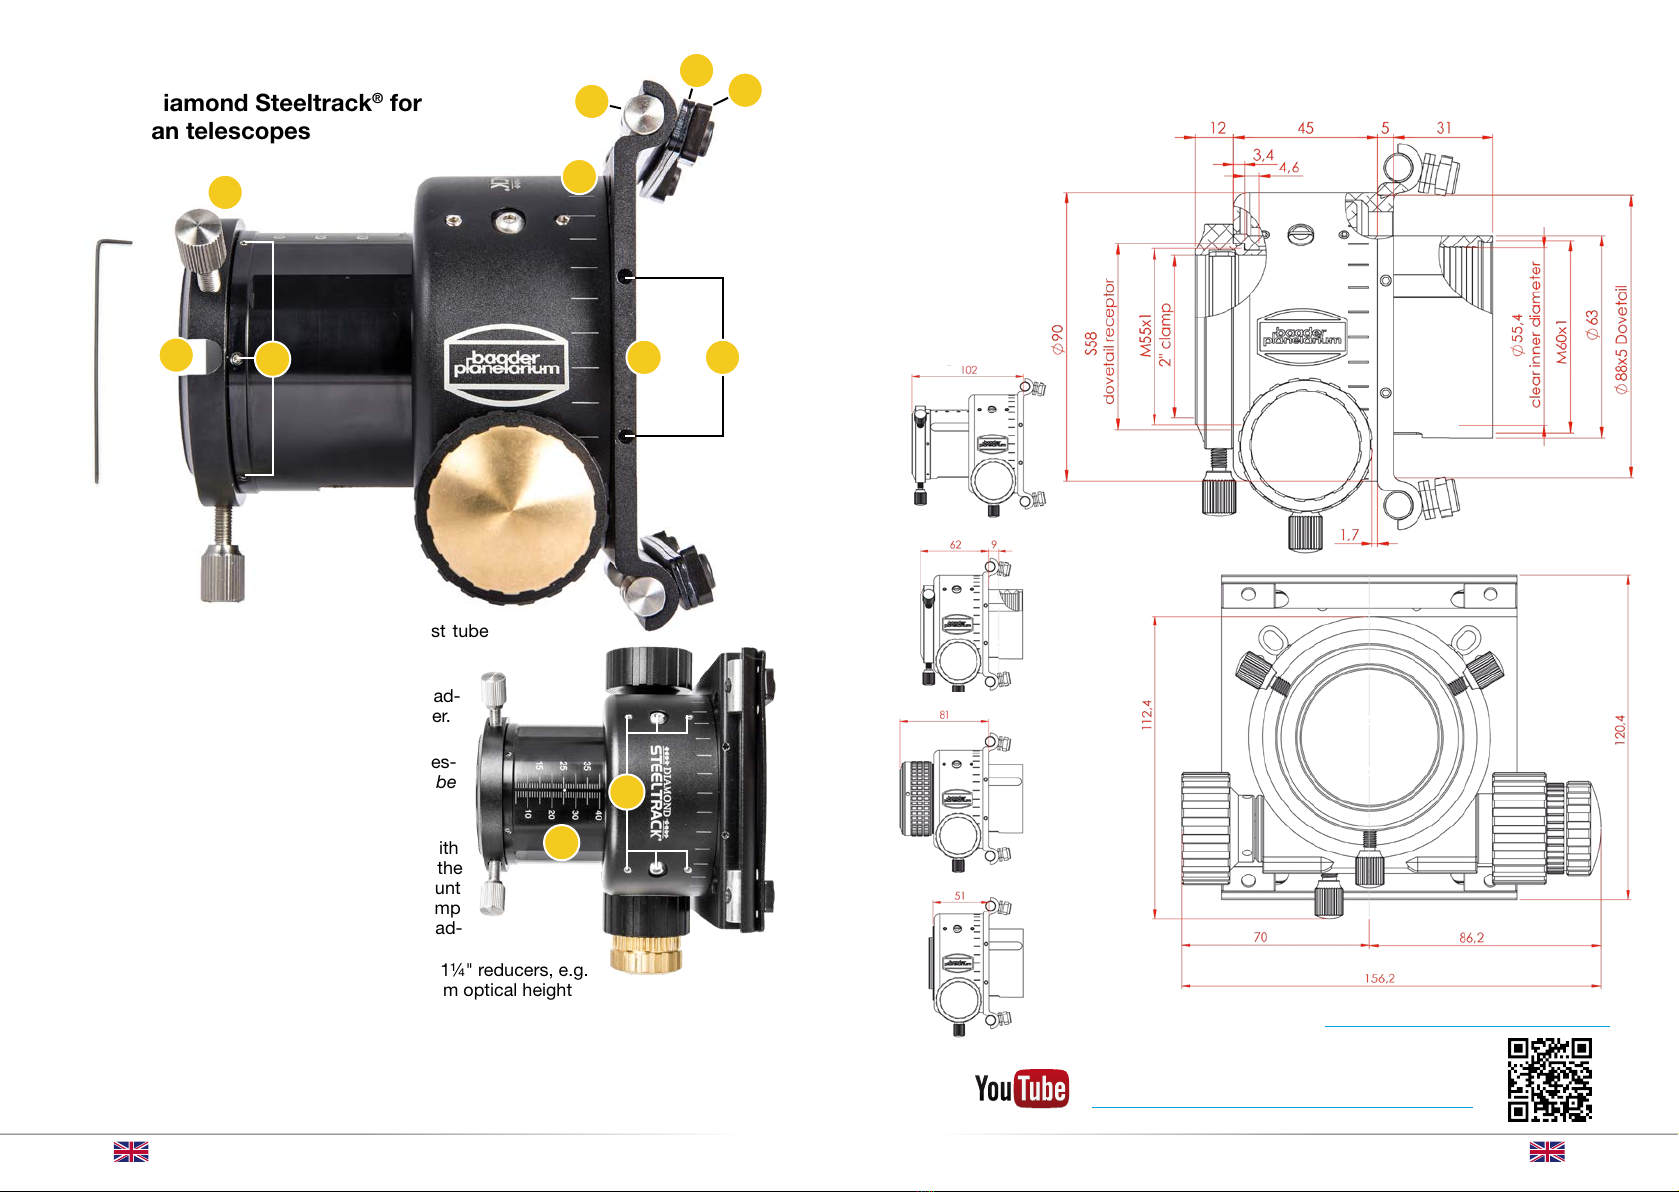
12 © Baader Planetarium GmbH | 2019 13
Instruction manual: Baader Diamond Steeltrack®
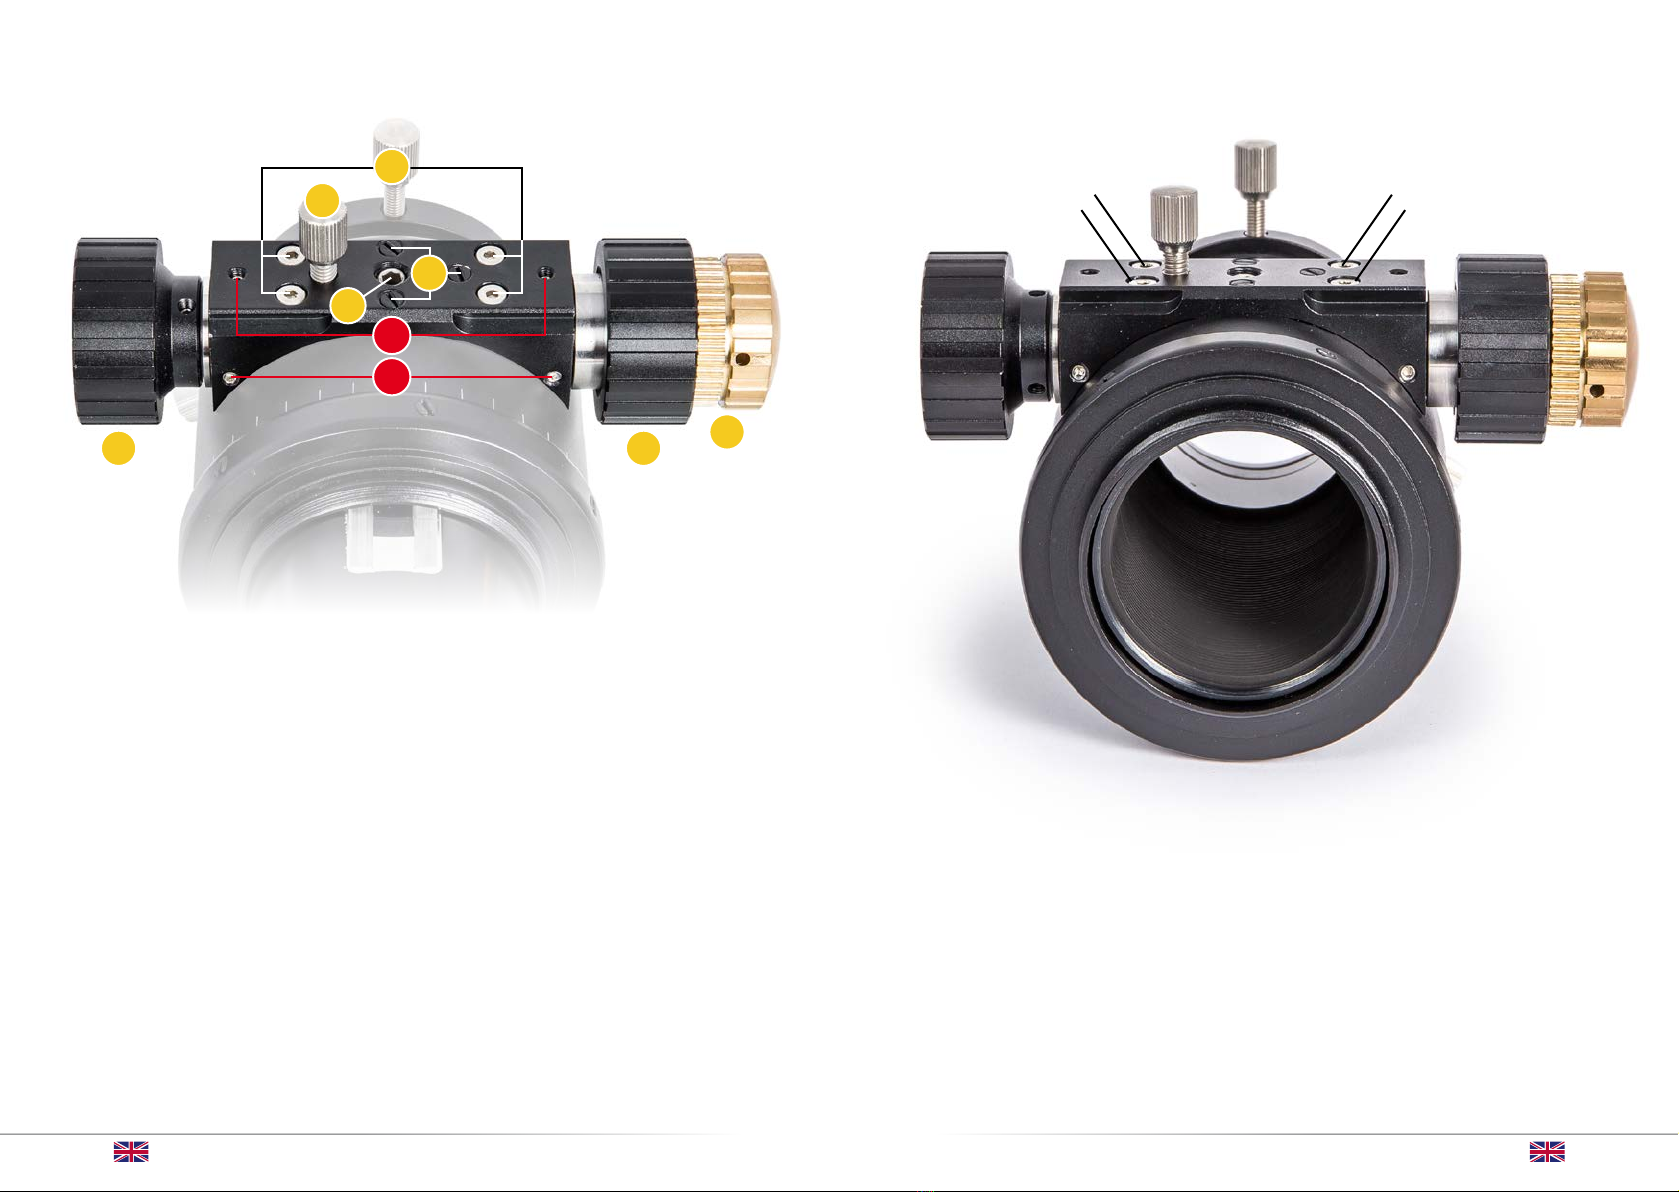
All BDS: adjusting the drawtube to align
with the optical axis of your telescope
Baader Diamond Steeltrack®(BDS) focusers are unique in their ability to be ne-aligned (collimated),
enabling critical users to achieve accurate alignment, or ‘squaring-on’ of the focuser to the optical
axis. This is particularly useful for imagers who require the imaging plane to be accurately square
to the optical axis in order to produce sharp stars out to all corners of their images. Critical users
of SCT telescopes will also nd this alignment capability useful, to give them the necessary degree
of freedom to nally achieve accurate alignment of the focuser axis to the optical axis (alignment of
the focuser axis to the center of the secondary mirror).
Every BDS focuser is perfectly precision aligned at our factory to be square to its mounting base.
Most users will nd that this nominal alignment is sufcient to give very good performance with
most commercially produced telescopes and that adjustment of the focuser alignment is not nee-
ded or desired. This is particularly the case for visual observers, where precise squaring-on of an
eyepiece is not needed nor even detectable.
Warning, please note:
• The following adjustment procedure is provided for those users who require an accurate alignment
(‘squaring-on’) of the focuser to the optical axis. We do not recommend it for most visual uses.
• Before attempting any adjustment, we recommend that you rst read through these instructions
completely in order to familiarize yourself with the process.
• Adjusting a focuser can be very tricky. We recommend always making only small adjustments /
turning screws by a small amount in order to be able to gradually home in on the perfect setting.
Too large adjustments will give rise to a result that is uncontrollable.
• Right at the beginning of the procedure, you should rst take note of the force required to pull
out the focuser tube against the existing contact pressure. This force should not be substantially
exceeded to avoid damaging the mechanism.
• During the rst adjustment procedure, no heavy accessories should be attached – the focuser
tube is loose and could slip out. Once you are familiar with the procedure and you know how
the focuser behaves you can dare to leave your camera on the focuser while adjusting. Please
note that Baader Planetarium will not be held responsible for damages to your equipment due
to slipping of the drawtube.
• All BDS focusers have been designed so strong to carry heaviest loads without danger to any
of the components. We are convinced that any damage done to bearings or drive mechanism
represents a clear sign of improper handling. In general screws should never be tightened too
rmly as mechanical parts, such as bearings, could be subjected to high loads and thereby
destroyed. Such treatment may void the warranty and result in costly repairs.
Please read the following thoroughly and only proceed with the alignment procedure if you
feel well informed about what you are doing.
Tools Required:
1. Metric Hex Keys (2mm, 2.5mm, 4mm)
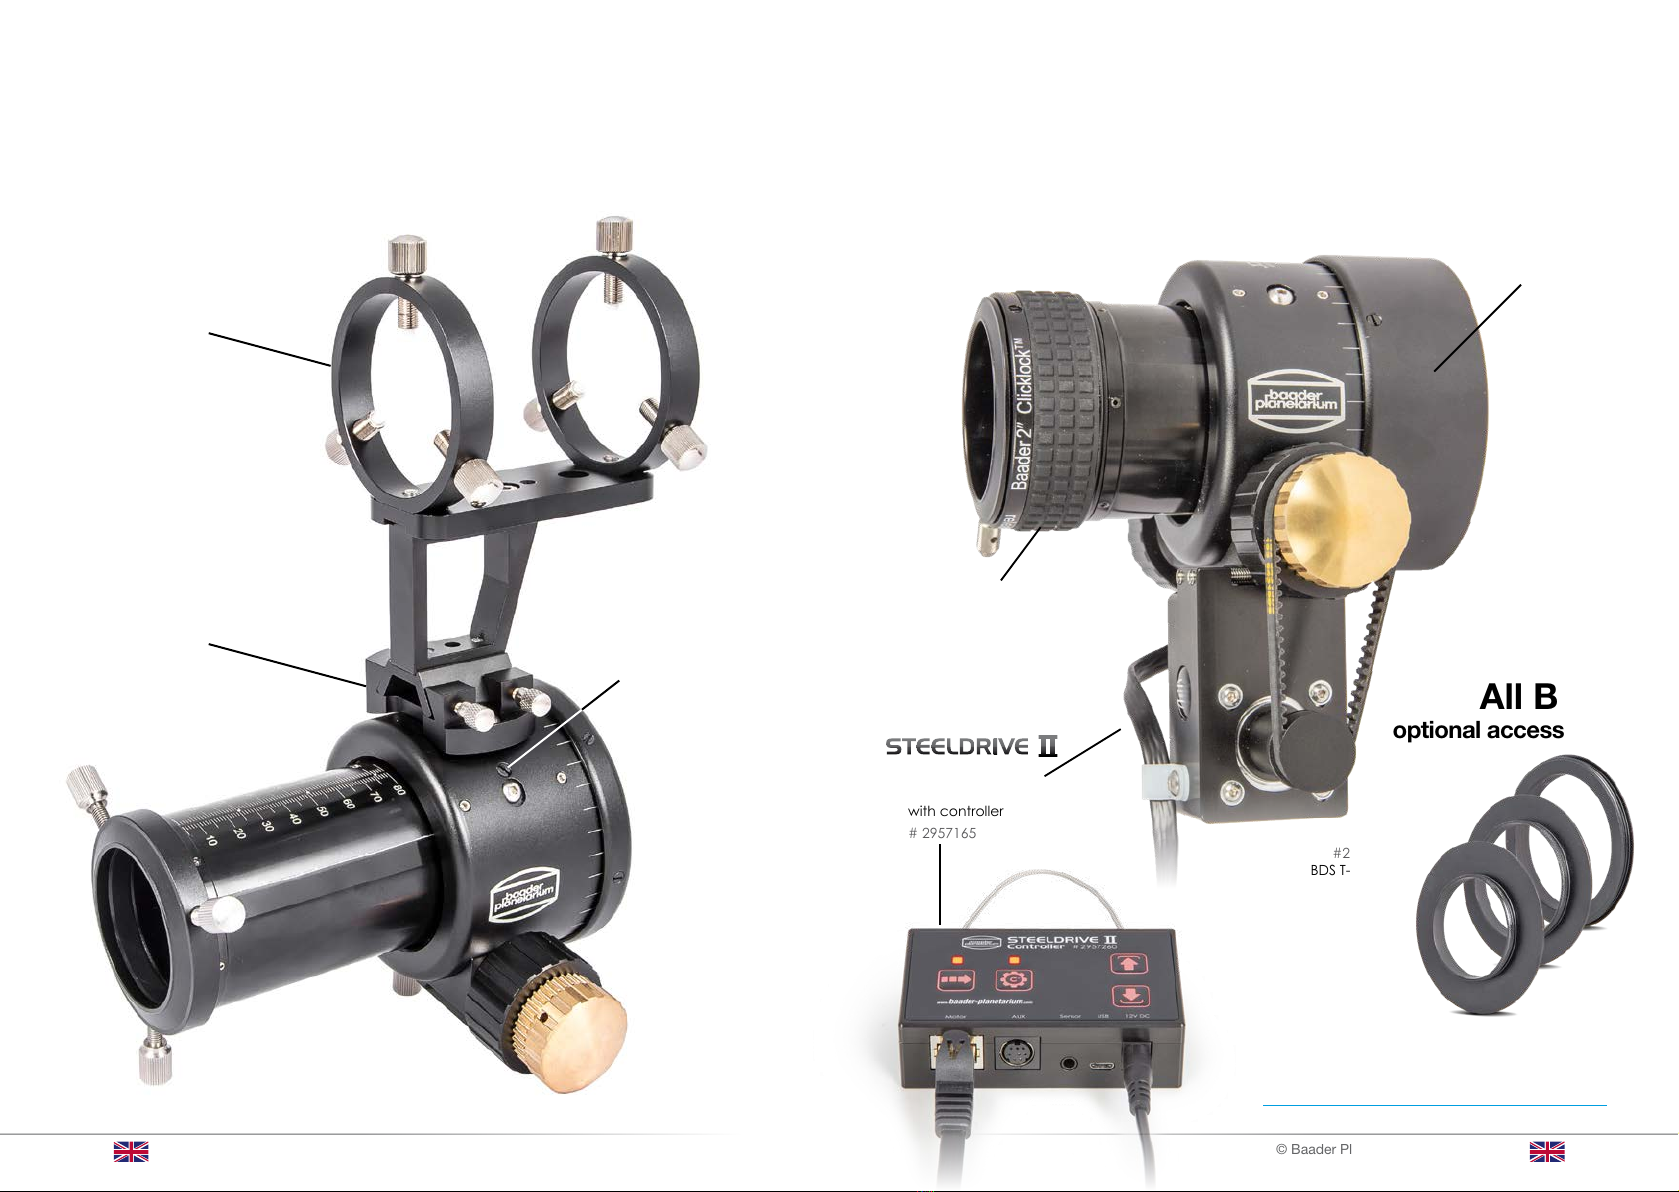
2. Collimation Tool: We recommend the use of a collimation tool to monitor changes in focuser
adjustment and to attain accurate alignment of the focuser axis to the optical axis. A laser colli-
mator such as the Baader Mark III LaserColliTM (#2450343) is ideal for this purpose (RT/NT only).
Adjustment procedure:
Screws marked No.8 are holding the bearing block in place which fastens all four roller-bearings.
These two screws are the pivot point for the bearing block. Screws no. 6-9 are the bearing adjust-
ment screws we are aiming at for this instruction. The focuser is set to a certain pressure. Tightening
down the adjustment screws will increase the pressure even more. So before you tighten something
you always must at rst release pressure at the other side (means: when you for instance tighten
screws 5+7 or 4+6 at the same time, you must first release the screw 8 at the same side).
Up and Down
A: Shifting the drawtube up on the CCD side and down on
the telescope side:
• Loosen screws 4 and 5 by ½ turn
• Tighten screws 6 and 7 by ½ turn
B: Shifting the drawtube down on the CCD side and up on
the telescope side.
• Loosen screws 6 and 7 by ½ turn
• Tighten screws 4 and 5 by ½ turn
Sideways
(This is not very handy to do as the up and down positi-
on will always simultaneously change slightly. Only VERY
slight changes should be made)
C: Shifting the drawtube sideways to the left
• Loosen screws 4 and 7 by ¼ turn
• Tighten screws 5 and 6 by ¼ turn
D: Shifting the drawtube sideways to the right
• Loosen screws 5 and 6 by ¼ turn
• Tighten screws 4 and 7 by ¼ turn
More adjustment typically is not necessary. We recommend not to change the factory centering.
Nevertheless it is possible (as shown below). If you feel comfortable with what you are doing, you
can change the entire center position of the drawtube which we had set as factory setting. This may
only become necessary if your lens is not perfectly centered with your mechanics to a large degree.
Centering can be checked by putting a star in the center of your chip and rotating the focuser. If the
star circles on the chip your focuser is not fully centered to the lens. You may be able to tilt the lens
with the tip tilt screws. However, many scopes do not offer this possibility. Therefore the BDS offers to
displace the entire drawtube to a very small degree, for nding the new optical/mechanical centerline.
You should make small iterative adjustments rather than doing one BIG change and ruin the hole adjust-
ment beyond return. Carefully watch out to not have the drawtube scratch against the outer housing.
Lifting/Lowering drawtube in parallel to the
focuser housing
E: Lifting the whole drawtube up
• Loosen screws 4-7 as well as 3.2 by ½ turn
• Tighten screws 3.1 by ½ turn as well as screws 2 and 1
by ¼ turn, then fasten screws 8 and 3.2 hand tight
Then check if every screw except 1 is tight and fasten it
hand tight if necessary. Check the lifting force and adjust
screw 2 until the payload does not slip if in vertical position.
F: Lowering the whole drawtube down
• Loosen screws 8, 3.1 and 3.2 by ½ turn as well as
screws 2 and 1 by ¼ turn
• Tighten screws 4-7 by ½ turn, then fasten all other
screws except 1 hand tight
Then check if every screw except 1 is tight and fasten it
hand tight if necessary. Check the lifting force and adjust
screw 2 until the payload does not slip if in vertical position.
In case the optimum adjustment has not yet been achieved, you should repeat the procedure. After
a short time, you will develop a feel for the interaction of the various adjusting screws. In each case,
make sure not to continue increasing the pressure in the same direction without relieving it in the
opposite direction accordingly, in order to avoid damage to the mechanics.
AB
BA
4 6
5 7
CD
DC
8
E E
FF
3 .1
3.2
2
1
4 6
8
5 7

14 © Baader Planetarium GmbH | 2019 15
Instruction manual: Baader Diamond Steeltrack®
All BDS: Steeldrive II motor focuser
(Example: BDS-SC Diamond Steeltrack®)
All Baader Diamond Steeltrack®focusers are equipped with a dovetail which al-
lows the mounting of the optional temperature compensating Baader Steeldri-
ve II motor focuser with controller (# 2957165). A mounting instruction is inclu-
ded with each Steeldrive II.
Only for BDS-RT
Baader Standard Base and further accessories
To mount the Baader Standard Base, remove two of the 5 x M5 screws (see also
#3 on page 4). These screws serve only to cover the M5 threads that have been
drilled in the BDS-RT housing to allow attachment of further accessories.
All BDS:
optional accessories
optional Baader
Steeldrive II motor focuser
with controller
# 2957165
optional Baader 2"
S58 ClickLock®Clamp
# 2956258
Example: BDS-SC
Diamond Steeltrack
# 2957220
#2957202
BDS T-2 adapter
#2957204
BDS M48 adapter
#2957206
BDS M68 adapter
Discover all telescope- or camera-
sided BDS-adapters on:
www.baader-planetarium.com/en/bds
Baader MQR III / IV
Finder bracket
# 2457020 / # 2457030
(includes Standard
base # 2457000)
5 x M5 screws with M5
thread for mounting
further accessories
Baader Standard
Finder base
# 2457000

Maintenance
Baader Diamond Steeltrack®focusers require very little maintenance.
The focusers should be kept clean to prevent dust and dirt to accumulate on
the tracks. If the tracks are found to be dirty, clean with a soft cloth and isopro-
pyl alcohol.
The focuser should not be subjected to temperatures > 80° C (176° F). This is
the max. temperature for the grease specication used.
The Baader Diamond Steeltrack®is greased for lifetime. No re-greasing is
necessary. Please note: do not apply any grease onto the roller track or onto
the Diamond pressure plate.
Product care
After years of intensive use, the lubricating grease may solidify. However, even
solidied grease will not have any signicant affect on the function of the system.
The color anodizing of the Baader Diamond Steeltrack®is as resistant to aging
as possible using state-of-the-art methods of electro-plating. The color, never-
theless, may change slightly if it is exposed to UV-radiation for years. UV-radi-
ation is exceptionally intense if for example the focuser is positioned behind a
window directed south in the same setting for years.
Every shop that features a window display facing the sun experiences this ef-
fect. Leather shoes, textiles, etc. fade within a short period of time – anodized
metallic surfaces suffer the same effect. For this reason, most shop windows
are tted with UV-absorbing lm, to prevent the displayed goods from fading
within a short while. Few private household windows incorporate UV protecti-
on and we recommend that you protect the Baader Diamond Steeltrack®from
prolonged exposure to UV.
Warranty and Re-Alignment / Repairs
Attempting to tweak the alignment of your BDS-focuser in regard to the optical
axis of the telescope with brute force or by not following the instructions on
page 12 may void the warranty. We certainly will be able to repair your Diamond
Steeltrack®, but we may have to charge you for the repair.
© 2019 Baader Planetarium. All Rights reserved. Products or instructions may change without notice
or obligation. Images and illustrations may differ from the original products. We reserve the right of
errors. Reproduction of this instruction manual, complete or in parts, only with written permission by
BAADER PLANETARIUM
Zur Sternwarte 4 •D-82291 Mammendorf •Tel. +49 (0) 8145 / 8089-0 •Fax +49 (0) 8145 / 8089-105
www.baader-planetarium.com •kontakt@baader-planetarium.de •www.celestron.de
G
M
B
H
This manual suits for next models
5
Table of contents
Other Baader Planetarium Accessories manuals

Baader Planetarium
Baader Planetarium MicroStage II User manual

Baader Planetarium
Baader Planetarium HYPERION Universal Zoom MARK IV User manual

Baader Planetarium
Baader Planetarium Stronghold User manual

Baader Planetarium
Baader Planetarium Alan Gee II User manual

Baader Planetarium
Baader Planetarium Steeldrive II Guide