BaBylissMEN SUPER-X METAL Series User manual

SUPER-X METAL SERIES
15 IN 1 MULTI TRIMMER
7200U
SAFETY CAUTIONS
• This appliance should only be used as described within this
instruction book. Please retain for reference.
IMPORTANT CHILD SAFETY
• ALWAYS keep out of the reach of children (during and after
use).
• This appliance should not be used, cleaned or maintained
by children.
• Always take extra care if used on children or near children.
• Do not use on very young children.
IMPORTANT SAFETY
• This appliance can be used in the bath or shower.
• UKOnly:Donotchargethisapplianceinthebathroom.
• Outside the UK: If using the appliance in a bathroom, unplug
after use as the proximity of water can be dangerous even
if the appliance is switched off. For additional protection the
installation of a residual current device (RCD) with a rated
residual operating current not exceeding 30mA is advisable
in the electrical circuit supplying the bathroom. Ask your
installer for advice.
CAUTION: Keep the power cord and the appliance dry.

• Always inspect the appliance before use for noticeable signs
of damage. Do not use if damaged or if the appliance has
been dropped. In the event of damage contact the Conair
Customer Care Line (refer to ‘UK After Sales Service’ section
for further information).
• Do not use the appliance if the charging adaptor or lead
is damaged. In the event of damage, discontinue use
immediately. If the charging adaptor or lead is damaged, it
must be replaced by the manufacturer. Return the appliance
to the Customer Care Centre (refer to ‘UK After Sales Service’
section for further information). No repair must be attempted
by the consumer.
• Only use the attachments supplied with this appliance.
• WARNING! For the purposes of recharging the battery, only
use the detachable charging supply unit provided with this
appliance (CA92). This symbol indicates there is a
detachable power supply for means of charging.
• Do not leave the appliance unattended when switched on.
• Do not place the appliance on any surface whilst in operation.
• Special care is required when using the appliance close to
the ears, eyes and face.
• This appliance should not be used by adults whose reduced
physical, sensory or mental capabilities, or whose lack of
experience and knowledge, might cause a hazard, unless
they have been correctly instructed to understand the safe
use and hazards involved and are adequately supervised.
• This product contains a Lithium Ion rechargeable battery
that is not to be removed from the appliance for charging.
The batteries in this appliance are non-replaceable. Batteries
must be disposed of safely at the end of life. Please take to a

recycling centre for safe disposal.
• The supply terminals are not to be short circuited.
• For indoor, household, domestic use only.
• This product complies fully with all appropriate EU and UK
Legislation and the standards relevant to this type and class
of appliance. We are an ISO9001:2015 certied company
that continually evaluates our Quality Management System
performance. If you have any queries regarding product
safety and compliance, please contact the Conair Customer
Care Line (refer to ‘UK After Sales Service’ section).
INSTRUCTIONS FOR USE
IMPORTANT! Only use the adaptor and attachments supplied with this
appliance.
General
• Always inspect the appliance before use to ensure the trimmer blades
are free from hair, debris etc.
• Use on clean, dry hair that has been combed until tangle-free.
Oiling Instructions
• For optimum cutting performance, it is highly recommended to oil the
blades after every use.
• When using the oil for the rst time, unscrew the cap and cut off the very
end of the plastic tube with a pair of scissors.
• Remove the blade guard and switch the appliance on.
• Holding the trimmer at a 45 degree angle, gently squeeze the oil tube and
apply 2 drops directly onto the blades.
• Leave the unit on for a further few seconds to allow the oil to thoroughly
spread along the length of the blades.
• Switch off the unit and remove any excess oil by gently dabbing with a
cloth before using on hair.

Charging the appliance
• This trimmer is equipped with lithium ion batteries.
• Before using for the rst time, the appliance should be fully charged
continuously for 3 hours. This initial super-charge ensures optimum
power performance to ensure smooth fast trimming every time. Maximum
battery capacity will only be reached after 3 charging and discharging
cycles.
• Plug the charging adapter into a suitable mains power socket and switch
on at the wall. A blue LED light will continuously run up the product to
indicate the trimmer is charging. When the battery is fully charged the
LED light will stop running up the product and all 5 charging lights will
remain alight.
Note: Always place the trimmer in the base with the ‘I/0’ switch in the OFF
position.
• When the trimmer is running low on charge, the bottom LED charging
light will ash to warn there is approximately 15 minutes of battery use
remaining. A 3 hour charge will provide 5 hours use. A 20 minute quick
charge will provide approximately 40 minutes use.
• If all 5 charging lights start to ash rapidly (more than 4 ashes per
second) then the appliance is faulty. If this happens then please stop
charging and remove the adapter from the mains and contact the Conair
Customer Care Line. (See ‘UK After Sales Service’ section for further
information).
Preserving the batteries
In order to maintain the optimum capacity of
the rechargeable batteries, the trimmer should
be fully discharged and then recharged for 3
hours every 6 months.
Changing the Magnetic Heads
• Before changing the heads, ensure the
appliance is switched off.
• To remove a head, hold the handle of the
appliance with one hand, hold the head with
the other and simply pull up to release the
head from the unit.

• To attach a head, align the slots on the head with the ribs on both sides of
the trimmer unit as shown below, until it meets the magnet and is securely
held in place.
Comb Guides
This appliance is supplied with 11 comb guides for use with the Precision
Trimmer and Power Trimmer blades.
Note: The Precision Trimmer and Power Trimmer can be used without any
comb guides and will cut to a length of 0.2mm.
Attaching the comb guides to the trimmer
• Slide the trimmer teeth and the top of the blades into the space under
the comb guide. (Fig. 1)
• Click the guide into position by gently pressing the back of the guide
down onto the back of the blade. (Fig. 2)
• The comb guide should click under the back of the metal blade.
Using the trimmer without the comb guide
The Precision Trimmer and Power Trimmer
blades can be used to edge and detail or to get
a much closer cut (0.2mm).
• To remove the comb guide, squeeze the sides
of the comb guide, which will release the back
from the blade.
• Lift the guide away.
Fig. 1. Fig. 2.

Trimming
Using the Precision Trimmer with 6-Position Stubble Comb Guide
•
Attach the 6-position comb guide and select the required length (1-3.5mm)
.
• Switch the trimmer on.
• Hold the trimmer with the teeth pointing upwards, yet at against the
skin.
• Move the trimmer upwards and outward through the hair, against the
direction of hair growth.
• The trimmer will work most efciently when cutting through hair at its
own speed.
• Never switch the appliance off whilst in the hair.
Using the Precision Trimmer with the Beard Comb Guides
• Attach one of the four comb guides (5mm, 6mm, 7mm or 8mm).
• If you require more than one cutting length, start with the longest length
rst.
• Switch the trimmer on.
• Hold the trimmer with the teeth pointing upwards, yet at against the
skin.
• Move the trimmer upwards and outward through the hair you wish to
trim.
• To blend-in a shorter length use a shorter length comb guide and use in
the same way as above.
• The trimmer will work most efciently when cutting through hair at its
own speed.
• Never switch the appliance off whilst in the hair.
Using the Precision Trimmer with the Body Comb Guides
• Attach one of the two comb guides (3mm or 4mm).
• If you require more than one cutting length, start with the longest
length rst.
• Switch the trimmer on.
• Hold the trimmer with the teeth pointing upwards, yet at against the
skin.
• Move the trimmer upwards and outward through the hair, against the
direction of hair growth.
• Make sure to be particularly careful when trimming sensitive areas.

• The trimmer will work most efciently when cutting through hair at its
own speed.
• Never switch the appliance off whilst in the hair.
Using the Precision Trimmer with 2-Position Eyebrow Comb Guide
• Attach the 2-position comb guide and select the required length (3mm
or 5mm).
• Switch the trimmer on.
• Move the comb guide through the hair you wish to remove following the
direction of hair growth until you reach the desired length.
• The trimmer will work most efciently when cutting through hair at its
own speed.
• Never switch the appliance off whilst in the hair.
Using the Power Trimmer with the Hair Comb Guides
For an all over even cut:
• Attach one of the three comb guides (9mm, 12mm or 16mm).
• Switch the trimmer on.
• Starting at the nape of the neck, hold the trimmer with the teeth pointing
upwards, ensuring that the comb guide is resting at against the head.
• Slowly move the trimmer upwards and outwards through the hair towards
your crown, against the direction of the hair growth. The comb guide will
help to lift the hair and the blades will cut the hair at the desired length.
• Once the desired length is achieved at the back of the hair, start cutting
the top and sides.
• Hold the trimmer to the front of your hair with the teeth pointing towards
the back of your head, and move the trimmer towards your crown.
Repeat as necessary, moving in rows from the front and the sides of your
head to the back.
• You should achieve an even length cut all over your head.
For a shorter back and sides, with length on the top:
• Attach one of the three comb guides (9mm, 12mm or 16mm).
• Use a longer length comb guide for the top of your hair.
• Switch the clipper on and the blades will start to move.
• Hold the trimmer to the front of your hair with the teeth pointing towards
the back of your head and move the trimmer towards your crown. Repeat

as necessary, moving in rows from the front and the sides of your head to
the back.
• If you then wish to take the back and sides of your hair to a shorter
length, switch off the appliance and attach a shorter comb guide.
• Starting at the nape of the neck, with the comb guide at against the
head, move the trimmer upwards and outwards over the area you want
to take shorter.
• Repeat on the sides of the hair, starting with the teeth of the trimmer
pointing upwards and comb guide at against the area above the ear
again moving the trimmer upwards and outwards.
Outlining
With the Precision Trimmer and Power Trimmer attachments
• To tidy up the edges around your cut e.g. neckline and sideburns, detach
the comb guides.
• Hold the appliance upside down, so the front of the trimmer is facing
towards your head.
• Hold the trimmer blades straight on your sideburns or neckline and move
the trimmer blades downwards. This will give you a clean, smooth nish.
Using the Detail Foil Shaver
• Finish edges with a smooth, close shave result with the detail foil shaver
head attachment.
• Always ensure the foil is not damaged before each use.
• Switch the trimmer on.
• Move the shaver gently over the skin, applying minimal pressure and
shave in the direction of hair growth.
• Make sure to be particularly careful when shaving sensitive areas.
• Never switch the appliance off whilst in the hair.
Using the Nose & Ear Trimmer
• For the safe and easy removal of unwanted nose and ear hair use the
rotary trimmer head.
• Switch the trimmer on.
• Insert the trimmer into the nose or ear and gently move the trimmer in a
circular motion.
• Only use the trimmer at the entrance to the ear or nose. Do not use any
deeper, as this could cause injury.

• Never turn the trimmer off whilst in the nose and ear hair.
Waterproof
The trimmer, attachment heads and comb guides are 100% waterproof
and can be used in the shower and bath. Always ensure to clean and allow
the trimmer to dry after each use and before storing away. See ‘Cleaning
& Maintenance’ section.
CLEANING & MAINTENANCE
To maintain optimum performance, the appliance should be cleaned after
each use:
• Remove the comb guide after use. Rinse under running water and dry
thoroughly before storage or use.
• Remove the trimmer head after use. The heads are washable for easy
cleaning. Rinse under running water and dry thoroughly before storage
or use.
• Do not disassemble the blades.
• Periodically, it may be necessary to oil the blades. After cleaning, attach
a trimmer head, switch on and oil the blades using a few drops of the
lubricating oil supplied. Only use the lubricating oil supplied with the
appliance as this is specically formulated for high speed trimmers and
does not evaporate or slow the blades.
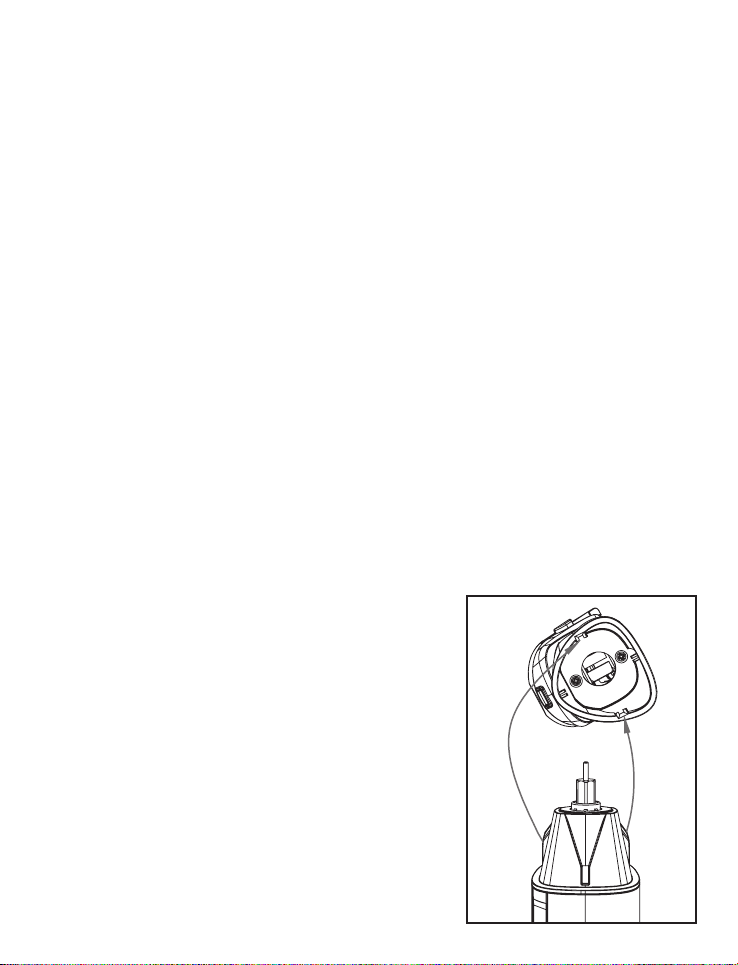
• For instructions on how to re-attach the head, please refer to ‘Changing
the Magnetic Heads’ section.
To clean the Detail Foil Shaver attachment
WARNING! Be careful not to push on the foils, they are delicate and can
easily be damaged.
• Rinse the shaver cutter and foil frame under running water or in a sink. Do not
use hot water. Use only warm or cold water.
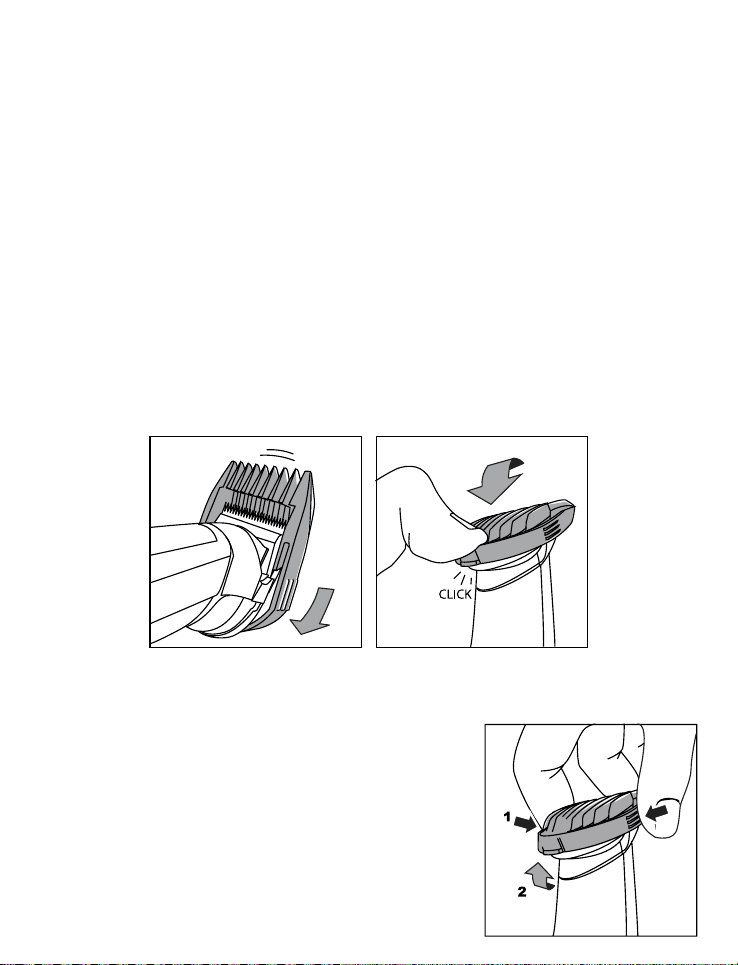
• After wet cleaning, allow the foil frame and cutters to air-dry before closing the
foil frame and shaver head. Replace shaver head back onto the shaver until
it clicks into place. Wipe the surface of the main unit with a dry towel. Do not
dry the foil area. Let the shaving head air-dry.
• The cutter can also be cleaned with a cleaning brush.
• If the body of the shaver becomes dirty, wipe off with a damp cloth and mild
detergent or soap. NEVER use thinners, other solvents or any harsh cleaners.

CAUTION
1. When shaking off excess water, hold the main unit rmly to prevent releasing
the head assembly or dropping the units.
2. Do not use a dryer or heater to dry the shaver. This may result in malfunction
or damage to the shaver.
BATTERY DISPOSAL
This appliance contains Li ion batteries. To protect the environment
this appliance and its batteries must be disposed of safely. At the
end of its life, please take this appliance to a recycling centre, where
the internal rechargeable battery should be removed by a professional and
recycled separately. For more information about the recycling of electrical
and battery operated appliances please contact your local council ofce
or your household waste disposal service. For specic enquiries regarding
the replacement of batteries in this product please contact our Conair
Customer Care Line (refer to ‘UK After Sales Service’ section).
UK GUARANTEE
The Conair Group Ltd, Unit 3, Waterfront Business Park, Fleet, GU51 3TW
This BaBylissMEN appliance is guaranteed for consumer use for 3 years
and is only valid within the United Kingdom.
This guarantee covers consumer use only i.e. defects occurring under
normal use within the home from date of purchase or date of delivery,
whichever is later.
If the product develops a fault due to defects in materials or manufacture
within 12 months from the date of purchase, to avoid delays and
unnecessary inconvenience, where possible please return the product to
the point of purchase for an exchange.
If the product develops a fault due to defects in materials or manufacture
after 12 months from the date of purchase, and within the guarantee
period, Conair UK After Sales Service will repair or replace the product.

Exclusions
This guarantee will no longer be valid meaning that The Conair Group Ltd
will not be liable to repair or replace your product where:
1.) The appliance has been used on a voltage supply other than that which
is marked on the product, or advised within this instruction booklet
2.) The appliance has been purchased from an unauthorised stockist*
3.) The appliance is used for professional / non domestic usage
4.) Repairs or alterations have been attempted by unauthorised persons
5.) The failure of the appliance is a direct result of misuse
6.) The failure is a result of not following the instructions for use
This guarantee does not cover any cosmetic damage due to misuse of the
product nor any damage to persons or property that occurs because of
product misuse.
*unauthorised stockists include, but are not limited to online auction sites,
private sellers and those selling second hand goods, refurbished products
etc.
Please contact the Conair Customer Care Line on 03705 133 191 (09:00 to
17:00 Monday to Friday) or e-mail ukinfo@conair.com for further information
on authorised stockists.
It is important to retain your proof of purchase. We recommend
attaching your receipt to this page.
Even where a refund may be applicable, no refund will be provided
without a valid receipt or proof of purchase, we will only be able to
offer a repair or replacement service. Please note this does not apply
if the product was purchased directly from The Conair Group Ltd.
Guarantees on replacement products run from the original purchase date
or date of delivery, whichever is later, and not from the date of replacement.
This guarantee is an additional benefit and does not affect your
statutory rights as a consumer.

If you have any queries regarding this guarantee please contact the Conair
Customer Care Line on 03705 133 191 (09:00 to 17:00 Monday to Friday)
or e-mail ukinfo@conair.com.
UK AFTER SALES SERVICE
For further advice on using the appliance, contact the Conair Customer
Care Line on 03705 133191 (09:00 to 17:00 Monday to Friday) or email
your enquiry to ukinfo@conair.com.
If you should need to return your appliance to us please send it to the
following address:
Customer Care Centre
Conair Logistics
Unit 4
Revolution Park
Buckshaw Avenue
Buckshaw Village
Chorley
PR7 7DW
Please enclose your name and address, together with a copy of proof of
purchase and details of the fault.
Please note this Instruction Booklet is not the guarantee.
IB-20/409
Other manuals for SUPER-X METAL Series
2
This manual suits for next models
1
Table of contents
Other BaBylissMEN Trimmer manuals