Bachmann Thomas & friends User manual

Bachmann Industries Inc.; 1400 East Erie Avenue; Philadelphia, PA 19124 USA • www.bachmanntrains.com
Instructions for
Bachmann®Large Scale
Thomas & Friends™
DCC Sound Module
DCC Sound Technology by SoundTraxx®
• 16-Bit Sound Processor
• Automatic Dual Mode Decoder
for DC and DCC Operation
PLEASE READ FIRST
When carefully installed, this module will provide all the pleasures of high quality, digital onboard sound and the benefits of today’s DCC (Digital Command Control) technology. Please
note that while each module is tested thoroughly before it is shipped, Bachmann cannot control the correctness of the installation. It is imperative that you read and follow the
information and steps below for a successful installation.
IMPORTANT FOR A SUCCESSFUL INSTALLATION
Before you install your sound module, there are some simple precautions you should take:
The electronics should be handled carefully in a static-free environment. To discharge static electricity,
touch a grounded water pipe or bare sheet metal surface before handling the module.
•Work in a clean, well-lit area on a non-conductive surface. Stray metal scraps and dirt can get onto the circuitry and cause shorts.
• NEVER INSTALL THE MODULE WHILE IT IS POWERED.
• Do not exceed the track output ratings for which the module is designed.
• Do not install the module into a model that it was not designed for.
14
Notice
The information in this document is subject to change without notice.
Neither Bachmann Industries, Inc. nor SoundTraxx (Throttle Up!) shall be liable
for technical or editorial errors or omissions contained herein; nor for incidental or
consequential damages resulting from the furnishing, performance or use of this material.
This document contains information protected by copyright. No part of this document may
be photocopied or reproduced in any form without the prior written consent of Bachmann
Industries, Inc.
Product names mentioned herein may be trademarks and/or registered trademarks of
their respective companies.
Bachmann and Spectrum are registered trademarks of Bachmann Industries, Inc.
SoundTraxx and Tsunami are registered trademarks of Throttle Up! Corp.
SoundTraxx DCC, Digital Sound Decoder, Dynamic Digital Exhaust, Auto-Exhaust and
Hyperlight are trademarks of Throttle Up! Corp.
© 2016 Gullane (Thomas) Limited
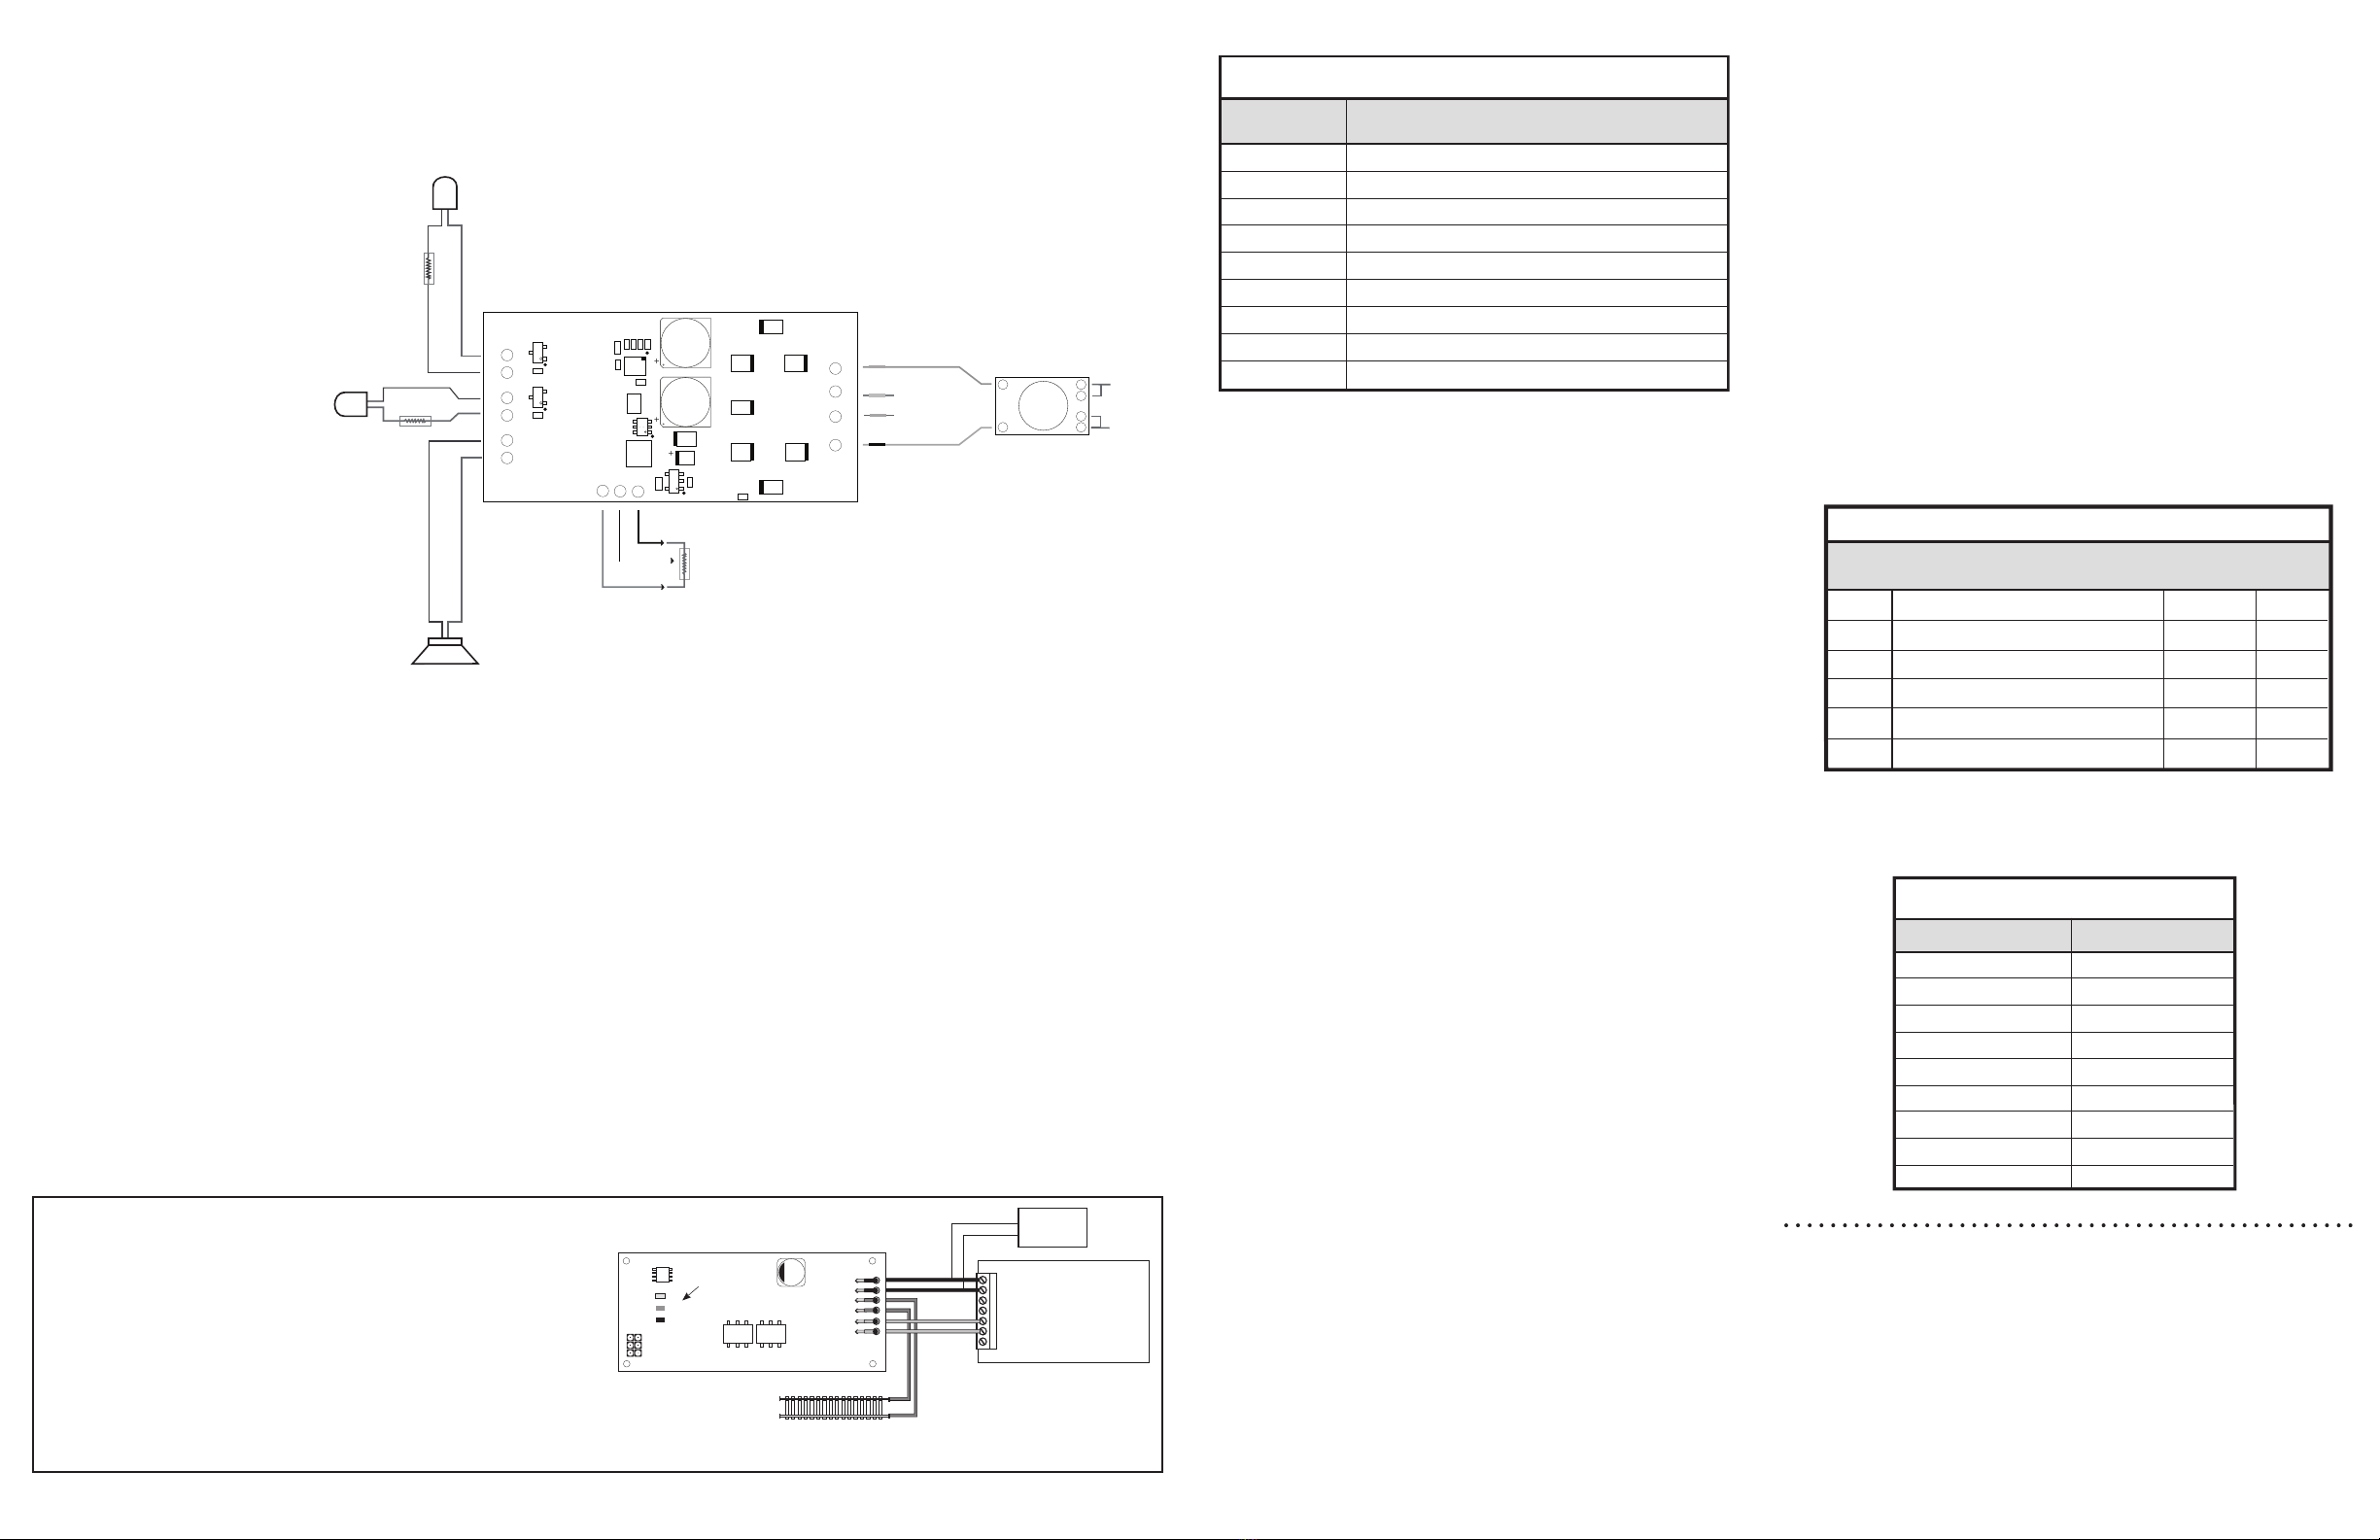
Bring the sounds of Sodor to life with this separate-sale Sound
Module for installation in your Large Scale Thomas & Friends™
engines! Solder pad installation and customer-supplied speaker
required. Sound package includes whistle or bell per prototype,
chuff, and cylinder blow down. Also controls customer-installed
headlamp(s) if desired. Character sound suites available through
DCC CV selection only. Character sound suites include Thomas,
Percy, James, Edward, Henry, Gordon, Emily, Spencer, and Toby.
Approximate board dimensions: 60mm x 30mm x 15mm. Factory
preset for Thomas sound suite. Designed for Large Scale use only.
Printed in U.S.A.
These instruction assume that you have some understanding of, or experience with DCC. It covers the differences you may need to know between this decoder and any you may have
previously used.
Your Bachmann Sound Decoder is both a DCC Sound Decoder and a DC Sound System. The sound decoder performs numerous functions on both Analog (DC) and Digital (DCC or Digital
Command Control). The operation of some of these functions will be different depending on which you are using:
Motor control – the decoder controls the motor in both DC and DCC, enabling proper coordination of the locomotive’s movement with other operating features and sound effects.
Sound
– Customer-installed speaker required. The authentic sounds of your favorite characters are digitally reproduced through the powerful 3-watt audio amplifier. All sounds are
polyphonic; one sound will never interrupt another.
Lights
– Headlights and/or backup lights are NOT factory installed - however, should you wish to add LEDs, the sound decoder has the ability to turn them on or off in DCC mode using F0
(or F10 on the Bachmann E-Z Command®DCC system).
Troubleshooting Checklist
1. If there is no sound, be sure the volume control knob has not been turned all the
way off.
2. If operating in DCC mode, follow the “Starting Over” instructions to reset the
locomotive to factory default settings.
Adjusting the Master Volume in DC
If your locomotive has a volume control potentiometer, turn the knob clockwise to turn on the
audio portion of the sound decoder. This will not affect the operation of the motor, but allows
you to increase or decrease the overall volume of all the sound effects simultaneously. Turn
the knob all the way counter-clockwise to turn the audio off.
Use of the “Polarity” Switch
Due to varying standards, if you are running in analog mode with a DC power pack, you may
set the locomotive’s default direction of travel with the “polarity” switch under the model if
your locomotive is equipped with a polarity switch. Set to “Large Scale” or “NMRA” according
to your preference. When running in DCC, changing this switch has no effect.
is stopped. When operating in analog mode, be careful not to exceed the decoder’s input
voltage rating of 26 Volts. When your track voltage exceeds 28 Volts, the decoder will
automatically shut off the sound and motor: back down on the throttle immediately.
Power Supply
Important: Your sound decoder will work best in analog mode when using a high quality,
electronically regulated power pack, preferably one that supplies smooth, filtered DC power.
Older rheostat style power packs and pulse power packs will result in erratic and unreliable
operation and should NOT be used with this sound decoder.
Operating the Model
Once the throttle has achieved sufficient voltage, if the throttle is set to move the locomotive
forward, two blasts of the whistle (except Toby) will sound as the throttle is increased.
Increasing the throttle further will set the locomotive in motion, increasing speed as the
throttle is increased. The exhaust chuff is synchronized to the speed of the locomotive.
Once the locomotive has reached and maintained a constant speed, the whistle will sound
approximately every 20 seconds. If the throttle is decreased slowly to stop, you will
also hear a steam release effect just before stopping.
For service/repair, contact the Bachmann Service Department by visiting
www.bachmanntrains.com/home-usa/service.php, calling 1-800-356-3910
(toll-free within the U.S. and Canada), calling 215-533-1600 (for all countries),
available Monday through Friday, 8:00 am to 4:00 pm ET. Please be aware you
may need to leave a message on our voice mail system. Your call will be returned as
soon as a service technician is available. We thank you in advance for your patience.
COMPATIBLE WITH
THE NMRA DCC STANDARDS
AND RECOMMENDED
PRACTICES
This sound module is warranted to the original purchaser for a period of ninety (90) days from the original purchase date — under normal
use and service — against defective materials or workmanship. This warranty is given in lieu of all other express warranties. All implied
warranties, including but not limited to implied warranties of fitness and merchantability, shall expire ninety days from the date of purchase.
Some jurisdictions do not allow limitations on how long an implied warranty lasts, so the above limitation may not apply to you.
This warranty is void if the component has been damaged by accident or unreasonable use, neglect, improper service or other causes
including improper installation not arising out of defects in material or workmanship. BACHMANN SHALL NOT BE LIABLE FOR
INCIDENTAL OR CONSEQUENTIAL COSTS, EXPENSES OR DAMAGES INCURRED BY THE PURCHASER. Some jurisdictions
do not allow the exclusion or limitation of incidental or consequential damages, so the above limitation or exclusion may not apply to you.
This warranty gives you specific legal rights, and you may also have other rights which vary from location to location. In order to validate
this warranty, the accompanying Owner Registration Card must be completed and mailed within ten (10) days after purchase of the module
to the address listed below:
Send Owner Registration Card and direct inquiries to:
Attention: Service Department
Bachmann Industries, Inc.; 1400 East Erie Avenue; Philadelphia, PA 19124 USA
Telephone: 800-356-3910 (toll free within the United States and Canada only)
Telephone: 215-533-1600 (for all countries)
E-mail: [email protected]
90 DAY LIMITED WARRANTY FOR SOUND MODULE
purchased in the United States and Canada
effective November 1, 2011, this warranty supersedes all previous (and/or concurrent) warranties
For residents of the U.S. and Canada only, please fill in and mail this card within 10 days after purchase to validate warranty. PLEASE PRINT.
Pour les résidents des É.-U. et du Canada seulement : prière de remplir cette fiche et de la poster dans un délai de 10 jours après l’achat
afin de valider la garantie. PRIÈRE D’ÉCRIRE EN CAPITALES.
Item # Description Purchastem # Descrip
Item # Description Purchase Date
No de l’article ______________________ Description ______________________________________________________ Date d’achat ______________________________
Retailer’s Name tailer’s Name
Retailer’s Name
Nom du détaillant______________________________________________________________________________________________________________________________
City State/Province Zip/Postal Code Country
Ville __________________________________________________État/Province ____________Code postal ____________________________ Pays ____________________
Owner’s Name
Owner’s Name
Nom du propriétaire ____________________________________________________________________________________________________________________________
Address
Address
Adresse _____________________________________________________________________________________________________________________________________
____________________________________________________________________________________________________________________________________________
City State/Province Zip/Postal Code Country
Ville __________________________________________________État/Province ____________Code postal ____________________________ Pays ____________________

2 3
WIRING INSTRUCTIONS
The following diagram will help you to install the decoder. Lighting, volume, and motor wiring instructions are illustrated below.
When connecting wires, use the following considerations and this master wiring diagram as a guide:
• Secure the decoder in place using double-sided foam tape.
• When wiring the decoder, trim all wires to the necessary length. This will prevent wires from interfering with the drive mechanism and being pinched when closing the body shell.
• To ensure long-term reliability, solder all connections.
Note:
The following diagram serves as a general guide for reference.
Use an 8-Ohm speaker rated for 3 watts.
Ring the Bell (Toby Only)
To ring the bell, press F1 on your controller. This is an on/off function, i.e., once on, the bell
will continue to ring the bell sequence until you turn it off by pressing F1 again to turn it off.
Blow the Whistle (For All Characters Except Toby)
To activate the Whistle, press F2 on your controller to blow the whistle. The longer you press
the key, the longer the whistle will blow. While this allows you to make short or long signals,
F3 is designated as a ‘short’ whistle so you can create whistle signals that will have that nice,
crisp, ‘toot’ regardless of how responsive your controller may be.
Blowdown
Press the F4 key to open the blowdown valve (steam hiss). Press the F4 key again to close the
blowdown valve.
Exhaust Chuff
The exhaust chuff and sounds are automatically generated whenever the locomotive is set
into motion.
Mute the Sound
Pressing F8 will gradually mute all sound effects. Pressing it a second time will allow you to
hear the sounds again.
For now, simply set your controller to Locomotive 3, place the locomotive on the
mainline and see what happens!
Sound Features
The volume levels of the individual sound effects have been pre-adjusted to provide the best possible sound for each character when operating in DCC or DC mode.
However you can also adjust the master volume via DCC operation or a customer-installed potentiometer for both DCC and DC operation. See DCC section for adjustment of master and
individual sound effects via CV selection.
Throttle Features
The Digital Sound Decoder has many advanced throttle features as part of SoundTraxx’s Hyperdrive system.
With the addition of these features, you will be able to better control your locomotive speed under varying conditions.
Decoder Specifications
• Supports extended address mode for assigning any locomotive number up to 9,999.
• Supports advanced consist addressing.
• Supports ‘Operation Mode Programming’, allowing CVs to be changed on the mainline without using a programming track.
Throttle Specifications
• Supports 14, 28 and 128 speed step modes.
• Programmable acceleration, deceleration and starting voltage for prototypical starting and stopping.
• Use of standard and alternate speed tables.
Additional information about automatic sound functions can be found in the User’s Guide available on both the Bachmann (www.bachmanntrains.com) and
SoundTraxx (www.soundtraxx.com) websites.
OPERATING WITH DCC
Your locomotive will respond to address 3 as it would if you had just installed any DCC decoder. Your sound decoder has been shipped with all CVs pre-programmed so you can begin using
your locomotive immediately without having to worry about what adjustments to make. The locomotive’s sound decoder is factory-set with the following “default” function assignments:
LH V + LB V + S - S +
+
+
Headlight (LED) (customer supplied)
+
1.2k Ω
Resistor, 1/4 Watt
Backlight (LED) (customer supplied)
GND
VOL
3.3V
98
RL -M+M RR
1.2k Ω
Resistor, 1/4 Watt
Motor - (Gray)
Motor + (Orange)
M2
M1
Left Rail
Right Rail
Existing Polarity
Switch Board
Volume Potentiometer (customer supplied).
Although not required, the Volume Potentiometer will act as an external volume control
in both DC and DCC modes. Use a panel-mount, single-turn 10k Ω potentiometer.
Sound Decoder
Speaker (customer supplied)
Speaker -
Speaker +
F0
F1
F2
F3
F4
F5
F6
F7
F8
Function Key Default Effect
Sound Decoder Function Assignments
Lighting (Lights NOT Factory Installed)
Bell On/Off (Toby Only)
Whistle On/Off (All Characters Except To by)
Short Whistle (All Characters Except To by)
Blowdown
(Not Assigned)
(Not Assigned)
(Not Assigned)
Mute
Programming the CVs
As you see, no programming is necessary to begin enjoying your sound system. However…
after you have had a chance to play with your decoder for a little while, you may wish to
make some changes such as selecting a new address or altering a sound effect. The following
section will introduce you to CVs and how and why you might wish to change them.
What is a CV?
CV stands for Configuration Variable, which is the industry-adopted term for a decoder’s user-
programmable memory locations. CVs allow you to customize individual decoder properties
such as the address, momentum, throttle response, sound volume and much more. Once a CV
has been programmed, the setting will be permanently remembered even after the power
has been turned off. A CV can be modified as often as necessary by simply reprogramming it
with a new value. These adjustments will require an NMRA-compatible DCC system capable
of changing CV values.
The factory installed decoders are preset so that they ship with the proper “voices”. Items
such as the exhaust chuff rate have already been calculated and optimized for the locomotive.
The decoder is set to operate immediately using either a 12 Volt DC power pack or NMRA-
compatible DCC command station.
Programming Procedure
As each DCC system is different, the procedure for programming a CV will vary depending
upon the system. Unfortunately, we cannot provide detailed instructions to cover every
command station and have to assume that you have some level of understanding regarding
its capabilities and operating procedures. For specific programming procedures, please
consult your DCC system manual.
Resetting the CVs or Starting Over
Occasionally, something goes wrong and the sound system will not respond as expected.
Usually, this is caused by one or more CVs being programmed to the wrong value. All CVs
can be quickly reset to their factory default values using the following procedure.
1. Program CV 8 to a value of 8 using either Service Mode or Operations Mode.
2. Place the locomotive on a powered section of track. If locomotive is already on the
mainline, turn power to the track off and then back on.
3. After power is restored to the track there should be no indication of activity for a
period of six seconds. If sound comes on immediately upon restoring power, the
decoder did not reset. Repeat steps 1 and 2.
4. Once the six-second period has elapsed, the sound should come on indicating that the
CVs were successfully reset.
5. The decoder will now respond to short address 3 just as it did when it was first used or
installed and all CVs are now reset to original factory-programmed (default) values.
Sound Volume
CV 128 selects the Master Sound Volume for each character. This adjustment will adjust the
overall volume up or down of all the sounds associated with the character.
Note: If your locomotive has a volume control knob, it must be ON. Make sure that it is
turned up enough so that you can hear your changes before entering a value into CV 128.
In addition to the Master Volume CV, the following individual sound volumes can be adjusted:
Selecting a Different Character
Please note that not all characters have all sound effects! If for some reason you wish to
select a different “character”, adjust the value in CV 115 (Character Select CV) as follows:
OPERATING USING A DC POWER PACK
While the sound system installed in your Bachmann model is first and foremost a DCC
decoder, it may be used on a DC powered layout. When operating in analog mode, you
may control your locomotive using an ordinary power-pack though operation will be a bit
different than when running non-decoder equipped locomotives. With the power pack’s
throttle set to zero, the decoder will be silent as it has no power. The throttle must be turned
up to approximately 9 Volts to provide sufficient voltage to power up the internal circuitry of
the decoder. Increasing the throttle further will set the locomotive in motion, increasing speed
as the throttle is increased. Note that the direction can only be changed when the locomotive
128
129
130
131
136
137
Master Volume
Whistle Volume
Bell Volume
Steam Exhaust Volume
Blowdown Volume
Steam Release Volume
0 - 255
0 - 255
0 - 255
0 - 255
0 - 255
0 - 255
Sound Volume CVs
125
195
125
150
135
64
CV Description Range Default
Thomas
Percy
Edward
James
Henry
Gordon
Toby
Spencer
Emily
Character CV Value
0
1
2
3
4
5
6
7
8
(factory setting)
CV 115, Character Selection
Power In
Power In
To Programming Track Output
Programming Track
To Programming Track
POWER
SUPPLY
COMMAND
STATION
PTB-100
ACKN
COMM
FAULT
BLACK
BLACK
ORANGE
ORANGE
YELLOW
YELLOW
Status LEDs
To Power Supply or Power
Inputs on Command Station
General Wiring Diagram for the SoundTraxx PTB-100
PROGRAMMING AND READING CVS
If your decoder is otherwise working properly (i.e., responds properly on the mainline to
speed and direction commands) but your command station is having trouble reading CV data,
it may be due to incompatibilities between the electrical requirements of the decoder (which
are different from conventional decoders due to the added audio circuitry) and the electrical
characteristics of your programming track. In such an event, you will need to use a Program-
ming Track Booster, such as SoundTraxx PTB-100 (P.N. 829002). The PTB-100 amplifies the
programming track signals to levels that work best with Tsunami. It is easy to install
(see diagram to right) and inexpensive. An advantage to using the PTB-100 is that it also
provides short-circuit detection and some helpful diagnostics.
FEATURES AND SPECIFICATIONS
The custom decoder has been pre-programmed
for a great ready-to-run experience. However,
there are features available that you may wish to
experiment with or adjust to suit your personal
preferences. These adjustments will require the
use of a DCC system capable of changing CV
values (Configuration Variables). Some features
will require a little explanation.
Other Bachmann Recording Equipment manuals
Popular Recording Equipment manuals by other brands

HMS Networks
HMS Networks Intesis INKNXDAL0640200 user manual

IXXAT
IXXAT CAN@net II manual

J&M Corporation
J&M Corporation JMDM-IPBT-HDDR Installation & operation instructions

Behringer
Behringer Multicom Pro MDX4400 user manual

Altera
Altera Arria 10 Avalon-ST Interface user guide

Fostex
Fostex 8335 owner's manual