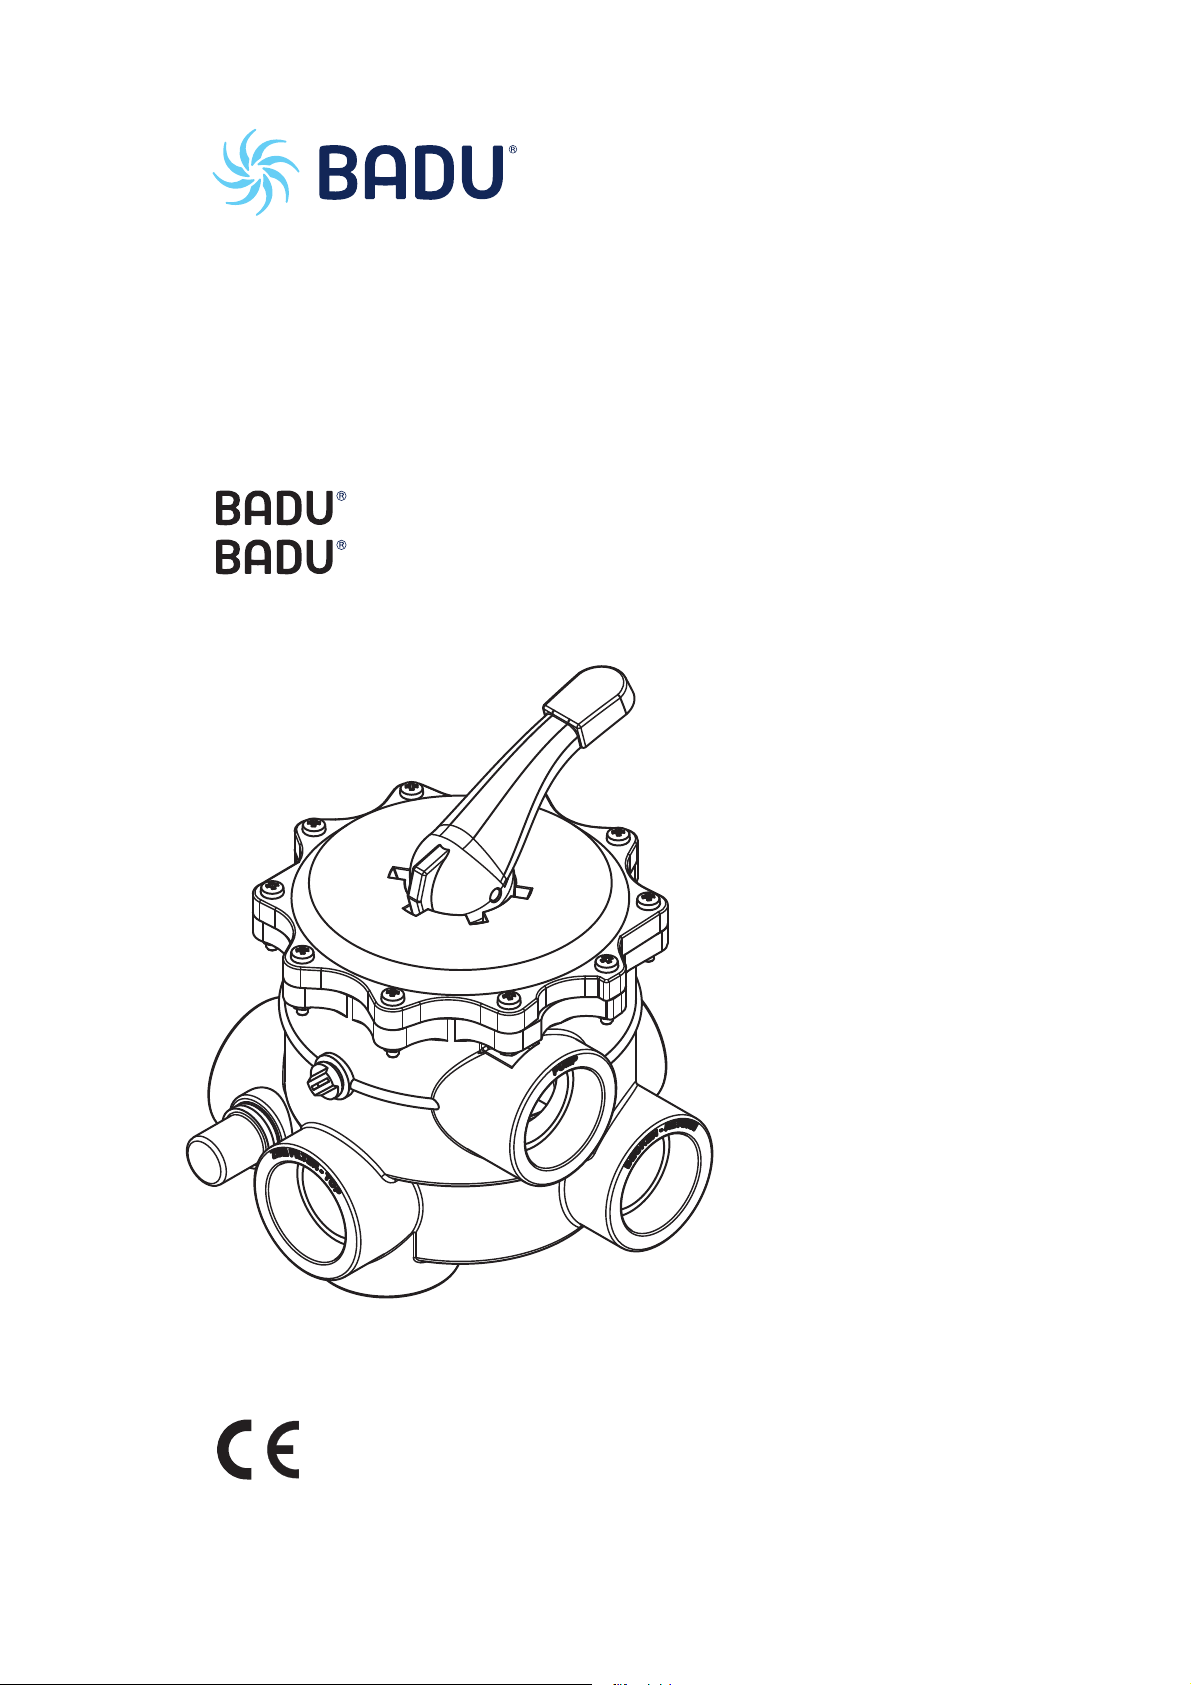
BADU Mat R 41 Owner's manual

DE Originalbetriebsanleitung
EN Translation of original operation manual
Mat R 41
Mat R 51
WG26.50.000-P

Inhaltsverzeichnis
DE Originalbetriebsanleitung
EN Translation of original operation manual

DE
DE Originalbetriebsanleitung
Filter-Rückspülautomatik
6-Wege-Ventil mit Klarspüleinrichtung
BADU MAT R41-R51

2 DE 01|2019
BADU®ist eine Marke der
SPECK Pumpen Verkaufsgesellschaft GmbH
Hauptstraße 3
91233 Neunkirchen am Sand, Germany
Telefon 09123 949-0
Telefax 09123 949-260
info@speck-pumps.com
www.speck-pumps.com
Alle Rechte vorbehalten.
Inhalte dürfen ohne schriftliche Zustimmung von
SPECK Pumpen Verkaufsgesellschaft GmbH weder
verbreitet, vervielfältigt, bearbeitet noch an Dritte
weitergegeben werden.
Dieses Dokument sowie alle Dokumente im Anhang
unterliegen keinem Änderungsdienst!
Technische Änderungen vorbehalten!

Inhaltsverzeichnis
01|2019 DE 3
Inhaltsverzeichnis
1Allgemeiner Hinweis........................................................................ 4
2Funktion ........................................................................................... 4
3Ventil-Positionen ............................................................................. 5
4Reinigen des BADU Mat.................................................................. 5
5Demontage BADU Mat..................................................................... 6
6Montage BADU Mat ......................................................................... 6
7Technische Daten............................................................................ 7
7.1 Durchflusskennlinie ................................................................... 7
7.2 Maßzeichnung........................................................................... 8

Allgemeiner Hinweis
4 DE 01|2019
1 Allgemeiner Hinweis
Die Rückspülautomatik BADU Mat ist zum direkten Aufbau auf
einen Filterbehälter bestimmt.
Der BADU Mat R 41 hat fünf Innengewinde Rp 1½ und/oder
Klebemuffen Ø50. Der BADU Mat R 51 hat fünf Innengewinde
Rp 2.
Es können vier Gehäusevarianten für drei verschiedene
Einbaulagen geliefert werden und als Ausführung 3A alle
Anschlüsse offen mit zwei Verschlussstopfen Rp 1½ bzw. Rp 2
mit O-Ring.
HINWEIS
Zum Eindichten der Gewinde nur Teflon-Dichtungsband
verwenden. Nicht zuviel verwenden, um ein Aufplatzen der
Anschlüsse zu vermeiden.
Bei Klebeausführungen mindestens 12 Stunden Aushärtezeit
beachten!
2 Funktion
Vor Betätigung des BADU Mat ist die Pumpe abzuschalten. Durch
Herunterdrücken und Drehen des Hebels kann das Ventil in die
gewünschte Position gebracht werden.
Ist der Filter so weit verschmutzt, dass kein ausreichender
Filtrationsförderstrom mehr vorhanden ist, sollte wie folgt
vorgegangen werden:
1. Pumpe abschalten.
2. Hebel von der Position FILTERN in die Position
RÜCKSPÜLEN bringen.
3. Pumpe einschalten.
4. Ausreichend Rückspülen, Pumpe wieder ausschalten.
Kontrolle über Schauglas möglich.
5. Hebel in die Stellung NACHSPÜLEN bringen.
6. Pumpe kurz laufen lassen, um das Filtermedium klar zu
spülen.
7. Pumpe abschalten.
8. Frischwasser nachspeisen, bis das Ausgangsniveau wieder
erreicht ist.
9. BADU Mat zurück in die Position FILTERN stellen und
Pumpe wieder einschalten.

Ventil-Positionen
01|2019 DE 5
3 Ventil-Positionen
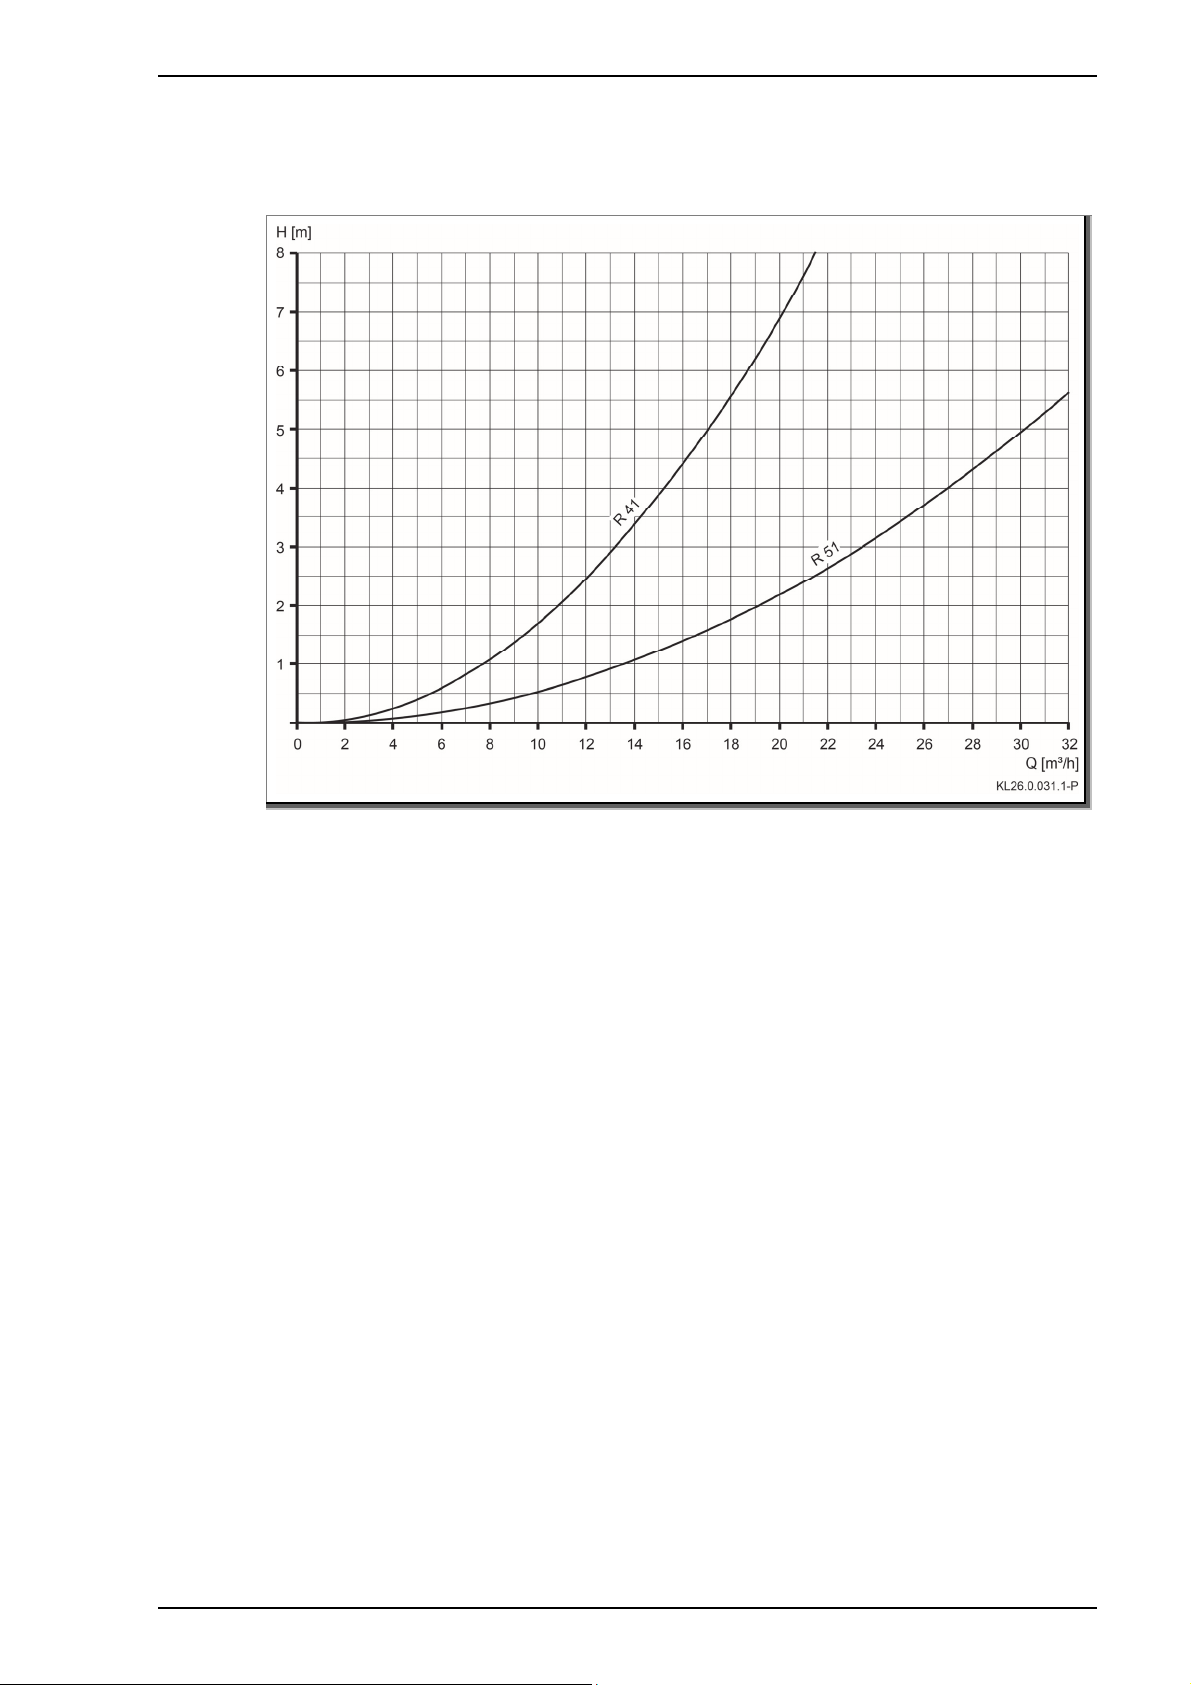
Ventil-Position Funktion/Durchflussrichtung im Ventil
FILTERN Schwimmbadwasser wird gefiltert.
PUMPE – ZUM FILTER (oben) – DURCH
DEN FILTER (von oben nach unten) –
VOM FILTER (unten) – BECKEN –
SCHWIMMBAD
RÜCKSPÜLEN Reinigen des Filtersystems im Gegenstrom.
PUMPE – VOM FILTER (unten) – DURCH
DEN FILTER (von unten nach oben) –
KANAL – ZUM FILTER (oben) – ABLAUF
NACHSPÜLEN Reinigen des Filtermediums und
Rohrleitungen nach dem Rückspülen.
PUMPE – ZUM FILTER (oben) – DURCH
DEN FILTER (von oben nach unten) –
VOM FILTER (unten) – KANAL – ABLAUF
GESCHLOSSEN Keine Zirkulation.
Pumpe nie in dieser Position betreiben!
ENTLEEREN Schwimmbadentleerung.
PUMPE – KANAL – ABLAUF
ZIRKULIEREN Umpumpen ohne Filter.
PUMPE – BECKEN - SCHWIMMBAD
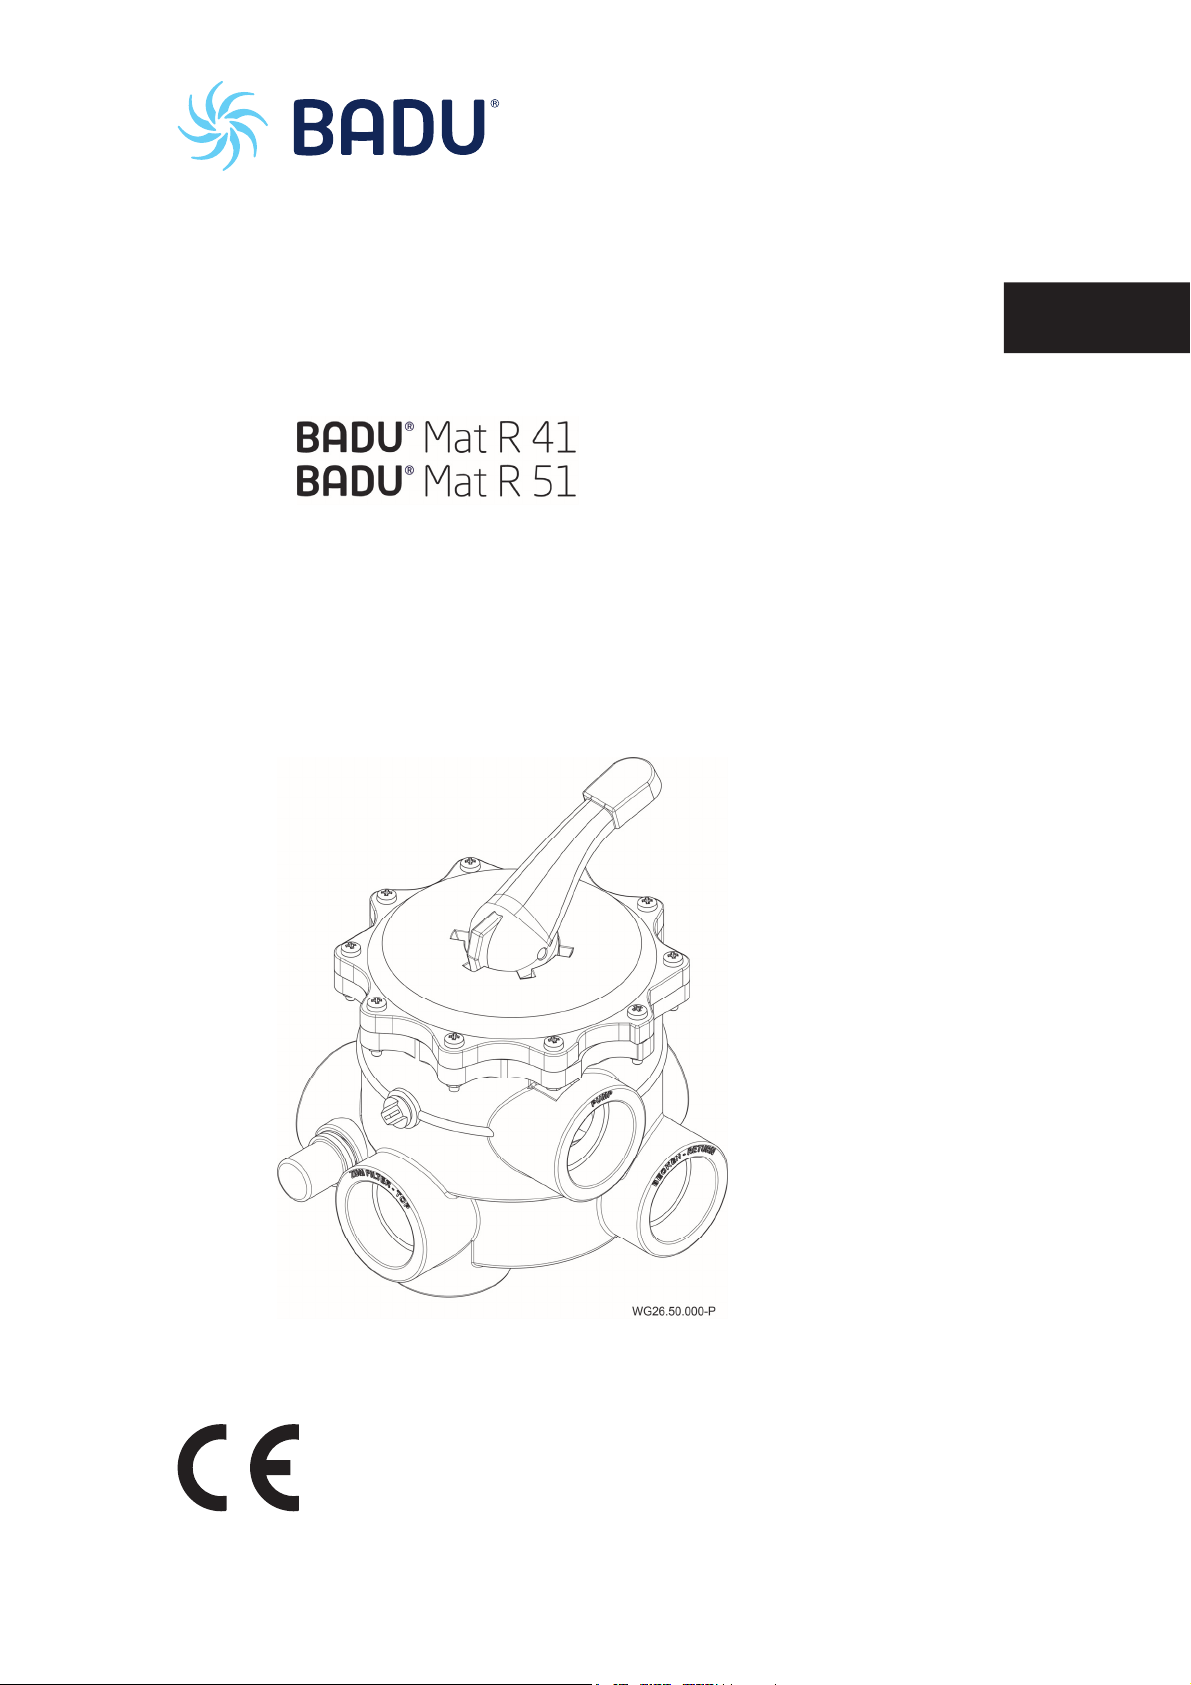
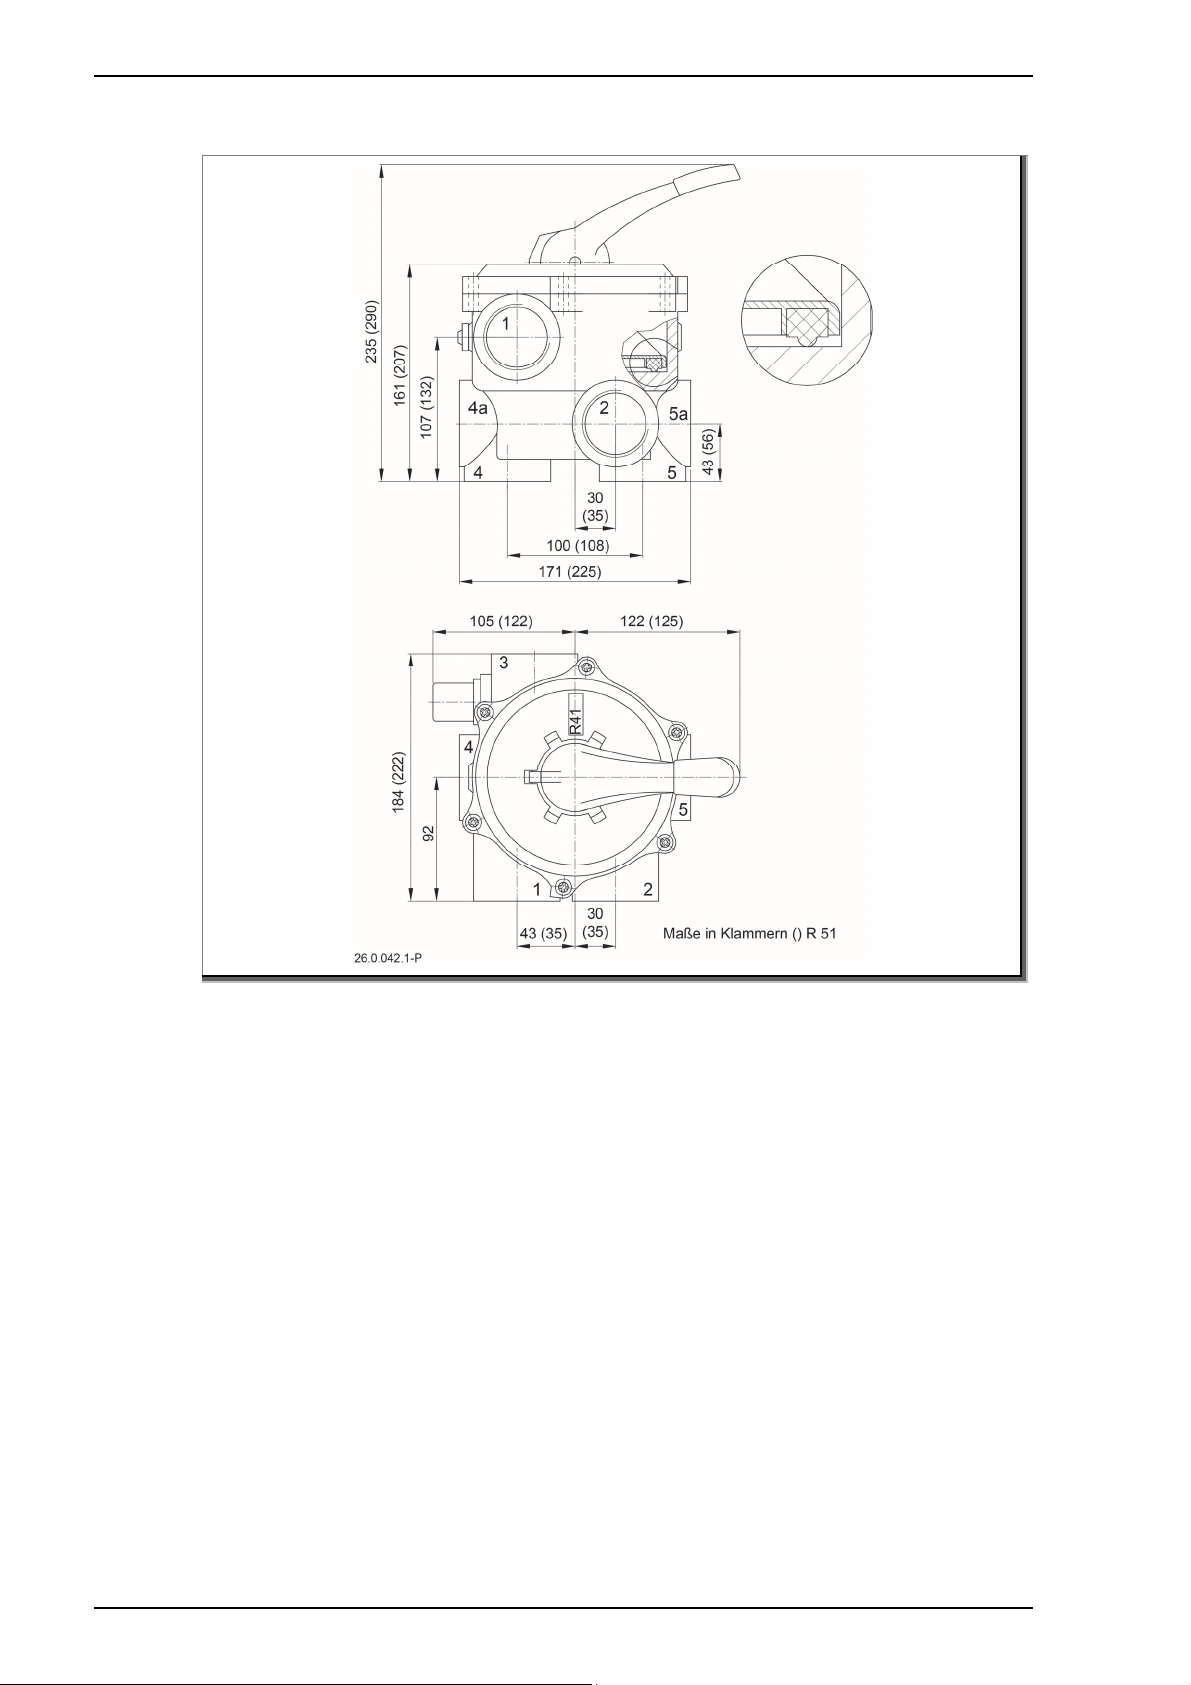
4 Reinigen des BADU Mat
1. Pumpe abschalten.
2. Wenn erforderlich, Kugelhähne in den Rohrleitungen
schließen und die Anlage etwas entleeren.
3. Die 6 bzw. 10 Schrauben des Deckels lösen, komplettes
Oberteil abnehmen und BADU Mat reinigen.
4. Beim Zusammenbau auf die Positionsmarkierung achten (die
gleichen Befestigungslaschen von Deckel und Gehäuse
müssen übereinander liegen).

Demontage BADU Mat
6 DE 01|2019
5 Demontage BADU Mat
1. Pumpe abschalten.
2. Wenn nötig, Kugelhähne in den Rohrleitungen schließen und
Anlage etwas entleeren.
3. Zylinderstift des Handhebels herausklopfen.
4. Unterlegscheibe herausnehmen und sorgfältig aufbewahren.
5. Die 6 bzw. 10 Schrauben des Deckels lösen und Deckel
abnehmen.
6. Einsatz mit Feder herausnehmen.
7. Ventil reinigen, falls erforderlich O-Ring des Einsatzes
erneuern.
6 Montage BADU Mat
1. Zusammenbau in umgekehrter Reihenfolge.
2. Darauf achten, dass ein neuer O-Ring unter dem Deckel
eingelegt wird. Alle O-Ringe fetten!
3. Positionsmarkierung von Deckel und Gehäuse müssen
übereinander liegen.
4. Schrauben gleichmäßig über Kreuz anziehen.

Technische Daten
01|2019 DE 7
7 Technische Daten
7.1 Durchflusskennlinie
Abb. 1

Technische Daten
8 DE 01|2019
7.2 Maßzeichnung
Abb. 2

Technische Daten
01|2019 DE 9
Abb. 3


EN
EN Translation of original operation manual
Filter backwash valve
6-way multiport valve with clear rinsing unit

2 EN 01|2019
BADU®is a trademark of
SPECK Pumpen Verkaufsgesellschaft GmbH
Hauptstraße 3
91233 Neunkirchen am Sand, Germany
Phone +49 9123 949-0
Fax +49 9123 949-260
info@speck-pumps.com
www.speck-pumps.com
All rights reserved.
Contents may not be distributed, duplicated, edited or
transferred to third parties without the written
permission of SPECK Pumpen Verkaufsgesellschaft
GmbH.
This document and all attached documents are not
subject to update service!
Subject to technical modifications!

Table of contents
01|2019 EN 3
Table of contents
1General note..................................................................................... 4
2Function ........................................................................................... 4
3Valve positions ................................................................................ 5
4Cleaning the BADU Mat................................................................... 5
5Disassembly of the BADU Mat........................................................ 6
6Assembly of the BADU Mat............................................................. 6
7Technical data.................................................................................. 7
7.1 Flow characteristics................................................................... 7
7.2 Dimensional drawing................................................................. 8

General note
4 EN 01|2019
1 General note
The BADU Mat 6-way multiport valve is designed to be mounted
directly on the filter housing.
The BADU Mat R 41 has five Rp 1½ inner threads and/or Ø50
glue sockets. The BADU Mat R 51 has five Rp 2 inner threads.
Four housing designs are available for three various installation
positions. For the 3A design, all connections are open with two Rp
1½ or Rp 2 sealing plugs and an O-ring.
NOTICE
Only use Teflon sealing tape to seal the threads. Do not use too
much in ordert o avoid the connections splitting open.
Observe the curin
g
time of at least 12 hours for the
g
lued version!
2 Function
The pump has to be switched off before operating the
BADU Mat. The valve can be brought to the desired position by
pressing down and turning the lever.
If the filter is soiled to such an extent that the filtration flow is no
longer sufficient, proceed as follows:
1. Switch the pump off.
2. Turn the lever from the FILTER position to the BACKWASH
position.
3. Switch the pump on.
4. Backwash sufficiently. Switch the pump off again. A sight
check can be performed via the inspection glass.
5. Press and turn the lever once more to select the RINSE
position.
6. Run the pump briefly to rinse the filter medium through.
7. Switch the pump off.
8. Feed fresh water into the pump up to the initial level.
9. Set the BADU Mat back to the FILTER position and switch
the pump back on.

Valve positions
01|2019 EN 5
3 Valve positions
Valve position Function/flow direction in valve
FILTER Swimming pool water is filtered.
PUMP – TO FILTER (top) – THROUGH
THE FILTER (from top to bottom) – FROM
FILTER (bottom) – TANK – SWIMMING
POOL
BACKWASH Cleaning the filter system in reverse flow.
PUMP – FROM FILTER (bottom) –
THROUGH THE FILTER (from bottom to
top) – TO FILTER (top) – LINE – DRAIN
RINSE Clean the filter medium and pipes after
backwashing.
PUMP – TO FILTER (top) – THROUGH
THE FILTER (from top to bottom) – FROM
FILTER (bottom) – LINE – DRAIN
CLOSED No circulation.
Never operate the pump in this position!
WASTE Pool drainage.
PUMP – LINE - DRAIN
CIRCULATE Circulate without filter.
PUMP – TANK - SWIMMING POOL
4 Cleaning the BADU Mat
1. Switch the pump off.
2. If required, close the ball valves in the pipes and drain the
system slightly.
3. Release the 6 or 10 screws on the lid, remove the complete
upper part and clean the BADU Mat.
4. When reassembling, pay attention to the position markings
(the same mounting brackets from the lid and housing must
sit above each other).

Disassembly of the BADU Mat
6 EN 01|2019
5 Disassembly of the BADU Mat
1. Switch the pump off.
2. If required, close the ball valves in the pipes and drain the
system slightly.
3. Knock the cylinder pin out of the hand lever.
4. Remove the washer and store it in a safe place.
5. Release the 6 or 10 screws on the lid and remove the lid.
6. Remove the insert with the spring.
7. Clean the valve, if necessary renew the O-ring in the insert.
6 Assembly of the BADU Mat
1. Assembly is carried out in reverse order.
2. Ensure that a new O-ring is placed under the lid. Grease all
O-rings!
3. The position markings on the lid and housing must sit above
each other.
4. Tighten the screws evenly in a crosswise sequence.

Technical data
01|2019 EN 7
7 Technical data
7.1 Flow characteristics
Fig. 1

Technical data
8 EN 01|2019
7.2 Dimensional drawing
Fig. 2
This manual suits for next models
1
Table of contents
Languages:
Other BADU Control Unit manuals
Popular Control Unit manuals by other brands

Sharp
Sharp ND-AR325H installation manual

Hydra-Stop
Hydra-Stop Insta-Valve 250 Patriot installation instructions

Advantage
Advantage Sentra SR Series reference guide

Elster
Elster Kromschroder VMF Series technical information

Watts
Watts HKFC20 Series Installation and operating manual

Viessmann
Viessmann LB1 Installation and service instructions for contractors