Baldwin Baldwin Concert Master Mark II User manual

Owner’s Guide
Concert Master Mark II

INSTRUCTIONS PERTAINING TO A RISK OF FIRE, ELECTRIC SHOCK, OR INJURY TO PERSONS
The lightning flash with arrowhead symbol, within an equilateral triangle, is intended to alert the user to the presence of u n-insulated
“dangerous voltage” within the product’s enclosure that may be of sufficient magnitude to constitute a risk of electric shock to
persons.
The exclamation point within an equilateral triangle is intended to alert the user to the presence of important operating and
maintenance (servicing) instructions in the literature accompanying the product
GROUNDING INSTRUCTIONS: This product must be grounded. If it should malfunction or breakdown, grounding provides a path
of least resistance for electric current to reduce the risk of electric shock. This product is equipped with a cord having an equipment-
grounding conductor and a grounding plug. The plug must be plugged into an appropriate outlet that is properly installed and
grounded in accordance with all local codes and ordinances.
DANGER - Improper connection of the equipment-grounding conductor can result in a risk of electric shock. Check with a qualified
electrician or serviceman if you are in doubt as to whether the product is properly grounded. Do not modify the plug provided with the
product - if it will not fit the outlet, have a proper outlet installed by a qualified electrician
CAUTION: TO REDUCE THE RISK OF ELECTRIC SHOCK,
DO NOT REMOVE COVER
NO USER SERVICABLE PARTS INSIDE
REFER SERVICING TO QUALIFIED PERSONNEL.
C A U T I O N
1

Introduction
Welcome
Congratulations on choosing the Baldwin Concert Master player piano system! A great
advancement over player pianos of yesterday, the Baldwin Concert Master sets several new
standards for ease-of-use, versatility, convenience, and musical realism. Whether you want soft
background music for conversation, the gentle mood created by an upbeat jazz trio, or a powerful
symphonic experience, the Baldwin Concert Master will accommodate you with years of unsurpassed
musical enjoyment.
Overview
The Baldwin Concert Master player piano system is a MIDI equipped music playback and record
system (with record option) for acoustic pianos. MIDI is an acronym for Musical Instrument Digital
Interface. It is a universal language adopted by the musical instrument manufacturers so
various MIDI equipped devices can talk to each other. MIDI is a form of communication.
The Baldwin CM system has two main parts, the Stationary Controller (the central brain) and the
solenoid rail (or engine). Notes or keys C1 to A8 on the piano have a corresponding solenoid.
The Performance system performs the MIDI messages sent from either the internal CD-ROM, Internal
Library, or external USB device. A message received by the CM prompts the key solenoid to rise, hitting
the tail of the piano key. The associated hammer then precisely strikes the string, exactly duplicating manual playing.
Choosing aGood Location
To prevent excessive internal heat buildup in the electronic components, place the piano in a location
with sufficient air circulation.
Do not install the piano:
Near heat sources such as radiators or hot air ducts.
In direct sun light.
In places where excessive dust, mechanical vibration or shocks exist.
2

Introduction/Welcome 2
Getting Started 3
What media to play 3
Source/Library 4, 5
Volume and Balance 6
Tone Control/Expression/Tempo/Transpose 7
Help/Repeat/Random/Menu 8
Attention/Additional Features 9
Quick Start 10
Unlock/Copy 11, 12, 13, 14
A-B Repeat 13
Internal Library Structure 15, 16
Playlist Function 17
IR Remote 18, 19, 20
Functions - Update - Remote Assistant 21
Solenoid Controller Setup 22
Split Play - Split Note - Help - Random 23, 24
Repeat - Tone - Pan - Tempo - Transpose 25
Add/Playlist - All - Delete - Rename - Copy 26
The Source Buttons 27
USB 28, 29
CD 30
CD Auto Play 31
Accompaniment Volume 32
Menu 33, 34, 35, 35
37, 38, 39, 40
41, 42
Connections 42
Playback Sources 43
Index 44, 45
Internal Library Song List 46, 47
Warranty 48

In order to start operating your ConcertMaster, first:
Make sure that the power cord is connected to a wall outlet (110V).
Turn on the power supply mounted under the piano.
Performance will now go through a 60 second“self check” process.
Now we are ready to use all the features of the Pianoforce player system.
HOW TO TURN THE CONTROL UNIT (PERFORMANCE) ON and OFF:
The left sensor near the edge of
the display is for ON/OFF (the
same function can also be
performed by using the remote
Power button)
The right sensor near the edge of
the display is for the CD Eject
function. (Can be also performed
using the remote’s Eject button).
Move your finger close to one of the sensors (no need to touch the display), and hold it there until the
function becomes active. Display will show ON or OFF or the CD tray will open.
GETTING STARTED
Now that you have your player system turned on, you want to enjoy it as soon as possible!
Just a few moments and you will hear your piano playing by itself and even accompanied by audio tracks.
WHAT MEDIA TO PLAY?
The Concert Master plays music from several different sources and multiple formats:
INTERNAL LIBRARIES: (MIDI,Wave, Compressed audio, Multiple Player Piano CD formats)
PLAYER PIANO CDs: (Yamaha Pianosoft Plus , QRS Pianomation , Pianoforce WAVE+MIDI CD,
Webonlypiano CD, Data CD)
USB: Wave,Wave+MIDI, MIDI, OGG, OGG+MIDI, WPD (Pianodisc wav track),WPM (Pianomation wav tracks),
WDK (Yamaha Disklavier wave track)
3
TM TM
TM
TM TM

LET THE MUSIC (YOUR PIANO) PLAY!
SELECT A SOURCE
To select a source press the corresponding button on the IR (Infrared) remote.
First, try a CD.
1. Insert a player piano CD into the CD drive and press the CD
button
2. Press YES to start the playback
3. Adjust the Volume and accompaniment
4. Select a different track
5. Press NO to stop the playback
4
-
ConcertMaster

DISCOVER THE INTERNAL LIBRARIES
To select one of the internal libraries
Press the LIB (Library) button
The display shows current album ( ex. CLASSICAL VOL 1)
If you want to listen to music from the CLASSICAL VOL 1 library, press YES
The display shows MIDI Demo
Press YES
The display shows the first song in the Library
Press YES - piano starts to play
To select a different library press the LIB (Library) button again
Press the + and - buttons to scroll through the libraries
Press YES to activate the library
Press the PREVIOUS or NEXT button to select an album
Press YES
Display shows the first song in the album
Press YES - Piano will start to play
To select or play another song press the NEXT or PREVIOUS button
To stop the playback, press the NO button
When an album is selected from the internal library, these buttons can
also be used to go to the previous or next album.
5
The Baldwin Concert Master comes with pre-loaded music libraries.
ConcertMaster

DISCOVER THE INTERNAL LIBRARIES
To select one of the internal libraries
Press the LIB (Library) button
The display shows current album ( ex. CLASSICAL VOL 1)
If you want to listen to music from the CLASSICAL VOL 1 library, press YES
The display shows MIDI Demo
Press YES
The display shows the first song in the Library
Press YES - piano starts to play
To select a different library press the LIB (Library) button again
Press the + and - buttons to scroll through the libraries
Press YES to activate the library
Press the PREVIOUS or NEXT button to select an album
Press YES
Display shows the first song in the album
Press YES - Piano will start to play
To select or play another song press the NEXT or PREVIOUS button
To stop the playback, press the NO button
When an album is selected from the internal library, these buttons can
also be used to go to the previous or next album.
5
The Concert Master comes with pre-loaded music libraries.
Concert Master

HOW TO ADJUST THE VOLUME AND BALANCE
There are two volume controls available:The Master Volume
(+ - ADJUST) control the global volume of the piano and orchestral
accompaniment while the Accompaniment (+ -) buttons adjust the
balance between the piano and background music.
The master volume controls how hard or soft the hammers strike the
piano strings (128 levels), while the Accompaniment controls the audio
output to the speakers.
Press the Adjust + - buttons to increase or decrease the global volume
(piano and accompaniment - if available). The level ranges from 1-30.
NOTE:The lowest piano volume level is 1.
If you want to turn off the piano (and accompaniment) completely
without interrupting the playback, use the MUTE button.
interrupting the playback, use the MUTE button.
While the Master Volume is set to 1, it is possible to adjust the
accompaniment level up or down in relation to the piano volume.
Use the accompaniment + - buttons to adjust. Once the master volume
is moved off of“1”, the accompaniment will keep the same “balance’with
the piano.
MUTE
If the music has orchestral accompaniment and sometimes even
vocal, you can adjust the balance between the piano and the audio
tracks by pressing the ACCOMPANIMENT + - buttons.
The levels are 0 - 25 when the master volume is set to 1, or 0-42 when
Master is 2 or higher.
6
Concert Master

CM plays your piano just like a pianist does. As keys are moving,
the hammers are striking the strings with variable force (expression).The
orchestral accompaniment is typically amplified by powered speakers
under the piano. There are different brands of speakers used and
performance and sound will vary accordingly. Recordings also represent a
wide spectrum of sound especially in tone (treble, mid-range, and bass). In
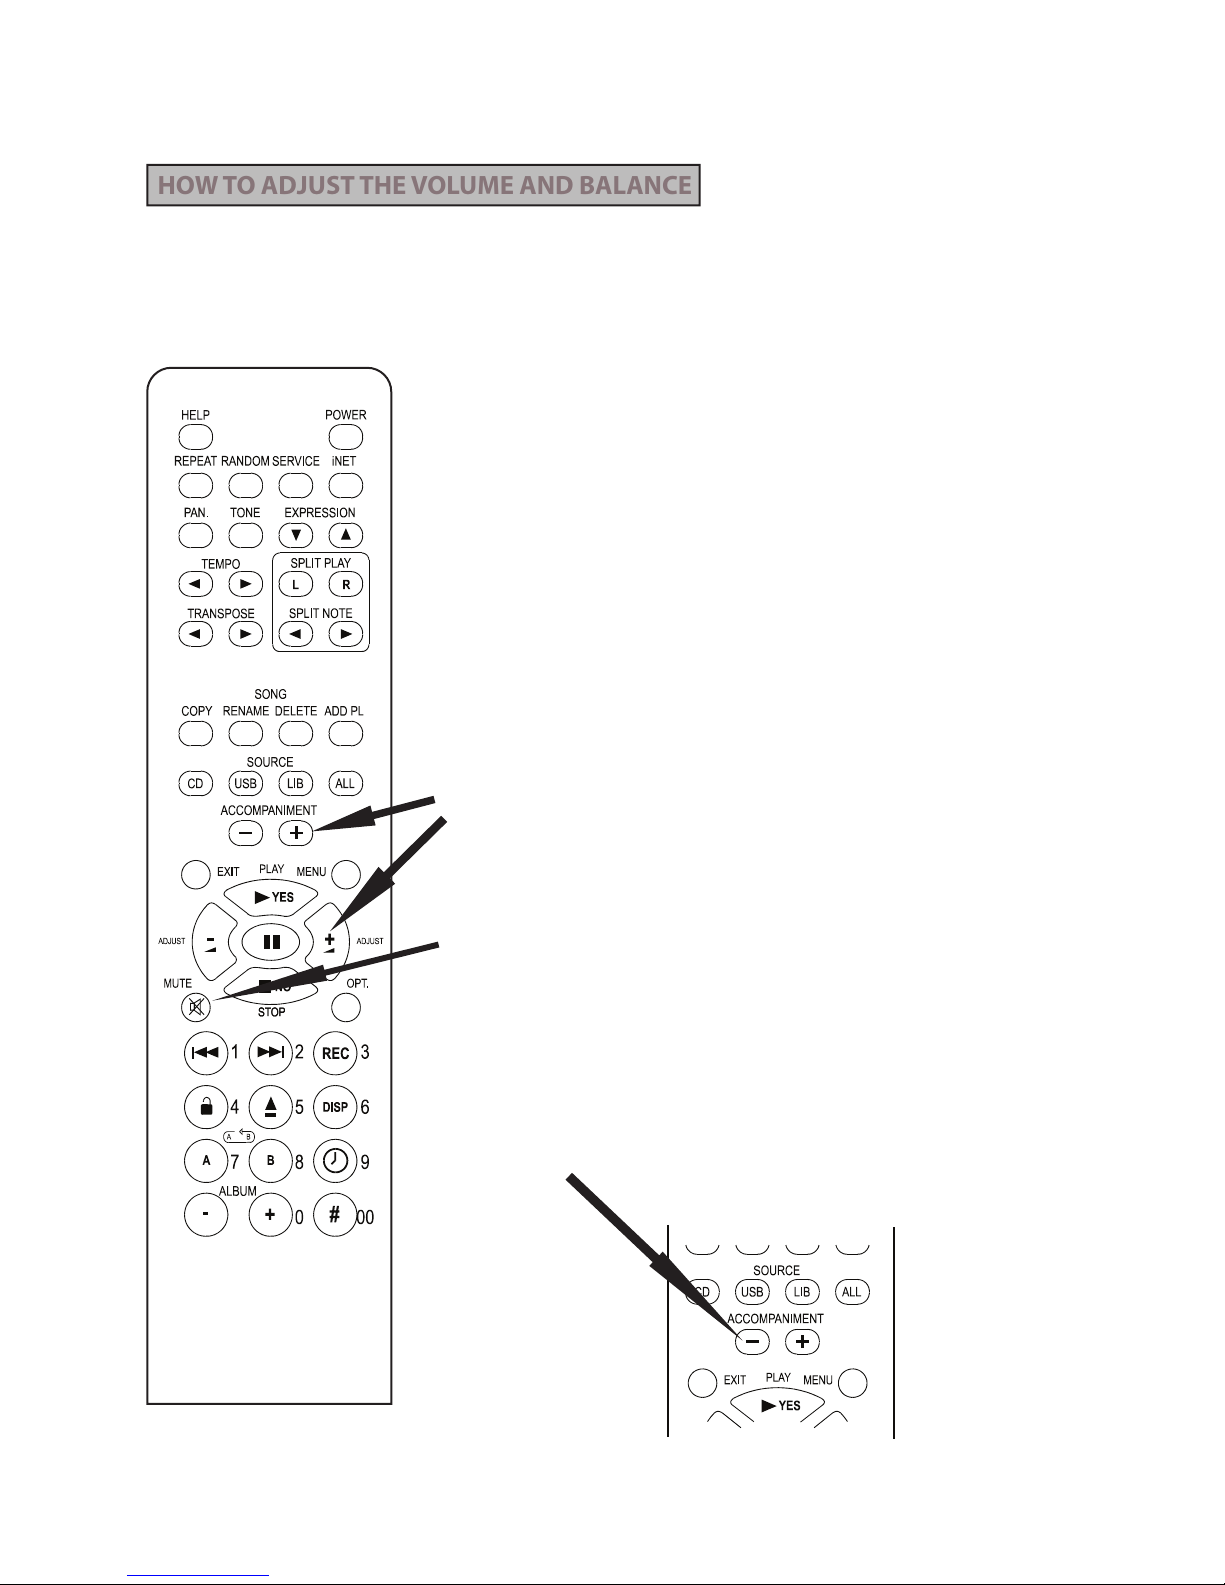
addition to the Balance control between the piano and the accompani-
ment, CM also offers tone control, so you can adjust Treble and
Bass to your liking.
When first pressing the TONE button, the display shows Tx (x is the
current boost or cut level of the Treble setting). To change the
Treble setting use the ADJUST + - buttons.
When the TONE button is pressed the second time, the display
shows Bx (x is the current boost or cut level for the Bass level).
Use the ADJUST button to change the bass setting.
The Treble and Bass corrections of the digital accompaniment range
from -18 to +18 dB.
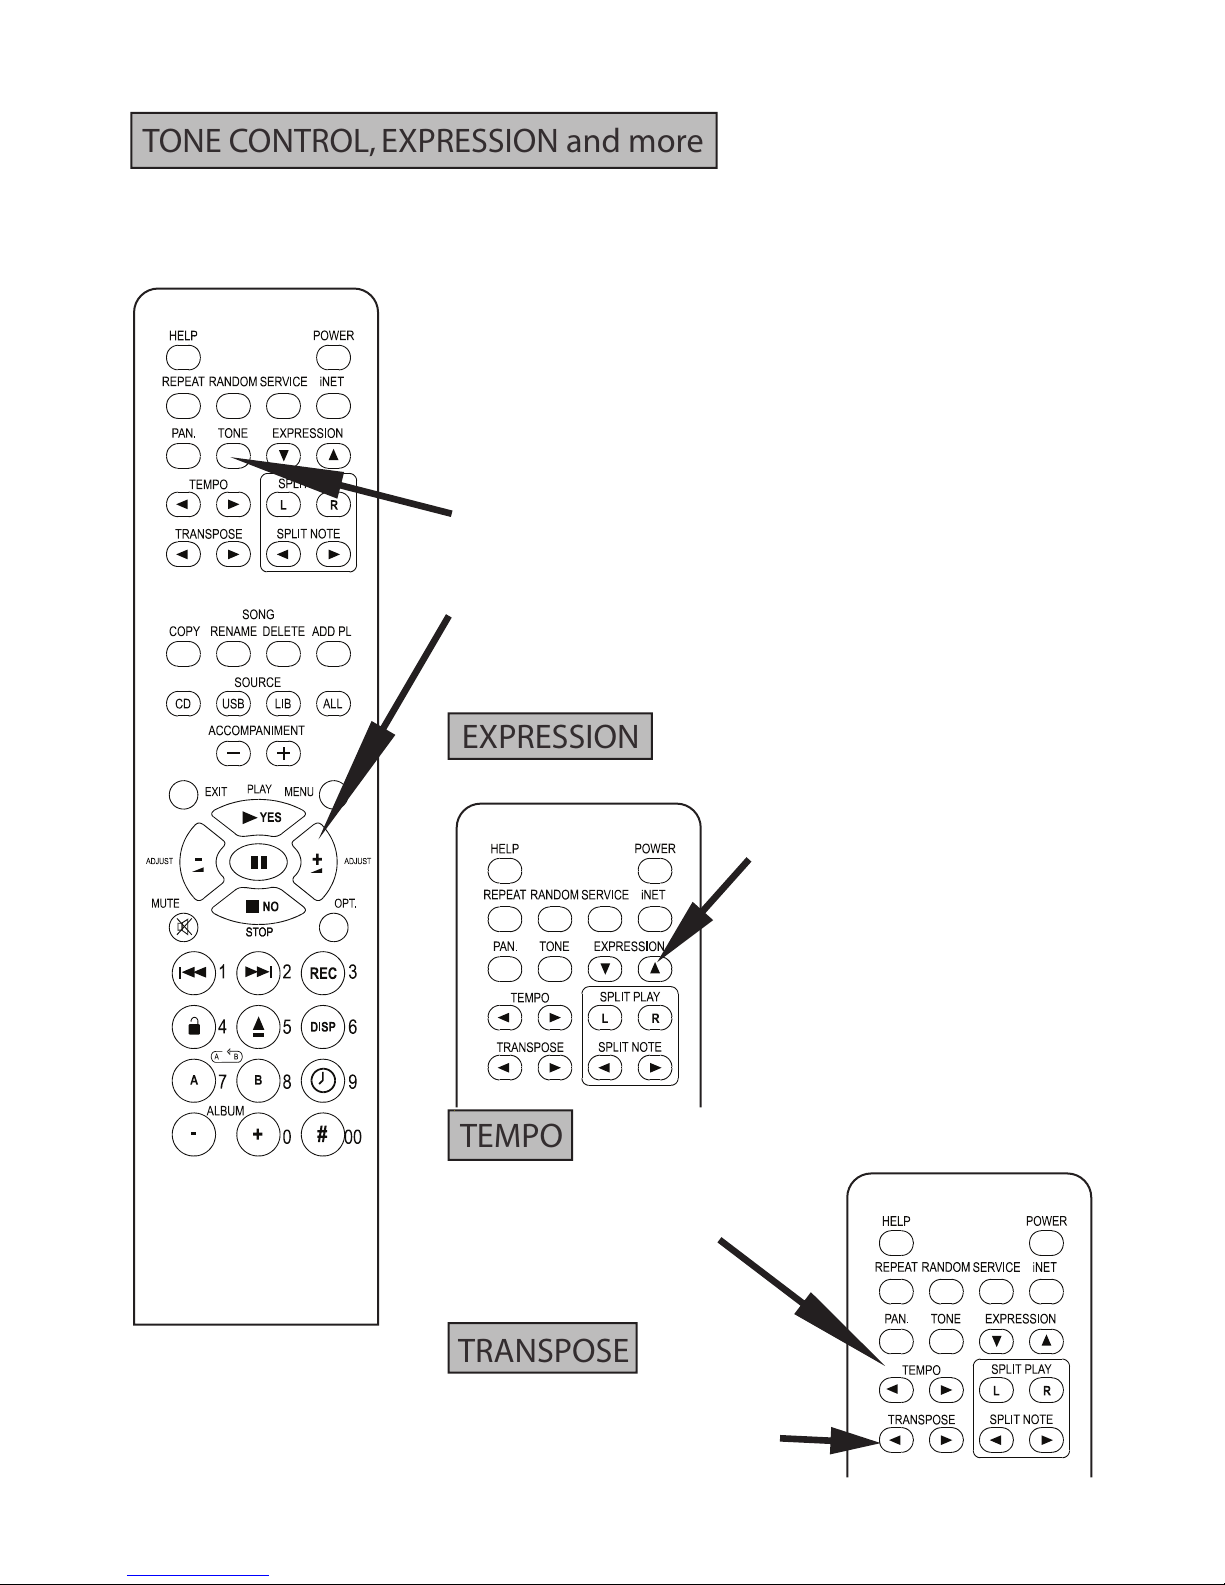
Performance plays multiple CD and other
media formats.The piano expression level
varies from different software manufac-
turers.The EXPRESSION buttons allows
selection of SOFT, MEDIUM, or DEEP
expressions. Deep is probably the best for
classical piano music, soft if very quiet
playback is desired, and medium for pop,
jazz, and easy listening music.
TEMPO buttons can
change the playback
tempo by + - 50% of some
playback formats such as
MIDI .
It is possible to transpose
some playback formats by
+ - 2 octaves
TONE CONTROL, EXPRESSION and more
EXPRESSION
TEMPO
TRANSPOSE
7
Concert Master

HELP
The REPEAT button toggles between three repeat options:
No Repeat
Single Song Repeat
All Song Repeat
REPEAT
Pressing the HELP button followed by another function
button will display information, instruction, and help.
RANDOM
The RANDOM button toggles between normal and
RANDOM. In this mode, Performer automatically selects
songs in no particular order from the current source.
MENU
The MENU opens up the list of all available features.
The main MENU items are:
SOURCE, AUDIO, PIANO, PLAYBACK OPTIONS, OPTIONS, SETUP, INET, ABOUT
You may want to discover the DISPLAY MENU first.
Using the MENU button followed by the ADJUST + - buttons you can select and adjust the:
DISPLAY SCROLL SPEED
LIGHT LEVEL
FADE LEVEL
FADE DELAY
You can also turn the touchless sensors ON and OFF
Push MENU, use the ADJUST + - buttons to
select SETUP. Then press YES, use the
ADJUST + - buttons to select DISPLAY SETUP.
Press YES and adjust the parameters.
The dot matrix display will show the new
setting.
8
For the complete MENU guide and all available Performance features, please refer to the owners manual or
use the built in Help function.

HOW TO COPY PLAYER PIANO CDs or MIDI FILES to a USB
The Concert Master has three USB connectors.You can connect a Jump Drive, USB Hard Drive, or USB Floppy Drive
to store a large collection of music. Only 1 USB Music storage device can work at a time.The system automati-
cally defaults music storage to the first plugged in device, reserving the other ports for other options.
IMPORTANT! Before you connect any USB device, turn off the ConcertMaster, connect the device, and power up.
WHAT CAN YOU STORE?
You can copy and store different format player piano CDs, MIDI files, and audio CDs.
HOW TO COPY
You will need a PC, USB device, and one of the following player piano CD, MIDI file, or Audio CD:
Yamaha Pianosoft Plus CD
QRS Pianomation CD
Pianodisc Player Piano CD (prior to January 2006 release)
MIDI files copied to CD
Standard audio CD
PREPARE! If plan to use an external USB hard drive, the drive has to be formatted first. It is important that the
hard drive is formatted with FAT 32 option and single partition. Since Windows may have a problem with
formatting a hard disk in FAT 32 beyond 32 Gig, we have included the format option and strongly recommend
using it instead of your computer.
1. To format a HD, turn off the Performemance system (at the Power Supply) or unplug it
2. Connect the HD
3. Turn on the power and wait until the boot and self check is complete
4. Press MENU
5. Select item MEDIA, press YES
6. Select item USB Format, press YES
Confirmation question with default answer NO is displayed“All data from connected device will be
erased during the format. Are you sure to proceed?”
7. Select item YES with button + (No changes to YES)
8. Confirm by pressing YES
Formatting is executed now - it can take about 5 minutes.
When the hard drive is formatted, turn off the ConcertMaster, disconnect the hard drive, then connect it to your PC.
Insert a player piano CD into the CD drive and open your CD burner program (like Nero).
Select the Convert Audio CDs to Audio Files.
Select the Destination Location (the USB hard drive you just connected)
Output file format: PCM wav file
Frequency: 44100
Bits: 16
Channels: Stereo
Select the CD tracks you want to copy
Select: GO
After the song files are copied, you will need to change the file extensions as follows:
For Yamaha Piano Soft Plus change from; My Song.wav to My Song.wdk
For QRS Pianomation CD file from; My Song.wav to My Song.wpm
For Pianodisc Player Piano CD from; My Song.wav to My Song.wpd
For Audio CD or MIDI file; no extension change is needed
12

1
Concert Master Internal Library Structure
4
The Concert Master has 256 Mb Internal memory allowing to store MIDI and audio files. There are several libraries
setup and the user can create a large number of additional ones.The“tree structure”makes navigation easy.
Here is an overview how the Concert Masters Libraries and Albums are or can be organized:
Press the SOURCE LIB (Library) button
The display shows: Classical
To select another library press the ADJUST + - button
You will find the following libraries: Classical, Country, Download, Jazz, My,
Other, Popular, Rock, Shared, Quick Record
Add New Library
NOT ALL THE LIBRARIES CONTAIN MUSIC !
TO FIND AND PLAY MUSIC FROM A LIBRARY,YOU HAVE TO SELECT AN
ALBUM. ALBUMS ARE SUB-DIRECTORIES WITHIN THE LIBRARY.
The following LIBRARIES contain ALBUMS when your KD-7 is
CLASSICAL Press
Classical Vol 1 (ALBUM) 17 songs
COUNTRY (empty)
DOWNLOAD (empty)
JAZZ Press
East-West Locked ! See unlock information in the Quick Guide
Press
Jazz Vol 1 Press
Jazz Vol Press
Pop
Press
Standards (ALBUM) Press 16 Songs
OR
15

MY (empty)
Press
Inspirational (ALBUM) 10 Songs
Press
Latin (ALBUM) 16 Songs Press
New Age (ALBUM) 15 Songs
OTHER
to start playing Album
or press
POPULAR (Empty)
ROCK (Empty)
SHARED (Empty)
QUICK RECORD (Empty) - When recording, the new song is stored in this library until copied to other
library or source.There is only one song at a time stored in this library!
ADD NEW LIBRARY - create new library here
Press
Display shows: NEW LIBRARY NAME
Then cursor blinks
To enter the new library name:
Use the ADJUST - button
for upper case letters
Use the ADJUST + button
for lower case letters
Use the Next and Previous buttons
to move the cursor
Library Capacity
99 LIBRARIES 999 ALBUMS 999 SONGS IN EACH ALBUM
When finished, press
16

PERFORMER PLAYLIST FUNCTION
PLAYLIST is a temporary list of selected songs.They can be from different libraries or sources.
How to create a PLAYLIST
13
4
11
2
1Select a song from one of the sources (CD, LIBRARY, or USB)
2Press the SONG/ADD PL button to add a new song to the playlist
1Select a new song from one of the sources (CD, LIBRARY, or USB)
2Press the SONG/ADD PL button to add a new song to the playlist
Repeat the select and add functions as many times as needed
How to play a PLAYLIST
The button SOURCE/ALL 3selects all available playback sources
Press ALL 3
4
Press the ADJUST + - buttons 4to scroll through the available libraries
Select the library PLAYLIST
5
Press YES 5to start playback
NOTE !
PLAYLIST IS TEMPORARY AND IT IS NOT MEMORIZED AFTER THE
INSTRUMENT IS TURNED OFF !
17
Concert Master

Concert Master IR Remote
Almost all the Concert Master functions are
selected and activated from the IR
(Infrared) remote controller.The remote
controller operates on two 1.5 V AAA
batteries. Although the batteries have a
long life time at average use, it is necessary
sometimes to replace them for
uninterrupted operation.
Note: If for any reason the remote controller
is not operational,Concert Master has CD
Autoplay default feature, meaning that
using the touchless sensor on the CD units
display can open the tray. After a CD is
inserted and the tray is closed,Concert Master will
start the CD playback automatically at the
default main and accompaniment volume
setting.
The following pages will describe each
button on the remote and guide you
through the related functions.
18
BAL
Concert Master

Description of the remote controller buttons
[1] Power – turns the CD control unit on or places it into standby mode
[2] Service – accesses service functions like ECR Calibration or firmware update (see menu Service)
[3] iNet – internet access functions
[4] Expression up/down – to select playback expression Soft, Medium, or Deep (see menu Piano/Expression)
[5] Split L,R – playback split hand on/off buttons.When L is pressed, the left hand playback is muted.
To un-mute, press L again.When R is pressed, the right hand playback is muted. To unmute press R.
[6] Split note – to select the Split Note.The Split Note divides the keyboard into Left and Right playback.
Pressing the split up/down buttons select the next or previous split note. Note:When Split Note
is changed the selected key is softly depressed indicating the new Split Note.
[7] Help – displays help information. Press the Help button followed by another you wish to access the
help and information about.
[8] Random – selects between random or normal song playback.
[9] Repeat –selects between No Repeat, Single Song Repeat, and All Songs Repeat
[10] Tone – selects the audio tone adjustment. When first pressed , the display shows“T”and a number.
The Treble can be increased or decreased by+18 -18dB using the Ajust + - buttons. Pressing the Tone
button again, (display shows BX) the Bass can be increased or decreased by +18 - 18dB by using the
Adjust + - buttons.
[11] Balance – audio BAL left and right adjustment (when 2 speakers installed). When pressing the PAN
button (display shows PX), the audio sound can be shifted left to right in the stereo field using
the Adjust + - buttons. Center position is P0, hard left is P-10, hard right is P+10
[12] Tempo – to change playback tempo of currently played MIDI file. When pressed
(display shows SX), current tempo can be changed (+ - 50%).
[13] Transpose – to change playback pitch of currently played MIDI file. When
pressed (display shows TX).The current MIDI file can be transposed by + -24 steps.
Note: It is possible to transpose AMI song (player piano CD), by 12 tone increments, but
the audio portion of the CD remains the same.
[14] Add to Playlist – to add the current song to the Playlist. Note: Playlist can be selected with
button Source All [16] and select the Playlist by browsing all sources with buttons –[25]
and +[26].
[15] Library – to select an internal library and album.When pressed display shows the last
selected Group of albums in the internal library. A different group of albums can be selected by
using the Adjust + - buttons.To enter the desired group press YES. Use the Adjust buttons to
select an Album and press YES.
[16] All Sources – to select one of the sources like Quick record or Playlist.
[17] Copy/Rename/Delete – to perform any of these functions with the current song.
[18] USB source select – to select and access the currently connected USB drive as source of
playback.
[19] CD source –to select CD as the source of playback.
[20] Accompaniment Decrease – Decrease relative volume of the accompaniment
[21] Accompaniment Increase – Increase relative volume of the accompaniment
[22] Menu – Opens main menu.When pressed the display shows the last selected menu item.
To select a different item use the Adjust buttons. Enter menu by pressing Yes [24]. If deeper
menu item exists - the last selected item is displayed.
19

[23] Exit – Exits current display context (e.g. menu). Basic context is the current song name.
[24] Yes/Play – confirms current selection or starts playback.
[25] - Decrease – to decrease the current value, volume, and scroll through selections
[26] + Increase – to increase the current value, volume, and scroll through selections.
Note: buttons [25][26] when menu is selected show next or previous menu item.
When value is selected, - + buttons change current value. When nothing is selected
(song name or song time is displayed), - + buttons change Main volume.
[27] No/Stop – to abort current selection or stop the playback.
[28] Options – to open current context menu with options (see menu/options)
[29] Mute – to mute/un-mute playback. If playback is muted – it is the same as setting the main
volume to zero (0).
[30] Previous song / Fast rewind – to select the previous song. When the button is pressed and held
for 2 seconds, fast rewind is engaged. If the song playback is advanced more than 6 seconds,
then pressing button [30] will rewind it to the current song start.
[31] Next song / Fast forward – to select the next song. When the button is pressed and held for 2
seconds, fast forward.
Note:When a song name (or other text) is edited on the player display - pressing the Previous [30]
will delete the last letter. Button Next [31] will accept current letter and forward
editing to the next letter.
[32] Eject – Ejects CD from drive. When playback from CD is active, playback will be stopped before ejecting.
[33] Unlock – When the selected album/group is locked, player shows: “Album/group is locked”,
followed by the information you need to order Unlock code.
The ordering information shows (e.g.Yes: Order code A-593-8315). Press YES,
the display will ask to enter the Unlock Code (e.g. 1234.5678.9123). This code
can be entered directly from the remote by using numeric buttons [30-41]. E.g. to enter code 1234,
press the buttons [30][31][38][33]. For details – see section: Digital Right Management.
[34] Set B point – When button B is pressed the end of MIDI song loop point is set.
[35] Set A point – When button A is pressed the start of MIDI song loop point is set.
[36] Previous album – When an album from one of the internal libraries is active, press this button to select
the previous album.
[37] Next album – When an album from one of the internal libraries is active, press this button to select
the next album.
[38] Record – Start a single track record. The optional Record Strip device has to be installed to be able to use
this function.The file will be automatically stored after the Stop button is pressed. To access the song,
press Source All/Quick Record. The song can be copied to any library or USB location, and it can be renamed.
[39] Display – selects one of the three options: Song name, Song time, and Album name with the number of
songs stored in the album.
[40] Clock – to set the timer options (Sleep, Daily Schedule, Set Date/Time). For details
see menu Setup/Timer.
[41] Numeric keys activation – When entering an Unlock Code, the user can toggle between function
of number and function keys. It can also be used for entering a song number (e.g buttons [41][30][33]
will select song 14), album number, or menu is started.
20

1. POWER - Like the touchless sensor on the
FCD this button turns the control unit ON or
sets it into STANDBY mode.
NOTE: Use the ON/OFF switch
on the power supply (under the piano) for
complete power down. Wait 20-30 seconds
before re-starting the whole system.
2. SERVICE - Access to Solenoid Controller Setup,
Touch Sensor Setup, Firmware Upgrade,
Remote Access
Note: Service functions should only be used by
a certified Pianoforce technician!
THE SERVICE FUNCTIONS
Press SERVICE
Available functions are: Upgrade Firmware
Remote Assistant
Solenoid Controller Setup
Upgrade Firmware
New features, improvements, or corrections can be added by operating system updates . Updates can
simply be made by connecting the Performer to the Internet. Power down the system completely by turn-
ing off the power supply under the piano. Wait about 45 seconds. Connect a high speed Ethernet cable to
the back of the CD controller (ETHERNET 10M/100M). Turn on the power supply. When the start up is
completed, and if a new operating system version is available for your piano, the message “Yes, New Update
Is Available ... Do you want to update?”will appear. If you want to upgrade, press the Yes button and follow
the instructions on the display.
If a high speed Internet connection is not available, ask Pianoforce or your dealer for the latest firmware
version on a CD. Updating with CD is very easy. Open the CD tray, insert the CD labeled Pianoforce
Performance Firmware Update Version X.XX. By default, Performance has CD Auto Play. If this function is not
disabled by the user after the tray is closed, the update will start automatically. Follow the instructions on
the display. DO NOT TURN OFF THE SYSTEM WHILE UPDATING THE OPERATING SYSTEM. When the update is
completed, remove and store the CD.
Remote Assistant
To access the Remote Assistant, a high speed Internet connection is necessary. Power down the player
system by turning off the power supply under the piano. Connect the Ethernet cable to the back of the CD
unit. Turn on the power and wait until the start up is completed. Press SERVICE, then select the Remote
Assistant function by pressing the ADJUST + or - buttons. Press YES and follow the directions on the display.
With the Remote Assistant you can connect to online service support. Your system can be tested, analyzed
and in some cases even repaired this way. Please contact the Pianoforce service department at 877-542-
8807 ext. 2 before connecting to the Remote Assistant.
PERFORMER FUNCTIONS
21

Solenoid Controller Setup
The Solenoid Controller Setup functions are intended to be used by a qualified installer technician only.
Here is a description of the functions:
Ca: Calibration advanced - this function is very important to achieve the best possible playback and
has to be performed by the installer technician!
Ca will adjust the expression levels for each key solenoid, tests if each
solenoid is performing correctly and performs an analysis before auto-
matically storing the information. Ca is the highest calibration level and
depending on the firmware version it can take 45-90 minutes. During
calibration the lid of the piano should be open and a quiet enviroment
is necessary.
To start the advanced calibration press the YES button while the display shows: Ca:Calibration advanced
Cq: Calibration quick - this is a faster but less detailed calibration.
An: Analysis of calibration - this function can be used to review the calibration result. By pressing YES
the system performs a calibration test and displays the results.
Ck: Key Calibration - allowing single key calibration. When pressing YES Kxx will be displayed
((xx) indicating the key number). Pressing the Forward or Rewind buttons any of the keys between
K05-K84 can be selected. Once the key is selected, pressing the YES button will start calibrating the
selected key.
HC: Key Hold Force - sets the optimal key solenoid hold force. Piano actions, and key weights are
different on each piano. It is important to select the best Key Hold Force value for the particular piano.
Available value ranges from 0-99. Pressing the ADJUST + and - buttons will increase or lower the force.
If the hold force is too low, the piano will play short (staccato) notes even if it was recorded as a long
(legato) one. Adjust the hold force level and listen, carefully triggering several keys accross the
keyboard. Keys can be selected by pressing the Forward or Rewind buttons.The default value is set
to 6. By our experience Key Hold Force level 6 is optimal for most small to grand pianos.
RC: Key Release Force - controls how fast the plunger returns to the rest position.This is another
very important parameter to set to the optimal value. Available value ranges from 0-99. The lower the
value, the faster the plunger returns to its rest position.This will allow the solenoid to“fire”faster
resulting, better note repetition. Higher value slows down the plunger return, resulting quieter
plunger movement but decreasing repetition rate. Select different values testing several keys
accross the keyboard. Listen to a piano piece you know very well, especially with fast repeating
notes. Select the optimal release value. Factory setting is 13.
SC: Sustain Force - adjusts the force of the pedal solenoid.The Sustain Force is not calibrated
automatically. It is important to select a value that will lift the damper rail without delay
and at the minimum mechanical noise. Pressing YES will display the current force level. Pressing
the ADJUST + and - buttons will increase or decrease the solenoid force. It is important that all
trapwork related mechanical adjustments are correct (loss motion, solenoid travel, susutain lever)
before the SC value is selected.The default setting is 23. Once the optimal value is established, it is
recomended adding +2 digits. During extended playback the solenoid heats up and needs
additional power to perform correctly.
WARNING! These functions should only be used by a certified
Concert Master technician !
22
Table of contents