B&G electronics DAR-04 User manual

PLEASE READ BEFORE USING THE EQUIPMENT
EN 3.0
INSTALLATION AND OPERATION MANUAL
English
DAR-04
Digital Audio Recording System
& Digital Audio Recording Software
DAR-04 Digital Audio Recording System DAR-04 Digital Audio Recording System
2 3
DAR-04 Digital Audio Recording System 2
INTRODUCTION
DAR (Digital Audio Recording system) has the capability to record and process conversations,
executing a digital audio processing to deliver a higher quality.
DAR records conversations from 1 to 4 audio inputs simultaneously and stores them in an
internal memory. All the conversations are stored during a week time for each audio input
and, once the maximum storage capacity has been reached, it starts to rewrite the oldest
recordings fi rst, and so it records in a continuous loop. The equipment accepts different
audio input devices, such as B&G microphones or B&G intercoms.
DAR can be set to record at specifi c time schedules; otherwise, DAR records continuously by
default, even when the intercoms are off.
The equipment includes a software for recording management, where the recorded audios
can be fi ltered by date, played, and downloaded. For the equipment and software to function,
both the DAR and the computer executing the software need to be connected to the same
computer network (LAN).
INSTALLATION
Before installing the DAR, make sure that the audio input device to plug in (intercom or
microphone) is properly installed and operational.
Depending on the input device to connect with the DAR, locate the audio wires and perform
all the required junctions, as explained on the next page.
If the wire’s length is suffi cient for the installation space, connect them directly to the DAR;
otherwise, add more wire and do all the jointing. Take the recommendations into account to
avoid affecting the input device’s correct operation.
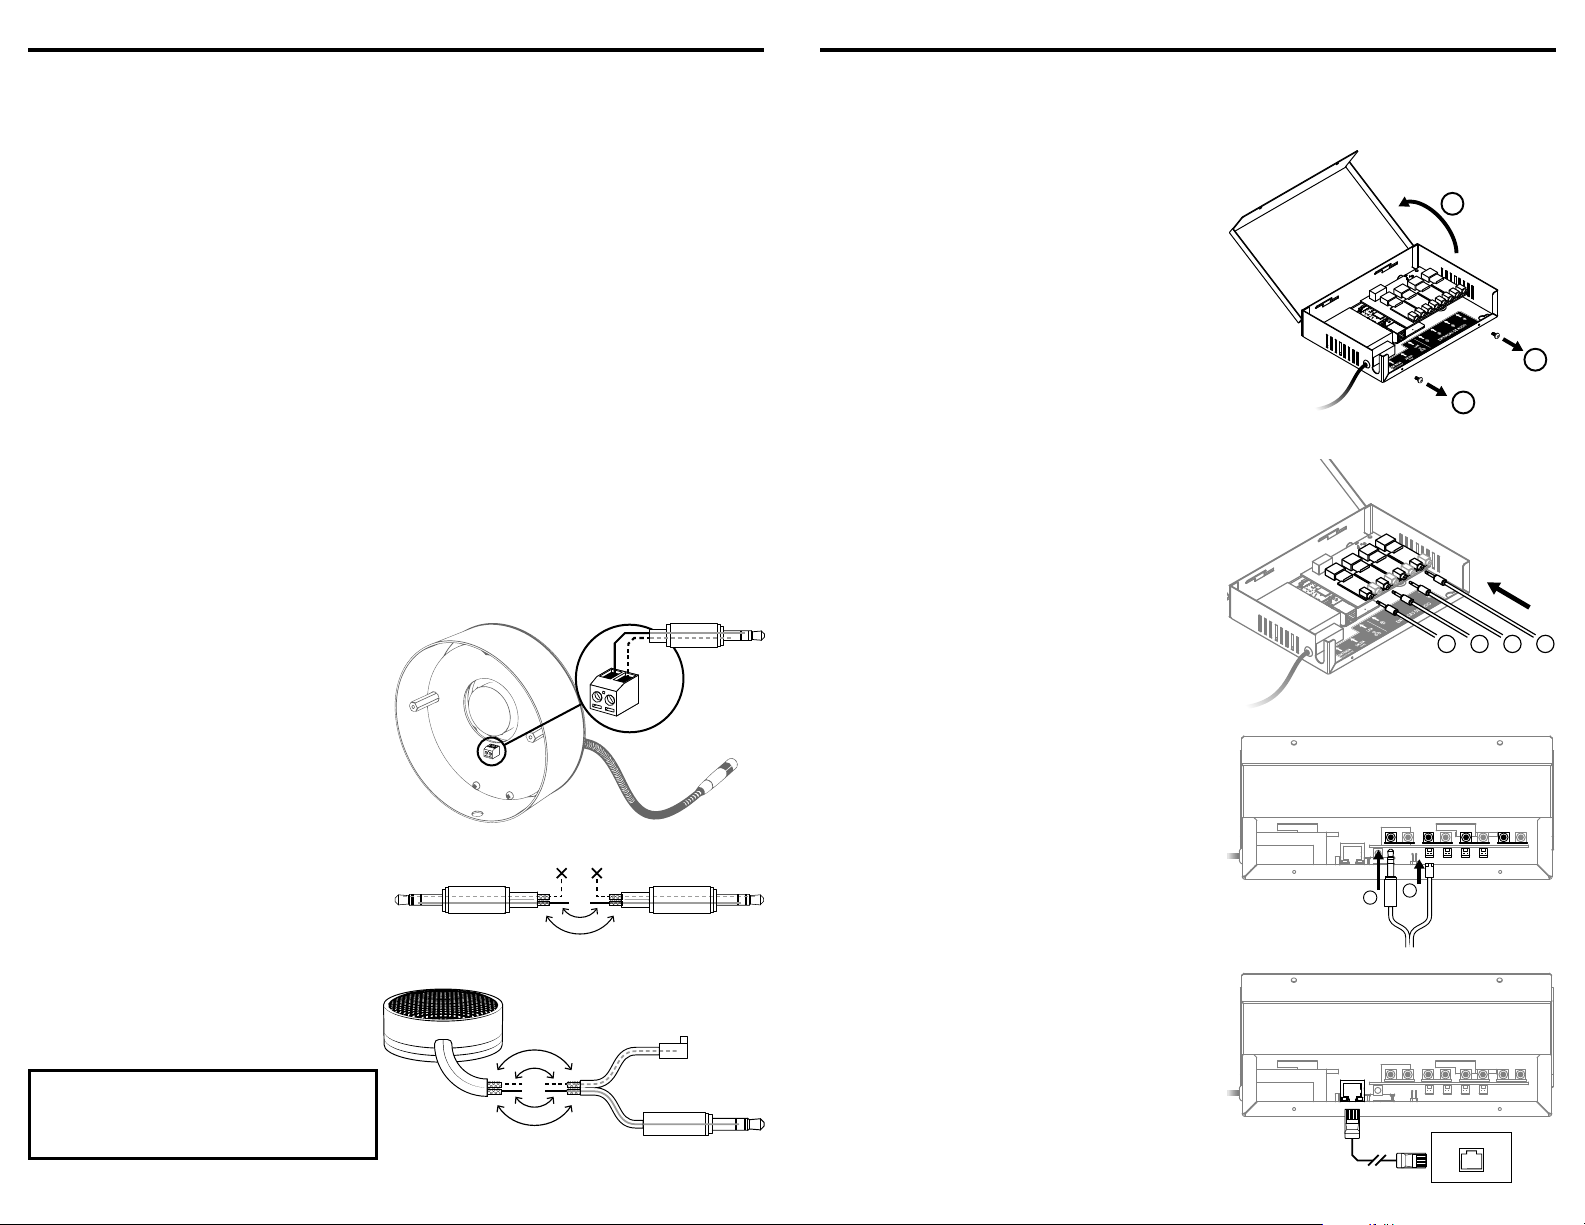
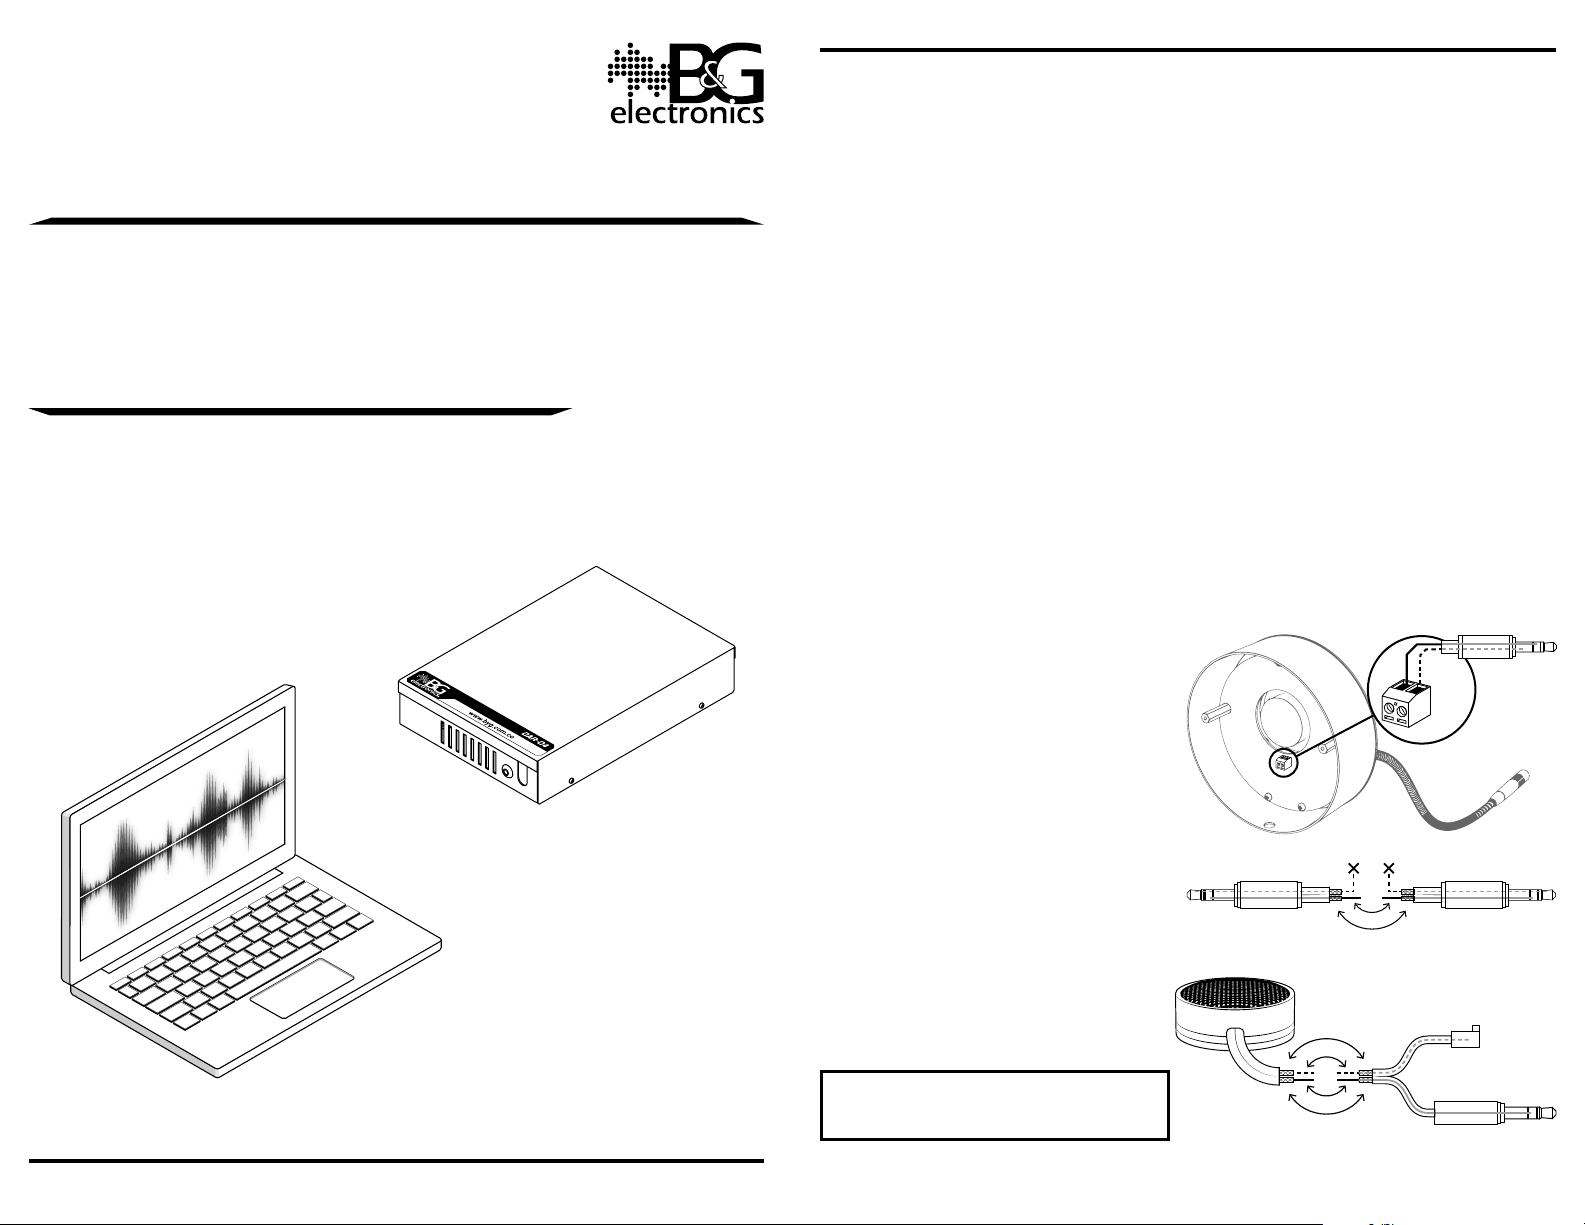
Connection instructions according to the input device
Connection to LTG intercom
Plug the wires into the terminal as shown
in the fi gure.
Adjust the wires with the terminal screws,
leaving some slack wire.
SHIELD
RED
Connection to LTC intercom
Join and weld the wires as shown in the
fi gure. Insulate the wires upon fi nishing.
D
L
E
I
H
S
D
E
R
WHITEWHITE
Connection to Microphone
Join and weld the wires as shown in the
fi gure. Insulate the wires upon fi nishing.
D
L
E
I
H
S
S
H
I
E
L
D
D
E
R
W
H
I
T
E
NOTE: Avoid connecting the red’s
shield to the white’s shield to prevent
introducing noise into the recordings.
Once you have done all the needed wire joints, follow the installation procedure.
DAR-04 Digital Audio Recording System 3
Installation procedure
When selecting the place where the DAR electronic unit is to be installed, make sure that
there is a nearby network point.
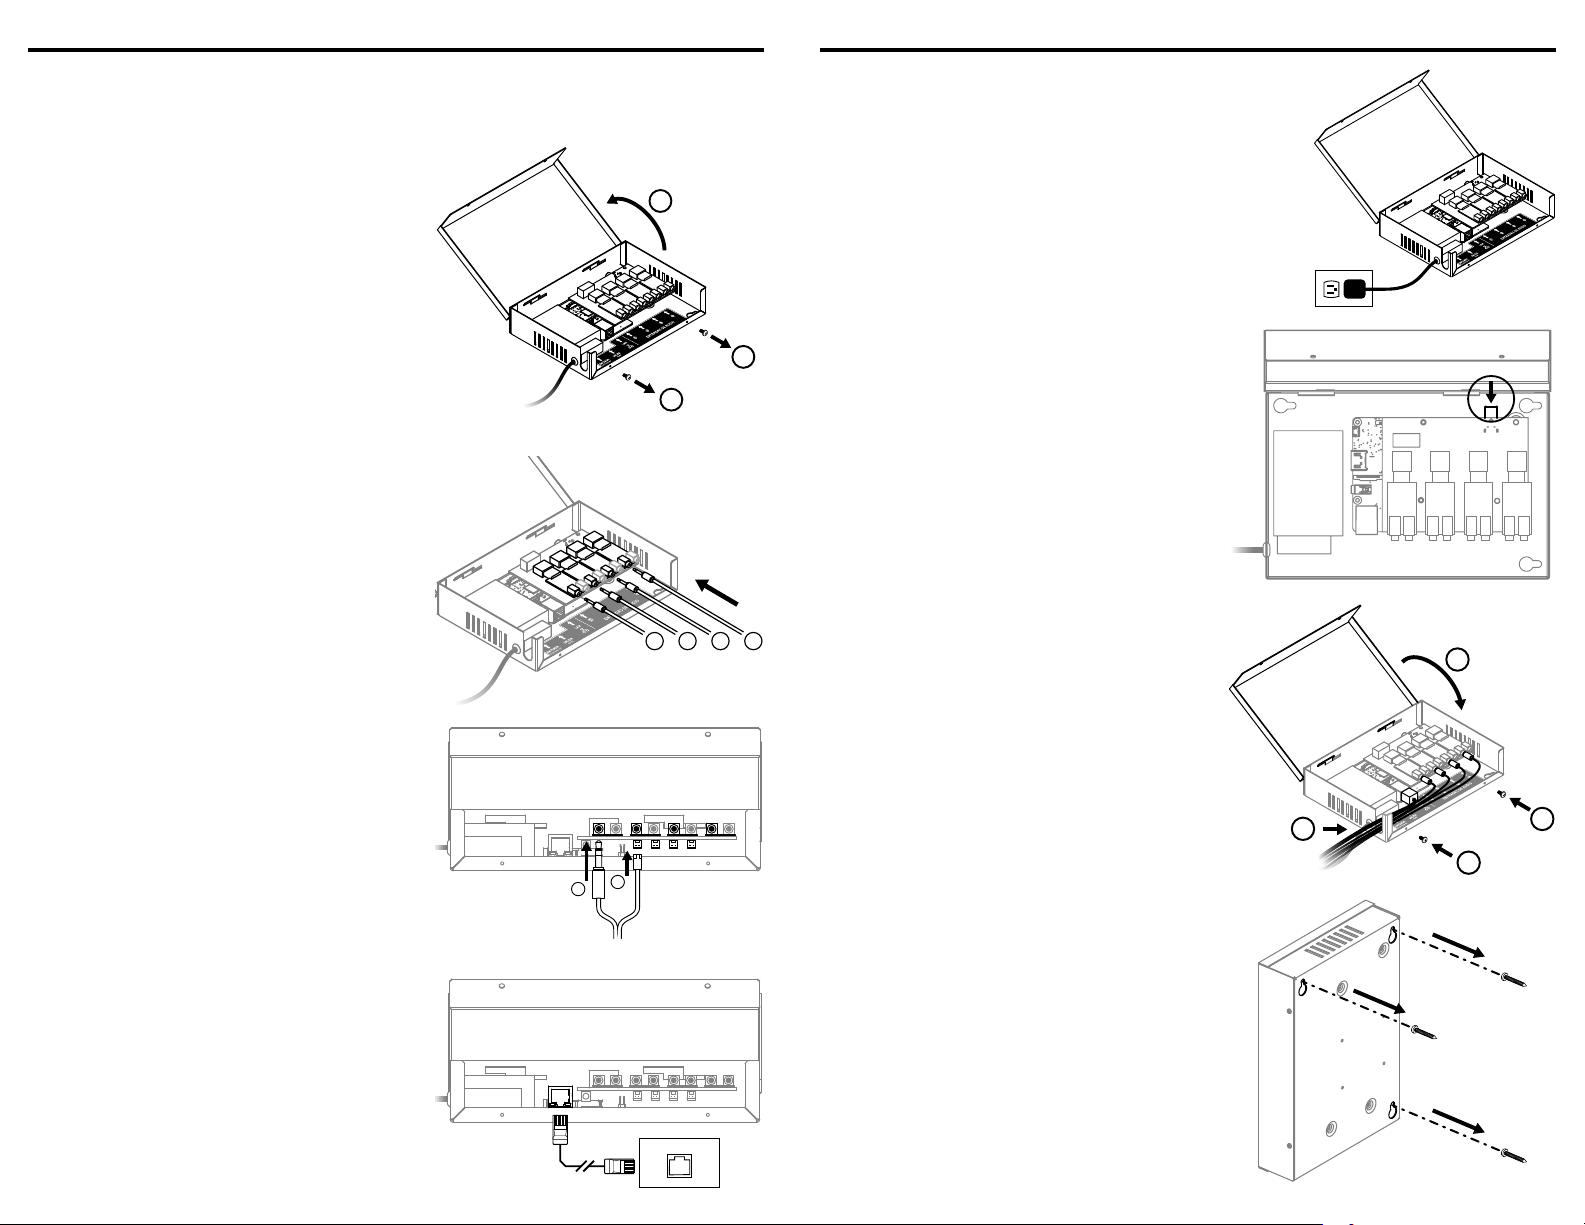
1. Open the case
Remove the two screws on the side and pull up
the case cover.
1
1
2
2. Connection of audio input according to the input device
2.A. Connection to LTG and LTC intercoms
Connect the 3.5 mm stereo plug coming from the
audio input (LTG or LTC) into one of the yellow
audio connectors as shown on the fi gure.
Repeat the procedure for the 4 audio inputs.
1 2 3 4
2.B. Connection to Microphone
Connect the 3.5 mm stereo plug coming from the
audio input (LTG or LTC) into one of the yellow
audio connectors as shown on the fi gure.
Connect the power connector to one of the
connectors below the audio inputs as shown on
the fi gure.
Repeat the procedure for the 4 audio inputs.
12
3. Network connection
Conecte el cable UTP al punto de red más
cercano.
RED
LAN

DAR-04 Digital Audio Recording Software 5
DAR-04 Digital Audio Recording System 4
DAR-04 Digital Audio Recording System 4
4. Power connection
Connect the power plug to a 110 or 220 V AC
power outlet.
110V / 220V
AC
5. Turn on the equipment
To turn on the equipment, press and hold the
power button for 5 seconds until the power
indicator blinks. The power indicator will stop
blinking once the DAR has started up correctly.
6. Accommodate cables and close the case
Accommodate the cables and pass them through
the U shaped opening as shown on the fi gure.
Carefully shut the cover without squeezing any
cable.
Put back the screws, securing the cover.
3
3
2
1
7. Mount on the wall
Position the wall mount slots at least two screws
on the wall.
Use the drilling template on the last page to
position the screws on the wall.
DAR-04 Digital Audio Recording System 5
DIGITAL AUDIO RECORDING SOFTWARE
SYSTEM REQUIREMENTS
Operative system: Windows 7 o superior
Multimedia: Audio playing device
BEFORE INSTALLATION
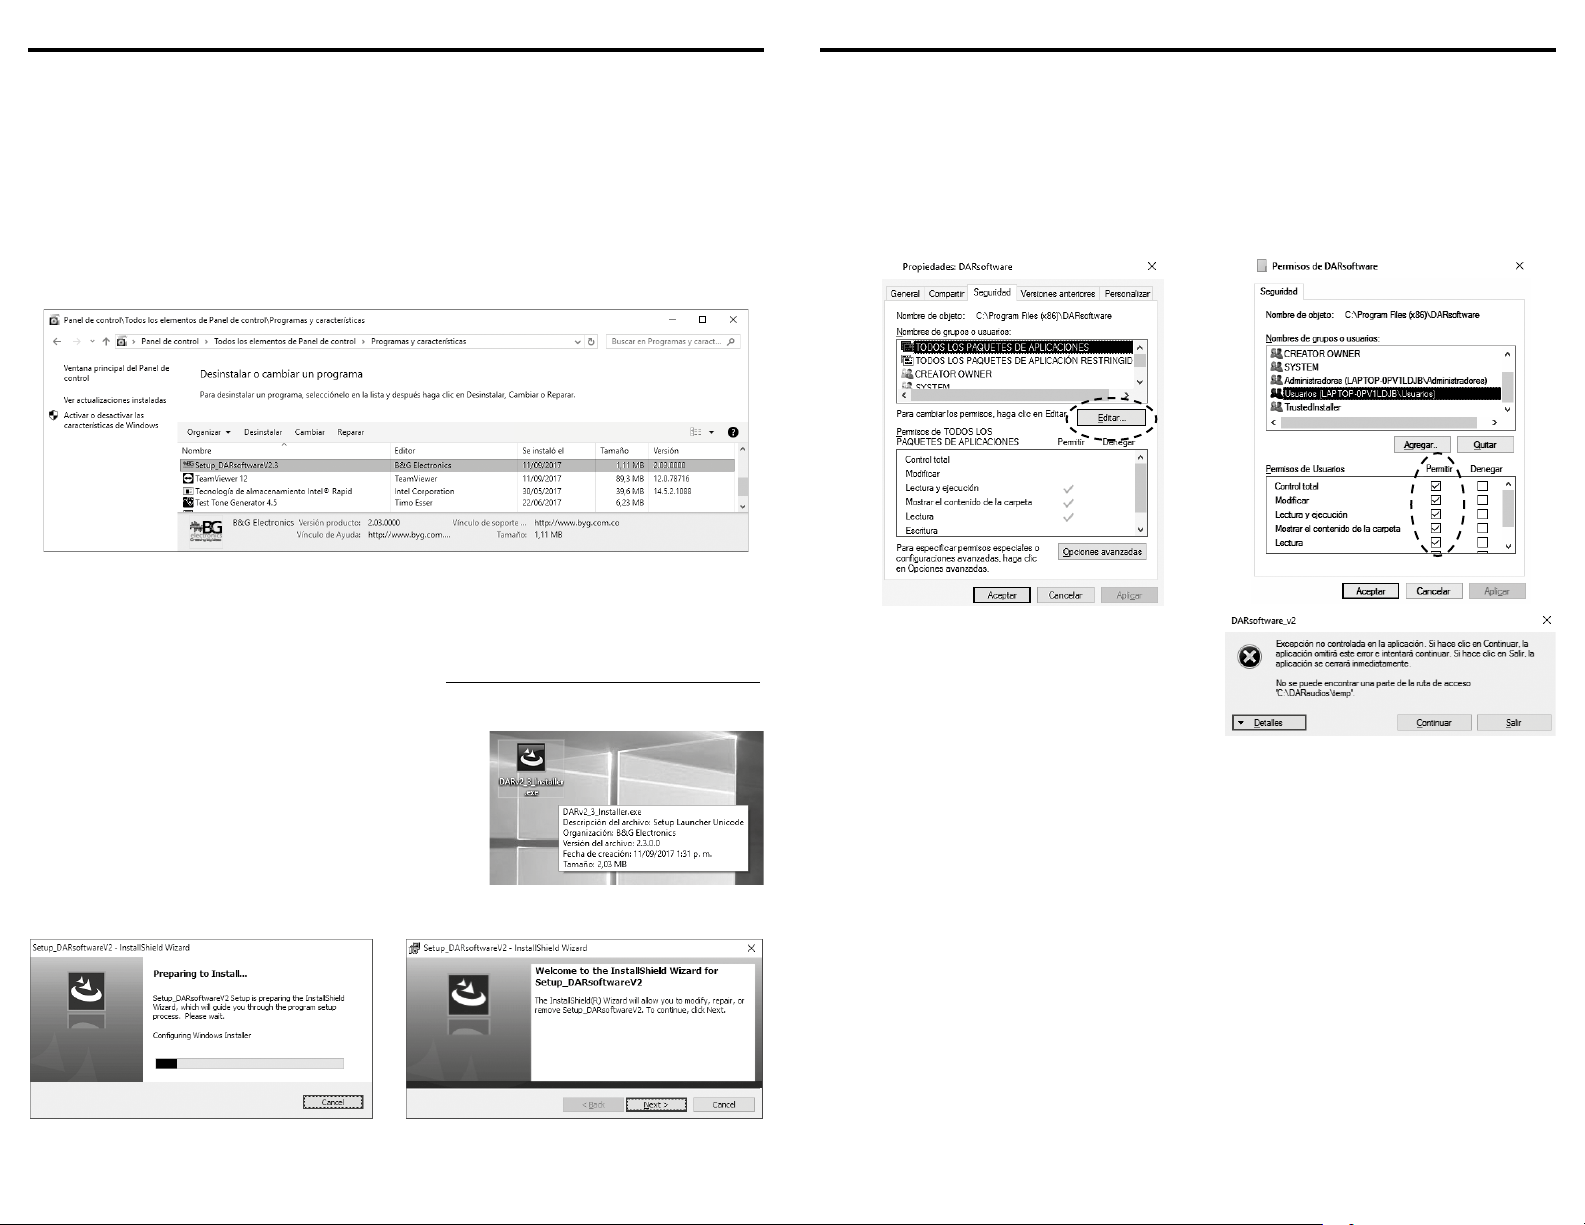
In order to avoid confl icts with previous versions, uninstall any existing versions of the
software by going to Control Panel / Programs and Features. Select the program DARsoftware
and click Uninstall.
Once any previous version has been uninstalled, delete the folder DARsoftware located in
Program fi les (x86), and delete the folder DARaudios located in the root directory C.
INSTALLATION
1. Download the installation fi le from www.byg.com.co/Productos/DAR_en.html, located
in the Resources tab, contained in the compressed fi le DAR-04_Software_Installer.rar.
Extract the installation fi le.
2. Run the application fi le DARsoftware_Setup.exe as
administrator.
In Windows 7 or superior, right click on the fi le
and select Run as administrator. Depending on the
user permissions, it is possible that it requests the
system password.
3. Follow the instructions given by installer and click Next when required.
4. At the end of the installation process, click the check box to allow the application to run,
so that it creates its home folders.

DAR-04 Digital Audio Recording Software DAR-04 Digital Audio Recording Software
6 7
DAR-04 Digital Audio Recording Software 6
5. Abandon the application and proceed to
grant permissions to its folders.
Look for C:\Program Files (x86)\DARsoftware
and right click on the folder. In the drop down
menu select Properties.
Go to Security tab and click on Edit.
6. In the pop-up window, select Users
(PCname\Users) and enable all of the
check boxes in the column Allow.
Thereafter, hit Apply and then Accept.
You can now start the software.
NOTE: If you get an error while trying to
play an audio, either because folder C:\
DARaudios\temp can’t be found (see
fi gure on the right), or because you lack
permissions, repeat the steps 5 and 6 on
this folder.
If the said folder does not exist, it is possible that it was not created due to lack of administrator
permissions. If that is the case, create the temp folder manually in C:\DARaudios.
CHARACTERISTICS OF DARsoftware
• Allows to select between multiple DARs and manage the recordings from the 4 audio
inputs connected to each DAR.
• Includes an audio player which allows to play up to 20 consecutive minutes and navigate
through the recordings, going forward, backwards, and skipping minutes.
• It offers two options of manual saving: download a backup of all the existing recordings,
and download of recordings from specifi c time ranges.
• Allows to create up to 8 users with read-only permission, in addition to the administrator
user created by default. These users without admin permission can only play and
download recordings.
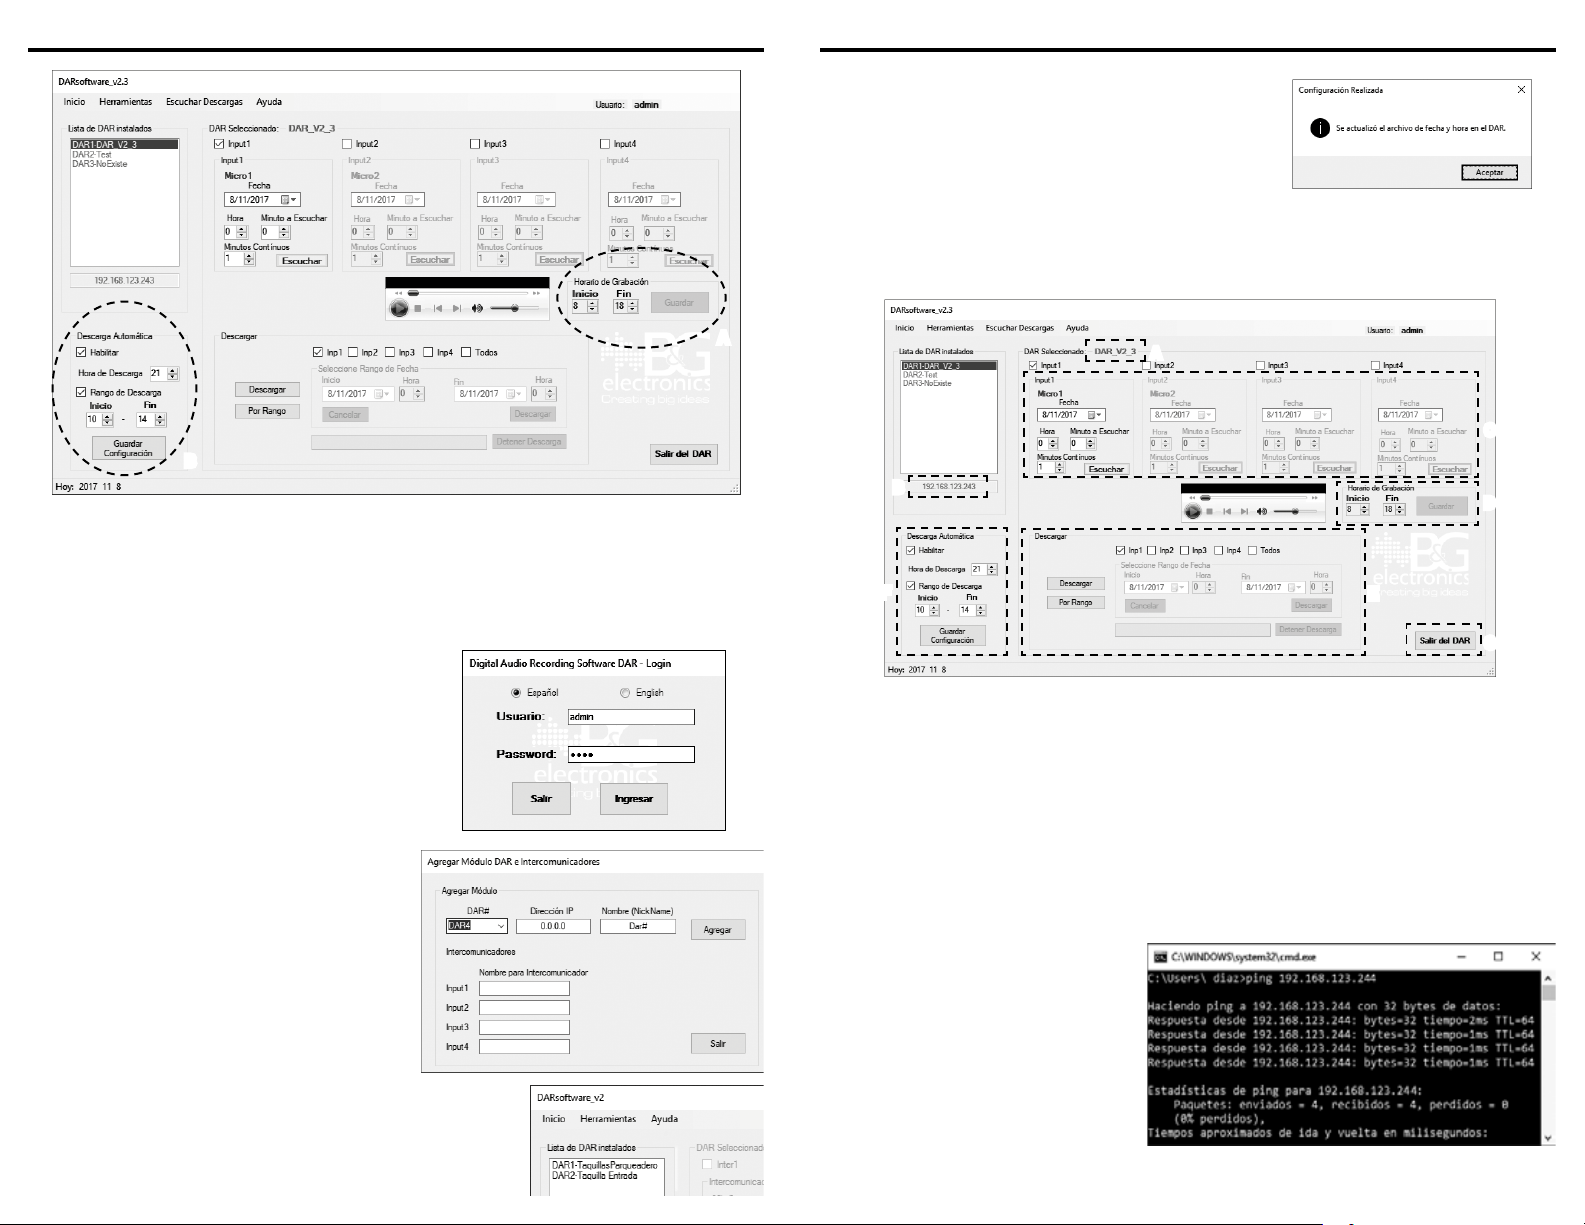
• Allows to set a time range to record. For example, if the opening time goes from 8am to
5pm, is it is possible to set the DAR to record conversations inside this period of time only
(see fi gure on the next page, A), allowing that way to optimize the use of the equipment’s
storage capacity.
DAR-04 Digital Audio Recording Software 7
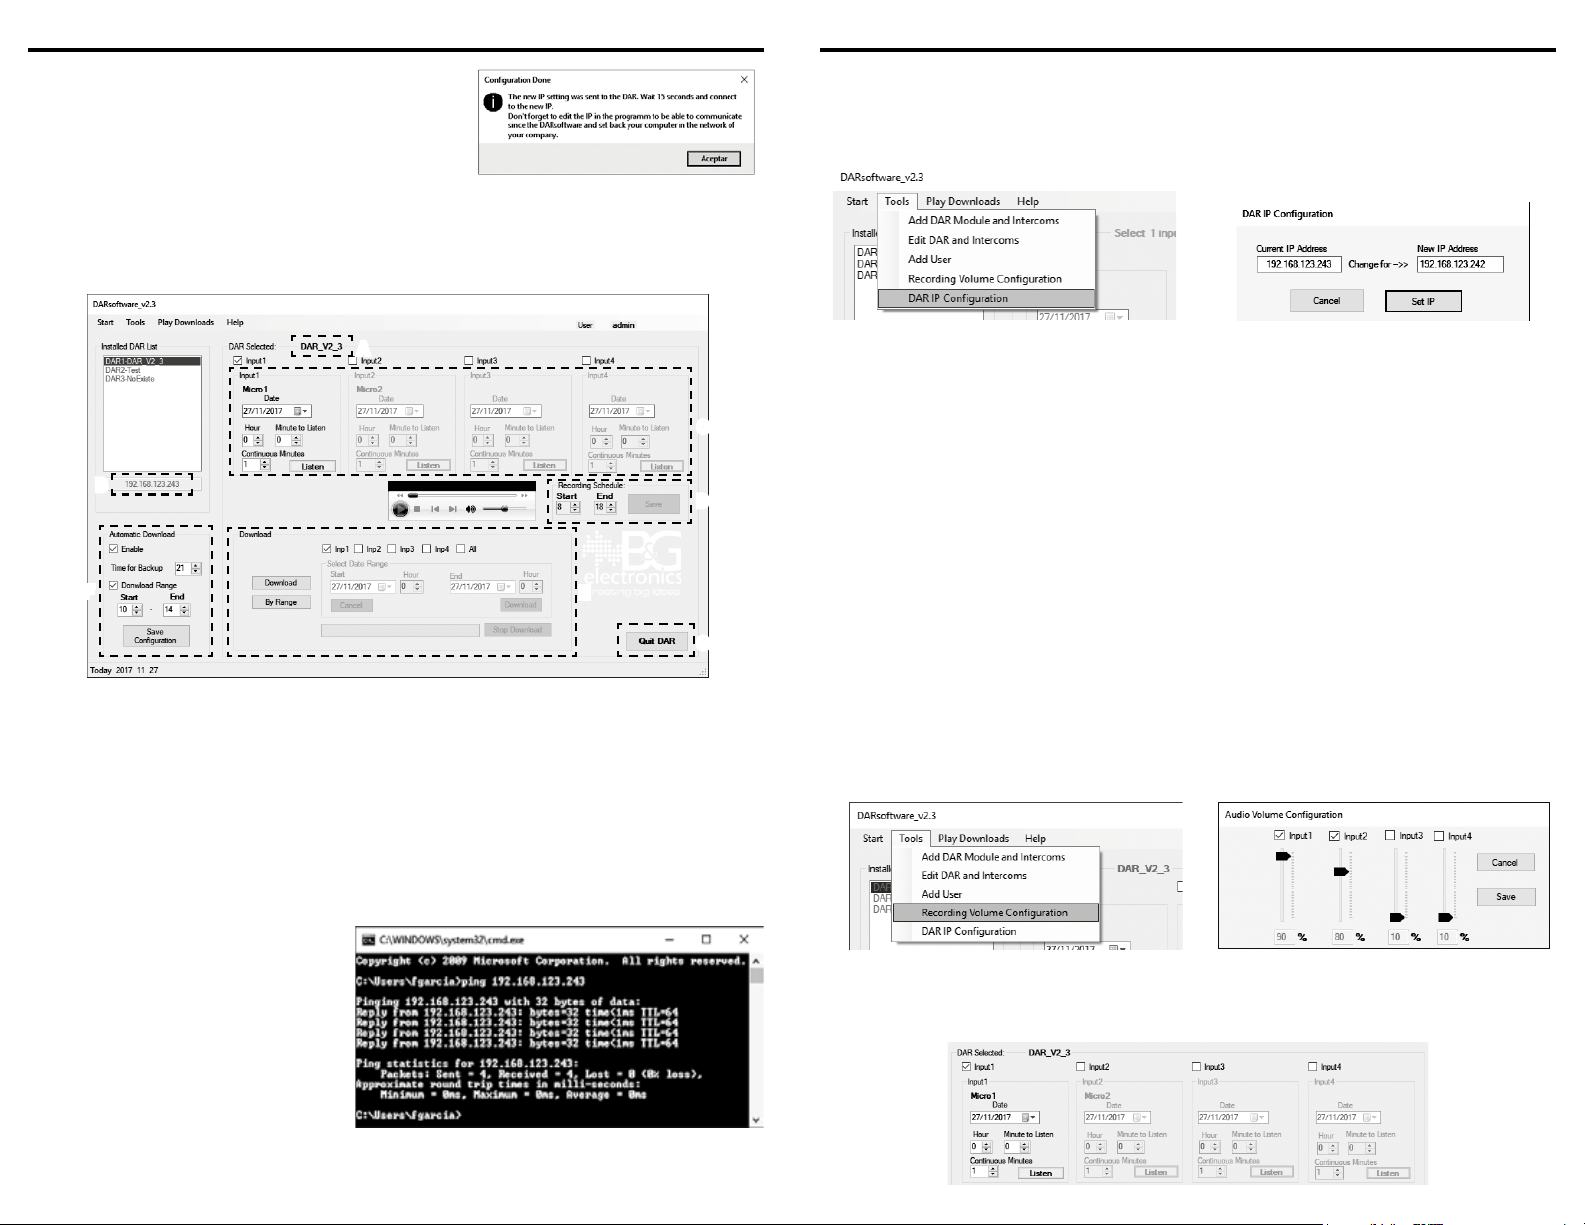
DARsoftware v2.3 A: Record inside a time range, B: Program of a daily backup
• Allows to program automatic downloads in order to do a daily backup of recordings,
either of the previous 24 hr, or of a specifi c period of time (see fi gure above, B). This option
downloads the recordings from all of the DARs managed on the software, as long as the
software is running.
OPERATION OF THE SOFTWARE
Log in and get access
1. Start the application and log in, entering the
user name and password.
By default settings, the administrator session
has “admin” as user name, and “1234” as
password (without quotes).
2. To be able to get access to installed DARs,
these must be added to the list of DARs
administrated by the program. To add a
new DAR, go to the menu Tools and select
Add Module DAR & Intercoms.
Select a DAR number from the drop down
list DAR#, or just leave the default value.
Enter the static IP address (fi xed) set in
the DAR and enter a name for the DAR
according to its location, so that it is easier
to distinguish between DARs (for example,
“Entrance box offi ce”). Name each of the
audio inputs connected to the DAR, from Input1 to Input4
(for example, “Desk 1”, “Desk 2”, etc).
Press Add when you are done. The interface will then
refresh, showing your new DAR in the List of installed DAR.
A
B
DAR-04 Digital Audio Recording Software DAR-04 Digital Audio Recording Software
8 9
DAR-04 Digital Audio Recording Software 8
3. To check an equipment, click on the respective DAR
from the List of installed DAR.
This order synchronizes the equipment and the
application, making it possible to visualize the
equipment’s information.
Successful synchronization message
4. Once the connection between DAR and software is successfully established, the right side
area of the interface gets enabled, displaying relevant information of the selected DAR
(see fi gure below): its name (A), IP address (B), browse through the recordings and play
(C), recording time range (D), download recordings (E), program backups (F), exit DAR (G).
A
C
B
F
D
E
G
DAR IP address confi guration
To set up the DAR’s IP address so that it matches with the installation point’s network, follow
the procedure explained below.
1. Connect the DAR to the computer that will run DARsoftware (either point-to-point or
through a switch).
2.
The DAR’s factory default IP is 192.168.123.244; you will need to change the computer IP to
a temporary one that is inside DAR’s IP network segment (for example, 192.168.123.240).
NOTE: Write down the computer’s IP before changing it; at the end of the procedure you
will need to change it back.
3. Make sure that the computer can
communicate with the DAR to the
default IP address by running a ping
test in the Command Prompt. Once
you ping the default IP, you should
get an answer as the one shown on
the right side image.
If it does not yield an answer (“host
inaccessible”), there is a problem
either with the physical connection
or with the computer network
confi guration.
In such case, check the wiring and the computer temporal IP.
DAR-04 Digital Audio Recording Software 9
4. Once the connection has been verifi ed,
open the DARsoftware and go to Tools /
DAR IP Confi guration.
5. You will get a message asking if you are
certain the computer communicates with
the DAR, and if you know the current IP (the
one you are about to change).
Then, you will get a pop-up window where
you can enter a new IP address for the DAR.
6. Afterwards, you will get a confi rmation that the procedure is ongoing and you will need
to wait a few seconds while the DAR restarts and the new confi guration is successfully
applied.
Thereafter, you will need to edit or add the IP address in the DARsoftware interface (go to
Tools / Edit DAR & Intercoms or Tools / Add DAR Module & Intercoms), so the computer can
connect and download audios from the user network.
NOTE 1: After fi nishing the procedure, change the computer’s IP address to the one it
originally had.
NOTE 2:
If you forget the current IP, reset the factory IP and redo the confi guration procedure.
While the DAR is on, press and hold the Reset button (5 s) using the tip of a paper clip; the
equipment will then restart and you will be able to connect using the IP 192.168.123.244.
Audio input activation and volume confi guration
It is possible to set the recording volume for each audio input independently. If, for instance,
audio input 1 records at a lower volume than the rest, it can be set to record at a higher
volume without affecting the confi guration of other audio inputs.
1. Select the DAR for which you wish to set
the volume. In the menu bar on the top, go
to Tools / Recording Volume Confi guration.
2. In the pop-up window, activate the audio
inputs that will be recording by clicking
on their Input check box.
Once the inputs are active, set a volume
percentage for each and hit Save.
Play recordings
1. Select an active DAR from the List of installed DAR and then select one of the audio inputs
by clicking on its Input check box.

DAR-04 Digital Audio Recording Software DAR-04 Digital Audio Recording Software
10 11
DAR-04 Digital Audio Recording Software 10
2. Enter the point in time you
wish to play, by date, hour
and minute.
3. In Continuous Minutes,
enter the time length
you wish to play
starting from the
point you selected on
step 2.
4. Press Listen and if the
selected time range was
found in the recordings,
you will get the following
message:
Upon pressing Accept,
the reproduction will start
automatically.
NOTE 1: Follow the same procedure with the other audio inputs.
NOTE 2: If the time range was not found in the recordings, you will get an error message.
Recording schedule confi guration
Select the DAR for which you wish to set up the recording
schedule. In the Recording Schedule frame enter the upper
and lower limits of the recording time range.
NOTE:
Once you set a recording time range for a DAR, it will remain as its default confi guration
even after it is turned off.
Manual download of recordings
It is possible to download recordings from
one or more audio inputs at a time. Select
the audio inputs you wish to include in the
download by clicking on the check box Inp
(see fi gure on the right).
The downloaded audios are saved in the folder C:\DARaudios. Inside that folder, the fi les are
distributed in subdirectories by Input device, Year, Month, Day and Hour.
Download
Downloads the entire collection of recorded audios that have not been previously downloaded.
This procedure checks for already saved fi les and omits those during the download.
By Range
Downloads the recorded audios belonging to a
specifi c period of time.
Upon starting the download By Range, the frame
Select Time Frame gets enabled. Enter upper and
lower limits of the time range to download.
NOTE: During any download procedure the interface gets disabled to prevent breaking the
connection to the DAR and interrupt the download.
Automatic backup
If you wish to schedule a daily automatic backup of the
recordings, in the frame Automatic Download, click on the check
box Enable.
Enter the time at which the backup will start every day; the
program allows to schedule the backup only between 18 to 23 hr,
as it is the recommended time frame for such procedures.
If you wish to program a backup of recorded audio belonging to
a specifi c time range, click on the check box Download Range and
DAR-04 Digital Audio Recording Software 11
enter upper and lower limits of the range; otherwise (if Download Range is left unchecked),
the program will automatically save a backup of the last 24 hours.
If you wish to check the report of performed backups, open the fi le BackupHistory.txt located
in C:\DARaudios.
NOTE 1: Scheduled backups will download everyday, as long as the software is running.
NOTE 2: Once you hit Save Confi guration, the automatic backup confi guration will be saved in
the computer and it will load upon starting the program.
Playing recorded audios already saved in the computer
Downloaded audios are saved by the program in
C:\DARaudios; from that location, you can play
the audios by going to Play Downloads in the
menu bar.
You will then get a pop-up window where you can enter the minute you wish to play (see
fi gure below). For playing an entire hour, starting from the hour you entered, hit Play an Hour
(A); at any time during the reproducing you can pause, stop or go forward/backwards by
using the audio player’s controls (B)).
B
A
TECHNICAL SPECIFICATIONS
Input voltage 110 VDC
Maximum audio input devices 4
LAN connection outlet UTP connector RJ 45
Dimensions 21.5 x 15 x 4.5 cm 8.5’’ x 5.9’’ x 1.8’’
B&G ELECTRONICS
ONE YEAR LIMITED WARRANTY
BYG Electrónica S.A.S. guarantees that this product leaves the factory free from defects related to
materials and manufacturing. If a failure related to materials and manufacturing were to occur during the
period of one year after the date of purchase, BYG Electrónica S.A.S. would repair or replace the failing
equipment free of charge.
This warranty shall be voided if the product is modifi ed, tampered with, misused, or subjected to abnormal
working conditions. This warranty does not cover physical damage to the product surface. This warranty
does not apply when the malfunction results from the use of this product in conjunction with accessories,
other products, or peripheral equipment not designed by BYG Electrónica S.A.S.
DAR-04 Digital Audio Recording System 13
FAVOR LEER ESTE MANUAL ANTES DE USAR EL EQUIPO
ES 3.0
MANUAL DE INSTALACIÓN Y OPERACIÓN
Español
DAR-04
Digital Audio Recording System
& Digital Audio Recording Software
DAR-04 Digital Audio Recording System 2
INTRODUCCIÓN
DAR (Digital Audio Recording system) tiene la capacidad de grabar y procesar conversaciones,
ejecutando un procesamiento digital del audio para entregar una mayor calidad.
Graba conversaciones provenientes de 1 a 4 entradas de audio simultáneamente, en una
memoria interna. Todas las conversaciones se almacenan durante una semana por cada
entrada de audio y, una vez la capacidad máxima de almacenamiento ha sido alcanzada, se
empiezan a sobrescribir los audios más antiguos, grabando permanentemente en un bucle
continuo. Como entradas de audio, el equipo permite diferentes dispositivos tales como
micrófonos presenciales B&G o intercomunicadores B&G.
DAR puede confi gurarse para que grabe en un horario específi co; de lo contrario, DAR graba
ininterrumpidamente por defecto, incluso cuando los intercomunicadores están apagados.
DAR incluye un software para administrar las grabaciones desde donde pueden fi ltrar los
audios por fecha, así como escucharlos y descargarlos. Para que el equipo y el software
funcionen correctamente, tanto el DAR como el computador desde donde se ejecuta el
software deben estar conectados a la misma red de computadores (LAN).
INSTALACIÓN
Antes de iniciar la instalación del DAR, verifi que que el dispositivo de entrada de audio que
vaya a usar (intercomunicador o micrófono presencial) esté instalado y en funcionamiento.
Dependiendo del dispositivo de entrada que se vaya a conectar al DAR, ubique los cables de
audio y realice los respectivos empalmes, como se explica en la siguiente página.
Si la longitud de los cables es adecuada para el espacio de instalación, conecte
directamente al DAR; de lo contrario, adicione cable y realice los empalmes. Tenga presente
las recomendaciones para no afectar el funcionamiento del intercomunicador o micrófono.
Instrucciones de empalme según el dispositivo de entrada
1. Conexión a intercomunicador LTG
Introduzca los cables en la bornera como
se indica en la fi gura.
Ajuste usando los tornillos de la bornera y
deje los cables holgados.
MALLA
ROJO
2. Conexión a intercomunicador LTC
Una y suelde los cables como se indica en
la fi gura. Aísle los cables al fi nalizar.
A
L
L
A
M
O
J
O
R
BLANCOBLANCO
3. Conexión a micrófono presencial
Una y suelde los cables como se indica en
la fi gura. Aísle los cables al fi nalizar.
A
L
L
A
M
M
A
L
L
A
O
J
O
R
B
L
A
N
C
O
NOTA: Evite conectar la malla del
rojo con la malla del blanco para no
introducir ruido en la grabación.
Una vez haya realizado los empalmes, siga los pasos indicados en el procedimiento de
instalación.
DAR-04 Digital Audio Recording System DAR-04 Digital Audio Recording System
14 15
DAR-04 Digital Audio Recording System 3
Procedimiento de instalación
Antes de instalar el equipo asegúrese de tener un punto de red cercano al punto de
instalación.
1. Destapar caja
Retire los dos tornillos laterales y levante la tapa
de la caja.
1
1
2
2. Conexión de entradas de audio según el dispositivo de entrada
2.A. Conexión a intercomunicador LTG y LTC
Conecte el plug estéreo de 3.5 mm proveniente
del cable de la entrada de audio a conectar (ya
sea intercomunicador LTG o LTC) en una de las
entradas de audio amarillas, como indica la
imagen.
Repita el procedimiento con las 4 entradas de
audio. 1 2 3 4
2.B. Conexión a micrófono presencial
Conecte el plug estéreo de 3.5 mm proveniente
del cable del micrófono en una de las entradas de
audio amarillas, como indica la imagen.
Conecte el conector de poder a uno de los
conectores ubicados del lado inferior de las
entradas de audio, como se indica en la imagen.
Repita el procedimiento con las 4 entradas de
audio.
12
3. Conexión a red
Conecte el cable UTP al punto de red más
cercano.
RED
LAN
DAR-04 Digital Audio Recording System 4
4. Conexión a poder
Conecte a clavija a un tomacorriente de 110 o
220 V AC.
110V / 220V
AC
5. Encender el equipo
Para encender el equipo, presione y sostenga el
botón de encendido por 5 segundos hasta que
el indicador de encendido parpadee. El indicador
dejará de parpadear una vez el DAR haya iniciado
correctamente.
6. Acomodar cables y cerrar caja
Acomode los cables y páselos por el orifi cio en U
como indica la imagen.
Cierre la tapa teniendo cuidado de dejar ningún
cable aprisionado con la tapa.
Ponga los dos tornillos laterales que ajustan la
tapa.
3
3
2
1
7. Fijar a la pared
Coloque las ranuras de montaje sobre al menos
dos tornillos en la pared.
Use la plantilla de perforación de la última página
para ubicar los tornillos en la pared.
DAR-04 Digital Audio Recording Software DAR-04 Digital Audio Recording Software
16 17
DAR-04 Digital Audio Recording Software 5
DIGITAL AUDIO RECORDING SOFTWARE
REQUERIMIENTOS DEL SISTEMA
Sistema operativo: Windows 7 o superior
Multimedia: Dispositivo de reproducción de audio
ANTES DE INSTALAR
Para evitar posibles confl ictos con versiones anteriores, desinstale cualquier versión
existente del software ingresando a Panel de control / Programas y características, seleccione
la aplicación DARsoftware y haga clic en Desinstalar.
Una vez desinstalada la versión anterior, elimine la carpeta DARsoftware ubicada en Archivos
de Programa (x86), y elimine la carpeta DARaudios ubicada en el directorio raíz C.
INSTALACIÓN
8. Descargue el archivo de instalación desde www.byg.com.co/Productos/DAR.html,
ubicado en la pestaña Recursos, contenido en archivo comprimido Instalador_Software_
DAR-04.rar. Descomprima el archivo de instalación.
9. Ejecute como administrador el archivo del
instalador DARsoftware_Setup.exe.
En Windows 7 o superior, haga clic derecho sobre
el archivo y elija Ejecutar como administrador.
Dependiendo de los permisos del usuario, es posible
que pida la contraseña de administrador.
10. Siga las instrucciones del instalador y haga clic en Siguiente cuando sea el caso.
11. Al fi nal de la instalación, haga clic en la casilla para permitir que se ejecute la
aplicación, y así permitir que la aplicación genere sus carpetas de inicio.
DAR-04 Digital Audio Recording Software 6
12. Salga de la aplicación y proceda a
generar permisos para las carpetas.
Busque C:\Archivos de Programa (x86)\
DARsoftware y haga clic derecho sobre la
carpeta. En el menú desplegable seleccione
la opción Propiedades.
Seleccione la pestaña Seguridad y haga clic
en Editar.
13. En la ventana emergente
seleccione Usuarios (NombrePC\
Usuarios) y habilite todos los cuadros
de la columna Permitir.
Luego haga clic en Aplicar y
seguidamente en Aceptar.
Hecho esto, ya se puede iniciar el
software.
NOTA: Si al intentar escuchar un audio se
generara un error porque no se encuentra la
carpeta C:\DARaudios\temp (ver fi gura a la
derecha) o no tiene permisos para acceder a
ella, repita los pasos 5 a 6 sobre esa carpeta.
En caso de que no exista dicha carpeta, es posible que no se haya creado debido a permisos
de administración. De no existir, proceda a crearla manualmente (C:\DARaudios\temp).
CARACTERÍSTICAS DEL DARsoftware
• Permite seleccionar entre varios equipos DAR, y desde allí permite administrar las
grabaciones provenientes de las 4 entradas de audio conectadas a cada DAR.
• Incluye un reproductor de audio desde el que se puede escuchar una lista de hasta 20
minutos consecutivos de audio, así como manipular la reproducción a cada minuto,
permitiendo adelantar, atrasar, o pasar al siguiente minuto.
• Ofrece dos opciones de descarga manual de audio que permite elegir entre descargar
todas las grabaciones existentes, o descargar grabaciones por rangos de tiempo
específi cos.
• Permite crear hasta 8 usuarios con permiso de sólo lectura, adicionales al perfi l de
administrador que se crea por defecto. Estos usuarios sin permisos administrativos sólo
pueden escuchar y descargar grabaciones.
• Permite confi gurar el rango de horas que se desean grabar. Por ejemplo, si el horario de
atención es de 8am a 5pm, es posible confi gurar el equipo para que solo grabe durante
esas horas (ver fi gura en la siguiente página, A), permitiendo así optimizar el uso de la
capacidad de almacenamiento.
DAR-04 Digital Audio Recording Software DAR-04 Digital Audio Recording Software
18 19
DAR-04 Digital Audio Recording Software 7
A
B
Interfaz DARsoftware v2.3 A: Grabar dentro de un periodo de tiempo, B: Programar un backup diario
• Permite programar descargas automáticas para hacer backup diario, ya sea de las
últimas 24 horas, o de un rango específi co de tiempo (ver la fi gura de arriba, B).
Esta opción descarga las grabaciones de todos los DAR administrados en el software,
siempre y cuando el software se encuentre activo.
INSTRUCCIONES DE USO DEL SOFTWARE
Inicio de sesión y consulta
1. Inicie la aplicación a través del formulario de
Login, ingresando el nombre de usuario y el
password.
Como ajuste predeterminado, el administrador
tiene como nombre de usuario “admin” y como
contraseña “1234” (sin comillas).
2. Para poder acceder a DAR instalados, deben
agregarse a la lista de DAR administrados
por el programa. Para agregar un DAR, vaya
al menú Herramientas y seleccione Agregar
Módulo DAR e Intercomunicadores.
Seleccione un número del menú desplegable
DAR#, o deje el valor predeterminado.
Introduzca la dirección IP estática (fi ja)
confi gurada en el DAR, e ingrese un nombre
para el DAR según su ubicación para
poder distinguirlo fácilmente (por ejemplo,
“Atención al público”).
Asigne un nombre a cada una de las entradas de audio
conectadas al DAR en las casillas Input1 a Input4 (por
ejemplo, “Asesor 1”, “Asesor 2”, etc).
Presione Agregar al fi nalizar. La interfaz se actualizará,
mostrando el nuevo DAR en la lista.
DAR-04 Digital Audio Recording Software 8
3. Para consultar un equipo, haga clic sobre el DAR a
consultar en la Lista de DAR instalados.
Esta orden realiza una sincronización entre el
equipo y la aplicación para poder visualizar la
información del equipo en el programa.
4. Si la conexión ha sido exitosa, se habilita la zona derecha de la interfaz, mostrando toda
la información relevante del DAR seleccionado (ver fi gura de abajo): nombre del DAR (A),
dirección IP (B), navegar entre las grabaciones y reproducir (C), horario de grabación (D),
descargar grabaciones (E), programar descargas automáticas (F), salir del DAR (G).
A
C
B
F
D
E
G
Confi guración IP en el equipo DAR
Para cambiar la dirección IP del equipo DAR de forma que se ajuste a la red del sitio de
instalación, siga el procedimiento explicado a continuación.
1. Conecte el DAR al computador con el software DAR (punto a punto o por medio de un
switch).
2. La dirección IP de fábrica del DAR es 192.168.123.244; necesitará cambiar temporalmente
la IP del computador por una dentro del segmento de red de la IP de fábrica del DAR (por
ejemplo,192.168.123.240).
NOTA: Antes de cambiarla, asegúrese de tomar nota de la IP actual de su computador ya
que necesitará volverla a colocar al fi nalizar el procedimiento.
3. Asegúrese de que el computador
puede comunicarse con el DAR a
la dirección por defecto, haciendo
una prueba ping en la consola de
comandos.
Una vez ha hecho ping a la IP
por defecto debería obtener una
respuesta como se muestra en la
imagen de la derecha. Si no recibe
una respuesta (“host inaccessible”),
existe un problema de conexión
física o de confi guración de red en
su PC. En tal caso, verifi que el cable y la IP asignada temporalmente en su computador.

DAR-04 Digital Audio Recording Software DAR-04 Digital Audio Recording Software
20 21
DAR-04 Digital Audio Recording Software 9
4. Una vez haya comprobado la conexión,
abra el software y en el menú
Herramientas seleccione Confi gurar IP en
DAR.
5. Recibirá un mensaje preguntando si está
seguro de que el computador se comunica
con el DAR y si conoce la IP actual (la que
se dispone a cambiar).
Aparecerá una ventana emergente donde
podrá ingresar la nueva dirección IP para
el DAR.
6. Hecho esto, recibirá una confi rmación de que el procedimiento esta realizándose y
necesitará esperar unos segundos mientras el DAR reinicia con la nueva confi guración.
Posteriormente necesitará editar o agregar la dirección IP en la interfaz del DARsoftware
(vaya a Herramientas / Editar DAR e Intercomunicadores o Herramientas / Agregar Módulo
DAR e Intercomunicadores), para que el computador se pueda conectar y descargar audios
en la red de usuarios.
NOTA 1: No olvide retornar el computador a la dirección IP que tenía originalmente.
NOTA 2: Si olvida la IP actual, puede restablecer la de fábrica y repetir la confi guración.
Teniendo el equipo encendido, oprima y sostenga el botón Reset (5 s) usando la punta de un
clip; hecho esto, el equipo se reiniciará y podrá conectarse usando la IP 192.168.123.244.
Activación de entradas de audio y ajuste del volumen de grabación
Es posible confi gurar el volumen de grabación de cada entrada de audio independientemente.
Si, por ejemplo, la entrada 1 graba a muy bajo volumen, se puede confi gurar para que grabe a
un volumen más alto sin afectar la confi guración de las demás entradas del DAR.
1. Seleccione el DAR para el que desea
confi gurar el volumen. En la barra de
menú superior, diríjase a Herramientas /
Ajustar Volumen de Grabación.
2. En la ventana emergente, active las entradas
de audio a usar haciendo clic en su casilla
Input respectiva. Una vez las entradas están
activas, defi na el porcentaje de volumen
para cada una y presione Guardar.
Confi guración del horario de grabación
Seleccione el DAR para el que desea programar un
horario de grabación. En el cuadro Horario de Grabación
introduzca la hora de inicio y fi nalización de las
grabaciones.
NOTA: Esta confi guración queda establecida por defecto en el DAR seleccionado, así se
apague el equipo DAR.
Escuchar grabaciones
1. Seleccione un DAR de la Lista de DAR instalados y luego elija una de las entradas de audio
haciendo clic en su casilla Input (ver imagen a continuación).
DAR-04 Digital Audio Recording Software 10
2. Seleccione el momento
que desea escuchar
introduciendo la fecha,
hora y minuto.
3. Introduzca en Minutos
Continuos el número de
minutos consecutivos
que desea escuchar
a partir del punto
seleccionado en el
paso 1.
4.
Presione el botón
Escuchar y si el minuto
indicado se encuentra
grabado, aparecerá el
siguiente mensaje:
Al pulsar Aceptar se inicia la
reproducción de la sección
de audio seleccionada.
NOTA 1: Realice el mismo procedimiento para acceder a cualquiera de las entradas de audio.
NOTA 2: Si el audio seleccionado no fue grabado o ya se borró, recibirá un mensaje de error.
Descarga manual de grabaciones
Es posible descargar las grabaciones de una
o más entradas de audio simultáneamente,
seleccionándolas en las casillas Inp del
recuadro Descargar (ver fi gura a la derecha).
Los audios descargados se guardan en C:\DARaudios. Dentro de esta carpeta, los archivos
se distribuyen en sub-carpetas por Entrada de audio, Año, Mes, Día y Hora.
Descargar
Descarga el contenido completo de cada
entrada de audio seleccionada que no haya sido
descargado anteriormente. Este procedimiento
verifi ca archivos ya existentes y los omite en la
descarga.
Por Rango
Descargar grabaciones pertenecientes a un periodo específi co de tiempo de cada entrada
de audio seleccionada.
Al iniciar la descarga Por Rango se habilita el recuadro Seleccione Rango de Fecha, desde
donde se defi ne la fecha y hora de inicio y fi nalización de las grabaciones a descargar.
NOTA: Durante cualquier descarga la interfaz queda inhabilitada para prevenir que se corte
la comunicación con el DAR y se interrumpa la descarga.
Descarga automática de grabaciones
Si desea programar un backup diario de las grabaciones, en el
cuadro Descarga Automática haga clic en la casilla Habilitar.
Introduzca en Hora de Descarga la hora a la que se iniciará
la descarga automática todos los días; el software permite
programar la descarga entre las 18 y las 23 horas, ya que es
recomendable que los backups se hagan en horario nocturno.
Si desea programar la descarga de audios pertenecientes a un
periodo de tiempo específi co, haga clic en la casilla Rango de

DAR-04 Digital Audio Recording Software 22
DAR-04 Digital Audio Recording Software 11
Descarga e introduzca la hora de inicio y fi nalización de las grabaciones a descargar; de
lo contrario (si el recuadro Rango de Descarga está deshabilitado), el programa descargará
automáticamente las últimas 24 hr de audio.
Si desea consultar el reporte de los backups realizado, abra el archivo BackupHistory.txt
ubicado en C:\DARaudios.
NOTA 1: Las descargas programadas se realizarán, siempre y cuando el software esté corriendo.
NOTA 2: La confi guración establecida se guarda en el computador al pulsar el botón Guardar,
permitiendo cargar la misma confi guración cada que inicie el programa.
Reproducción de grabaciones descargadas al computador
Los audios descargados quedan guardados en
el computador en la ruta C:\DARaudios; desde
esa ubicación, puede reproducir los audios
guardados yendo a Escuchar Descargas en la
barra de menú.
En la ventana emergente puede seleccionar el minuto que se desea escuchar (ver fi gura
de abajo). Para reproducir una hora completa a partir de la hora seleccionada, presione
Reproducir Hora (A); en cualquier momento de la reproducción es posible pausar, detener,
adelantar o atrasar, usando los controles del reproductor de audio (B).
B
A
ESPECIFICACIONES TÉCNICAS
Alimentación 110 VDC
Número máximo de entradas de audio 4
Salida a conexión LAN UTP conector RJ 45
Dimensiones 21.5 x 15 x 4.5 cm 8.5’’ x 5.9’’ x 1.8’’
B&G ELECTRÓNICA
GARANTÍA LIMITADA DE UN AÑO
BYG Electrónica S.A.S. garantiza que este producto sale de fábrica libre de defectos de materiales y
manufactura. Si por algún motivo presentara fallas por materiales o manufactura durante el periodo de
un año después de la compra, BYG Electrónica S.A.S. reparará o cambiará la parte dañada libre de costo
adicional.
Esta garantía no cubre daños ocasionados por mal manejo, mala operación o mala instalación. Esta
garantía no cubre daños físicos a la superfi cie del producto, o daños ocasionados por el uso del producto
en conjunto con otros productos o accesorios no diseñados por BYG Electrónica S.A.S.

12.6 cm
18.3 cm
Drilling template for mounting on the wall. /
Plantilla de perforaciones para instalación en pared.
Table of contents
Languages:
Other B&G electronics Recording Equipment manuals


