Banner American BA-FS27 User manual

Table of Contents
I. Get to Know Your Laminator ........................... 1-2
II. For Your Safety ............................................... 3
III. Electrical Safeguards....................................... 3-4
IV. Specifications .................................................. 4
V. Set-up.............................................................. 4-6
Inspection ........................................................ 4
Appropriate Location ....................................... 4
Accessories ..................................................... 4
Loading Film onto Mandrels ............................ 5
Threading the Film........................................... 5
Mandrel Tension Adjustment ........................... 6
Roller Pressure Adjustment ............................. 6
Slitters.............................................................. 6
VI. Thermal Laminating......................................... 7
VII. Pressure Sensitive Laminating ........................ 7-8
VIII. Coating Mount Board....................................... 8
IX. Mounting & Laminating.................................... 8-9
X. Maintenance/Service ....................................... 9-10
Cleaning Rubber Rollers.................................. 9
Cleaning RollerShoes™ .................................. 10
Removing Wrap-arounds................................. 10
XI. Trouble-shooting.............................................. 10-11
XII. Laminating & Mounting Do’s & Don’ts ............ 11
XIII. Warranty & Return Policy ................................ 12
abcoffice 800-658-8788 www.abcoffice.com

FORWARD
REVERSE
Upper Mandrel
Upper
Supply
Mandrel
Holder
Emergency
Stop Button
Lower Mandrel
Upper Idler Bar
SafetyShield
Tie Bar
Lower
Supply
Mandrel
Holder
Feed Table Guide
Emergency
Stop Button
Feed Table Lower Idler Bar
Right Control
Panel (see below)
Left Control Panel
(see below)
Motor
HEATED ROLLERS
MOTOR CONTROL
FANS
LEFT CONTROL PANEL RIGHT CONTROL PANEL
TEMPERATURE
CONTROL
TOP HEAT SHOE
TOPHEAT
LCD DISPLAY FOR
BOTTOM HEAT SHOE
BOTTOM HEAT
I. Get to Know Your Laminator...
1
1
0
1
0
1
0
1
0
1
0
LCDDISPLAYFOR
abcoffice 800-658-8788 www.abcoffice.com

Roller Pressure Adjustment
To Open the Rollers: Pull out the pin and turn handle clockwise until it will not turn any
farther and the pin locks into place.
To Mount: From the OPEN position, pull out the pin and turn handle counter-clockwise
until pin locks into place. The front pressure adjustment handle has two positions for
mounting; 3/16” and 1/2”. The rear pressure adjustment handle has one mount position for
both board thicknesses. From the CLOSE position, turn the handle clockwise.
To Close the Rollers: Pull out the pin and turn the handle counter-clockwise until it will not
turn any farther and the pin locks into place.
Front Rear
to
OPEN
turn
clockwise
to
CLOSE
turn
counter-
clockwise
MOUNT
3/16” 1/2”
PIN
to
OPEN
turn
clockwise
to
CLOSE
turn
counter-
clockwise
MOUNT
PIN
2
abcoffice 800-658-8788 www.abcoffice.com

uDo not connect the laminator to electrical power or attempt to operate it until you have read
these instructions completely. Keep these instructions in a convenient location for future
reference.
uRead all safety messages located in this instruction manual and on the laminator very care-
fully.
uAlwaysreplace safety shield before operatingyourlaminator. If you service this
machine yourself, ensure that the safety shield is returned to the operating position
when service is completed. Do this to protect all operators. Operators may be
harmed if you do not follow this instruction.
uUsecautionandhavesomeonehelpyouwhenremovingthefeedtable.Thefeedtable
weighs approximately 15 pounds and removing it exposes hot and moving parts. When the
table is in the proper position the risk of injury to the operator is reduced.
uDo not operate this laminator without all detachable units correctly installed. There is risk of
injury if this product is operated without all of its parts in their proper positions.
uKeep hands and clothing away from rollers. The rollers are pinch points that can trap
body parts or clothing and cause serious injury.
uDo not touch the RollerShoes™ or front rollers while the laminator heater power is on. Turn
rollersand RollerShoes™ off andallowto cool completely beforetouching.
uDonot use thelaminator for other thanits intended purpose.
uOnly operate this machine if you have been properly trained and authorized to do so. Contact
themanufacturerfortraininginformationat909-296-9780.
III.ElectricalSafeguards...
uNeveroverrideor attempt to defeat electrical ormechanicalsafetyinterlock devices.
uDisconnect power supply before servicing your laminator. This laminator uses double
pole/neutral fusing.
uAreadily accessible disconnect deviceshouldbe incorporated in thefixed wiring.
uThemachine has been manufacturedwithoutaplug on the powercord. This
unit must be connected directly to a power main. Connection to the main should be accom-
plished by an experienced electrician. Care must be exercised to properly identify the neutral
wire in the power cord. The neutral power cord wire is color coded blue. The neutral of the
powermain should beidentifiedusing a suitablevoltmeter.
uThelaminator should only be operatedfromthetype of power source indicatedinthese
OPERATINGINSTRUCTIONS and on the seriallabellocatedon the rear panel oftheunit.
uDo not leave the laminator power on for extended periods while not in use. Open the panel
breaker at the end of the day as a precaution against a possible fire hazard.
II. For your Safety...
3
abcoffice 800-658-8788 www.abcoffice.com

uDonot operate the laminatorwith a damaged powersupplycord or plug.
uReplace fuses only with same type rated 30A, 240V and 1A, 250V fuses. Contact your dealer
forreplacement fuses.
uThere are TWO (2) EMERGENCY STOP buttons on your Finisher 2700. Pressing either
one of these buttons will stop the rollers.
IV.Specifications...
OperatingSpeed: 0 to 30 fpm (15.24cm/sec.)
PowerRequirements
Voltage: Single Phase 230 VAC,60 Hz
Heater Wattge: 6900 watts
Fuse: 30amps
WarmUp Time: 15minutes
MaximumLaminatingDimensions
Thickness: ½” (12.70mm)
Width: 27”(68.6cm)
Net Weight: 280 lbs (127 kgs.)
ShippingWeight: 400 lbs (182 kgs.)
V. Set-up...
Inspection:
Upon receipt of your Finisher 2700, inspect the crate, the machine and all other contents of the crate for ship-
pingdamage. Damageshould be brought immediately to the attentionofthedeliveringcarrier.
Appropriate Location:
Your Finisher 2700 must be placed in a clean, well lit area with ample space on all four sides of the laminator. If
you are using the stand designed expressly for the Finisher 2700, make sure all four wheels of the laminator are
lockedand resting squarely onthefloor to prevent movement. Ifyou are using a tableor stand other thanthe
Finisher 2700 stand be sure that it is sturdy.
Accessories:
TheFinisher 2700 comeswith the feed table,film holder brackets andmandrels pre-assembled. Check to make
surethe following items areincludedon your Finisher 2700:
Item Qty.
•FeedTable ...................................1
• Feed Table supports .....................2
• Bottom Mandrel ............................1
•TopMandrel..................................1
• Lower Film holder brackets ...........2
• Upper Film holder brackets ...........2
4
Lower Supply Mandrel Holder Upper Supply Mandrel Holder
Feed Table Mounts
Mandrels
abcoffice 800-658-8788 www.abcoffice.com

Feed Table Installation:
Slidethe feed table over thefrontandrear feed table holders. (Thefeedtableweighs about 15 lbs.)
Loading Film onto Mandrels
Thefollowing instructions applyto poly-in film rollsas they would appearfrom the front ofthe laminator.
Top Roll: Hold the core gripper to the side and place the roll of film onto the mandrel so that the film unwinds
toward you from the bottom of the roll. Turn the roll on the mandrel to lock the core gripper and the roll into
place.
Bottom Roll: Hold the core gripper to the side and place the roll of film onto the mandrel so that the film unwinds
toward you from the top of the roll. Turn the roll on the mandrel to lock the core gripper and the roll into place.
Thecore gripper onthe top and bottommandrels spring back inopposite directions. The gripper shouldspring
back in the direction that the core will rotate when laminating. When the film is loaded properly the core gripper
willkeep the filmfromturning on themandrel. Keepin mind thatwhenusing poly-out rolls thetoprolloffilm
shouldunwind from thetopof the rollandthe bottom rollshouldunwind from thebottom.
Once the film is properly loaded onto the mandrels, replace the mandrels onto the laminator.
Threading the Film (Figures1&2)
1.Feedthefilm from thetoprollbehindtheupper idler rollerrodanddrapeoverboth RollerShoes™. Be sure
that the shiny side of the film is against the shoes.
2. To thread the lower roll, first remove the two red knobs on each side of the idler slide mechanism. Slide
the idler roller rod toward you.
3. Feed the film from the bottom roll under and behind the lower idler roller rod. Push the idler slide
mechanism back into position and replace the red knobs.
4. Laythe film from thelowerroll over both RollerShoes™,againensuring that the shinysideof the film is
facing the shoes. If you are cold loading it will be necessary to tape the bottom film to the top film. If you
arehot loading, the bottomfilmwilladhere to the topfilmwhere it overlaps at theRollerShoes™.
5.Haveapieceofposterboardreadyto use as a feed card to thread the film into and through the laminator.
6.Set the PRESSURE CONTROL totheCLOSE position.
7.Setthe FORWARD/REVERSE switch to theFORWARDposition.
8.Turnthe MOTOR CONTROL ON/OFF switchtotheON position.
9.Turn theMOTORCONTROLknobfarenoughtoallowtherollers to sufficiently pull the poster board into
the laminator.
10.Feed the poster board betweentheRollerShoes™ and into the frontrollers.
11.Afterthelaminatorisproperlythreadedand the poster board has exited the rear of the laminator, make
any necessary adjustments.
5
Brake
Nut
Core
Gripper
Mandrel
abcoffice 800-658-8788 www.abcoffice.com

Mandrel Tension Adjustment
Mandrel tension must be set correctly to ensure good lamination quality. Adjust the tension by turning the
knurled knobs at both ends of the mandrels.
To tighten the tension, turn the knobs clockwise. To loosen the tension, turn the knobs counterclockwise.
Adjust only 1/8 of a turn between tests. Too much tension may cause the laminating film to stretch.
Roller Pressure Adjustment
The Finisher 2700 gives you the option to automatically set the roller pressure by selecting OPEN, MOUNT, or
CLOSE. In the CLOSE position you can laminate items up to 1/8” (3.175mm) thick. The MOUNT position
allowsfor mounting items upto ½” (12.7mm) thick. TheOPEN position is usedforremoving film from the
rollers.
Thepressure on yourFinisher 2700 has beenpreset at the factoryand should require nomanual adjustment. If
you find that the pressure does require adjustment, please contact our Roll Laminator Technical Service Depart-
mentat 909-296-9780 for assistance.
Slitters (Figure 3)
To install the slitters, place the mounts into the TOP ROLLER GUARD where they will slide into the slot in the
GUARD top edge, located at the end of the GUARD. Before setting the slitters in place, ensure the machine is
loaded with the proper laminating film. Use a piece of paper/card stock the same width as the product to be
laminatedto feed into thelaminator until it hasexitedseveral inches beyond theTOP ROLLER GUARD. This
will permit accurate placement of the slitters. Locate the two BLADE HOLDERS. The blade holder is a square
shaped bar with a blade in one end. Place the holder, blade down, into the mount until the blade. barely pen-
etrates the plastic web at the edge of the test piece leaving the required border beyond the edge. Ensure the
point of the blade is pointed toward the front of the laminator. Tighten both screws on the mount. To ensure the
mount and holder won’t move from side to side, use an Allen wrench to tighten the screws.
CAUTION: Remove the slitter when it is not in
use. Thiswill help prevent personal injuryor
accidental damage to the rollers.
6
Figure 1 Figure 2
BA-FS27 Threading Diagram
for Poly-in Rolls BA-FS27 Threading Diagram
for Poly-out Rolls
Figure 3
Slitter
Knob
SlitterAdjustment
Knob (5/16-18 cap
screw) SlitterAssy.
Mount
Screw
(5/16-18
capscrew)
SlitterMain
BodyClamp
SlitterBlade
Slitter
Blade
Holder
abcoffice 800-658-8788 www.abcoffice.com

VI.ThermalLaminating...
1.Be sure all laminator parts(i.e.safetyshield, feed table, etc.)areintheir proper positions and thelaminating
filmis loaded correctly (See page 3forfilmloading instructions).
2. Select the CLOSE position using the Pressure Control handle located on the right side of your Finisher
2700.
3.Turn the HEATED ROLLERS switchandthe TOP AND BOTTOMHEAT switchesto the ON positions. The
heatedrollers are necessary only duringwarm-upand may be turned offformost applications when operating
temperature is reached.
CAUTION: Heated Rollers are forwarm-uponly
and should be turned off when operating temp-
erature is reached to avoid damaging the rollers.
4. Set the temperatures according to the film manufacturer’s recommendations for the film you have chosen.
Alow-meltfilmsuchasDIGIKote™isrecommendedfordigitalcolorprints.Thetemperaturesindicatedbelow
are approximate. The laminator will take approximately 15 minutes to reach operating temperature. The
temperatureswill be indicated onthe LCD displays onthecontrol panel.
3milDIGIKote™ 220°-230°F
5milDIGIKote™ 210°-220°F
10mil DIGIKote™ 180°-190°F
5. Turn the fans ON. This allows for a clear lamination by cooling the film as it exits the rollers.
6. Perform a test lamination to ensure proper settings for successful lamination. If any adjustments are
necessary make them now and run another test. Repeat this step until you obtain desired results.
7.Feedtheprinttobelaminatedslowly and evenly into the laminator, smoothing it as the rollers pull it through.
8.You maylaminatesubsequent prints now, leaving amplespacebetween prints for trimming.
9. Once your last print has completely exited the laminator, turn the MOTOR CONTROL AND FAN switches
OFFand use the trimmeronthe rear of thelaminatorto remove the lamintedprints.
VII. Pressure Sensitive Laminating...
Note: Youmust have theRewind Option for PressureSensitive Films in orderto laminate with pressuresensi-
tive material.
1. Load a roll of pressure sensitive film onto the upper mandrel so that it unwinds from the bottom.
2. Load an empty film core on the take-up mandrel and place it in its position in front of the upper mandrel.
3. Either place a roll of material on the lower mandrel that is at least as wide as the pressure sensitive film you
are using and thread as usual or use an additional piece of media under the print you will be cold laminating.
Thiswill keep the adhesivefrom transfering to theheatshoes or rollers.
4.Thread the pressure sensitive film behindtheupperidler roller rod and overtheRollerShoes™ensuring that
thatthe adhesive sideis facing away fromthe RollerShoes™.
5. Peel back enough of the release liner to tape it to the empty film core on the take-up mandrel. Tape the liner
to the back of the core.
6. Set the pressure control handle on the right side of your laminator to the CLOSE position.
7
abcoffice 800-658-8788 www.abcoffice.com

7. Set the FORWARD/REVERSE switch to the FORWARD position.
8.Turnthe MOTOR CONTROL ON/OFF switchtotheON position.
9.Turn the MOTORCONTROLknob far enoughtosufficiently pull afeedcard into thelaminator.
10. Feed the feed card between the RollerShoes™ and into the front rollers.
11.After the laminatoris properly threaded andthe poster board hasexited the rear ofthe laminator, makeany
necessary adjustments.
VIII. Coating Mount Board...
TheFinisher 2700 is capable ofapplyinganadhesive coating to mount boardthathasnot previous been coated.
1.Loada roll of adhesive, withthelinerwoundto the outside, onto thetopmandrelinthe same manner as with
laminatingfilm.
2. If the mount board is the same width as the roll of adhesive it is not necessary to load anything onto the
bottommandrel. If the mount boardisnarrower than the adhesive,loada roll of paperorfilmonto the bottom
mandrelto keep the adhesivefromaccumulating on the rollers andheatshoes. Thread as for laminatingfilm.
3. Select the MOUNT position on the right side of your laminator.
4.Turn the HEATED ROLLERS andtheTOPAND BOTTOM HEAT switches totheONpositions. The heated
rollersarenecessaryonlyduringwarm-upandmaybe turned off for most applications when operating tempera-
tureisreached.
5.Set the temperature toapproximately 200°F, depending uponthe type of adhesiveused. The Finisher2700
will take approximately 10 minutes to reach operating temperature. The roller and shoe temperatures are
indicated on the LCD displays on the control panel.
6.Feed the uncoated mountboard into the laminatorbehind a leader board. Theleaderboard will prevent the
compressionof the leading edge ofyourmount board.
7. Youmay coat subsequentboards now, one directlybehind the other, sothat the board infront becomes the
leaderboard. We recommend thatyou coat a sufficientsupply of mount boardinone session so you’llhave it
readyforfuture use.
IX. Mounting & Laminating...
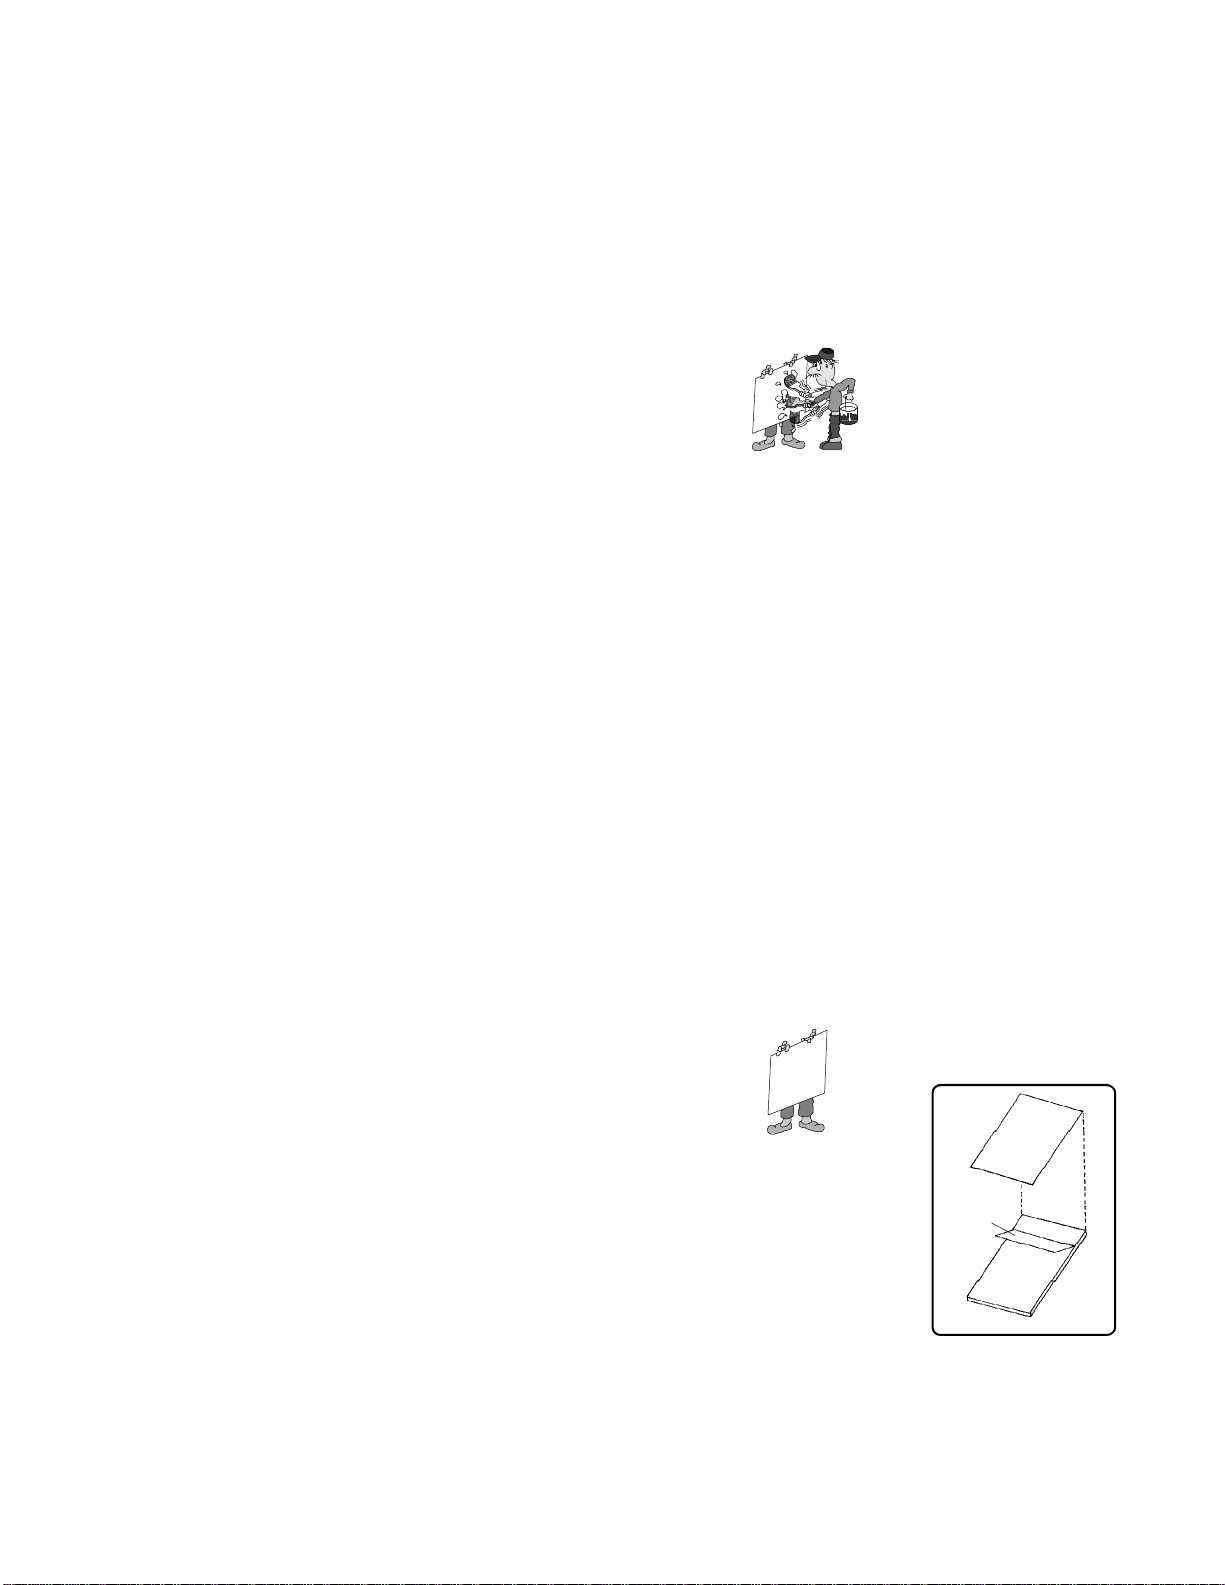
Preparing your print for mounting:
1. Peel back about 4” of the release liner on your precoated, low-tack mount board.
2. Align the top edge of your print with the top edge of the mount board (see Figure 4).
Mounting your Print:
1. Be sure all laminator parts (i.e. safety shield, feed table, etc.) are in their proper
positionsand the laminatingfilmis loaded correctly (See page5 for film loading
instructions).
2.Select the MOUNTpositionusing the PRESSURE
PRINT
MOUNT
BOARD
RELEASE
LINER
Figure 4
3. Turn the HEATED ROLLERS switch and the TOP & BOTTOM HEAT switches to the ON positions. The
heated rollers are necessary only during warm-up and may be turned off for most applications when operat-
ing temperature is reached.
8
abcoffice 800-658-8788 www.abcoffice.com

CAUTION: Heated Rollers are forwarm-uponly
and should be turned off when operating temp-
erature is reached to avoid damaging the rollers.
4.Set the temperatures according tothefilmmanufacturer’s recommendations for thefilmyouhave chosen.
The Finisher 2700 will take approximately 15 minutes to reach operating temperature. The roller and shoe
temperatures are indicated on the LCD displays on the control panel.
5. Turn the fans ON. This allows for a clear lamination by cooling the film as it exits the rollers.
6.Performa test mount to ensure proper settingsforsuccessfulmounting. Ifany adjustments are necessary
make them now and run another test. Repeat this step until you obtain desired results.
7. Position the print to be mounted on a section of mount board up to ½” thick.
8. Feed the print and mount board into the laminator behind the leader board slowly and evenly. If you are
using a low-tack mount board, be sure to pull back the release liner before it enters the rollers.
9. You may mount subsequent prints now, one directly behind the other so that the board in front becomes
theleader board.
10.Onceyourlast print has completely exited the laminator,turntheMOTORCONTROLandFAN switches
OFF and use the trimmer on the rear of the laminator to remove the mounted and laminated prints.
X.Maintenance/Service...
Always use caution when servicing your laminator.
Precautions:
Disconnect the power supply and open the panel breaker be-
foreattempting to serviceorrepair the laminator.
Anymaintenance orserviceshould beperformedonly bythose
havingappropriatetechnicaltraining and experience. Contact
themanufacturerat800-572-2144fortraininginformationor
technical assistance.
Adjust only those controls that are specified in these operat-
ing instructions.
Cleaning Rubber Rollers:
Excessivebuild-up of adhesiveonthe rollers maycausepoor lamination quality anderratic film movement.
Usethefollowing procedure to remove any adhesive fromthelaminatingrollers.
1. Turn the HEATED ROLLERS and TOP & BOTTOM HEAT switches OFF and allow the laminator to
cool.
2. Cut the film where it comes off the top and bottom supply rolls. Pull any film out of the laminator and
away from the heat shoes.
3.Remove the feedtable and RollerShoes™ toaccess the rollers.
4. Disconnect the power supply.
5.Clean the exposed sectionoftherollers with a softclothdampened with an appropriate cleaningsolution
such as isopropyl or denatured alcohol.
6. Reconnect the power supply and turn the FORWARD/REVERSE switch to the FORWARD position.
9
abcoffice 800-658-8788 www.abcoffice.com

Cleaning RollerShoes™:
CleantheRollerShoes™periodicallytoavoidadhesive build-up. Build-up can inhibit the film from moving over
the shoes smoothly. Use the following procedure to clean the RollerShoes™.
1. Turn the HEATED ROLLERS and TOP & BOTTOM HEAT switches off and allow the laminator to cool.
2.Cutthe film where it comesoffthetop and bottom supply rolls. Pullanyfilmoutof the laminator and away
from the heat shoes.
3. Disconnect the power supply.
4. Open the safety shield and remove the feed table to expose the RollerShoes™. The feed table weighs
approximately 15 pounds.
5.Clean the RollerShoes™witha clean, softclothdampened with anappropriatecleaning solution suchas
isopropyl or denatured alcohol. Since the heat shoe is hard anodized you can use a scrub pad or very fine
steel wool.
6. Allow the RollerShoes™ to dry completely before rethreading the laminating film.
Removing Wrap-Arounds:
Build-uponthe rollers and RollerShoes™ may causeafilmwrap-around,especially when using thin film
gauges. Followthe procedure below to removewrap-arounds.
1.Turnthe HEATED ROLLERS and the TOP&BOTTOMHEATswitches OFF. Allow the laminatortocool.
2. Cut the film where it comes off the top and bottom supply rolls.
3. Select the OPEN position on the right side of your laminator and pull the film out of the unit that has
becomewrapped around the rollers.
4.If you have a severewrap-around,it may be necessary tousethe REVERSE feature to backthefilm out.
Be sure to pull the film away from the laminator.
XI.Trouble-shooting...
Symptom Possible Cause Corrective Action
LCDs do not show display No power to laminator Closepanelbreaker
when heat switches are on. Blownfuse Disconnect power and
replace fuse
Film is not bonding to the print Laminatornot set to optimal Adjust temperature slightly
laminatingtemperature upward.
Ink on print is wet Allow ink to dry thoroughly
Paper is too slick Usea more matte paper
10
7. Repeat steps 3-5 until the rollers are thoroughly clean.
8.Allow the rollers to drycompletelybeforerethreading the laminating film.
abcoffice 800-658-8788 www.abcoffice.com

Laminateditemcurls Toporbottomfilmtension Loosen tension on side (top
is too high or bottom) that is curling up
Laminateditemis wrinkled Mandrel tension too loose Increase mandreltensionon
side (top or bottom) that has
wrinkles
Temperaturetoo high Reducetemperature
Moisture in paper being laminated Storepaper in dry area
Laminateditemis blistered Temperaturetoohigh Reduce temperature
Mandrel tension does not remain Brakenutimproperlyadjusted Tightennut
constant Coregripperbladeisnotpreventing Rotate film corewhileholding
thecore from spinning onthe the mandrel firm to lock the
mandrel blade into the core.
Mandrels are reversed. Reversemandrels
XII. Laminating & Mounting
Do’s and Don’ts...
Readtheinstructionmanualbeforeoperating your laminator.
Alwaysrun test samples before laminatingvaluableitems.
Feed the print through slowly and evenly, smoothing it as it is pulled into the laminator.
Operatethelaminator with two rolls of the samewidthlaminatingfilmto avoid excessive adhesive transfer to
the rollers.
If laminator is not in current use, lower the heat setting or turn laminator off.
To avoiddamagingtherollers, the heated rollers should be turnedoffformostapplicationsafterthe laminator
reaches operating temperature. Never feed abrasive materials or metal objects such as staples, paper clips,
and glitter through the laminator. Keep sharp objects like scissors and rulers away from the rollers at all
times.
Once an item has been fed between the rollers do not attempt to alter its position as this can damage the
print.
Donot stop the laminatorbefore the item hascompletely exited from therearto avoid a “dwellline” accross
the print.
Do not clean or service the laminator before disconnecting the power supply.
11
abcoffice 800-658-8788 www.abcoffice.com

XIII. Warranty & Return Policy...
Warranty:
YourFinisher 2700 iswarrantedto be free ofdefects in material andworkmanship for a periodof 1 year fromthe
dateof original purchase. Inthe event of adefect in materials orworkmanship, Banner American Products,Inc. or
its authorized dealer, will repair or replace (at their option) the laminator.
Banner American Products, Inc. makes no other warranty stated or implied except as stated above. This war-
ranty does not cover damage to the machine that occurs as a result of misuse or improper handling, or damage to
prints.
Return Policy:
Ifyourlaminatorisnot operating properly, first review the Operating Instructions andthetroubleshootingguide. If
the malfunction cannot be corrected, contact your local dealer for instructions. Be sure to have your machine
serialnumberand date of purchase handy.
If the laminator must be returned to the dealer, it is your responsibility to ensure that it is packaged properly.
Shippingdamage as aresultof improper packagingisnot covered undertheterms of thiswarranty.
12
abcoffice 800-658-8788 www.abcoffice.com
This manual suits for next models
1
Table of contents
Other Banner American Laminator manuals

Banner American
Banner American PL100 PL150 User manual

Banner American
Banner American Easy-Lam II User manual

Banner American
Banner American Easy-Lam II User manual

Banner American
Banner American PL135-4 User manual

Banner American
Banner American BA-EN45 User manual

Banner American
Banner American PL4A User manual

Banner American
Banner American QuikFinish PL100 User manual

Banner American
Banner American QuikFinish PLH4100 User manual

Banner American
Banner American BA-FS43 User manual

Banner American
Banner American PL12A User manual