Renz HT 330 L User manual

BEDIENUNGSANLEITUNG \ OPERATION MANUAL \ MANUAL DE INSTRUCCIÓNES \ INSTRUCTIONS
TASCHENLAMINATOR / POUCH LAMINATOR / PLASTIFICADORA / PLASTIFICATION
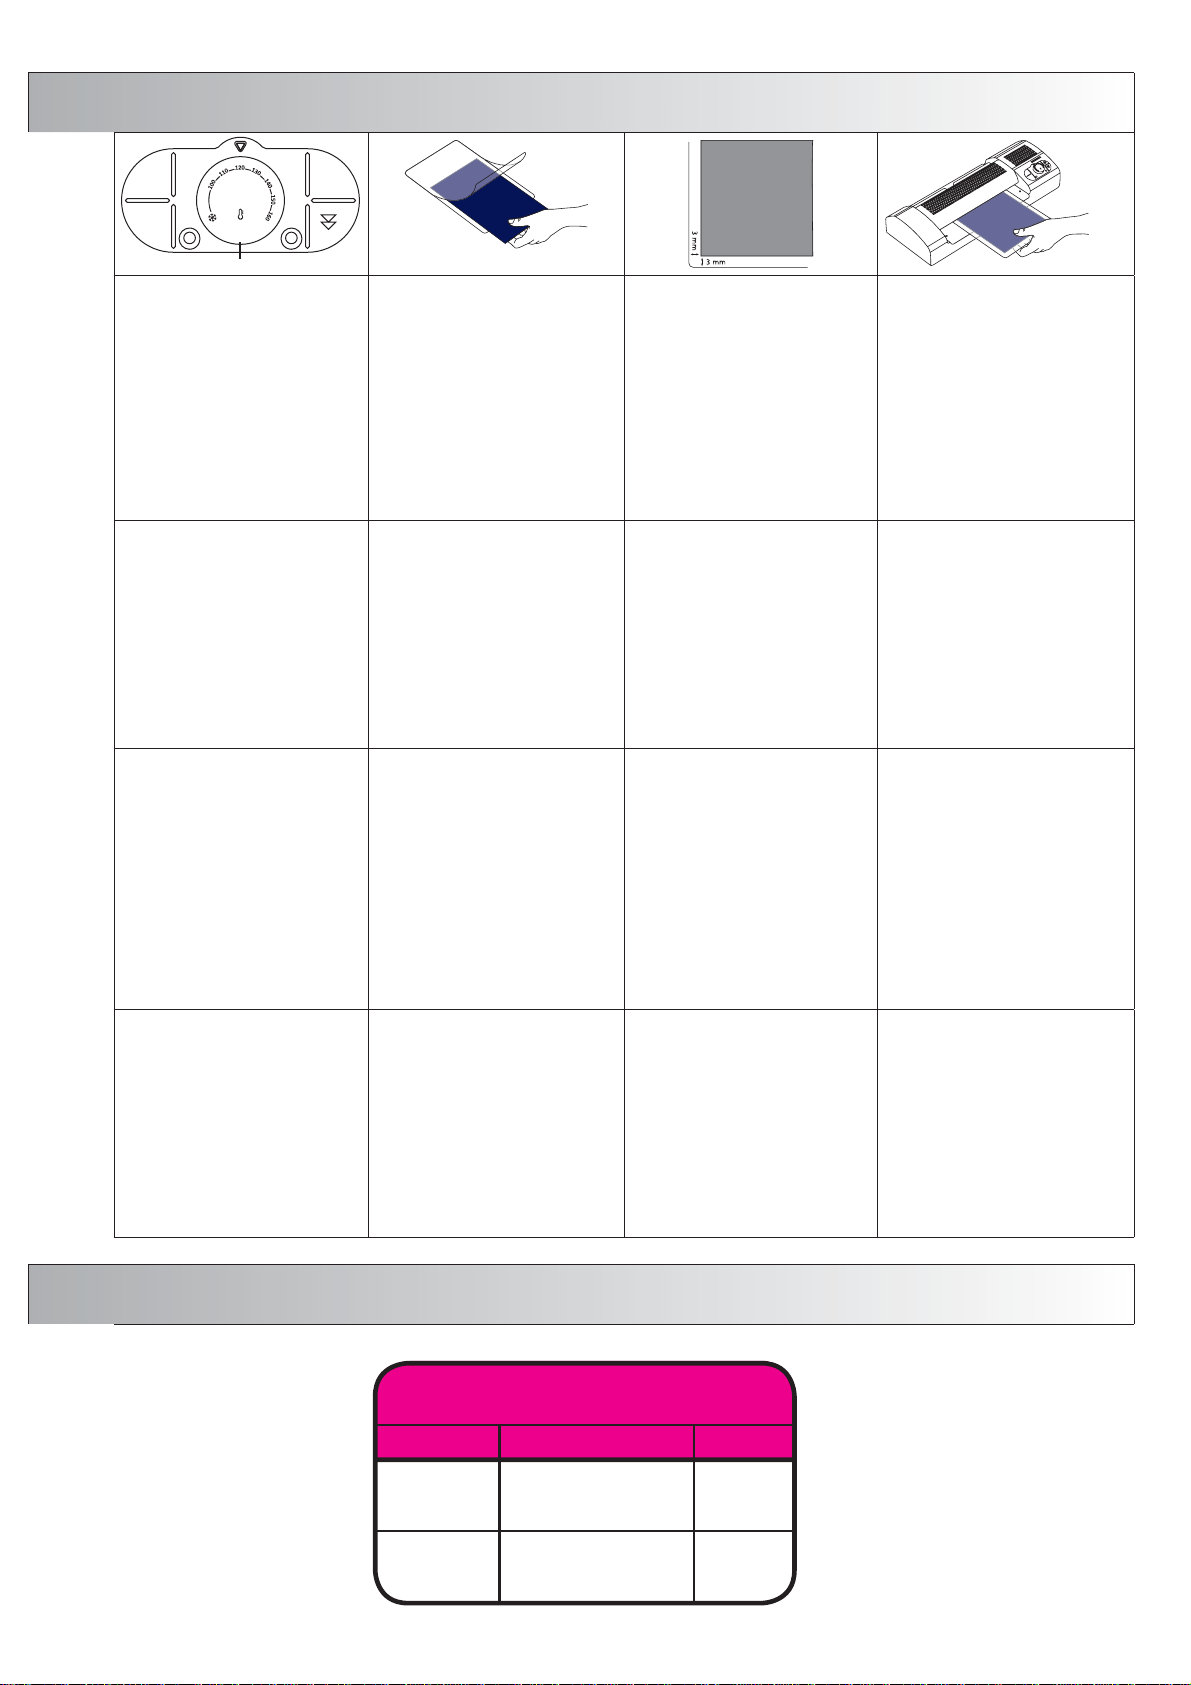
Bedienfeld
2. Rücklauftaste
3. Temperaturanzeige grün
4. Temperatur - Einstellknopf
5. Bereitschaftsanzeige rot
Anzeige gelb im Stand by Modus
Control Panel
2. Reverse button
3. Temperature light green
4. Temperature adjusting knob
5. Power light
Power light yellow in Stand by mode
Panel de control
2.Tecla de Retroceso
3. Indicador verde de temp.
4. Termostato
5. Indicador de encendido
Indicador amarillo Stand by
Tableau de commande
2. touche de retour
3. indicateur de température vert
4. bouton de réglage de la
température
5. indicateur de disponibilité rouge
indicateur jaune en mode d‘attente
Bitte lesen sie diese Bedienungsan-
leitung sorgfältig durch.
Für fehlerhafte Bedienung überneh-
men wir keine Haftung.
Sicherheitshinweise:
• Keine anderen Materialien wie
Papier verwenden.
• Das Gerät darf nur für geeignete
Laminiertaschen verwendet werden.
• Stecken Sie keine anderen Gegen-
stände in den Einlaufschacht.
• Das Laminiergerät darf nur von Per-
sonen benutzt werden, die es sicher
bedienen können.
• Das Gerät darf nur in trockenen
Innenräumen verwendet werden und
nicht mit Feuchtigkeit in Berührung
kommen.
• Schließen Sie das Gerät an eine
Steckdose an, deren Netzspannung
den technischen Daten des Geräts
entspricht.
• Das Gerät nicht in Betrieb nehmen,
wenn das Netzkabel sichtbare
Schäden aufweist; trennen Sie es
vom Stromnetz, wenn Sie zu einem
anderen Zeitpunkt solche Schäden
bemerken.
• Das Gerät darf nicht geöffnet
werden, solange es am Stromnetz
angeschlossen ist. Schicken Sie das
Gerät bei einem Defekt zurück zum
Hersteller.
Please read this manual carefully
and attentively. We do not assume
any liability for incorrect operation.
Safety instructions.
• Do not use any other material than
paper.
• Make sure to use only suitable
laminating pouches.
• Do not put any other objects in the
entry slot.
• The laminator must only be operated
by persons who are firm and familiar
with its operation.
• The laminator must only be operated
in dry indoor rooms and must not be
exposed to any humidity.
• Make sure to connect the laminator
into a plug where the line voltage
corresponds to the technical data of
this laminator.
• Do not operate the laminator if the
power cord shows visible defects.
Immediately separate the laminator
from the electric circuit, also if you
notice such defects at any other time
during operation.
• The laminator must not be opened as
long as it is connected to the electric
circuit. Return the laminator to the
supplier if it is defective.
Por favor, lea detenidamente las
instrucciones de uso. No nos hace-
mos responsables de averías por
mala manipulación de la máquina.
Medidas de seguridad:
• No usar otro material que no sea
papel.
• La máquina sólo se puede usar con
láminas de plastificado apropiadas.
• No introduzca ningun otro tipo de
objeto en el canal de plastificado.
• La máquina sólo debe ser usada por
personas que puedan manipularla con
seguridad.
• El equipo sólo puede instalarse en
habitaciones secas, no se debe mani-
pular con las manos húmedas.
• Enchufe la máquina a una red que
se corresponda con el voltaje del
equipo .
• No haga funcionar el equipo si el
cable de alimentación de red está
visiblemente deteriorado; en caso de
detectar daños como este,
desenchufe el equipo de la red.
• No debe abrir el equipo mientras
esté conectado a la red eléctrica. Re-
torne el equipo al fabricante en caso
de tener algun defecto.
Veuillez lire attentivement ce mode
d‘emploi. Nous déclinons toute
responsabilité en cas de manipula-
tion erronée.
Conseils de sécurité :
• Ne pas utiliser d‘autres matières que
du papier.
• Utiliser la machine seulement
pour des pochettes de plastification
appropriées.
• Ne pas introduire d‘autres objets
dans le fente d‘alimentation.
• La machine de plastification doit
être employée uniquement par des
personnes sachant l‘utiliser.
• Actionner la machine seulement
dans des locaux intérieurs secs et la
tenir à l‘abri de l‘humidité.
• Brancher la machine sur une
prise dont l‘alimentation de secteur
correspond aux caractéristiques tech-
niques de la machine.
• Ne pas mettre la machine en
exploitation si le câble d‘alimentation
présente des détériorations visibles ;
la couper immédiatement du secteur
lorsque de telles détériorations se
manifestent plus tard au cours de son
exploitation.
• Il est interdit d‘ouvrir la machine tant
qu‘elle reste branchée sur le secteur.
En cas de défaut, veuillez réexpédier
la machine au constructeur.
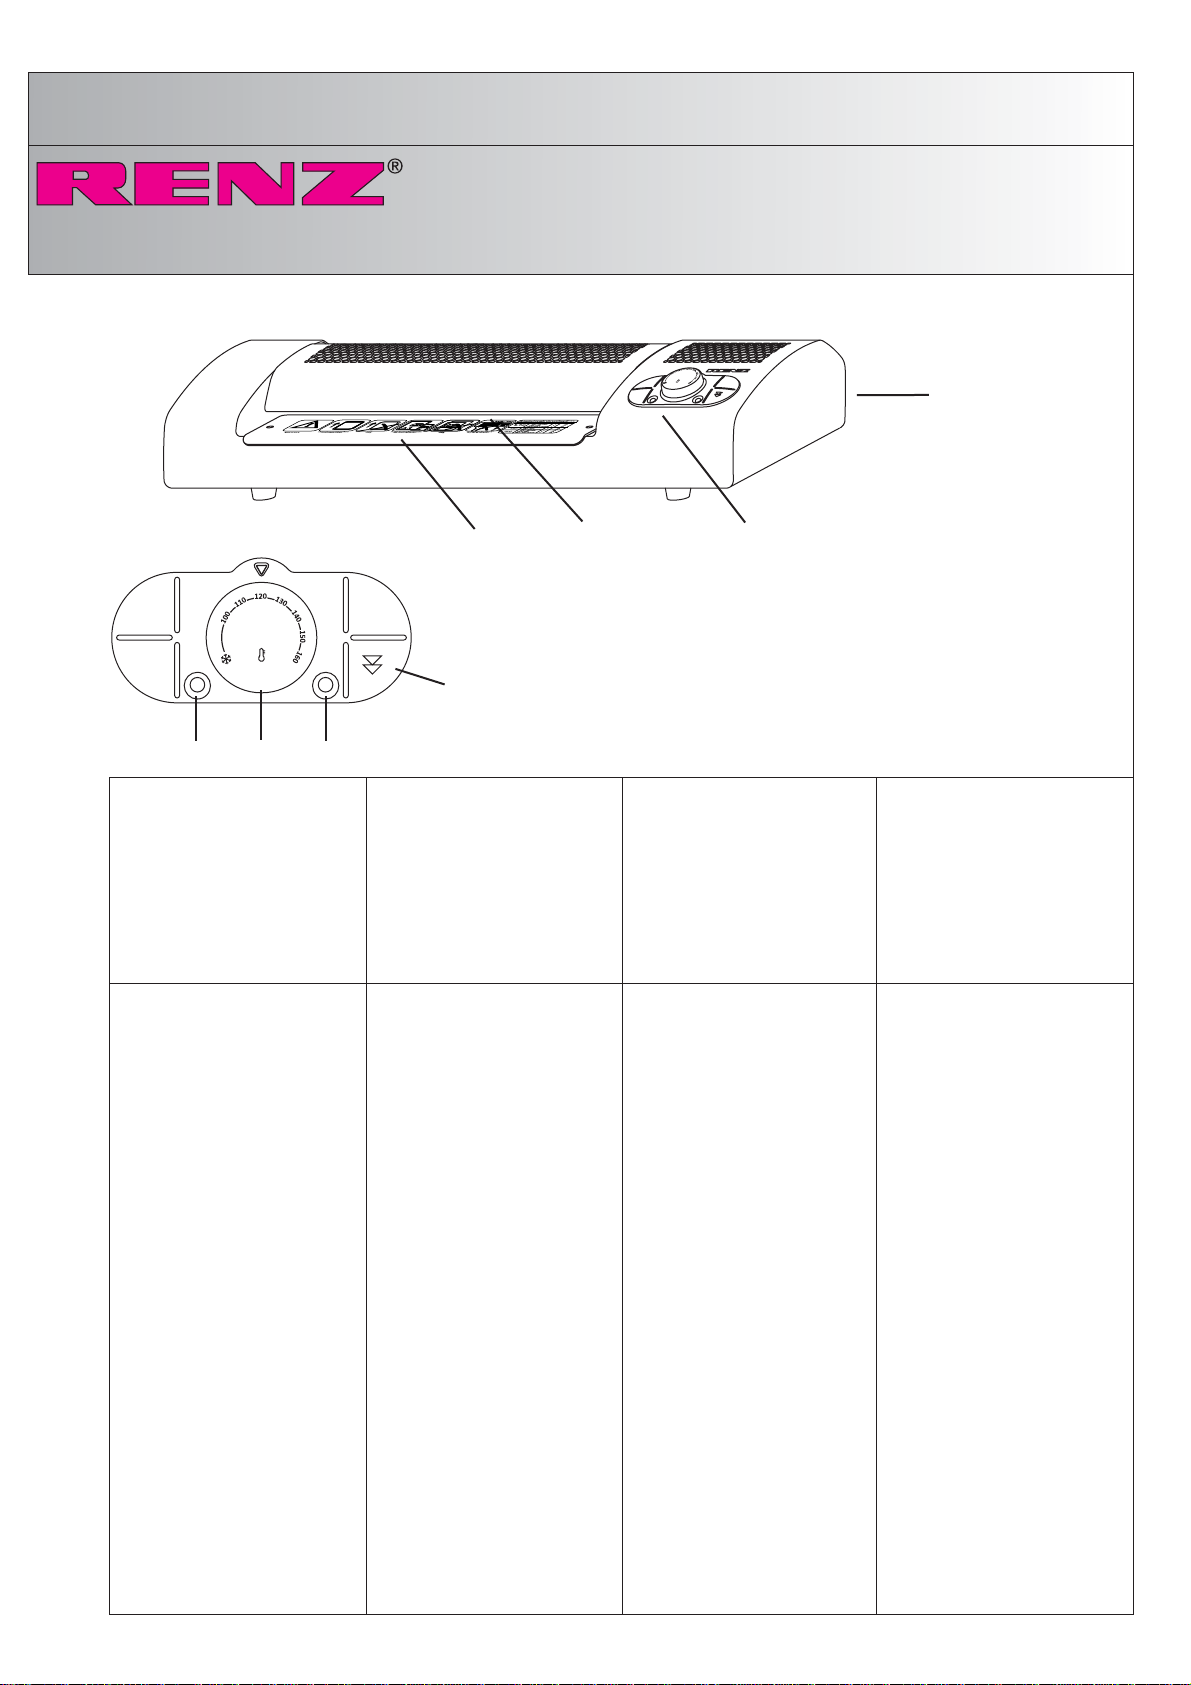
HT 330 L
Bedienfeld
Control Panel
Panel de control
Tableau de commande
1. Netzanschluß
Voltage
Conexión a la red
Branchement électrique
1. Hauptschalter / Sicherung
Main switch / Fuse
Interruptor principal / Fusible
Interrupteur principal / Fusible
Tabelle
List
Lista
Tableau
d‘instruction
Einlaufschacht
Entry slot
Canal de plastificado
Fente d‘alimentation
4
2
3
5

1AUFSTELLEN UND ANSCHLIESSEN \ SETUP AND CONNECT \ COLOCACIÓN \ MISE EN PLACE
Gerät aus der Verpackung nehmen.
Lieferumfang prüfen:
- Laminiergerät
- Elektrokabel
- Bedienungsanleitung
Richtigen Standort wählen.
Achten Sie auf ausreichend Platz auf
der Rückseite des Laminiergeräts.
DIN A3 große Laminierungen benö-
tigen ca. 45 cm Platz, um ganz aus
dem Gerät transportiert zu werden.
DIN A4 ca. 32 cm.
Elektrokabel anschließen.
Nur an Steckdosen mit Schutz-
kontakt anschließen. Schalten Sie das
Gerät mit dem Netzschalter (1) auf der
Rückseite ein; die Bereitschaftsanzei-
ge (5) leuchtet rot.
Das Gerät heizt sich auf.
Achten Sie immer auf die richtige
Laminiertemperatur, da sich die Folie
wieder vom Dokument lösen kann,
wenn zu kalt laminiert wurde; oder
das Dokument zu wellig wird, wenn zu
heiß laminiert wurde.
Remove machine and check contents
of the box. You should have...
- Laminating Machine
- Cable
- Manual
Choose a correct place.
Make sure to have enough free space
at the backside of the laminator.
Laminations in A3 size require approx.
45 cm free space to be fully trans-
ported out of the laminaor. A4 size
requires approx. 32 cm space.
Connect cable.
Connect the machine only to plugs
which are grounded. Switch on the la-
minator by pressing the power switch
(1) at the backside of the machine; the
standby signal (5) lights in red. The
laminator starts to heat up.
Make sure to always set the correct
laminating temperature as the film
may detach from the document if the
temperature was too low or the docu-
ment turns out wavy if the temperature
was set too high.
Saque la máquina del cartón y revise
el contenido.
Vd. debería tener:
- Laminadora
- Cable con el enchufe,
- Instrucciones de uso
Elija un emplazamiento estable.
Deje suficiente espacio libre en la
parte posterior del equipo.
Los plastificados de formato A3 nece-
sitan alrededor de 45 cm de espacio
para que la lámina salga totalmente
del equipo.
Los plastificados de formato A4 nece-
sitan alrededor de 32 cm de espacio
para que la lámina salga totalmente
del equipo..
Conecte el cable.
Conecte la máquina sólo a
enchufes que tengan toma de tierra.
Encienda la máquina accionando
la tecla de encendido que está en
la parte trasera (1). El indicador de
encendido (5) se iluminará en rojo.
La máquina está en proceso de
calentamiento.
Seleccione siempre la temperatura
adecuada para el proceso de plastifi-
cado. Si la temperatura es demasiado
baja, la lámina plástica no se adhiere
correctamente al documento. Si la
temperatura es demasiado alta, el do-
cumento laminado quedará ondulado.
Sortez la machine de son emballage.
Vérifiez le contenu de livraison :
- la machine de plastification
- le câble d‘alimentation
- les instructions de service
Choisissez un emplacement adé-
quat. Veillez à laisser suffisamment
d‘espace du côté arrière de la ma-
chine de plastification. Les pochettes
plastifiées au format A3 ont besoin
d‘env. 45 cm d‘espace pour qu‘elles
puissent sortir entièrement de la
machine ; le format A4 en a besoin
d‘env. 32 cm.
Branchez le câble d‘alimentation.
Ne le branchez que sur des prises
ayant un contact de mise à la terre.
Mettez la machine en marche à
l’aide de l‘interrupteur de secteur (1)
placé à la face arrière de la machine ;
l‘indicateur de disponibilité (5) s‘allume
en rouge.
La machine se met à température.
Veillez à maintenir toujours la bonne
température de plastification, car il
se peut que la feuille se redétache
du document en cas de température
insuffisante lors de la plastification ;
ou bien que le document devienne
trop ondulé en cas de température
excessive lors de la plastification.

2LAMINIEREN / LAMINATING / PLASTIFICADO / PLASTIFICATION
Die gewünschte Temperatur mit dem
Temperaturregler (4) einstellen.
Angaben dazu entnehmen Sie bitte
der Tabelle, die an der Maschine an-
gebracht und auch in der Gebrauchs-
anleitung abgebildet ist. Achtung!
Diese Angaben sind ca. Werte und
können differieren.
Die Laminiervorlage in eine entspre-
chende Folientasche stecken und auf
gleichmäßigen Folienrand achten.
Überrüfen Sie, ob die gewünschte
Laminiertemperatur erreicht wurde:
dies ist der Fall, wenn die Temperatur-
anzeige (3) grün leuchtet.
Optimal sind 3 mm Folienrand. Schieben sie die Folientasche mit der
geschlossenen Seite voran, gerade in
den Einlaufschacht, bis das Dokument
von den Laminierwalzen erfasst und
eingezogen wird. Das Dokument wird
durch das Gerät gezogen und auf der
Rückseite heraustransportiert. Neh-
men Sie das Dokument und lassen
Sie es auf einer ebenen Fläche einige
Sekunden abkühlen. Nächste Vorlage
vorbereiten und wie oben beschrieben
verfahren. So ist ein kontinuierlicher
Arbeitsablauf gewährleistet.
Set the required temperature by
turning the temperature knob (4).
Please refer to the relevant list printed
on the machine and shown in the
manual.
Caution! These indications are appro-
ximate values and may vary.
Put the original to be laminated into
the correct pouch and and make sure
to have an equal edge on all sides.
Ideal would be 3 mm at each side.
Check if the desired laminating tem-
perature is reached. This is the case if
the temperature (3) lights in green.
Ideal would be 3 mm at each side. Insert the laminating pouch with the
closed side first into the entry slot
until the document is seized by the
laminating drums and is transported
into the laminator. The document is
transported through the laminator
and comes out at the backside of
the machine. Let the document cool
down for some seconds on an even
surface. Prepare your next document
and proceed as described above. This
guarantees a continued work flow.
Ajuste el termostato (4) a la tempera-
tura deseada.
Utilice los datos reflejados en la tabla
adjunta a la máquina o en las instruc-
ciones de uso.
Atención: Estos datos son sólo aproxi-
maciones y pueden variar
Coloque el documento que se quiere
plastificar en una lámina plástica
adecuada, cuidando de dejar espacios
iguales en cada margen.
El espacio ideal de los márgenes sería
de unos 3 mm
Compruebe que la máquina haya
alcanzado la temperatura deseada, en
este caso el marcador de temperatura
(3) se iluminará de color verde.
El espacio ideal de los márgenes
sería de unos 3 mm Introduzca la lámina plástica en el ca-
nal de plastificado, recta y con la parte
cerrada hacia adelante hasta que los
rodillos hayan agarrado el documento
y tiren de él.
El documento ya laminado sale por la
parte posterior del equipo. Déjelo re-
posar en una superficie plana durante
unos segundos.
Prepare el nuevo documento y repita
la operación de laminado siguiendo
las instrucciones antes descritas.
De esta manera se garantiza un ciclo
de trabajo estable.
Réglez la température souhaitée à
l’aide du bouton de réglage de la tem-
pérature (4) . Veuillez vous référer aux
paramètres indiqués sur la machine et
dans le manuel.
Attention ! Ces paramètres ne sont
que des valeurs approximatives et
peuvent varier.
Introduisez le document à plasti-
fier dans une pochette à plastifier
adéquate et veillez à ce que la marge
de la feuille soit régulière. Une marge
de 3 mm serait parfaite. Vérifiez si la
température de plastification souhaitée
a été atteinte : C‘est le cas lorsque
l‘indicateur de température (3) est
allumé en vert.
Un marge de 3 mm serait parfaite. Glissez la pochette transparente, son
côté fermé étant devant, tout droit
dans la fente d‘alimentation jusqu’à
ce que le document soit saisi par les
rouleaux de plastification et inséré. Le
document passe par la machine et sort
à l‘arrière de la machine. Retirez le do-
cument et laissez-le refroidir pendant
quelques secondes à plat. Préparez le
document suivant et procédez tel que
décrit ci-devant. Ainsi vous assurez
une continuité des opérations.
3EINSTELLWERTE / SETTINGS / AJUSTES / AJUSTAGES
4
Die Angaben sind ungefähre Werte und können differieren.
The specifications are approx. values and may vary.
Folie / Film Papier / Paper Temp. in C°
80 - 100 mic.
(3,2 - 4 mil.)
80 gr. copy paper 100
120 gr. paper 110
200 gr. paper & photos 120
125 mic.
(5 mil.)
80 gr. copy paper 120
120 gr. paper 130
200 gr. paper & photos 140

4STAND BY MODUS / MODO STAND BY ( Modo de espera)
/ MODE D‘ATTENTE
HEIZUNG / HEATING / CALENTAMIENTO / CHAUFFAGE
Hat sich in der Maschine ein Stau
gebildet, Rücklauftaster (2) drücken
und gedrückt halten, Motor läuft
rückwärts und das gestaute Material
wird rückwärts aus der Maschine
transportiert.
Rücklauftaster loslassen, Motor läuft
vorwärts, Gerät ist wieder betriebs-
bereit.
Die zuvor eingestellte Temperatur wird
automatisch geregelt. Dies wird ange-
zeigt durch Erlöschen und Wiederauf-
leuchten des grünen Lichts (3).
If there is a jam in the machine,
press the reverse key (2) and keep
it pressed. The motor run backwards
and the jammed material is trans-
ported out of the machine.
Release the reverse button, the motor
starts to run forwards and the lamina-
tor is ready for further operation.
The temperature once set is automa-
tically controlled. This is shown by
means of the green light (3) that lights
and shuts off.
En caso de atasco en la máquina,
apretar de manera continua la tecla
de retroceso (2), el motor invierte el
sentido de funcionamiento y devuelve
el documento que estaba atascado.
Al soltar la tecla de retroceso el motor
funcionará en sentido normal, el equi-
po está nuevamente listo para usarse.
La temperatura se ajusta de modo au-
tomático, estos cambios se muestran
cuando la luz verde (3) se enciende
y apaga.
En cas de bourrage dans la machine,
appuyez sur la touche de retour (2)
et maintenez la pression. Le moteur
marche en sens inverse libérant
ainsi du côté alimentation la pochette
coincée. Relâchez la touche de retour
pour que le moteur marche en avant ;
la machine est alors de nouveau prête
à l‘emploi.
La température choisie auparavant se
règle automatiquement. Ceci se mani-
feste par l‘extinction et le rallumage du
témoin vert. (3)
23

5WARTEN \ MAINTENANCE \ MANTENIMIENTO \ MAINTENANCE
1
Nach Beenden der Laminierarbeiten
Gerät ausschalten. Netzschalter (1)
umlegen auf Stellung 0.
Nur trocken reinigen.Mit trockenem
oder feuchtem Tuch abwischen. Keine
Lösungsmittel verwenden.
Gerät nicht öffnen.
Gerät darf nur von Fachpersonal
geöffnet werden.
After having finished all laminating
work, make sure to turn off the
machine. Turn the power switch (1) to
position 0.
Cleaning
Wipe with a dry or moist cloth. Do not
use solvents.
Do not open the machine. The machi-
ne is only to be opened and serviced
by an authorized service center.
Apague el equipo una vez haya
terminado sus trabajos de plastifi-
cado. Ponga el interruptor (1) en la
posición 0.
Limpieza sólo en seco. Limpie con un
paño seco o humedecido. No utilice
disolventes.
No abra la máquina. La máquina sólo
puede ser manipulada por personal
especializado de la empresa de servi-
cios autorizada.
Une fois les travaux de plastification
achevés, débrayez la machine. Mettre
l‘interrupteur principal (1) sur position
0.
Ne nettoyer qu’à sec. Essuyer avec un
chiffon sec ou humide. Ne pas utiliser
de solvant.
Ne pas ouvrir l‘apparail
Seul un technicien doit ouvrir
l‘appareil.
6SICHERUNG WECHSEL \ CHANGE OF FUSE \ CHAMBIO DE FUSIBLE \ CHANGER LE FUSIBLE
Netzstecker ziehen Sicherungshalter mit Schraubendreher
herausdrücken Sicherung kontrollieren. Wenn defekt.,
Ersatzsicherung einsetzen. Sicherungshalter einsetzen und ein-
drücken. Netzstecker einstecken.
Unplug the machine Pry out fuse holder with screw driver Check fuse. If fuse is defective, put in
replacement fuse Put in fuse holder and press it in.
Connect main plug
Desenchufar la máquina Desenroscar la tapa del fusible con un
destornillador Comprobar el fusible. Si está fundido,
colocar un fusible nuevo. Meter el fusible en su tapa y presionar
Conectar el enchufe principal
Retirer la prise de courant Enlever la protection du fusible avec
un tourne-vis Controller le fusible. Si le fusible est
defectueux, remplacer le. Insérer la protection du fusible et
brancher la prise de courant.

7FEHLERLISTE / TROUBLE SHOOTING / SOLUCIÓN DE PROBLEMAS / LISTE DE RECHERCHE DES PANNES
Gerät läuft nicht.
Gerät am Stromnetz angeschlossen?
Strom vorhanden?
Sicherung kaputt?
The laminator does not run.
Is the laminator correctly plugged in ?
Is power available ?
Fuse defective ?
El equipo no funciona.
Está enchufado a la red?
Llega corriente al enchufe?
Compruebe si el fusible está en buen
estado
La machine ne fonctionne pas.
La machine est-elle branchée sur le
secteur ?
Y a-t-il du courant disponible ?
Le fusible est-il défectueux ?
Vorlage nicht sauber verschweißt,
Folie bleibt „milchig“
Temperatur zu niedrig.
Temperatur höher stellen.
The document is not properly lami-
nated, the foil remains „milky“
The temperature is set too low.
Increase temperature.
Los documentos plastificados no
sueldan correctamente, la lámina
plástica no sale de color transpa-
rente.
La temperatura seleccionada es de-
masiado baja, aumentar la temperatu-
ra de laminado.
Le document n‘est pas parfai-
tement soudé, la feuille reste
„laiteuse“.
La température est trop basse,
augmenter la température.
Vorlage ist wellig.
Temperatur zu hoch.
Temperatur niedriger stellen.
The document turns out „wavy“
The temperature is set too high.
Lower temperature.
El documento sale ondulado
La temperatura seleccionada es de-
masiado alta, disminuir la temperatura
de laminado.
Le document est ondulé.
La température est trop élevée.
Baisser la température.
8TECHNISCHE DATEN TECHNICAL DATA DATOS TECNICOS DONNEES TECHNIQUES
Arbeitsbreite 330 mm Working width 330 mm / 13“ Ancho de trabajo 330 mm Largeur de travail 330 mm
Folienstärke bis max. 125 mic. Film thickness up to 125 mic. / 5 mil. Espesor de lamina hasta 125 mic. Epaisseur de pochettes jusqu’à 125
mic.
Max Laminierstärke 1 mm Max. laminating thickness 1 mm Espesor de laminación max.1 mm Epaisseur de plastification 1 mm max.
Aufwärmzeit ca. 3 Minuten Warm-up-time approx. 3 minutes Tiempo de calentamiento aprox. 3 min Durée de mise à température environ
3 minutes
Laminiergeschwindigkeit 0,65 m/min. Laminating speed 0,65 m/min. Velocidad de plastificado 0,65 m/min. Vitesse de plastification 0,65 m/min.
Laminiertemperatur einstellbar Laminating temperature adjustable Temperatura de plastificado variable Température de plastification réglable
Temperaturkontrolle automatisch Automatic temperature control Control automático de temperatura Contrôle automatique de la
température
Kaltlaminierung möglich Cold lamination posible Laminado en frío posible Plastification à froid possible
Fotolaminierung Photo lamination Laminado de fotografias Plastification de photos
Rücklauffunktion Return function Modo retroceso Fonction de retour
Transporttasche nicht erforderlich Carrier not required Carrier no necessario Pochette de transport: pas nécessaire
Anzahl Rollen 4 Number of rolls 4 No. de rodillos 4 Nombre de rouleaux 4
Heizung 2 Rollen Heating 2 rollers Calentamiento 2 rodillos Chauffage 2 rouleaux
230 V 50 HZ/ 650 W 230V 50 ccls. / 650 W or
110V 60 ccls. / 650 W. 230V 50 CC650 W o.
110V 60 Cc. 650 W 230 V 50 cy. 650 W ou
110 V 60 cy. 650 W
Gewicht: 8 kg Weight: 8 kg / 17,60 lbs. Peso: 8 kg Poids: 8 kg
Länge x Breite x Höhe
51 x 20 x 11 cm Length x Width x Height
51 x 20 x 11 cm / (20 x 8 x 4,3“) Largo x Ancho x Altura
51 x 20 x 11 cm Longueur, largeur, hauteur
51 x 20 x 11 cm

9EG-Konformitäts-Erklärung im Sinne der EG-Richtlinien
EG conformity declaration according to the EG guidelines
Déclaration de conformité EG selon les directives EG
Declaración de conformidad de la UE en el sentido de las directivas comunitarias sobre
für / for / pour / por
Maschinen/machines/machines/maquinaria 2006/42/EG
geändert durch/amended by/modifié par/modifica da por 91/368/EG und/and/et/y 98/37/EG
Anhang/appendix/appendice/anexo II A
Elektromagnetische Verträglichkeit / electromagnetic consistency/comptabilité électromagnétique /
comptabilidad electromagnética 04/108/EG
Niederspannung / low tension / basse tension / baja tensión 2006/95/EG
Die Anlage bzw. Maschine / The construction of the machine / La construction de la machine / La construcción de la máquina
Fabrikat / Model / Modèle / Producto:
Elektrischer Taschenlaminator / Electric Pouch Laminator / Laminadora eléctrica / Laminateur electric
Typ / Type / Type / Tipo:
RENZ HT 330 L
Wurde entwickelt, konstruiert und gefertigt in Übereinstimmung mit den o.g. EG-Richtlinien, in alleiniger Verantwortung von /
was developed, constructed and produced in accordance with the EG guidelines and with the sole responsibility of /
a été développée, construite et produite conformément aux directives et avec la seule responsabilité de /
ha sido diseñada, construida y fabricada de conformidad con las antes citadas directivas comunitarias, bajo la exclusiva
responsabilidad de:
Firma / Company / Société / Empresa: Chr. Renz GmbH, 73540 Heubach / Gerrmany
Folgende harmonisierte Normen wurden angewandt: /
The following harmonized specifications were applied: /
Les normes harmonisées suivantes ont été appliquées: /
Se han aplicado las siguientes normas armonizadas: /
1 ISO 12100-1 + EN ISO 12100-1 + EN ISO 12100-2
Sicherheit von Maschinen, Geräten und Anlagen
Security of machines, units and systems
Sécurité des machines, unités et système
Seguridad de máquinas, instalaciones y equipos
1 DIN EN 60204-1
elektrische Ausrüstung von Maschinen
Electrical equipment for industrial machines
Equipement électrique pour des machines industrielles
Equipamiento eléctrico de maquinaria
Eine Technische Dokumentation ist vollständig vorhanden.
Die entsprechende Betriebsanleitung liegt in folgenden europäischen Sprachen vor: Deutsch, Englisch, Französisch, Spanisch
A complete technical documentation as well as the relevant manual are available in the European languages:
German / English / French / Spanish
Une documentation complète technique ainsi que la notice d‘utilisation sont disponibles dans les langages européens
Allemand / Anglais / Français / Espagnol
Se dispone de una documentación técnica completa y de las instrucciones de servicio pertenecientes a la máquina en los
Heubach, 01.04.2008 General Manager
Gérant
Director
Gerente
This manual suits for next models
1
Other Renz Laminator manuals

Renz
Renz LAMIGO A3 PRO User manual

Renz
Renz HT330Dual User manual

Renz
Renz LAMIGO A3 PRO User manual

Renz
Renz LAMIGO A3 PRO User manual

Renz
Renz Renz ERW User manual

Renz
Renz LAMIGATOR IQ User manual

Renz
Renz LAMIGO A4 User manual

Renz
Renz LAMIGATOR IQ User manual

Renz
Renz HT 330 Dual User manual

Renz
Renz HT 330 L User manual