Bareknuckle Welterweight APS Instruction Manual
WELTERWEIGHT
AIRLESSPAINT
SPRAYER
ImportantSafetyInstructions:
Carefullyreadallsafetywarningsand
operatinginstructionspriortouse.Savethese
instructionsforfuturereference.
Mustbegroundedwhenusingthispump:ReadGrounding
instructions.Onlyusewithgroundedelectricaloutlets
protectedbyaresidualcurrentdevice.
Personswithanyheartconditionorhavingapacemaker
shouldnotusethismachine.
Whenunpackingthiscarton,ifanypartsaremissingorbroken,
immediatelyreturntotheplacethatyoupurchasedthisproductfrom.
BareknuckleOperatingInstructions
andSafetyManual
Forportablesprayapplicationof
paintsandcoatings
COMPLIES WITH
AS/NZ 60204.1:2005/Amend 1:2006

Bareknuckle Welterweight - Airless Paint Sprayer OPERATING INSTRUCTIONS & SAFETY MANUAL | 1
Important safety instructions 1 - 2
Technical Data 2
Warning 3 - 5
Installation 6 - 9
Pressure Relief Procedure 9
Operating Instructions 10 - 13
Airless Sprayer Cleaning Procedure 14 - 15
Long Term Storage 16
Grounding and Electric Requirements 17 - 18
Daily Maintenance 18
General Repair Information 19
Troubleshooting 20
Airless Sprayer Electrical Installation Drawing 21
Parts List 22 - 23
Project Sheet 24
Warranty 25
INSTRUCTIONS PERTAINING TO A RISK OF FIRE, ELECTRIC
SHOCK, OR INJURY TO PERSONS
WARNING – When using this machine, basic precautions
should always be followed, including the following:
a) SAVE THESE INSTRUCTIONS - To reduce the risks of fire
or explosion, electrical shock and injury to persons, read
and understand all instructions included in this manual.
Be familiar with the controls and the proper usage of the
equipment.
b) WARNING - To reduce the risk of fire or explosion:
1) Do not spray flammable or combustible materials near
an open flame or sources of ignition such as cigarettes,
motors, and electrical equipment.
2) For units intended for use with only water-based
materials-Do not spray or clean with flammable liquids.
Use water based liquid only.
3) For units intended for use with only water-based or
mineral spirit-type materials with a minimum flash
point of 21C°(69.8 F°) Do not spray on clean with
liquids having a flash point less than 21C°(69.8 F°)
4) Paint or solvent flowing through the equipment is able
to result in static electricity. Static electricity creates
a risk of fire or explosion in the presence of paint or
solvent fumes. All parts of the spray system, including
the pump, hose assemble, spray gun, and objects in
and around the spray area shall be properly grounded
to protect against static discharge and sparks. Use
only conductive or grounded high-pressure airless
paint sprayer hoses specified by the manufacturer.
5) Verify that all containers and collection systems are
grounded to prevent static discharge.
6) Connect to a grounded outlet and use grounded
extension cords. Do not use a 3 to 2 adapter.
7) Do not use a paint or a solvent containing halogenated
hydrocarbons. See operating instructions for examples
of these types of materials.
8) Keep spray area well ventilated. Keep a good supply
of fresh air moving through the area. Keep pump
assembly in a well ventilated area. Do not spray pump
assembly.
9) Do not smoke in the spray area.
10) Do not operate light switches, engines, or similar spark
producing products in the spray area.
11) Keep area clean and free of paint or solvent
containers, rags, and other flammable materials.
12) Know the contents of the paints and solvents being
sprayed. Read all Material safety Data Sheets (MSDS)
and container labels provided with the paints and
solvents. Follow the paint and solvent manufacturer’s
safety instructions.
13) Fire extinguisher equipment shall be present and
operational.
c) WARNING - To reduce the risk of skin injection.
1) Do not aim the gun at, or spray any person or animal.
2) Keep hands and other body parts away from the
discharge. For example, do not try to stop leaks with
any part of the body.
3) Always use the nozzle tip guard. Do not spray without
nozzle tip guard in place.
4) Only use a nozzle tip specified by the manufacturer.
5) Use caution when cleaning and changing nozzle tips.
In the case where the nozzle tip clogs while spraying,
follow the manufacturer’s instructions for turning off
the unit and relieving the pressure before removing the
nozzle tip to clean.
6) Do not leave the unit energized or under pressure while
unattended. When the unit is not in use, turn off the
unit and relieve the pressure in accordance with the
manufacturer’s instructions.
7) High-pressure spray is able to inject toxins into the
body and cause serious bodily injury. In the event that
injection occurs, seek medical attention immediately.
8) Prior to use, thoroughly check the spray machine, hose
and parts for any signs of visible damage. If there is
any signs of damage or wear and tear, do not use the
machine.
9) This system is capable or producing 20.7Mpa. Only use
replacement parts or accessories that are specified
by the manufacturer and that are rated a minimum of
22.8Mpa.
10) Always engage the trigger lock when not spraying.
Verify the trigger lock is functioning properly.
11) Verify that all connections are secure before operating
the unit.
12) Know how to stop the unit and bleed pressure quickly.
Familiarise yourself with the controls of the machine
before use.
d) WARNING - To reduce the risk of injury.
1) Always wear appropriate gloves, eye protection, and a
respirator or mask when painting.
2) Do not operate or spray near children. Keep children
away from equipment at all times.
CONTENTS
Operating Instructions and Safety Manual
IMPORTANT SAFETY INSTRUCTIONS
Important Information
The Bareknuckle Welterwieght Airless Spray Machine is a lightweight and portable
airless spray machine designed to be used for a wide range of DIY / household
projects including painting walls, ceilings, fences, garage doors, outdoor furniture.
This spray machine is not intended for commercial use and large painting projects.
Commercial use of this machine will void the warranty. A 12 month limited warranty
is provided with this machine. The warranty does not cover normal wear and tear of
consumable items. Refer to Important Warranty Information in this manual.
Bareknuckle Welterweight - Airless Paint Sprayer OPERATING INSTRUCTIONS & SAFETY MANUAL Bareknuckle Welterweight - Airless Paint Sprayer OPERATING INSTRUCTIONS & SAFETY MANUAL |2 | 3
3) Do not overreach or stand on an unstable support.
Wear safety footwear and keep well balanced at all
times.
4) Stay alert and watch what you are doing.
5) Do not operate the unit when fatigued or under the
influence of drugs or alcohol.
6) Do not kink or over-bend the hose.
7) Do not expose the hose to temperatures or to pressures
in excess of those specified by the manufacturer.
8) Do not use the hose as a strength member to pull or
lift the equipment.
9) The maximum pressure for the air hose is 22.8 Mpa, the
normal pressure is 20.7Mpa
10) The paint can be compatible: phenol aldehyde paint
series, nitryl paint series, alkyd paint series, epoxy
resin paint series, oxidized rubber paint series, latex
paint series, water soluble paint series. The paint
should be kept in the shade and dry location.
11) Be aware of any hazards presented by the material
being sprayed and consult the markings on the
container or information supplied by the manufacturer
of the material to be sprayed, including requirements
for the use of personal protective equipment.
12) Do not spray any material where the hazard
is not known.
The following warnings are for the setup, use,
grounding, maintenance and repair of this
equipment. The exclamation point symbol alerts
you to a general warning and the hazard symbol
refers to procedure-specific risks. Refer back
to these warnings. Additional, product-specific
warnings may be found throughout the body of
this manual where applicable.
Flammable fumes, such as solvent and paint
fumes, in work areas can ignite or explode. To
help prevent fire and explosion:
• Use equipment only in well ventilated areas.
• Eliminate all ignition sources; such as pilot
lights, cigarettes, portable electric lamps, and
plastic drop cloths (potential static arc charge).
• Sprayer generates sparks. When flammable
liquid is used in or near the sprayer or for
flushing or cleaning, keep sprayer at least 20
feet (6 m) away from explosive vapors.
• Keep work area free of debris, including
solvent, rags and gasoline.
• Do not plug or unplug power cords or turn
lights on or off when flammable fumes are
present.
• Ground equipment and conductive objects in
work area. Read Grounding instructions.
• If there is static sparking or you feel a shock,
stop operation immediately. Do not use
equipment until you identify and correct the
problem.
• Keep a working fire extinguisher in the work
area.
Improper grounding, setup, or usage of the
system can cause electric shock.
• Turn off and disconnect power cord before
servicing equipment.
• Use only grounded electrical outlets.
• Use only 3-wire extension cords.
• Ensure the power outlet is protected by a
residual current device.
• Do not expose the equipment to rain.
Store indoors.
High-pressure fluid from gun, hose leaks, or
ruptured components will pierce skin. This may
look like just a cut, but it is a serious injury that
can result in amputation. Get immediate medical
treatment.
• Do not point gun at anyone or at any part of
the body.
• Do not put your hand over the spray tip.
• Do not stop or deflect leaks with your hand,
body, glove, or rag.
• Engage trigger lock when not spraying.
• Follow Pressure Relief Procedure in this
manual, when you stop spraying and before
cleaning, checking, or servicing equipment.
DO NOT USE THE BAREKNUCKLE WELTERWEIGHT AIRLESS SPRAY MACHINE WITH A GENERATOR
OR UNREGULATED POWER SUPPLY. THE MACHINE REQUIRES CONSISTENT REGULATED POWER.
POWER SPIKES OR SURGES MAY LEAD TO DAMAGE TO THE MACHINE, COSTLY REPAIR OR
PERMANENT DAMAGE.
TECHNICAL DATA
TYPE: Bareknuckle Welterweight
Power requirements 230±10%Vac, 50±1Hz
Input power 650 - 750W
Rated current 2.0~4.5A
Maximum working pressure 3000PSI
Sound pressure level: 89 db
Vibration value: 0.715 m/s²
Maximum delivery gpm (lpm) 1.1
Working environment temperature requirement: 5oC - 40oC
Working environment humidity requirement: 30% - 95%
Standard nozzle 517
Transportation and storage temperature requirement: 25oC - 55oC
Paint hose: 7.6m
Paint outlet connector: 1/4-18-NPSM
Dimensions Weight 9.7kg
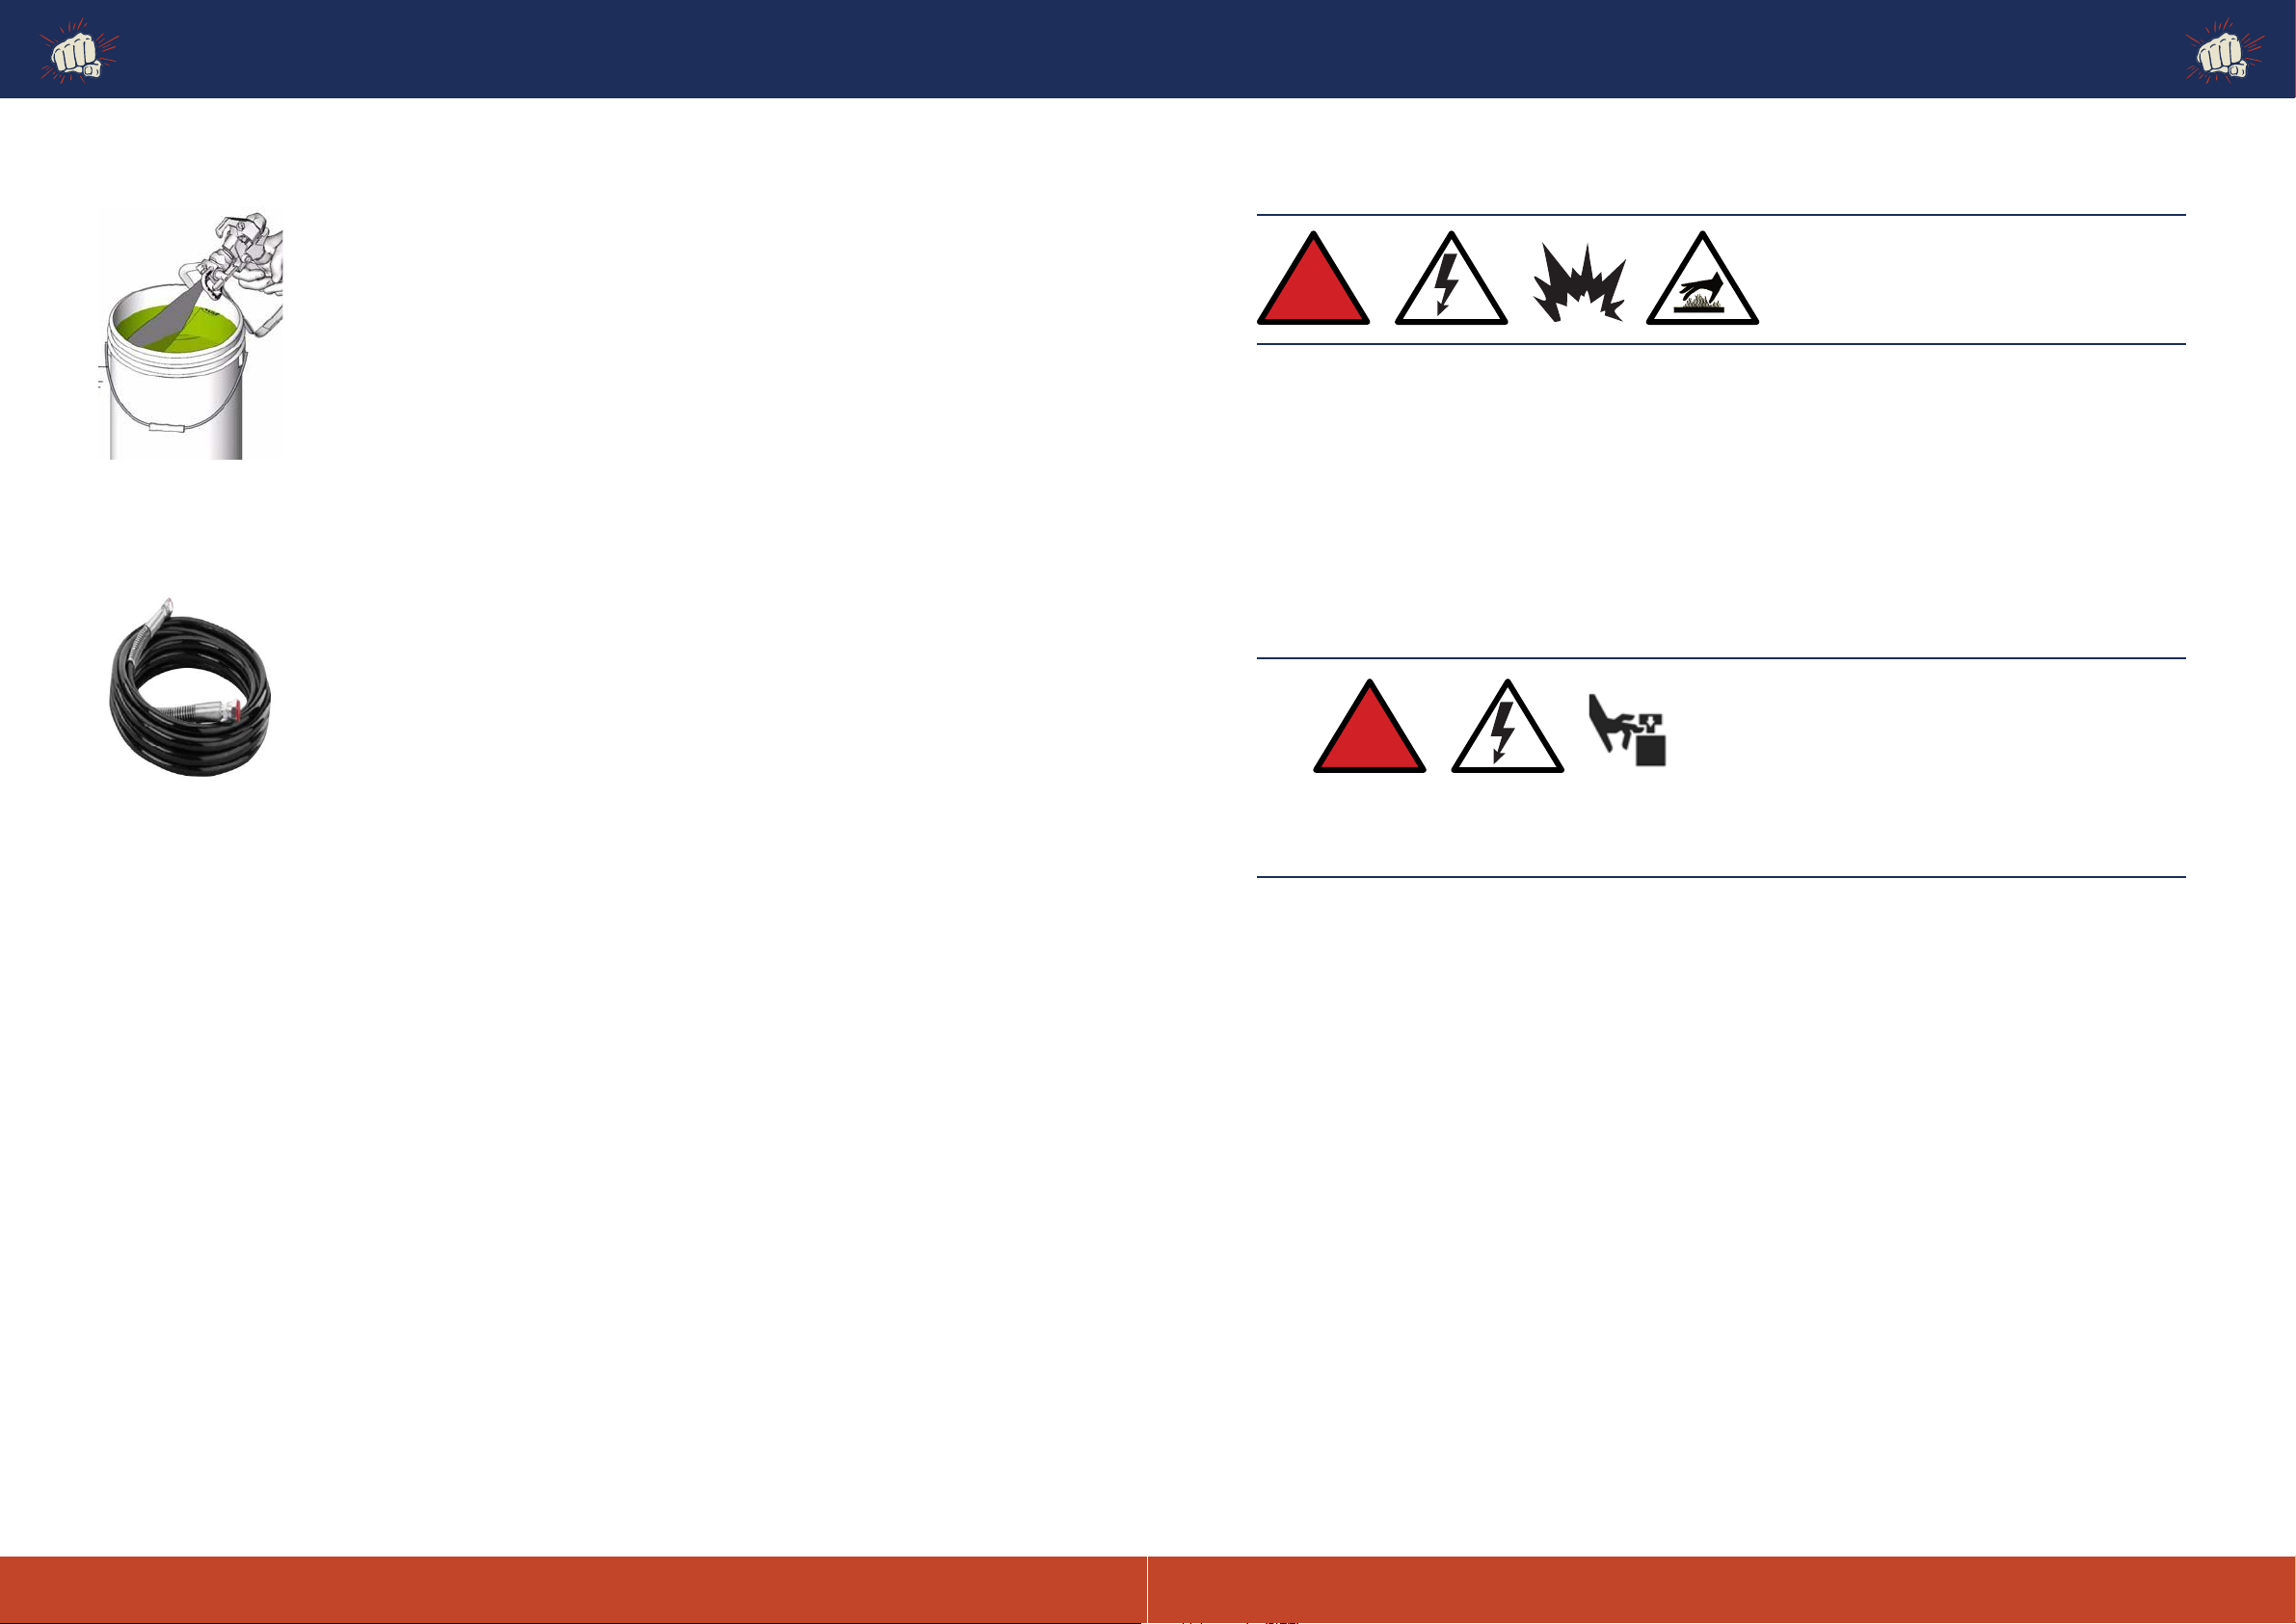
FIRE AND EXPLOSION HAZARD
SKIN INJECTION HAZARD
WARNING
ELECTRIC SHOCK HAZARD
WARNING
!

Bareknuckle Welterweight - Airless Paint Sprayer OPERATING INSTRUCTIONS & SAFETY MANUAL Bareknuckle Welterweight - Airless Paint Sprayer OPERATING INSTRUCTIONS & SAFETY MANUAL |4 | 5
WARNING
Equipment surfaces can become very hot during
operation. To avoid severe burns, do not touch hot equipment. Wait until equipment has cooled
completely.
BURN HAZARD
Moving parts can pinch or amputate fingers and
other body parts.
• Keep clear of moving parts.
• Do not operate equipment with protective
guards or covers removed.
• Pressurized equipment can start without
warning. Before checking, moving, or servicing
equipment, follow the Pressure Relief Procedure
in this manual. Disconnect power or air supply.
MOVING PARTS HAZARD
Toxic fluids or fumes can cause serious injury or
death if splashed in the eyes or on skin, inhaled,
or swallowed.
• Read warnings to know the specific hazards of
the fluids you are using.
• Store hazardous fluid in approved containers,
and dispose of it according to applicable
guidelines.
TOXIC FLUID OR FUMES HAZARD
You must wear appropriate personal protective
equipment (PPE) when operating, servicing, or
when in the operating area of the equipment to
help protect you from serious injury, including
eye injury, inhalation of toxic fumes, burns, and
hearing loss. This equipment includes but is not
limited to:
• Protective eye wear
• Clothing and respirator as recommended by the
fluid and solvent manufacturer
• Gloves
• Hearing protection
• Protective footware
PERSONAL PROTECTIVE EQUIPMENT
Misuse can cause death or serious injury.
• Do not exceed the maximum working pressure
or temperature rating of the lowest rated
system component. Read Technical data.
Technical Data in all equipment manuals.
• Use fluids and solvents that are compatible with
equipment wetted parts. Read Technical Data in
all equipment manuals.
Read fluid and solvent manufacturer’s warnings.
For complete information about your material,
request MSDS from the distributor or retailer.
• Check equipment daily. Repair or replace
worn or damaged parts immediately with
manufacturers replacement parts only.
• Do not alter or modify equipment.
• Use equipment only for its intended purpose.
Call your Retailer for information.
• Route hoses and cables away from traffic areas,
sharp edges, moving parts, and hot surfaces.
• Do not kink or over bend hoses or use hoses to
pull equipment.
• Comply with all applicable safety regulations.
• Keep children and animals away from work area.
• Do not operate the equipment when fatigued or
under the influence of drugs or alcohol.
EQUIPMENT MISUSE HAZARD
Do not use 1, 1, 1-trichloroethane, ethylene
chloride, other halogenated hydrocarbon solvents
or fluids containing such solvents in pressurized
aluminum equipment.
Such use can cause serious chemical reaction and
equipment rupture, and result in death, serious
injury, and property damage.
PRESSURIZED ALUMINUM PARTS HAZARD
A) The machine is not designed for use in potentially
explosive atmospheres;
B) Use of electrostatic atomizing and spraying equipment
with machines not specially designed for this
equipment, may result in serious harm and/or hazard
for the operators
C) Hazards resulting from contact with and/or breathing
of toxic materials, gases, mists and vapours which
may be created by operation of the machine. Such
warnings shall also include the use of personal
protective equipment and reminding the user to be
aware of the recommendations of the coating material
manufacturer;
D) Surface temperatures of any part of the machine,
reachable during normal operation, maintenance and
servicing but not normally in contact with the human
body, which can exceed 48oC or be less than 0oC.
E) Pressured coating material and /or compressed air not
to be directed towards persons or animals;
F) Relating to training for the safe operation, adjustment,
cleaning and maintenance of the machine;
G) Regarding any special earthing measures;
H) Stating that a list of the materials used in the
construction of the machine will be made available on
request to validate the compatibility with the coating
materials being used;
I) Regarding the requirements of using the machine only
in a well ventilated area with regards to health, fire and
explosion risks;
J) Regarding the visual inspection for damage on hoses
which may be subjected to friction
K) Requirements for environmental protection to be
observed
L) Reduce the quantity of coating and/or auxiliary
materials at workplaces to a minimum
a) Maximum allowable pressure for the coating
material……… 20.7 Mpa (3000psi)
b) Typical coating material flow rate for sample
conditions: 1.1L/Min
c) Type and use of any safety devices in the machine:
1. Temperature control device
2. Maximum pressure control device
3. Maximum electrical current control device
4. Creepage protect control device
5. Hand-hurt protect device
SPECIAL FOCUS
SPECIAL ATTENTION:
!
Bareknuckle Welterweight - Airless Paint Sprayer OPERATING INSTRUCTIONS & SAFETY MANUAL Bareknuckle Welterweight - Airless Paint Sprayer OPERATING INSTRUCTIONS & SAFETY MANUAL |6 | 7
Clean Sprayer immediately to prevent permanent damage. Clean Sprayer immediately to prevent permanent damage.
7
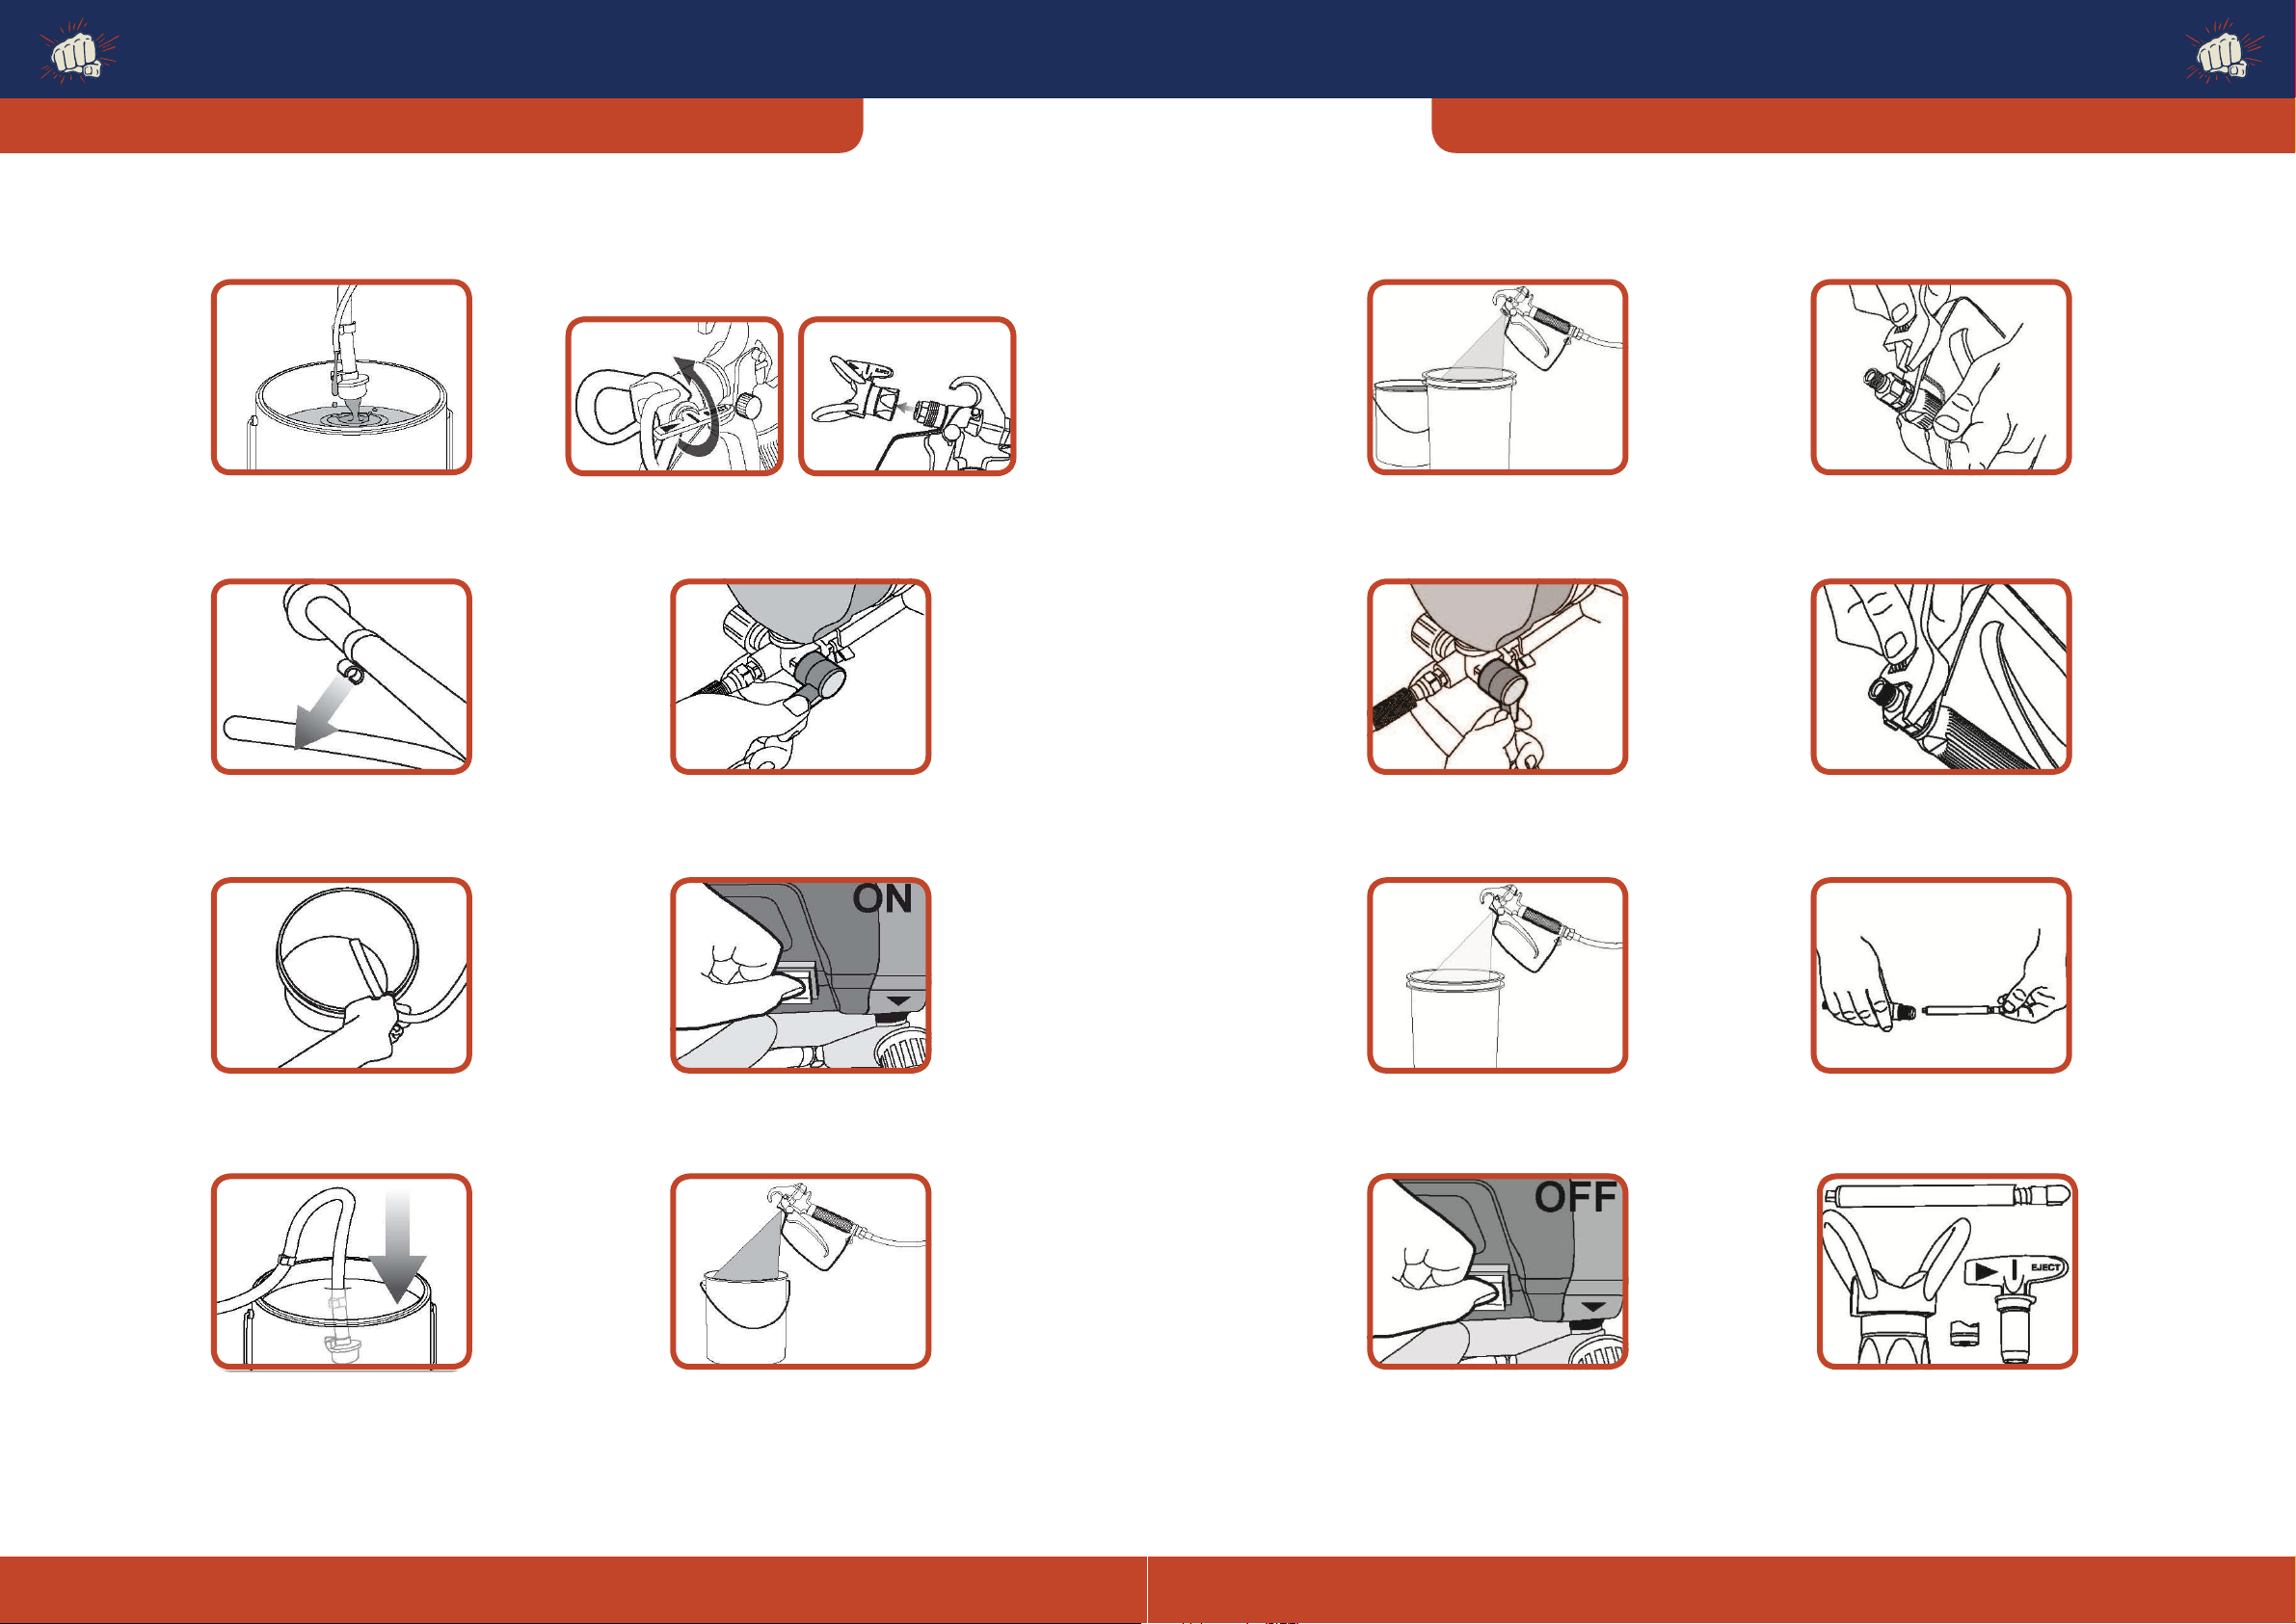
INSTALLATION:
8
8
8
8
8
8
8
BEFORE YOU BEGIN
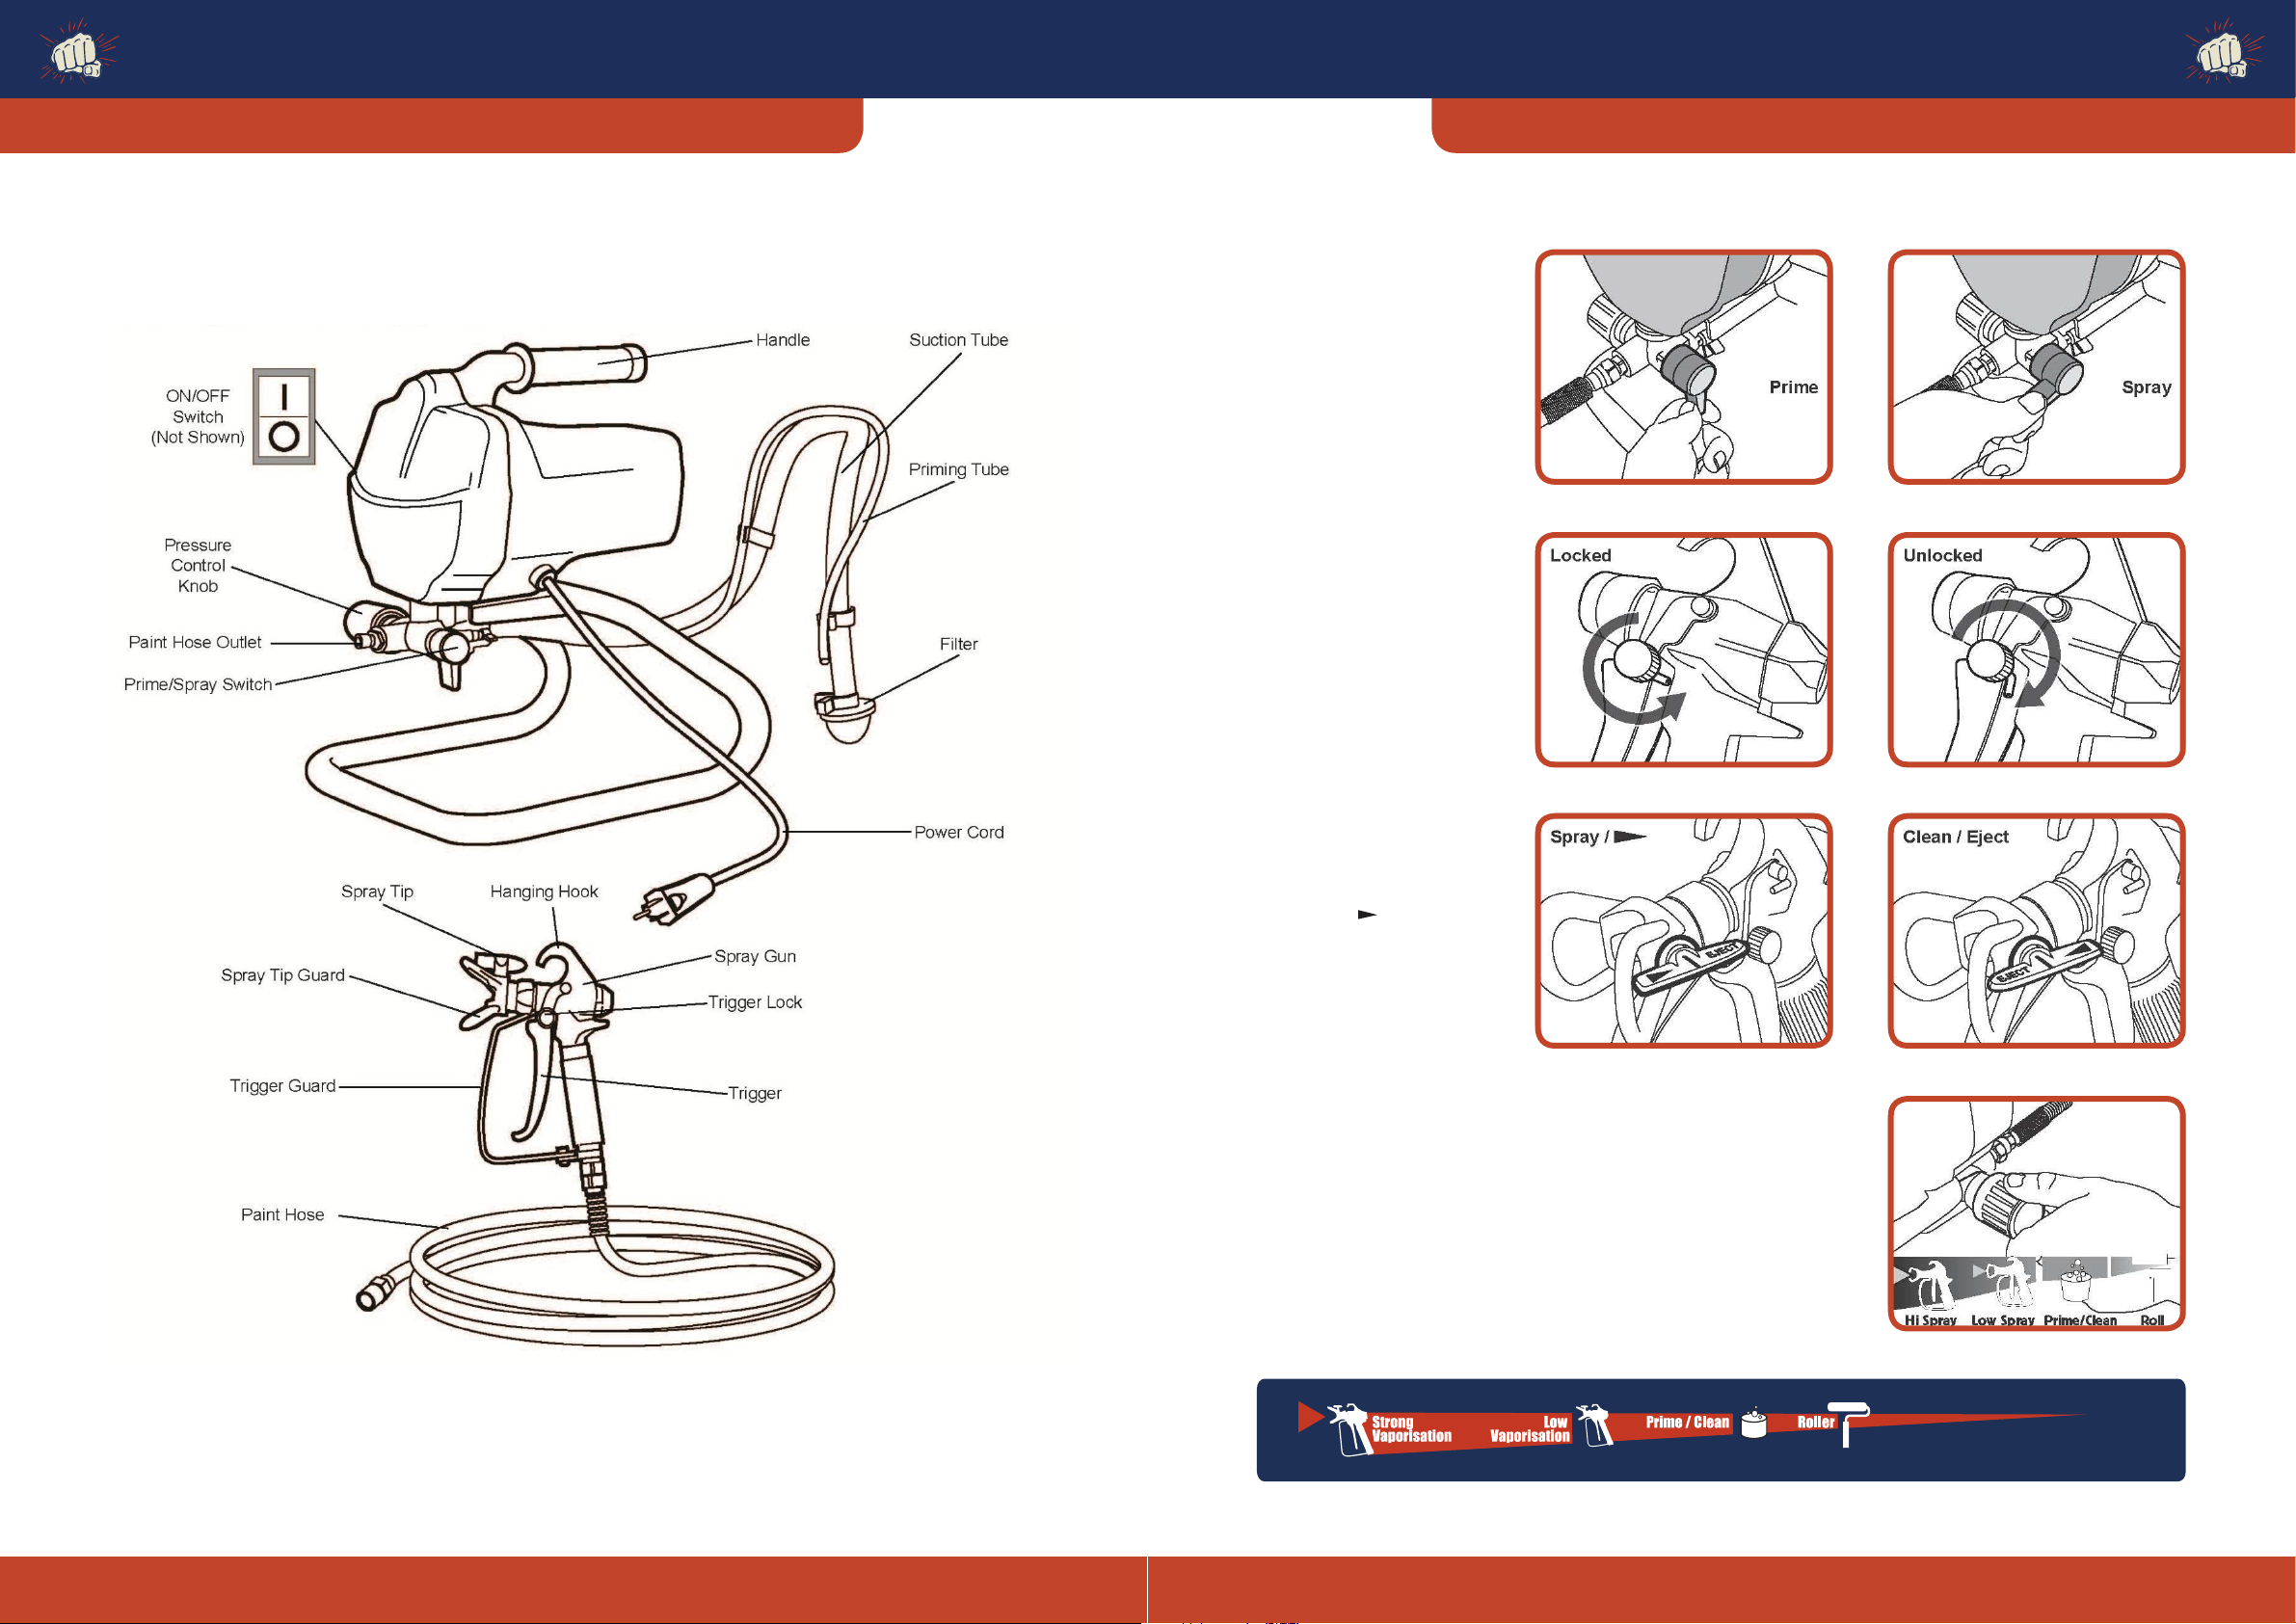
Familiarise yourself with the Paint Sprayer and it’s functions. Prime/Spray Switch
This switch toggles the unit between
priming mode and spraying mode.
Trigger Lock
When engaged, this mechanism
prevents the trigger from being
pulled accidentally such as if the
gun is dropped.
Lock whenever not in use.
Nozzle
The nozzle is reversible and
removable to make cleaning and
unclogging easier.
Turn to Spray ( ) position to use
the spray gun.
Turn to Clean (Eject) position to
clean the nozzle.
Pressure Control Knob
The Pressure Control Knob can be adjusted for High Pressure Spraying,
Low Pressure Spraying , Priming/Cleaning, or Rolling. Align the Pressure
Control Knob with indicator on the Sprayer Housing to set the function.
High Pressure Spray
Low Pressure Spray Rolling
Prime/Clean
Returns not accepted & warranty void if sprayer is
not properly cleaned immediately after every use.
Returns not accepted & warranty void if sprayer is
not properly cleaned immediately after every use.

Bareknuckle Welterweight - Airless Paint Sprayer OPERATING INSTRUCTIONS & SAFETY MANUAL Bareknuckle Welterweight - Airless Paint Sprayer OPERATING INSTRUCTIONS & SAFETY MANUAL |8 | 9
Clean Sprayer immediately to prevent permanent damage. Clean Sprayer immediately to prevent permanent damage.
9
9
9
9
9
9
9
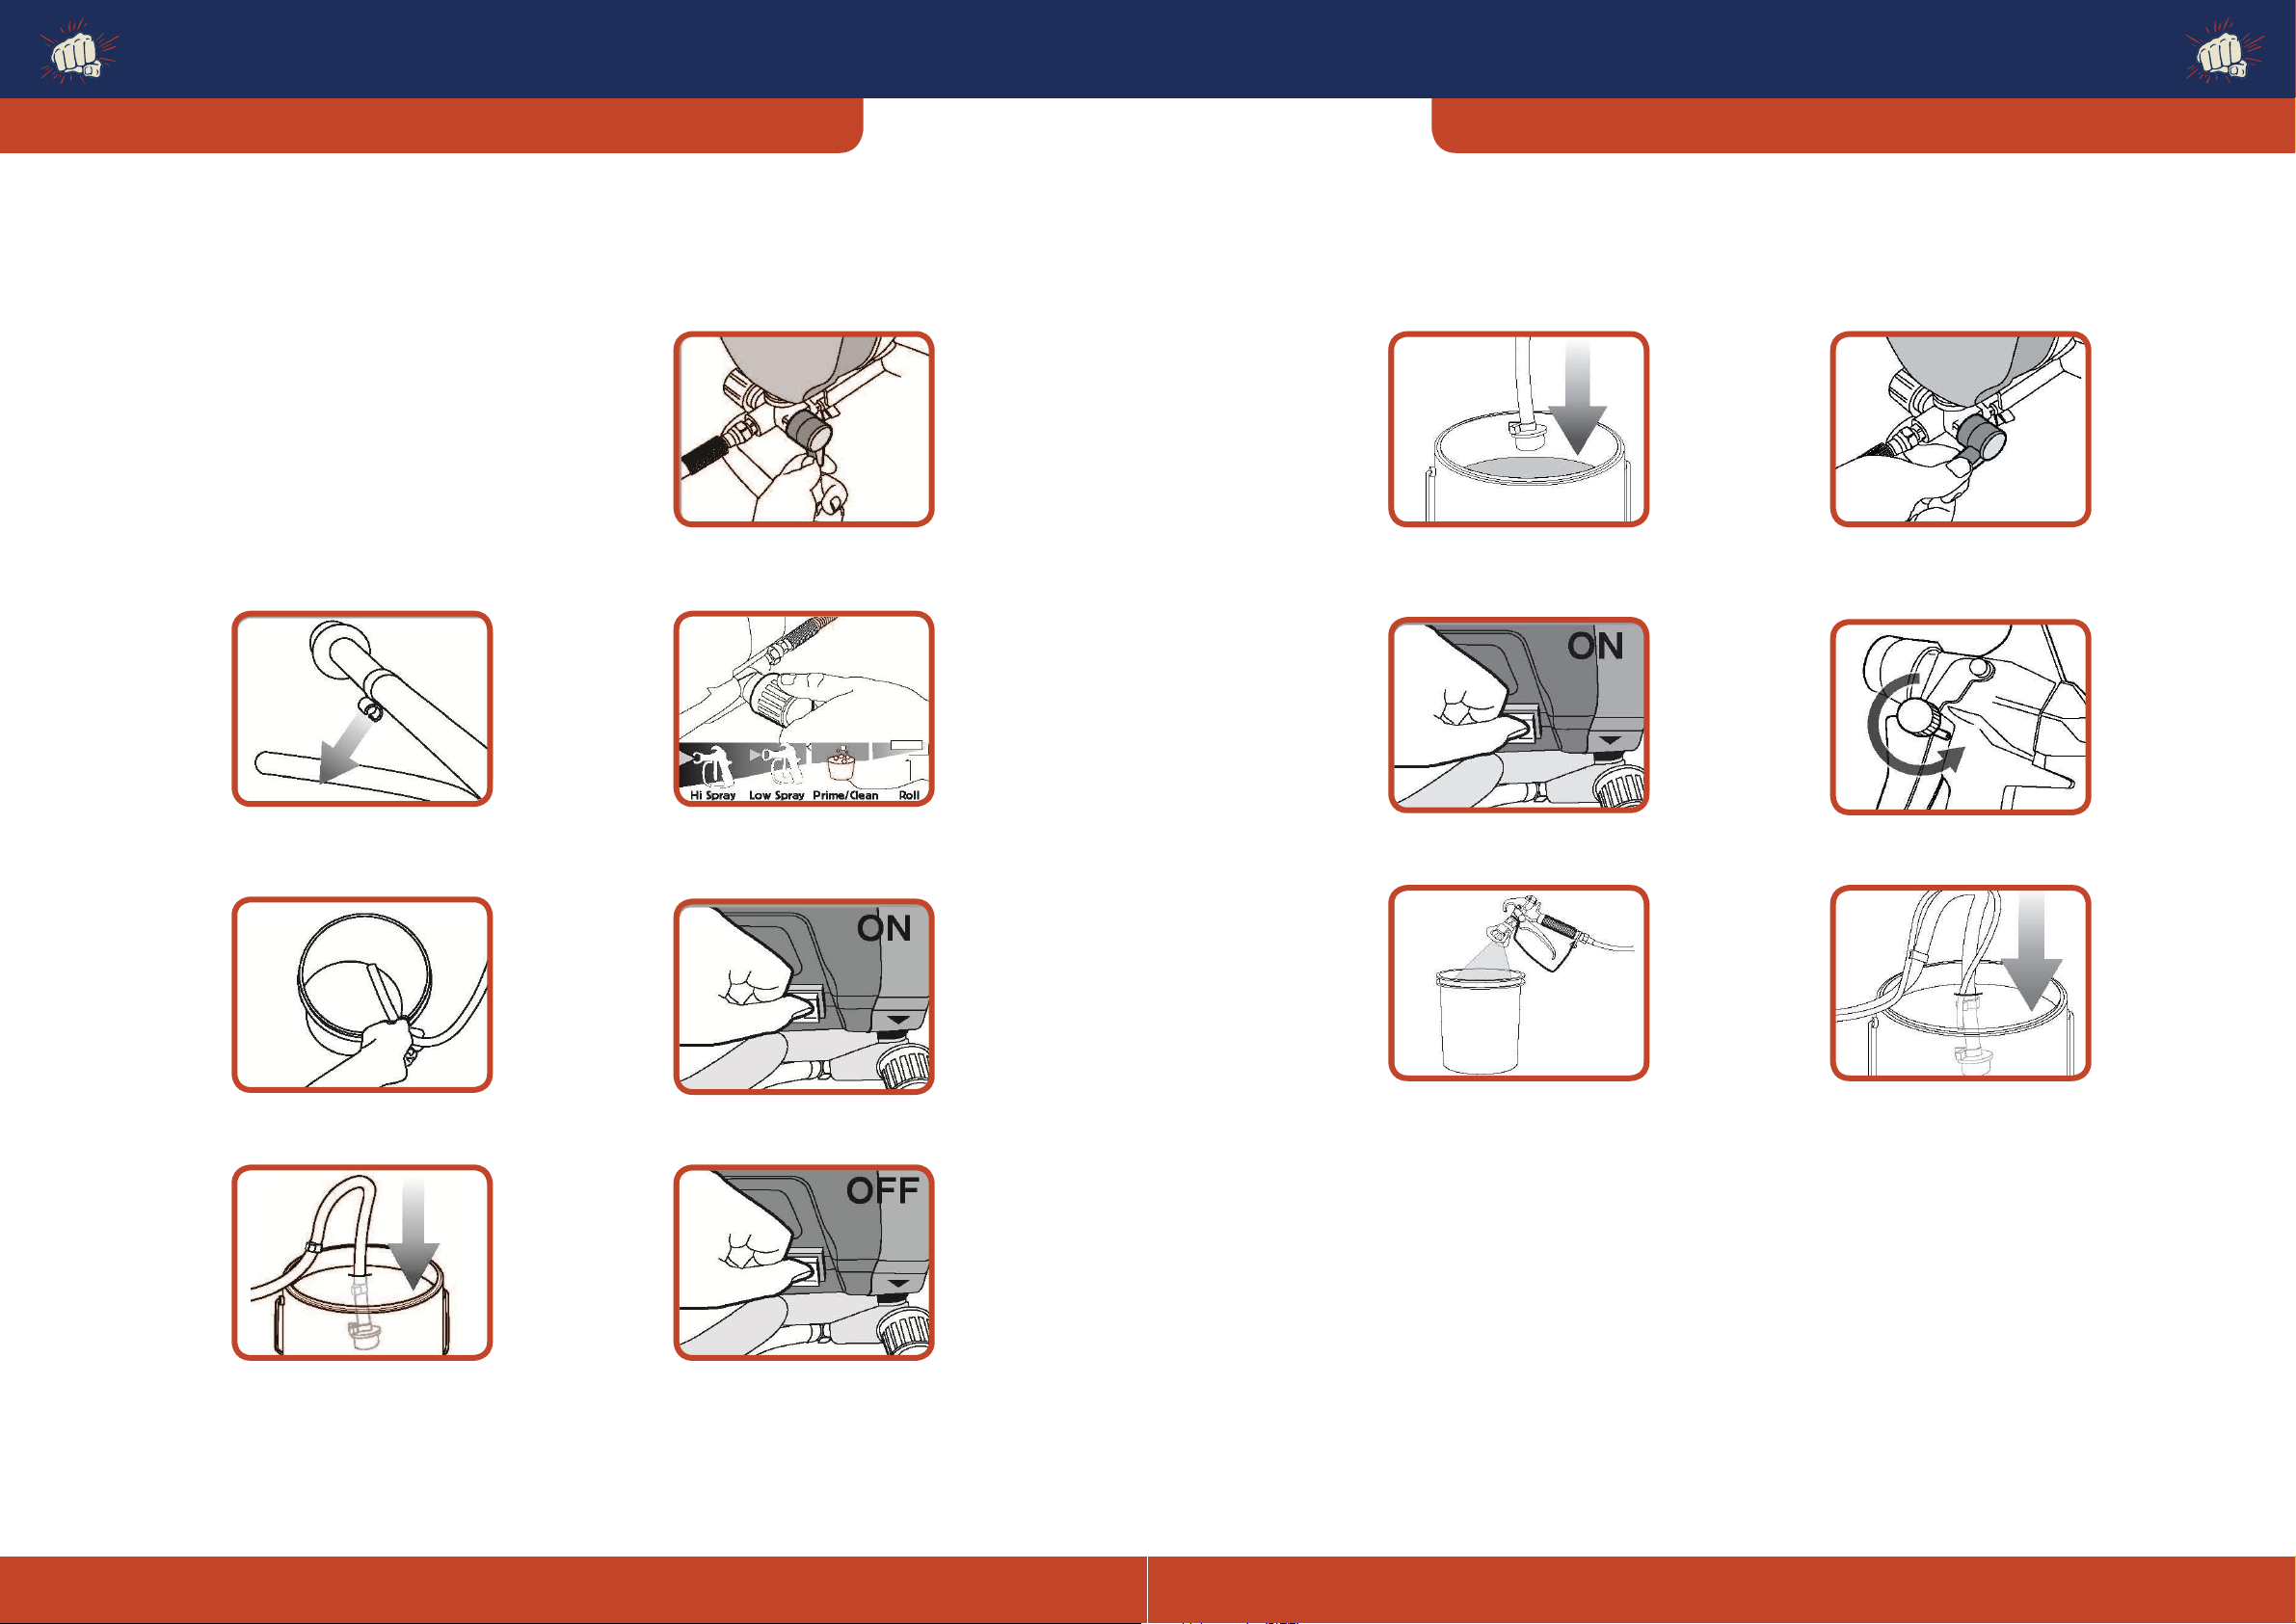
TO RELIEVE SPRAYER PRESSURE
SETUP NOTE: Remove or cover objects that you want to protect from overspray (paint mist).
1. Attach Paint Hose to Paint Hose
Outlet and tighten with wrench.
1. Turn Power Switch off and unplug unit
from outlet
2. Switch Prime/Spray switch to Prime mode. Note: Always set to Prime mode
between uses.
3. Point gun into paint pail and activate
Sprayer Trigger to relieve pressure.
4. Turn Trigger Knob to Locking poistion.
2. Attach Paint Hose to Paint Gun
and tighten with two wrenches. 3. Turn Pressure Control Knob to
Low Pressure Spray setting.
Bareknuckle Welterweight - Airless Paint Sprayer OPERATING INSTRUCTIONS & SAFETY MANUAL8 |
9
BEFORE STARTING
1) CHECK all fittings and connections in the pump system,
hose, and gun to ensure that they are tight.
CHECK to ensure that there is a spray tip in the gun,
and that the tip is the correct size for the coating you
are to spray. (There are various tips available, for each
type of coating or configuration.)
2) MAKE SURE the power source is securely grounded and
match the motor rating of your sprayer.
3) New spray: Oil is used by the factory for testing and
protection. It is necessary to flush unit before spraying.
Clean the pump with warm soapy water. Make sure
the hydraulic oil in the pump is clean and sufficient in
volume then begin the following procedure
1. Remove spray tip from gun
2. Put the input hose and pressure relief tube into the
bucket with some water,
3. Turn on the motor and push the pressure valve
upright. In a few seconds, water will begin to flow
up through the tube and flow out from outlet valve,
tighten the outlet valve deasil, then tighten the
pressure valve deasil.
4. When the pressure reaches up to around 207bar,
check if there is any leakage on the outlet hose, if it’s
leaking, Please check. Don’t stop or deflect leaks with
your hand, body, glove or rag.
5. If it doesn’t leak, open the spray gun and test spray.
Clean the oil in pump. Change the soapy water and
use clean water when the spray is clean.
6. Turn off power, Continue to spray until there is no
more water.
7. Unlock trigger lock. Put the pressure valve upright, till
no soapy water in pump.
Whenever instructed to relieve pressure, Stop spraying,
Check or service equipment or install or clean spray tip.
1. Engage trigger safety lock on gun. Turn Off power
and turn sprayer pressure control to lowest pressure
setting.
2. Hold gun against side of flushing pail. Trigger gun
into pail to relieve pressure.
3. Turn off pump and release fluid pressure by turning
the pressure relief prime valve located on the side of
the pump down.
OPERATING INSTRUCTIONS
PRESSURE RELEASE PROCEDURE
9
Returns not accepted & warranty void if sprayer is
not properly cleaned immediately after every use.
Returns not accepted & warranty void if sprayer is
not properly cleaned immediately after every use.
Bareknuckle Welterweight - Airless Paint Sprayer OPERATING INSTRUCTIONS & SAFETY MANUAL Bareknuckle Welterweight - Airless Paint Sprayer OPERATING INSTRUCTIONS & SAFETY MANUAL |10 | 11
Clean Sprayer immediately to prevent permanent damage. Clean Sprayer immediately to prevent permanent damage.
12
12
12
12
12
12
PRIMING SPRAY GUN
PRIMING AND STARTUP STEPS
This procedure is used for first time operation and also to flush
storage fluids out of the Sprayer.
Priming Water-Based vs. Oil-Based Paints
Oil-based Paint:
Flush with mineral spirits followed by warm clean water.
WARNING! TO PREVENT FIRE:
When using mineral spirits, ground gun by holding it against a
metal container while flushing.
Water-based (Latex) Paint:
Flush with warm clean water.
3. Submerge Suction Tube in
water or flushing solvent. 7. Sprayer will start pumping and water
or flushing solvent as well as air
bubbles will be purged from system.
Let fluids discharge from Priming Tube
into waste bucket for 30 to 60 seconds
then switch Power to Off.
11
11
10. Paint should work itself from
Suction Tube to Sprayer to Priming
Tube until paint discharges from
Return Tube. Point gun into waste
bucket and pull trigger.
13. Remove the Priming Tube from the
waste bucket and clip to Suction Tube
and submerge in paint pail.
14. If the motor stops, the pump and
tubes are primed. If it does not stop,
repeat priming steps.
15. Start Painting.
2. Place Priming Tube in waste bucket. 6. Plug in Sprayer and turn on power.
11
11
9. Switch Power to On. 12. Stop spraying and activate trigger lock.
11
1. Separate smaller Priming Tube
from Suction Tube. 5. Adjust Pressure Control Knob to
Prime/Clean setting.
11
8. Remove Suction Tube from water
or flushing solvent and submerge
in paint pail.
11. Turn Spray/Prime Switch to Spray
mode and continue to spray into
waste bucket.
4. Turn Prime/Spray switch to
Prime mode.
11
Returns not accepted & warranty void if sprayer is
not properly cleaned immediately after every use.
Returns not accepted & warranty void if sprayer is
not properly cleaned immediately after every use.

Bareknuckle Welterweight - Airless Paint Sprayer OPERATING INSTRUCTIONS & SAFETY MANUAL Bareknuckle Welterweight - Airless Paint Sprayer OPERATING INSTRUCTIONS & SAFETY MANUAL |12 | 13
Clean Sprayer immediately to prevent permanent damage. Clean Sprayer immediately to prevent permanent damage.
13
13
13
13
13
PAINTING CLEARING SPRAY TIPPAINTING TECHNIQUES
Before painting, ensure the Sprayer has been primed (see Priming
and Startup steps) and verify that Nozzle Tip is aligned properly.
Note: Remove or cover objects that you want to protect
from overspray and paint mist.
Occasionally, the Spray Gun Tip will become clogged with paint.
Follow these instructions to clear Spray Gun Tip.
Before painting, ensure the Sprayer has been primed (see Priming
and Startup steps) and verify that Nozzle Tip is aligned properly.
Keep the gun approximately 30cm from the surface.
1. Once primed, adjust nozzle to
Spray setting. 1. Switch power off and set Trigger Lock.1. Keep gun straight and move
arm across at a steady rate
while staying 30cm from the
surface .
2. Do not fan the gun or paint will
be uneven.
3. Overlap strokes by half, always
aim stroke at bottom edge of
last stroke.
Overlap
Strokes
2. Start spraying at the lowest
setting on the Pressure Control
Knob and increase pressure as
needed by turning clockwise to
create a good spray pattern.
14
14
2. Adjust nozzle to clean setting.
14
5. Unlock Trigger.
14
6. Spray into waste bucket until
clog clears.
14
7. Release Trigger and engage
Trigger Lock.
14
8. Adjust nozzle to Spray mode.
14
3. Turn Spray/Prime Switch to Spray mode.
14
4. Turn power on.
14
Returns not accepted & warranty void if sprayer is
not properly cleaned immediately after every use.
Returns not accepted & warranty void if sprayer is
not properly cleaned immediately after every use.
Bareknuckle Welterweight - Airless Paint Sprayer OPERATING INSTRUCTIONS & SAFETY MANUAL Bareknuckle Welterweight - Airless Paint Sprayer OPERATING INSTRUCTIONS & SAFETY MANUAL |14 | 15
Clean Sprayer immediately to prevent permanent damage. Clean Sprayer immediately to prevent permanent damage.
15
16
16
16
16
16
16
16
16
15
15
15
15
15
15
15
15
CLEANING
1. Relieve pressure and drain
paint from tube. 9. Change to waste bucket as
paint thins. 13. Remove trigger guard from
housing.
2. Separate tubes. 10. Turn to Prime mode. 14. Unscrew nut.6. Turn to Spray mode.
3. Place Priming Tube in empty
waste bucket. 11. Continue to flush until clear. 15. Remove filter.
4. Submerge Suction Tube in
water or flushing fluid. 12. Release trigger, turn power off
and relieve pressure. 16. Clean all parts in warm, soapy
water or flushing fluid with a
bristled brush.
5. Unthread spray tip and remove.
7. Switch power to on.
8. Spray paint into paint pail.
Returns not accepted & warranty void if sprayer is
not properly cleaned immediately after every use.
Returns not accepted & warranty void if sprayer is
not properly cleaned immediately after every use.
Bareknuckle Welterweight - Airless Paint Sprayer OPERATING INSTRUCTIONS & SAFETY MANUAL Bareknuckle Welterweight - Airless Paint Sprayer OPERATING INSTRUCTIONS & SAFETY MANUAL |16 | 17
Clean Sprayer immediately to prevent permanent damage.
17
17
17
17
17
17
17
17
17
18
Grounding and Electric Requirements
Grounding Instructions
This product must be grounded. In the event of an eletrical short circuit, grounding reduces the risk of electric
shock by providing an escape wire for the electric current. This product is equipped with a cord having a grounding
wire with an appropriate grounding plug . The plug must be plugged into an outlet that is properly installed and
grounded in accordance with all local codes and orinances.
Improper installation of the grounding plug can result in a risk of electric shock.
If repair or replacement of the cord or plug is necessary, do not connect the green grounding wire to either flat blade
terminal. The wire with insulation having a green outer surface with or without yellow stripes is the grounding wire
and must be connected to the grounding pin. Check with a qualified electrician or serviceman if the grounding
instructions are not completely understood, or if you are in doubt as to whether the product is properly grounded. Do
not modify the plug provided. If the plug will not fit the outlet, have the proper outlet installed by a qualified electrican.
The sprayer cord includes a grounding wire with an appropriate grounding contact.
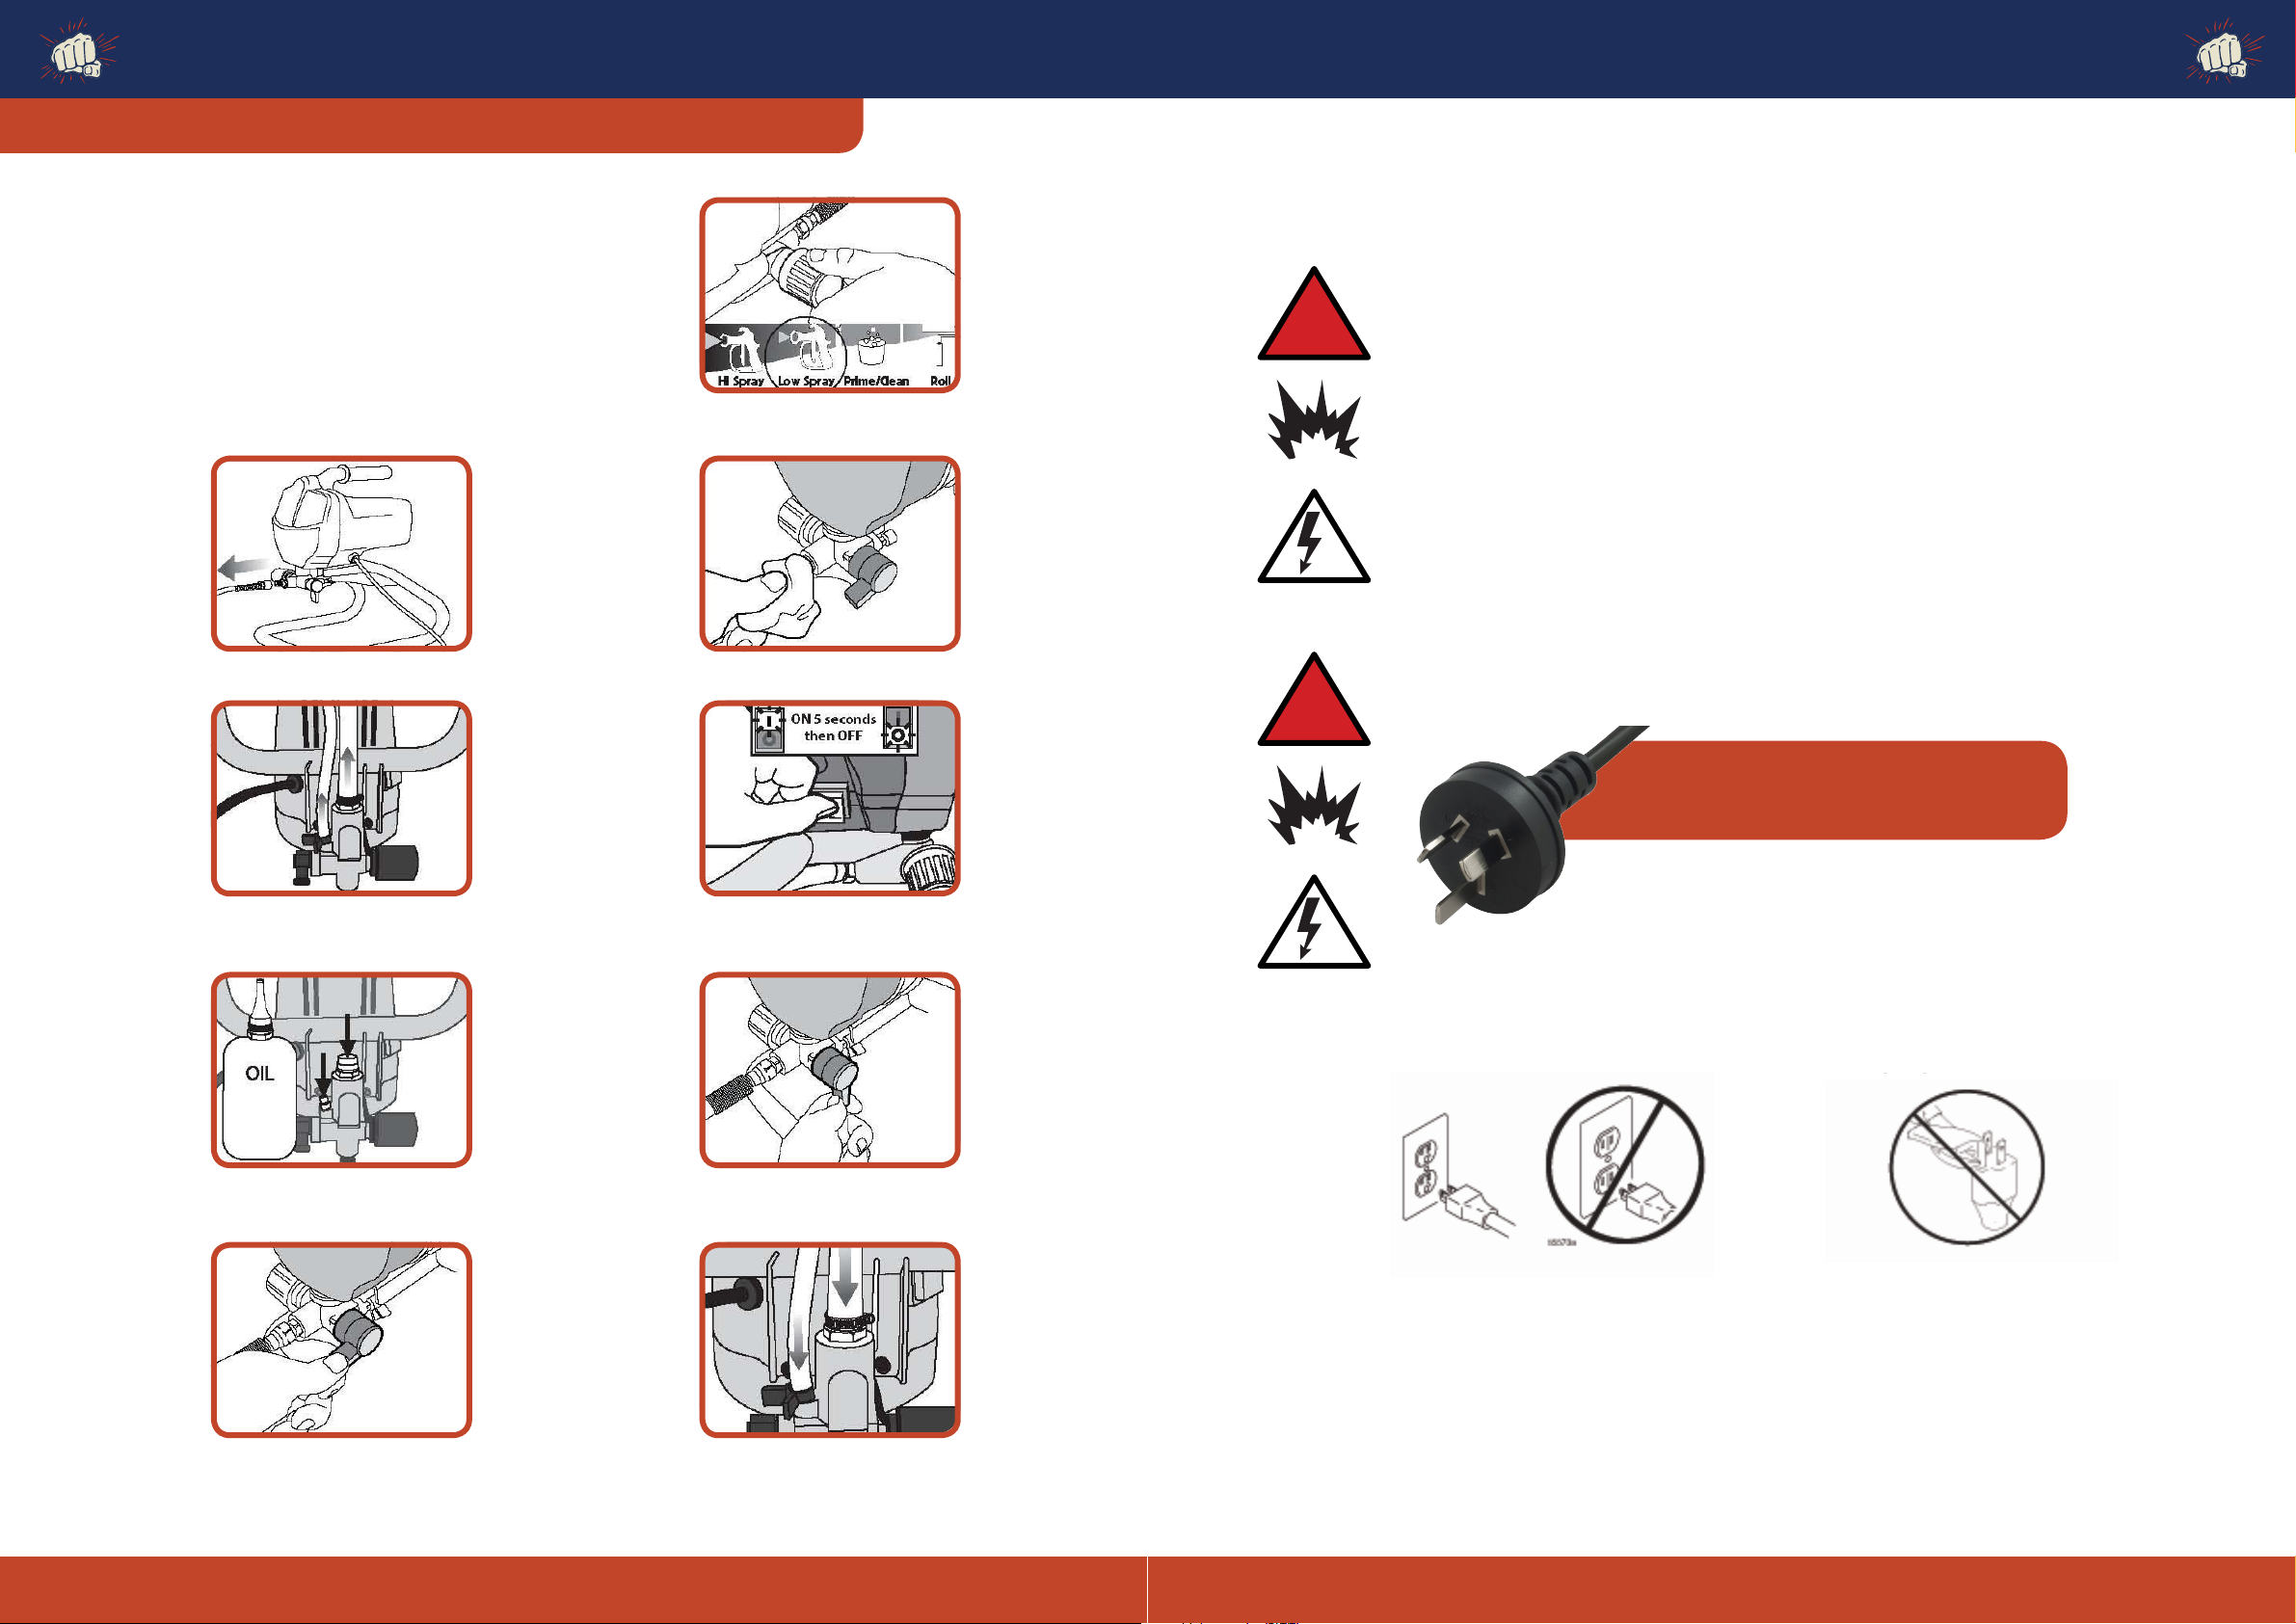
Never use an outlet that is not grounded or an adapter.
Do not use the sprayer if the electrical cord has a damaged ground contact. Only use an extension cord with
an undamaged ground contact.
Warning!
The Plug According to the state!
The sprayer requires for type 470:
220-240Vac, 50Hz,11A, 1 phase,
circuit with a grounding receptacle.
18
Grounding and Electric Requirements
Grounding Instructions
This product must be grounded. In the event of an eletrical short circuit, grounding reduces the risk of electric
shock by providing an escape wire for the electric current. This product is equipped with a cord having a grounding
wire with an appropriate grounding plug . The plug must be plugged into an outlet that is properly installed and
grounded in accordance with all local codes and orinances.
Improper installation of the grounding plug can result in a risk of electric shock.
If repair or replacement of the cord or plug is necessary, do not connect the green grounding wire to either flat blade
terminal. The wire with insulation having a green outer surface with or without yellow stripes is the grounding wire
and must be connected to the grounding pin. Check with a qualified electrician or serviceman if the grounding
instructions are not completely understood, or if you are in doubt as to whether the product is properly grounded. Do
not modify the plug provided. If the plug will not fit the outlet, have the proper outlet installed by a qualified electrican.
The sprayer cord includes a grounding wire with an appropriate grounding contact.
Never use an outlet that is not grounded or an adapter.
Do not use the sprayer if the electrical cord has a damaged ground contact. Only use an extension cord with
an undamaged ground contact.
Warning!
The Plug According to the state!
The sprayer requires for type 470:
220-240Vac, 50Hz,11A, 1 phase,
circuit with a grounding receptacle.
GROUNDING AND ELECTRICAL REQUIREMENTS
!
!
Grounding Instructions
LONG TERM STORAGE
When cleaning for long term storage (more than 48 hours).
It is very important that the Paint Sprayer is not stored with any water
or water-based material left in the Pump, Hose, Tubes, or Spray Gun.
This will corrode the product.
IMPORTANT: Clean the Sprayer before storage. See
“Cleaning”on pages 14-15.
1. Remove paint hose if not already removed.
2. Turn the unit over and loosen the Clamps
from both Tubes, then disconnect Tubes
from the Pump Body.
3. Add one ounce of light household oil or a
pump storage product into each inlet.
4. Turn Prime/Spray switch to Spray.
6. Hold a rag over the paint hose outlet.
5. Turn Pressure Control Knob to Low/Spray.
7. Switch Power to ON for five seconds, then
turn the power OFF.
8. Turn Prime/Spray switch to Prime, this will
keep storage fluids in sprayer.
9. Replace the Tubes and secure with the Clamps.
10. Wipe the sprayer with a clean cloth. Store in a clean dry location out of reach of children.
Returns not accepted & warranty void if sprayer is
not properly cleaned immediately after every use.
This product must be grounded. In the event of
an electrical short circuit, grounding reduces the
risk of electric shock by providing an escape wire
for the electric current. This product is equipped
with a cord having a grounding wire with an
appropriate grounding plug . The plug must be
plugged into an outlet that is properly installed
and grounded in accordance with all local codes
and ordinances.
Improper installation of the grounding plug can
result in a risk of electric shock.
If repair or replacement of the cord or plug is
necessary, do not connect the green grounding
wire to either flat blade terminal. The wire with
insulation having a green outer surface with
or without yellow stripes is the grounding wire
and must be connected to the grounding pin.
Check with a qualified electrician or serviceman
if the grounding instructions are not completely
understood, or if you are in doubt as to whether
the product is properly grounded. Do not modify
the plug provided. If the plug will not fit the
outlet, have the proper outlet installed by a
qualified electrician.
The sprayer cord includes a grounding wire with an appropriate grounding contact.
The sprayer requires for type 470:
220-240Vac, 50Hz,11A, 1 phase, circuit
with a grounding receptacle.
Never use an outlet that is not grounded
or an adapter. Do not use the sprayer if the electrical cord has a
damaged ground contact. Only use an extension
cord with an undamaged ground contact.
Bareknuckle Welterweight - Airless Paint Sprayer OPERATING INSTRUCTIONS & SAFETY MANUAL Bareknuckle Welterweight - Airless Paint Sprayer OPERATING INSTRUCTIONS & SAFETY MANUAL |18 | 19
19
Smaller gauge or longer extension cords may reduce sprayer performance.
Spray gun: ground through connection to a properly grounded fluid hose and pump.
Fluid supply container: follow local code.
Solvent and Oil-based fluids: follow local code. Use only conductive metal pails placed on a grounded surface
such as concrete. Do not place the pail on a nonconductive surface such as paper or cardboard, which interrupts
grounding continuity.
Grounding the metal pail: Connect a ground wire to the pail by clamping one end to pail and other end to ground such as
a water pipe.
To maintain grounding continuity when flushing or relieving pressure: hold metal part of the spray gun firmly to the
side of a grounded metal pail, then trigger the gun.
Electrical bonding
A hose, hose assembly, and spray gun assembly shall be constructed to provide electrical bonding to dissipate static
electricity from the tip of the Spray gun through the spray gun assembly and the couplings at the ends of the hose to the
pump assembly. The spray gun assembly shall also provide an external means to dissipate static electricity during the
cleaning process when spraying into a metal container.
Construction
Black hose is constructed of an extruded, seamless themoplastic inner tube, chemically bonded to multi-layers of high
tensile synthetic resistant polyurethane cover. A static drain element of flexible, electrically conductive material is located
between the braid layers.
FEATURES
·Polyurethane cover permits greater flexibility and tighter bends
·Resistant to flex fatigue
·Dissipates static charge
·Will not swell or degrade in contact with most paint chemicals, oils and most other solvents
·Light weight- approximately half that of comparable rubber or wire hose
·O.D smaller than comparable rubber hose without reducing the I.D., pressure rating, or fluid-carrying capacity
·Highly abrasion resistant
·Extrmely durable
Daily Maintain
Equipment lifetime is rely on daily maintain. The following respects should be obeyed:
1. Read the Manual carefully before first using.
2. Check the electrical requirement before each working.
3. Thorough cleaning equipment and the accessories after using.
4. Coil the tube after cleaning, in case of any damage.
5. Add some lubricant if long time not use.
Smaller gauge or longer extension cords may
reduce sprayer performance.
Spray gun: ground through connection to a
properly grounded fluid hose and pump.
Fluid supply container: follow local code.
Solvent and Oil-based fluids: follow local
code. Use only conductive metal pails placed
on a grounded surface such as concrete.
Do not place the pail on a nonconductive
surface such as paper or cardboard, which
interrupts grounding continuity.
Grounding the metal pail: Connect a ground
wire to the pail by clamping one end to pail
and other end to ground such as a water
pipe.
To maintain grounding continuity when
flushing or relieving pressure: hold metal
part of the spray gun firmly to the side of a
grounded metal pail, then trigger the gun. • Keep all screws, nuts, washers, gaskets, and electrical
fittings removed during repair procedures. These parts
usually are not provided with replacement kits.
• Test repairs after problems are corrected.
• If sprayer does not operate properly, review
repair procedure to verify you did it correctly. See
Troubleshooting, page 8.
• Overspray may build up in the air passages. Remove any
overspray and residue from air passages and openings
in the enclosures whenever you service sprayer.
• Do not operate the sprayer without the motor shroud in
place. Replace if damaged. Motor shroud directs cooling
air around motor to prevent overheating and insulates
the control board from accidental electric shock.
• Do not run sprayer dry for more than 30 seconds. Doing
so could damage pump packings.
• Protect the internal drive parts of this sprayer from
water. Openings in the cover allow for air cooling of the
mechanical parts and electronics inside. If water gets
in these openings, the sprayer could malfunction or be
permanently damaged.
• Prevent pump corrosion and damage from freezing.
Never leave water or water-base paint in sprayer when
its not in use in cold weather. Freezing fluids can
seriously damage sprayer. Store sprayer with Pump
Armor to protect sprayer during storage.
Flammable materials spilled on hot, bare, motor
could cause a fire or explosion. To reduce risk of
burns, fire or explosion, do not operate sprayer
with cover removed.
To reduce risk of serious injury, including electric shock:
• Do not touch moving or electric parts with fingers or
tools while testing repair.
• Unplug sprayer when power is not required for testing.
• Install all covers, gaskets, screws and washers before
you operate sprayer.
The equipment lifetime relies on regular maintenance. The following respects should be obeyed:
1. Read the Manual carefully before first using.
2. Check the electrical safety before each operation.
3. Thoroughly clean the equipment and accessories in accordance with the cleaning instructions after each use.
4. Coil the tube after cleaning, in case of any damage.
5. Add lubricant according to the instructions if the machine will not be in use for more than 48 hours.
A hose, hose assembly, and spray gun
assembly shall be constructed to provide
electrical bonding to dissipate static
electricity from the tip of the spray gun
through the spray gun assembly and the
couplings at the ends of the hose to the
pump assembly. The spray gun assembly
shall also provide an external means
to dissipate static electricity during the
cleaning process when spraying into a metal
container.
Construction
The spray hose is constructed from extruded,
seamless thermoplastic inner tube,
chemically bonded to multi-layers of high
tensile synthetic resistant polyurethane
cover. A static drain element of flexible,
electrically conductive material is located
between the braid layers.
Features
• Polyurethane cover permits greater
flexibility and tighter bends
• Resistant to flex fatigue
• Dissipates static charge
• Will not swell or degrade in contact with
most paint chemicals, oils and most other
solvents
• Light weight- approximately half that of
comparable rubber or wire hose
• O.D smaller than comparable rubber hose
without reducing the I.D., pressure rating, or
fluid-carrying capacity
• Highly abrasion resistant
• Extremely durable
ELECTRICAL BONDING
CAUTION
DAILY MAINTENANCE
GENERAL REPAIR INFORMATION
!
!

Bareknuckle Welterweight - Airless Paint Sprayer OPERATING INSTRUCTIONS & SAFETY MANUAL Bareknuckle Welterweight - Airless Paint Sprayer OPERATING INSTRUCTIONS & SAFETY MANUAL |20 | 21
28
Micro Computer Controlled
Board
Sealing ring replace:
1. Removed the rear cover with 5”allen wrench.
2. Loosen two screws on pump frame with 5”allen wrench, the pump to be removed from the pump frame.
3. Loosen four screws which connector the pump and pump cover with 4”allen wrench.
4. Open the pump cover, take out the connecting rod component and the gear.
5. Screw out the connector with special sleeve.
6. Carefully check the piston rod and seal and o-ring and other parts for wear and scratches, if any, should be replaced immediately,
(head the ball into the connector seat, can remove piston, sealing ring, etc.)
7. With special sleeve screw the connector to pump body and tighten in place.
8. Put the connector assembly and gear into pump hosing.
9. Locking pump cover and pump housing with screw, then pump loaded on the frame, and cover the rear cover.
10. Assembled the Suction tube and Priming tube component.
11. According to operating Instructions steps to activate and check the equipment without dripping.
Note:
1. All components apply a little oil before assembled.
2. Even if a sealing ring is damaged, must be replaced the whole repair parts.
230V Airless Sprayer Electrical Installation Drawing
Electricity (230V)
Heat Pressure Control
Protection Switch
Electrical
Switch
Motor
a. Joint stopper b. O-ring 22.5*1.8 c. Stopper sleeve
d. Position washer e. Copper washer f. Felt
g. Connector seat h. Copper guide bushing i. Connector
Problem What To Check
(If check is OK, go to next check) What To Do
(When check is not OK, refer to this column)
Motor Won’t Operate
Basic Fluid
Pressure 1. Pressure control knob setting. Motor will not run
if set at minimum (fully counter-clockwise). 1. Slowly increase pressure setting to see if motor
starts.
2. Spray tip or fluid filter may be clogged. 2. Relieve pressure, then clear clog or clean gun
filter.
3. Machines does not pump. 3. Depress reset button beneath the pump to loosen
the ball.
Basic Mechanical 1. Pump frozen or hardened paint.
1. Thaw sprayer if water or water-based paint has
frozen in sprayer. Place sprayer in warm area to
thaw. Do not start sprayer until thawed completely.
If paint hardened (dried) in sprayer, replace pump
packings.
2. Displacement pump connecting rod pin.
Pin must be completely pushed into connecting rod
and retaining spring must be firmly in groove or
pump pin.
2. Push pin into place and secure with spring
retainer.
3. Motor. Remove drive housing assembly. 3. Replace motor if fan won’t turn.
Low Output 1. Worn spray tip. 1.Relieve pressure, replace tip.
2. Verify pump does not continue to stroke when
gun trigger is released. 2. Service pump.
3. Prime valve leaking. 3. Relieve pressure, then repair prime valve.
4. Suction tube connections. 4. Tighten any loose connections. Check o-ring on
suction tube.
5. Electric supply with volt meter.
Meter must read 220-240 Vac or 110V(According to
models). Low voltages reduce sprayer performance.
5. Reset building circuit breaker; replace building
fuse. Repair electrical outlet or try another outlet.
6. Extension cord size and length. 6. Replace with a correct, grounded extension cord.
7. Leads from motor to circuit board for damaged or
loose wire connectors. Inspect wiring insulation and
terminals for signs of overheating.
7. Be sure male terminal pins are centered and
firmly connected to female terminals. Replace
any loose terminals or damaged wiring. Securely
reconnect terminals.
8. Worn motor brushes which must be
greater than 1/4 in. (6 mm). 8. Replace brushes.
9. Motor brushes binding in brush holders. 9. Clean brush holders. Remove carbon dust by
using compressed air to blow out brush dust.
10. Low stall pressure. Turn pressure control knob
fully clockwise. 10. Replace pressure control assembly.
11. Motor armature for shorts by using an armature
tester (growler) or perform spin test. 11. Replace motor.
TROUBLESHOOTING SEALING RING REPLACEMENT
230V AIRLESS SPRAYER ELECTRICAL INSTALLATION DRAWING
1. Common Problems of Equipment 1. Removed the rear cover with 5” Allen wrench.
2. Loosen two screws on pump frame with 5” Allen wrench,
the pump to be removed from the pump frame.
3. Loosen four screws which connector the pump and
pump cover with 4” Allen wrench.
4. Open the pump cover, take out the connecting rod
component and the gear.
5. Screw out the connector with special sleeve.
6. Carefully check the piston rod and seal and o-ring and
other parts for wear and scratches, if any, should be
replaced immediately, (head the ball into the connector
seat, can remove piston, sealing ring, etc.)
7. With special sleeve screw the connector to pump body
and tighten in place.
8. Put the connector assembly and gear into pump hosing.
9. Locking pump cover and pump housing with screw, then
pump loaded on the frame, and cover the rear cover.
10. Assembled the Suction tube and Priming tube
component.
11. According to operating Instructions steps to activate
and check the equipment without dripping.
NOTE:
1. Apply a little oil to all components before assembly. 2. Even if a sealing ring is damaged you must replace all
worn parts.
Bareknuckle Welterweight - Airless Paint Sprayer OPERATING INSTRUCTIONS & SAFETY MANUAL Bareknuckle Welterweight - Airless Paint Sprayer OPERATING INSTRUCTIONS & SAFETY MANUAL |22 | 23
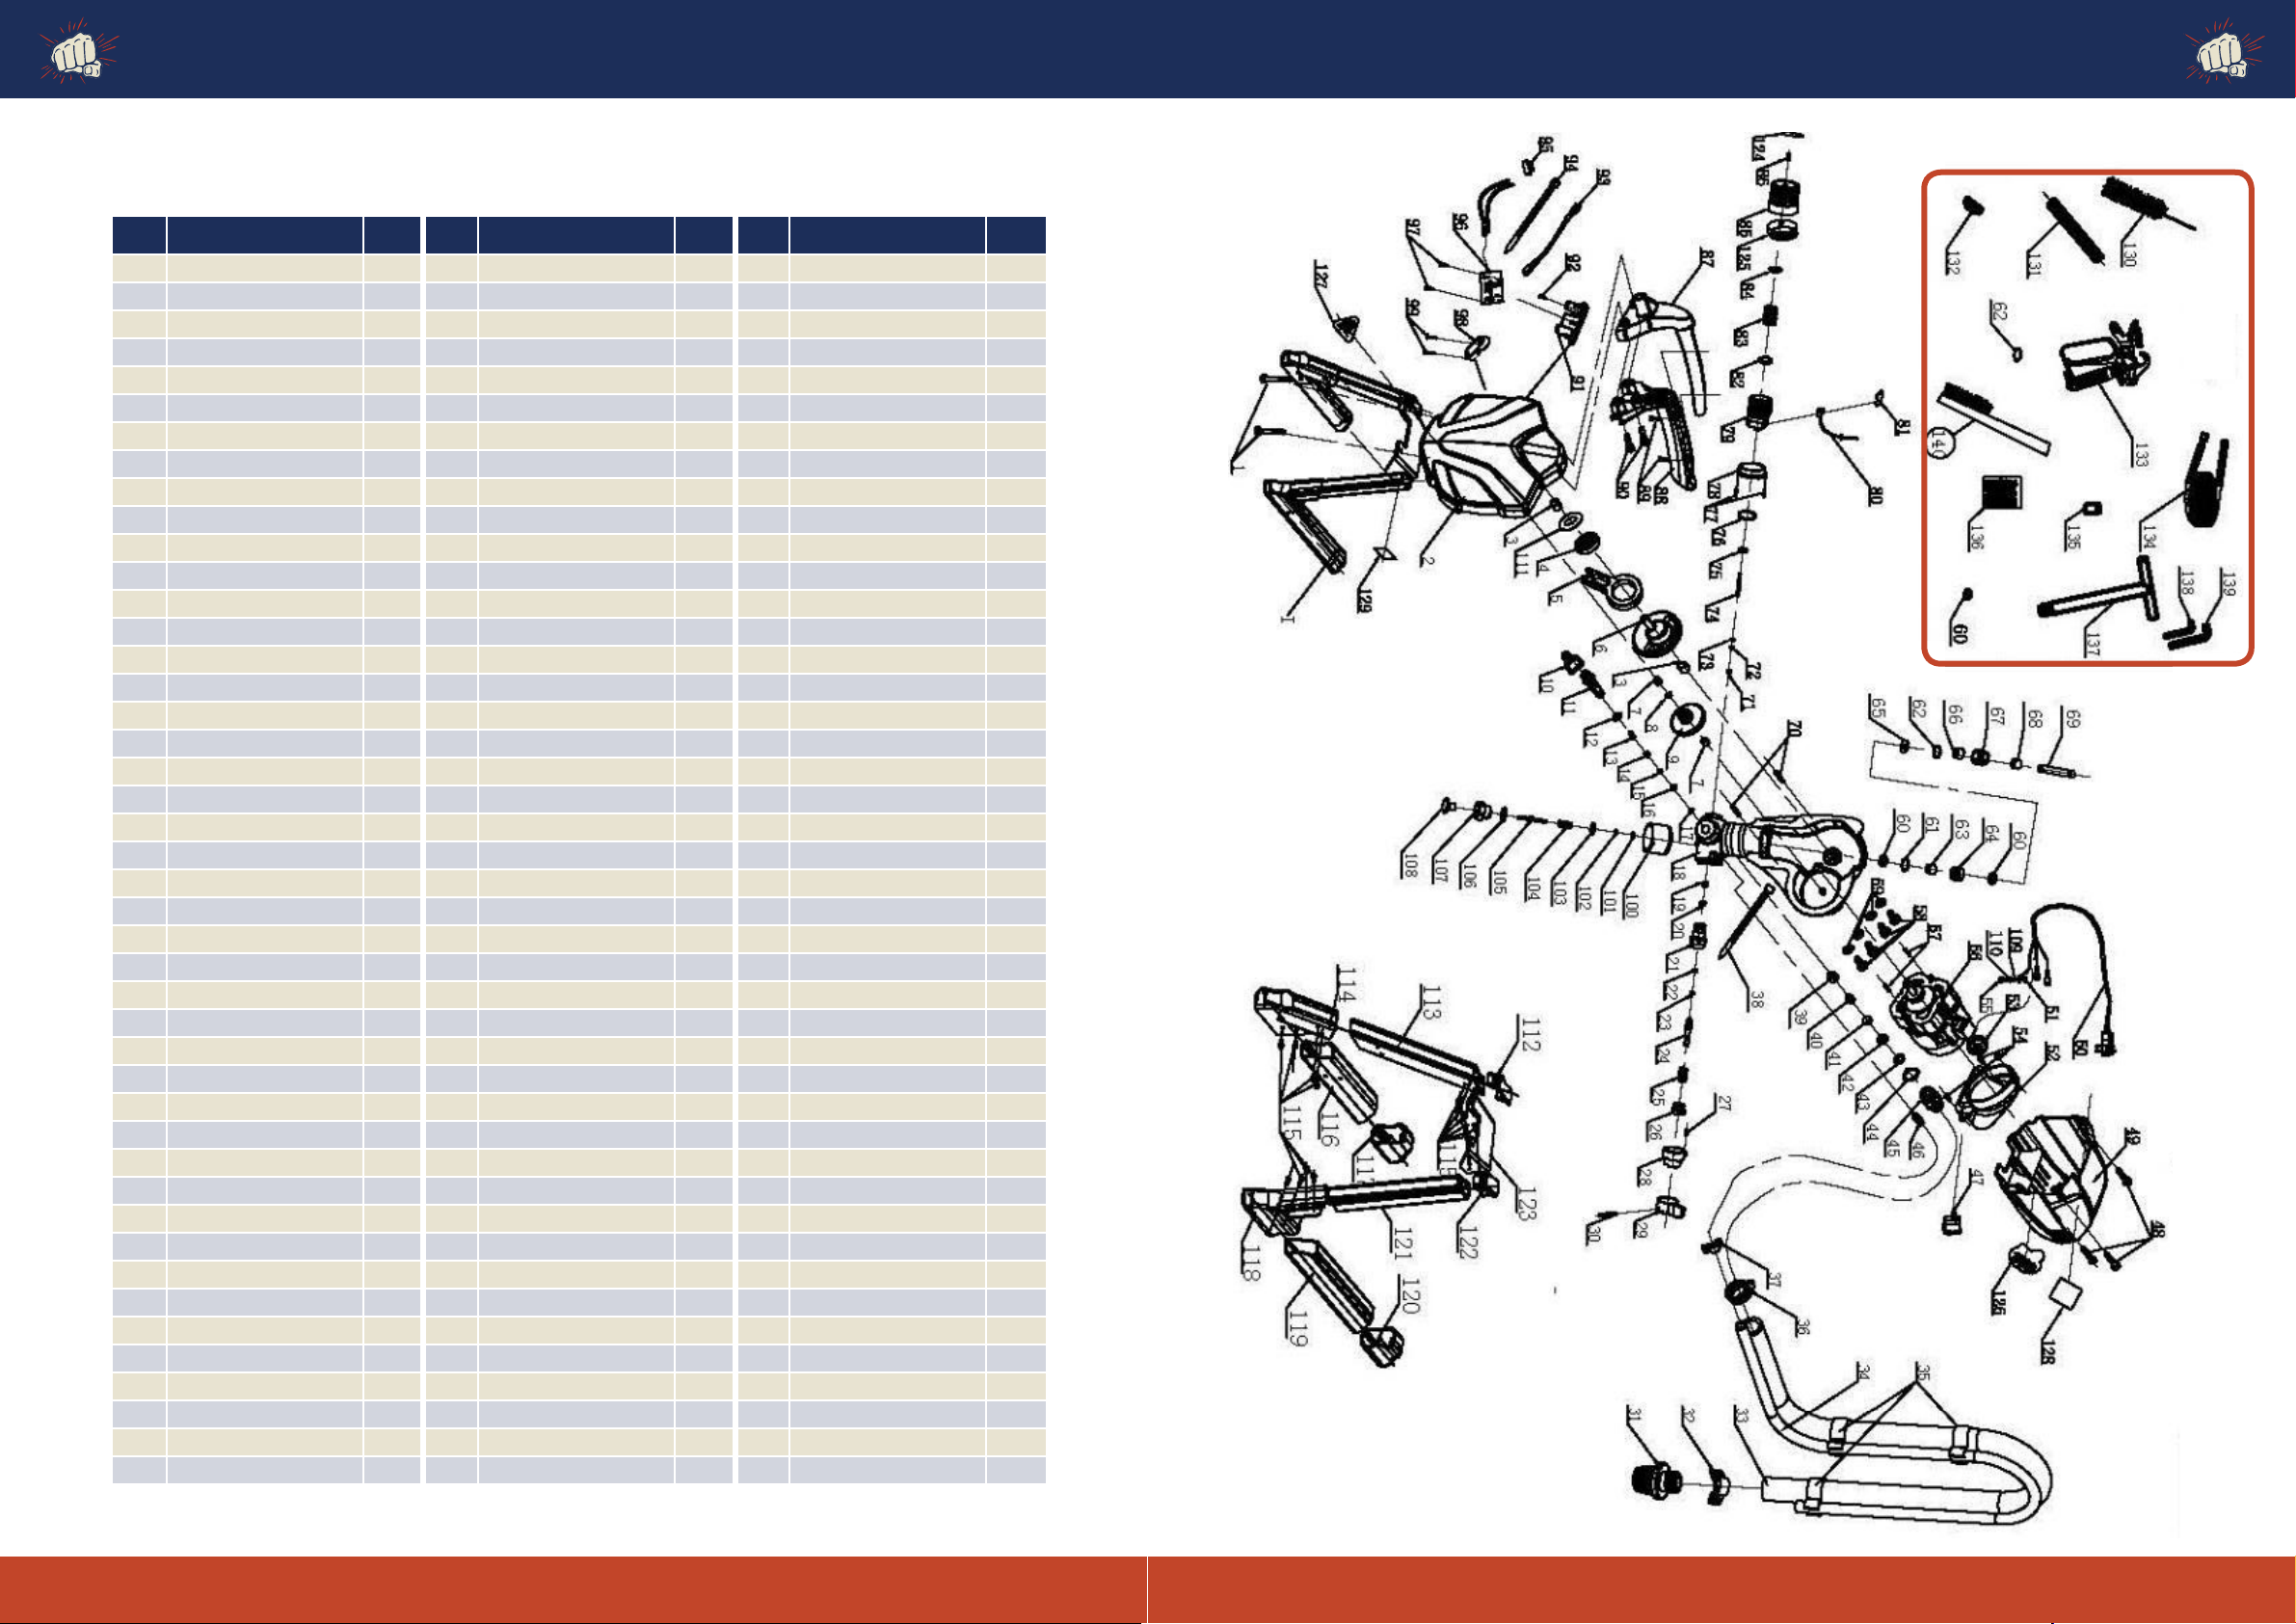
No. Description Qty. No. Description Qty. No. Description Qty.
1 Hex Bolt M6*20 2 45 Paint Input adaptor 1 89 Hex bolt M4*10 2
2 Pump cover 1 46 Pressure relief plug 1 90 Hex bolt M6*25 2
3 Output Gear bushing 2 47 Power switch 1 91 PCB supporter 1
4 Rolling bearing 1 48 Hex bolt M5* 14 3 92 Bolt M4*10 1
5 Output pole 1 49 Housing 1 93 Wire connector 1
6 Gear 1 50 Power plug 1 94 Nylon Cable tie 1
7 Gear bushing 2 51 Locking ring 1 95 Safety cover 1
8 Gear washer 1 52 Exhaust tube 1 96 PCB Assembly 1
9 Output gear 1 53 Wire Fastening seat 1 97 Tapping screw 2
10 Screw 1 54 Screw 3.5*10 3 98 Power cord fixer 1
11 Paint outlet 1 55 Bolt M4*10 1 99 Bolt M4*20 2
12 O-ring 10*8 1 56 Motor assembly 1 100 Shield 1
13 Output spring 1 57 Pin 3*12 2 101 O-ring 2.4*1.8 1
14 Mandrel 1 58 Hex bolt M5*14 4 102 Stopper 1
15 Steel ball 6.4 1 59 Spring washer 5 4 103 Copper gasket 1
16 Seal seat 1 60 Joint stopper 2 104 Touch control spring 1
17 Output washer 1 61 O-ring 1 105 Touch control pole 1
18 Pump 1 62 O-ring 22.5*1.8 1 106 O-ring 10*1.5 1
19 Plastic washer 1 63 Stopper sleeve 1 107 Touch control seat 1
20 Screw seat insert 1 64 Position washer 1 108 Touch control stem 1
21 Pressure relief valve seat 1 65 Copper washer 1 109 Flat washer 4 1
22 O-ring 5*1.8 1 66 Felt 1 110 Spring washer 4 1
23 Ring 1 67 Connector seat 1 111 Pole stopper 1
24 Pressure relief valve pole 1 68 Copper guide bushing 1 112 Pump frame assembly 1
25 Spring 1 69 Connector 1 130 Bush 1
26 Spring seat 1 70 Pin 5*12 2 131 Filter 1
27 Pin 3*8 1 71 Lock sleeve 1 132 Rubber stopper 1
28 Switch seat 1 72 White seal 1 133 Airless paint sprayer 1
29 Switch knob 1 73 Sealing washer 1 134 Paint hose 7.6m 1
30 Pin 2.5*25 1 74 Pressure control pin 1 135 Socket 22mm 1
31 Filtrate seat assembly 1 75 O-ring 8.8*1.9 1 136 Manual 1
32 Inlet pipe lock ring 1 76 O-ring 27*2.4 1 137 Wrench 1
33 Suction tube 1 77 Hex bolt M3*10 2 138 Hex wrench 4mm 1
34 Priming tube 1 78 Pressure seal cover 1 139 Hex wrench 5mm 1
35 Clip 1 79 Micro switch 1 140 Bush 1
36 Large clamp 1 80 Micro switch cover 1
37 Small clamp 1 81 Pressure control switch 1
38 Nylon cable tie 1 82 Switch cover 1
39 Inlet spring holder 1 83 Pressure adjusting spring 1
40 Input spring 1 84 Spring pusher 1
41 Steel ball 12.7 1 85 Pressure knob 1
42 Input seal 1 86 Pressure control bolt 1
43 Input washer 1 87 Up handle 1
44 O-ring 17*1.8 1 88 Below handle 1
PARTS LIST
26
Explode view for RP8623NL
BAREKNUCKLE WELTERWEIGHT

Bareknuckle Welterweight - Airless Paint Sprayer OPERATING INSTRUCTIONS & SAFETY MANUAL24 |
PAINT PROJECT PAINT COLOUR
The Bareknuckle Welterweight Airless Spray Machine comes
with a 12 month limited warranty. This warranty is against
any manufacturing defect in material or workmanship
under normal use as defined in the Bareknuckle
Welterweight Airless Sprayer Operating Instructions and
Safety Manual. This warranty does not cover replacement
of items as a result of normal operating wear and tear,
malfunction, damage or wear caused by misusing this
machine or maintenance not carried out as per this
manual, or any abuse or negligence, misuse, accident,
substitution of non genuine parts.
This product is designed and intended for DIY / household
use only. This warranty will be void if the product is used
for commercial use or income producing purposes.
In the event of a warranty claim, the product shall be
returned to the place of purchase with the original proof of
purchase:
For a warranty claim, we reserve the right to:
• repair or replace the goods (or part thereof)
• resupply a refurbished machine
• repair any item that is deemed necessary
If the resultant inspection of the product does not show a
defect in the material or workmanship, repair to the item
will be made at a reasonable cost to you. This cost may
include the costs of parts, labor and transportation.
The warranty becomes void if the correct operating,
cleaning and storage instructions have not been followed
by the user as defined by these Bareknuckle Welterweight
Operating Instructions and Safety manual.
A 12 month limited warranty ( from the original date or
purchase) is provided with this machine. Please retain
proof of purchase for any warranty claims and return to the
place of purchase.
In no event will HDI Trading Pty Ltd be liable for any
indirect, incidental or consequential damages resulting
from the sale or use of this product.
WARRANTY INFORMATION - IMPORTANT
Bareknuckle Welterweight Airless Paint Sprayer
Original Date of Purchase:
Place Purchased:
Please retain a copy of the receipt as proof of purchase.

Bareknuckle Welterweight - Airless Paint Sprayer OPERATING INSTRUCTIONS & SAFETY MANUAL26 |
BareknuckleOperatingInstructions
andSafetyManual
Forportablesprayapplication
ofpaintsandcoatings
HDI Trading Pty Ltd 2A/274 Macquarie Rd, Warners Bay NSW 2282 Australia
Product Code 174694 Made in China
WELTERWEIGHT
AIRLESSPAINT
SPRAYER
Table of contents
Popular Paint Sprayer manuals by other brands


Central Pneumatic
Central Pneumatic PAINT SPRAY GUN 30224 Assembly and operating instructions

Black Ridge
Black Ridge T100 instruction manual

AQUAJOE
AQUAJOE AJ-WW30-TND quick guide

Central Pneumatic
Central Pneumatic 93205 Assembly and operating instructions

EUROPRO
EUROPRO AC-50-G user manual

EUROPRO
EUROPRO Compact-Pro 120 user manual