Bartell Global SPE DG250-II User manual
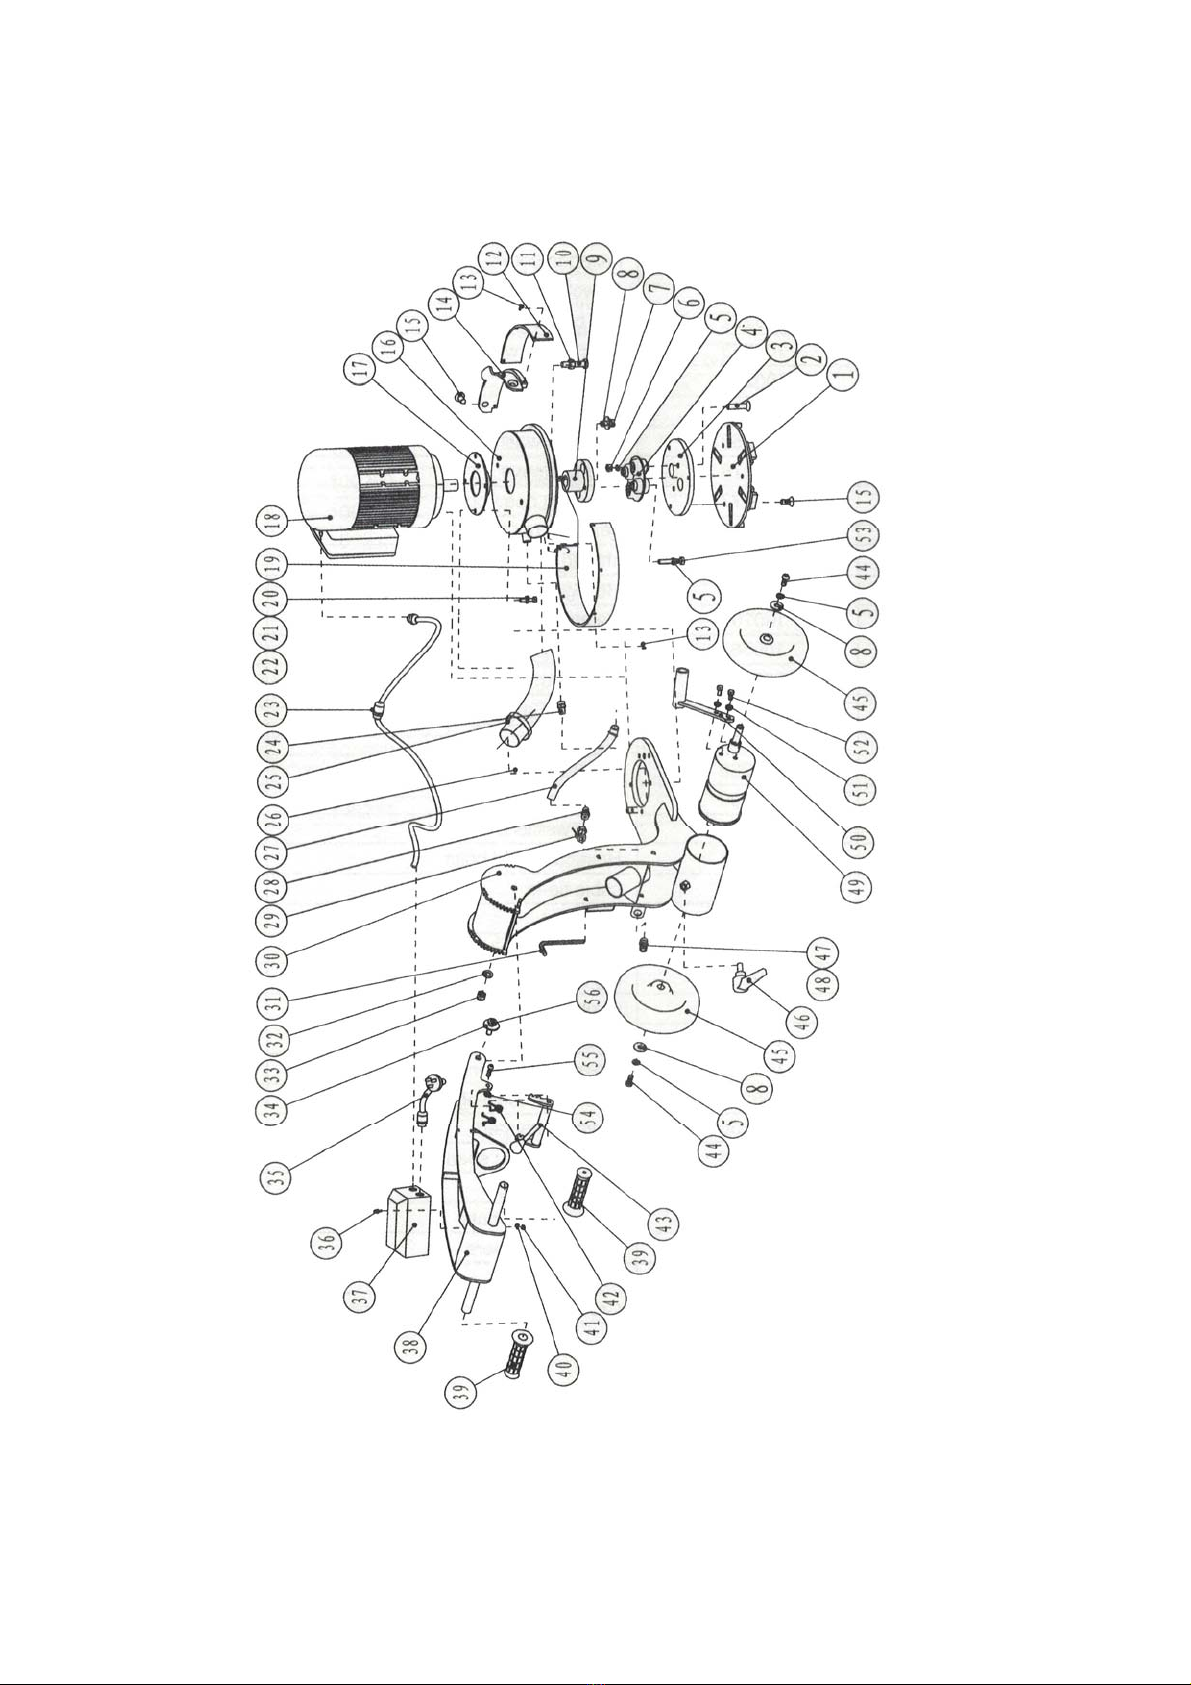
USER MANUAL
DG250-II Floor Grinder
Important!!
Before operating the machine, please read this manual, and retain it for future
reference.

1
Contents
Safety Precautions .......................................................................... 2
Introduction & description .............................................................. 4
Technical data ................................................................................. 5
Operation Instructions .................................................................... 5
Troubleshooting .............................................................................. 9
Maintenance .................................................................................. 11
Exploded View ................................................................................ 12
PARTS LIST .................................................................................... 13
This machine is designed to operate with the wheels in contact with the
floor at all times.
Do not operate with the wheels off the floor.

2
Safety Precautions
The Floor Grinder has been designed to minimize noise and vibration levels and to
Provide maximum operator safety. However, incorrect use of the grinder may
cause serious injury and therefore the following precautions must be taken:
1. Read and understand the instructions on the machine. Different models may
have different parts and controls.
2. Equipment should only be operated by trained personnel, in good physical
condition and mental health (not fatigued). The operator and maintenance
personnel must physically be able to handle the bulk weight and power of this
machine.
3. This is a one person machine. Maintain a safe operating distance to other
personnel. Remember ‘one machine, one operator’.
4. This equipment is intended for commercial use.
5. For the operators’ safety and the safety of others, always keep all guards and
shrouds in place.
6. Never start or run machine when unattended.
7. This machine is intended for use on floor surface only.
8. Never start or run machine with handle folded or when disk(s) are not in
contact with the surface.
9. Do not lend or rent machine without the operating instructions for the
machine (and the engine, if applicable).
10. Wear clothing suitable for the job and for the work place including, safety
shoes, hard hat, hearing protection, non-fogging vented safety goggles, and
dust mask suitable for dust.
11. Keep body part or any loose clothing away from moving parts. Failure to
comply could result in bodily injury.
12. Do not modify machine in any way. Only use genuine DG250-II parts and
accessories.

3
13. Repairs should be performed by qualified persons only.
14. Ensure parts have stopped moving and disconnect power or spark plug when
servicing or changing wheels or accessories.
15. Never operate machine in rain or heavy moisture.
16. Do not operate DG250-II with any covers or doors removed or open.
17. The DG250-II can produce sound pressure level greater than 85db. The
operator.
18. Must wear approved safety ear protection.
19. Do not allow the supply cord to come in contact with the grinding wheel/head
or other moving parts of this machine.
20. Do not use the grinder for longer than prescribed in your local environmental
working regulations, as the noise load from extensive daily use may result in
hearing defects.
21. Do not modify the grinder in any manner, or use a machine that has been
modified by anyone other than the manufacturer or authorized dealer.
22. Do not add weight to the machine to make the grinder work harder. Instead
reduce the number of segments on the grinding plate to increase performance.
23. Be sure that re-tipped and new grinding plates are properly balanced.
24. Do not run the grinder with grinding head raised any higher than necessary,
i.e tipped back on handle.
25. Always be sure that folding handle latch is secure and has not vibrated loose
after use.
26. When grinding, the machine is exposed to high vibration. Occasionally check
machine for bolts/nuts which may have vibrated loose.
27. Do not allow water or cotton to enter the interior of the motor.

4
Introduction & description
This manual is intended to provide operation and service information
necessary for the safe and efficient use of the Floor Grinder.
Operating or servicing the unit other than in accordance with the instructions
given may subject the machine to conditions beyond its capability, which may
result in machine failure or personal injury.
IMPORTANT
Read the entire operating manual carefully before attempting to
use the floor grinder. Special attention should be paid to the
section entitled ‘Safety Precautions’.
The Floor Grinder is a sturdy, reliable and easy to use machine.
The Floor Grinder is fitted with 2.2kW single phase motor. This motor offers a
direct drive to the grinding plate with the incorporation of a flexible coupling
between the motor and the plate.
The shroud system is unique in design, automatically adjusting to suit
segment height and floor angle. This shroud system, when used in
conjunction with an appropriate industrial vacuum unit, eliminates dust loss
during grinding. The shroud has 2 removable sections to enable the operator
to grind close up to the wall etc. Please note that dust loss is possible when
this section is removed.
The floor grinder comes complete with a water connection for wet grinding
should this be required. This incorporates a ball valve allowing the operator to
regulate the water supply to obtain the best grinding results.
The floor grinder has a foldable handle which enables it to be easily
transported in the trunk of most small vehicles. The rear wheels can also be
extended outward should the operator want more stability from the grinder.
This requires the use of a 10mm wrench. The operator can also raise or lower
the height of the handle to maximize their comfort when using the grinder. And
the new designed lifter system makes operator handy to use.

5
Technical data
Motor HP 3hp
Motor KW Rating 2.2kw
Motor RPM 1410rpm
Unit weight 67KG
Plate type Standard 250mm plate or Cub Shoe
Plate Bolt Types M12x25 Countersunk socket head
Main Construction Powder Coated Steel
Ensure all re-tipped and new grinding plates are properly balanced.
Operation Instructions
The floor grinder is designed to be used either wet or dry. If the floor is being
ground dry, ensure a suitable industrial vacuum is connected and that
operator is wearing suitable breathing respiratory equipment. Contact your
local work place health authority to ensure that their requirements regarding
respiratory equipment are being met.
Starting the Grinder
Check the grinding plate being used is suitable for the material being ground
AND THAT THEY ARE CORRECTLY BALANCED.
Check that the grinding plates being used are in good order and properly
attached, with all countersunk bolts firmly in place. Check this occasionally
during use, as they can work loose during operation.
Check that the grinding plate is adjusted so that it sits level on the ground.
Check that all nuts and bolts on the folding handle latch are tight and firm.
Raise the grinding plates from the floor.

6
Start the motor by pressing the black switch on the starter box.
Lower the grinding plate and commence grinding.
Stop the Grinder
De-press the red stop button on the starter box.
Note:
By turning and pushing the handles, you can fix vertical grinding position.
You can adjust the axle’s width for your need
Other instructions during working:
1. Wear clothes suitable for the job and for the work place including, safety shoes,
hard hat, hearing protection, non-fogging vented safety goggles, and dust
respirator suitable for dust.
2. Be sure all equipment is tested and tagged prior to use on any job.
3. Inspect entire area to be ground before grinding and remove any bolts or
concrete nails (etc) that could damage diamond tooling or machine which could
cause a hazardous situation.
4. Ensure there are no obstacles or existing structures that could present a
hazard to the operator. If so, take necessary action to eliminate the hazard.
5. Fold handle into the highest position in operating model and lock in place
using the locking lever, then tilt machine back so handle is resting on the floor.
6. Install appropriate diamond tool on the machine. Only use genuine GSA250
parts or accessories. Failure to comply could result in bodily injury.
7. Tilt machine back onto the disk and lock handle into the best position for the
operator comfort.
8. Connect machine to suitable power outlet. Only use heavy duty power lead
suitable for high current use (preferably 2.5 mm2 cable), no longer than 20
meters.

7
9. If no power is available within the specified distance, have a qualified person
install a suitable power outlet closer to your work. Alternatively use 4 mm2
cable for up t0 50 meters.
10. Connect a suitable dust extractor to the machine via a 50mm flexible hose. The
machine is designed to take the standard GSA250 hose ends to make
connection of dust extractors easy and hassle free.
11. Keep machine clear of drainage pits and grates or any such hazard. Failure to
comply could result in bodily injury and or could damage the machine or
property.
12. Ensure machine is on a level surface and handle is not folded (see operation
mode on previous page).
13. Switch on the dust extractor.
14. Hold the handles firmly and switch the machine on by pushing the black
button.
15. The machine is designed to operate with the wheels in contact with the floor at
all times. Do not operate with wheels off the floor.
16. Do not attempt to make any adjustments while the machine is in operation.
Any adjustments must only be performed when machine is stopped and power
disconnected.
17. In the event of the machine pulling to one side all the time; adjust the axle
height to obtain the best result.
18. After a few minutes of grinding, check the wear out of the diamond tool due to
soft concrete/abrasive concrete. We have a wide range of diamonds to suit
every need.
19. WARNING! Breathable silica may be generated by use and maintenance of this
machine. Silica can cause severe and permanent lung damage, cancer, and or
other serious diseases. Do not breathe the dust. You must wear appropriate
respiratory protection when operating or maintaining this equipment.

8
20. All electrical maintenance and repairs to be carried out by qualified persons
only.
21. CAUTION-Line terminals may be alive when main switch is in the off position.
Disconnect all power at source before performing any maintenance or repairs.
22. WARNING-DO NOT operates the machine with any electrical panels open.
23. WARNING-The GSA250 has an overload switch and will trip when under
excessive load and will not allow the machine to be switched on if it is
overloaded.
24. Never use equipment that has not been tested and tagged (including cords).
25. Before connecting the machine to power, check the condition of all power leads
and cables on, or used in conjunction with the machine. Do not use it if any
fault(s) cuts; wear marks, bare wires out of plugs or sockets, etc…
Get qualified persons to repair and re-tag it as required by regulations in your
country.

9
Troubleshooting
SYMPTOM POSSIBLE CAUSE SOLUTION
Machine doesn’t
start/ run
1. No power is available at
cable end;
2. Machine is trying to start
on glue or other sticky
substance;
3. Power lead is too small in
capacity or too long.
Check and confirm the power
cable is available;
Clear a patch with scraper
and grind into the glue a
little, preventing glue build-
up on diamonds;
Upgrade the power lead to
2.5mm2(15meters max) or
4mm2(30 meters max)
Machine is not
grinding at all
No blade/accessories in unit. Fit blade and check wear on
machine.
Very Hard Cocrete or glazed
topping on concrete
Turn dust extractor down,
the extra dust acts as an
abrasive between the
segments, making diamonds
work better.
Place river sand or equivalent
on the floor as an abrasive as
described above.
Use Softer grade diamond
tool, which will expose the
diamonds better.
Use Coarser diamond tool,
which will get through the
hard topping without wearing
out the diamond too fast

10
Grinder runs for 5-
15 seconds, then
stops
The current allow screw is not
adjusted properly
Adjust the current screw to
the right position
Extension cable too long and/or
not made from heavy enough
cable
Get electrician to check
extension lead compatibility
Grinder runs but
does not perform
adequately
Motor defective Repair or replace
Grinder vibrates
during use
Grinding plates not correctly
balanced
Replace or re-balance
grinding plates
Grinding noise
coming from
grinding head when
up on jockey wheel.
Excessively worn motor
bearings
Have motor serviced.
The diamonds are
wearing out too fast
The concrete is:
Soft
Abrasive Concrete
Rain Damaged
A rough finish(Scarified)
Use a powerful dust extractor
to remove as much dust as
possible
Use harder diamond matrix
to expose diamond easily
Use diamond cup wheels
with more segments or area
of l segment to reduce wear.

11
Maintenance
Daily cleaning: The motor in use should always be kept clean. No water drops,
cotton etc should be allowed to get into the interior of the motors.
Check on load current: While the motor is in operation, constant care should
be taken to keep the load’ current below the rated value.
Operational sounds: During operation of the motor there must be no rubbing
sounds, shrieks or other random noises. Stop the motor immediately and
restart after inspection and corrections have been made.
Check folding handle latch periodically. This is adjustable. To adjust, loosen
the lock nut on the latch and then screw in until a satisfactory tension has
been achieved.
The wheel bearings use seated bearings and require no regular greasing.
NB To minimize vibration and uneven blade wear, rotate plate
every 2 hours.
Failure to do so can lead to premature wear of the flexible coupling

12
Exploded View

13
PARTS LIST
Item No. Part No. Description Qty
1. 100663 Main Disc 1
2. 100279 Hexagon Socket Countersunk Screw 2
3. 100664 Dowel Disc 1
4. 100272 Flex Coupling 1
5. 100253 Spring Lock Washers 4
6. 100275 Hexagon Nut 2
7. 100274 Hexagon Head Bolts 1
8. 100266 Big Plain Washers 3
9. 100276 Driving Sleeve 1
10. 100277 Hexagon Head Bolts 2
11. 100210 Hexagon Nut M12 2
12. 100207 Shroud Plastic Wear strip set 1
13. 100206 Hexagon Socket Head Screws 9
14. 100208 Detachable Shroud 1
15. 100665 HEX. Socket countersunk Screw, M8×16 5
16. 100270 Enclosure 1
17. 100211 Location Case 1
18. 100216 Motor 1
19. 100269 Shroud Plastic Wear Strip Set 1
20. 100109 Washer 8-2/2 4

14
21. 100086 Spring washer 8-6/2 4
22. 100268 Hexagon Head Bolts 4
23. 100066 Cable Tie-in 2
24. 100267 Pipe Joint 1
25. 100222 Flexible Conduit L=480 1
26. 100263 Big Clip 2
27. 100222 Flexible Conduit L=245 1
100264 Small Clip 2
28. 100249 Crossover Coupling 1
29. 100249 Crossover Coupling 1
30. 100666 Frame Body Part 1
31. 100245 Inner Hexagon Spanner 1
32. 100307 Flat Washer 12 2
33. 100667 Hexagon Jam Nuts 2
34. 100668 Big Plain Washers 2
35. 100669 Power Cord 1
36. 100670 Cross recessed pan head screw M4×16 3
37. 100223 Breaker, GV2-ME16C 1
100224 Breaker crust, GV2-MC02 1
100225 UVT assemble 1
38. 100671 Upper Arm 1
39. 100217 Grip 2

15
40. 100672 Plain Washers 3
41. 100673 HEX. Lock nut M4 3
42. 100674 Lock twist spring (left/right) 2
43. 100675 Positioning clamping claw buckle 1
100676 Adjustable handle M10 ×25 1
44. 100252 Hexagon Socket Button head screws 2
45. 100251 Wheel 2
46. 100250 Adjustable handle M10 ×25 1
47. 100246 Quick Joint 1
48. 100247 O-Ring 1
49. 100678 Eccentric Shaft 1
50. 100679 Lift Lever 1
51. 100654 Spring Washer 2
52. 100262 Hexagon Bolt 2
53. 100273 Hexagon head Bolts 2
54. 100303 Flat Washer 8 2
55. 100680 Hexagon Socket Button Head Screws 2
56. 100681 Hex flat round head screws 2
57. 100271 Key 1
Table of contents
Other Bartell Global Floor Machine manuals
Popular Floor Machine manuals by other brands

BETCO
BETCO CRETE Rx CP30 Operator and parts manual

Nilfisk-Advance
Nilfisk-Advance Advenger BR 600S Series Instructions for use

Powr-Flite
Powr-Flite Shine Brite 1200 RPM Operator's manual

Tennant
Tennant 607853 Operator and parts manual

Superabrasive
Superabrasive Lavina Elite L30GE user manual

Numatic
Numatic CRO 8055 troubleshooting guide

Tornado
Tornado 98473 Operation & maintenance manual

Tennant
Tennant BOSS 2000E Operator and parts manual

Cleanfix
Cleanfix Pelican QuadVac + Safety, operation & maintenance manual

Numatic
Numatic NPR 1515/S instruction manual

Flextool
Flextool ART-CUB operating instructions

Numatic
Numatic NR 1500 Owner's instructions