Bass Habit PP600.1 User manual

PP600.1

Congratulations on purchasing this Bass Habit product! Please read this manual to learn how
to get the best result from this product. Closely follow the advices, recommendations and
safety precautions.
Thank you for choosing Bass Habit! We hope you enjoy listening to your product as much as
we have enjoyed creating it.
SAFETY INSTRUCTIONS
Do not expose this product to damp or moisture - doing so may result in fire, shock or
damage to the product.
Before wiring, disconnect the cable from the positive or negative battery terminal -
failure to do so may result in electric shock or injury..
Ensure good and correct connections - failure to make the correct connections may result in
fire or damage to the product.
Do not use any functions of this equipment that may take your concentration away
from driving your vehicle - do not set up the audio whilst driving. Doing so may result in an
accident. For prolonged interaction with the product, make sure that your vehicle is stationary
and parked in a safe location.
CAUTION
Playing loud music in a vehicle can hinder your ability to hear traffic and can permanently
damage your hearing. We recommend listening at low or moderate levels while driving. BASS
HABIT accepts no liability for hearing loss, bodily injury or property damage resulting from the
use/misuse of this product or installation.
To get the very best performance from your BASS HABIT amplifier we recommend that
installation be intrusted to a qualified installer. Although these instructions explain how to
install a BASS HABIT amplifier in general, they do not show specific installation methods that
may be required for your particular vehicle. If you do not have the necessary tools or experien-
ce, do not attempt the installations yourself. If any uncertainty please ask your local Bass Habit
dealer about a professional installation.

INSTALLATION
Turn off the audio system and other electronic devices before you start. Disconnect the
negative (-) lead from your vehicle’s battery.
Choose a mounting location in an area where the amplifier will not be damaged, and where the
amplifier is not covered up.
Mount the amplifier so that it remains dry - never mount an amplifier outside the vehicle or in
the engine compartment.
Amplifier cooling is essential for proper amplifier operation. If the amplifier is to be installed in
an enclosed space, make sure there is sufficient air circulation for the amplifier to cool itself.
When mounting the amplifier under a seat, ensure that it is clear of all moving parts and does
not affect the seat functionality.
Check clearances on both sides of a planned mounting surface before drilling any holes or
fixing any screws. Remember that the screws can extend behind the surface.
At the installation area, locate and take note of all fuel lines, hydraulic brake lines, vacuum lines
and electrical wiring. Use extreme caution when cutting or drilling in and around these areas.
Before drilling or cutting any holes, use a utility knife to remove unwanted fabric or vinyl to
keep material from snagging in a drill bit.
When routing cables, keep input-signal cables away from power cables and speaker wires.
When making connections, make certain ale cables are secure and properly insulated.
Make sure that the amplifier is mounted securely using nuts and bolts or the supplied
mounting screws.

POWER/SPEAKER CONNECTIONS (FIG 1 & FIG 2)
To get the very best performance out of your Bass Habit amplifier, carefully follow the
instructions below:
Ground Connection (GND):
Connect the amplifier Ground (GND) terminal to a solid point on the vehicles metal chassis, as
close to the amplifier as possible.
Scrape away any paint from this location; use a star-type lock washer to secure the connection.
Ground cable minimum size (100% Oxygen Free Copper cable):
PP600.1 min. 4 awg/ 20mm2
Remote Connection (REM):
Connect the amplifier Remote (REM) terminal to the source unit remote turn on lead using a
minimum of 0.75mm2/18-gauge wire.
If your source unit does not have a remote signal output, connect the amplifier (REM) terminal
through a power switch button which can provide a +12V signal.
Speaker connections (SPEAKER OUTPUT):
Speaker connections should be made using a minimum of 1,25 mm2/16-gauge wire.
Minimum allowed impedance load on a mono amplifier is 1 ohm.
Mono amplifiers may be equipped with dual terminals for more versatile speaker connections.
The dual -/+ speaker connections are internally connected to each polarity inside the amplifier.
Power Connection (+12V):
Connect the 12V power supply cable after all other leads have been connected and secured.
Make sure the power supply cable is secured with a fuse 20-30cm from the positive 12V
battery terminal.
Power cable minimum size (100% Oxygen Free Copper cable):
PP600.1 min. 4 awg/ 20mm2

FIG 1: POWER CONNECTION
FIG 2: SPEAKER CONNECTION

FRONT PANEL (FIG 3 & FIG 4)
Bass Habit PP600.1 is a Class D amplifier and can be used for speakers (e.g. Subwoofer) in the
range between 32-300 Hz.
While listening to music, adjust the gain/crossover/subsonic/bass boost for the least perceived
distortion from the speakers, allowing the speaker to reproduce as much bass as possible.
Line Inputs (LINE IN)
Connect the line outputs from your source unit to the line inputs L and R on the amplifier using
a RCA signal cable.
Bridge In/Output (BRIDGE IN/OUT)
Two separate Bass Habit PP600.1 can be linked to power a minimum 2 Ohm subwoofer setup
for increased power output. Follow these instructions carefully, if not carried out correctly you
may permanently damage your products.
The power cables on both amplifiers need to be of the same size and quality. Consult your
local Bass Habit dealer to make sure that you have the right size cables and fuses.
The settings on the main amplifier (AMP1 on FIG 3) will be operational, the settings on the
linked amplifier (AMP2 on FIG 3) will not.
Use a high-quality RCA cable to connect the two amplifiers, the link connects from BRIDGE OUT
on amplifier 1 to BRIDGE IN on amplifier 2.
As illustrated on FIG 3 – Bridge the negative (-) speaker connectors on each amplifier and
connect AMP1 negative speaker terminal to AMP2 negative speaker terminal.
Bridge the positive (+) speaker connectors and connect the speaker cables to your subwoofer
setup. IMPORTANT: The minimum load is 2 Ohm, this is only possible with two (2) Bass
Habit PP600.1 amplifiers.
AMP 1 AMP 2
Subwoofer setup
AMP 1 AMP 2
FIG 3: LINKED CONNECTION OF TWO AMPLIFIERS

Input level control (GAIN):
GAIN control is adjustable between 0,2V- 6 V.
Tips for adjusting the GAIN control correctly:
- Initially turn the GAIN control to minimum (counter clockwise).
- On the source unit, increase the volume control to the 3/4 of maximum volume. Turn of all
EQ settings and filter on the source unit and the amplifier.
- Slowly increase the GAIN control until you hear slight distortion in the speaker/speakers,
then reduce the GAIN slightly until distortion is no longer heard.
Bass Boost control (BASS BOOST):
Bass Boost is adjustable between 0-18dB (at 45 Hz)
Please use the BASS BOOST knob with care, excessive use can damage you system!
LPF Crossover (LPF):
The low pass filter is adjustable between 32-300 Hz.
A good starting point is 80Hz, this will remove the vocal information from the subwoofer.
Subsonic control (SUB SONIC):
Subsonic control is an adjustable high pass filter ranging from 10–50Hz. The subsonic control
can be used for removing the deepest bass notes from the subwoofer, get a tighter and more
rhythmical sound. For a normal setup the subsonic should be adjusted to the 10Hz setting.
Phase shift control (PHASE SHIFT):
Phase shift control is adjustable between 0 – 180 degrees. The Phase shift can be used for a
better relative phase relationship between the subwoofer and your other installed speakers.
For a normal setup the subsonic should be adjusted to the 0-degree setting.
Remote Level Control (REMOTE)
PP600.1 has a remote level control included for adjustment of the input level from the listening
position. Connect the remote-control cable using the REMOTE input jack on the amplifier.
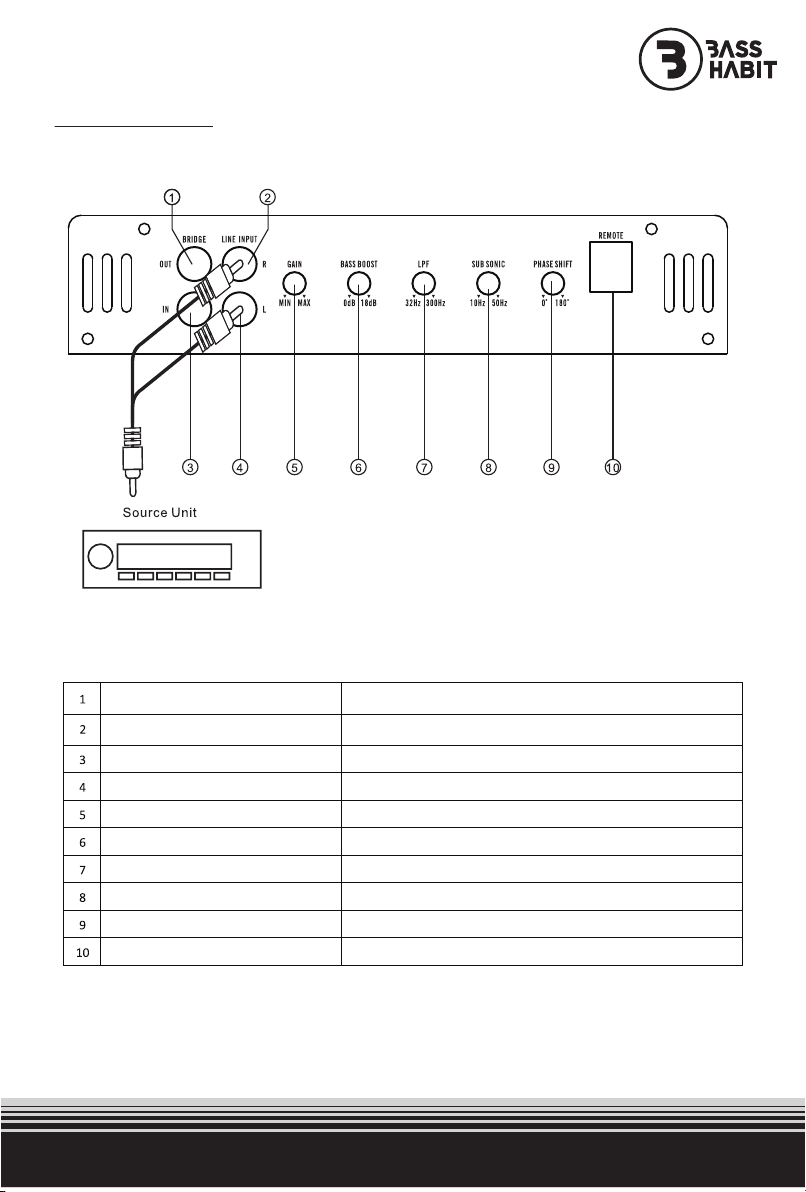
FIG 4: FRONT PANEL
BRIDGE OUT
BRIDGE IN
LINE INPUT L
GAIN
BASS BOOST
LPF
SUB SONIC
PHASE SHIFT
REMOTE
Bridge a second PP600.1 using an RCA jack cable
Source signal input right
Bridge a second PP600.1 using an RCA jack cable
Source signal input left
Input signal level adjustment
Bass Boost 12db/6dB/0dB
Low pass crossover 32Hz-300Hz
Sub Sonic crossover 10Hz-50Hz
0-180⁰
Bass level remote input
LINE INPUT R
SPECIFICATIONS:
PP600.1
• Number of channels: 1CH
• Power output (RMS) @ 1 ohm: 1x600W
• Power output (RMS) @ 2 ohm: 1x350W
• Power output (RMS) @ 4 ohm: 1x180W
• Bass remote control: Included
• LPF crossover control: 32Hz-300Hz
• HPF crossover control: N/A
• Subsonic crossover: 10Hz-50Hz
• Bass boost: 0-18dB (45Hz)
• Phase control: 0-180 degrees
• Frequency response: 20Hz-500Hz
• S/N: >85dB
• Input sensitivity: 0.2-6V
• THD: <0.05%
• Operation Voltage: 9-16V
• Fuse rating: 25A x 3
TROUBLESHOOTING:
Symptom
No audio. (Power LED not active)
Distorted audio
Music lacks bass and attack
Check / Control
Measure voltage at +12V and REM
terminals. Check GND connections.
Check GAIN control, so it is properly set.
Check source unit or amplifier, if defective
it can cause distortion.
Check speaker connections for proper
polarity.

Winn Scandinavia AB
Adolfsbergsvägen 6, 702 27 Örebro
Sweden
www.winnscandinavia.com
This product, literature and the packaging included must be taken to separate
collection at the end of their working life. Do not dispose of these products as
unsorted municipal waste: take them for recycling. For info on your nearest
recycling point, check with your local waste authority
WARRANTY
All Bass Habit products carry a full warranty depending on the conditions in the country where
it is sold. The Warranty is valid from the date of the original receipt as proof of purchase.
The warranty does NOT cover:
• Damage to product due to improper installation.
• Subsequent damage to other components
• Damage caused by exposure to moisture, excessive heat, chemical cleaners and/or
UV radiation.
• Damage through negligence, misuse, accident or abuse. Repeated returns for the same fault
may be considered abuse.
• Any cost or expense related to the removal and/or abuse. Repeated returns for the same
fault may be considered abuse.
• Damage caused by amplifier clipping or distortion.
• Items repaired or modified by any unauthorised repair facility
• Return shipping on non-defective items.
• Products returned without a return authorisation number.
• Damage to product due to use of sealant.
INTERNATIONAL WARRANTY
Contact your Bass Habit dealer or distributor concerning specific procedure for your country’s
warranty policies.
RECYCLING


Table of contents
Popular Power Supply manuals by other brands

Videx
Videx 520MR Installation instruction

Poppstar
Poppstar 1008821 Instructions for use

TDK-Lambda
TDK-Lambda LZS-A1000-3 Installation, operation and maintenance manual

TDK-Lambda
TDK-Lambda 500A instruction manual

Calira
Calira EVS 17/07-DS/IU operating instructions

Monacor
Monacor PS-12CCD instruction manual


