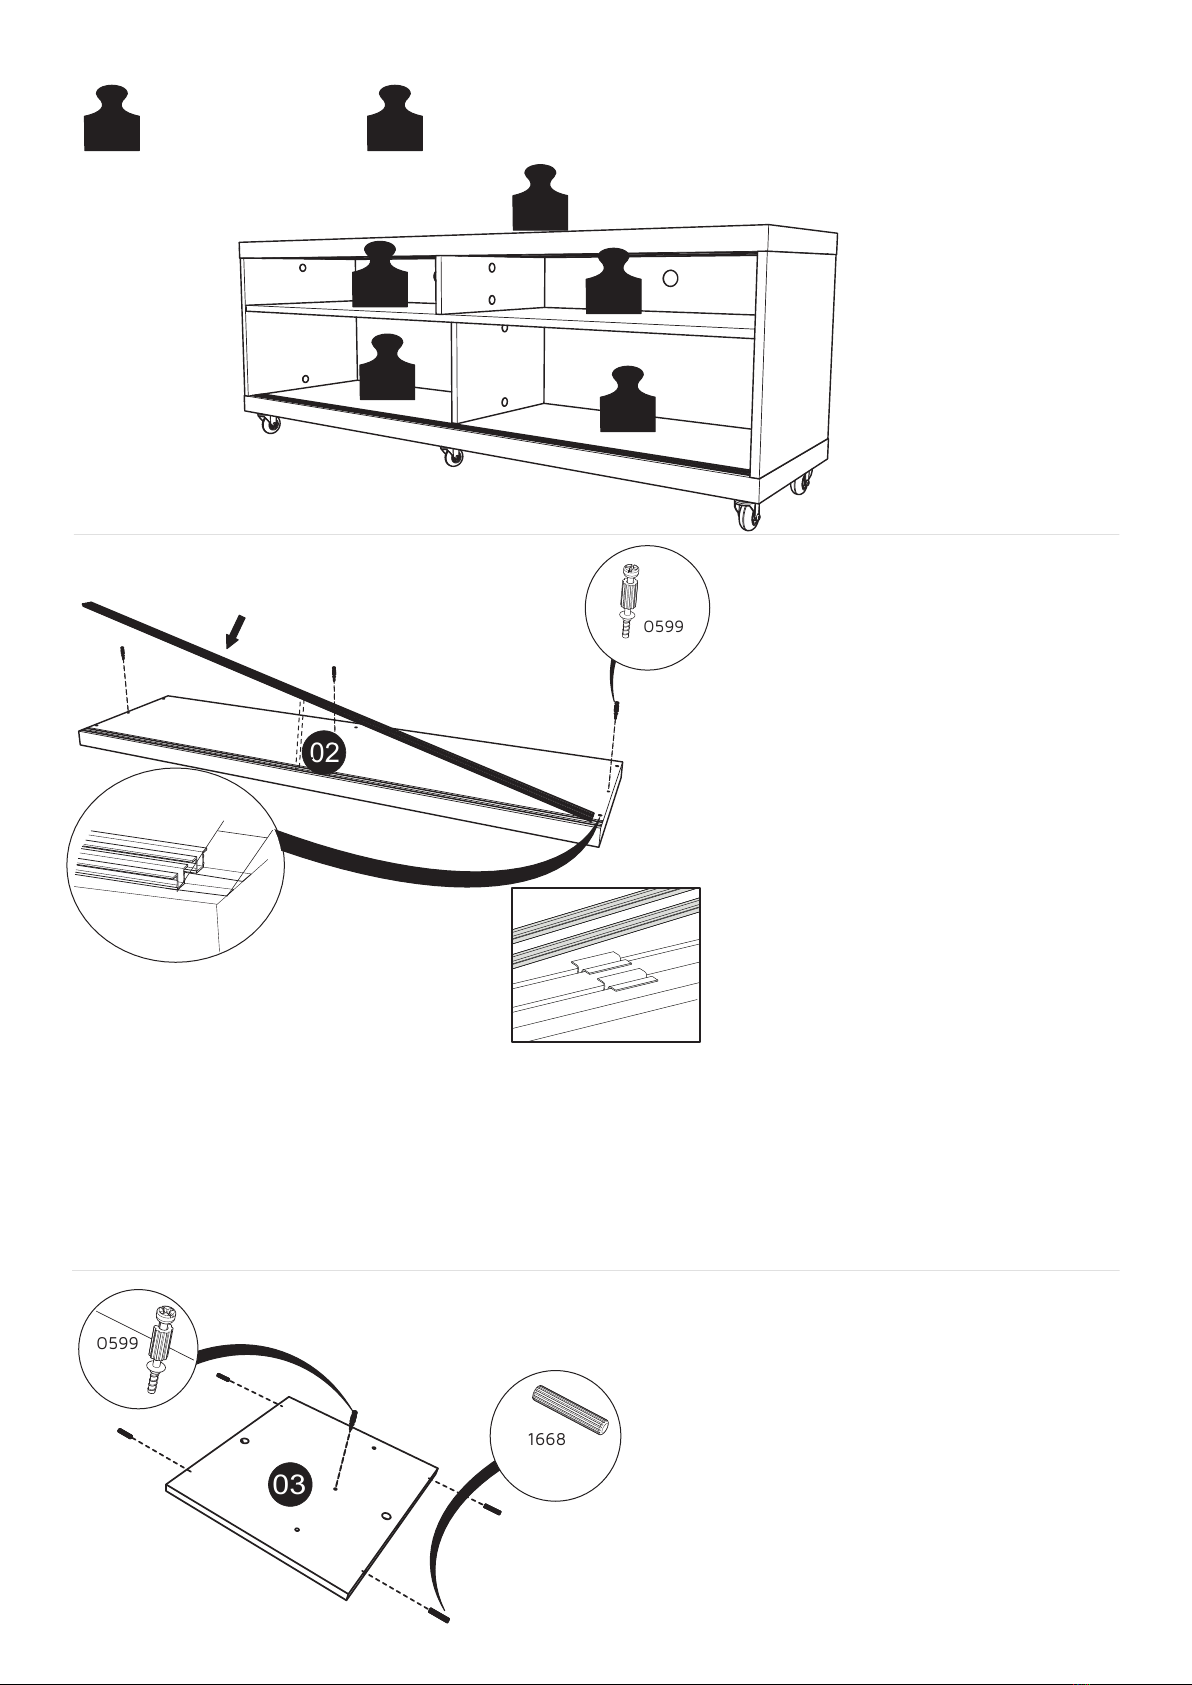
manuals.online logo
Brands
  1. Home
  2. •
  3. Brands
  4. •
  5. Batavia
  6. •
  7. Indoor Furnishing
  8. •
  9. Batavia 18400 User manual

Batavia 18400 User manual

This manual suits for next models

3

Popular Indoor Furnishing manuals by other brands

Homelegance California 1662PEK-1CK Assembly instruction

Homelegance

Homelegance California 1662PEK-1CK Assembly instruction

Osmond Ergonomics FLO instructions

Osmond Ergonomics

Osmond Ergonomics FLO instructions

OVE ELOISE 42 installation manual

OVE

OVE ELOISE 42 installation manual

overstock MF286255 Assembly instructions

overstock

overstock MF286255 Assembly instructions

Sonoma 160-801 Assembly instructions

Sonoma

Sonoma 160-801 Assembly instructions

BOLERO Wicker Side Chair CF158 Care Instructions

BOLERO

BOLERO Wicker Side Chair CF158 Care Instructions

Coaster 4799N Assembly instructions

Coaster

Coaster 4799N Assembly instructions

Stor-It-All WS39MP Assembly/installation instructions

Stor-It-All

Stor-It-All WS39MP Assembly/installation instructions

Lexicon 194840161868 Assembly instruction

Lexicon

Lexicon 194840161868 Assembly instruction

Next AMELIA NEW 462947 Assembly instructions

Next

Next AMELIA NEW 462947 Assembly instructions

impekk Manual II Assembly And Instructions

impekk

impekk Manual II Assembly And Instructions

Elements Ember Nightstand CEB700NSE Assembly instructions

Elements

Elements Ember Nightstand CEB700NSE Assembly instructions

JWA CARY 68429 Assembly instruction

JWA

JWA CARY 68429 Assembly instruction

VIPACK AMORI AMKB9014 Assembly instructions

VIPACK

VIPACK AMORI AMKB9014 Assembly instructions

Rowico SANNA Assembly instructions

Rowico

Rowico SANNA Assembly instructions

Southern Enterprises CK556000TX Assembly instructions

Southern Enterprises

Southern Enterprises CK556000TX Assembly instructions

hygena 314/5041 Assembly instructions

hygena

hygena 314/5041 Assembly instructions

VINNOVA Kinsley 536060S manual

VINNOVA

VINNOVA Kinsley 536060S manual

manuals.online logo
manuals.online logoBrands
  • About & Mission
  • Contact us
  • Privacy Policy
  • Terms and Conditions

Copyright 2025 Manuals.Online. All Rights Reserved.

1V : 00
MANUAL DE MONTAGEM
ASSEMBLY INSTRUCTIONS
INSTRUCCIONES DE MONTAJE
A B
COD BR: 18400
COD US: 19800 COD BR: 18500
COD US: 19900
1350mm
1350mm
70.9 inches
1800mm
53.1 inches 1800mm
2V : 00
Introdução
Introducción
Introduction
Leia atentamente este manual e siga os passos indicados para uma perfeita montagem.
Lea este manual y siga los pasos para el ajuste perfecto.
Read this manual and follow the steps for the perfect fit.
Sumário
Resumen
Summary
2
3
4
4
3
5
Montagem do móvel
Furniture assembly
Montaje de la mueble
Introdução
Introduction
Introducción
Antes de começar
Before starting
Antes de comenzar
Identificação das peças
Identifying parts
Identificación de las piezas
Evite acidentes
Avoid accidents
Evitar accidentes
Dimensões e ferramentas
Dimensions and tools
Dimensiones y herramientas
L: 1350
L: 1350
W: 53.1
L: 1800
L: 1800
W: 70.9
AB
Antes da montagem, identifique qual é o seu produto.
Before assembling, identify your product.
Antes del ensamblaje, identificar lo que su producto.
Com este manual, você efetua a montagem de 2 configurações de comprimento.
With this manual, you can assemble 2 length settings.
Con este manual, haces la montaje de 2 configuraciones de longitud.
3V : 00
Evite acidentes
Prevenir accidentes
Avoid accidents
X
Antes de começar
Antes de comenzar
Before starting
Antes de começar a montagem prepare o ambiente, deixando-o completamente limpo e
com bom espaço para iniciar o trabalho.
Antes de comenzar el montaje preparar el ambiente, dejándolo completamente limpio y
con bueno espacio para comenzar el trabajo.
Prepare the room before starting the assembly, leaving it completely clean and the area in
good condition to start the work.
Utilize o papelão da própria embalagem,
bem como a isomanta de proteção para
separar e apoiar as peças retiradas das caixas.
Utilice el cartón de la embalaje y la espuma protectora
para separar y apoyan las piezas
desmontadas de las cajas.
Use the cardboard of the packaging and
the foam sheets protection to separate and support
the parts removed from the boxes.
Forre a área de montagem com um
cobertor ou tapete. Assim, você evita
avarias nas peças durante o processo de
montagem.
Cubrir la zona de ensamble con una manta o
alfombra. De este modo, se evitan daños
en las piezas durante el proceso de montaje.
Cover the assembly area with a blanket or carpet
to avoid damaging the parts during the
assembly process.
No se suba ni se apoye en el mueble.
Do not climb or lean on the furniture.
Não escale ou se apoie no móvel.
4V : 00
Dimensões e ferramentas
Dimensions and tools
Dimensiones y herramientas
L: 1350 A: 500 P: 379 mm
W: 53.1 H: 19.68 D: 14.9 inches
L: 1800 A: 500 P: 379 mm
W: 70.9 H: 19.68 D: 14.9 inches
A
B
Número do lote de
fabricação do seu
produto.
Numero de lote
fabricación de su
producto.
Manufacturing batch
number of the product.
Para identificar o número da peça, verifique o verso da mesma, lá você encontra informações
do lote de fabricação, código de identificação do produto e o número da peça.
Para identificar el número de pieza, compruebe en la parte posterior de cada una, ahí también se
puede encontrar información del número de lote de producción, el código de indentificación del
producto y el número de la pieza.
To identify the part number, check its back. There you can find information from the production
batch, product reference code and part number.
LOT 00000 PROD 000000 PC 000
Número de
identificação
do seu produto.
Numero de
identificación
de su producto.
Reference number of
the product.
Número da peça.
LOT 000000 PRODUC 000000 PC 000
Número de pieza.
Part number.
5V : 00
001
002
003
004
005
006
007
008
009
010
TAMPO
BASE
LATERAL DIREITA
LATERAL ESQUERDA
DIVISORIA INFERIOR
PRATELEIRA
DIVISÓRIA SUPERIOR
PORTA
FUNDO MENOR
FUNDO MAIOR
PEÇA DESCRIÇÃO QUANT. CAIXA
1
1
1
1
1
1
1
2
2
1
1
1
1
1
1
1
1
1
1
1
001
002
003
004
005
006
007
008
009
010
CUBIERTA
BASE
LATERAL DERECHA
LATERAL IZQUIERDA
LATERAL INFERIOR
ESTANTE
LATERAL SUPERIOR
PUERTA
FONDO PEQUEÑO
FONDO GRANDE
1
1
1
1
1
1
1
2
2
1
1
1
1
1
1
1
1
1
1
1
PIEZA DESCRIPCIÓN CANTIDAD CAJA
001
002
003
004
005
006
007
008
009
010
TOP BOARD
BASE
RIGHT SIDE
LEFT SIDE
BOTTON DIVIDER
SHELF
TOP DIVIDER
DOOR
SHORT BACKPLATE
LONG BACKPLATE
1
1
1
1
1
1
1
2
2
1
1
1
1
1
1
1
1
1
1
1
PART DESCRIPTION QTY BOX
06
08
08
01
10
09
09
04
05
03
02
07
ADESIVO
STICKER
ADHESIVO
RODIZIO
CASTORS
RUEDAS GIRATORIAS
TRILHO
RAILS
RIELES
x10
0996 x 24
0357 x 55
0599 x 10
0494 x 10 1668 x 20 0342 x 14
A B
53.1 inches
1350mm
70.9 inches
1800mm
1350mm 1800mm
ACESSÓRIOS INCLUÍDOS NA CAIXA 01 - HARDWARE INCLUDED IN BOX 01 - ACCESORIOS INCLUÍDOS EN LA CAJA 01.
6V : 00
PASSO 1
Centralizar e encaixar os trilhos
na base 02 e parafusar
minifix 03x0599.
STEP 1
Center and fit rails on
BASE 02 and screw
Minifix 03x0599.
PASO 1
Centralizar y adaptarse a los rieles
en la base 02 y el tornillo
minifix 03x0599
BASE
LATERAL DIREITA / RIGHT SIDE / LADO DERECHO
1668
0599
PASSO 2
Encaixar cavilhas 4x1668 na lateral direita
03 e parafusar minifix 1x0599.
STEP 2
Insert dowels 4x1668 on Right Side 03
and screw minifix 1x0599.
PASO 2
Clavijas de ajuste 4x1668 en el lado
derecho 03 y el tornillo minifix 1x0599.
02
03
A
B
B
B
B
B
A
=30KG - 66LB =5KG - 11LB
0599
16mm
0.63in
Se os trilhos ficarem folgados, devido a variações na espessura do alumínio, utilize pedaços de papel ao longo do canal.
Se a espessura de uma folha for pouca, utilize quantas forem necessárias, até que os trilhos entrem com pressão suficiente
para não sair do canal com o movimento das portas.
If the tracks become untied due to variations in the thickness of aluminum, use pieces of paper along the canal.
If the thickness of a sheet is low, use as many as necessary, until the rails come with enough pressure not to leave the channel with the
movement of the door.
Si los rieles quedarem vagos, debido a las variaciones en el espesor de aluminio, use un pedazo de papel a lo largo del canal.
If the thickness of a sheet is low, use as many como sea necesario, hasta que los rieles están dotadas la presión suficiente para no dejar el
canal con el movimiento de la puerta.
7V : 00
05
1668
0599
04
PASSO 3
Encaixar cavilhas 4x1668 na lateral esquerda
04 e parafusar minifix 1x0599.
STEP 3
Insert dowels 4x1668 on the Left Side 04 and
screw minifix 1x0599.
PASO 3
Clavijas de ajuste 4x1668 en el lado izquierdo
04 y el tornillo minifix 1x0599.
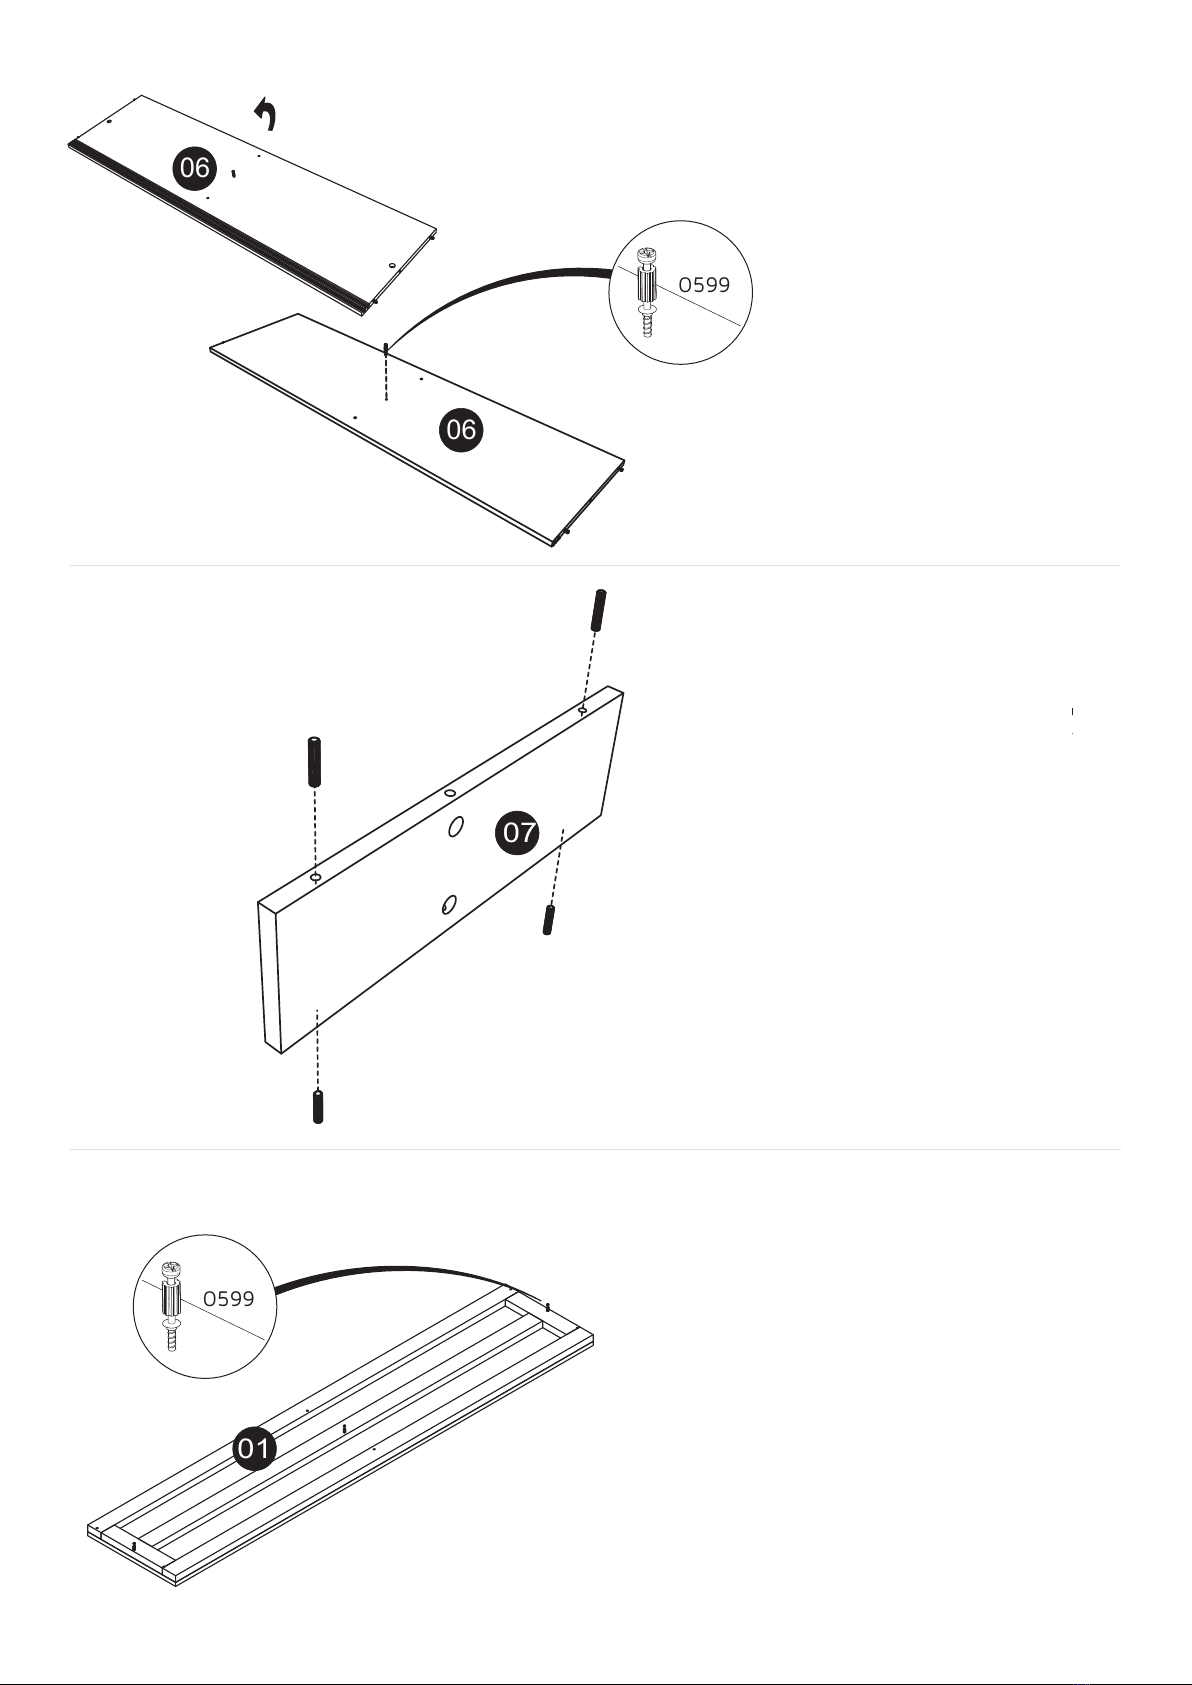
PASSO 4
Encaixar cavilhas 4x1668
na divisória 05.
STEP 4
Insert dowels 4x1668
on Part 05.
PASO 4
Clavijas de ajuste 4x1668
la partición 05.
DIVISÓRIA / BOTTOM DIVIDER / PARTICIÓN.
LATERAL ESQUERDA / LEFT SIDE / LADO IZQUIERDO
06
1668
0599
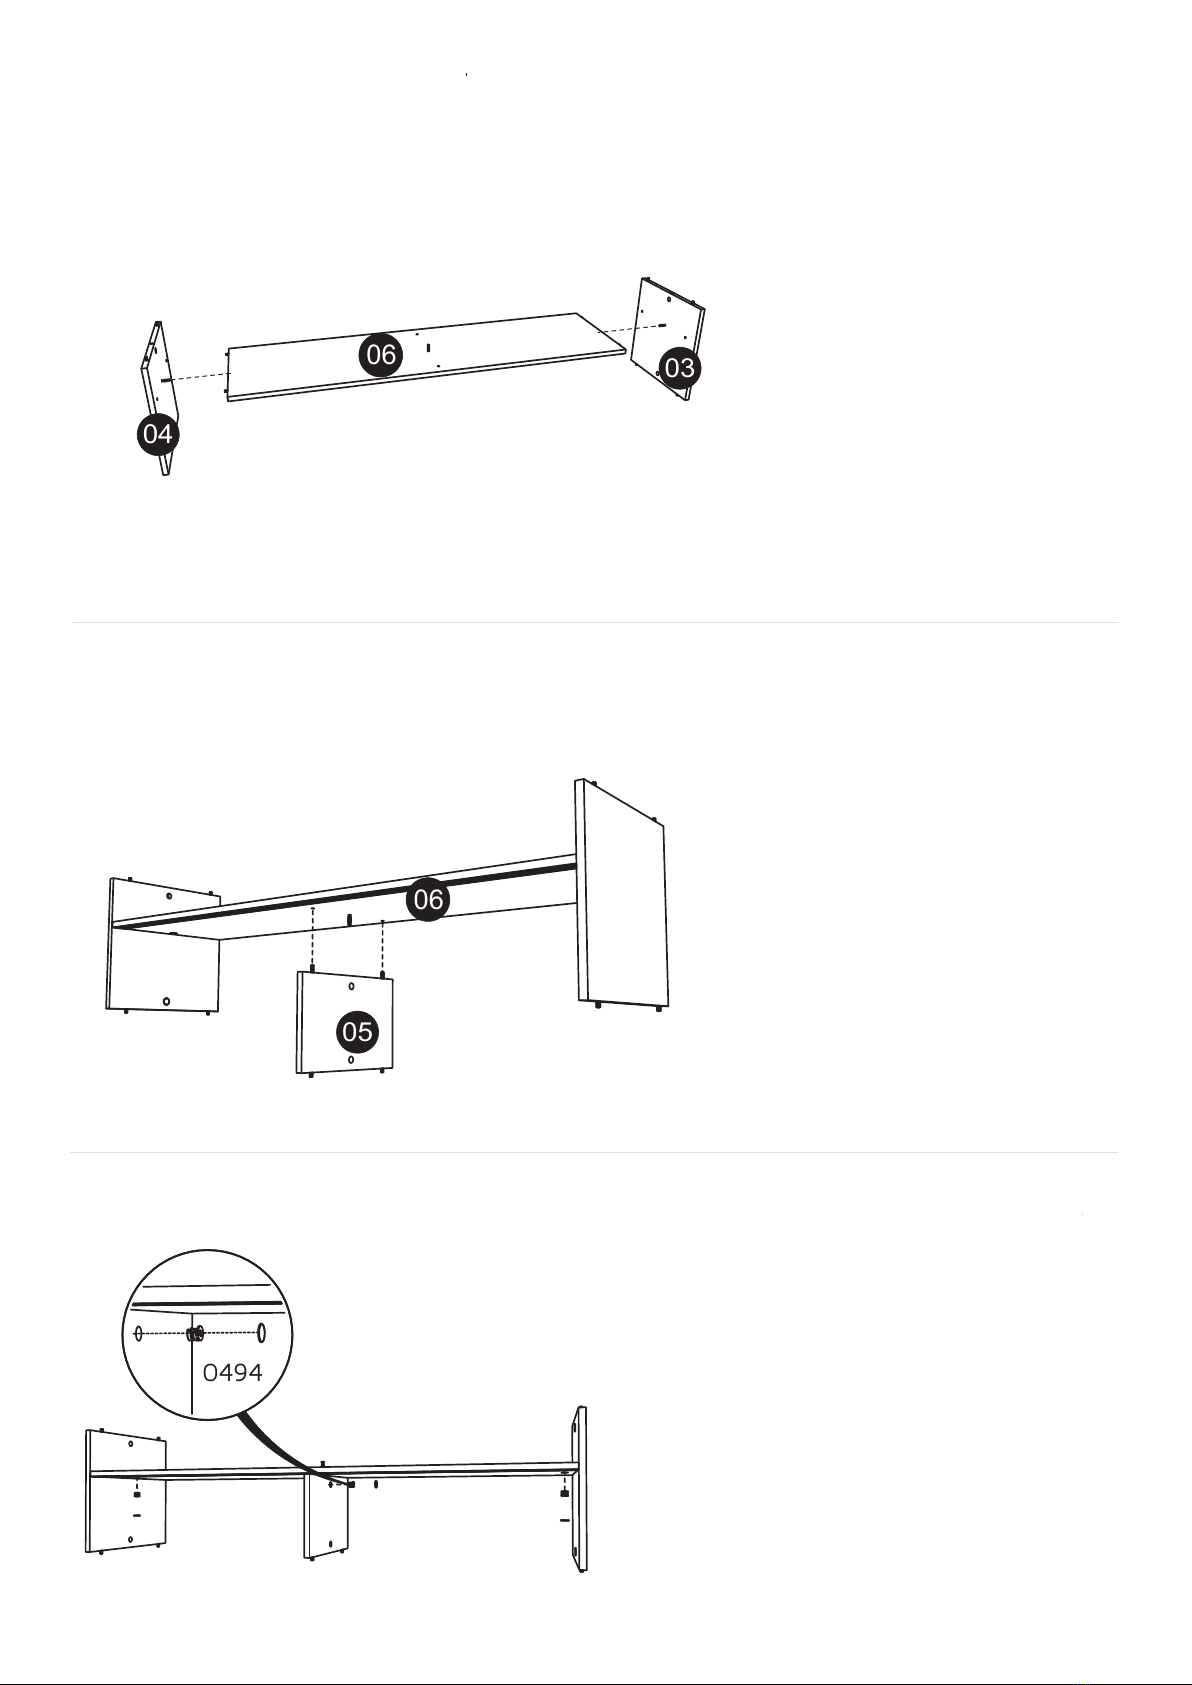
PRATELEIRA / SHELF / PLATAFORMA PASSO 5
Encaixar cavilhas 4x1668 na prateleira 06
parafusar minifix 1x0599 centralizar e
encaixar trilhos.
STEP 5
Insert dowels 4x1668 on Shelf 06. Screw
1x0599 minifix center and fit rails.
PASO 5
Clavijas de ajuste 4x1668 el tornillo de
plataforma 06 minifix 1x0599 centro y ajuste
carriles.
Se os trilhos ficarem folgados, devido a variações na espessura do alumínio, utilize pedaços de papel ao longo do canal.
Se a espessura de uma folha for pouca, utilize quantas forem necessárias, até que os trilhos entrem com pressão suficiente
para não sair do canal com o movimento das portas.
If the tracks become untied due to variations in the thickness of aluminum, use pieces of paper along the canal.
If the thickness of a sheet is low, use as many as necessary, until the rails come with enough pressure not to leave the channel with the
movement of the door.
Si los rieles quedarem vagos, debido a las variaciones en el espesor de aluminio, use un pedazo de papel a lo largo del canal.
If the thickness of a sheet is low, use as many como sea necesario, hasta que los rieles están dotadas la presión suficiente para no dejar el
canal con el movimiento de la puerta.
8V : 00
07
01
0599
06
PASSO 6
Parafusar minifix 1x0599
na prateleira 06.
STEP 6
Screw minifix 1x0599
on Shelf 06.
PASO 6
Tornillo minifix 1x0599
la plataforma 06.
DIVISÓRIA / TOP DIVIDER / PARTICIÓN SUPERIOR.
TAMPO / TOP BOARD / CUBIERTA
PASSO 7
Encaixar cavilhas 4x1668
na divisória 07.
STEP 7
Insert dowels 4x1668
on the Part 07.
PASO 7
Clavijas de ajuste 4x1668
la partición 07.
06
PASSO 8
Parafusar minifix 3x0599
na Tampo 01.
STEP 8
Screw minifix 3x0599
on Top Board 01.
PASO 8
Tornillo minifix 3x0599
la Cubierta 01.
0599
09V : 00
05
PASSO 10
Encaixar divisória 05 na
prateleira 06.
STEP 10
Attach partition 05 to shelf 06.
PASO 10
Montar la pieza 05 en la
plataforma 06.
PASSO 11
Parafusar castanhas 3x0494
e colar 3adesivos.
STEP 11
Screw nuts 3x0494
and place 3stickers.
PASO 11
Atornillar las tuercas 3x0494
y pegar 3adhesivos.
0494
ADESIVO
STICKER
ADHESIVO
06
MONTAGEM DAS PEÇAS NA PRATELEIRA / ASSEMBLING THE PARTS ON THE SHELF / COLOCAR LAS PIEZAS EN ESTANTE
PASSO 9
Encaixar as Laterais 04 e 03 na
Prateleira 06.
STEP 9
Attach the Sides 04 and 03 to the
Shelf 06.
PASO 9
Montar la laterales 04 y 03 en la
Estante 06.
06
04
03
10V : 00
PASSO 12
Encaixar as portas 08 nos trilhos
da prateleira 06 e na base 02.
Parafusar castanhas 3x0494
e colar 3adesivos.
STEP 12
Place the doors 08 on the rails
of Shelf 06 and on Base 02.
Screw nuts 3x0494 and place
3stickers.
PASO 12
Montar la puerta 08 en los carriles
la estante 06 y en la base 02.
Atornillar las tuercas 3x0494 y
pegar 3 adhesivos.
07
06
PASSO 13
Encaixar Divisória 07 na Prateleira
06.
STEP 13
Attach Top Divider 07 to Shelf 06.
PASO 13
Montar la Division Superrior 07 en
el Estante 06.
PASSO 14
Encaixar Tampo 01.
STEP 14
Fit Top Board 01.
PASO 14
Montar la Cubierta 01.
01
0494
08
08
02
ADESIVO
STICKER
ADHESIVO