Bath Royale MasterSuite BR237 User manual

1
Models: BR237 (elongated) Tools Required:
BR283 (round) Phillips Head Screwdriver
Tape Measure or Ruler
MasterSuite Toilet Seat—Installaon Instrucons
Eurocast is the ideal material for toilet seats due to it’s strength and durability. It
handles harsh environments, such as bathrooms, with ease. Eurocast is
highly-resistant to cleaning chemicals, solvents, grease, stains and scratches. It is
non-porous and will not absorb moisture or germs. Toilet seats made of Eurocast are
a solid color throughout and will not chip, peel or fade.
Heavy Duty (and Beauful)
- Eurocast seats are very popular in Europe for their style,
strength, durability and funconality.
Stronger
- Bath Royale seats are designed and tested to hold 400 pounds (on the
closed cover and the seat itself). With the cover open, a “sway” test presses one side
of the seat, then the other (back and forth) 26,000 times with 350 pounds. The seat
and cover may flex, but will not crack, break or permanently deform.
Longer Lasng
- Frequent exposure to high humidity (steam), human waste
(including acidic urine) and harsh cleaning chemicals will destroy most seats within a
year or two. Bath Royale Eurocast seats are built to last.
Best Warranty
- Bath Royale Eurocast toilet seats have our best warranty. Your seat
is protected against defects in materials and workmanship for 2 years. (The industry
standard warranty is 1 year.)
Eurocast vs Plasc or Wood
IMPORTANT: Installaon is not difficult, but it is very different from other
seats. Please review the diagrams and follow these instrucons step by step.
If you have any quesons, please call us at (704) 589-1009.
2
2-Buon Li & Clean:
Makes
thorough cleaning fast and easy.
Eliminates hidden areas that collect
waste and odor-causing germs.
Slow Close: Simply tap the seat (or
cover) forward and it will close quietly
and soly by itself.
NOTE: Slow Close does not
work until the seat is installed
on the toilet.
"Perfect Fit" and Stays Secure:
Unlike other seats, your Bath Royale®
seat is
adjustable (front-to-back and
side-to-side). This also allows the seat to be
installed on different hole spacings.
The
mounng hardware will hold your seat
firmly in place.
NOTE: Your seat aaches to the toilet
via mounng bases that must be
installed on the toilet bowl first.
Features:
IMPORTANT!
Posts face forward

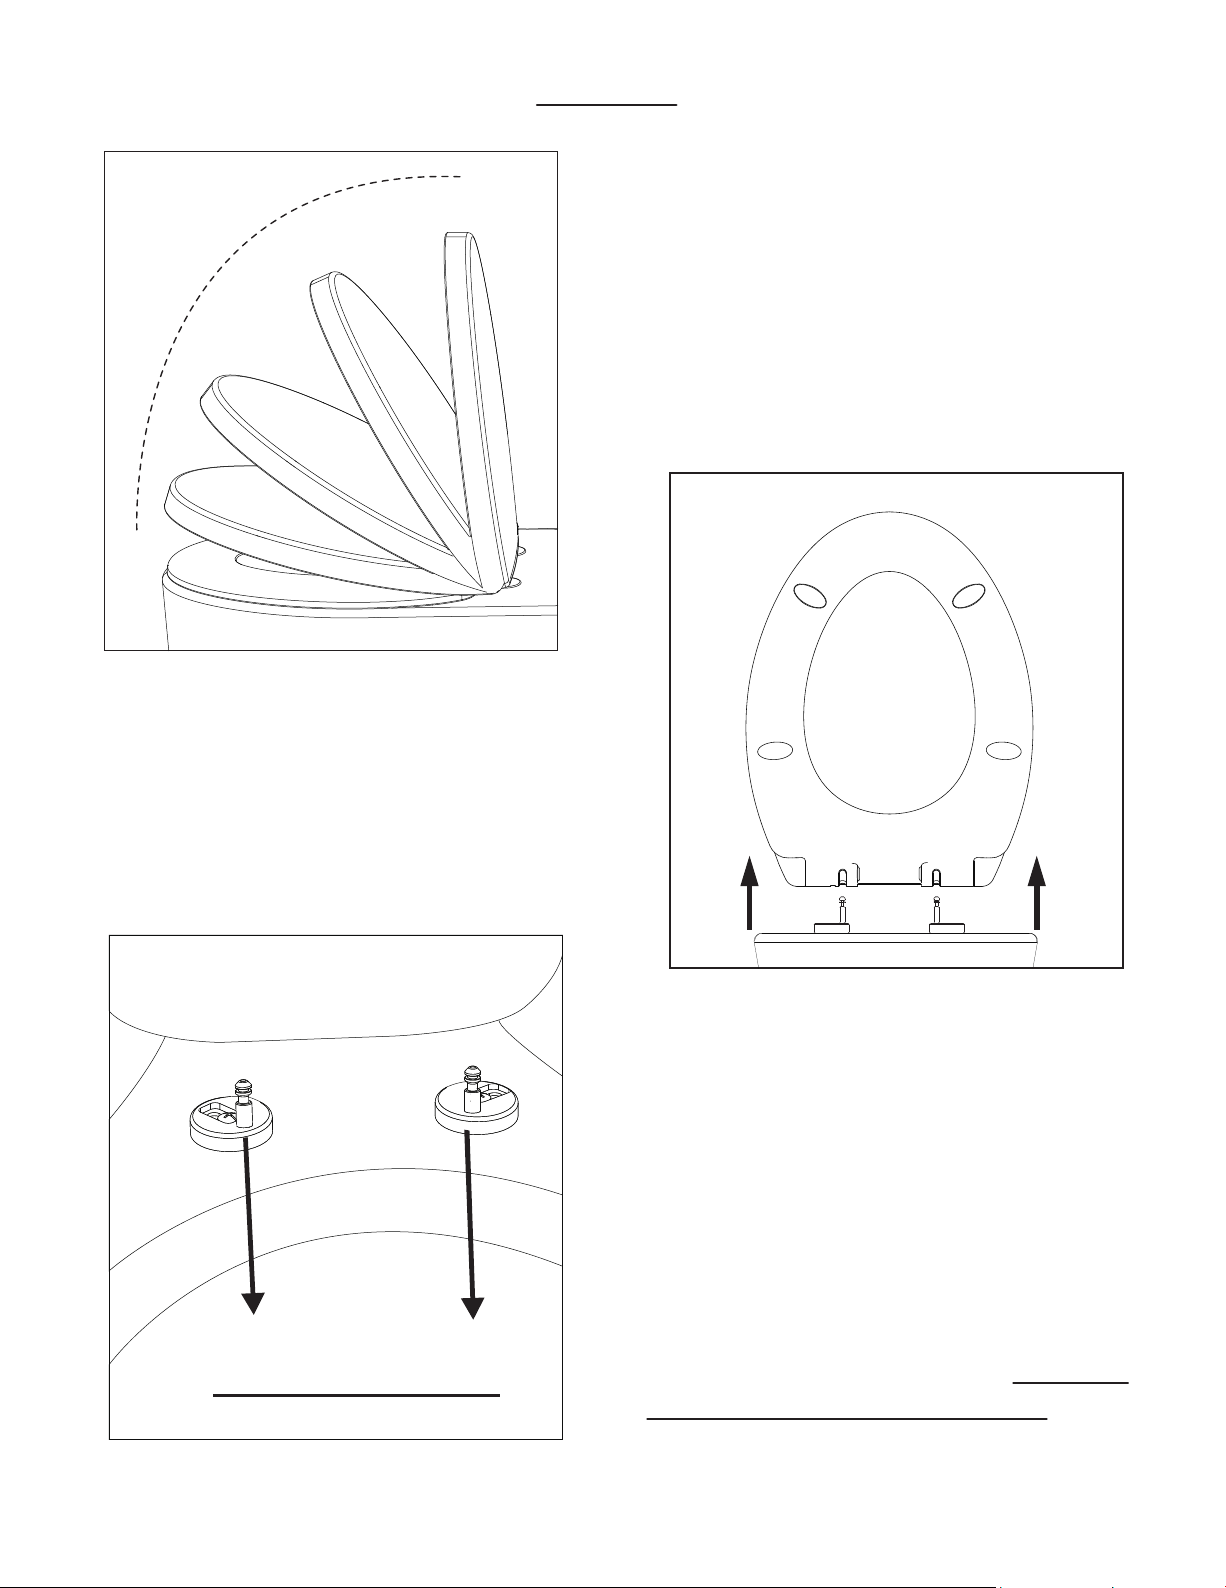
3
NOTE: Some 1-piece toilets or toilet bowls with flat sides (concealed trap way)
require "Top-mount" hardware. Top-mount hardware is sold separately at
Amazon.com (search "B0759WR3F9") or www.bathroyale.com.
Mounng Hardware—Parts List
IMPORTANT: Be sure to use all parts.
Missing Parts? Please do not return your seat. Call (704) 589-1009 or email
[email protected] and we will Immediately send parts at no charge.
Stainless Steel Washer
Mounng bases with stainless
steel mounng posts.
Mounng base cover
Stainless Steel Screw
Clear Plasc Ribbed Insert
Black Rubber Washer
White Plasc Washer
White Plasc Wing Nut

4
3. Do Not Completely Tighten Nuts:
(Mounng bases must rotate freely
so the seat can be adjusted.)
2. Install mounng bases on bowl.
a) Insert clear plasc ribbed inserts into
the holes in the toilet. (Do not worry
if holes in seat do not align with holes
in toilet.)
b) Insert screws through rectangular
washer, mounting base and clear
plastic ribbed insert.
c) Install washers and nuts.
1.
Remove old toilet seat (if necessary).
IMPORTANT: Make sure toilet bowl is clean and dry, especially around the mounng
holes, with no chemical residue. Mounng surface must be level.
IMPORTANT! Black rubber washer
goes on first, then white washer and
finally, the white wing nut.
4-3/4 in.
IMPORTANT!
IMPORTANT: Rotate mounng bases so
posts face forward
(closest to front of
the bowl, not tank). Using tape measure
or ruler, adjust bases so posts are 4-3/4
inches apart. Do not ghten nuts.

5
5. Close seat and cover. Tap forward and let the
seat and cover close by themselves.
6. Adjust seat. With the cover closed, adjust seat by the moving bases and seat
together. (Loosen screws further, if necessary.)
Hand - tighten wing nuts. (Put finger
or thumb on screw head to prevent
screw from turning.)
NOTE: Be sure seat does not move.
Tip: We recommend installing the seat
overhanging the front of the bowl by 1/4
inch. That way, users can li it without
touching the toilet bowl.
6
NOTE: If posts are not perfectly aligned and inserted
at the same me, one post may “lock” into place. If
this happens, don’t try to unlock or remove the seat.
Instead, move the base(s) so the second post can be
inserted.
4
4. Aach seat. Gently lower the seat (holes) onto the mounng posts. (You may hear
a “click” as the buons pop out, locking the release mechanism.)
NOTE: The Quick Release mechanism is unlocked by pushing the buons “in”. (If
buons are pushed before aaching seat, don’t worry, they will pop “out” when you
aach the seat.)
This manual suits for next models
1
Table of contents
Popular Toilet manuals by other brands


American Standard
American Standard CONCEPT Cube TF-2704 installation manual

BIOLAN
BIOLAN ECO Instructions for installation, use and maintenance

Thetford
Thetford C260 Series user manual

KELISS
KELISS T162A Series instruction manual

Silent Venus
Silent Venus SVP600 Installation & maintenance

Kohler
Kohler K-22241K Installation and care guide