Bathology Spectrum 230 User manual
BATHOLOGY
rediscover bathing
Spectrum 230
In-Shower Light Switch
with On / Off / Dim
Installation and Operation Manual

Spectrum 230 by BATHOLOGY
Specifications
Switch Type: Flush-mounted
Switch Voltage: 5VDC
Switch Diameter: 2-1/32”
Switch Trim Depth: 3/16”
Switch Trim Finish: Chrome or Brushed Nickel
Switch Body Diameter: 1-17/32”
Switch Body Depth: 1-5/16”
Switch Rough-in Cut-out: 1-1/2” Diameter
Switch Time Circuit: 20-minute off delay
Maximum Wall Thickness: 2-1/2”
Power Supply: 120VAC, 15 AMPS
Power Supply Length: 7-7/8”
Power Supply Width: 7-1/2“
Power Supply Height: 3-1/4”
Power Supply Testing: CSA, Type 2
Package Includes
- (1) Soft-touch light switch
- (1) Power supply module
- (1) Coupler
- (1) 25’ Soft-touch switch cable
- (2) Plastic wall anchors
- (2) Stainless steel screws, #6
- (1) NEMA male plug
- (1) Strain relief bushing
- (1) RTV silicone sealant, 1 oz tube
- Installation and operation manual
2
Installation Considerations
Please read this manual in its entirety prior to installation.
Note: To familiarize yourself with the Spectrum
230’s installation and required electrical materials,
examine figure 1 on page 3.
Note: Prior to installation, consider the placement
of the Soft-Touch light switch carefully, taking into
account the location of electrical, plumbing, and
other fixtures.
Note: All wiring must be done in accordance with
National Electrical Code and local building code.
Note: The Spectrum 230 in-shower light switch is
designed to be installed inside or outside the
bathing environment dependant on personal
preference.
Note: The Spectrum 230 in-shower light switch is
designed for use with standard dimming fixtures.
Warning: If the Soft-Touch light switch is installed
inside the bathing environment, it must be located
approximately 48” above the floor, on a vertical
wall, convenient for user operation. It must also
avoid hazardous elements such as steam
emissions.
-
-
-
-
-
-
For safety purposes, use safety goggles
at all times.
Check for piping/electrical before
cutting or drilling.
Some electrical components are not
waterproof.
If there is any risk of uninsulated
electrical connections in your wall/ceiling area, use
insulating gloves.
Before wiring to power supply, turn off
electricity at the fuse or circuit breaker box.

Spectrum 230 by BATHOLOGY
Installation
With light fixture installed, mount the power
supply module in an accessible dry location
and within the 25’ run of the Soft-Touch switch
cable length. Note: The Spectrum 230 is
designed for use with standard type dimming
fixtures.
Install two electrical boxes and within 36” of the
power supply module (see A and B in figure 1).
Run a 120VAC light circuit to a 15 amp
grounded outlet A (not supplied).
Run the light fixture wires to single gang
electrical box B.
Mount supplied NEMA male plug and strain
relief bushing to a cover with 1/2” knockout
(not supplied). Connect to light fixture wires
(see figure 2).
1.
2.
3.
4.
5.
3
Important: It is recommended that all electrical equipment be tested prior to installation.
Important: It is recommended that all electrical
equipment be tested prior to installation.
Figure 1
Remote, Accessible Location Desired Light and
Switch Location
6’ Power Supply
Module Tether
25’ Soft-Touch
Switch Cable
Power Supply
Module
Wire Run per Local
Building Code
Switch Cable Run
to Soft-Touch
Light Switch
Soft-Touch
Light Switch
Example Light
Fixture
4’ Male Power
Supply Module Cord
NEMA Male
Plug
Light Power
Supply Outlet
Grounded
120VAC Light
Circuit Outlet
“A”
“B”
4’ Female Power
Supply Module Cord
2C
3
2
1
2A
4
2B
Figure 2
Standard Single
Gang Electrical Box
Utility 1/2”
Knockout Cover
(Not Supplied)
NEMA Male
Plug
4
Strain Relief
Bushing
5
12
3
1. Hot (Black)
2. Neutral (White)
3. Ground (Green)
NEMA Plug as seen above
Spectrum 230 by BATHOLOGY
4
Operation
On/Off light button. The first press will
turn the light on, starting at 100%. The red
indicator light just above the button will
light up, indicating the power is on. The
second press will turn the light and its red
indicator light off.
Increase light button. Press or hold to
increase brightness of light up to a
maximum of 100% brightness. Red
indicator light to its right will light up while
pressed.
Decrease light button. Press or hold to
decrease brightness of light down to a
minimum of 50% brightness. Red indicator
light to its left will light up while pressed.
Product Care
For routine cleaning, simply use a soft damp cloth
and common household soap. Use a damp cloth
to wipe clean, then dry. Clean product frequently to
avoid calcium deposits on surfaces. Use only mild
soap. Never use abrasive cleaners, bleach,
disinfectants or cleaning products containing
alcohol, ammonia, hydrochloric or phosphoric
acids as they may damage the product’s finish. To
clean electrical components, gently wipe down
using a dry cloth or duster. Never use a wet duster,
water, or any other liquid to clean the device.
Replacement Parts
Description
Soft-Touch light switch, polished chrome
Soft-Touch light switch, brushed nickel
Power supply module
25’ Soft-Touch switch cable
NEMA male plug
Strain relief bushing
Part Number
Spectrum034
Spectrum037
Spectrum035
Spectrum036
Spectrum038
Spectrum039
Contact your Bathology representative for Spectrum
230 In-Shower Light Switch replacement parts.
Installation (continued)
Make a 1-1/2” diameter hole at the desired
Soft-Touch light switch location.
Route the 25’ Soft-Touch switch cable from the
Soft-Touch switch to the 6‘ power supply
module switch tether.
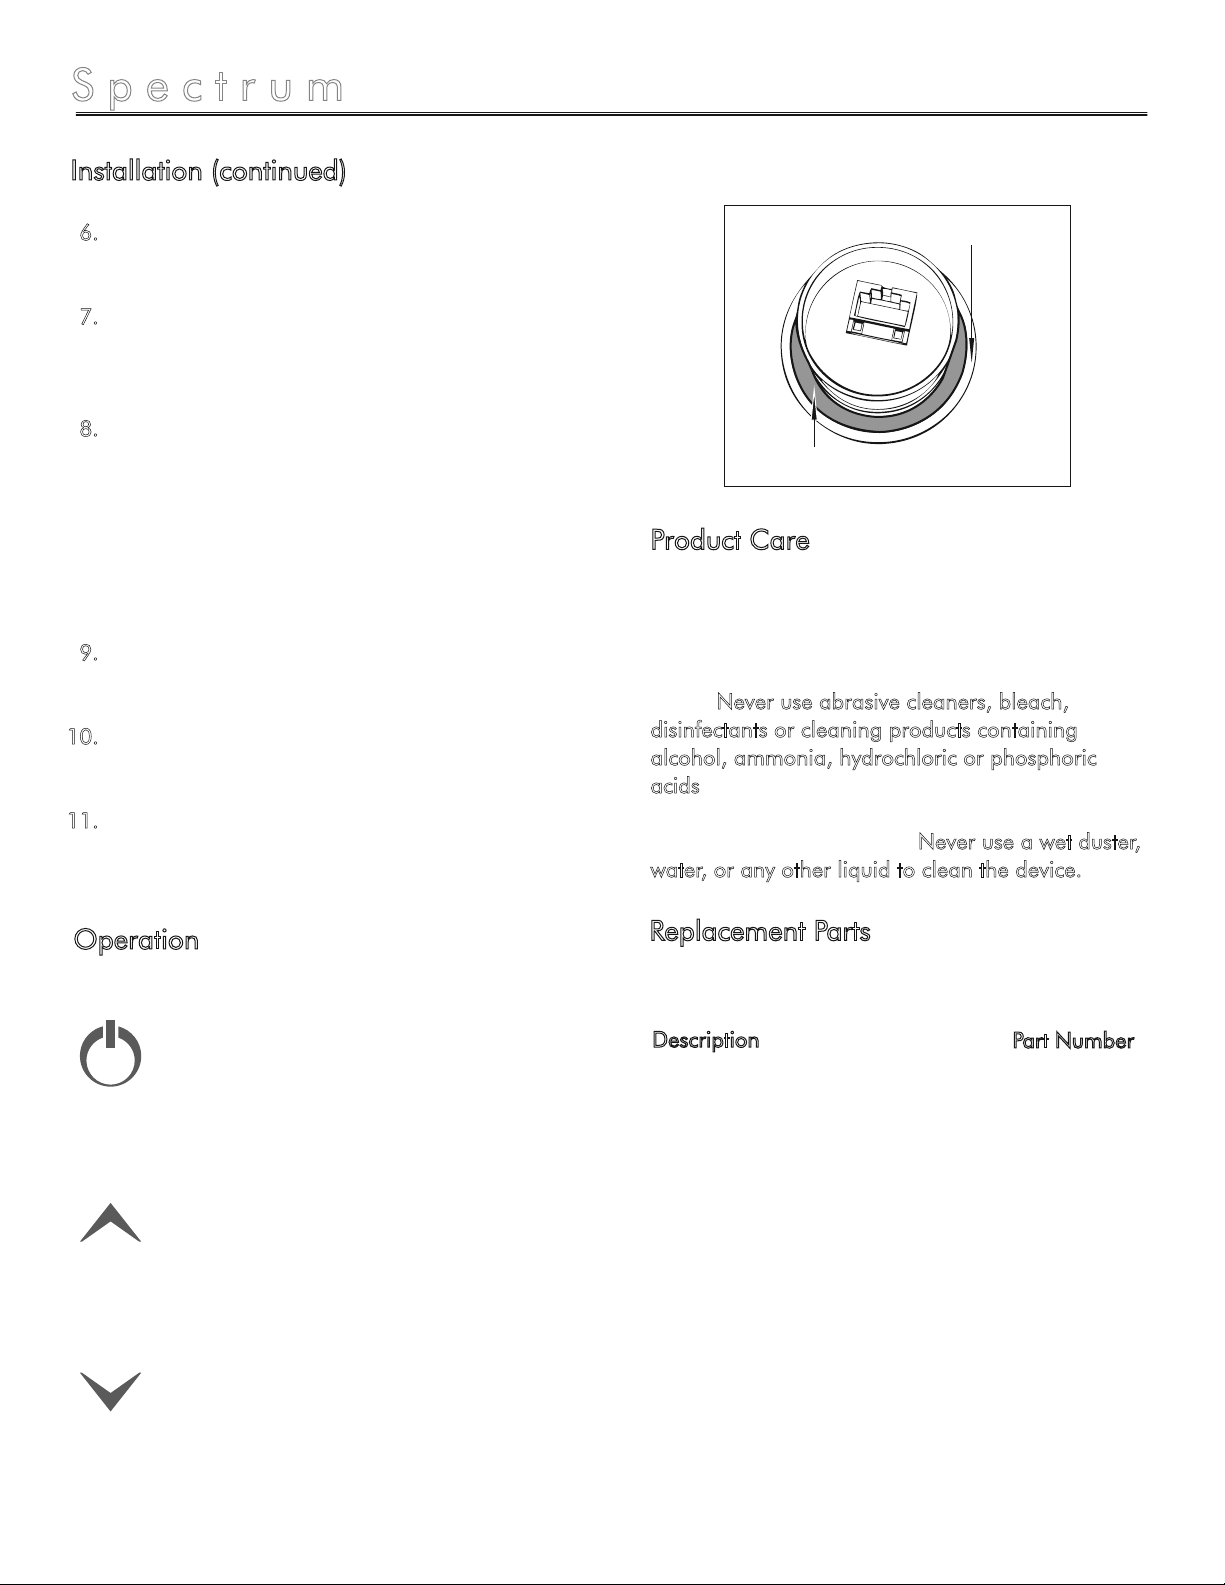
With a clean and dry mounting surface, remove
the peel-off paper from the back of the
Soft-Touch light switch (see figure 3). For wet
environments, run a thin bead of silicone
completely around the mounting flange. Press
the Soft-Touch light switch against the wall until
the adhesive sticks.
Plug in the NEMA male plug into 4’ female
power supply module cord.
Plug in the 4’ male power supply module cord
into the grounded 120VAC light circuit outlet A.
Allow silicone to cure for 24 hours before
exposing Soft-Touch light switch to any source
of moisture.
6.
7.
8.
9.
10.
11.
900-0113-1012
BATHOLOGY
rediscover bathing
A division of Bathing Brands, Inc.
www.Bathology.com 847-465-1070
Peel-Off Paper
Mounting Flange
Figure 3
Spectrum 230 by BATHOLOGY
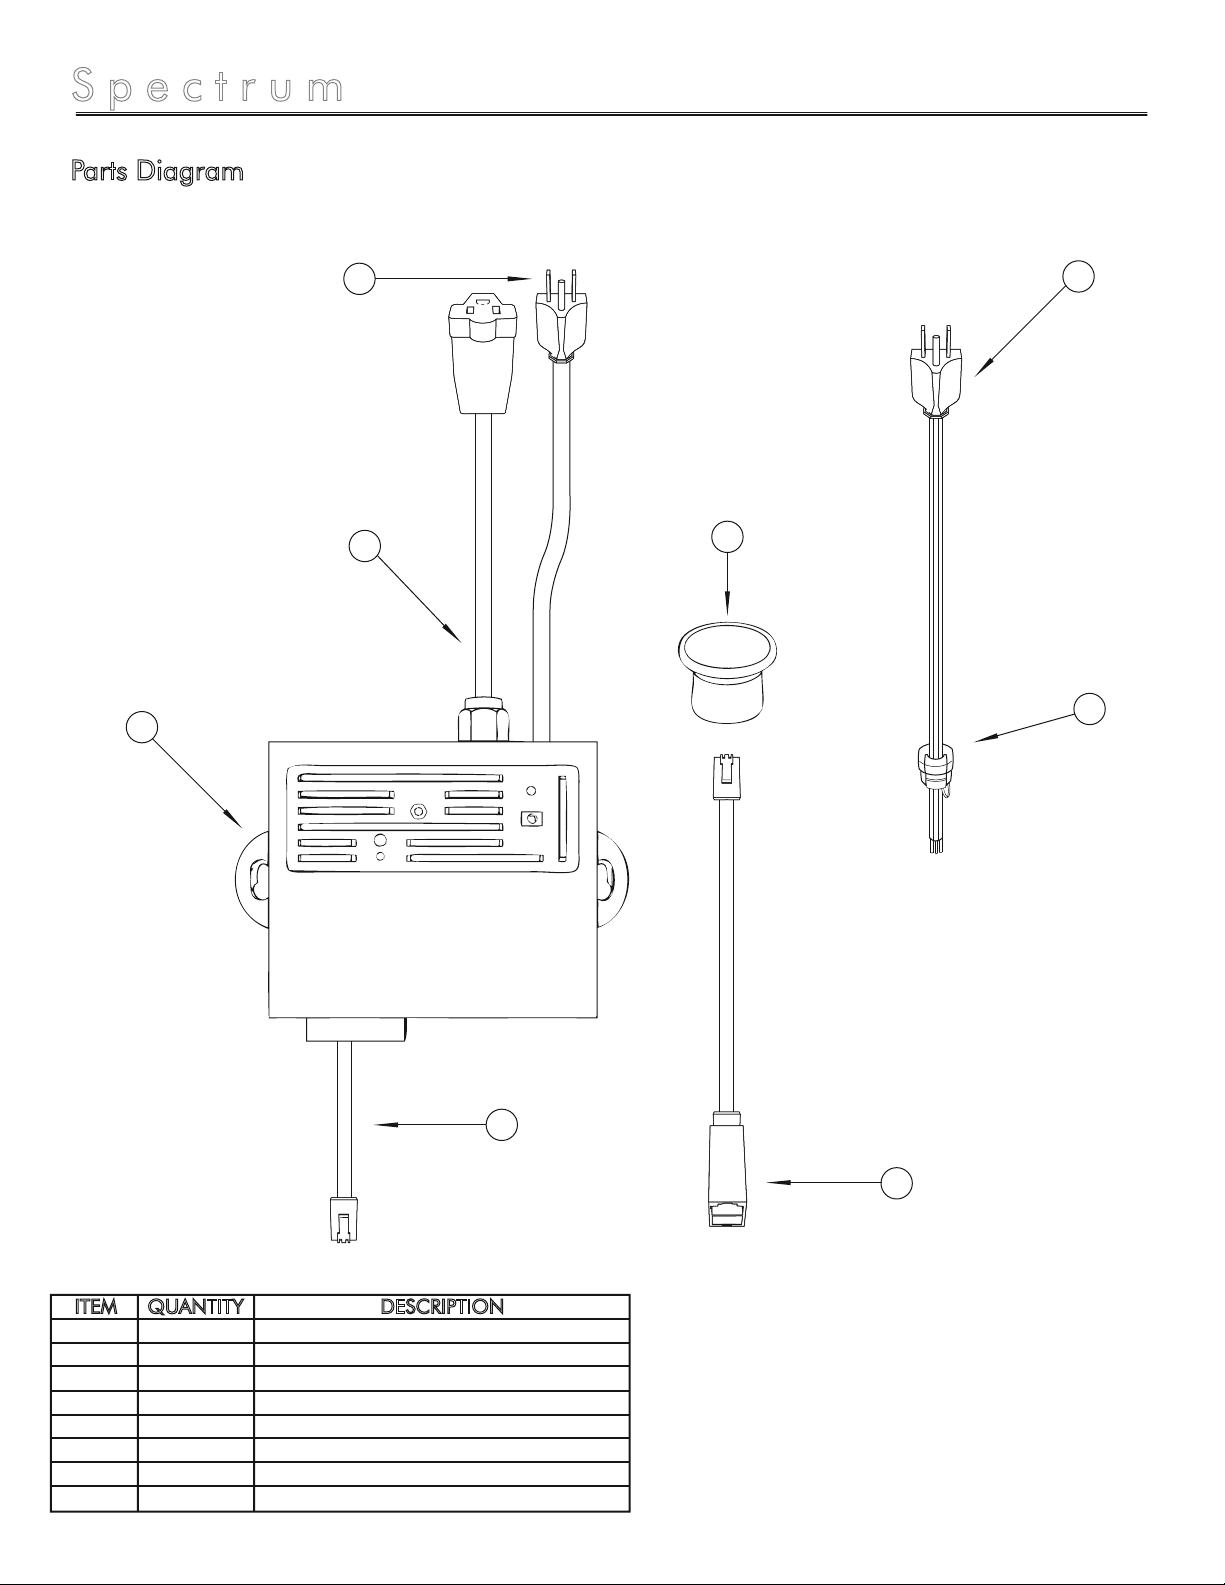
Parts Diagram
5900-0113-0713
BATHOLOGY
rediscover bathing
A division of Bathing Brands, Inc.
www.Bathology.com 847-465-1070
Soft-Touch
Light Switch
1
25’ Soft-Touch
Switch Cable
with Coupler
3
6’ Power Supply
Module Switch Tether
2C
4’ Female Power
Supply Module Cord
2B
4’ Male Power Supply
Module Cord
2A
NEMA Male
Plug
4
Strain Relief
Bushing
5
Power Supply
Module
2
ITEM
1
2
2A
2B
2C
3
4
5
QUANTITY
1
1
1
1
1
1
1
1
DESCRIPTION
Soft-Touch Light Switch
Power Supply Module
4’ Male Power Supply Module Cord
4’ Female Power Supply Module Cord
6’ Power Supply Module Tether
25’ Soft-Touch Switch Cable with Coupler
NEMA Male Plug
Strain Relief Bushing
Table of contents
Popular Bathroom Fixture manuals by other brands

Zenna Home
Zenna Home 35633BNP installation instructions

Aqua elite
Aqua elite SF020A Series Installation and maintenance instructions

Jacuzzi
Jacuzzi LINK 160x70 installation manual

Rubi
Rubi VERTIGO RVT17 Installation

Brizo
Brizo Tresa 62436LF quick start guide

Amba
Amba RADIANT LARGE CURVED HARDWIRED installation instructions

Hewi
Hewi System 162 Mounting instructions

KRION
KRION ALMOND Semi 100157813 Technical specification

KEUCO
KEUCO Edition 11 51151 010002 Mounting instruction

Gima
Gima 27735 User instructions

Signature Hardware
Signature Hardware Andromeda 296157 installation instructions

KERRA
KERRA MOONLIGHT Assembly and maintenance instructions


