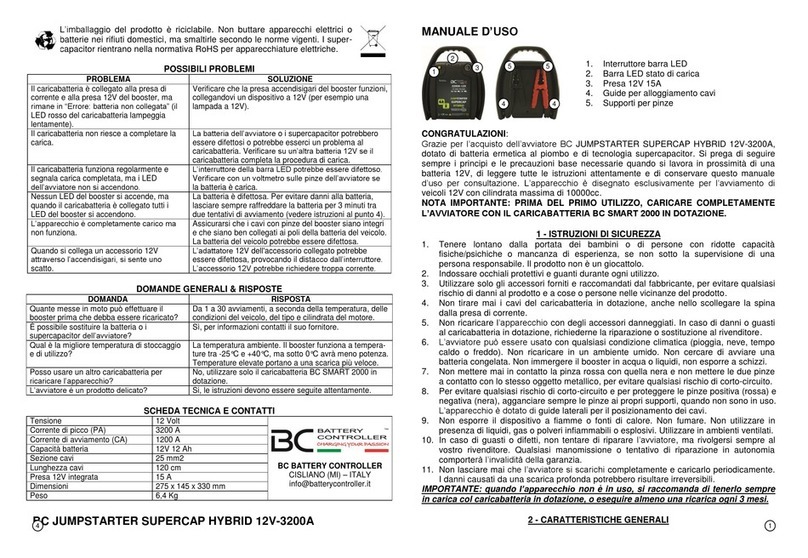
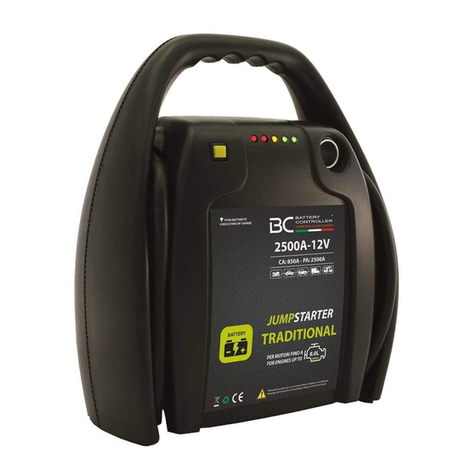
Battery Controller BC JUMPSTARTER TRADITIONAL 12-24V User manual

L’imballaggio del prodotto è riciclabile, si prega di smaltirlo in modo
rispettoso per l’ambiente. Non buttare apparecchi elettrici o batterie nei
rifiuti domestici, ma smaltirle secondo le normative vigenti.
TROUBLESHOOTING
PROBLEMA
SOLUZIONE
Il caricabatteria è collegato alla presa di
corrente e alla presa 12V del booster, ma
rimane in “Errore: batteria non collegata” (il
LED rosso del caricabatteria lampeggia
lentamente).
Controllare che l’interruttore del booster sia in posizione
12V.
Verificare che la presa accendisigari del booster funzioni,
collegandovi un dispositivo a 12V (per esempio una
lampada a 12V).
Il caricabatteria non riesce a completare la
carica.
Una delle batterie dell’avviatore potrebbe essere
difettosa o potrebbe esserci un problema al
caricabatteria. Verificare su un’altra batteria 12V se il
caricabatteria completa la procedura di carica.
Il caricabatteria funziona regolarmente e
segnala carica completata, ma il voltmetro
digitale dell’avviatore non si accende.
L’interruttore del voltmetro digitale potrebbe essere
difettoso. Verificare con un voltmetro sulle pinze
dell’avviatore se il booster è carico.
L’apparecchio è completamente carico ma
non funziona.
Assicurarsi che i cavi con pinze del booster siano integri
e che siano ben collegati ai poli della batteria del veicolo.
Controllare che ci sia tensione sulle pinze del booster, in
caso contrario verificare che il fusibile di sicurezza sulla
pinza rossa sia integro. La batteria del veicolo potrebbe
essere difettosa.
Quando si collega un accessorio 12V
attraverso l’accendisigari, si sente uno
scatto.
L’adattatore 12V dell'accessorio collegato potrebbe
essere difettosa, provocando il distacco dall’interruttore.
L’accessorio 12V potrebbe richiedere troppa corrente.
DOMANDE GENERALI & RISPOSTE
DOMANDA
RISPOSTA
Quante messe in moto può effettuare il
booster prima che debba essere ricaricato?
Da 1 a 30 avviamenti, a seconda della temperatura, delle
condizioni del veicolo, del tipo e cilindrata del motore.
È possibile sostituire le batterie
dell’avviatore?
Sì, per informazioni contatti il suo fornitore.
Qual è la migliore temperatura di stoccaggio?
La temperatura ambiente. Il booster funziona anche a
temperature inferiori a zero, ma avrà meno potenza.
Temperature elevate portano a una scarica più veloce.
Posso usare un altro caricabatteria per
ricaricare l’apparecchio?
No, utilizzare solo il caricabatteria BC SMART 4000 in
dotazione.
L’avviatore é un prodotto delicato?
Si, le istruzioni devono essere seguite attentamente.
SCHEDA TECNICA E CONTATTI
Tensione
12/24 Volt
Corrente di picco (PA)
5000A 12V / 2500A 24V
Corrente di avviamento (CA)
1700A 12V / 850A 24V
Capacità batteria
2 x 12V 22Ah
Sezione cavi
50 mm2
Lunghezza cavi
150 cm
Fusibile esterno
500A
Dimensioni
350 x 300 x 600 mm
Peso
21,5 Kg
BC JUMPSTARTER TRADITIONAL 12-24V
MANUALE D’USO
1. Interruttore 12V/24V/OFF (tenere su OFF
quando il prodotto non viene utilizzato)
2. Presa 12V per ricarica
3. Pulsante per voltmetro
4. Voltmetro digitale
5. Allarme per inversione o corto
6. Maniglia trolley
7. Guide per avvolgimento cavi
8. Supporti per pinze
Grazie per l’acquisto dell’avviatore BC JUMPSTARTER TRADITIONAL 12/24V. Si prega di
seguire sempre i principi e le precauzioni base necessarie quando si lavora in prossimità di
una batteria 12V o 24V, di leggere tutte le istruzioni attentamente e di conservare questo
manuale d’uso per consultazione. L’apparecchio è disegnato esclusivamente per un uso
professionale per l’avviamento di veicoli con batterie 12V o 24V al piombo.
NOTA IMPORTANTE: PRIMA DEL PRIMO UTILIZZO, CARICARE COMPLETAMENTE
L’AVVIATORE CON IL CARICABATTERIA BC SMART 4000 IN DOTAZIONE.
1 - ISTRUZIONI DI SICUREZZA
1. Tenere lontano dalla portata dei bambini o di persone con ridotte capacità
fisiche/psichiche o mancanza di esperienza, se non sotto la supervisione di una
persona responsabile. Il prodotto non è un giocattolo.
2. Indossare occhiali protettivi, guanti, para-orecchie e abbigliamento adeguato (mai in
vinile) durante l’uso. Non indossare oggetti metallici. Tenere a portata di mano
estintore e acqua. Assicurarsi che ci sia qualcuno che possa fornire assistenza.
3. Utilizzare solo gli accessori forniti e raccomandati dal fabbricante.
4. Qualsiasi modifica o alterazione al dispositivo è vietata.
5. Non tirare mai i cavi del caricabatteria, anche nello scollegare la spina dalla presa.
6. Non ricaricare l’apparecchio con degli accessori danneggiati. In caso di danni o guasti
al caricabatteria in dotazione, richiederne la riparazione o sostituzione al rivenditore.
7. L’avviatore può essere usato con qualsiasi condizione climatica (pioggia, neve, tempo
caldo o freddo). Non ricaricare in un ambiente umido. Non cercare di avviare una
batteria congelata. Non immergere il booster in acqua o liquidi, non esporre a schizzi.
8. Non mettere mai in contatto la pinza rossa con quella nera e non mettere le due pinze
a contatto con lo stesso oggetto metallico, per evitare qualsiasi rischio di corto-circuito.
9. Per evitare qualsiasi rischio di corto-circuito e per proteggere le pinze positiva (rossa) e
negativa (nera), agganciare sempre le pinze ai propri supporti, quando non sono in uso.
L’apparecchio è dotato di guide laterali per il posizionamento dei cavi.
10. Non esporre il dispositivo a fiamme o fonti di calore. Non fumare. Non utilizzare in
presenza di liquidi, gas o polveri infiammabili o esplosivi. Utilizzare in ambienti ventilati.
11. In caso di guasti o difetti o urti/cadute, non tentare di riparare l’avviatore, ma rivolgersi
sempre al vostro rivenditore. Qualsiasi manomissione o tentativo di riparazione in
autonomia comporterà l’invalidità della garanzia.
12. Non lasciare mai che l’avviatore si scarichi completamente e caricarlo periodicamente.
I danni causati da una scarica profonda potrebbero risultare irreversibili.
1
4
3
2
1
5
8
4
6
7
7
3
4

IMPORTANTE: quando l’apparecchio non è in uso, si raccomanda di tenerlo sempre
in carica col caricabatteria in dotazione, o eseguire almeno una ricarica ogni 3 mesi.
2 - CARATTERISTICHE GENERALI
1. Tipo di batterie: 2 batterie 12V 22Ah sigillate al piombo di tipo AGM (Absorbed Glass
Mat), conformemente alle norme di sicurezza IATA. La batteria AGM ermetica permette
di collocare e utilizzare l’apparecchio in qualsiasi posizione.
2. Le pinze sono completamente isolate e i cavi in rame sono super flessibili. La sezione
dei cavi è di 50 mm2e la lunghezza di 150 cm, per il massimo comfort.
3. Il caricabatteria intelligente BC SMART 4000 in dotazione è dotato di microprocessore
e algoritmo automatico a 8 cicli. Può rimanere sempre collegato all’avviatore senza
rischio di danni e può essere utilizzato per la manutenzione di altre batterie 12V.
4. Presa accendisigari 12V integrata per la ricarica dell’apparecchio.
5. Fusibile di sicurezza posizionato sul morsetto positivo, all’interno della manopola
(fare scorrere la copertura rossa verso il basso). Utilizzare solo fusibili consigliati e
verificare quale fusibile è installato sul dispositivo prima di ordinarne uno. La
sostituzione è molto semplice: basta svitare i due bulloni che fissano il fusibile,
sostituirlo e serrare di nuovo i due bulloni.
6. Interruttore 12V/24V/OFF: tenere l’interruttore spento quando il booster non viene
utilizzato e mentre si collegano le pinze al veicolo. Solo dopo aver accertato che il
collegamento sia corretto, girare l’interruttore su 12V o 24V a seconda della batteria del
veicolo.
7. Allarme per inversione o corto: il buzzer emetterà un suono o una luce quando rileva
un’inversione di polarità. Funziona solo se l’interruttore ON/OFF è posto su OFF (come
deve essere durante il collegamento dell’avviatore al veicolo).
8. Voltmetro digitale che indica lo stato di carica (vedi paragrafo successivo).
3 - VISUALIZZAZIONE DEL LIVELLO DI CARICA
1. Per verificare lo stato di carica dell’avviatore, premere il pulsante giallo. Se la tensione
è inferiore a 12.7V, è necessario ricaricare il booster. Quando si lascia il booster
collegato al veicolo dopo l’avviamento (max 10 secondi), il voltmetro indica la tensione
di carica dell’alternatore.
2. Quando l’apparecchio è collegato al caricabatteria in dotazione, fare riferimento alla
barra LED del caricabatteria per verificare lo stato di carica.
4 - RICARICA DELL’AVVIATORE
1. Il kit dell’avviatore comprende il caricabatteria BC SMART 4000, completamente
automatico a 8 cicli di carica. Per ricaricare l’avviatore, collegare il caricabatteria alla
presa di corrente 220V e alla presa 12V dell’avviatore tramite l’adattatore in dotazione,
quindi posizionare l’interruttore del booster su 12V. Ricaricare in un ambiente ventilato.
2. Il LED verde “CHARGE” del caricabatteria lampeggia lentamente durante le fasi di
recupero e carica, lampeggia velocemente durante la desolfatazione ed è acceso fisso
durante il mantenimento. Il passaggio da una fase alla successiva è completamente
automatico. Per informazioni dettagliate sull’algoritmo di carica e sul funzionamento del
caricabatteria, si prega di fare riferimento al manuale del caricabatteria stesso.
3. Quando tutti i LED (uno giallo e tre verdi) della barra sul caricabatteria sono accesi,
l’avviatore è pronto all’uso. Se possibile, si consiglia comunque di completare la fase di
desolfatazione, L’avviatore può comunque essere scollegato in qualsiasi momento.
4. Dopo la messa in moto di un veicolo, prima di scollegare l’apparecchio, attendere max
10 secondi a motore acceso, così che l’alternatore possa ricaricare l’avviatore.
Si ricorda che quando l’apparecchio non è in uso è consigliato lasciarlo sempre in
carica con il caricabatteria BC SMART 4000 in dotazione!
5 - ISTRUZIONI DI UTILIZZO –AVVIAMENTO DI EMERGENZA
Prima di eseguire l’avviamento, verificare che il veicolo sia in folle con freno a mano tirato e
chiave in posizione OFF. Leggere il manuale del veicolo e seguire le istruzioni di sicurezza
al paragrafo 1. Assicurarsi che tutti i carichi (luci, radio, aria condizionata…) siano spenti e
che l’interruttore dell’avviatore sia posizionato su OFF.
1. Collegare prima la pinza rossa (positiva) al polo positivo della batteria del veicolo.
2. Successivamente, collegare la pinza nera (negativa) al polo negativo della batteria del
veicolo o a massa al telaio del veicolo, distante dalla batteria e della linea del
carburante. Fare attenzione alle parti mobili come la ventola, le cinghie, ecc.
3. Posizionare l’interruttore su 12V o 24V, a seconda del veicolo da avviare.
4. Allontanarsi dalla batteria e dall’avviatore nel momento in cui comincia a funzionare e
assicurarsi che esso sia in posizione stabile, in modo che le vibrazioni del motore
successive all’avviamento non ne provochino la caduta. La lunghezza dei cavi è
sufficiente nella maggior parte dei casi a posizionare l’avviatore a terra.
5. Una volta avviato il veicolo, dopo aver eventualmente atteso qualche minuto perché
l’alternatore ricarichi la batteria interna, scollegare prima la pinza nera (negativa) e poi
la pinza rossa (positiva).
6. Riposizionare immediatamente entrambi le pinze sui loro rispettivi supporti.
7. Mettere l’apparecchio in carica con il caricabatteria BC SMART 4000 in dotazione.
Non utilizzare mai in modalità 24V con veicoli a 12V!!!
IMPORTANTE: Se il veicolo non si mette in moto entro 10 secondi, non insistere. Lasciare
raffreddare la batteria dell’apparecchio per 3 minuti prima di riprovare con un ulteriore
tentativo. In caso contrario, la batteria interna potrebbe subire danni irreversibili (i tentativi di
avviamento dovranno essere molto brevi).
NOTA: In presenza di una batteria difettosa, questa potrebbe rifiutare la carica
dell’avviatore. Questa potrebbe essere la ragione per cui il veicolo non si mette in moto.
6 - ISTRUZIONI DI UTILIZZO –PRESA 12V
La presa 12V dell’avviatore può essere utilizzata anche per alimentare dispositivi 12VDC
dotati di un adattatore accendisigari, posizionando l’interruttore del booster su 12V. La
presa è dotata di protezione automatica da sovraccarico e può essere utilizzata come
salva-memorie per alimentare i dispositivi di bordo di un’automobile, quando è necessario
scollegare la batteria per sostituzione o per operazioni di manutenzione. La gamma
accessori BC comprende l’adattatore OBD Memory Saver (codice 710-OBDMS), con il
quale la presa 12V del booster può essere collegata direttamente alla presa OBD dell’auto.
7 - GARANZIA
Forelettronica Srl offre una garanzia limitata di 2 anni sull’avviatore e sulla batteria interna
per guasti o malfunzionamenti imputabili ai materiali o alla fabbricazione. Si considerano
escluse da garanzia le parti il cui deterioramento è imputabile all'uso. La garanzia decade in
caso di uso improprio o di manomissioni di alcun genere o di riparazione effettuata da un
tecnico non autorizzato. La presente garanzia è limitata all'acquirente originale: non è
trasferibile a soggetti terzi. La garanzia esclude forme di garanzia implicite, incluse garanzie
per danni recati in conseguenza dell'uso del dispositivo: Forelettronica Srl si ritiene
esonerata da qualsiasi danno recato a persone o cose dall'impiego dei propri prodotti. I
costi di trasporto per la restituzione del dispositivo difettoso sono a carico dell'acquirente.
2
3

The packaging of the product is recyclable. Do not dispose of electrical
appliances or batteries in household waste, but please follow current
regulations.
TROUBLESHOOTING
PROBLEM
SOLUTION
The charger is connected to power outlet and
jump starter’s 12V socket, but the charger’s
red LED blinks slowly (Error: battery not
connected).
Check that the jump starter’s switch is on 12V.
Verify that the jump starter’s 12V socket is working, by
connecting whatever 12V device (for example, a 12V
lamp).
The battery charger cannot complete the
charge.
One of the jump starter’s batteries might be defective or
the battery charger might be damaged. Please try
recharging another 12V battery with the battery charger
to verify whether the same problem occurs.
The battery charger works perfectly and it
completes the charge, but the jump starter’s
digital voltmeter doesn’t turn on.
The voltmeter button might be damaged. Please verify
with a voltmeter on the jump starter’s clamps the battery
voltage / state of charge..
The device is fully charged but it doesn’t
work.
Make sure the cables and clamps of the jump starters
are intact and that they are well connected to the poles
of the vehicle battery. Check there is voltage on the
clamps, otherwise check that the safety fuse is not
broken. The vehicle’s battery might be defective.
When a 12V accessory gets connected to
the 12V socket, a strange noise is heard.
The 12V adapter of the connected device could be
defective, causing the switch to interrupt. The 12V device
could require too much current.
F.A.Q.
QUESTION
ANSWER
How many jumpstarts can be done before to
recharge the jump starter?
1 to 30 jumpstarts, according to the temperature, the
vehicle’s conditions, the engine type and capacity.
Is it possible to replace the jump starter’s
battery?
Yes, please ask your Dealer for information.
Which is the best storing temperature?
Ambient temperature. The jump starter works also with
temperatures below 0°C, but it can lose power. High
temperatures bring to a faster discharge.
Can I use another battery charger to
recharge the device?
No, use only the provided battery charger BC SMART
4000.
The jump starter is a fragile product?
Yes, it is necessary to follow all instructions carefully.
TECHNICAL DATA & CONTACTS
Voltage
12/24 Volt
Peak Current (PA)
5000A 12V / 2500A 24V
Cranking Current (CA)
1700A 12V / 850A 24V
Battery Capacity
2 x 12V 22Ah
Cables Section
50 mm2
Cables Length
150 cm
External Fuse
500A
Dimensions
350 x 300 x 600 mm
Weight
21.5 Kg
BC JUMPSTARTER TRADITIONAL 12-24V
USER’S MANUAL
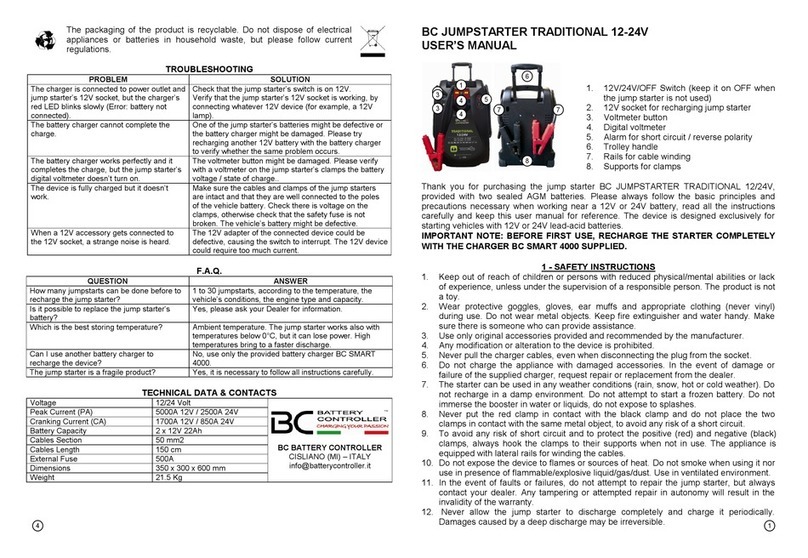
1. 12V/24V/OFF Switch (keep it on OFF when
the jump starter is not used)
2. 12V socket for recharging jump starter
3. Voltmeter button
4. Digital voltmeter
5. Alarm for short circuit / reverse polarity
6. Trolley handle
7. Rails for cable winding
8. Supports for clamps
Thank you for purchasing the jump starter BC JUMPSTARTER TRADITIONAL 12/24V,
provided with two sealed AGM batteries. Please always follow the basic principles and
precautions necessary when working near a 12V or 24V battery, read all the instructions
carefully and keep this user manual for reference. The device is designed exclusively for
starting vehicles with 12V or 24V lead-acid batteries.
IMPORTANT NOTE: BEFORE FIRST USE, RECHARGE THE STARTER COMPLETELY
WITH THE CHARGER BC SMART 4000 SUPPLIED.
1 - SAFETY INSTRUCTIONS
1. Keep out of reach of children or persons with reduced physical/mental abilities or lack
of experience, unless under the supervision of a responsible person. The product is not
a toy.
2. Wear protective goggles, gloves, ear muffs and appropriate clothing (never vinyl)
during use. Do not wear metal objects. Keep fire extinguisher and water handy. Make
sure there is someone who can provide assistance.
3. Use only original accessories provided and recommended by the manufacturer.
4. Any modification or alteration to the device is prohibited.
5. Never pull the charger cables, even when disconnecting the plug from the socket.
6. Do not charge the appliance with damaged accessories. In the event of damage or
failure of the supplied charger, request repair or replacement from the dealer.
7. The starter can be used in any weather conditions (rain, snow, hot or cold weather). Do
not recharge in a damp environment. Do not attempt to start a frozen battery. Do not
immerse the booster in water or liquids, do not expose to splashes.
8. Never put the red clamp in contact with the black clamp and do not place the two
clamps in contact with the same metal object, to avoid any risk of a short circuit.
9. To avoid any risk of short circuit and to protect the positive (red) and negative (black)
clamps, always hook the clamps to their supports when not in use. The appliance is
equipped with lateral rails for winding the cables.
10. Do not expose the device to flames or sources of heat. Do not smoke when using it nor
use in presence of flammable/explosive liquid/gas/dust. Use in ventilated environment.
11. In the event of faults or failures, do not attempt to repair the jump starter, but always
contact your dealer. Any tampering or attempted repair in autonomy will result in the
invalidity of the warranty.
12. Never allow the jump starter to discharge completely and charge it periodically.
Damages caused by a deep discharge may be irreversible.
1
4
3
2
1
5
8
4
6
7
7
3
4

IMPORTANT: when the jump starter is not used, we recommend to keep it always
connected to the provided charger, or at least to recharge it once every 3 months.
2 - GENERAL FEATURES
1. Battery types: 2 x 12V 22Ah AGM (Absorbed Glass Mat) sealed lead battery, according
to IATA safety norms. The AGM sealed battery allows to place and use the jump starter
in whatever position.
2. The clamps are completely insulated and the copper cables are super flexible. The
cable section is 50 mm2and 150 cm long, for maximum comfort.
3. The included battery charger BC SMART 4000 is provided with a microprocessor and
an automatic 8-steps charging algorithm. It can stay always connected to the jump
starter with no risk of damages and it can be used also for the care of other 12V
batteries.
4. Embedded 12V socket for recharging the jump starter.
5. Safety fuse placed on the positive clamp, inside the handle (slide the red cover down).
Use only recommended fuses and verify which kind of fuse is mounted on the device
before ordering spare parts. The fuse replacement is very easy: just unscrew the two
bolts that fix the fuse, replace it and retighten the two bolts.
6. 12V/24V/OFF Switch: keep the switch in OFF position when the jump starter is not
used or while connecting the clamps to the vehicle. Only after making sure that the
connection is correct, turn the switch to 12V or 24V depending on the vehicle battery.
7. Alarm for short circuit or reverse polarity: the buzzer will emit a sound or a light
when it detects a polarity inversion. It only works if the ON / OFF switch is set to OFF
position (we always recommend to keep it in OFF position while connecting the jump
starter to the vehicle).
8. Digital voltmeter showing the state of charge (see next point).
3 - INDICATION OF THE STATE OF CHARGE
1. To check the of charge of the jump starter, turn the switch to 12V position and press
the yellow button. If the voltage is below 12.7V, it is necessary to recharge the jump
starter. When leaving the booster connected to the vehicle after starting (max 10
seconds), the voltmeter indicates the alternator charge voltage.
2. When the jump starter is connected to the supplied battery charger, refer to the LED
bar of the battery charger to check the state of charge.
4 - RECHARGING THE JUMP STARTER
1. The jump starter’s kit includes the battery charger BC SMART 4000, completely
automatic with 8 charging steps. To recharge the jump starter, connect the charger to a
power outlet and to the 12V socket of the jump starter, then turn the jump starter’s
switch in 12V position. Recharge only in ventilated environments.
2. The green “CHARGE” LED of the battery charger blinks slowly during recovery and
charging, it blink fast during desulfation and it is steadily on during maintenance. The
device switches automatically from one step to the following one. For detailed
information about the charging algorithm and the charger’s operation, please refer to
the manual of the charger itself.
3. When the green LED on the charger switches to fast blinking (desulfation), the jump
starter is ready to use. However, it is recommended to wait for the green LED to be
steadily on, Anyway, jump starter can be disconnected from charger in any moment.
4. After starting a vehicle, before disconnecting the appliance, wait max 10 seconds with
the engine running, so that the alternator can recharge the jump starter's battery.
Please keep in mind that it is recommended to keep the jump starter connected with
the battery charger BC SMART 4000 when it is not used!
5 - OPERATING INSTRUCTIONS - EMERGENCY JUMP STARTING
Before jump starting the vehicle, please check that the vehicle is in neutral with the
handbrake on and the ignition key in OFF position. Read the vehicle’s manual and follow all
safety instructions. Make sure that all loads (lights, radio, air conditioning...) are switched off
and that the jump starter’s switch is in OFF position.
1. First connect the red (positive) clamp to the positive pole of the vehicle battery.
2. Next, connect the black (negative) clamp to the negative pole of the vehicle's battery or
to ground to the vehicle frame, away from the battery and the fuel line. Pay attention to
moving parts such as fan, straps, etc.
3. Turn the jump starter’s swith in 12V or 24V position, according to the vehicle to start.
4. Move away from the battery and the jump starter when it starts running and make sure
it is in a stable position so that the engine vibrations following the jumpstart do not
cause it to fall. The length of cables is enough in most cases to position the starter on
the ground.
5. Once the vehicle is started, after waiting for some minutes to allow the alternator to
recharge the internal battery, disconnect black clamp (negative) first and then red
clamp (positive).
6. Reposition both clamps immediately on their respective supports.
7. Put the device in charge with the provided battery charger BC SMART 4000.
Never use for 12V vehicles when the switch is in 24V position!!!
IMPORTANT: If the vehicle does not start within 10 seconds, do not insist. Let the jump
starter’s battery cool down for 3 minutes before to try again. Otherwise, the internal battery
could be irreversibly damaged (jump starting attempts have to be very short).
NOTE: In presence of a faulty battery, this could reject the jump starter's charge. This could
be the reason why the vehicle does not start.
6 - OPERATING INSTRUCTIONS –12V SOCKET
The jump starter’s 12V socket can be used as a portable power supply for all 12VDC
devices provided with a cigar socket adapter. The 12V socket is provided with an automatic
overload protection. Moreover, the socket can be used as a memory saver to supply a car’s
on board devices, when it’s necessary to disconnect the battery for replacement or for
maintenance operations. BC accessories range includes the adapter OBD Memory Saver
(part number 710-OBDMS) to connect the jump starter’s 12V socket directly with a car’s
OBD socket.
7 - WARRANTY
Forelettronica Srl offers a 2-years limited warranty on the jump starter for faults or
malfunctions due to materials or manufacturing. Parts whose deterioration is attributable to
use are considered excluded from the guarantee. The warranty is void in case of improper
use or tampering of any kind or repair carried out by an unauthorized technician. This
warranty is limited to the original purchaser: it is not transferable to third parties.
The warranty excludes implicit forms of warranty, including guarantees for damage caused
as a result of use of the device: Forelettronica Srl is deemed exonerated from any damage
to persons or property from the use of its products. The shipping costs for returning the
defective device are the responsibility of the purchaser.
2
3
This manual suits for next models
1
Table of contents
Languages:
Other Battery Controller Remote Starter manuals
