Bauhn MD 83615 User manual

After Sales Support
Telephone: 1300 884 987
Email: [email protected]
Premium Micro System
for iPad/iPhone/iPod
10/12
MEDION Australia Pty Ltd
St Leonards, NSW 2065
Australia
helpline: 1300 884 987
e-mail: [email protected]
www.medion.com.au
INSTRUCTION MANUAL
Model Number: MD 83615
N26968
audio

Premium Micro System
for iPad/iPhone/iPod
Warranty Details
The product is guaranteed to be free from defects in workmanship and parts for a period of 12 months
from the date of purchase. Defects that occur within this warranty period, under normal use and care, will
be repaired, replaced or refunded at our discretion. The benefits conferred by this warranty are in addi-
tion to all rights and remedies in respect of the product that the consumer has under the Competition and
Consumer Act 2010 and similar state and territory laws.
Our goods come with guarantees that cannot be excluded under the Australian Consumer Law. You are
entitled to a replacement or refund for a major failure and for compensation for any other reasonably
foreseeable loss or damage. You are also entitled to have the goods repaired or replaced if the goods fail
to be of acceptable quality and the failure does not amount to a major failure.
After Sales Support
Telephone: 1300 884 987
Email: [email protected]
After Sales Support
Telephone: 1300 884 987
Email: [email protected]
Premium Micro System
for iPad/iPhone/iPod
Repair and Refurbished Goods
or Parts Notice
Unfortunately, from time to time, faulty products are manufactured which need to be returned to the Sup-
plier for repair.
Please be aware that if your product is capable of retaining user-generated data (such as files stored on a
computer hard drive, telephone numbers stored on a mobile telephone, songs stored on a portable media
player, games saved on a games console or files stored on a USB memory stick) during the process of
repair, some or all of your stored data may be lost. We recommend you save this data elsewhere prior to
sending the product for repair.
You should also be aware that rather than repairing goods, we may replace them with refurbished goods
of the same type or use refurbished parts in the repair process.
Please be assured though, refurbished parts or replacements are only used where they meet ALDI’s strin-
gent quality specifications.
If at any time you feel your repair is being handled unsatisfactorily, you may escalate your complaint.
Please telephone us on 1 300 884 987 or write to us at:
MEDION Australia Pty Ltd
St. Leonards, NSW 2065
Australia
MEDION Help Desk 1300 884 987
(Operating Hours: Mon-Fri 8:30AM to 6:00PM EST)
Email: [email protected]
audio audio

1
After Sales Support
Telephone: 1300 884 987
Email: [email protected]
Table of contents
Welcome 3
General safety instructions 4
Overview of the equipment 7
Front 7
Rear 8
Display 9
Remote control 10
Parts List 11
Getting started 11
Insert batteries into the remote control 11
Setting up the device 11
Connections 12
Connecting the loudspeakers 12
Connecting headphones 12
Aerial connection 12
Image transmit 13
Connecting external device to the LINE IN connection 13
Connecting external device to the AUDIO IN connection 13
Mains connection 14
Connecting an iPod/iPhone/iPad 14
Attaching/replacing iPod/iPhone holder 14
Connecting an iPad 14
Connecting a USB memory stick 14
General operating functions 15
Audio functions 15
Setting clock time 15
Using the timer 15
Using the sleep timer 16
Select operating mode 16
Radio 17
Tuning 17
Search function 17
Automatic station saving 17
Saving and selecting stations 17
Clearing stations 17
Stereo/mono reception 17
RDS reception 17
USB operation 18
Starting/stopping playback 18
Track selection, fast rewind/forward 18
Direct track selection 18
Folder selection 18
Program the playing order of tracks 18
Repeat function/random playback 18
Display track information 18
iPod/iPhone/iPad playback control 19
Starting/stopping playback 19
Track selection, fast rewind/forward 19
Repeat function/random playback 19
Image playback on the TV (iPod/iPhone only via dock) 19
Playback on AUDIO IN/LINE IN connections 19
Playing audio or MP3 CDs 20
Inserting a disc 20
Readouts in the display 20
Starting/pausing/stopping playback 20

2After Sales Support
Telephone: 1300 884 987
Email: [email protected]
Track selection, fast rewind/forward 20
Direct track selection 20
Folder selection 20
Program the playing order of tracks 20
Repeat function/random playback 21
Display track information 21
FAQ 21
Cleaning 21
Disposal 22
Technical data 23
Copyright © 2012. All rights reserved.
The company Medion® owns the copyright.
"Made for iPod", "Made for iPhone", and "Made for iPad" means that an electronic accessory has been designed to connect specifically to
iPod, iPhone. or iPad, respectively, and has been certified by the developer to meet Apple performance standards. Apple is not responsible
for the operation of the device or its compliance with safety and regulatory standards. Please note that the use of this accessory with iPod,
iPhone, or iPad may affect wireless performance.
iPad, iPhone, iPod, iPod classic, iPod nano, iPod shuffle, and iPod touch are trademarks of Apple Inc., registered in the U.S. and
other countries.
Subject to technical and optical changes, as well as printing errors.

3
After Sales Support
Telephone: 1300 884 987
Email: [email protected]
Welcome
Congratulations on choosing to buy a BAUHN® product. By doing so you now have the assurance and peace of mind that comes with
purchasing a product made by one of the leading manufacturers. All products brought to you by BAUHN® are manufactured to the
highest standards of performance and safety and, as part of our philosophy of customer service and satisfaction, are backed by our
comprehensive 1 Year Warranty. We hope you will enjoy using your purchase for many years to come.

4After Sales Support
Telephone: 1300 884 987
Email: [email protected]
General safety instructions
Please be sure to read these operating instructions carefully and follow all instructions given. The instructions will help you
to operate the device reliably and help increase its service life. Always store these instructions near the device. Keep these
operating instructions so that you can pass them on with the device if you sell it.
Warning symbols and key words used in these instructions
DANGER!
Warning: immediate mortal danger!
WARNING!
Warning: possible mortal danger and/or serious irreversible injuries!
CAUTION!
Please follow the guidelines to avoid injuries and/or property damage!
CAUTION!
Please follow the guidelines to avoid property damage!
PLEASE NOTE!
Additional information on using the device!
PLEASE NOTE!
Please follow the guidelines in the operating instructions!
WARNING!
Warning: danger of electric shock!
Proper use
This device offers various options in terms of its use:
The device is intended for playing sound and image media (CDs, MP3 data media, USB devices), as well as for radio reception. In addition,
you can connect an iPod, iPhone or iPad device for charging and for the playback of audio/video files (video data on iPod/iPhone only).
The device is intended for private use only and not for industrial/commercial use.
Please note that we shall not be liable in case of improper use:
• Do not modify the device without our consent and do not use any auxiliary equipment which we have not approved or supplied.
• Use only spare parts and accessories which we have supplied or approved.
• Follow all the instructions in these directions for use, especially the safety information. Any other use is deemed improper and can
cause personal injury or damage to the product.
• Do not use the device in extreme ambient temperatures and conditions.
This device is not intended for use by people (including children) with reduced physical, sensory or mental abilities or by those without
experience and/or knowledge, unless they are supervised by a person responsible for their safety or they have been instructed in its use by
that person. Children should be supervised to ensure they do not play with this device.

5
After Sales Support
Telephone: 1300 884 987
Email: [email protected]
Setting up the device in a safe place
This device is intended for private use only. Only use the device in residential rooms or similar rooms.
Set up and operate all components on a stable, level and vibration-free surface to prevent the device from falling down.
Make sure that:
• the device is not exposed to direct sources of heat (for example, heaters)
• the unit is not in direct sunlight
• there is no contact with moisture, water and splashes
• naked flames (such as lit candles) are not placed near or on the device
• no liquid-filled containers (e.g. vases) are placed on any part of the device
• the device is not placed close to magnetic fields (e.g. television sets or speakers)
• Ensure that there is sufficient distance between the device and the speaker of at least 10cm on all sides.
• To prevent interference, the speakers should be kept at a distance of at least 30cm from the CRT TV or monitors.
Ventilation
Do not cover the air vents. Ensure that ventilation is adequate.
Maintain a minimum clearance of approx. 10cm above and to the sides of the main device.
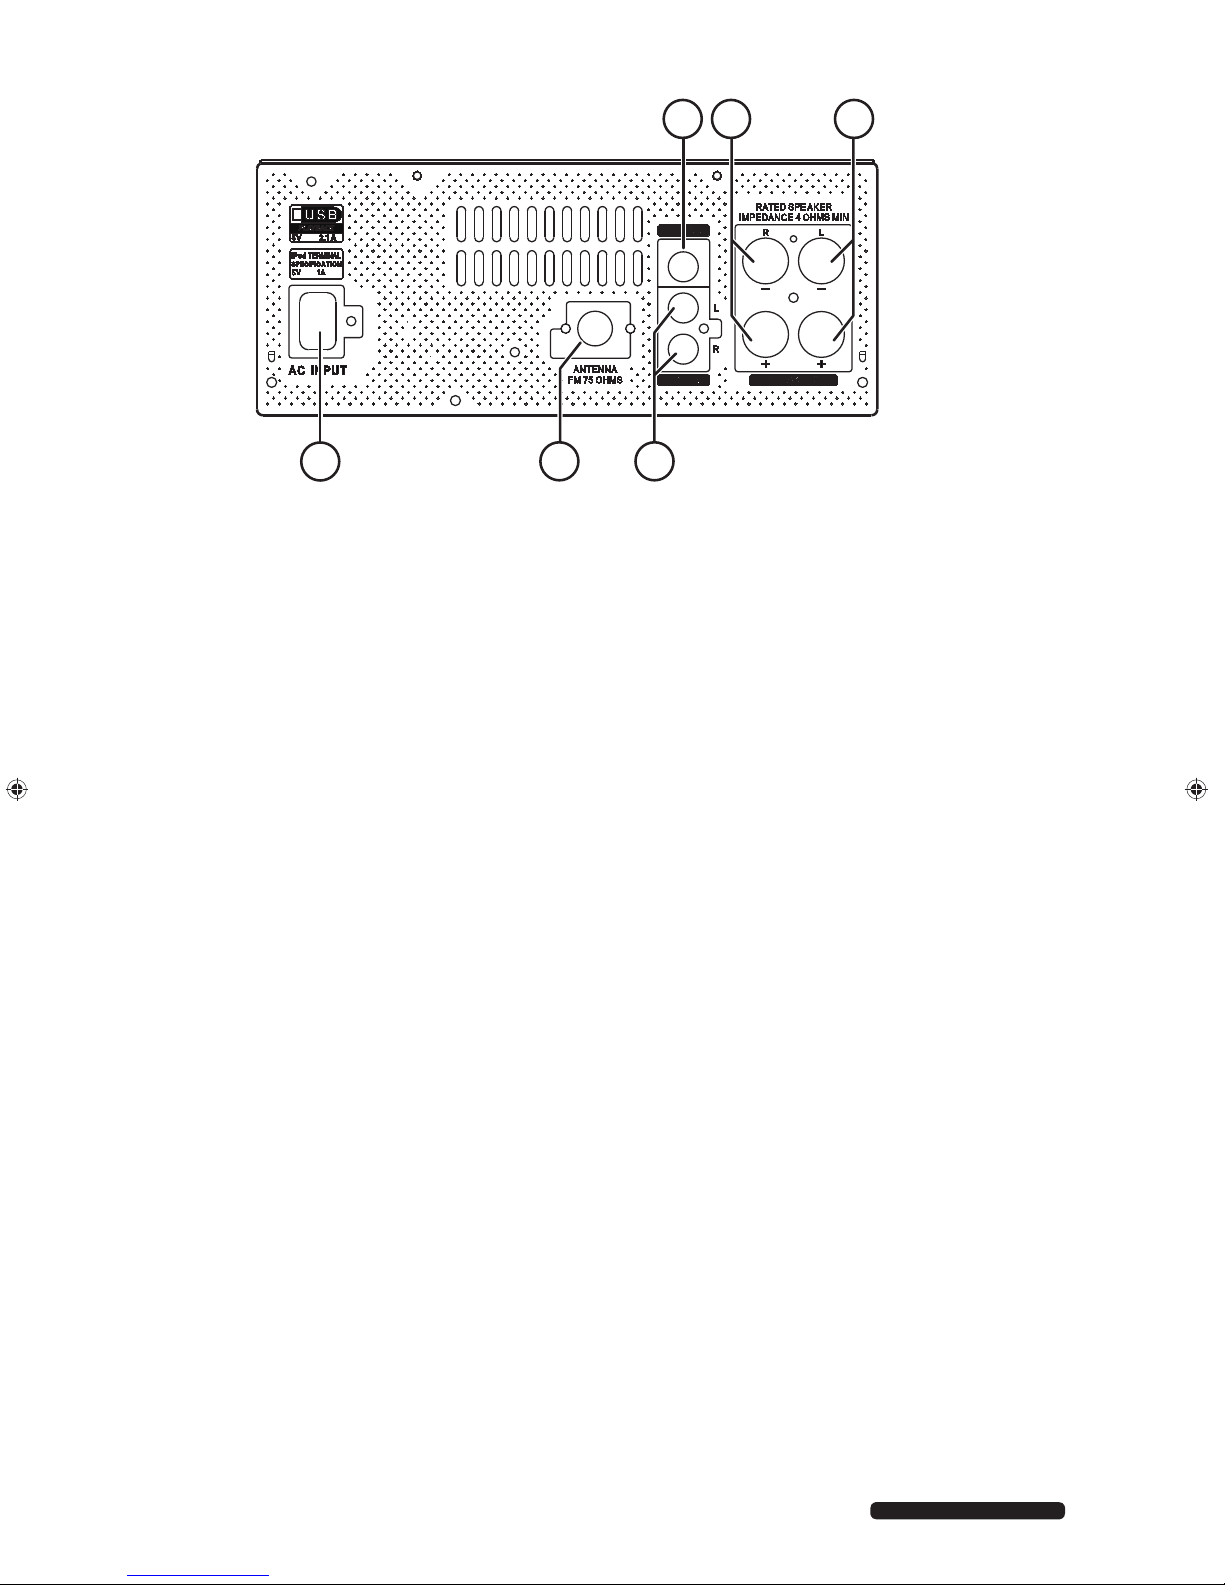
Ensure accessibility of mains power socket
Only connect the device to a power point (230 V ~ 50 Hz) that is easy to reach and close to the place where you have set
up the device. The socket must be easily accessible so that you can quickly unplug the device from the mains if necessary.
Unplug the device from the mains if there is a storm or if the device is not going to be used for a long period of time.
Never carry out repairs yourself
Never try to open and/or repair the device yourself. There is the risk of electric shock! In the event of a fault, contact our Service Centre or
another suitable professional repair workshop. The user may be subject to serious risks if repairs are not carried out by a qualified person.
If the device or mains cable is damaged, remove the plug from the mains immediately, to avoid risks.
CD player
The CD player is a class 1 laser product. The machine is supplied with a safety system which prevents dangerous
laser beams from escaping during normal use. To avoid eye injuries, never tamper with or damage the safety
system of the device.
Information on electrostatic charge
If the device does not work correctly because of electrostatic charge, reset it by disconnecting it from the mains for a short period of time.

6After Sales Support
Telephone: 1300 884 987
Email: [email protected]
Safe handling of batteries
The remote control is battery-operated. Please observe the following instructions:
• Keep batteries out of the reach of children. Seek medical attention immediately if a battery is swallowed.
• Before inserting the batteries, check that the contacts in the device and on the batteries are clean and, if necessary, clean them.
• Only use new batteries. Never use old and new batteries together.
• Do not use a combination of battery types.
• Please note the polarity (+/-) when inserting the batteries.
• ATTENTION! There is a risk of explosion if batteries are incorrectly replaced! Replace the batteries only with the same or equivalent
type.
• Never try to recharge non-rechargeable batteries. There is a risk of explosion!
• Never expose the batteries to excessive heat (such as direct sunlight, fire or similar).
• Store batteries in a cool, dry place. Strong direct heat can damage batteries. Therefore, keep the unit away from strong heat sources.
• Never short-circuit batteries.
• Never throw batteries into a fire.
• Remove leaking batteries from the device immediately. Clean the contacts before inserting a new battery. There is a risk of chemical
burns from battery acid!
• Also remove dead batteries from the device.
• If the device is not going to be used for long periods, remove the batteries.
Headphones
WARNING!
Listening with headphones at a high volume can damage your hearing. Before putting on headphones set the volume to
minimum! Your hearing can be damaged if you listen at high volumes over a long period or if the volume is increased too
suddenly.

7
After Sales Support
Telephone: 1300 884 987
Email: [email protected]
Overview of the equipment
Front
15
1
2 643
5
14 13 12 11 10 9 8 7
1) : switch device on/off
2) IR sensor for remote control
3) Timer display
4) Disk tray
5) iPod/iPhone cradle: “Docking station” for an iPod/iPhone device1
6) Volume selector
7) : open/close disk compartment
8) : iPod/iPhone/iPad/CD/USB: next track, radio: forward station search
9) : iPod/iPhone/iPad/CD/USB: previous track, radio: forward station search
10) : iPod/iPhone/iPad/CD/USB: stop playback
11) /: iPod/iPhone/iPad/CD/USB: start/pause playback
12) HWPEVKQP": select operating mode
13) : headphone connection 3.5mm jack
14) CWFKQ"KP: audio input
15) USB connection
1 iPod/iPhone/iPad is a registered trademark of Apple Inc. in the USA and other countries.

8After Sales Support
Telephone: 1300 884 987
Email: [email protected]
Rear
DC
DC
1
6
2 3
45
1) XKFGQ"QWV: cinch video output
2) URGCMGT"T: connections for the right-hand speaker
3) URGCMGT"N: connections for the left-hand speaker
4) NKPG"KP: audio cinch inputs L/R
5) HO"CPV"97"QJO: aerial connection
6) CE"KPRWV: mains connection

9
After Sales Support
Telephone: 1300 884 987
Email: [email protected]
Display
2 3 4 65 7 8
12
13
16
171819202122
24 23
15 14
911101
1) WUD: USB/iPad operating mode
2) KRQF: iPod/iPhone operating mode
3) EF: CD operating mode
4) OR5: MP3 operating mode
5) TFO: random playback enabled
6) OGO: memory playback enabled
7) : repeat all tracks; 1: repeat current track
8) : playback stopped/started
9) radio station set; FM ST stereo signal received from radio station
10) TFU: RDS radio station display
11) RV[K: is displayed when a station issues a genre identifier;
VR: is displayed when a station provides traffic announcements;
VC: is displayed when a station is currently broadcasting a traffic announcement
12) UNGGR: sleep timer activated
13) VQVCN: displays total duration of a data medium
14) FKUE: shows a disk is inserted
15) : timer is set
FCKN[: configured timer is set to "daily"
16) VTCEM: displays the track number
17) HKNG: displays the file name
18) CNDWO: displays the album for a track
19) HQNF: displays the folder
20) CTVKUV: displays the artist for a track
21) VKVNG: displays the title of a track
22) OWVKPI: mute activated
23) Z/DCUU: X-bass activated

10 After Sales Support
Telephone: 1300 884 987
Email: [email protected]
Remote control
1) IR transmitter
2) QRGP1ENQUG<"open and close disc compartment
3) OGOQT[: memory button
4) ENGCT: clear key
5) ENQEM1VKOGT: set the clock/timer
6) UNGGR: set the sleep timer
7) / TGRGCV: set repeat function
8) : mute
9) TCPFQO: set to random playback
10) "VWPKPI"<"iPod/iPhone/iPad/CD/USB: fast forward/next
track; radio: forward station search
11) XQN-: increase volume
12) GPVGT: confirm selection
13) FKOOGT: set display brightness
14) IPRWV1CWFKQ1NKPG: select input mode
15) VWPGT: select radio operating mode
16) /: iPod/iPhone/iPad: start and pause playback
17) OGPW: iPod/iPhone/iPad:
18) /: CD/USB: start and pause playback
19) : CD/USB: stop playback
20) FKURNC[: Radio: switch between station names, program type,
radio text and frequency
21) RV[: Radio: select station genre
22) CURO: Radio: start automatic station search and store
23) FKURNC[: CD/USB: display track information
24) FKURNC["*VX"QWV+: image output from iPod/iPhone to a
television
25) KRQF1KRJQPG: switch to iPod/iPhone operating mode
26) WUD1KRCF: switch to USB/iPad operating mode
27) EF: switch to CD operating mode
28) RTGUGV : iPod/iPhone/iPad: selection down; radio: previous
stored station
29) HQNFGT: CD/USB: activate/deactivate folder mode
30) XQN/: decrease volume
31) RTGUGV: iPod/iPhone/iPad: selection up; radio: next stored station
32) "VWPKPI"<"iPod/iPhone/iPad/CD/USB: fast rewind/previous track; radio: backward station search
33) Z/DCUU: activate/deactivate x-bass
34) DCUU1VTGDNG: set bass/treble
35) Number buttons
36) UVCPFD[: switch on the device from standby mode and switch back to standby mode
&'86%
5$',2
'$7$
iPod/iPhone
31
30
28
25
26
27
23
22
24
33
36
1
34
32
35
29
3
4
5
6
7
8
9
10
2
11
13
21
20
19
17
16
15
14
18
12

11
After Sales Support
Telephone: 1300 884 987
Email: [email protected]
Parts List
CAUTION!
Keep the packaging out of reach of children. There is a risk of suffocation.
When unpacking the product, ensure that the following parts are included:
• Micro audio system
• Remote control incl. battery (R6/LR06/AA/Mignon 1.5V)
• FM aerial: wire aerial
• iPad stand
• Power cable
• 3 x iPhone adapters
• Audio cable (3.5mm -> 2 x Cinch)
• Video cable (1 x Cinch)
• Documentation
Getting started
Insert batteries into the remote control
Insert the 1.5V R6/LR06/AA/Mignon battery in the remote control.
Open the battery compartment cover.
Insert the battery so that the negative pole is placed next to the springs.
Replace the battery compartment cover.
Setting up the device
• Place the device on a sturdy, level surface. Some aggressive furniture paints can corrode the device´s rubber feet. If necessary, place
the device on a suitable underlay.
CAUTION!
Before making a connection to an external device, unplug the device from the mains.

12 After Sales Support
Telephone: 1300 884 987
Email: [email protected]
Connections
The sound will be transmitted via the loudspeaker supplied.
You can transmit videos from an iPod/iPhone to an external device, e.g. to a television.
Connecting the loudspeakers
1
2
3
4
DC
DC
Connect the bare ends of the speaker cables to the corresponding colour-coded sockets URGCMGTU R (right) is for the cable pair
of the right loudspeaker, L (left) is for the cable pair of the left loudspeaker.
Connect the cable as shown in the diagram.
Connecting headphones
On the front of the device you will find a 3.5mm headphone socket.
Insert headphones with a 3.5mm jack plug into the headphones connection.
When headphones are connected the in-built speaker is disabled. Volume adjustment is still possible to alter the headphone volume.
The headphone connection is not active when using an iPhone in the docking station. If headphones are connected while an iPhone is in
the docking station, the following appears on the display: HP INVALID.
ATTENTION!
Excessive pressure when using earphones and headphones can result in damage to hearing and/or loss of hearing. Before
pressing play, set the volume to the lowest setting.
Aerial connection
FM
DC
DC
Connect an aerial cable to the FM 75 Ohm aerial connection on the device to enable radio reception.
• A wire aerial is included in the delivery. Connect the wire aerial to the device and position it to achieve the best reception.
• Alternatively, you can connect an external aerial cable to an appropriate wall socket.

13
After Sales Support
Telephone: 1300 884 987
Email: [email protected]
Image transmit
TV
DC
DC
Videos stored on an iPod/iPhone can be transmitted to an external device (e.g. a television).
To do so, connect the supplied cinch cable with the yellow plug to the device's XKFGQ"QWV connection and a corresponding
input plug to the external device.
Connecting external device to the LINE IN connection
TV
DC
DC
You can connect an external device (e.g. a television) for audio transmission to the micro system. To do this you require the audio cinch
connecting cable.
Connect the end of the cinch plug to the left and right NKPG"KP connections
Connect the other end of the cinch plug to the audio output on the external device. Pay attention to the colour coding on the plugs
when doing so.
Connecting external device to the AUDIO IN connection
There is an audio input for another external device on the front of the device. A 3.5 mm jack to L/R cinch adapter cable is supplied for this
purpose.
Connect the 3.5mm jack plug to the CWFKQ"KP connection.
Connect the cinch plug to the external device.

14 After Sales Support
Telephone: 1300 884 987
Email: [email protected]
Mains connection
DC
DC
Once all other components are connected, connect the mains cable.
To do so, place the flat end in the CE"KPRWV connection and the other end of the cable into a properly installed 230V ~ 50 Hz
safety plug which is accessible at all times.
Connecting an iPod/iPhone/iPad
The device allows playback of music and video files from a wide range of iPod, iPhone and iPad models. When an iPod, iPhone or iPad is
connected, the battery is also charged.
Made for.
• iPod touch (1st, 2nd, 3rd, and 4th generation)
• iPod nano (2nd, 3rd, 4th, 5th, and 6th generation)
• iPhone (iPhone, 3G, 3GS, 4, and 4S)
• iPad (iPad, iPad 2, and iPad 3rd Generation)
Attaching/replacing iPod/iPhone holder
Numerous holders are included with the device to ensure a more secure hold for the inserted iPod/iPhone. Check which holder is best
suited to your iPod/iPhone. Certain types do not require any separate holder.
Choose the appropriate holder for your iPod.
Place the holder in the slide-in cradle, cut-out facing down, and press down until it clicks into place.
After inserting the iPod, its battery will charge. For this the micro system must be in standby mode or switched on.
Connecting an iPad
An iPad stand is supplied for iPads. The holder ensures a secure hold. The USB connection does not support video transmission.
First connect the transmission cable supplied with the iPad to the iPad. This will charge the iPad and transmit the audio.
Connect the other end of the cable to the WUD"7X" "403C USB connection on the front of the device.
After connecting the iPad, its battery will charge. For this the micro system must be in USB mode and switched on.
Place the iPad in the holder and guide the cable back through the specially designed cable duct.
Connecting a USB memory stick
USB memory sticks can be connected to the USB connection. This allows music tracks to be played from a USB memory stick. The USB
connection does not support video playback.
Connect the USB memory stick to the WUD"7X" "403C"USB slot.

15
After Sales Support
Telephone: 1300 884 987
Email: [email protected]
General operating functions
Audio functions
NOTE!
The description applies to audio output on the connected speakers. Where devices with separate speakers are connected,
you can of course adjust the sound on those devices.
Volume
Press the XQN- button on the remote control or turn the volume adjuster on the device clockwise to increase the volume.
Press the XQN⁄"button on the remote control or turn the volume adjuster on the device anti-clockwise to decrease the volume.
Switch sound off – MUTE
Press the button on the remote control to turn the sound off completely. MUTING will appear on the display.
Press the button on the remote control to turn the sound back on again. MUTING disappears from the display.
Bass/Treble
Press the DCUU1VTGDNG button once or multiple times until the desired BASS or TREBLE function appears on the display.
Use XQN"/1- to set the desired bass and treble.
X-bass
X-bass allows you to activate or deactivate a bass boost using the remote control.
Press the Z/DCUU button on the remote control. The display will show X-BASS. The function is activated.
Press the button again to deactivate X-bass again. The message on the display will disappear.
Setting clock time
Proceed as follows to set the clock:
Press the ENQEM1VKOGT button on the remote control while the device is switched on.
Confirm within 10 seconds using the GPVGT button.
To set the day, press or and confirm your selection with GPVGT. Days are displayed in the English format: MON =
Monday, TUE = Tuesday, WED = Wednesday, THU = Thursday, FRI = Friday, SAT = Saturday, SUN = Sunday.
Now use the or keys to choose either a 12- or 24-hour format and confirm with GPVGT.
Use the or keys to select the desired hour and confirm with GPVGT.
Press or to set the desired minutes. Confirm with GPVGT.
Finally, press the ENQEM1VKOGT button again to save the settings.
Using the timer
The timer allows you to have the device start up in a particular mode at a particular time. The device offers two types of timer:
• The one-off timer is shown in the display with and starts the device once only at the set time for a specific duration.
• The daily timer is shown in the display with FCKN[ and starts the device at the same time for a specified duration every day.
You can set both timers separately. There must be an interval of at least 1 minute between the chosen times.
To use the timer function, the time must be set as described above.

16 After Sales Support
Telephone: 1300 884 987
Email: [email protected]
Setting the timer
Hold down the ENQEM1VKOGT button for 2 seconds while the device is switched on.
Press the or button within 10 seconds to choose whether you wish to set a daily (DAILY) or a one-off (ONCE) timer.
Confirm with GPVGT.
Select a TIMER SET entry in the display within 10 seconds and confirm with GPVGT.
Now set which source should be used. Press or to select CD, TUNER, USB, IPOD, AUDIO IN, LINE IN and then
confirm with GPVGT.
If you have chosen the radio function TUNER, you can select the desired radio station using or . If no radio stations are
stored, NO PRESET is displayed and the timer programming is aborted.
Press or to select the day. Confirm with GPVGT.
Press or to set the hour the device should be switched on at and once again confirm with GPVGT.
Use or to choose the minutes the device should be switched on at and press GPVGT.
Repeat the last two steps and specify the hour and minutes the device should be switched off at. Then confirm with GPVGT.
Now select the desired volume using XQN-1/.
Switch the device into standby mode using QP1UVCPFD[. The LED for the timer lights up.
When the set time is reached, the device switches on in the desired operating mode and switches off again at the set time. While a timer is
being executed, TIMER flashes on the display.
Enabling/disabling preset timers
You can enable or disable a previously set timer.
Hold down the ENQEM1VKOGT button for 2 seconds while the device is switched on.
Using or select the ONCE (one-off timer) or DAILY (daily timer) entry within 10 seconds, depending on which timer you
wish to enable/disable.
Now press the TIMER ON (to enable) or TIMER OFF (to disable) entry on the display within 10 seconds and confirm with GPVGT.
The set timer is turned on or off.
Using the sleep timer
With the sleep timer, the device turns off automatically after a defined period of time.
Press the UNGGR button during operation.
Use the number keys within 5 seconds to select the desired period of time until the device is to be turned off. The display reads
UNGGR.
The device will now switch off when the set period of time expires.
When a sleep timer is activated, you can query the time remaining at any time:
Press UNGGR. The time remaining is displayed.
If you wish to cancel the sleep timer, proceed as follows:
Press UNGGR.
Press the 2twice within 5 seconds until SLEEP 00 appears in the display. The sleep timer is turned off.
Select operating mode
Choose the operating mode using the following buttons on the remote control or the HWPEVKQP"button on the device:
−VWPGT: radio
−WUD: playback from a USB data medium or an iPad
−KRQF: playback from an iPod of an iPhone
−CWFKQ1NKPG"KPRWV: playback of audio signals from an external device connected to the CWFKQ"KP slot; playback of
audio signals from an external device connected to the NKPG"KPslot.
−EF: playback of CDs

17
After Sales Support
Telephone: 1300 884 987
Email: [email protected]
Radio
Press the HWPEVKQP button once or multiple times or press the VWPGT"button on the remote control until FM and the current
frequency are shown on the display.
If you have connected a wire aerial, arrange the aerial to achieve the optimum reception.
NOTE
The display always shows the RDS station names and returns to this display after changing stations. To see the status when
saving a station or entering a radio frequency, press the FKURNC[ button in the TCFKQ"FCVC section on the remote
control several times until the radio frequency appears on the display.
Tuning
Press the VWPKPIand VWPKPIbuttons to search for a station manually.
Search function
Hold down one of the VWPKPIor VWPKPIbuttons for longer to perform an automatic forwards/backwards station search.
Automatic station saving
Hold down the CURO button until ASPM appears on the display.
The automatic station search begins automatically. All located stations are then stored in order in the memory spaces.
You can cancel the search by pressing CURO.
Saving and selecting stations
The radio has 40 memory spaces where you can save your favourite stations.
To store a preset station, press the OGOQT[ button.
Press the RTGUGV"and RTGUGVbuttons and choose the desired memory space.
To confirm the storage, press the OGOQT[ button again.
You can select channels by pressing the RTGUGV"and RTGUGVbuttons and thus select the desired memory space.
Alternatively you can have the stored stations play for 5 seconds each one after the other. For this, hold down the RTGUGV"and
RTGUGVbuttons. The number of the memory space currently playing flashes. Press RTGUGV"or RTGUGVagain
when you have found the memory space.
Clearing stations
To clear all stored stations, proceed as follows:
Hold down the ENGCT button until TUNER CLEAR appears on the display.
All stored stations are now cleared.
Stereo/mono reception
If the stereo reception is too weak, you may be able to achieve clear reception with the mono setting.
Press VWPGT to switch between stereo and mono reception. The ST indicator appears or disappears from the display.
RDS reception
If a radio station transmits RDS signals then the RDS symbol will appear in the display.
Display RDS
Press the FKURNC[ button in the TCFKQ"FCVC section on the remote control to show the following information on the display:
−RDS NAME: Station name
−Frequency
−RDS TEXT: Further information from the radio text (if this is not available, NO TEXTwill appear).
−RDS TYPE: PTY code for the currently played station (if this is not available NO PTY and then NONE will appear)
Search RDS stations by genre
If a station broadcasts RDS signals and a genre description, you can search for a station by desired genre.
Press the RV[ button. PTI TI SELECT appears.
Use or to select a desired genre.
Press the RV[ button again to start the search for a station. If no stations with this genre are found, NOT FOUND appears on the
display.

18 After Sales Support
Telephone: 1300 884 987
Email: [email protected]
USB operation
USB memory sticks can be connected to the WUD"7X" "403C USB slot.
Note the following:
• Due to the numerous different file systems and file formats, the operation of connected memories cannot be guaranteed.
• Depending on the size of the data medium, it make take time for the system to be detected.
• Supported file systems are FAT16 and FAT32; the supported file format is MP3.
• If the correct file type is not recognised by the device, NOT SUPPORTED appears on the display.
• External hard disks are not supported.
Starting/stopping playback
Start track playback using the" button on the device or in the EF1WUD section on the remote control. To stop playback, press
the button again. Pressing the button once more resumes playback.
Track selection, fast rewind/forward
Press the button to go back to the start of a specified track. Press the button again to skip to the previous track. The button
skips straight to the next track.
Hold the button down to fast rewind within a track or to fast forward.
Direct track selection
Press buttons 2/; on the remote control to select a track directly. Where the track number is a multi-digit track number, press the +10
button once or multiple times and then enter the track number.
Folder selection
When playing back MP3 files, these may be saved in various folders for a better overview. You can select these folders on the device
individually in order to play the correct track. This may involve folders and additional sub-folders. The folders are numbered automatically
by the device.
To select a folder, first put the device into folder mode.
Press the HQNFGT button on the remote control. FOLD appears on the display.
Using RTGUGV"1select the desired folder.
Using the or and buttons, you can now select and play the track as described.
Press the HQNFGT button again to exit folder mode. The FOLD message disappears.
When folder mode is turned off, all music tracks on the data medium are shown and played. The folder structure is ignored. In folder mode,
you can combine the individual tracks and thus only work in specific folders.
Program the playing order of tracks
The program function allows you to compile your own playlist by only selecting specific tracks for playback. You can specify the order in
which the list is played yourself. Proceed as follows:
Press the "OGOQT[ button.
Using RTGUGV and RTGUGV select the desired folder containing the track.
Press or and choose the desired track.
Save the track using OGOQT[.
Repeat these steps until all tracks have been programmed.
A programmed playlist is indicated on the display with OGO.
Start the programmed playlist by pressing .
You can clear a programmed playlist again by pressing .
Repeat function/random playback
Press the TGRGCV button to enable/disable the repeat function.
Press the TCPFQO button to enable/disable random playback.
Display track information
The FKURNC[ button in the EF1WUD section of the remote control allows you to have track information displayed for each track.
The file name, folder, track title, artist, album and track number are displayed one after another.
Table of contents
Other Bauhn Stereo System manuals

Bauhn
Bauhn AMHFB-815 User manual

Bauhn
Bauhn ASBW-0716 User manual

Bauhn
Bauhn AMHFB-815 User manual

Bauhn
Bauhn ACD-108 User manual

Bauhn
Bauhn AMHST-014 User manual

Bauhn
Bauhn AMHFB-0319 User manual

Bauhn
Bauhn ACD-108 User manual

Bauhn
Bauhn ASPP4-0721-B User manual

Bauhn
Bauhn AMHST-014 User manual

Bauhn
Bauhn AMHFB-0319 User manual