Bavaria BCD 18/1 Li User manual

Original operating instructions
Cordless Drill
Art.-Nr.: 45.135.82 I.-Nr.: 11013 BCD 18/1 Li
Anleitung_BT_CD_18_1_Li_SPK1:_ 10.03.2010 15:34 Uhr Seite 1

1
2
1
6910
5
11
4
32
11
5
4
9
3
4
8
8
2

a7
6
9
10
1
4
2
3
5
6
3

â
Change the gear only when the drill is at a standstill. If you fail to observe this
point, the gearing may be damaged.
Caution
Read the operating instructions to reduce the risk of injury.
Wear ear-muffs.
The impact of noise can cause damage to hearing.
Wear safety goggles.
Sparks generated during working or splinters, chips and dust emitted by
the device can cause loss of sight.
Wear a breathing mask.
Dust which is injurious to health can be generated when working on
wood and other materials. Never use the device to work on any materials
containing asbestos!
4

1. General Safety Rules
WARNING! Read all instructions Failure to follow all
instructions listed below may result in electric shock,
re and/or serious injury. The term ’’power tool’’ in all
of the warnings listed below refers to your mains-
operated (corded) power tool or battery-operated
(cordless) power tool.
SAVE THESE INSTRUCTIONS
CAUTION
Read all safety regulations and instructions.
Any errors made in following the safety regulations
and instructions may result in an electric shock, re
and/or serious injury.
Keep all safety regulations and instructions in a
safe place for future use.
1. Work area
a. Keep work area clean and well lit. Cluttered and
dark areas invite accidents.
b. Do not operate power tools in explosive
atmospheres, such as in the presence of
ammable liquids, gases or dust. Power tools
create sparks which may ignite the dust or fumes.
c. Keep children and bystanders away while
operating a power tool. Distractions can cause you
to lose control.
2. Electrical safety
a. Power tool plugs must match the outlet. Never
modify the plug in any way. Do not use any
adapter plugs with earthed (grounded) power tool.
Unmodied plugs and matching outlets will reduce
risk of electric shock.
b. Avoid body contact with earthed or grounded
surfaces such as pipes, radiators, ranges and
refrigerators. There is an increased risk of electric
shock if your body is earthed or grounded.
c. Do not expose power tools to rain or wet
conditions. Water entering a power tool will
increase the risk of electric shock.
d. Do not abuse the cord. Never use the cord for
carrying, pulling or unplugging the power tool.
Keep cord away from heat, oil, sharp edges
or moving parts. Damaged or entangled cords
increase the risk of electric shock.
e. When operating a power tool outdoors, use an
extension cord suitable for outdoor use. Use of
a cord suitable for outdoor use reduces the risk of
electric shock.
f. If operating a power tool in a damp location
is unavoidable, use a residual current device
(RCD) protected supply. Use of an RCD
reduces the risk of electric shock.
3. Personal safety
a. Stay alert, watch what you are doing and use
common sense when operating a power tool. Do
not use a power tool while you are tired or under
the inuence of drugs, alcohol or medication. A
moment of inattention while operating power tools
may result in serious personal injury.
b. Use safety equipment. Always wear eye
protection. Safety equipment such as dust
mask, non-skid safety shoes, hard hat, or hearing
protection used for appropriate conditions will
reduce personal injuries.
c. Avoid accidental starting. Ensure the switch is
in the off-position before plugging in. Carrying
power tools with your nger on the switch or
plugging in power tools that have the switch on
invites accidents.
d. Remove any adjusting key or wrench before
turning the power tool on. A wrench or a key left
attached to rotating part of the power tool may result
in personal injury.
e. Do not overreach. Keep proper footing and
balance at all times. This enables better control of
the power tool in unexpected situations.
f. Dress properly. Do not wear loose clothing or
jewellery. Keep your hair, clothing and gloves
away from moving parts. Loose clothes, jewellery
or long hair can be caught in moving parts.
g. If devices are provided for the connection of
dust extraction and collection facilities, ensure
these are connected and properly used. Use of
these devices can reduce dust-related hazards.
4. Power tool use and care
a. Do not force the power tool. Use the correct
power tool for your application. The correct power
tool will do the job better and safer at the rate for
which it was designed.
b. Do not use the power tool if the switch does not
turn it on and off. Any power tool that cannot be
controlled with the switch is dangerous and must be
repaired.
c. Disconnect the plug from the power source and/
or the battery pack from the power tool before
making any adjustments, changing accessories,
or storing power tools. Such preventive safety
measures reduce the risk of starting the power tool
accidentally.
d. Store idle power tools out of the reach of
children and do not allow persons unfamiliar
with the power tool or these instructions to
operate the power tool. Power tools are dangerous
in the hands of untrained users.
e. Maintain power tools. Check for misalignment or
binding of moving parts, breakage of parts and
any other condition that may affect the power
tools operation. If damaged, have the power tool
repaired before use. Many accidents are caused by
poorly maintained power tools.
f. Keep cutting tools sharp and clean. Properly
maintained cutting tools with sharp cutting edges are
less likely to bind and are easier to control.
g. Use the power tool, accessories and tool bits
etc. in accordance with these instructions and
in the manner intended for the particular type
of power tool, taking into account the working
conditions and the work to be performed. Use
of the power tool for operations different from those
intended could result in a hazardous situation.
5

5. Service
a. Have your power tool serviced by a qualied
repair person using only identical replacement
parts. This will ensure that the safety of the power
tool is maintained.
6. Recommendation
We recommend that the tool always be supplied via
residual curtrent device with a rated residual current of 30
mA or less.
2. Additional Safety Rules
Hold the equipment by the insulated handles
when carrying out work during which the screw
or the plug-in tool could strike concealed power
cables. Contact with a live cable may also make
the metal parts of the equipment live and cause
an electric shock.
We pay a great deal of attention to the design
of every battery pack to ensure that we supply
you with batteries which feature maximum
power density, durability and safety. The battery
cells have a wide range of safety devices. Each
individual cell is initially formatted and its
electrical characteristic curves are recorded.
This data is then used exclusively to be able to
assemble the best possible battery packs. Despite
all the safety precautions, caution must always be
exercised when handling batteries. The following
points must be obeyed at all times to ensure safe
use.
Safe use can only be guaranteed if undamaged
cells are used. Incorrect handling can cause cell
damage.
Important! Analyses confirm that incorrect use
and poor care are the main causes of the damage
caused by high performance batteries.
Information about the battery
1. The battery pack supplied with your cordless
tool is not charged. The battery pack has to
be charged before you use the tool for the
first time.
2. For optimum battery performance avoid low
discharge cycles. Charge the battery pack
frequently.
3. Store the battery pack in a cool place, ideally
at 15°C and charged to at least 40%.
4. Lithium-ion batteries are subject to a natural
ageing process. The battery pack must be
replaced at the latest when its capacity
falls to just 80% of its capacity when new.
Weakened cells in an aged battery pack are
no longer capable of meeting the high power
requirements and therefore pose a safety
risk.
5. Do not throw battery packs into an open fire.
There is a risk of explosion!
6. Do not ignite the battery pack or expose it
to fire.
7. Do not exhaustively discharge batteries.
Exhaustive discharge will damage the battery
cells. The most common cause of exhaustive
discharge is lengthy storage or non-use of
partly discharged batteries. Stop working
as soon as the performance of the battery
falls noticeably or the electronic protection
system triggers. Place the battery pack in
storage only after it has been fully charged.
8. Protect batteries and the tool from
overloads. Overloads will quickly result in
overheating and cell damage inside the
battery housing without this overheating
actually being apparent externally.
9. Avoid damage and shocks. Replace batteries
which have been dropped from a height of
more than one meter or which have been
exposed to violent shocks without delay,
even if the housing of the battery pack
appears to be undamaged. The battery cells
inside the battery may have suffered serious
damage. In this respect, please also read the
waste disposal information.
10. If the battery pack suffers overloading and
overheating, the integrated protective cut-
off will switch off the equipment for safety
reasons. Important! Do not press the ON/
OFF switch any more if the protective cut-off
has actuated. This may damage the battery
pack.
11. Use only original battery packs. The use
of other batteries may result in injuries,
explosion and a fire risk.
Information on chargers and the charging
process
1. Please check the data marked on the rating
plate of the battery charger. Be sure to
connect the battery charger to a power
supply with the voltage marked on the rating
plate. Never connect it to a different mains
voltage.
2. Protect the battery charger and its cable
from damage and sharp edges. Have
damaged cables repaired without delay by a
qualified electrician.
3. Keep the battery charger, batteries and the
cordless tool out of children’s reach.
4. Do not use damaged battery chargers.
5. Do not use the supplied battery charger to
charge other cordless tools.
6. In heavy use the battery pack will become
warm. Allow the battery pack to cool to
room temperature before commencing with
the charging.
6

m
7. Do not over-charge batteries. Do not
exceed the maximum charging times. These
charging times only apply to discharged
batteries. Frequent insertion of a charged
or partly charged battery pack will result in
overcharging and cell damage. Do not leave
batteries in the charger for days on end.
8. Never use or charge batteries if you suspect
that the last time they were charged was
more than 12 months previously. There is
a high probability that the battery pack
has already suffered dangerous damage
(exhaustive discharge).
9. Charging batteries at a temperature below
10°C will cause chemical damage to the cell
and may cause a fire.
10. Do not use batteries which have heated
during the charging process, as the battery
cells may have suffered dangerous damage.
11. Do not use batteries which have suffered
curvature or deformation during the charging
process or which show other non-typical
symptoms (gassing, hissing, cracking,…)
12. Never fully discharge the battery pack
(recommended depth of discharge max.
80%) A complete discharge of the battery
pack will lead to premature ageing of the
battery cells.
13. Never charge the batteries unsupervised.
Protection from environmental influences
1. Wear suitable work clothes. Wear safety
goggles.
2. Protect your cordless tool and the battery
charger from moisture and rain. Moisture and
rain can cause dangerous cell damage.
3. Do not use the cordless tool or the battery
charger near vapors and inflammable liquids.
4. Use the battery charger and cordless tools
only in dry conditions and an ambient
temperature of 10-40°C.
5. Do not keep the battery charger in places
where the temperature is likely to reach over
40°C. In particular, do not leave the battery
charger in a car that is parked in the sun.
6. Protect batteries from overheating.
Overloads, over-charging and exposure to
direct sunlight will result in overheating and
cell damage. Never charge or work with
batteries which have been overheated –
replace them immediately if possible.
7. Storage of batteries, battery chargers and
cordless tools. Store the charger and your
cordless tool only in dry places with an
ambient temperature of 10-40°C. Store your
lithium-ion battery pack in a cool, dry place
at a temperature of 10-20°C. Protect them
from humidity and direct sunlight. Only place
fully charged batteries in storage (charged to
at least 40%).
8. Prevent the lithium-ion battery pack from
freezing. Battery packs which were stored
below 0°C for more than 60 minutes must be
disposed of.
9. When handling batteries be aware of
electrostatic discharge: Electrostatic
discharges cause damage of the electronic
protection system and the battery cells.
Avoid electrostatic charging and never touch
the battery poles.
Important!
When using equipment, a few safety precautions
must be observed to avoid injuries and damage.
Please read the complete operating manual with
due care. Keep this manual in a safe place, so that
the information is available at all times. If you give
the equipment to any other person, give them
these operating instructions as well.
We accept no liability for damage or accidents
which arise due to non-observance of these
instructions and the safety information.
3. Layout (Fig. 1)
1. Torque selector
2. Forward / Reverse switch
3. ON/OFF switch
4. Battery pack
5. Pushlock button
6. Selector switch for 1st gear or 2nd gear
7. Keyless chuck
8. Battery charger
9. Battery capacity indicator
10. Switch for battery capacity indicator
11. LED light
4. Proper use
The tool is designed for tightening and undoing screws,
as well as for drilling in wood, metal and plastic.
The machine is to be used only for its prescribed
purpose. Any other use is deemed to be a case of
misuse. The user / operator and not the manufacturer will
be liable for any damage or injuries of any kind caused as
a result of this.
Please note that our equipment has not been
designed for use in commercial, trade or industrial
applications. Our warranty will be voided if the
machine is used in commercial, trade or industrial
businesses or for equivalent purposes.
7
5. Technical data
Voltage supply 18 V d.c.
Idling speed 0-350/0-1200 rpm
Torque settings 19 + 1
Forward and reverse rotation yes
Chuck capacity max. 10 mm
Battery charging voltage 14.4–18V d.c.
Battery charging current 1500 mA
Mains voltage for charger 230–240 V ~ 50–60
Hz
Weight 1.7 kg
Max. screw diameter 6 mm
Sound and vibration
Sound and vibration values were measured in
accordance with EN 60745.
LpA sound pressure level 72 dB(A)
KpA uncertainty 3 dB
LWA sound power level 83 dB(A)
KWA uncertainty 3 dB
Wear ear-muffs.
The impact of noise can cause damage to hearing.
Total vibration values (vector sum of three directions)
determined in accordance with EN 60745.
Total vibration values (vector sum of three directions)
determined in accordance with EN 60745.
Drilling in metal.
Vibration emission value ah≤ 2.5 m/s2
K uncertainty = 1.5 m/s2
Screwing without hammer action
Vibration emission value ah≤ 2.5 m/s2
K uncertainty = 1.5 m/s2
Additional information for power tools.
Warning!
The specied vibration value was established in
accordance with a standardised testing method. It may
change according to how the electric equipment is
used and may exceed the specied value in exceptional
circumstances.
The specied vibration value can be used to compare
the equipment with other electric power tools.
The specied vibration value can be used for initial
assessment of a harmful effect.
Keep the noise emissions and vibrations to a
minimum.
• Only use appliances which are in perfect working
order.
• Clean the tool regularly.
• Adapt your working style to suit the tool.
• Do not overload the tool.
• Switch the tool off when it is not in use.
• Wear protective safety equipment.
Residual risks.
Even if you use this power tool in accordance with
instructions, certain residual risks cannot be ruled out.
The following hazards may arise in connection with the
equipment’s construction and layout:
1. Lung damage if no suitable protective dust mask
is used.
2. Damage to hearing if no suitable ear protection is
used.
3. Health damage caused by hand-arm vibrations if
the equipment is used over a prolonged period or is
not properly guided and maintained.
6. Before starting the equipment
Be sure to read the following information before you
use your tool for the rst time:
1. Charge the battery pack with the charger supplied.
An empty battery pack requires a charging period of
approximately 1 hour.
2. Only ever use sharp drill bits and screwdriver bits
which are suitable for the purpose and in faultless
condition.
3. Always check for concealed electric cables and gas
and water pipes when drilling and screwing in walls.
7. Operation
7.1 Charging the LI battery pack (Fig. 2/3)
The battery is protected from exhaustive discharge.
An integrated protective circuit automatically switches off
the equipment when the battery is at. In this case the
chuck will cease to turn.
Warning! Do not press the ON/OFF switch any more
if the protective circuit has actuated. This may damage
the battery.
1. Remove the battery pack (4) from the handle,
pressing the pushlock button (5) downwards to do
so.
2. Check that your mains voltage is the same as that
marked on the rating plate of the battery charger.
(230V - 240V). Plug the mains plug of the charger
(8) into the mains socket outlet.
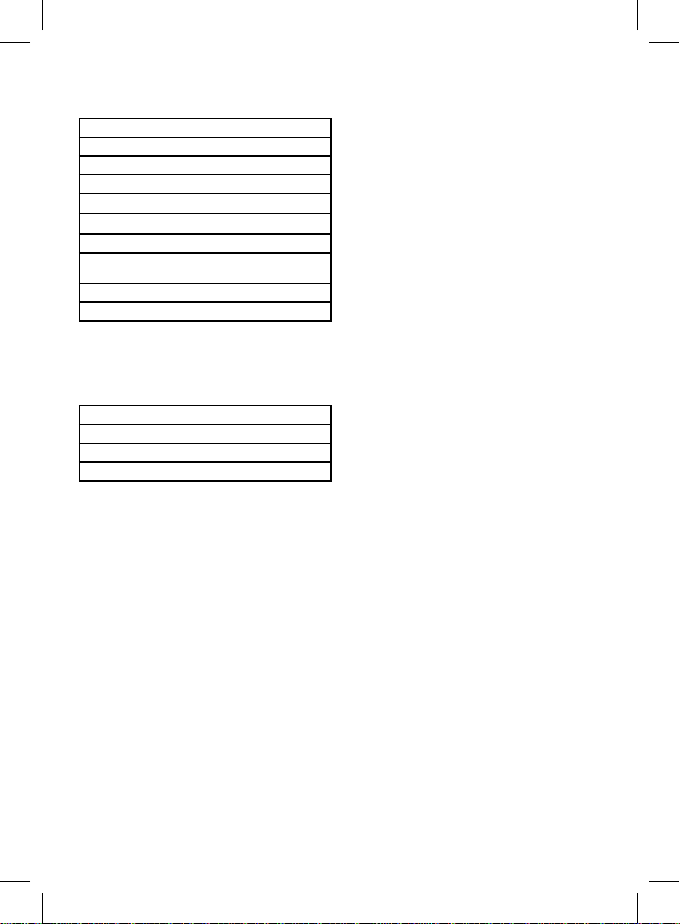
8

Indicator status Explanations and actions
Red Green
LED LED
OFF Flashing Ready for use
The charger is connected to the
mains and is ready for use; there is no
battery pack in the charger
ON OFF Charging
The charger is charging the battery
pack in quick charge mode.
OFF ON The battery pack is fully charged
(charging completed)
Action: Take the battery pack out of
the charger. Disconnect the charger
from the mains supply.
Flashing OFF Adapted charging
The charger is in gentle charging
mode. For safety reasons the charg-
ing is performed less quickly and
takes more than 1 hour. The reasons
can be:
• The battery pack has not been used
for a very long time or an already
at battery was further discharged
(exhaustive discharge)
• The battery pack temperature is
10°C and 45°C).
Action: Wait for the charging to be
completed; you can still continue to
charge the battery pack.
Flashing Flashing Fault
Charging is no longer possible.The
battery pack is defective.
Action: Never charge a defective bat-
tery pack. Take the battery pack out of
the charger.
ON ON Temperature fault
The battery pack is too hot (e.g. due
to direct sunshine) or too cold (below
0°C).
Action: Remove the battery pack and
keep it at room temperature (approx.
20°C) for one day.
Important!
At temperatures below 0°C the battery will not be
charged.
If the battery pack fails to become charged, please check
• whether there is voltage at the socket-outlet
• whether there is good contact at the charging
contacts of the battery charger (8)
If the battery still fails to become charged, please call our
After Sales Support number 1300 922 271.
To ensure that the Li battery pack provides long service
you should take care to recharge it promptly.You must
recharge the battery pack when you notice that the power
of the tool drops.
7.2 Torque setting (Fig. 4)
The tool is tted with a mechanical torque selector.
The torque for a specic size of screw is selected
with the torque selector (1). The correct torque depends
on several factors:
• On the type and hardness of material in question.
• On the type and length screws used.
• On the requirements needing to be met by the
screwed joint.
The clutch disengages the chuck by preventing rotation,
therefore indicates when the set torque is reached.
Important! The tool must be at a standstill when
you set the torque with the setting ring.
7.3 Drilling
For drilling purposes, move the torque selector
(Fig. 4/Item 1) to the last step “Drill“. In this setting the slip
clutch is inactive. The maximum torque is available in
drilling mode.
7.4 Forward/Reverse switch (Fig. 5 )
With the forward / reverse switch (2) you can select the
direction of rotation of the tool. You can choose between
clockwise and counter clockwise rotation. To avoid
causing damage to the gearing it is advisable to
change the direction of rotation only when the tool is at
a standstill. The On/Off switch (3) is blocked when the
forward / reverse switch (2) is in centre position. This
protects the tool against being switched on accidently.
7.5 On/Off switch (Fig. 5)
Innitely variable speed control is possible with the
On/Off switch (3). The further you press the switch, the
higher the speed.
7.6 Battery capacity indicator (Fig. 4)
Press the switch for the battery capacity indicator (10).
The battery capacity indicator (9) indicates the charge
state of the battery on 3 colored LEDs.
All LEDs illuminate:
The battery is fully charged.
The yellow and red LED illuminate:
The battery has an adequate remaining charge.
Red LED illuminates:
The battery is empty, recharge the battery.
7.7 Changing the accessory (Fig. 6)
Important! Set the forward / reverse switch (Fig. 5/Item
2) to its centre position whenever you carry out any work
(for example changing the accessory, maintenance work,
etc.) on the tool.
• The tool is tted with a chuck (7) with an automatic
spindle stop.
• Open the chuck (7) by rotating it counter-clockwise.
The chuck opening (a) must be large enough to
hold the tool (drill bit or screwdriver bit).
• Select the suitable accessory. Place the accessory
into the chuck opening (a).
• Tighten the chuck (7) by rotating it clockwise and
then check that the tool is secure. 9

7.8 Screwdriving
We recommend using self-centering screws (e.g. Torx
screws, recessed head screws) designed for reliable
working. Be sure to use a bit that matches the screw in
shape and size. Set the torque as per Section 7.2 of the
user guide.
7.9 Selecting 1st gear or 2nd gear (Fig. 4)
By adjusting the selector switch (6), you can work with a
faster or slower turning speed. Change the gear only
when the drill is at a standstill. If you fail to observe this
point, the gearing may be damaged.
7.10 LED lamp (Fig. 2)
The LED lamp (11) can be used in poor lighting
conditions to illuminate the area where you want to
drill or screw. The LED lamp (11) will be lit automatically
as soon as you press the ON/OFF switch (Fig. 1/Item 3).
8. Cleaning, maintenance and
ordering of spare parts
Always pull out the mains power plug before starting
any cleaning work.
8.1 Cleaning
Keep all safety devices, air vents and the motor housing
free of dirt and dust as far as possible. Wipe the tool
with a clean cloth or blow it with compressed air at low
pressure.
We recommend that you clean the tool immediately each
time you have nished using it. Clean the tool regularly
with a moist cloth and some soft soap. Do not use
cleaning agents or solvents; these could attack the plastic
parts of the tool. Ensure that no water can seep
into the tool.
8.2 Maintenance
There are no parts inside the equipment which
require additional maintenance.
8.3 Ordering Spare Parts
Contact our After Sales Support on 1300 922 271 and
quote the following data when ordering replacement
parts:
• Type of machine
• Article number of the machine
• Identication number of the machine
• Replacement part number of the part required
9. Disposal and recycling
The unit is supplied in packaging to prevent its being
damaged in transit. This packaging is raw material
and can therefore be reused or can be returned to
the raw material system.
The unit and its accessories are made of various
types of material, such as metal and plastic.
Defective components must be disposed of as
special waste.
10. Disposal of batteries
Batteries contain substances that can be harmful to the
environment. Never place batteries in your household
refuse, in re or in water. Batteries should
be collected, recycled or disposed of in an
environmentally friendly way. Seek advice on correct
disposal from local waste authorities or your local council.
10

Anleitung_BT_CD_18_1_Li_SPK1:_ 10.03.2010 15:35 Uhr Seite 71
The guarantee provided in this Guarantee Certificate is given by Einhell Australia Pty Limited
ACN 134 632 858 of 6/166 Wellington Street, Collingwood, Victoria (Telephone number 1300 922 271)
GUARANTEE
CERTIFICATE
EINHELL AUSTRALIA PTY LTD
6/166 Wellington Street
Collingwood VIC 3066
Australia
Phone: 1300 922 271
Dear
Customer,
All of our products undergo strict quality checks. In the unlikely event that your device develops a fault, please
contact our service department at the address shown on this guarantee certificate. Of course, if you would
prefer to call us then we are also happy to offer our assistance under the service number printed below.
Please note the following terms under which claims under the Einhell Express Guarantee can be made:
1. The benefits conferred by the Einhell Express Guarantee are in addition to all rights and remedies which
you may be entitled to under the Australian Consumer Law, and any other statutory rights you may have
under other applicable laws. This Einhell Express Guarantee does not exclude, restrict or modify any
We do not charge you for the Einhell Express Guarantee.
2. Our goods come with guarantees that cannot be excluded under the Australian Consumer Law. You are
entitled to a replacement or refund for a major failure and for compensation for any other reasonably
foreseeable loss or damage. You are also entitled to have the goods repaired or replaced if the goods
fail to be of acceptable quality and the failure does not amount to a major failure.
3. The Einhell Express Guarantee only covers problems caused by material or manufacturing defects, and
our liability under the Einhell Express Guarantee is limited, at our discretion, to the rectification of these
defects or replacement of the product. Please note that the product has not been designed for use in
commercial, trade or industrial applications. Consequently, the Einhell Express Guarantee will not apply
if the product is used in commercial, trade or industrial applications or for other equivalent activities.
4. The following are also excluded from the Einhell Express Guarantee: compensation for transport
damage, damage caused by failure to comply with the installation/assembly instructions or damage
caused by unprofessional installation, failure to comply with the operating instructions (e.g. connection to
the wrong mains voltage or current type), misuse or inappropriate use (such as overloading of the
product or use of non-approved tools or accessories), failure to comply with the maintenance and safety
regulations, ingress of foreign bodies into the product (e.g. sand, stones or dust), effects of force or
external influences (e.g. damage caused by the product being dropped) and normal wear resulting from
proper operation of the product. The Einhell Express Guarantee will also not apply if any attempt is made
5. The Einhell Express Guarantee is valid for a period of 2 years starting from the purchase date of the
product. Claims made under the Einhell Express Guarantee should be submitted before the end of this
guarantee period and within two weeks of the defect being noticed. No claims under the Einhell Expres
Guarantee will be accepted if submitted after the end of this guarantee period. The original guarantee
period remains applicable to the device even if repairs are carried out or parts are replaced. In such
cases, the work performed or parts fitted will not result in an extension of the guarantee period for the
Einhell Express Guarantee, and the Einhell Express Guarantee will not apply for the work performed or
6. To make a claim under the Einhell Express Guarantee, please send the relevant product postage-free
the address shown below and enclose either the original or a copy of your sales receipt or another date
proof of purchase. It would help us if you could describe the nature of the problem in as much detail as
possible. If the defect is covered by the Einhell Express Guarantee, your product will be repaired
immediately and returned to you, or we will send you a new device (at our election).
Any costs incurred by you in making a claim under this Einhell Express Guarantee, unless specified
otherwise in this guarantee certificate, must be borne by you.
Of course, we are also happy to offer a chargeable repair service for any defects which are not covered by the
scope of the Einhell Express Guarantee or for products which are no longer covered by the Einhell Express
Guarantee. To take advantage of this service, please send the product to our service address.
such rights or remedies.
to tamper with the product.
parts fitted. This also applies when an on-site service is used.
(Einhell Express Guarantee).

EH05/2013(01)
This manual suits for next models
1
Table of contents
Other Bavaria Power Screwdriver manuals


