manuals.online logo
Brands
  1. Home
  2. •
  3. Brands
  4. •
  5. Hertz
  6. •
  7. Subwoofer
  8. •
  9. Hertz SPL Show ST 25K Neo User manual

Hertz SPL Show ST 25K Neo User manual

Other manuals for SPL Show ST 25K Neo

1

This manual suits for next models

11

Other Hertz Subwoofer manuals

Hertz Cento Series User manual

Hertz

Hertz Cento Series User manual

Hertz SPL Monster M12 Setup guide

Hertz

Hertz SPL Monster M12 Setup guide

Hertz Dieci Series Setup guide

Hertz

Hertz Dieci Series Setup guide

Hertz DBA 200.3 User manual

Hertz

Hertz DBA 200.3 User manual

Hertz SX 250D Setup guide

Hertz

Hertz SX 250D Setup guide

Hertz ES 380 User manual

Hertz

Hertz ES 380 User manual

Hertz ES 200 Setup guide

Hertz

Hertz ES 200 Setup guide

Hertz Cento User manual

Hertz

Hertz Cento User manual

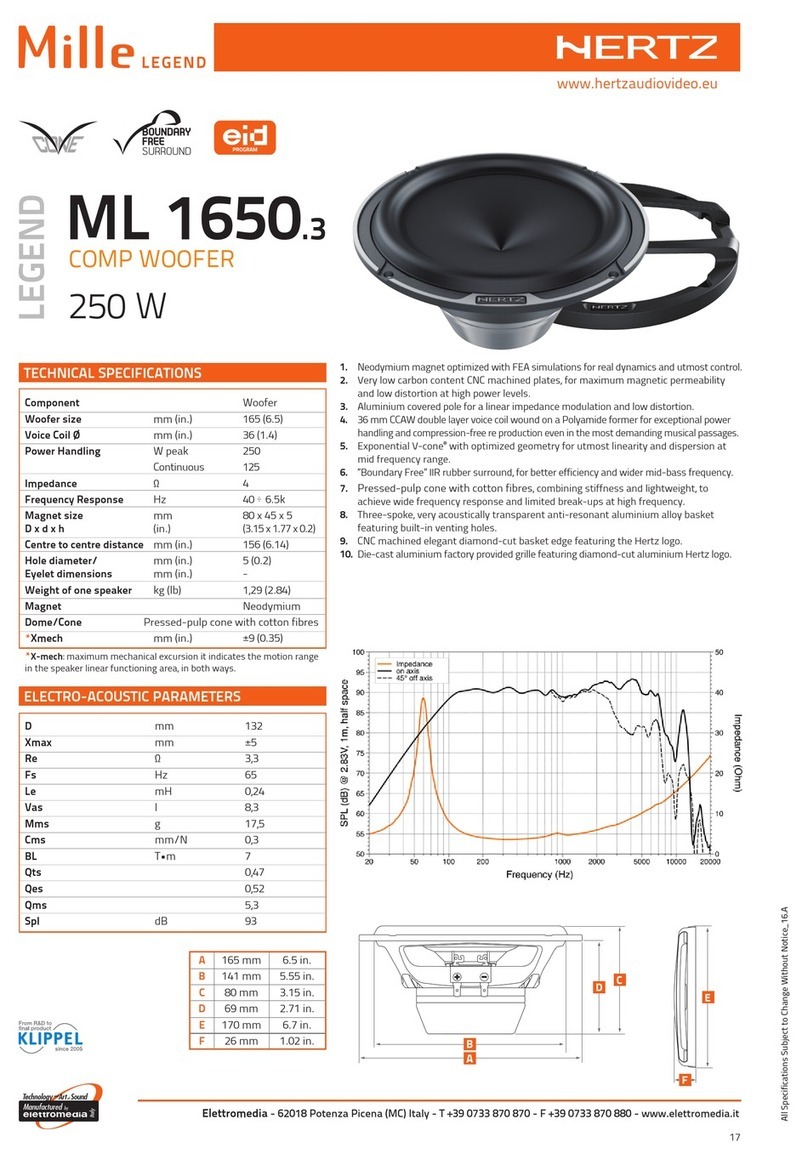
Hertz Mille LEGEND ML 1650.3 User manual

Hertz

Hertz Mille LEGEND ML 1650.3 User manual

Hertz EBX F20.5 User manual

Hertz

Hertz EBX F20.5 User manual

Hertz HX 200 User manual

Hertz

Hertz HX 200 User manual

Hertz HX 250; HX 250 D; HX 300; HX 380; HX 300 D*; HX 380... Setup guide

Hertz

Hertz HX 250; HX 250 D; HX 300; HX 380; HX 300 D*; HX 380... Setup guide

Hertz HX 300.5 SUB COMP User manual

Hertz

Hertz HX 300.5 SUB COMP User manual

Hertz HX 200 User manual

Hertz

Hertz HX 200 User manual

Hertz UNO S 300 S4 User manual

Hertz

Hertz UNO S 300 S4 User manual

Hertz MILLE ML2500 User manual

Hertz

Hertz MILLE ML2500 User manual

Hertz MILLE ML2500 User manual

Hertz

Hertz MILLE ML2500 User manual

Hertz diECi User manual

Hertz

Hertz diECi User manual

Popular Subwoofer manuals by other brands

Extron electronics SF 8CT SUB user guide

Extron electronics

Extron electronics SF 8CT SUB user guide

SVS PB-4000 quick start guide

SVS

SVS PB-4000 quick start guide

Pioneer S-DVR9SW Service manual

Pioneer

Pioneer S-DVR9SW Service manual

Yamaha YST-SW515 Service manual

Yamaha

Yamaha YST-SW515 Service manual

Velodyne SPL-800 ULTRA - REV B datasheet

Velodyne

Velodyne SPL-800 ULTRA - REV B datasheet

Teufel US 2110/1 SW operating instructions

Teufel

Teufel US 2110/1 SW operating instructions

Wet Sounds SS-65 user manual

Wet Sounds

Wet Sounds SS-65 user manual

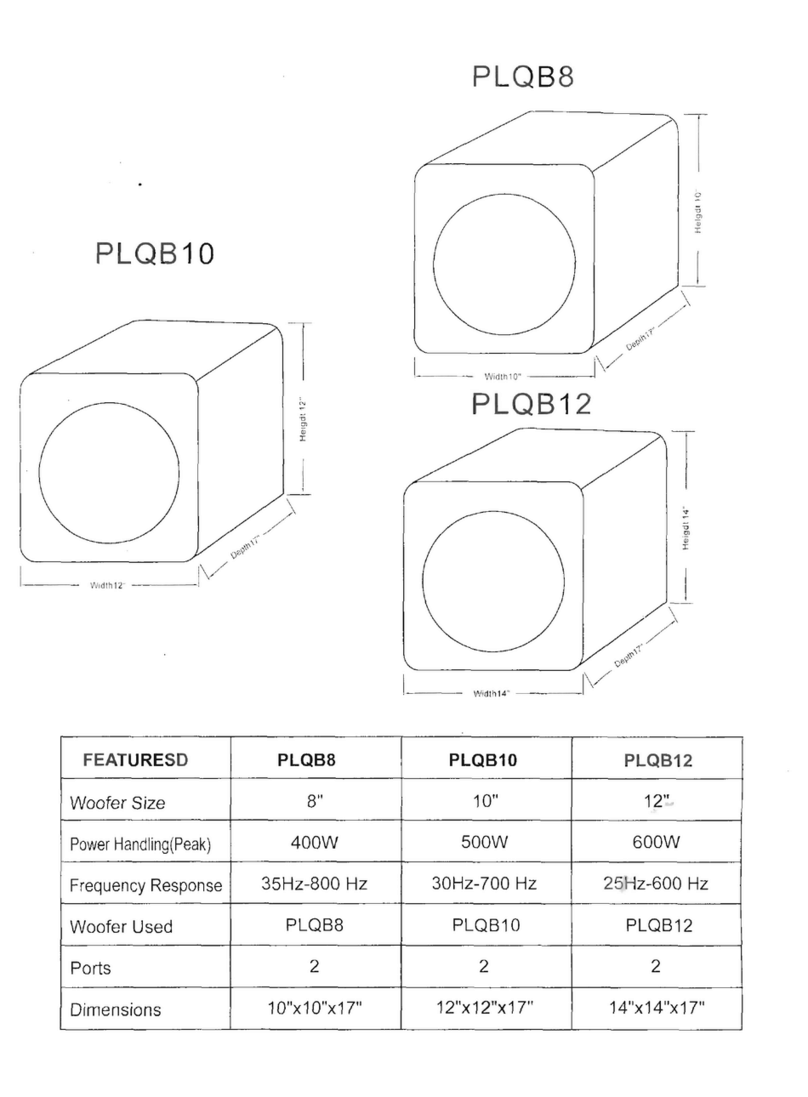
Pyle PLQB10 Specifications

Pyle

Pyle PLQB10 Specifications

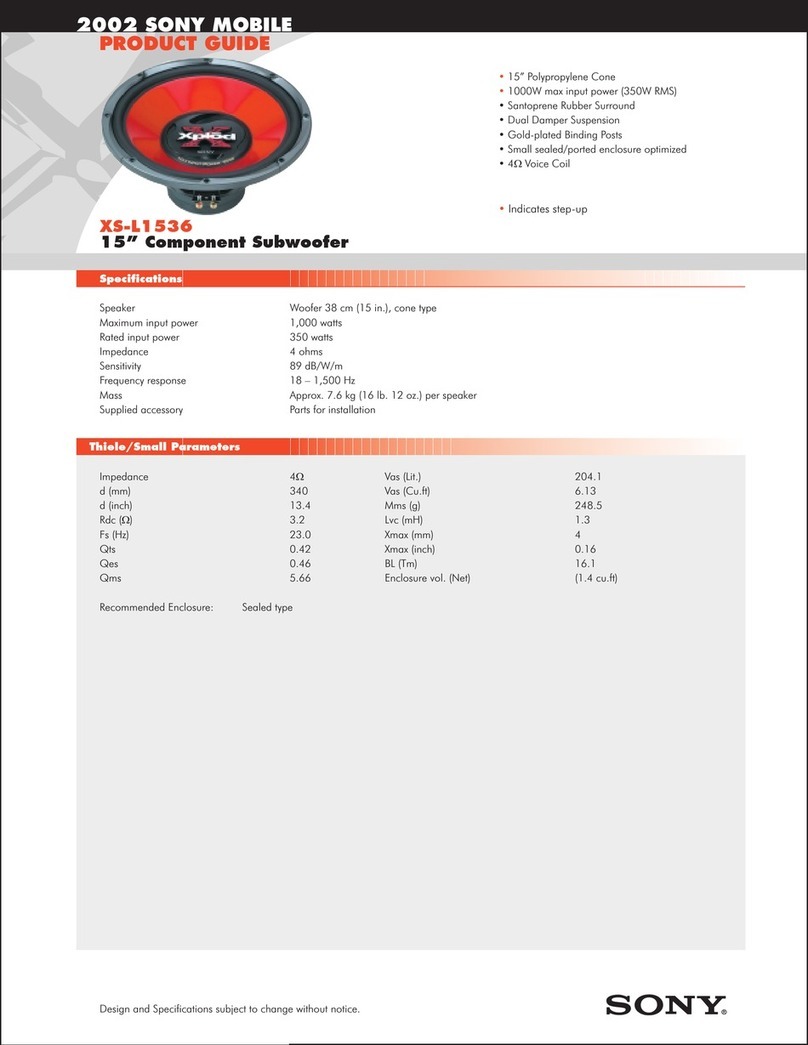
Sony XS-L1536 Product guide

Sony

Sony XS-L1536 Product guide

Sony XS-AW8 operating instructions

Sony

Sony XS-AW8 operating instructions

B&C Speakers 15 HPL 76W Specifications

B&C Speakers

B&C Speakers 15 HPL 76W Specifications

Velodyne DD-18+ Specifications

Velodyne

Velodyne DD-18+ Specifications

Sonance Cinema Series SUB 10-150 Specifications

Sonance

Sonance Cinema Series SUB 10-150 Specifications

Hifonics HW-12 Owners & installation manual

Hifonics

Hifonics HW-12 Owners & installation manual

Yamaha 64263 owner's manual

Yamaha

Yamaha 64263 owner's manual

Magnat Audio ADR 130 BP user manual

Magnat Audio

Magnat Audio ADR 130 BP user manual

Technics SB-AS500 Operaing instructions

Technics

Technics SB-AS500 Operaing instructions

Lyngdorf BW-2 owner's manual

Lyngdorf

Lyngdorf BW-2 owner's manual

manuals.online logo
manuals.online logoBrands
  • About & Mission
  • Contact us
  • Privacy Policy
  • Terms and Conditions

Copyright 2025 Manuals.Online. All Rights Reserved.

hertzaudiovideo.com
OWNER’S MANUAL
Comp
10
English / English
Congratulations on purchasing our product. Your satisfaction is the first requirement
that our products must meet: the same satisfaction as the one gained by those who
long for experiencing the car audio emotion. This manual has been drawn to provide
the main instructions required to install and use the system properly. However,
the range of possible applications is wide; for further information, please feel free
to contact your trusted dealer or our technical support at the email support@
elettromedia.it Before installing the components, please carefully read all of the
instructions contained in this manual. Failure to respect these instructions may
cause unintentional harm or damage to the product.
1. All components must be firmly secured to the vehicle structure. Do the same
when installing any custom structures you may have built. Confirm your installation
is solid and safe. A component coming loose while driving may cause serious
damage to the passengers, as well as to other vehicles.
2. Always wear protective eyewear when using tools, as splints or product residue
may become airborne.
3. In order to avoid incidental damage, keep the product in the original packaging
until you are ready for the final installation.
4. Do not carry out any installation inside the engine compartment.
5. Before starting with the installation turn the head unit and all other audio
system devices off, avoiding any possible damage.
6. Make sure that the location you choose to install the components does not
interfere with the normal operation of any mechanical or electrical devices of
the vehicle.
7. Do not install loudspeakers where they may be exposed to water, excessive
humidity, dust or dirt.
8. Do not install the tweeter without the protective grille.
9. Do not install the components or make cable run close to electronic or mechanical
devices of the vehicle.
10. Be very cautious when drilling or cutting into the vehicle chassis, making sure
there are no cables or structural elements essential to the vehicle underneath
or in the selected area.
11. When routing cables, make sure that the cable does not come in contact with
sharp edges or near moving mechanical devices. Make sure that it is firmly
attached and protected along its entire length and its insulation is self-extinguishing.
12. Only use cables with the proper section (AWG) indicated herein.
13. When running the cable through a hole in the vehicles chassis, protect the
cable with a rubber ring (grommet). Be sure to provide proper protection for
cables running close to heat-generating devices.
14. Do not run the wires outside of the vehicle.
15. Use top quality cables, connectors and accessories such as found in the
Connection catalogue.
16. Warranty certificate: For more information visit the Hertz website.
SAFE SOUND
USE COMMON SENSE AND PRACTICE SAFE SOUND. PLEASE REMEMBER THAT
LONG EXPOSURE TO EXCESSIVELY HIGH SOUND PRESSURE LEVELS MAY DAMAGE
YOUR HEARING. SAFETY MUST BE AT THE FOREFRONT WHILE DRIVING.
Information on electrical and electronic equipment waste (for those European countries which
organize the separate collection of waste)
Products which are marked with a wheeled bin with an X through it can not be disposed
of together with ordinary domestic waste. These electrical and electronic products must
be recycled in proper facilities, capable of managing the disposal of these products and
components. In order to know where and how to deliver these products to the nearest
recycling/disposal site please contact your local municipal office. Recycling and disposing
of waste in a proper way contributes to the protection of the environment and to prevent
harmful effects on health.

36
Продукция Hertz обладает гарантией в течение уставленного текущими
законамисрока,принормальныхусловияхиспользования,еслионавызвана
дефектами материалов или их производства. Гарантия действительна с
датыпокупки,подтвержденнойчеком.Гарантиянедействительнавследующих
случаях:
• продуктповрежденврезультатеинцидентов,некасающимсяматериаловили
  производственныхдефектов;
• продуктизмененилифальсифицированнеуполномоченнымилицами;
• егосерийныйномеризмененилистерт.
Еслинапродуктраспространяетсягарантия,егопроизводительпринимает
решение о ремонте или замене его неисправных деталей. Неисправный
продукт необходимо передать распространителю, где он был куплен,
предъявивполностьюзаполненныйгарантийныйсертификат.Вслучаеесли
гарантиябольшенераспространяетсянапродукт,онбудетотремонтирован
потекущейстоимости.Мынепринимаемнасебяобязательства,связанныес
повреждениямивследствиетранспортировки.Мыненесемответственности
за: расходы или потеря прибылей вследствие невозможности пользования
даннымпродуктом,прочиеслучайныеиливозможныеиздержки,расходыили
повреждения,покрытыеклиентом.Гарантиявсоответствиисдействующим
законодательством.
Гарантия Hertz
The Hertz products are warranted, under normal functioning
conditions, for the period of time as set by the laws in force, against
defects concerning materials or their manufacturing. The warranty is
valid from the date of purchase, certified by receipt.
The warranty is not valid if:
• the product is damaged by incidents, installations and/or improper
use,
or by any other causes not depending on materials or manufacturing
defects;
• the product is modified or tampered with by unauthorised people;
• its serial number has been altered or cancelled.
While the product is under warranty, defective parts will be repaired or
replaced at the manufacturer’s discretion.
The defective product, along with notification about it, must be
returned to the dealer from which it was purchased together with
the warranty certificate duly filled in. If the product is no longer under
warranty, it will be repaired at the current costs.
Elettromedia s.r.l. does not undertake any liability for damages due to
transportation.
Elettromedia s.r.l. does not take any responsibility for: costs or loss of
profit due to the impossibility to use the product, other accidental or
consequential costs, expenses or damages suffered by the customer.
Warranty according to laws in force.
For more information visit the Hertz website.
Hertz Warranty
37
Owner’s Manual
/ Съдържание на опаковката /包裝內容 /内装物/
Sadržaj pakiranja /Obsah balení / Pakkens indhold /Pakket inhoud
/Packaging contents / Pakendi sisu / Pakkauksen sisältö /Contenu de
l’emballage / Verpackungsinhalt / Περιεχόμενα συσκευασίας /
/A csomag tartalma /Isi kemasan / Contenuto dell’imballo /パッケー
ジ内容/패키지내용/Lepakojuma saturs / Pakuotės turinys /Innhold
// Zawartość opakowania / Conteúdo da embalagem /
Conținutul pachetului /Комплектация /Obsah balenia /Vsebina
embalaže / Contenido del embalaje /Förpackningens innehåll /ส่วน
ประกอบผลิตภัณฑ /Paket içeriği
ST 25K Neo ST 25A Neo SV 165.1
SV 200.1SV 200 Neo
SV 200L.1SV 250.1
SV 165 Neo
SX 165 Neo
SX 690 Neo
STG 25.2
Wrench Wrench
STX 25.2
38
/ Размер / 尺寸 /规格 /Veličina /Velikost /Størrelse
/Afmetingen / Size /Suurus / Koko / Dimensions / Größe /
Διαστάσεις / / Méretek / Ukuran / Ingombro / サイズ
/크기 /Izmērs /Dydis / Størrelse / / Wielkość /Dimensão
/ Dimensiuni / Размер /Rozmery /Velikost /Tamaño /Storlek /
ขนาด /Ebat
ST 25K Neo / ST 25A Neo
A
B
D
C
A B C D E
ST 25K Neo
ST 25A Neo
57 43,5 55,5 29,7 - mm
2.24 1.71 2.19 1.17 - in.
STG 25 Neo 57 - - - 13,1 mm
2.24 - - - o.52 in.
A E
400 mm /15.75 in. 800 mm /31.5 in.
STX 25.2
ST 25K Neo /ST 25A Neo
39
Owner’s Manual
Ring 1
L-key for tightening (not included)
Ring 2
Rubber
gasket
/ Монтаж / 安裝/安装 /Montaža / Montáž / Montering /
Montage / Mounting / Paigaldamine / Kiinnitys / Montage / Montage
/ Τοποθέτηση / / Beszerelés /Pemasangan / Montaggio /
マウント /마운트 /Uzstādīšana / Montavimas / Montering /
/ Montaż / Montagem / Montaj / Монтаж /Montáž / Namestitev /
Montaje / Montering / การใส่ลำาโพง /Montaj
ST 25K Neo /ST 25A Neo
40
Ring 1
STG 25.2
Rubber
gasket
L-key for tightening (not included)
ST 25K Neo +STG 25.2
41
Owner’s Manual
/ Предложени дължина и ъгъл / 建議長
度和角度 /建议长度及角度 /Preporučena duljina i kut nagiba /
Požadovaná délka a úhel / Foreslået længde og vinkel /Voorgestelde
lengte en hoek /Suggested Length and Angle /Soovitatav pikkus ja
nurk /Suositeltu pituus ja kulma /Longueur et angle recommandés
/Empfohlene
Länge und Winkel / Προτεινόμενο μήκος και γωνία
//Javasolt hossz és
szög /Panjang dan sudut
terbaik / Distanze e angolazione suggeriti /長さ・角度案 /권장
길이및앵글 / Ieteicamais garums un lenķis /Rekomenduojamas ilgis
ir pakreipimo kampas /Foreslått lengde og vinkel /
/Sugerowana długość i kąt /Sugestão de extensão e ângulo /
Distanța recomandată și unghiul de instalare /Рекомендуемое
расстояниеиуголустановки/Odporúčanádĺžkaa uhol/Predlagana
dolžina in nagib /Longitud y ángulo sugeridos / Föreslagen längd
och vinkel /ความยาวและมุมที่แนะนำา/Önerilen uzunluk ve açı
SV 165.1
SV 165 Neo
SV 200.1
SV 200 Neo
SV 200 L
SV 250.1
A = B
/ Свързвания / 連接 /连接 /Spajanje /Připojení /
Forbindelser / Verbindingen / Connections /Ühendused /Kytkennät
/Connexions /Verbindungen / Συνδέσεις / /Csatlakozók
/Sambungan /Connessioni /接続 /연결 /Savienojumi /Jungtys
/Tilkoblinger / /Połączenia / Ligações / Conectarea /
Подключения /Pripojenie /Vezave /Conexiones /Anslutningar /
การเชื่อมต่อ /Bağlantılar
OK
ST 25A/K Neo
ST 25K Neo
42
1. Disassembly
REPLACEMENT OF VOICE COIL GROUP
Broken
1.1 Remove
srews.
1.3 Remove broken
voice coil group
1.4 Replace with new
voice coil group
WARNING
1.2 Carefully separate
bottom from top
New
ST 25K Neo /ST 25A Neo
43
Owner’s Manual
2. Re-assembly
2.3 Replace
srews.
WARNING
WARNING
2.1 Carefully insert
new voice coil
group into bottom
+= 6.3mm
terminal
2.2 Place back in position
top cover on bottom.
Pay attention to again
screw movies.