BBK DV324S User manual

SERVICE MANUAL
ECHOVOL
DV324S

CONTENTS
1. SAFETY PRECAUTIONS 1
2. PREVENTION OF ELECTRO STATIC DISCHARGE(ESD)TO ELECTROSTATICALLY
SENSITIVE(ES)DEVICES 1
4. PREVERTION OF STATIC ELECTRICITY DISCHARGE 3
5. ASSEMBLING AND DISASSEMBLING THE MECHANISM UNIT 4
5.1 OPTICAL PICKUP UNIT EXPLOSED VIEW AND PART LIST 4
5.2 BRACKET EXPLOSED VIEW AND PART LIST
6
6. ELECTRICAL CONFIRMATION 8
6.1 VIDEO OUTPUT (LUMINANCE SIGNAL) CONFIRMATION 8
6.2 VIDEO OUTPUT(CHROMINANCE SIGNAL) CONFIRMATION 9
7. MPEG BOARD CHECK WAVEFORM 10
8. HY29LV800
11
9. SCHEMATIC & PCB WIRING DIAGRAM
22
10. SPARE PARTS LIST
8.1 IC42S16101 16
3. CONTROL BUTTON LOCATIONS AND EXPLANATIONS 2
5.3 MISCELLANEOUS 7
8.2 MT1389
37
19

1.1 GENERAL GUIDELINES
1. When servicing, observe the original lead dress. if a short circuit is found, replace all parts which have
been overheated or damaged by the short circuit.
2. After servicing, see to it that all the protective devices such as insulation barrier, insulation papers
shields are properly installed.
3. After servicing, make the following leakage current checks to prevent the customer from being exposed
to shock hazards.
Some semiconductor(solid state)devices can be damaged easily by static electricity. Such components
commonly are called Electrostatically Sensitive(ES)Devices. Examples of typical ES devices are integrated
circuits and some field-effect transistors and semiconductor chip components. The following techniques
should be used to help reduce the incidence of component damage caused by electro static discharge(ESD).
1. Immediately before handling any semiconductor component or semiconductor-equipped assembly, drain
off any ESD on your body by touching a known earth ground. Alternatively, obtain and wear a commercially
availabel discharging ESD wrist strap, which should be removed for potential shock reasons prior to
applying power to the unit under test.
2. After removing an electrical assembly equipped with ES devices,place the assembly on a conductive
surface such as alminum foil, to prevent electrostatic charge buildup or exposure of the assembly.
3. Use only a grounded-tip soldering iron to solder or unsolder ES devices.
4. Use only an anti-static solder removal device. Some solder removal devices not classified as anti-static
(ESD protected)can generate electrical charge sufficient to damage ES devices.
5. Do not use freon-propelled chemicals. These can generate electrical charges sufficient to damage ES
devices.
6. Do not remove a replacement ES device from its protective package until immediately before you are
ready to install it.(Most replacement ES devices are packaged with leads electrically shorted together by
conductive foam, alminum foil or comparable conductive material).
7. Immediately before removing the protective material from the leads of a replacement ES device, touch
the protective material to the chassis or circuit assembly into which the device will be installed.
Caution
Be sure no power is applied to the chassis or circuit, and observe all other safety precautions.
8. Minimize bodily motions when handling unpackaged replacement ES devices. (Otherwise harmless motion
such as the brushing together of your clothes fabric or the lifting of your foot from a carpeted floor can
generate static electricity(ESD).
notice (1885x323x2 tiff)
1. SAFETY PREAUTIONS
2.PREVENTION OF ELECTRO STATIC DISCHARGE(ESD)TO
ELECTROSTATICALLY SENSITIVE(ES)DEVICES
1

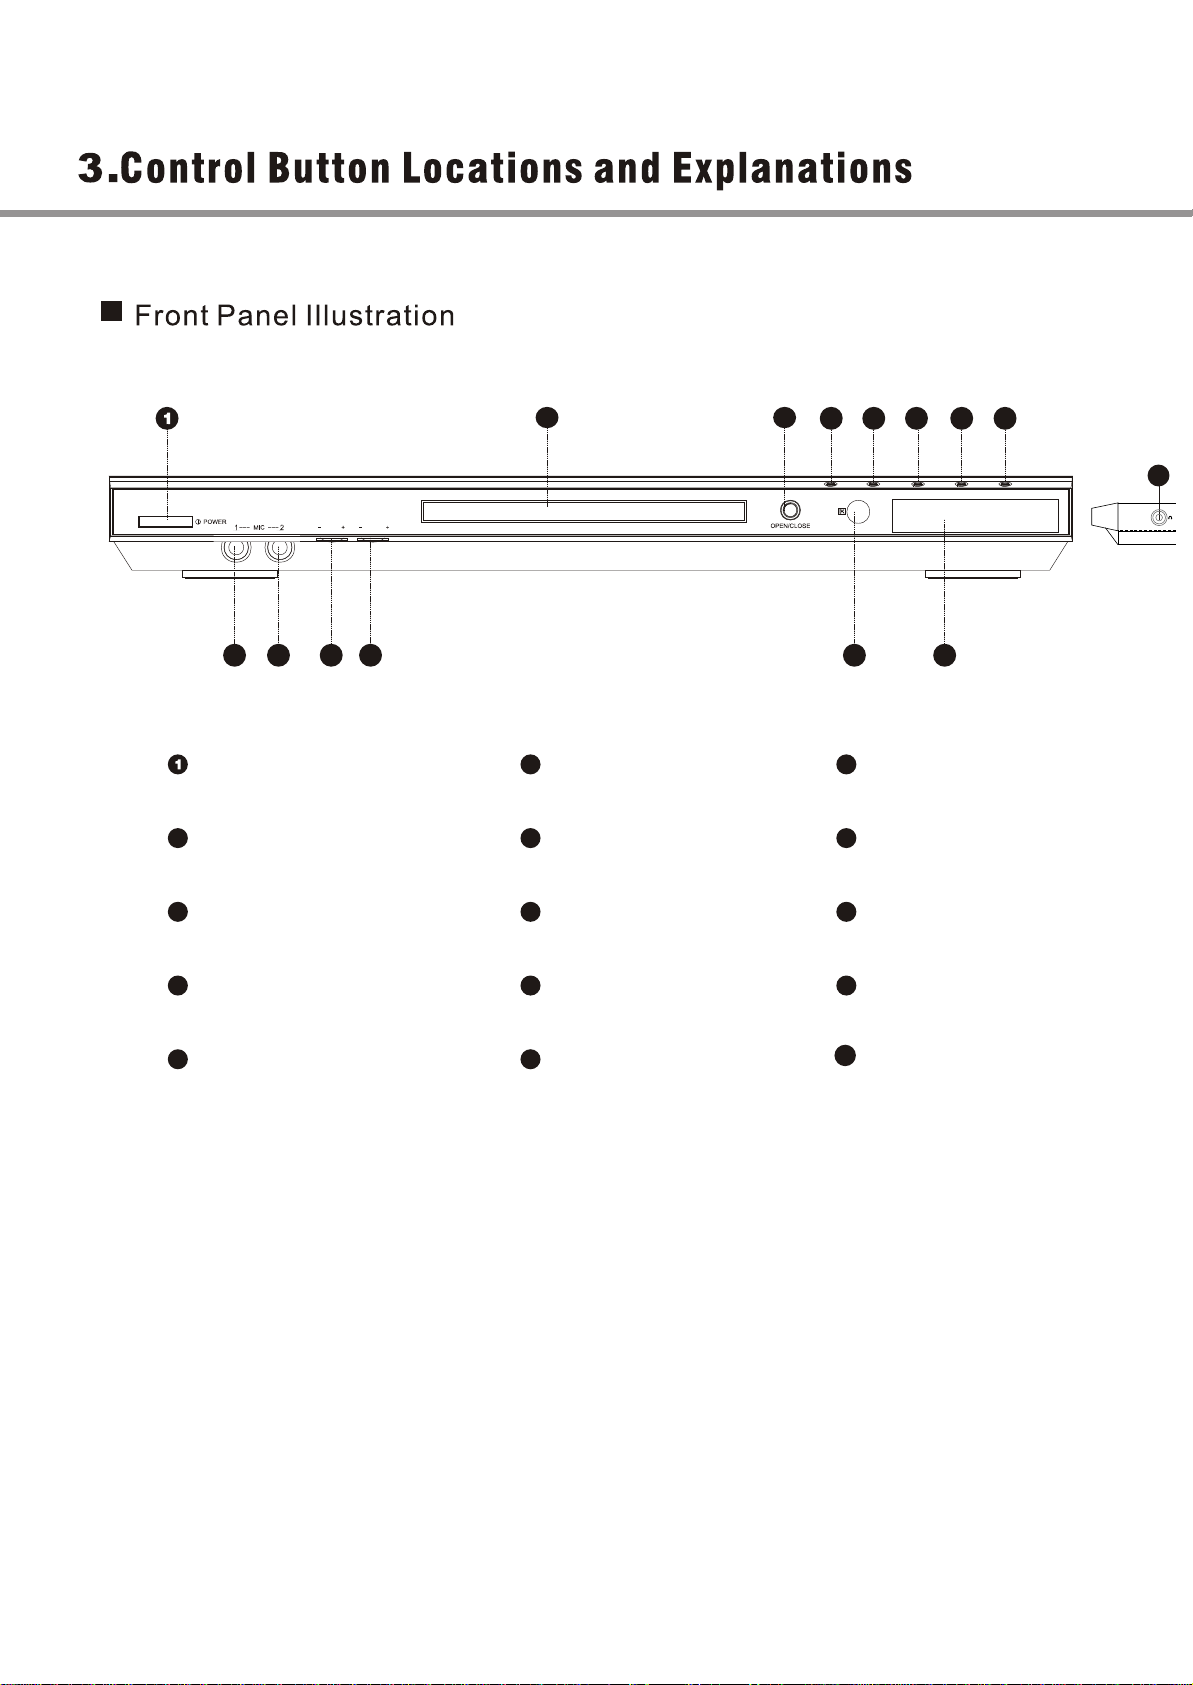
5PAUSE button MIC 2 jack
10
4PLAY button 9MIC 1 jack LED display window
14
POWER switch 6STOP button MIC VOLUME knob
11
8FWD button IR SENSOR
13
3OPEN/CLOSE button
2Disc tray 7REV button 12 ECHO adjustment knob
4
3
11 12 13 1410
9
2
ECHOVOL
5678
15
15
Headphone jack
2

The laser diode in the traverse unit (optical pickup)may brake down due to static electricity of clothes or human
body.Use due caution to electrostatic breakdown when servicing and handling the laser diode.
4.1.Grounding for electrostatic breakdown prevention
Some devices such as the DVD player use the optical pickup(laser diode)and the optical pickup will be damaged
by static electricity in the working environment.Proceed servicing works under the working environment where
grounding works is completed.
4.1.1. Worktable grounding
1. Put a conductive material(sheet)or iron sheet on the area where the optical pickup is placed,and ground the
4.1.2.Human body grounding
1 Use the anti-static wrist strap to discharge the static electricity from your body.
4.1.3.Handling of optical pickup
1. To keep the good quality of the optical pickup maintenance parts during transportation and before
installation, the both ends of the laser diode are short-circuited.After replacing the parts with new ones,
remove the short circuit according to the correct procedure. (See this Technical Guide).
2. Do not use a tester to check the laser diode for the optical pickup .Failure to do so willdamage the laser
diode due to the power supply in the tester.
4.2. Handling precautions for Traverse Unit (Optical Pickup)
1. Do not give a considerable shock to the traverse unit(optical pickup)as it has an extremely high-precise
structure.
2. When replacing the optical pickup, install the flexible cable and cut is short land with a nipper. See the
optical pickup replacement procedure in this Technical Guide. Before replacing the traverse unit, remove
the short pin for preventingstatic electricity and install a new unit.Connect the connector as short times as
possible.
3. The flexible cable may be cut off if an excessive force is applied to it.Use caution when handling the cable.
4. The half-fixed resistor for laser power adjustment cannot be adjusted. Do not turn the resistor.
safety_3 (1577x409x2 tiff)
sheet.
3
4.PREVENTION OF STATIC ELECTRICITY DISCHARGE

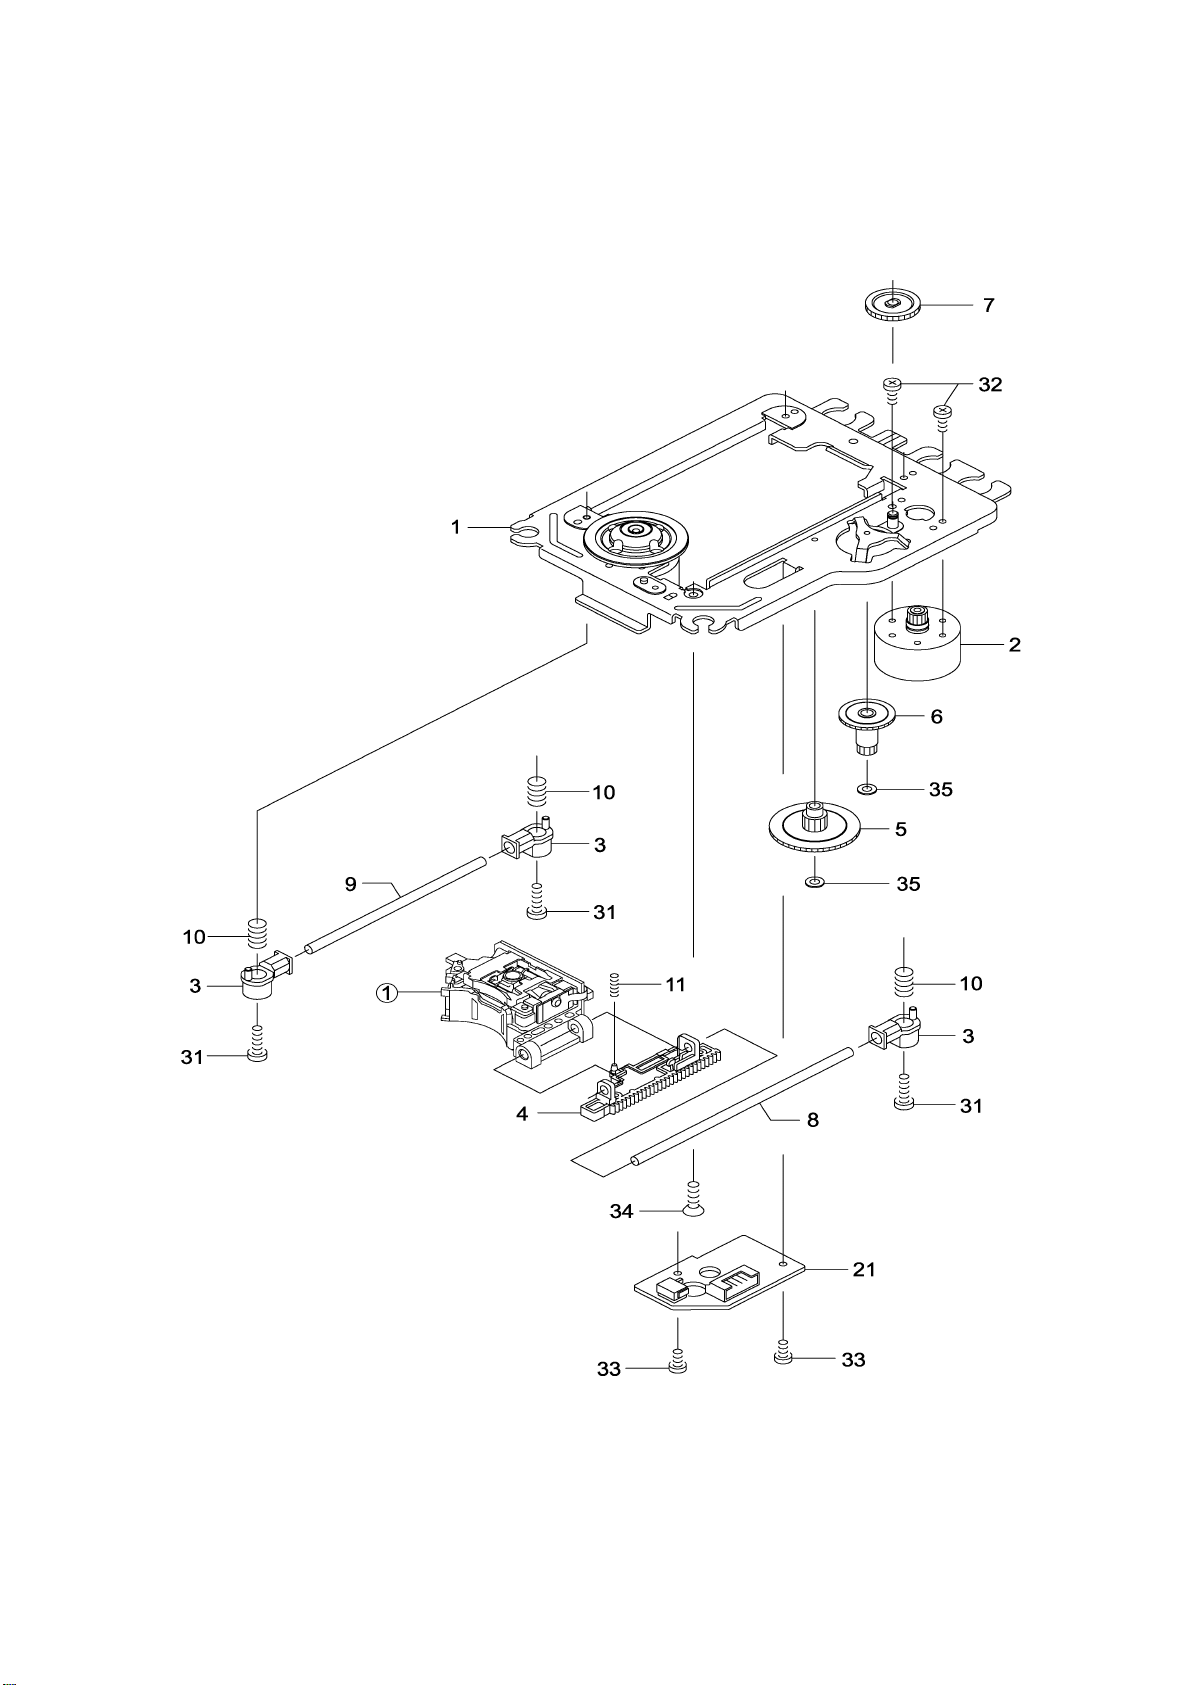
5.1 Optical pickup Unit Explosed View and Part List
Pic (1)
5. Assembling and disassembling the mechanism unit
4

Materials to Pic (1)
No. PARTS CODE PARTS NAME Q ty
14692200 SF-HD60 1
1 1EA0311A06300 ASSY, CHASSIS, COMPLETE 1
2 1EA0M10A15500 ASSY, MOTOR, SLED 1
Or 1EA0M10A15501 ASSY, MOTOR, SLED 1
3 1EA2451A24700 HOLDER, SHAFT 3
4 1EA2511A29100 GEAR, RACK 1
5 1EA2511A29200 GEAR, DRIVE 1
6 1EA2511A29300 GEAR, MIDDLE, A 1
7 1EA2511A29400 GEAR, MIDDLE, B 1
8 1EA2744A03000 SHAFT, SLIDE 1
9 1EA2744A03100 SHAFT, SLIDE, SUB 1
10 1EA2812A15300 SPRING, COMP, TYOUSEI 3
11 1EA2812A15400 SPRING, COMP, RACK 1
21 1EA0B10B20100 ASSY, PWB 1
Or 1EA0B10B20200 ASSY, PWB 1
31 SEXEA25700--- SPECIAL SCREW BIN+-M2X11 3
32 SEXEA25900--- SPECIAL SCREW M1.7X2.2 2
33 SFBPN204R0SE- SCR S-TPG PAN 2X4 2
34 SFSFN266R0SE- SCR S-TPG FLT 2.6X6 1
35 SWXEA15400--- SPECIAL WASHER 1.8X4 X0.25 2
Note : This parts list is not for service parts supply.
5

5.2 Bracket Explosed View and Part List
Pic (2)
Materials to Pic(2)
1.bracket 14.frontsiliconrubber
2.belt15.Backsiliconrubber
3.screw 16.Pick-up
4.beltwheel 17.Pick-up
5.gearwheel 18.switch
6.ironchip 19.Five-pinflatplug
7. Immobility mechanism equipment 20. screw
8.Magnet 21.PCB
9.Platen 22.motor
10.Bridgebracket 23.Motorwheel
11.screw 24.screw
12.screw 25.tray
13. Big bracket
Before going process with disassembly and installation, please carefully both
peruse the chart and confirm the materials.
6

5.3 MISCELLANEOUS
5.3.1 Protection of the LD(Laser diode)
Short the parts of LD circuit pattern by soldering.
5.3.2 Cautions on assembly and adjustment
Make sure that the workbenches,jigs,tips,tips of soldering irons and measuring instruments are
grounded,and that personnel wear wrist straps for ground.
Open the LD short lands quickly with a soldering iron after a circuit is connected.
Keep the power source of the pick-up protected from internal and external sources of electrical
noise.
Refrain from operation and storage in atmospheres containing corrosive gases (such as H2S,SO2,
NO2 and Cl2)or toxic gases or in locations containing substances(especially from the organic silicon,cyan,
formalin and phenol groups)which emit toxic gases.It is particularly important to ensure that none of the
above substances are present inside the unit.Otherwise,the motor may no longer run.
7

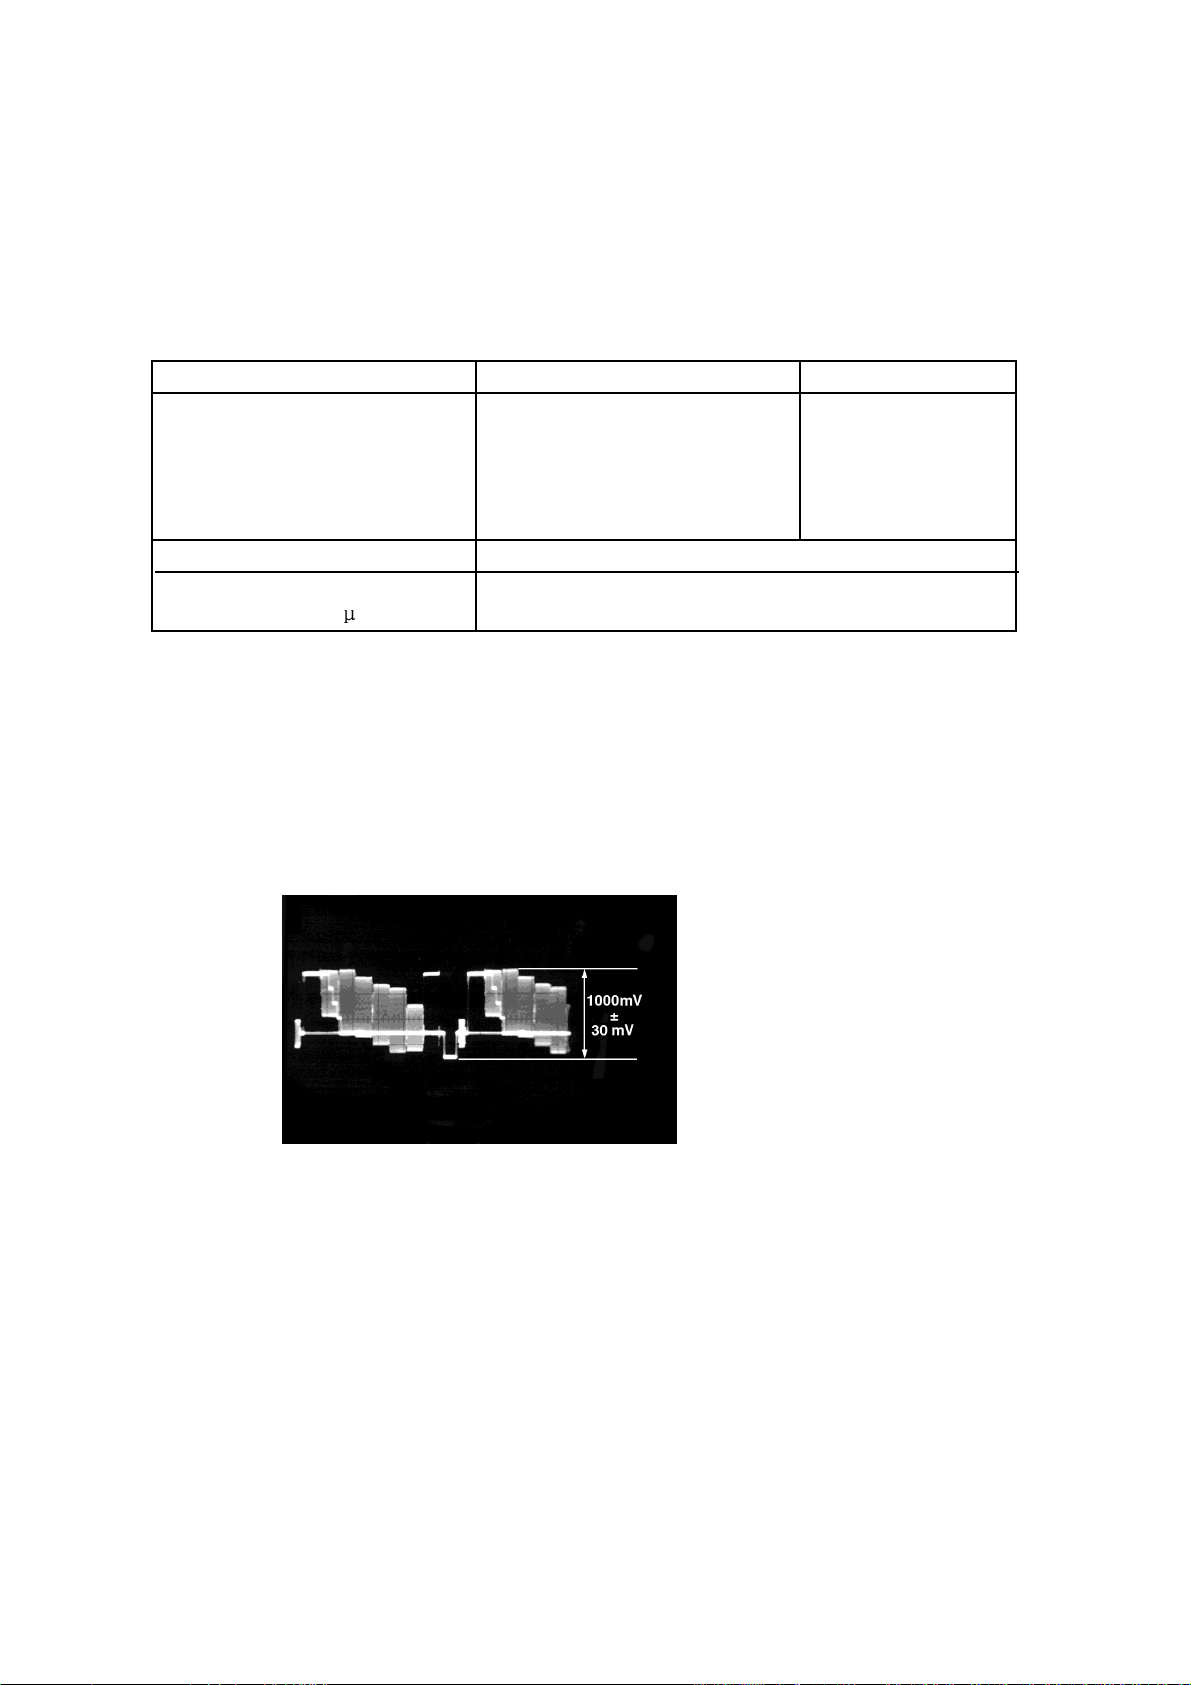
6.1. Video Output (Luminance Signal) Confirmation
DO this confirmation after replacing a P.C.B.
Purpose:To maintain video signal output compatibility.
1.Connect the oscilloscope to the video output terminal and terminate at 75 ohms.
2.Confirm that luminance signal(Y+S)level is 1000mVp-p±30mV
Measurement point
Video output terminal
Color bar 75%
PLAY(Title 46):DVDT-S15
PLAY(Title 12):DVDT-S01
DVDT-S15
or
DVDT-S01
Mode Disc
Measuring equipment,tools
200mV/dir,10 sec/dir 1000mVp-p±30mV
Confirmation value
6.Electrical Confirmation
8

Do the confirmation after replacing P.C.B.
Purpose:To maintain video signal output compatibility.
1.Connect the oscilloscope to the video output terminal and terminate at 75 ohme.
2.Confirm that the chrominance signal(C)level is 621 mVp-p±30mV
Measurement point
Video output terminal
Color bar 75%
PLAY(Title 46):DVDT-S15
PLAY(Title 12):DVDT-S01
DVDT-S15
or
DVDT-S01
Mode Disc
Measuring equipment,tools Confirmation value
Screwdriver,Oscilloscope
200mV/dir,10 sec/dir 621mVp-p±30mV
6.2 Video Output(Chrominance Signal) Confirmation
9

7.MPEG BOARD CHECK WAVEFORM
7.1 27MHz WAVEFORM
DIAGRAM
7.2 IC5L0380R PIN.2 WAVEFORM DIAGRAM
10

KEY FEATURES
nn
nn
nSingle Power Supply Operation
– Read, program and erase operations from
2.7 to 3.6 volts
– Ideal for battery-powered applications
nn
nn
nHigh Performance
– 65, 90 and 120 ns access time versions
nn
nn
nUltra-low Power Consumption (Typical
Values At 5 Mhz)
– Automatic sleep mode current: 0.2 µA
– Standby mode current: 0.2 µA
– Read current: 7 mA
– Program/erase current: 15 mA
nn
nn
nFlexible Sector Architecture:
– One 16 KB, two 8 KB, one 32 KB and
fifteen 64 KB sectors in byte mode
– One 8 KW, two 4 KW, one 16 KW and
fifteen 32 KW sectors in byte mode
– Top or bottom boot block configurations
available
nn
nn
nSector Protection
– Allows locking of a sector or sectors to
prevent program or erase operations
within that sector
– Sectors lockable in-system or via
programming equipment
– Temporary Sector Unprotect allows
changes in locked sectors (requires high
voltage on RESET# pin)
nn
nn
nFast Program and Erase Times
– Sector erase time: 0.7 sec typical for each
sector
– Chip erase time: 14 sec typical
– Byte program time: 9 µs typical
nn
nn
nUnlock Bypass Program Command
– Reduces programming time when issuing
multiple program command sequences
nn
nn
nAutomatic Erase Algorithm Preprograms
and Erases Any Combination of Sectors
or the Entire Chip
nn
nn
nAutomatic Program Algorithm Writes and
Verifies Data at Specified Addresses
nn
nn
nCompliant With Common Flash Memory
Interface (CFI) Specification
– Flash device parameters stored directly
on the device
– Allows software driver to identify and use
a variety of different current and future
Flash products
Product Brief
Revision 1, March 2000
A[18:0]
19
CE#
OE#
RESET#
BYTE#
WE#
8
7
DQ[7:0]
DQ[14:8]
DQ15/A-1
RY/BY#
LOGIC DIAGRAM
nn
nn
nMinimum 100,000 Write Cycles per Sector
nn
nn
nCompatible With JEDEC standards
– Pinout and software compatible with
single-power supply Flash devices
– Superior inadvertent write protection
nn
nn
nData# Polling and Toggle Bits
– Provide software confirmation of
completion of program and erase
operations
nn
nn
nReady/Busy# Pin
– Provides hardware confirmation of
completion of program and erase
operations
nn
nn
nErase Suspend/Erase Resume
– Suspends an erase operation to allow
reading data from, or programming data
to, a sector that is not being erased
– Erase Resume can then be invoked to
complete suspended erasure
nn
nn
nHardware Reset Pin (RESET#) Resets the
Device to Reading Array Data
nn
nn
nSpace Efficient Packaging
– 44-pin PSOP, 48-pin TSOP and 48-ball
FBGA packages
HY29LV800
8 Mbit (1M x 8/512K x 16) Low Voltage Flash Memory
11
8. HY29LV800

PB r1.0/Mar. 00
HY29LV800
GENERAL DESCRIPTION
The HY29LV800 is an 8 Mbit, 3 volt-only, CMOS
Flashmemoryorganizedas1,048,576(1M)bytes
or 524,288 (512K) words that is available in 44-
pin PSOP, 48-pin TSOP and reverse TSOP and
48-ball FBGA packages. Word-wide data (x16)
appears on DQ[15:0] and byte-wide (x8) data ap-
pears on DQ[7:0].
The HY29LV800 can be programmed and erased
in-system with a single 3 volt VCC supply. Inter-
nally generated and regulated voltages are pro-
vided for program and erase operations, so that
the device does not require a higher voltage VPP
power supply to perform those functions. The de-
vicecanalsobeprogrammedin standard EPROM
programmers. Access times as low as 65 ns over
the full operating voltage range of 2.7 - 3.6 volts
are offered for timing compatibility with the zero
wait state requirements of high speed micropro-
cessors. To eliminate bus contention, the
HY29LV800hasseparatechip enable (CE#),write
enable (WE#) and output enable (OE#) controls.
The device is compatible with the JEDEC single-
power-supplyFlashcommandsetstandard.Com-
mands are written to the command register using
standard microprocessor write timings. They are
then routed to an internal state-machine that con-
trols the erase and programming circuits. Device
programming is performed a byte/word at a time
by executing the four-cycle Program Command
writesequence.Thisinitiatesaninternalalgorithm
that automatically times the program pulse widths
and verifies proper cell margin. Faster program-
ming times can be achieved by placing the
HY29LV800 in the Unlock Bypass mode, which
requires only two write cycles to program data in-
stead of four.
TheHY29LV800’ssector erasearchitectureallows
any number of array sectors to be erased and re-
programmed without affecting the data contents
of other sectors. Device erasure is initiated by
executing the Erase Command sequence. This
initiates an internal algorithm that automatically
preprograms the array (if it is not already pro-
grammed) before executing the erase operation.
As during programming cycles, the device auto-
matically times the erase pulse widths and veri-
fies proper cell margin. Hardware Sector Protec-
tion optionally disables both program and erase
operations in any combination of the sectors of
the memory array, while Temporary Sector Un-
protect allows in-system erasure and code
changes in previously protected sectors. Erase
Suspend enables the user to put erase on hold for
any period of time to read data from, or program
data to, any sector that is not selected for era-
sure. True background erase can thus be
achieved.Thedeviceisfullyerased when shipped
from the factory.
Addresses and data needed for the programming
and erase operations are internally latched during
write cycles, and the host system can detect
completion of a program or erase operation by
observingtheRY/BY#pin,or by reading the DQ[7]
(Data# Polling) and DQ[6] (toggle) status bits.
Hardware data protection measures include a low
VCC detector that automatically inhibits write op-
erations during power transitions.
After a program or erase cycle has been com-
pleted,orafterassertion of theRESET#pin(which
terminates any operation in progress), the device
is ready to read data or to accept another com-
mand. Reading data out of the device is similar to
reading from other Flash or EPROM devices.
Two power-saving features are embodied in the
HY29LV800. When addresses have been stable
for a specified amount of time, the device enters
theautomaticsleep mode. Thehostcan alsoplace
the device into the standby mode. Power con-
sumption is greatly reduced in both these modes.
Common Flash Memory Interface (CFI)
To make Flash memories interchangeable and to
encourage adoption of new Flash technologies,
major Flash memory suppliers developed a flex-
iblemethodofidentifyingFlashmemorysizesand
configurationsinwhichallnecessaryFlashdevice
parameters are stored directly on the device.
Parametersstoredinclude memorysize,byte/word
configuration,sectorconfiguration,necessary volt-
ages and timing information. This allows one set
of software drivers to identify and use a variety of
different, current and future Flash products. The
standard which details the software interface nec-
essary to access the device to identify it and to
determineitscharacteristicsistheCommonFlash
Memory Interface (CFI) Specification. The
HY29LV800isfullycompliantwiththisspecification.
12

HY29LV800
PB r1.0/Mar. 00
BLOCK DIAGRAM
STATE
CONTROL
WE#
CE#
OE#
BYTE#
COMMAND
REGISTER
DQ[15:0]
A[18:0], A-1
V
CC
DETECTOR TIMER
ERASE VOLTAGE
GENERATOR AND
SECTOR SWITCHES
PROGRAM
VOLTAGE
GENERATOR
ADDRESS LATCH
X-DECODER
Y-DECODER
8 Mb FLASH
MEMORY
ARRAY
Y-GATING
DATA LATCH
I/O BUFFERS
I/O CONTROL
RESET#
DQ[15:0]
A[18:0], A-1
RY/BY#
SIGNAL DESCRIPTIONS
emaN epyT noitpircseD
]0:81[AstupnI .hgiHevitca,sserddA )BSL(tupni1-A/51QDehthtiwdenibmoc,stupni91esehT .snoitarepoetirwrodaerrofyarraehtnihtiwnoitacolenotceles,edometybni
,]1-[A/]51[QD ]0:41[QD stuptuO/stupnI etats-irT
hgiHevitca,suBataD daerrofhtapatadtib-61ro-8naedivorpsnipesehT. tib-02ehtfoBSLehtsadesusi1-A/51QD,edometybnI.snoitarepoetirwdna .edometybnidetats-irtniamerdnadesunuera]8:41[QD.tupnisserddaetyb
#ETYBtupnI .woLevitca,edoMetyB .edomdrowstceleshgiH,edometybstceleswoL
#ECtupnI .woLevitca,elbanEpihC romorfataddaerotdetressaebtsumtupnisihT ehtdnadetats-irtsisubatadeht,hgiHnehW.008VL92YHehtotatadetirw .edomybdnatSehtnidecalpsiecived
#EOtupnI woLevitca,elbanEtuptuO rofdetagendnasnoitarepodaerrofdetressA. gniruddaersidrowaroetybarehtehwsenimreted#ETYB.snoitarepoetirw .noitarepodaereht
#EWtupnI .woLevitca,elbanEetirW secneuqesdnammocrosdnammocfognitirwslortnoC noitarepoetirwA.yarrayromemehtfosrotcesesareroatadmargorpotredroni hgiHsi#EOdnawoLsi#ECelihwdetressasi#EWnehwecalpsekat.
#TESERtupnI
.woLevitca,teseRerawdraH ehtgnitteserfodohtemerawdrahasedivorP yletaidemmiti,tesersiecivedehtnehW.etatsyarradaerehtot008VL92YH ecivedeht,detressasi#TESERelihW.ssergorpninoitarepoynasetanimret .edomybdnatSehtnieblliw
#YB/YR tuptuO niarDnepO
.sutatSysuB/ydaeR nisidnammocesareroetirwarehtehwsetacidnI ylevitcasiecivedehtelihwwoLsniameR.detelpmocneebsahrossergorp .atadyarradaerotydaersitinehwhgiHseogdna,gnisareroatadgnimmargorp
V
CC
-- .ylppusrewoptlov-3
V
SS
-- .dnuorglangisdnarewoP
13

PB r1.0/Mar. 00
HY29LV800
Standard
TSOP48
DQ7
DQ14
44
43 DQ6
DQ13
42
41 DQ5
DQ12
40
39 DQ4
V
CC
38
37 DQ11
DQ3
36
35 DQ10
DQ2
34
33 DQ9
DQ1
32
31 DQ8
DQ0
30
29
A16
BYTE#
48
47 V
SS
DQ15/A-1
46
45
OE#
V
SS
28
27 CE#
A0
26
25
A11
A10 5
6
A9
A8 7
8
NC
NC 9
10
WE#
RESET# 11
12
NC
NC 13
14
RY/BY#
A18 15
16
A17
A7 17
18
A6
A5 19
20
A15
A14 1
2
A13
A12 3
4
A4
A3 21
22
A2
A1 23
24
Reverse
TSOP48
44
43
42
41
40
39
38
37
36
35
34
33
32
31
30
29
48
47
46
45
28
27
26
25
5
6
7
8
9
10
11
12
13
14
15
16
17
18
19
20
1
2
3
4
21
22
23
24
A11
A10
A9
A8
NC
NC
WE#
RESET#
NC
NC
RY/BY#
A18
A17
A7
A6
A5
A15
A14
A13
A12
A4
A3
A2
A1
DQ7
DQ14
DQ6
DQ13
DQ5
DQ12
DQ4
V
CC
DQ11
DQ3
DQ10
DQ2
DQ9
DQ1
DQ8
DQ0
A16
BYTE#
V
SS
DQ15/A-1
OE#
V
SS
CE#
A0
A6
A5 5
6
A4
A3 7
8
A2
A1 9
10
A0
CE# 11
12
V
SS
OE# 13
14
DQ0
DQ8 15
16
DQ1
DQ9 17
18
DQ2
DQ10 19
20
DQ3
DQ11 21
22
RY/BY#
A18 1
2
A17
A7 3
4A10
A11
40
39 A12
A13
38
37 A14
A15
36
35 A16
BYTE#
34
33 V
SS
DQ15/A-1
32
31 DQ7
DQ14
30
29 DQ6
DQ13
28
27 DQ5
DQ12
26
25 DQ4
V
CC
24
23
RESET#
WE#
44
43 A8
A9
42
41
PSOP44
PIN CONFIGURATIONS
© 1999 by Hyundai Electronics America. All rights reserved.
No part of this document may be copied or reproduced in any
form or by any means without the prior written consent of
Hyundai Electronics Industries Co., Ltd. or Hyundai Electron-
ics America (collectively “Hyundai”).
This document describes a product currently under design by
Hyundai. Theinformationinthisdocument issubjectto change
without notice. Hyundai shall not be responsible for any errors
that may appear in this document and makes no commitment
toupdate orkeepcurrenttheinformation containedinthisdocu-
ment. Hyundai advises its customers to obtain the latest ver-
sion of the device specification to verify, before placing orders,
that the information being relied upon by the customer is cur-
rent.
14

IC42S16101
Integrated Circuit Solution Inc.
DR025-0B 04/15/2002
ICSI reserves the right to make changes to its products at any time without notice in order to improve design and supply the best possible product. We assume no responsibility for any errors
which may appear in this publication. © Copyright 2000, Integrated Circuit Solution Inc.
FEATURES
• Drive Strength for low capacitive bus loading
• Clock frequency: 166, 143, 125 MHz
• Fully synchronous; all signals referenced to a
positive clock edge
• Two banks can be operated simultaneously and
independently
• Dual internal bank controlled by A11 (bank select)
• Single 3.3V power supply
• LVTTL interface
• Programmable burst length
– (1, 2, 4, 8, full page)
• Programmable burst sequence:
Sequential/Interleave
• Auto refresh, self refresh
• 4096 refresh cycles every 64 ms
• Random column address every clock cycle
• Programmable CAS latency (2, 3 clocks)
• Burst read/write and burst read/single write
operations capability
• Burst termination by burst stop and precharge
command
• Byte controlled by LDQM and UDQM
• Package 400mil 50-pin TSOP-2
DESCRIPTION
ICSI's 16Mb Synchronous DRAM IC42S16101 is organized
as a 524,288-word x 16-bit x 2-bank for improved
performance. The synchronous DRAMs achieve high-speed
data transfer using pipeline architecture. All inputs and
outputs signals refer to the rising edge of the clock input.
512K x 16 Bits x 2 Banks (16-MBIT)
SYNCHRONOUS DYNAMIC RAM
PIN CONFIGURATIONS
50-Pin TSOP-2
1
2
3
4
5
6
7
8
9
10
11
12
13
14
15
16
17
18
19
20
21
22
23
24
25
50
49
48
47
46
45
44
43
42
41
40
39
38
37
36
35
34
33
32
31
30
29
28
27
26
VCC
I/O0
I/O1
GNDQ
I/O2
I/O3
VCCQ
I/O4
I/O5
GNDQ
I/O6
I/O7
VCCQ
LDQM
WE
CAS
RAS
CS
A11
A10
A0
A1
A2
A3
VCC
GND
I/O15
I/O14
GNDQ
I/O13
I/O12
VCCQ
I/O11
I/O10
GNDQ
I/O9
I/O8
VCCQ
NC
UDQM
CLK
CKE
NC
A9
A8
A7
A6
A5
A4
GND
PIN DESCRIPTIONS
A0-A11 Address Input
A0-A10 Row Address Input
A11 Bank Select Address
A0-A7 Column Address Input
I/O0 to I/O15 Data I/O
CLK System Clock Input
CKE Clock Enable
CS Chip Select
RAS Row Address Strobe Command
CAS Column Address Strobe Command
WE Write Enable
LDQM Lower Bye, Input/Output Mask
UDQM Upper Bye, Input/Output Mask
Vcc Power
GND Ground
VccQ Power Supply for I/O Pin
GNDQ Ground for I/O Pin
NC No Connection
15

IC42S16101
Integrated Circuit Solution Inc.
DR025-0B 04/15/2002
PIN FUNCTIONS
Pin No. Symbol Type Function (In Detail)
20 to 24 A0-A10 Input Pin A0 to A10 are address inputs. A0-A10 are used as row address inputs during active
27 to 32 command input and A0-A7 as column address inputs during read or write command
input. A10 is also used to determine the precharge mode during other commands. If
A10 is LOW during precharge command, the bank selected by A11 is precharged,
but if A10 is HIGH, both banks will be precharged.
When A10 is HIGH in read or write command cycle, the precharge starts automati-
cally after the burst access.
These signals become part of the OP CODE during mode register set command
input.
19 A11 Input Pin A11 is the bank selection signal. When A11 is LOW, bank 0 is selected and when
high, bank 1 is selected. This signal becomes part of the OP CODE during mode
register set command input.
16 CAS Input Pin CAS, in conjunction with the RAS and WE, forms the device command. See the
"Command Truth Table" item for details on device commands.
34 CKE Input Pin The CKE input determines whether the CLK input is enabled within the device.
When is CKE HIGH, the next rising edge of the CLK signal will be valid, and when
LOW, invalid. When CKE is LOW, the device will be in either the power-down mode,
the clock suspend mode, or the self refresh mode.
The CKE is an
asynchronous i
nput.
35 CLK Input Pin CLK is the master clock input for this device. Except for CKE, all inputs to this
device are acquired in synchronization with the rising edge of this pin.
18 CS Input Pin The CS input determines whether command input is enabled within the device.
Command input is enabled when CS is LOW, and disabled with CS is HIGH. The
device remains in the previous state when CS is HIGH.
2, 3, 5, 6, 8, 9, 11 I/O0 to I/O Pin I/O0 to I/O15 are I/O pins. I/O through these pins can be controlled in byte units
12, 39, 40, 42, 43, I/O15 using the LDQM and UDQM pins.
45, 46, 48, 49
14, 36 LDQM, Input Pin LDQM and UDQM control the lower and upper bytes of the I/O buffers. In read
UDQM mode, LDQM and UDQM control the output buffer. When LDQM or UDQM is LOW,
the corresponding buffer byte is enabled, and when HIGH, disabled. The outputs go
to the HIGH impedance state when LDQM/UDQM is HIGH. This function corre-
sponds to OE in conventional DRAMs. In write mode, LDQM and UDQM control the
input buffer. When LDQM or UDQM is LOW, the corresponding buffer byte is
enabled, and data can be written to the device. When LDQM or UDQM is HIGH,
input data is masked and cannot be written to the device.
17 RAS Input Pin RAS, in conjunction with CAS and WE, forms the device command. See the
"Command Truth Table" item for details on device commands.
15 WE Input Pin WE, in conjunction with RAS and CAS, forms the device command. See the
"Command Truth Table" item for details on device commands.
7, 13, 38, 44 VCCQ Power Supply Pin VCCQ is the output buffer power supply.
1, 25 VCC Power Supply Pin VCC is the device internal power supply.
4, 10, 41, 47 GNDQ Power Supply Pin GNDQ is the output buffer ground.
26, 50 GND Power Supply Pin GND is the device internal ground.
16

IC42S16101
Integrated Circuit Solution Inc.
DR025-0B 04/15/2002
FUNCTIONAL BLOCK DIAGRAM
CLK
CKE
CS
RAS
CAS
WE
A11
A9
A8
A7
A6
A5
A4
A3
A2
A1
A0
A10
COMMAND
DECODER
&
CLOCK
GENERATOR MODE
REGISTER
REFRESH
CONTROLLER
REFRESH
COUNTER
SELF
REFRESH
CONTROLLER
ROW
ADDRESS
LATCH
MULTIPLEXER
ROW
ADDRESS
BUFFER
ROW
ADDRESS
BUFFER
COLUMN
ADDRESS LATCH
BURST COUNTER
COLUMN
ADDRESS BUFFER
ROW DECODER ROW DECODER
MEMORY CELL
ARRAY
BANK 0
COLUMN DECODER
MEMORY CELL
ARRAY
BANK 1
DATA IN
BUFFER
DATA OUT
BUFFER
SENSE AMP I/O GATE
SENSE AMP I/O GATE
2048
2048
DQM
I/O 0-15
Vcc/VccQ
GND/GNDQ
11
11
11 11
8
11 11
8
16
16 16
16
256
256
S16BLK.eps
17

MT1389
Progressive-Scan DVD Player SOC
Specifications are subject to change without notice
MediaTek MT1389 is a DVD player system-on-chip (SOC) which incorporates advanced features like high
quality TV encoder and state-of-art de-interlace processing. The MT1389 enables consumer electronics
manufacturers to build high quality, cost-effective DVD players, portable DVD players or any other home
entertainment audio/video devices.
Based on MediaTek’s world-leading DVD player SOC architecture, the MT1389 is the 3rd generation of the DVD
player SOC. It integrates the MediaTek 2nd generation front-end analog RF amplifier and the Servo/MPEG AV
decoder.
The progressive scan of the MT1389 utilized a proprietary advanced motion-adaptive de-interlace algorithm to
achieve the best movie/video playback. It can easily detect 3:2/2:2 pull down source and restore the correct
original pictures. It also supports a patent-pending edge-preserving algorithm to remove the saw-tooth effect.
MT1389L
DVD
PUH
Module
FLASH
DRAM
CVBS, Y/C,
Component
SDPIF
Front-panel
Remote
Audio DAC
DVD Player System Diagram Using MT1389
Key Features
RF/Servo/MPEG Integration
High Performance Audio Processor
Motion-Adaptive, Edge-Preserving De-interlace
108MHz/12-bit, 6 CH TV Encoder
Applications
Standard DVD Players
Portable DVD Players
8.2 MT1389
18
Table of contents
Other BBK DVD Player manuals