BBQ 15897 User manual

Use and Care Guide
Charcoal Grill with Offset Smoker
Sears Model No. 15897
Kmart item No. 08420711-7
Box
This Grill is for Outdoor Use Only
•Read and follow all Safety, Assembly,
and Use and Care Instructions in this
Guide before assembling and cooking
with this grill.
=Failure to follow all instructions in this
Use and Care Guide m'ay lead to fire or
explosion, which could result in property
damage, personal injury or death.
o Do not assemble without assistance.
Grill will require at least 2 people for
assembly.
-Safety
,Parts
• Assembly
• Use and Care
° EspaFiol p,19
Assembly Questions?
Call 1-800-489-1581
Tools needed for assembly:
Adjustable wrench (not provided)
Screwdriver (not provided)
SAVE THESE INSTRUCTIONS!
M_ual C_d_: 040B1_031 D_0@IO
See our extensive assortment of outdoor living products on-line at
www.sears.com and wvwv_kmarLcom
Sears, Roebuck and Co., Hoffman IL 60179, USA

Customer Service Cenler. ................................................................2
Safety Symbols .................................................................................2
Warranty ........................................................................................2
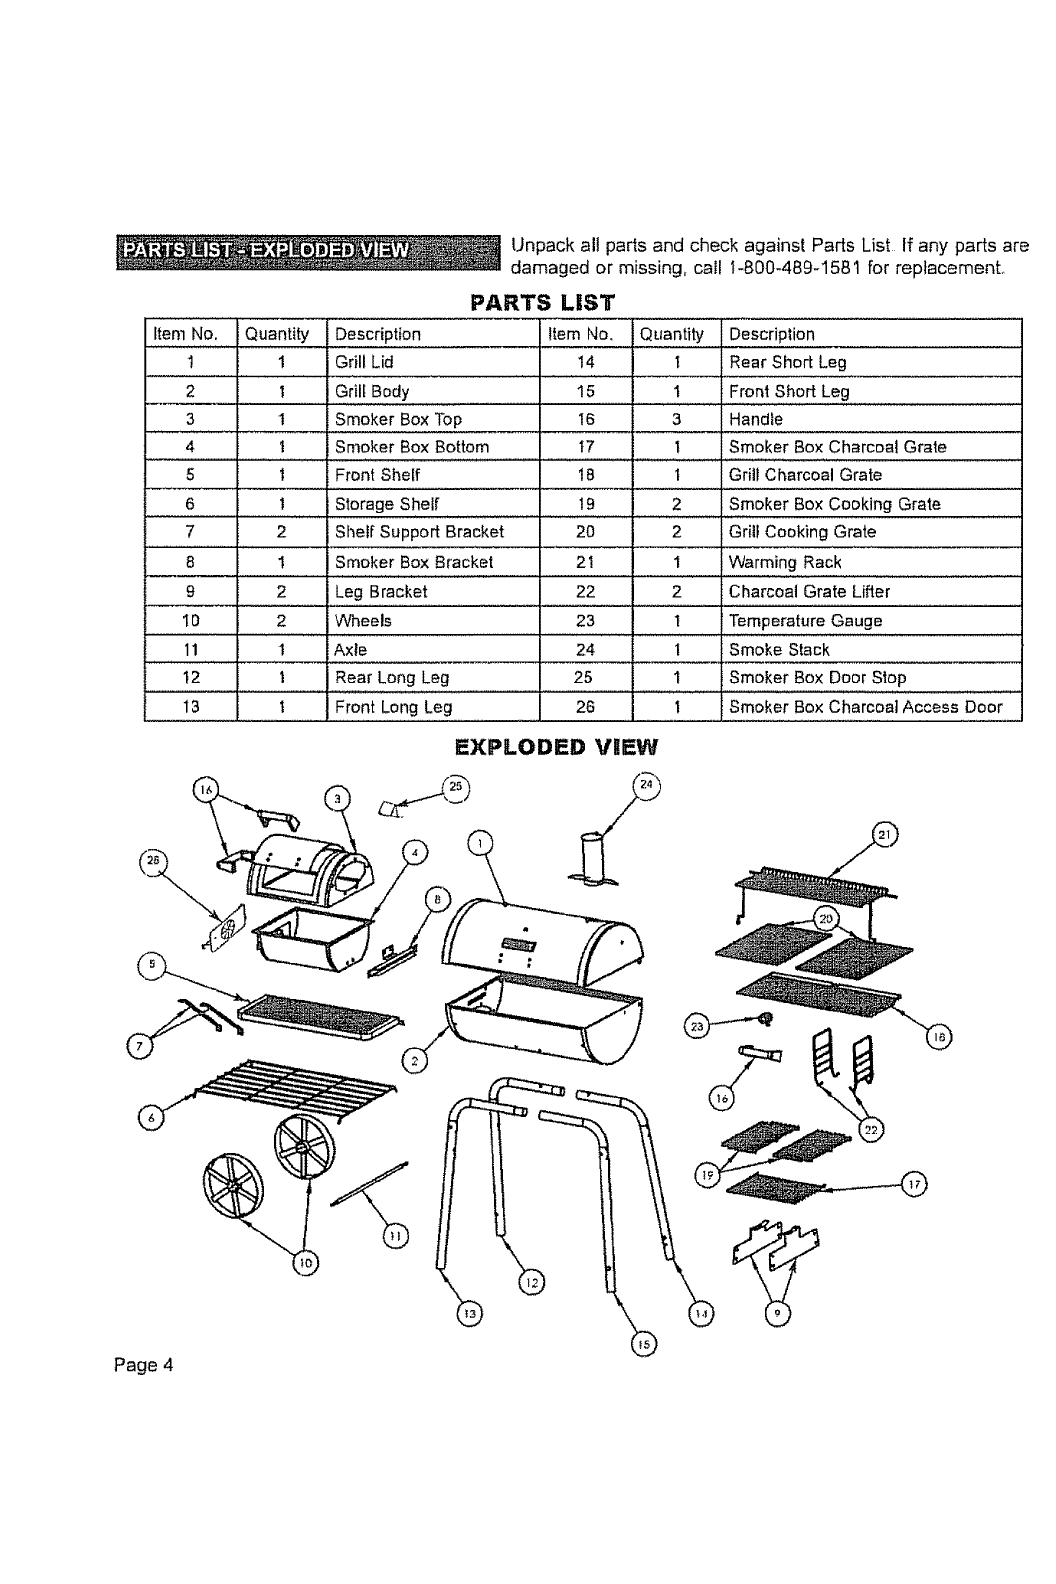
Paris List, Exploded V_ew .................................................................4
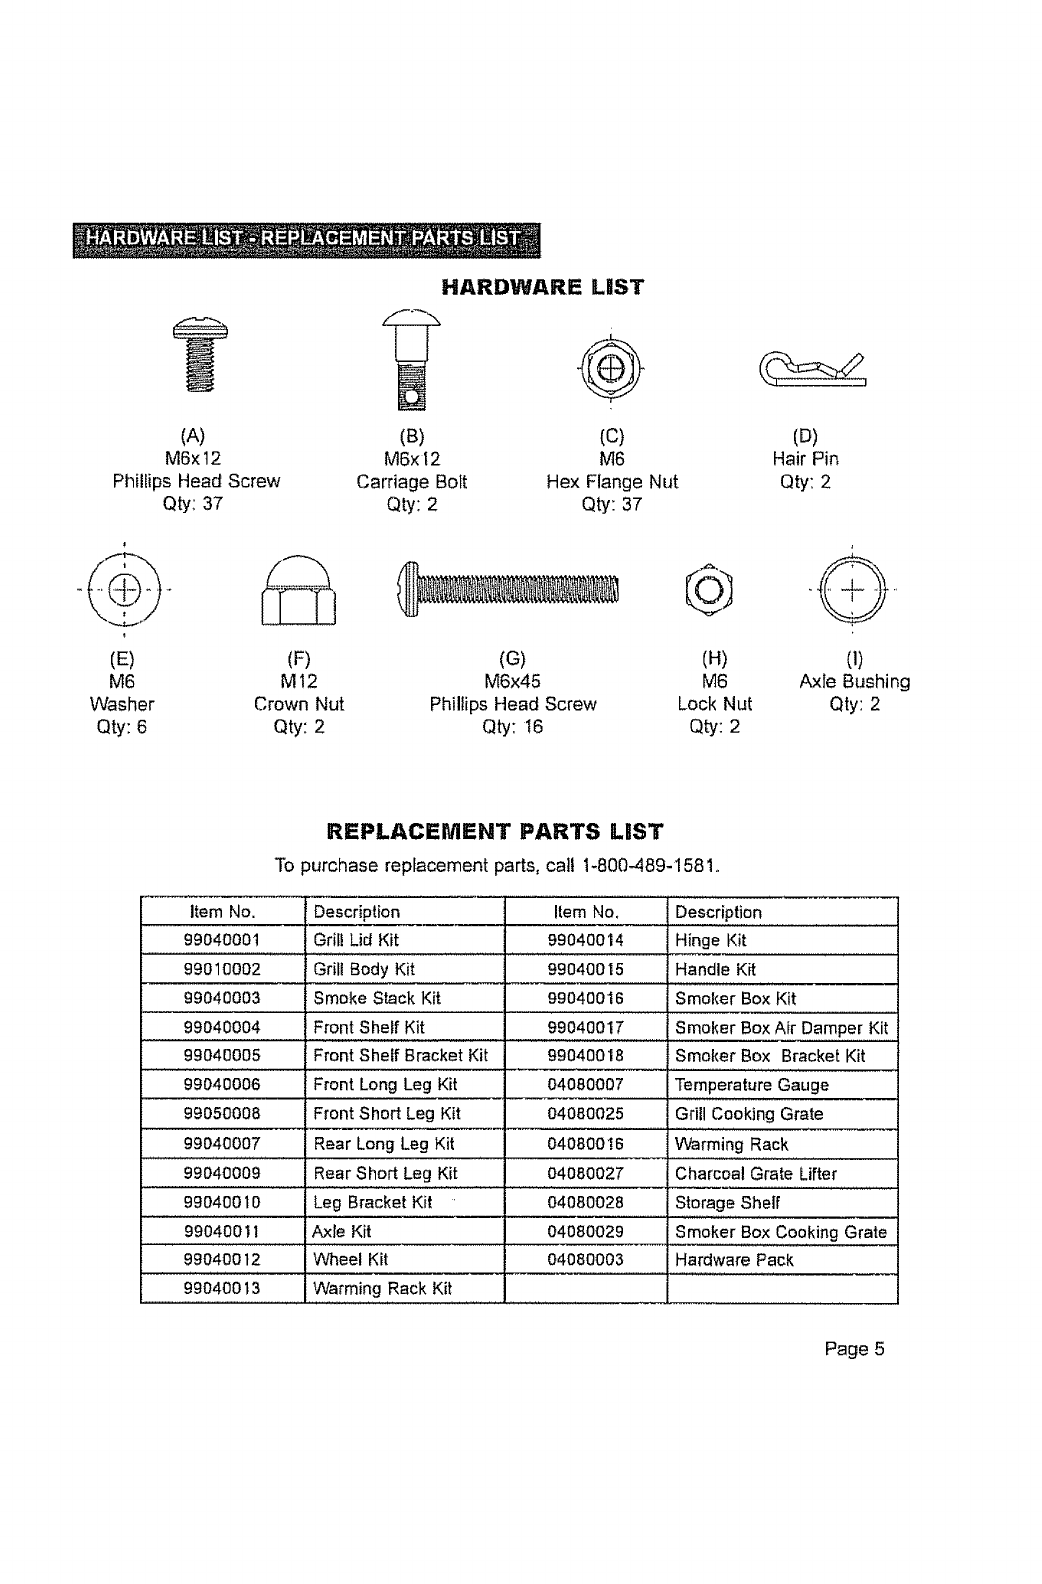
Hardware Lisi, Replacement Parts List ......................................5
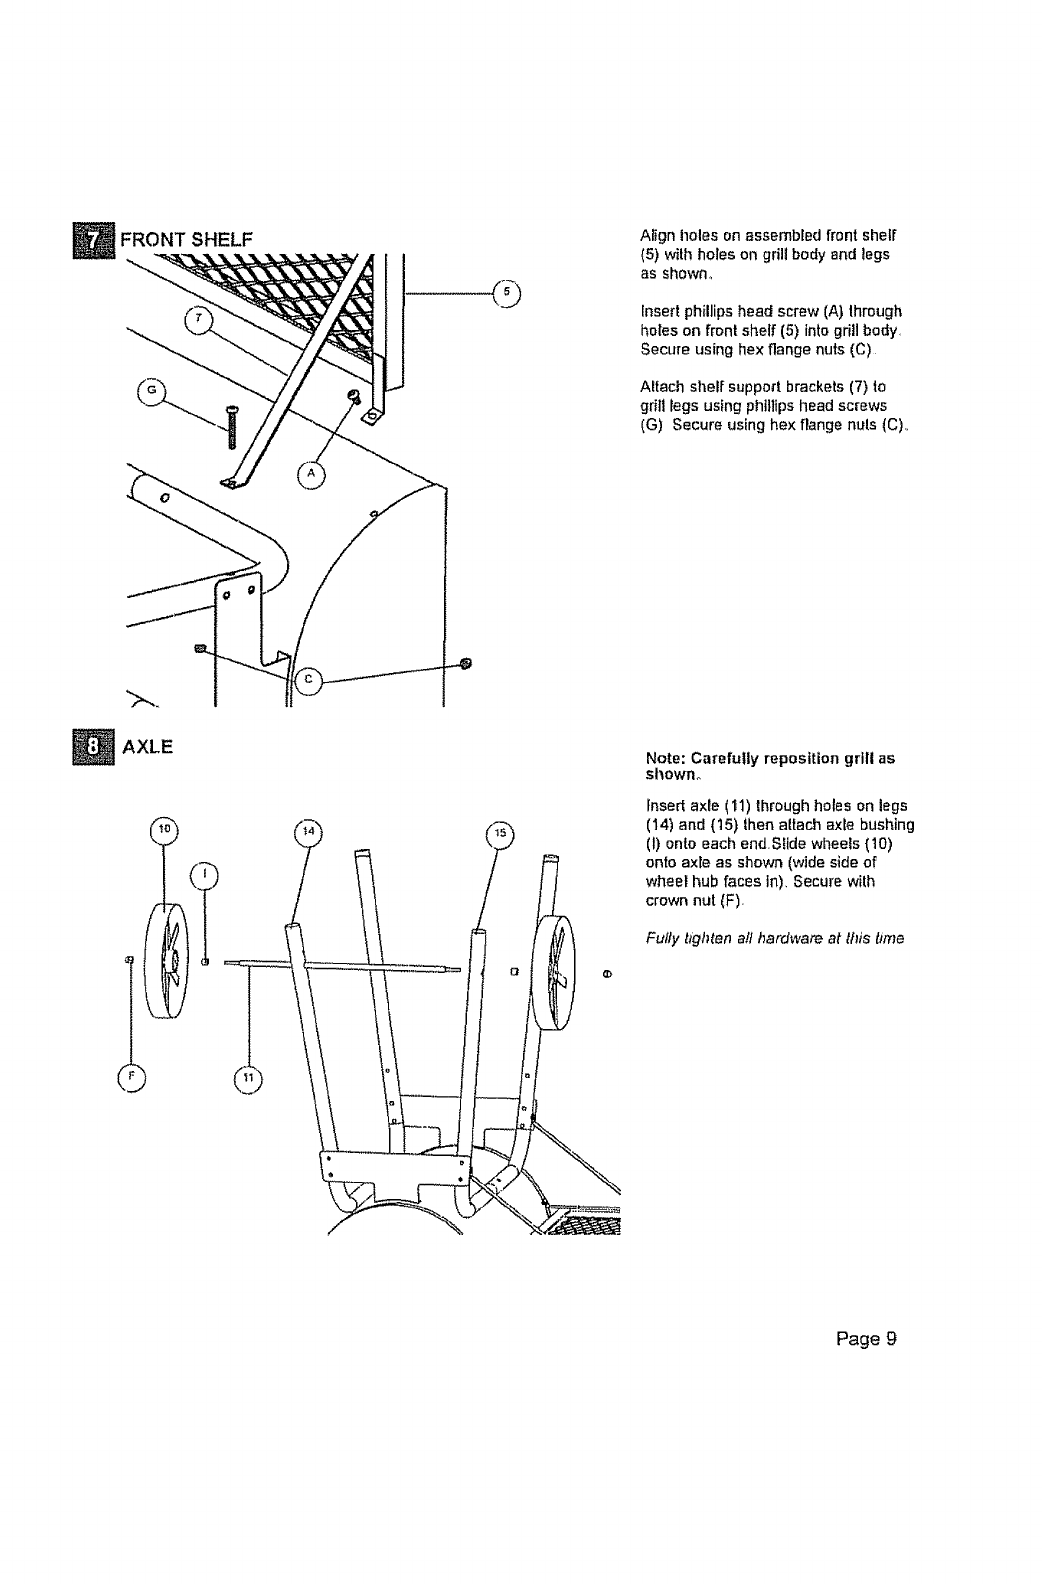
Assembly .............................................................................................6-15
Use and Care ......................................................................................16
Customer Service Center _Call for Help and Parts
•ForAssembly Assistance, Missing or Damaged Paris
Call: 1-800,,489-!581
Safety Symbols
The symbols and boxes shown below explain what each
heading means.. Read and foliow all of ihe messages found
throughout the manual.
if not avoided,willresult in death orserious injury_
Page 2 t_Sears Brands, LLC
.Keep a fire extinguisher accessible at all times
while operating grill.
•Never leave grill unattended while in use.
.Never use inside an enclosed area such as a
patio, garage, building or tent.
• Never use inside avehicle, arecreational
vehicle such as a motorhome, camper, or truck
bed.
• Never operate this grill under any overhead
construction such as roof coverings, carports,
awnings or overhangs.
.Maintain a minimum distance of 3 feet from all
structures.
.Keep area clear of all combustible materials
such as wood, dry plants, grass, brush, paper or
canvas,
• Never operate this grill within 25 feet of
flammable liquids,
•Never operate this grill within 3 feet of a gas
cylinder,
• Never use this grill as a heater°
•Use this grill only on a stable, level surface to
prevent tipping,
•Use on non-combustible surfaces such as dirt,
concrete, brick or rock°
•Keep children and pets away from grill at all
times_ Do not allow children to use grill
• Only use charcoal lighting fluid, Never use
gasoline, alcohol or other highly volatile fluids
to ignite charcoal,These fluids can explode
causing injury or death.
• Grill is HOT while in use and will remain HOT for
a period of time afterwards. Do not touch any
part of the grill without wearing protective
gloves.
• Never move grill when in use. Allow grill to cool
completely before moving or storing.
• Never leave HOT coals or ashes unattended.
. Do not store grill with HOT ashes or charcoal
inside grill Store only when fire is completely
out and all surfaces are cold.
•Dispose of cold ashes by placing them in
aluminum foil, soaking with water and
discarding in anon-combustible container.
• Never use this product for anything other than
its intended purpose. This grill is not for
commercial use.
•Always use this grill in accordance with all
applicable local, state and federal fire codes.

CALIFORNIA PROPOSITION 65
1. Combustion by-products produced when using this
product contain chemicals known to the State of
California to cause cancer, birth defects, and other
reproductive harm,
2.The materials used in this product may contain
lead a chemical known to the State of California to
cause birth defects and other reproductive harm.
BBQ-PRO GRILL WARRANTY
90 DAY Full Warranty
If Ibis BBQ-PROproduct failsdue to adefect inmaterial
or workmanship within 90 daysfromthe dateof
Jurchase,returnit to any Sears orKmart store or other
BBQ-PRO outtetin 1heUnited States wilh your proof of
_urchaseforfreereplacement
This warranty gives you specific legal rights, and you
may also have ether rights which vary from state to state
Seam,Roebuckand Co.,Hoffman Estates,IL60179
This manual contains important information
necessary for the proper and safe use of this grill.
Read and follow all warnings and instructions
before using grill and during use. Keep manual for
future reference.
Burning charcoal gives off carbon monoxide,
which has no odor and can cause death. DO NOT
burn charcoal inside homes, vehicles, tents,
garages or any enclosed areas. Use only outdoors
where it is well ventilated.
Failure to follow these warnings and instructions
properly could result in fire or explosion, which
could cause property damage, personal injury, or
death.
Page 3

Unpack all parts and check against Parts List If any parts are
damaged or missing, call 1-800-489-158 t for replacement,
PARTS LiST
Item No. Quantity
! 1
2 I
3 I
4 I
5 1
6 1
7 2
8 i
9
t0
11
12
13
Description Item No, Quantity Description
Grill Lid 14 I Rear Short Leg
• Grill Body 15 . 1 .Front Short Leg....
Smoker Box Top I6 3 Handle
Smoker Box Bottom t7 t Smoker Box Charcoal Grate
Front Shelf 18 I Grill Charcoal Grate
Storage Shelf 19 2 . Smoker Box Cooking Grate
Sheff Support Bracket 20 2 Grill Cooking Grate
Smoker Box Bracket 21 1 Warming Rack
2 Leg Bracket 22 2 Charcoal Grate Lifter
2 Wheels
1 Axle
I Rear Long Leg
1 Front Long Leg
23 t i Temperature Gauge ,
24 1 Smoke Stack
25 1 ! Smoker Box Door Stop
26 1 Smoker Box Charcoal Access Door
EXPLODED VREW
Page 4

HARDWARE LIST
(A) (B) (C) (D)
M6x 12 M6x t 2 M6 Hair Pin
Phillips Head Screw Carriage Bolt Hex Flange Nut Qty: 2
Qty: 37 Qty: 2 Qty: 37
(E)
M6
Washer
Qty: 6
(F)
M12
Crown Nut
Qty: 2
(G) (H) 0)
M6x45 M6 Axle Bushing
Phillips Head Screw Lock Nut Qty: 2
Qty: t6 Qty: 2
REPLACEMENT PARTS LIST
To purchase replacement parts, cat! 1-800-489-1581o
item No. {Description Item No,
99040001 Grill Lid Kit 99040014
99010002 Grill Body Kit 99040015
99040003 Smoke Stack Kit 99040016
99040004 Front Shelf Kit 99040017
99040005 Front Shelf Bracket Kit 99040018
Description
Hinge Kit
Handle Kit
Smoker Box Kit
Smoker Bo×,,,_ Damper Kit
Smoker Box Bracket Kit
99040006 Front Long Leg Kit 04080007 Temperature Gauge
99050008 Front Short Leg Kit 04080025 Grill Cooking Grate
99040007 Rear Long Leg Kit 04080016 Warming Rack
99040009 Rear Short Leg Kit 04080027 Charcoal Grate Lifter
99040010 Leg Bracket Kit 04080028 Storage Shelf
99040011 Axle Kit 04080029 Smoker Box Cooking Grate
99040012 Wheel Kit 04080003 Hardware Pack
99040013 Warming Rack Kit
Page 5

Before assembly read instructions carefulfy,, Assemble grilJ on a clean, flat surface. This unit {sheavy
DO NOT ASSEMBLE WITHOUT ASSISTANCE. GET A HELPERI
FRONT LEGS
Shelf Atlach Holes
REAR LEGS
Note: Pay close attention to
hardware holes when assembling
grill legs. Front legs have holes
near top to atlach front shelf,
insed front long leg (13) into front
short leg (15) as shown,
Insert rear long leg (12) inlo rear shod
leg (t4) as shown.
Page 6

STORAGE SHELF
Stora'ge Shelf
{nsedion Hole
Note: Steps 3_4 require assistance,
Get a helpert
Insert storage sl_elf (6) into holes of
assembled gfilf legs as shown.
LEG BRACKETS
Note: Do not fully tighten screws at
this time.
Attach togbracket (9) Io legs (12) and
(13) as shown using phillips head
screws (G) and hex flange nuts (C)
Repeat assembly slop on
opposite end for legs (t4) and (15)
Page 7

GRILLBODY Note: Be sure legs (13) and (15) are
assembled correctly showing
hardware holes in front to allow
front shelf attachmenL
Legs (14) and (15) have 2 additional
holes to allow wheel assembly,
Make sure these legs are on the
opposite end of the smoker box
opening_
Place grill body (2) with smoker box
opening to the left, onto assembled
legs.. Tightly secure griI! body 1oIegs
using washers (E), phillips head
screws (G). and hex flange nuts (C)
Attach grill body (2) to leg brackets (9)
using washers (E), phillips head
screws (A), and hex flange nuts (C)
as shown,,
Do not fully tighten screws at this
time
FRONT SHELF BRACKETS
Note: Position brackets so sharper
angled ends are used to connect to
grill legs,
Altach shelf suppoff brackets (7) to
front she_ (5) using phillips head
screws (A),
Do not fully tighten at this time
Page B

FRONTSHELF
Q
Atign holes on assembEed front shelf
(5) with holes on grill body and legs
as shown°
_nsert phillips head screw (A) through
hotes on front shelf (5) into grill body,
Secure using hex flange nuts (C)
Altach shetf support brackets (7) to
grill legs using phillips head screws
(G) Secure using hex flange nuls (C),,
AXLE
i
Note: Carefully reposition grill as
shown°
[nsed axle (11) through holes on legs
(14) and (15) then attach axle bushing
(i) onto each end,S_ide wileets (10)
onto axle as shown (wide side of
wheel hub faces in), Secure with
crown nut (F),
Fully tighten aft hardware at this ttme
Page 9

Note: Do not fully tighten smoker
box bracket screws at this time,
Bracket may need to be adjusted in
Step 13o
Atiach smoker box bracket (B) to
smoker box bottom (4) using phillips
head screws (A) and hex flar_ge nuts
(C) as shown,
Place smoker box top (3) onto smoker
box bollom (4), Insed phiIlips head
screws (A) through holes in outer lip
of smoker box as shown. Repeat on
opposite side _ghten securely
ATTACH SMOKER BOX
\\\k \
%
GET AHELPER! UNIT tS HEAVY°
CAREFULLY TURN GRILL ONTO
ITS LEGS,
Some parts not shown for clarity,
Insed 2 phillips head screws (A)
hal_ay into smoker box connecUon
holes as shown,,
Carefully insed attached phillips head
screws into keyholes on side of"grill
body (2)., Secure smoker box to grill
body with remaining phillips head
screws(A),
Align holes in firebox bracket (8) with
holes in grfll legs (t2) and (13), Use
phillips head screws (G) and flange
nuts (C) to secure
Fufly tighten all hardware at this time,
including ftle 2 halfway inseded
SCrews
Page 10

CHARCOALGRATE AND ACCESS DOOR Some parts not shown for clarity,
Insert smoker box charcoal grate (17)
into smoker box body as shown,
Set smoker box charcoal access door
(26) into hinges on side of smoker box
bottom (4) as shown
COOKING GRATES
Note: Shorter end of cooking grate
should be placed near corners.
Some parts not shown for clarity.
Insert smoker box cooking grales (t9)
into smoker box as shown.
Page t 1

HANDLES AND DOOR STOP Align holes in one handle (16) with
holes in smoker box top (3). Secure
handle to lid using phillips head screw
(A) and hex flange nut (C) as shown,
Repeat slep to attach a handle to
smoker box side,
Insed lab of door stop inlo slot in back
of smoker box lid Align hoFe in door
slop (25) with hole in back of smoker
box lid, Secure using phillips head
screw (A) and hex flange nut (C)o
GRILL BODY LID PIace grill tid (1) on top of grill body
(2)_,Screw a carriage bolt (B) through
hole in each side of grill lid and gril!
body, Secure using hair pin (D).
Page 12

HANDLE AND TEMPERATURE GAUGE Secure handle (16) to grill lid (t) using
phtliips head screws (A) and hex
flange nuts (C) as shown°
lnserl lemperature gauge (23) slem
through hole in grill lid, Secure wilh
pre-a!.lached nut
©
SMOKE STACK _nsert smoke stack (24) from inside of
grill lid (t)o Secure with phirlips head
screw (A) and hex flange nut (C)_
Page 13

GRATE LIFTERS
\
Posilion charcoal grate lifters (22) on
grill charcoal grate (18) as shown
Repeat step on opposite end,.
ATTACH GRATE LIFTERS
/
Raise and posilion charcoal grate fillers
(22) on side supports in gdll body,
Page 14

WARMING RACK
©
Note: Do not over-tighten, warming
rack should move freely.
Insert wan'ning rack (21) tab into hole
of gri{I lid {1) end,
Repeat step on opposite end.
Attach warming rack (21) support arm
onto _nnergrill body (2) with phillips
head screw (A) and lock nut (H) as
shown°
Repeat step on oppostle end,
COOKING GRATES Place cookinggrales (20) in grill body
(2) as shown_,
GRILL IS READY FOR USE.
Page15

8EFOREFIRSTUSE
Before cooking with your BBQ PRO GrilYSmoker. follow
Ihese steps closely to both cure the finish and season Ihe
interior of your griiYsmoker, Improper preparation of your
grill may affect the finish andtor add metallic flavors to your
firstfoods.
• Brush or wipe all interior surfaces including grills and
grates with vegetable cooking oil.,
Using charcoal, build a small fire on the charcoal grate
in the Smoker Box. being sure not to lay coals against
the walls,
Close doors. Open butterfly damper In Smoker Box and
Smokestack damper approximately one quarter.
Continue burning charcoal for two hours or more After
at least 2hours, begin increasing temperature by
opening the butterfly damper and smoke stack damper
half-way, and adding more charcoal until the
temperature gauge increases by aboul 50-75 degrees
Hold tf at that temperature for about 15-30 minutes,
Your BBQ-PRO Grill/Smoker is now ready for use
;RILLING IN THE MAIN COOKING CHAMBER
WARNING: Failure to read and follow instructions for
lighting charcoal may result in serious personal injury
and/or properly damage,
Charcoal is recommended, however a combinalion of
wood chunks or wood chips mixed in with Ihe charcoal
may be used as the fuel source for grilling,,
Remove the cooking grates and place charcoal on the
charcoal grate in the main cooking chamber. Do not
build too large of a fire, We recommend starting a fire
wilh no more than 4 pounds of charcoal (approximately
60 briquets) and adding more as needed during cooking
After allowing the fire to burn down. place the cooking
grates in lhe main cooking chamber,,
SMOKING AND SLOW COOKING
• If using the unit as a smoker, remove lhe cooking grates
from the smoker box and build your fire on lop of fhe
smoker box charcoal grate., Either charcoal or wood may
be used, but wood is fhe recommended fuel for the
flavor it imparts through lhe smoke. Most seasoned
hardwoods are good for smoking, such as hickory,
mesquita, pecan, oak, a_ple, etc, It's best to remove
barkbefore burning, as it contains a high acid content
and imparts an acrid flavor
• After allowing the fire to burn down, close lhe doors and
conlrol the lemperature and smoke with the dampers of
the smoker box and smoke slack, Since heal and smoke
rise, a nalural airflow will be maintained from lhe air
damper near the heal source up to fhe smoke slack
This is known as "air draw." Do not operate the unit with
temperatures exceeding 450 degrees in the smoker box_
• Place the food in the main cooking chamber and use the
temperature gauge to monitor temperalure. Cooking and
smoking are taking place using indirect heat, Because of
this, there is no worry of a grease fire flare-up ruining the
food. Do not place food within 6" of the opening from [he
main cooking chamber into the smoker box,
• A general rule of thumb for cooking is about 1 hour per
pound for smoking large cuts of meal. Refer to a cook
book for specific cuts of meals. Limit the number of times
you open the smoker box door, as this will allow heal to
escape and extend the cooking lime. If food seems to
be gelling too smoky or brown before the cooking time is
finished, cover it loosely with heavy duty aluminum foil
GRILL MAINTENANCE
Surface rust can form on the inside of your smoker.,To
prevent this, always make sure to apply a light coat of
vegetable oil on interior surfaces after cleaning. This wifi
aid in the prolecfion of your unit. Exlerior surfaces may
need occasional touch-up, We recommend the use of a
commercially available black high temperature spray
pjalnt.
EVER PAINT THE INSIDE OF YOUR GRILL/SMOKERI
Make sure coals are completely exlinguished before
cleaning inside of smoker, and always remove the ash
afler each use. Inside surfaces may be ctsaned with a
sotulion of detergent and water applied with a scrub
brush., Thoroughly rinse with water and allow to air dry.
Coat with vegetable oil before using again,
To ensure that it is safe to eat, food must be
cooked to the minimum internal temperatures
listed in the table below,
USDA* Safe Minimum Internal Temperatures
Fish 145= F
Pork 160_ F
Egg Dishes 161)_F
Steaks and Roasts of Beef, Veal or Lamb 145°F
Ground Beef, Veal or Lamb 16D= F
Whole Poultry (Turkey, Chicken, Duck, etc.) 165= F
Ground or Pieces Poultry (Chicken Breast, etc.) t65 ° F
" United States Department of Agriculture
THE HEAT OF THE COALS
_t_mp_l'alule
_anr_e(F:) vi._u.1_ues
_] 400 lo 45D rash'_deep r_d glow
PlOT COALS
iMODERA'rELYHOT
!_0HOTCOALS
MF!
_ODEFtAI ELY
HOT COALS
MOOERATEEi
COOL COALS
Ihlr_coating _! g{w ash;
375 Io 450 d_ep trodglow
_{gnlli:anl coaling of gr_y
3251l0 375 ash r_d plow
3013!o 325 lhtck cr_alil_gor gtt_y a_h:
d_ll red glow
Page t6

Page 17

This Page Intentionally Left Blank
Page 18

Guia de uso y mantenimiento
Parrilla a Carb6n Con Ahumador Lateral
Modelo de Sears No. 15897
Articulo de Kmart No. 08420711-7
Este producto s61o se puede usar al aire libre
°Antes de empezar a armar y a cocinar en
esta parrilla, lea y siga todas las
instrucciones de seguridad, de armado,
de uso y de mantenimiento que
aparecen en esta guia
°E! no seguir todas las instrucciones de
esta guia de uso y mantenimiento puede
ocastonar incendios o exptosiones, que
pueden provocar da_os materiales,
tesiones o la muerte.
° No arme esta unidad sin la ayuda de otra
persona. Se necesita de dos personas,
como minimo, para armar la parrilla+
. Seguridad
. Piezas
•Armado
. Uso y mantenimiento
LPreguntas sobre el armado?
Llame al 1-800-489-1581
Herramientas para el armado:
Llave regu]able (que no se suministra)
Destorniltador (que no se suministra)
iGUARDE ESTAS INSTRUCCIONESt Pagina t9

Centro de servicios a! cliente ..........................................................20
Simbolos de seguridad .................................................................20
Garanlia ..................................................................................................2t
Lisla de piezas, vista esquem_lica ................................................22
Lists de herrajes, lists de repuestos .............................................23
Armado ........................................._...............................................24-33
Uso y manlenimienlo...................................................................34
Centro de servictos al cliente -Llama parssoticitar ayuda y
repuestos
•Pars solicitar ayuda sabre el armada, piezas perdidas
o dafiadas, llama al 1-B00-489.15Bt
Simbolos de seguridad
Los stmbolos y casillas qua se muestran acantinuaci6n
e×plican qu_ signi_ca cads encabezamiento Lea y siga todas
las tnstrucciones de seguddsd qua aparecen en este marius1.
:te no evitarse ocasionar& la muede o lesiones graves_
IPELIGRO: Indica una situaci6n petigrosa inminente que,
de no evitarse, podria ocasionar la muerte o lesiones
Igraves.
P_gina 20 ®Sears Brands, LLC
I .....................,.......................................
•Tenga a mano en tooto momenta un extintor de
incendios cuando est6 usando esta parrilla
•Nunca deje la parrilta desatendida cuando la est(_
usando.
•Nunca la use en lugares cerrados, coma patios,
garajes, edtficactones o ttendas de campafia.
•Nunca la use dentro de un vehiculo, nl siqutera de un
vehicuto de recreo, coma Iss casas rodantes, los
remolques o las camas de los camiones_
•Nunca use esta parriila bajo ntnguna estructura
techada, coma cubiertas de techo, cocheras, totdos
o alaros.
• Mantenga una dis_ncia minima de 3 pies de todas
las estructuras
-Mantenga el _rea libra de materiales combustibles
coma ta madera, las plantas secas, la hierba, la
mafeza, el papal o el lienzo.
.Nunca hags funcionar la parfllla a menos de 25 pies
de distancia de recipientes con liquidos inflamables,
•ni a menos de 3 pies de distancla de un tanque de
gas.
• Nunca use asia parrilta coma calefactoro
•0sela sabre superficies ntveladas y estabfes, pars
impedir qua se voltee,
.0sela sabre superficies no combustibles, coma
tie-rra, hormig6n, ladrillo o piedra.
•En todo momenta, mantenga alos niSos yalas
mascaras alejados de la parrilta. No permits qua los
nlEos usen ia parrillao
•Use _nlcamente liquidos especiales pars encender
carb6n_ Nunca use gasolina, alcohol ni ning0n otro
liquido altamente vol_til pars hacerlm Estas
sustancias pueden explotar y causar lesiones o la
muerte.
• La parrilla estarb CALIENTE mientras se est_ usando
y segutrb CALIENTE par un tiempo despu_s que se
apague. No toque ninguna parle de la parrilla sin
ponerse guantes protectores.
•Nunca mueva la parritla cuando fa est_ usando. Deje
qua se enfrte par completo antes de moverla o
guardarta
• Nunca deje desatendidos los carbones o las cenizas
CALIENTES.
•Nunca guarde la parrilla con carbones ocenlzas
CALIENTES dentro. Gu_rdela sblo cuando el fuego
est6 totalmente apagado y todas las superficfes
est6n frias.
•Para botar las cenizas frtas, colSquelas en papet
aluminto, remSjetas con agua y des6chelas dentro de
un recipiente de material no combustible.
•Nunca use este producto para otro fin qua no sea
aquel para e! cual ha sido disehado. Esta parrUla no
est_ destinada al uso comerciaL
•0sela siempre de conformtdad con los c6dtgos de
prevenci6n de tncendios locales, estatales y
fe-derales correspondienteso
Other manuals for 15897
1
This manual suits for next models
1
Table of contents
Languages:
Other BBQ Grill manuals

BBQ
BBQ CBT916L User manual

BBQ
BBQ 146.23770310 User manual

BBQ
BBQ CBT825L User manual

BBQ
BBQ BQ04023-2 User manual

BBQ
BBQ 720-0266 Quick reference guide

BBQ
BBQ BQ05041-28 Guide User manual

BBQ
BBQ 122.20148510 User manual

BBQ
BBQ Grillware CBC835L User manual

BBQ
BBQ GSF2616AC User manual

BBQ
BBQ GFS2616AD-1 User manual
Popular Grill manuals by other brands

Kenmore
Kenmore 415.161278 Use and care guide

Scheer
Scheer SUPER 800 instruction manual

Tramontina
Tramontina TCP-400 MANUAL FOR SAFE AND APPROPRIATE USE

Kiwi
Kiwi KG 5803 instruction manual

vivandio
vivandio FYRE X VI-GX1-4BI-S Assembly instructions

Trisa electronics
Trisa electronics 7538.42 Instructions for use