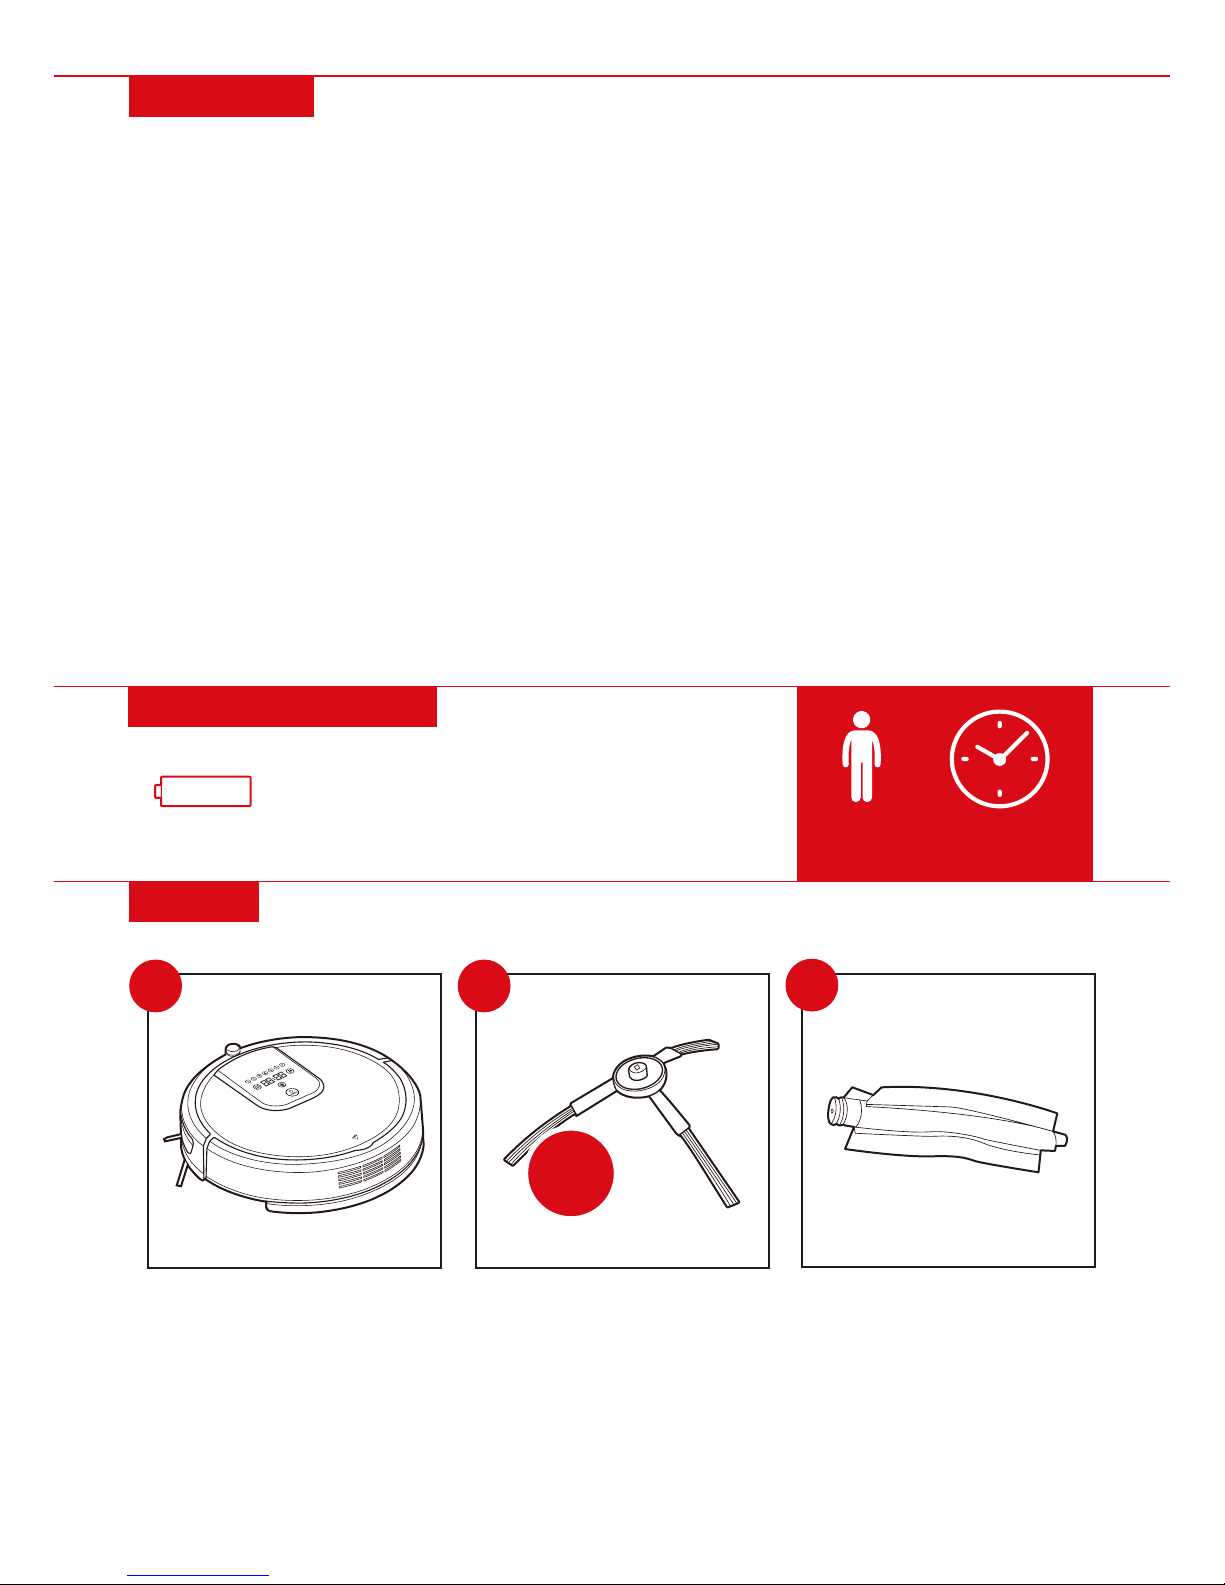
BCP SKY4719 User manual

SKY4719
Ver. 1
INSTRUCTION
MANUAL
Self-Charging Robot Vacuum

Thank you for choosing us! Since 2002, Best
Choice Products has been bringing customers
high-quality products at the absolute lowest
price. With everything ranging from instruments
and toys to furniture and outdoor, we’ve got
your everyday living essentials covered. We’re
centered around a customer-first philosophy –
with free shipping, exceptional customer
service, and a catalog sourced with you in mind.

Pg. 3
Please retain these instructions for future reference.
NOTICE
•This machine is intended for indoor use only.
•This machine is intended for household use only.
•Use with caution in the presence of children as it may startle or hurt them.
•Periodically check the connection between the recharger and socket to ensure that it is
properly plugged in.
•To prolong battery life, recharge machine for at least 16 hours after the first use or after
a long idle period.
•Before use, remove all objects that are prone to damage, such as glass or fabric, from
the floor.
•Be aware that if a room is too large the unit may not automatically return to the
charging dock when batteries are low.
•If any parts are missing, broken, damaged, or worn, stop using this item until repairs are
made and/or factory replacement parts are installed.
•Do not use this item in a way inconsistent with the manufacturer’s instructions as this
could void the product warranty.
TECHNICAL SPECIFICATIONS
Small Dustbin and Water Tank
250ml + 650ml
Charger
100-240V~50/60Hz 0.5A, Output: 24V 500mA
Dustbin Capacity
Rated Voltage
900ml
DC 14.8V
Rated Power
30W
Operating Temperature Range
14°F – 113°F
Input Voltage/Current
DC 24V/0.5A
Infrared Remote Control
38KHZ
Dimension
13.8 inches (Dia.) x 3.4 inches (H)
Weight
6.4 lbs
Battery
Lithium–ion 2200mAh

Pg. 4
1 PC
ROBOT VACUUM
2 PCS
SIDE BRUSH
1 PC
PARTS
ABROLLING BRUSH
C
WARNING
• Do not sit or stand on this machine.
• Do not use the machine in an extremely small, confined space such as a small table.
• Do not expose the machine to water or other liquids. Do not allow the vacuum to
intake liquids.
• Do not touch the power cable with wet hands.
• Never use the device in a room where there is a danger of explosion or in the vicinity
of flammable liquids or gases.
• Keep away from cigarettes, lighters, matches, flammable materials, or other
heat sources.
• Do not allow clothing or any part of the body to touch the brush or wheels when the
machine is in operation.
• Do not bend or place heavy objects on the power cord.
• Do not turn the machine over if you are using the water tank.
• Remove the water tank before filling it with water. Do not fill the water tank if it is still
installed in the unit.
4
EXTRA
PCS
APPROXIMATELY
10 MIN.
ASSEMBLY
1 PERSON
ASSEMBLY
REQUIRED ITEMS
2 AAA BATTERIES
+AAA -

Pg. 5
1 PC
MOP
1 PC
TRAILING BAR
1 PC
1 PC
CHARGER
M
1 PC
WATER TANK
JK
O
N
1 PC
CHARGING DOCK
SMALL DUSTBIN
L
PARTS
1 PC
FILTER FRAME
G
1 PC
BRUSH I
H
1 PC
HEPA FILTER
1 PC
DUSTBIN
D
1 PC
BRACKET F
E
1 PC
REMOTE CONTROL
2
EXTRA
PCS
1
EXTRA
PC

Pg. 6
PRODUCT ASSEMBLY
1
3
2
Attach the part B side brushes to the
bottom of the part A unit. Push firmly
during installation to ensure that they
are properly attached.
Slide the part C rolling brush onto the axle.
Insert the part D bracket to secure the
rolling brush.
Fully charge the unit, then turn on the power
switch and begin cleaning.
D
B
A
C

Pg. 7
DIAGRAM
BUMPER
TOP
BOTTOM
DUST COVER
DOCK
CHARGING
PORTS SIDE BRUSHES
ROLLING BRUSH
SIGNAL RECEIVER
CLIFF SENSORS
BRACKET
CLIFF SENSORS
WHEELS
RECHARGEABLE
BATTERY
FRONT WHEEL
DISPLAY SCREEN
START/STOP
CLEANING
CHARGING PORT
POWER SWITCH

Pg. 8
PANEL/DISPLAY SCREEN
START/STOP CLEANING:
Press this button to start/stop
automatic cleaning or mopping.
Cleaning will continue until batteries
are low, then it will automatically
return to the charging dock to charge.
SEEPING SPEED INDICATOR:
Solid light indicates normal water
seeping speed and blinking light
indicates fast water seeping speed.
The light will turn o and digital
indicator will display “E012” when the
water tank runs out of water.
DIGITAL INDICATOR:
Displays the current time or
error codes. During charging, it
will display “1111”, and when fully
charged it will display “FULL.”
DAY OF WEEK INDICATOR:
The numbers 1 to 7 indicate days
of the week, Monday to Sunday.
DOCKING INDICATOR:
Turns on when the unit is
automatically seeking the
charging dock.
CLEANING INDICATOR:
Turns on when the unit is vacuuming
or mopping.

Pg. 9
REMOTE CONTROL
•Insert two AAA batteries into the remote control.
•Remote control has a range of approximately 16 feet.
•HOME: Unit automatically returns to the charging dock to charge.
•POWER: Unit enters sleep/wake mode. While in sleep mode, press button for 1 second to wake unit.
•TURBO: Unit enters deep cleaning mode for ~70 minutes, which is suitable for very dirty floors.
•WALL: Unit cleans along the wall for ~10 minutes, and then reverts to cleaning normally.
•SPOT: Unit cleans normally but if it detects trash or excessive dirt it will return to that spot 3 to 4 times
to clean it.
•FULL GO: Unit cleans until the battery is depleted, returns to charging dock, and then continues to clean.
•TIMER: Set time, cleaning schedule, or water seeping speed (see pages 9-10).
•START/STOP: Start and stop automatic cleaning or mopping. Cleaning will continue until batteries are
low (~80 to 100 minutes), then it will automatically return to the charging dock to charge.
•DIRECTIONAL BUTTONS: Manually control where the unit moves.
START
TURBO
FULL GO TIMER
WALL
SPOT
STOP
X2
HOME
POWER
WALL
16ft
AAA
AAA
TURBO
TIMER
SPOT
FULL GO
DIRECTIONAL
BUTTONS
START/STOP
SETTING CURRENT DAY/TIME
1) While in standby, press the TIMER button and then press the TURBO button.
2) Press the LEFT/RIGHT buttons to toggle through the days of the week (1 represents Monday and 7
represents Sunday).
3) Hold the UP button to select a day. Hold the DOWN button to cancel a selected day.
4) Press START/STOP to save and continue to setting the time.
5) Press the LEFT/RIGHT buttons to switch between hour and minute.
6) Press the UP/DOWN buttons to increase/decrease the hour or minute.
7) Press START/STOP to save the settings.
E

Pg. 10
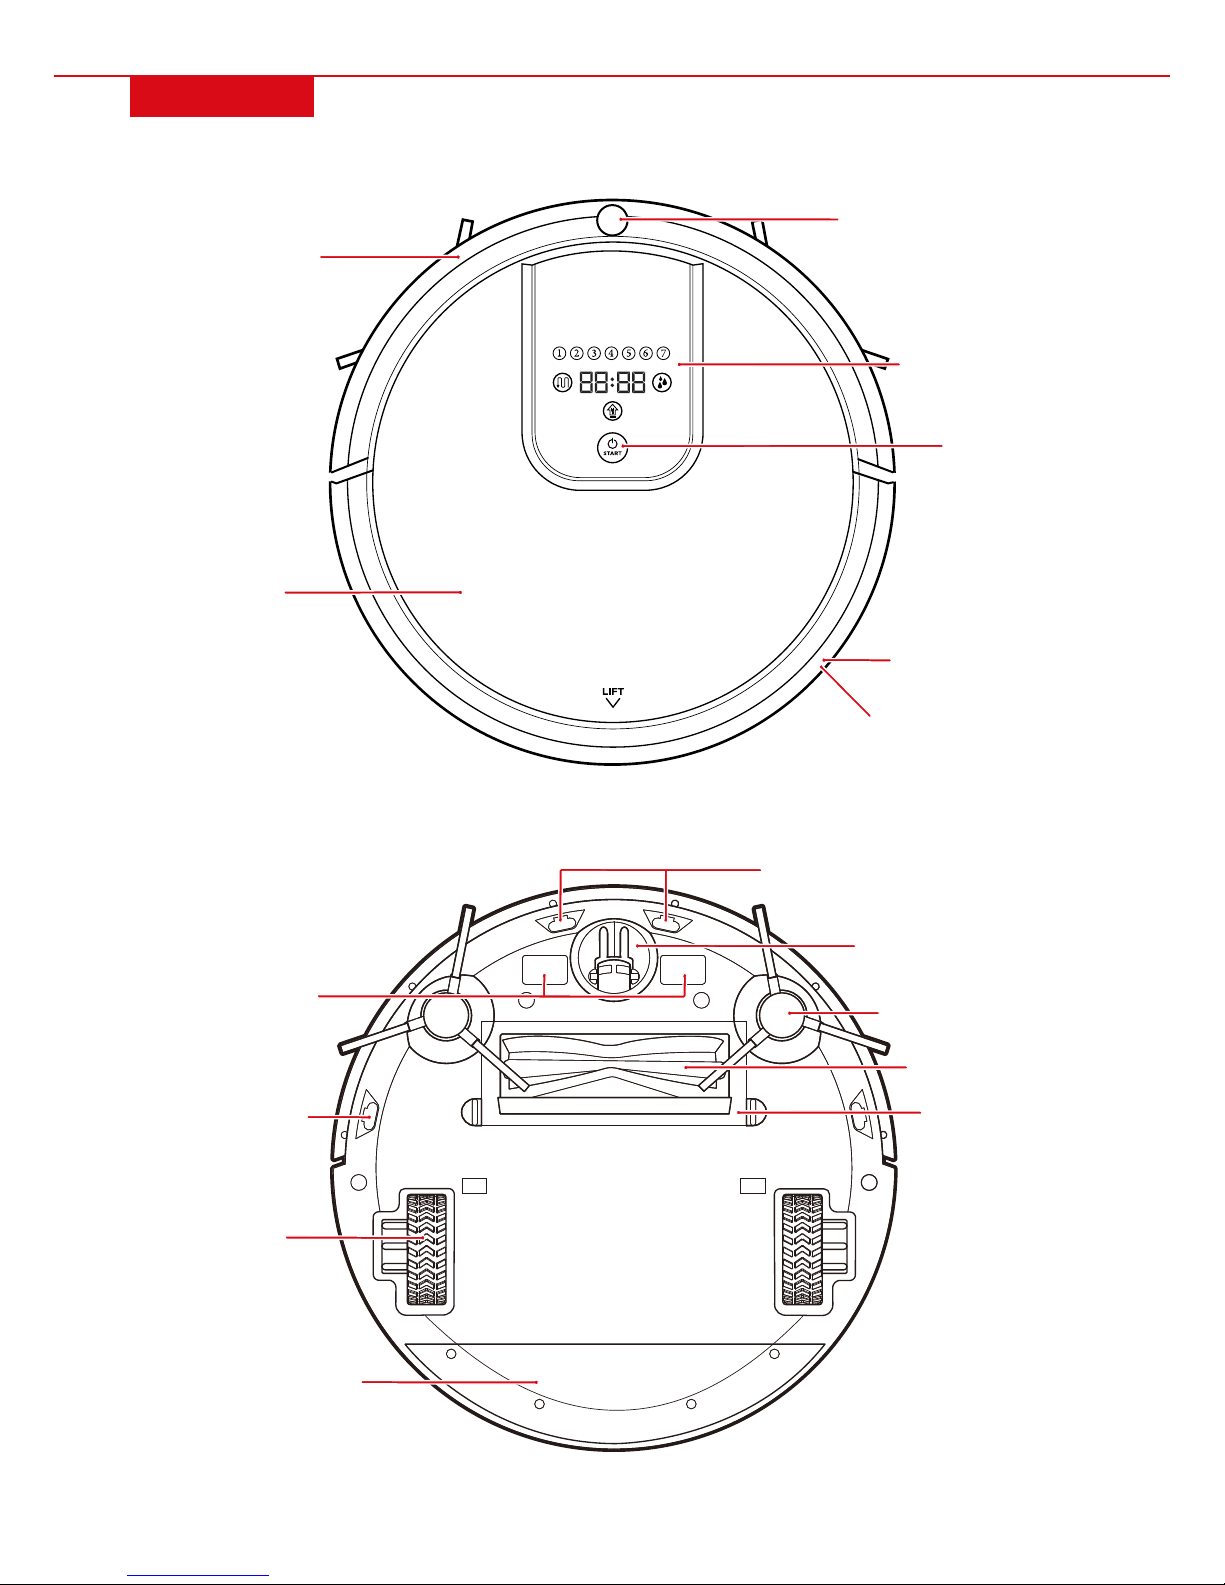
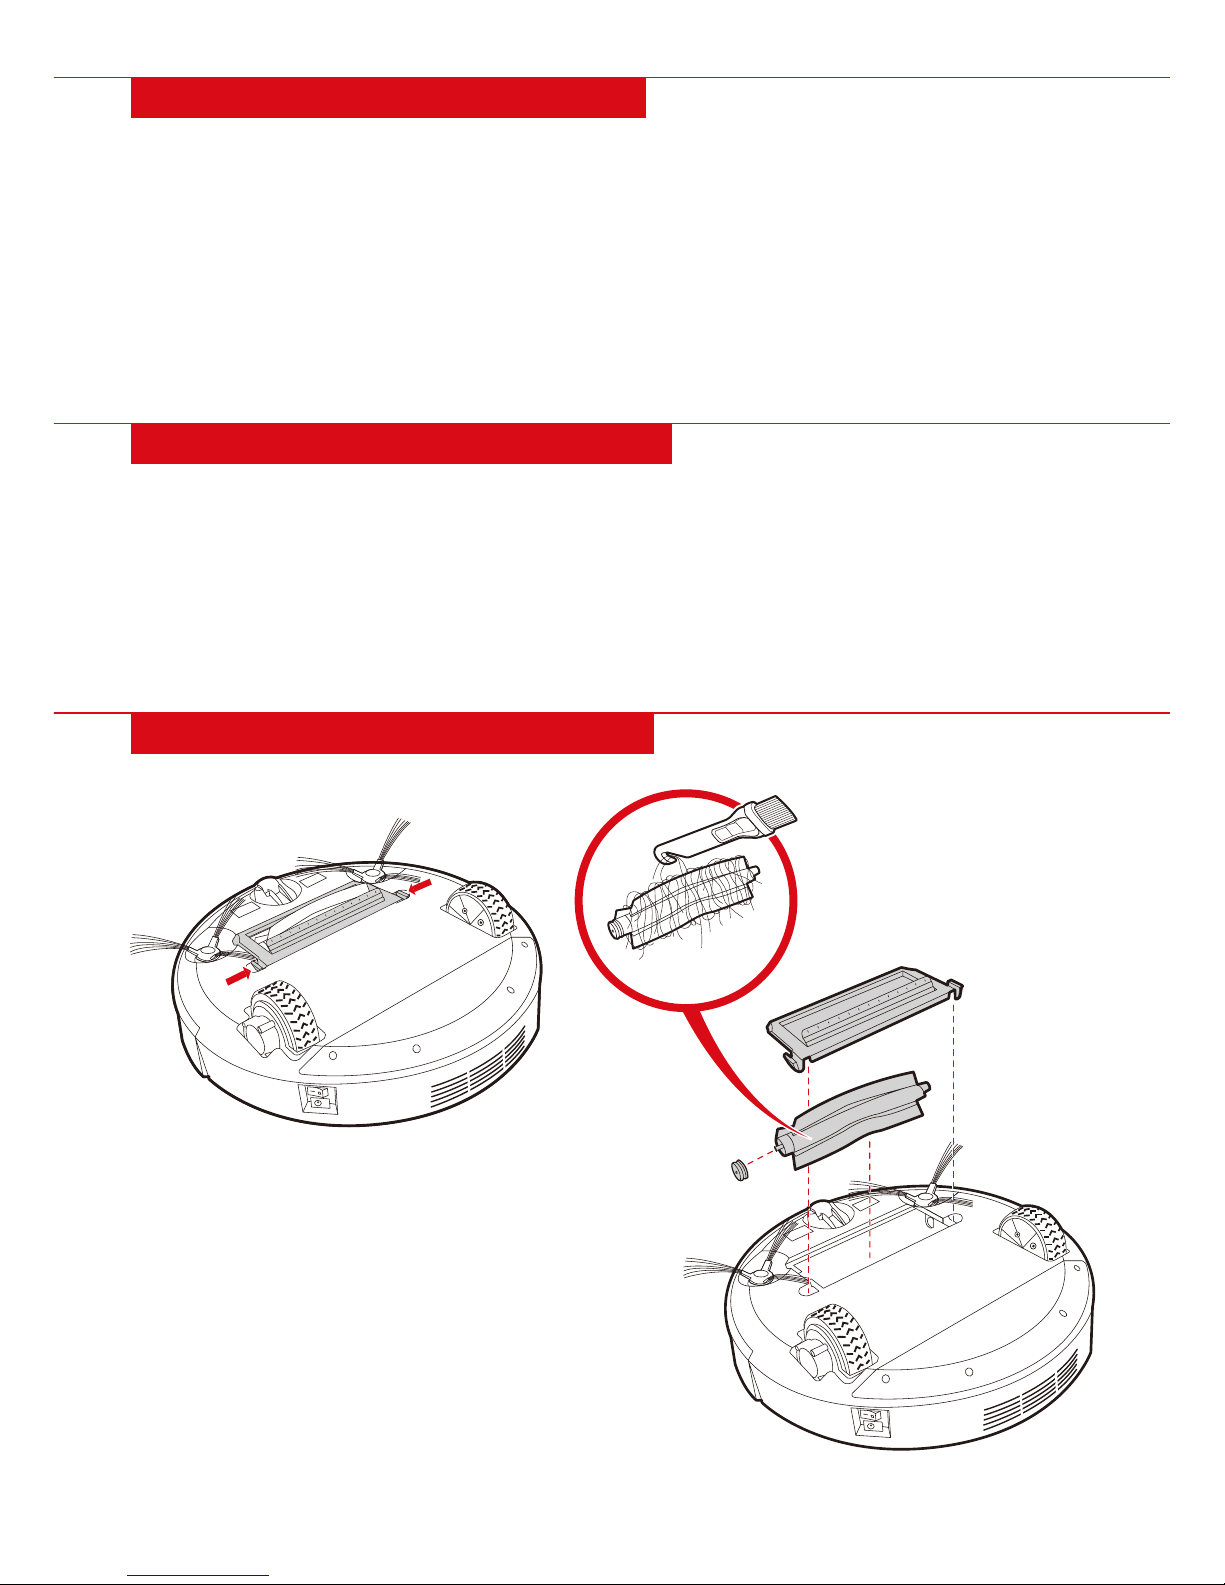
CLEANING THE ROLLING BRUSH
1) Compress the plastic tabs to remove the bracket.
2) Remove the rolling brush by carefully pulling it from the
left side.
3) Use the hook on the brush tool to remove hair from the
rolling brush.
4) If necessary, rinse the rolling brush with water. Make
sure it is completely dry before reinstallation.
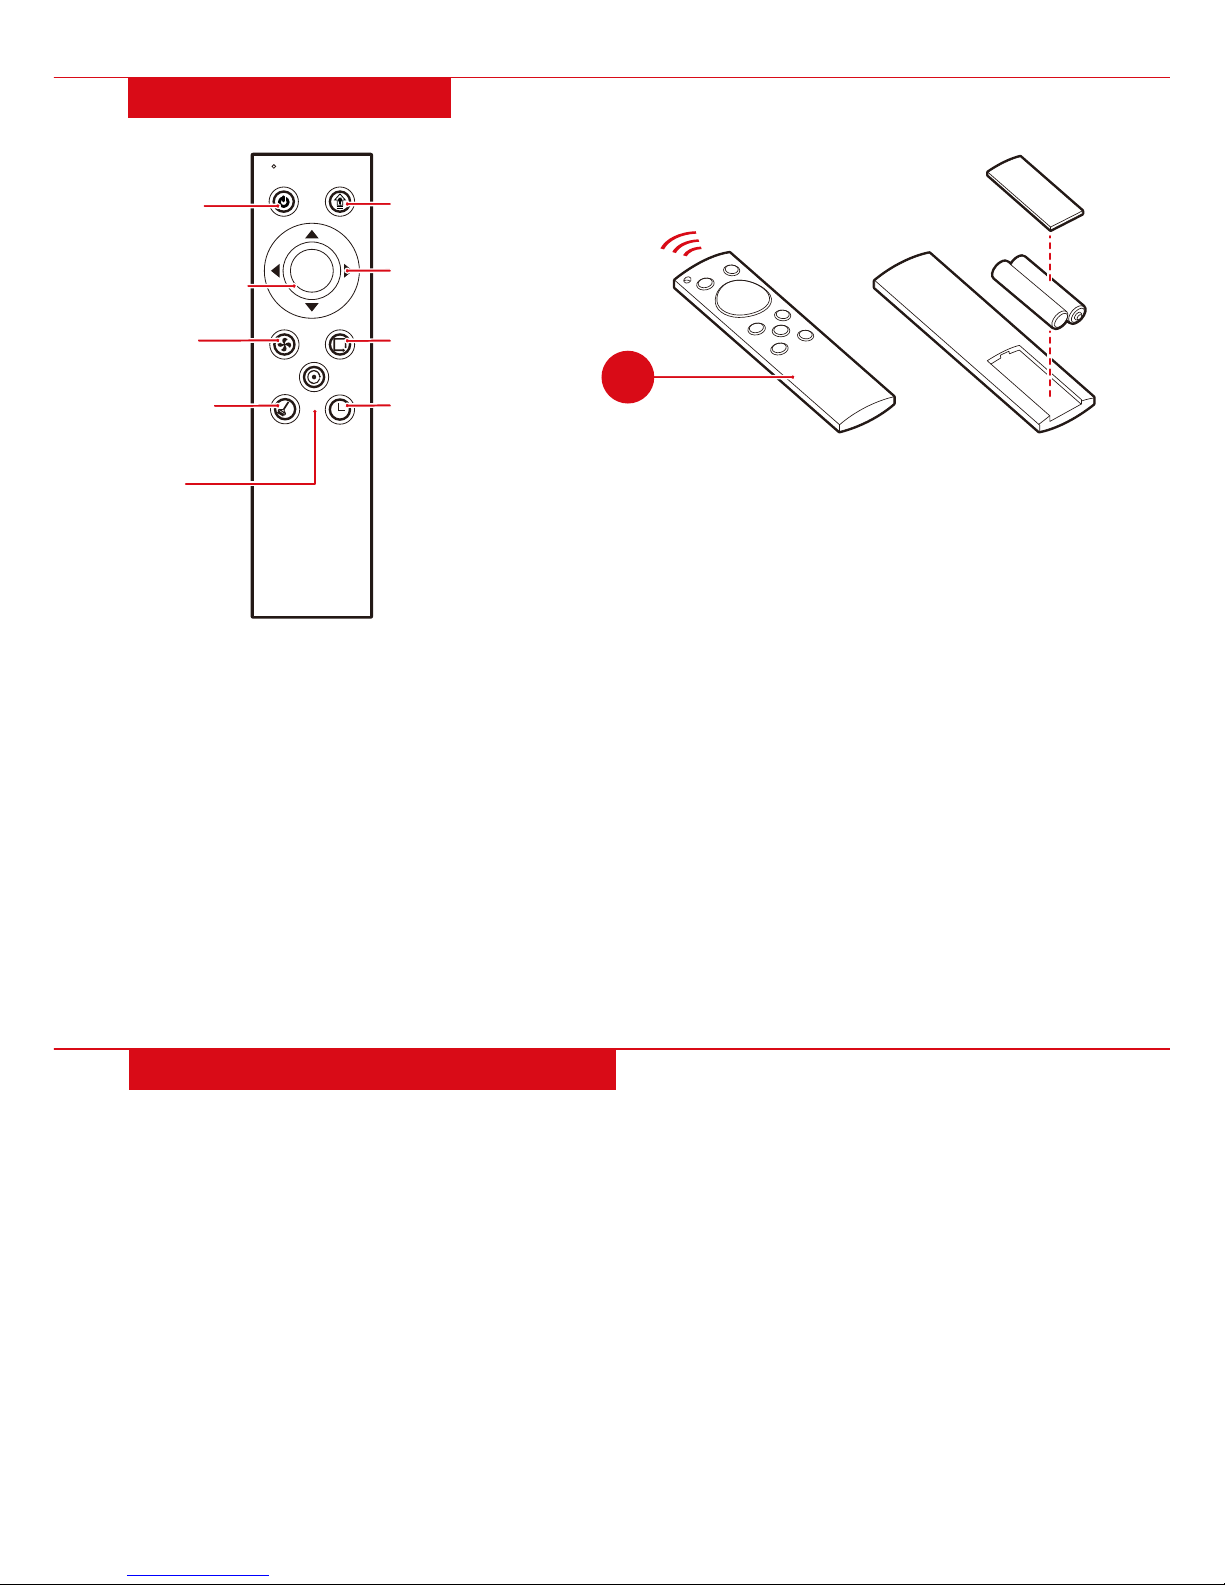
SETTING CLEANING SCHEDULE
1) While in standby, press the TIMER button and then press the SPOT button.
2) Press the LEFT/RIGHT buttons to toggle through the days of the week (1 represents Monday and 7
represents Sunday).
3) Hold the UP button to select a day. Hold the DOWN button to cancel a selected day.
4) Press START/STOP to save and continue to setting the time.
5) Press the LEFT/RIGHT buttons to switch between hour and minute.
6) Press the UP/DOWN buttons to increase/decrease the hour or minute.
7) Press START/STOP to save the settings.
SETTING WATER SEEPING SPEED
1) While in standby, press the TIMER button and then press the WALL button. The seeping speed
indicator light will flash.
2) Press the UP button to set normal water seeping speed, which is suitable for hardwood floors or
relatively clean floors. The indicator light will go solid and the screen will display “1111.”
3) Press the DOWN button to set fast water seeping speed, which is suitable for tile/marble floors or
very dirty floors. This indicator light will turn o and the screen will display “0000.”
4) Press the START/STOP button to save the settings.

Pg. 11
CLEANING THE DUSTBIN
1 2
3
Lift the dust cover. Remove the part F dustbin.
Open the dustbin and pour out the collected
dust/dirt into a waste basket. Use the part G brush
tool to clean the dustbin, filter frame, and
HEPA filter.
If necessary, rinse the parts with water. Make sure
that they are completely dry before reinstallation.
NOTE: It is recommended that you clean the suction
inlet and sensors each time you empty the dustbin.
A
F
I
H
G

1
MOPPING FUNCTION
Attach the trailing bar/mop to the bottom of the
unit by inserting it into the designated holes.
3
2
Slide the part L small dustbin onto the part M
water tank.
Open the plug, fill the water tank with clean water,
and replace the plug.
Insert the water tank/small dustbin into the unit
(replacing the normal dustbin).
M
L
K
J
Pg. 12

SETTING UP CHARGING DOCK
6.5'
3.2'
3.2'
Place the part N charging dock on flat ground against a wall and near a wall outlet.
Plug the charging dock into the wall outlet. Organize the power cord on the back of the
dock so it does not lay on the ground.
•Make sure that there are no obstacles
or uneven surfaces 6.5 feet in front or
3.2 feet from the sides of the dock.
•Do not block the infrared signal
emission window or the unit may be
unable to find the dock.
Robot vacuum unit can also be
charged with the DC power cord
by plugging directly into the unit.
O
NPOWER INDICATOR
POWER
ADAPTER JACK
SIGNAL EMISSION
WINDOW
POSITIVE
RECHARGING POLE
NEGATIVE
RECHARGING POLE
Pg. 13

TROUBLESHOOTING
ProblemError Code Solution
E001 Cannot detect ground
Suction inlet blocked
Left/right wheels not working
Side brushes not working
Left/right wheels o the ground
Rolling brush not working
Low battery
Charging failure
Wall detection failure
Front bumper not in place
Battery not properly installed
Low water level
Clean the cli sensors or place unit on flat ground
Clean the sensor head or clear the inlet
Clean foreign objects from the wheels
Clean foreign objects from side brushes
Place the unit on flat ground
Clean foreign objects from rolling brush
Move the unit back to the charging dock
Turn on power switch or make sure battery is
properly connected
Clean the sensors
Push the front bumper into place
Reinstall battery
Remove water tank and refill
E002
E003
E004
E005
E006
E007
E008
E009
E010
E011
E012
Pg. 14
STORAGE
•Turn o power before transporting or relegating machine to storage.
•When not in use, leave the machine on the charging dock to keep the battery in optimal condition.
•If only periodically used, make sure to recharge the machine at least once a month to keep the battery
in optimal condition.
•Before prolonged storage, charge the battery to full. Then use a screwdriver to remove the battery from
underneath the machine and store it in a cool, dry place.

Check out more great products:
bestchoiceproducts.com

All items can be returned for any reason within 60 days of the receipt and will receive a full refund as long as the
item is returned in its original product packaging and all accessories from its original shipment are included. All
returned items will receive a full refund back to the original payment method. All returned items will not be charged
a re-stocking fee.
All returned items require an RA (Return Authorization) number, which can only be provided by a Best Choice
Products Customer Service Representative when the return request is submitted. Items received without an RA
may not be accepted or may increase your return processing time. Once an item has been received by Best Choice
Products, refunds or replacements will be processed within 5 business days.
All returns must be shipped back to the Best Choice Products Return Center at the customer’s expense. If the
reason for return is a result of an error by Best Choice Products then Best Choice Products will provide a pre-paid
shipping label via email. Boxes for return shipping will not be provided by Best Choice Products, and is the
customer’s responsibility to either use the original shipping boxes or purchase new boxes.
Pictures may be required for some returns to ensure an item is not damaged prior to its return. Items returned are
not considered undamaged until they are received by Best Choice Products and verified as such. All damages to
items are the customer’s responsibility until the item has been received by and acknowledge by Best Choice
Products as undamaged.
CONTACT US; WE’RE HERE 7 DAYS A WEEK TO HELP YOU!
WARNING
Manufacturer and seller expressly disclaim any and all liability for personal injury, property damage or
loss, whether direct, indirect, or incidental, resulting from the incorrect attachment, improper use,
inadequate maintenance, or neglect of this product.
PRODUCT WARRANTY INFORMATION
bestchoiceproducts.com customerservice@
bestchoiceproducts.com 844.948.8400
ENJOY YOUR PRODUCT!
LEARN MORE!
Other manuals for SKY4719
1
Table of contents
Other BCP Vacuum Cleaner manuals
Popular Vacuum Cleaner manuals by other brands

Dustcontrol
Dustcontrol DC 1800 Autostart user manual

privileg
privileg VC-H4526E-5 user manual

Bissell
Bissell HEALTHY HOME VACUUM 61Z4 Series user guide

Parkside
Parkside PNTS 1500 A1 translation of original operation manual

Nilfisk-Advance
Nilfisk-Advance SELECT Instructions for use

Electrolux
Electrolux Rapido Vacuum Cleaner owner's guide