Bcube SP501 User manual

SP501
田邑压
MANUALE D'ISTRUZIONI
BEDIENUNGSANLEITUNG
USER'S MANUAL
Massimo Peso Utilizzatore
Maximale霍尸

-1 -
B ISTRUZIONI PER L'USO
ISTRUZIONI DI SICUREZZA
1. Leggere attentamente l'intero manuale prima di assemblare o
utilizzare l'unità.
2. Utilizzare l'apparecchio solo come descritto nelle istruzioni.
3. Prima di utilizzare l'unità, verificare che tutte le viti e i bulloni
siano ben serrati.
4. Tenere le mani lontane dalle parti in movimento.
5. Tenere i bambini e gli animali domestici lontani
dall'apparecchio. Non lasciare mai i bambini da soli con
l'apparecchio.
6. Prima dell'esercizio, verificare che tutte le parti della macchina
siano assemblate correttamente.
7. L'unità può essere utilizzata da una sola persona alla volta.
8. Montare e utilizzare l'unità su una superficie solida e piana.
Lasciare sempre un metro di spazio libero intorno all'unità.
9. Non utilizzare l'unità in prossimità di acqua o all'aperto.
10. Assicurarsi che il liquido non penetri mai nell'unità.
11. Tenere gli oggetti appuntiti lontano dall'unità.
12. Non utilizzare mai l'apparecchio se non funziona
correttamente.
13. Non tentare di riparare l'apparecchio da soli senza aver prima
consultato il nostro Centro di assistenza.
14. L'unità è destinata esclusivamente all'uso domestico e non
deve essere utilizzata in ambito commerciale. L'unità è
conforme alla norma EN 957-1/5 HC e non è adatta all'uso
terapeutico.
15. L'apparecchio non è adatto a persone con un peso corporeo
superiore a 130 kg.
SERVIZIO CLIENTI: In caso di rotture, danni o parti mancanti,
rivolgersi al nostro centro di assistenza per ottenere i pezzi di
ricambio originali. Nel frattempo, non utilizzare l'apparecchio.
ISTRUZIONI DI SICUREZZA PER L‘ALLENAMENTO
ATTENZIONE Prima di iniziare l'attività fisica, consultare il proprio
medico. Ciò è particolarmente importante per gli utenti con
problemi di salute esistenti.
1. Riscaldarsi bene prima di iniziare l'allenamento.
2. Per frenare o arrestare il volano, premere con forza il pulsante
di arresto.
3. Quando ci si allena, indossare sempre indumenti adeguati che
non possano impigliarsi nell'attrezzatura. Non utilizzare
l'attrezzatura a piedi nudi, ma indossare sempre scarpe da
ginnastica. Non indossare scarpe slacciate, con lacci penzolanti
o con suole di cuoio.
4. Tenere tutti gli indumenti appesi e gli asciugamani lontani
dal nastro di scorrimento. Se un oggetto si incastra, spegnere
immediatamente la macchina.
5. Non azionare mai l'unità quando c'è qualcuno sopra.
6. Non oscillare o saltare sul tapis roulant.
7. In caso di nausea, vertigini, dolore o altri sintomi fisici insoliti,
interrompere immediatamente l'allenamento e consultare
un medico.
8. Le persone disabili devono utilizzare l'apparecchio solo in
presenza di personale qualificato o del proprio medico.
9. I bambini devono utilizzare l'apparecchio solo in presenza di
un adulto.
10. In caso di malessere, nausea, dolore al petto o altri sintomi
anomali, interrompere immediatamente l'allenamento e
consultare un medico.
ISTRUZIONI PER LO SMALTIMENTO
I materiali di imballaggio sono riciclabili.
Si prega di smaltire l'imballaggio nel rispetto
dell'ambiente.
Non smaltire gli apparecchi elettrici nei rifiuti
domestici. Secondo la Direttiva europea
2002/96/CE sui rifiuti di apparecchiature
elettriche ed elettroniche e la sua
implementazione nella legislazione nazionale, è
necessario procedere come segue
gli apparecchi elettrici usati devono essere raccolti
separatamente e riciclati in modo ecologico. Se i prodotti
contengono batterie o batterie ricaricabili non installate in modo
permanente, queste devono essere rimosse prima dello
smaltimento e smaltite separatamente come batterie.

2
B ISTRUZIONI PER L'USO
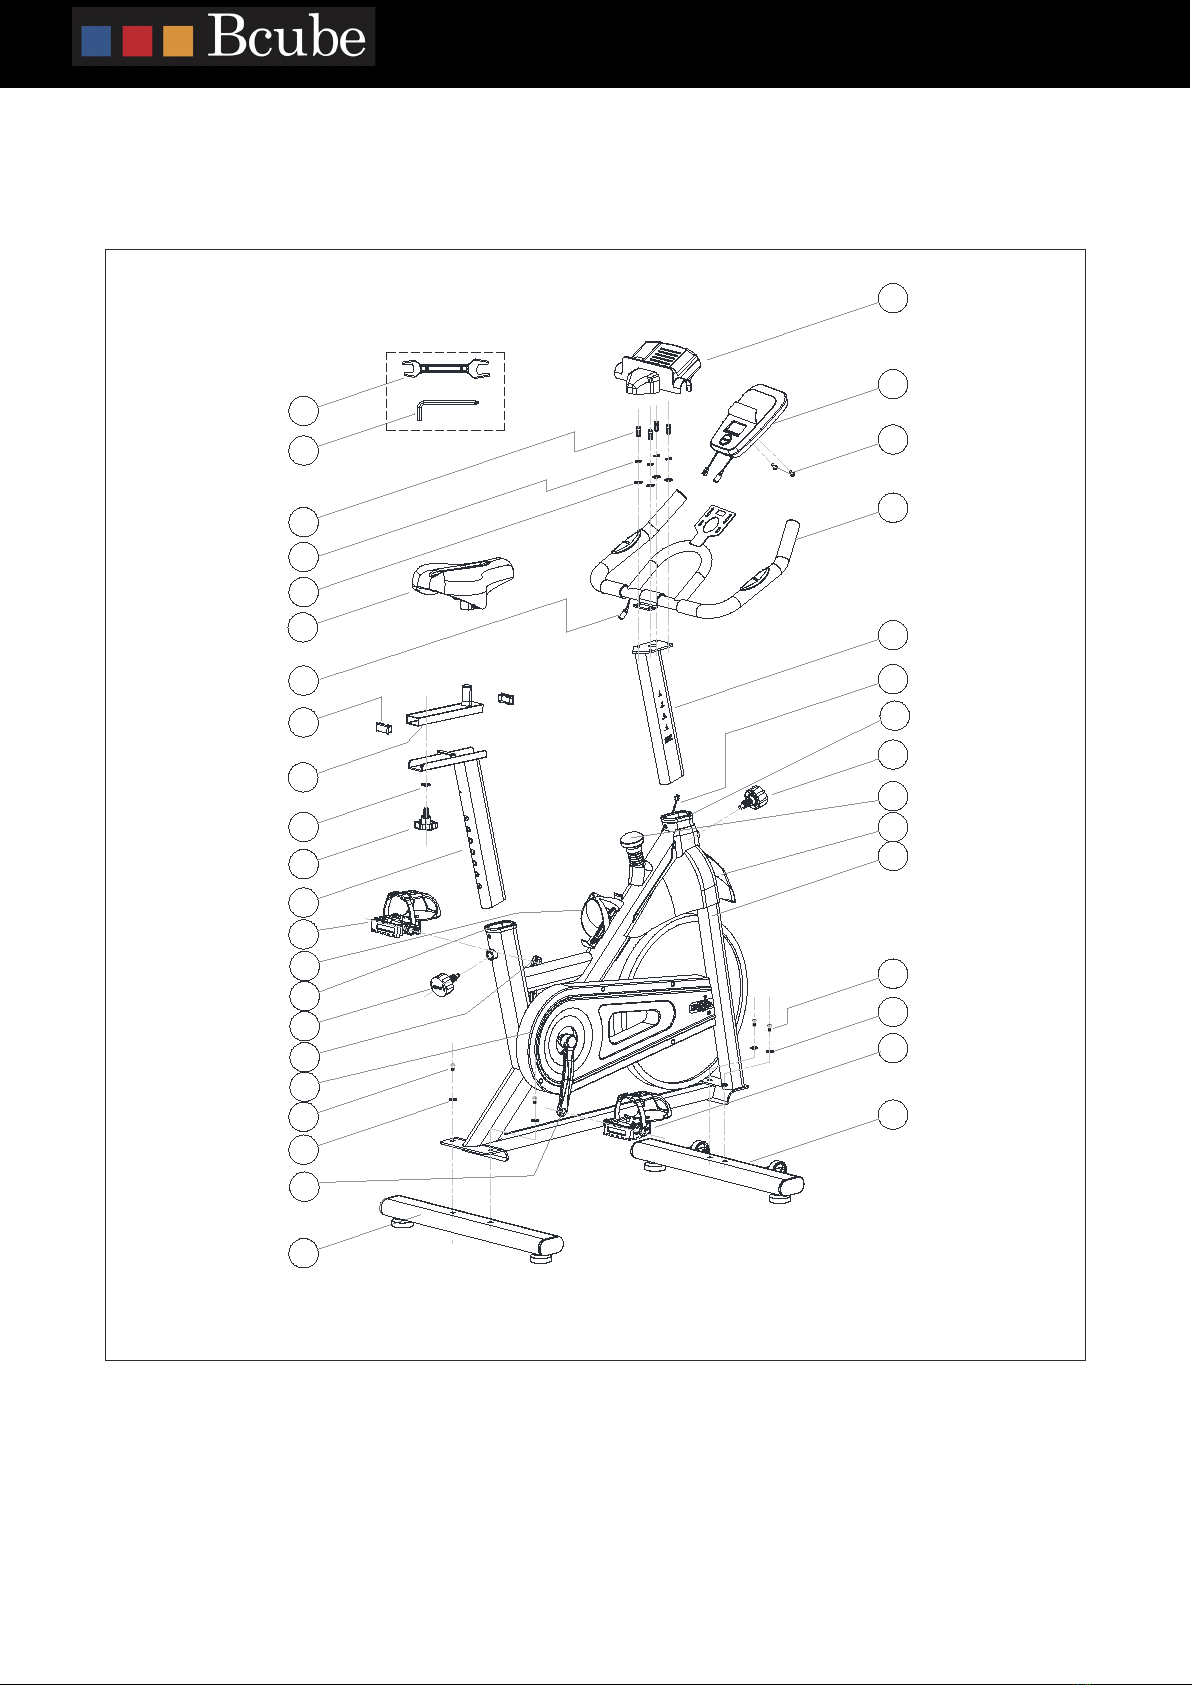
ISTRUZIONI DI MONTAGGIO
Primadi iniziare l'assemblaggio dell'unità, verificare che siano presentui componenspecifica. Alcunedelle fasi di
montaggio richiedono un sollevamento pesante. Si consiglia di farsi assistere da un'altra persona nell'assemblaggio del
prodoo.
FASE 1: La traversa anteriore (2) viene fissata al telaio (1) con bulloni a carrello (16), rondelle (17) e dadi a testa cilindrica (18)
e fissata con una chiave aperta (25). Nota: le ruote di trasporto della traversa anteriore (2) sono rivolte in avancome mostrato.
Analogamente, la traversaposteriore (3) è fissata al telaio (1) con bulloni a carrello (16), rondelle(17) e dadi (18) e fissata con
una chiave aperta (25).
La macchina può essere adaata a terreni irregolari grazie ai piedini regolabili sul supporto trasversale posteriore (3).
16# 4pcs
17# 4pcs
25#
18
1
16
17
16 2
17
3
FASE 2: Collegare il pedale destro (12) con il segno R allapedivella destra e fissarlo con una chiave aperta (25).Nota:
serrare in senso orario. Fissare il pedale sinistro (13) con il segno L allapedivella sinistra e fissarlo con una chiave aperta (25).
Nota: serrare in senso anorario. Fissare le manopole di regolazione (14) rispevamente sulla parte anteriore e posteriore
del telaio (1). Non ènecessario stringerle in questa fase.
13
25
12
25
25#
14
14
1

3
B ISTRUZIONI PER L'USO
FASE 3: Il reggisella (4) viene inserito nel telaio (1) e la manopola di regolazione (14) viene estraa in modo che la manopola
di regolazione (14) si innesautomacamente nel foro corrispondente del reggisella (4).
Allo stesso modo, inserire il supporto del manubrio (5) nel telaio (1) ed estrarre la manopola di regolazione (14) in modo che
questa si innesautomacamente nel foro corrispondente del manubrio (5).
Nota: estrarre la manopola di regolazione (14) per regolare l'altezza del reggisella (4) o del manubrio (5). Dopo la regolazione
è necessario stringere nuovamente le manopole di regolazione (14).
1
4
5
14
14
Fase 4: il regolatore della sella orizzontale (7) è montato sul reggisella (4) e fissato con una rondella (19) e un dado di
regolazione (15). Nota: allentare il dado di regolazione (15) per regolare la posizione del regolatore della sella orizzontale (7)
avane indietro nellaposizione appropriata. Il dado di regolazione (15) deve essere serrato prima dell'uso.
15
19
7
4

4
B ISTRUZIONI PER L'USO
Fase 5: fissare il manubrio (6) al supporto del manubrio (5) con le rondelle (17), le rondelle elasche (21) e le via testa
cilindrica (20) e serrare con una chiave a brugola (26).
5
6
17
21
20 6
22
17# 4pcs
21# 4pcs
20# 4pcs
26#
Fase 6: collegare il cavo (22) al cavo (#9a) sul retro del monitor (#9). Collegare il cavo di segnale (23) al cavo (#9b) sul retro del
monitor (#9). Facendo aenzione a non schiacciare i fili, far scendere i cavi colleganell'apertura e fissare il monitor (9) alla
staffa sul manubrio (#6).Fissarlo con due via testa tonda (10) e serrarle con la chiave a brugola (26).
6
10
9
6
22
23
10# 2pcs
26# 9a 9b
23
22

5
B ISTRUZIONI PER L'USO
Fase 7: fissare il supporto per cellulare (11) al manubrio (6).
11
6
ATTENZIONE! Prima dell'uso, accertarsi che tu le par siano montate saldamente e che l'apparecchio poggi saldamente
sul pavimento.
ELENCO DELLE PARTI DI RICAMBIO
No. Descrizione Dimensione Pezzo No. DescrizioneDimensione Pezzo
85.8ØecirtavaL711oialeT1
2Supporto trasversale
anteriore 1 18 Dado del tappo M8 4
3Supporto trasversale
posteriore 1 19 Lavatrice Ø10.5 1
461X8MetiV021allesiggeR4
5 Supporto del manubrio 1 21 Rondella elasticaØ8.5 4
1eroirepusovaC221oirbunaM6
1ovacottoS321allesiggeR7
421alleS8 Tappo per tubo
quadrato 20X40 2
151-31eselgnievaihC521rotinoM9
1mm6alogurbaevaihC6225MitiV01
11 Supporto per telefono
cellulare 2ivacippaT72152Øobutrep
12 Pedale destro R 1 28 Coperchiovolano 1
1aiccarrobatroP921LortsiniseladeP31
14 Manopola di
regolazioneM16 2 30 Copertura protettiva 1
15 Volantino M10 1 31 Manovella sinistra 1
16 Hexagon socket screw M8X20 4 32 Manovella destra 1

6
B ISTRUZIONI PER L'USO
DISEGNO DELL'ESPLOSIONE
3
17
16
14
13
15
19
4
7
24
8
26
25
2
12
17
16
1
14
5
6
10
9
11
17
21
20
23
22
18
27
27
28
29
31
30
32

7
B ISTRUZIONI PER L'USO
FUNZIONAMENTO DEL COMPUTER
TM R SP D D ST CAL
O DO RPM P U LS E SC A N
TASTO DI FUNZIONE
SELEZIONARE QUALSIASI FUNZIONE PREMENDO IL PULSANTE MODE, IN MODALITÀ DI SCANSIONE È POSSIBILE BLOCCARE LA
FUNZIONE CORRENTE PREMENDO IL PULSANTE DI MODE.
TENERE PREMUTO IL PULSANTE MODE PER 2 SECONDI PER RIPRISTINARE TUTTE LE FUNZIONI.
FUNZIONI
•ORDINE DI VISUALIZZAZIONE DELLA SCANSIONE: TMR→SPD→ DST→CAL→PULSE: IN MODALITÀ SCANSIONE,
PREMERE IL PULSANTE DI MODALITÀ PER SELEZIONARE UNA FUNZIONE DIVERSA.
OGNI 6 SECONDI, LE SINGOLE MODALITÀ VENGONO ESEGUITE AUTOMATICAMENTE UNA DOPO L'ALTRA.
•TIME TEMPO DI ALLENAMENTO DA 0:00 A 99:00
•DIST ACCUMULA LA DISTANZA TOTALE DA 0,0 A 999,9 KM.
•CAL ACCUMULA LE CALORIE BRUCIATE DURANTE L'ESERCIZIO DA 0,0 CAL A UN MASSIMO DI 999,9 CAL (QUESTI DATI
SONO UNA GUIDA APPROSSIMATIVA PER CONFRONTARE ALLENAMENTI DIVERSI E NON POSSONO ESSERE
UTILIZZATI PER TRATTAMENTI MEDICI).
•PULSE CON SEGNALE DI PULSAZIONI INSERITO PER 5 SECONDI, VIENE VISUALIZZATO IL BATTITO CORRENTE. SENZA
SEGNALE DI PULSAZIONI PER 5 SECONDI, VIENE VISUALIZZATO "P“
NOTA:
1. SE NON VIENE TRASMESSO ALCUN SEGNALE AL COMPUTER PER 4 MINUTI, IL COMPUTER SPEGNE
AUTOMATICAMENTE IL DISPLAY LCD E TUTTI I VALORI DELLE FUNZIONI VENGONO SALVATI.
2. SPECIFICHE DELLA BATTERIA DEL MONITOR: 1,5 V UM-4 O AAA (2 PEZZI)
3. QUANDO IL DISPLAY LCD SI OSCURA, SIGNIFICA CHE LE BATTERIE DEVONO ESSERE SOSTITUITE.
4. NON PREMERE IL PULSANTE MODE DURANTE LA SOSTITUZIONE DELLE BATTERIE. SE IL DISPLAY PRESENTA
ANOMALIE, REINSERIRE LE BATTERIE.

8
B BEDIENUNGSANLEITUNG
SICHERHEITSINWEISE
16. Lesen Sie das gesamte Handbuch sorgfältig durch, bevor Sie
das Gerät montieren oder in Betrieb nehmen.
17. Benutzen Sie das Gerät nur wie in der Anleitung beschrieben.
18. Prüfen Sie, ob alle Schrauben und Bolzen richtig angezogen
sind, bevor Sie das Gerät benutzen.
19. Halten Sie die Hände von beweglichen Teilen fern.
20. Halten Sie Kinder und Haustiere von dem Gerät fern. Lassen
Sie Kinder niemals alleine mit dem Gerät.
21. Überprüfen Sie vor dem Training, ob alle Teile des Geräts
richtig zusammengesetzt sind.
22. Das Gerät darf jeweils nur von einer Person benutzt werden.
23. Montieren und betreiben Sie das Gerät auf einer festen,
ebenen Fläche. Lassen Sie immer einen Meter freien
Durchgang um das Gerät herum.
24. Verwenden Sie das Gerät nicht in der Nähe von Wasser oder
im Freien.
25. Achten Sie darauf, dass niemals Flüssigkeit in das Gerät
eindringt.
26. Halten Sie scharfe Gegenstände vom Gerät fern.
27. Benutzen Sie das Gerät niemals, wenn es nicht richtig
funktioniert.
28. Versuchen Sie nicht, das Gerät selbst zu reparieren, ohne
vorher unser Service-Center zu konsultieren.
29. Das Gerät ist nur für den Heimgebrauch vorgesehen und darf
nicht im gewerblichen Bereich genutzt werden. Das Gerät
entspricht der Norm EN 957-1/5 HC und ist nicht für den
therapeutischen Einsatz geeignet.
30. Das Gerät ist nicht für Personen mit einem Körpergewicht von
mehr als 130 kg geeignet.
KUNDENDIENST: Bei Bruch, Beschädigung oder fehlenden Teilen
wenden Sie sich bitte an unser Servicezentrum, um
Originalersatzteile zu erhalten. In der Zwischenzeit darf das Gerät
nicht benutzt werden.
SICHERHEITSHINWEISE FÜR DAS TRAINING
ACHTUNG Bevor Sie mit dem Training beginnen, konsultieren Sie
Ihren Arzt. Dies ist besonders wichtig für Benutzer mit bestehenden
gesundheitlichen Problemen.
11. Wärmen Sie sich vor Beginn des Trainings gut auf.
12. Um die Schwungscheibe zu bremsen oder zu stoppen, drücken
Sie fest auf den Stopp-Knopf
13. Tragen Sie beim Training immer geeignete Kleidung, die sich
nicht in den Geräten verfangen kann. Benutzen Sie das Geräte
nicht barfuß, sondern tragen Sie immer Turnschuhe. Tragen
Sie keine ungebundenen Schuhe, mit baumelnden
Schnürsenkeln und keine Schuhe mit Ledersohlen.
14. Halten Sie alle hängenden Kleidungsstücke und Handtücher
vom laufenden Band fern. Sollte ein Gegenstand stecken
bleiben, schalten Sie das Gerät sofort aus.
15. Bedienen Sie das Gerät niemals, wenn sich jemand darauf
befindet.
16. Schwingen oder springen Sie nicht auf dem Laufband.
17. Bei Übelkeit, Schwindel, Schmerzen oder anderen
ungewöhnlichen körperlichen Symptomen das Training
sofort abbrechen und einen Arzt aufsuchen.
18. Behinderte Personen dürfen das Gerät nur in Anwesenheit
von qualifiziertem Personal oder ihres Arztes benutzen.
19. Kinder sollten das Gerät nur im Beisein eines Erwachsenen
benutzen.
20. Bei Unwohlsein, Übelkeit, Schmerzen in der Brust oder
anderen abnormen Symptomen ist das Training sofort
abzubrechen und ein Arzt aufzusuchen.
ENTSORGUNGSHINWEISE
Die Verpackungsmaterialien sind recyclebar.
Bitte die Verpackungen umweltgerecht
entsorgen.
Werfen Sie Elektrogeräte nicht in den Hausmüll.
Gemäß europäischer Richtlinie 2002/96/EG über
Elektro- und Elektroaltgeräte und deren
Umsetzung in nationales Recht, müssen
verbrauchte Elektrogeräte getrennt gesammelt und einer
umweltgerechten Wiederverwertung zugeführt werden.
Enthalten die Produkte Batterien oder Akkus, die nicht fest
verbaut sind, müssen diese vor der Entsorgung entnommen und
getrennt als Batterie entsorgt werden

9
B BEDIENUNGSANLEITUNG
AUFBAUANLEITUNG
Bevor Sie anfangen das Gerät aufzubauen, überprüfen Sie bie,dass alle angegebenen Teile vorhanden sind. Manche der
Auauschrie verlangen schweres Heben. Es wird empfohlen, dass Sie sich beim Auau dieses Produkts von einer anderen
Person unterstützen lassen.
SCHRITT 1: Die vordere Querstütze (2) wird mit Schlossschrauben (16), Unterlegscheiben (17) und Hutmuern (18) am
Rahmen (1) befesgt und mit einem Gabelschlüssel (25) fixiert. Hinweis: Die Transporträder der vorderen Querstütze (2) sind
nach vorne gerichtet, wie gezeigt. Ebenso wird die hintere Querstütze (3) mit Schlossschrauben (16), Unterlegscheiben (17)
und Abdeckmuern (18) am Rahmen (1) befesgt und mit einem Maulschlüssel (25) fixiert.
Mit den Verstellfüßen an der hinteren Querstütze (3) kann die Maschine an Unebenheiten im Boden angepasst werden.
3
17
162
17
16
1
25#
18# 4pcs
17# 4pcs
16# 4pcs
SCHRITT 2: Bringen Sie das rechte Pedal (12) mit der Markierung R an der rechten Kurbel an und befesgen Sie es mit einem
Gabelschlüssel (25). Hinweis: Ziehen Sie es im Uhrzeigersinn fest. Bringen Sie das linke Pedal (13) mit der Markierung L an der
linken Kurbel an und befesgen Sie es mit einem Gabelschlüssel (25). Hinweis: gegen den Uhrzeigersinn anziehen. Die
Einstellknöpfe (14) werden jeweils vorne und hinten am Rahmen (1) angebracht. Beachten Sie, dass sie zu diesem Zeitpunkt
nicht festgezogen werden müssen.
13
25
12
25
25#
14
14
1

10
B BEDIENUNGSANLEITUNG
SCHRITT 3: Die Sattelstütze (4) wird in den Rahmen (1) eingesetzt, und der Einstellknopf (14) wird herausgezogen, so dass
der Einstellknopf (14) automatisch in das entsprechende Loch der Sattelstütze (4) einrastet.
In ähnlicher Weise wird die Lenkerstütze (5) in den Rahmen (1) eingeführt und der Einstellknopf (14) herausgezogen, so dass
der Einstellknopf (14) automatisch in das entsprechende Loch der Griffstange (5) einrastet.
Hinweis: Ziehen Sie den Einstellknopf (14) heraus, um die Höhe der Sattelstütze (4) oder der Griffstütze (5) einzustellen. Nach
der Einstellung müssen Sie die Einstellknöpfe (14) wieder festziehen.
Schritt 4: Die horizontale Sattelverstellung (7) wird an der Sattelstütze (4) montiert und mit einer Unterlegscheibe (19) und
einer Einstellmutter (15) befestigt. Hinweis: Lösen Sie die Einstellmutter (15), um die Position der horizontale Sattelverstellung
(7) vor und zurück in die entsprechende Position zu bringen. Die Einstellmutter (15) muss vor dem Gebrauch festgezogen
werden.
1
4
5
14
14
15
19
7
4

11
B BEDIENUNGSANLEITUNG
Schritt 5: Der Lenker (6) wird mit den Unterlegscheiben (17), den Federscheiben (21) und den Kopfschrauben (20) an der
Lenkerstütze (5) befestigt und mit einem Innensechskantschlüssel (26) festgezogen.
Schritt 6: Verbinden Sie das Kabel (22) mit dem Kabel (#9a) auf der Rückseite des Monitors (#9). Verbinden Sie das Signalkabel
(23) mit dem Kabel (#9b) auf der Rückseite des Monitors (#9). Achten Sie darauf, dass keine Drähte eingeklemmt werden,
führen Sie die angeschlossenen Drähte in der Öffnung nach unten und befestigen Sie den Monitor (9) an der Halterung am
Lenker (#6). Befestigen Sie sie mit zwei Rundkopfschrauben (10) und ziehen Sie sie mit dem Innensechskantschlüssel (26) fest.
5
17
21
20 66
22
17# 4pcs
21# 4pcs
20# 4pcs
26#
10
9
66
22
23
10# 2pcs
26# 9a 9b
23
22

12
B BEDIENUNGSANLEITUNG
Schri 7: Bringen Sie die Handyhalterung (11) am Lenker (6) an.
ACHTUNG! Stellen Sie vor dem Gebrauch sicher, dass alle Teile fest monert sind und das Gerät sicher auf dem Boden
steht.
ERSATZTEILLISTE
11
6
Nr. Beschreibung GrößeStück Nr. Beschreibung Größe Stück
85.8ØebiehcsgelretnU711nemhaR1
48MrettumtuH811eztütsreuQeredroV2
15.01ØebiehcsgelretnU911eztütsreuQeretniH3
461X8MebuarhcS021eztütslettaS4
45.8ØebiehcsredeF121eztütsrekneL5
1lebaKserebO221rekneL6
1lebaKsretnU321eztütslettaS7
204X02eppakrhoR-tnakreiV421lettaS8
151-31lessülhcsnebuarhcS521rotinoM9
10 Schrauben M5 2 26 Innensechskant-
Schlüssel 6 mm 1
11 Halterung für
Mobiltelefon
für
Ø25Rohr 2nefpotslhoH721
12 Rechtes Pedal R 1 28 Schwungrad
abdeckung 1
1retlahnehcsalF921LladePsekniL31
1ellÜhztuhcS03261MfponklletsniE41
1lebruKekniL13101MdardnaH51
1lebruKethceR23402X8MwercstekcosnogaxeH61
13
B BEDIENUNGSANLEITUNG
EXPLOSIONSZEICHNUNG
3
17
16
14
13
15
19
4
7
24
8
26
25
2
12
17
16
1
14
5
6
10
9
11
17
21
20
23
22
18
27
27
28
29
31
30
32

14
B BEDIENUNGSANLEITUNG
COMPUTERBEDIENUNG
TM R SP D D ST C AL
O DO RPM PULSE SC A N
FUNKTIONSTASTE
MODE WÄHLEN SIE JEDE FUNKTION DURCH DRÜCKEN DER MODUS-TASTE, IM SCAN-MODUS KÖNNEN SIE DURCH DRÜCKEN
DER MODUS-TASTE DIE AKTUELLE FUNKTION SPERREN.
DRÜCKEN SIE DIE MODUS-TASTE UND HALTEN SIE SIE 2 SEKUNDEN LANG GEDRÜCKT, UM ALLE FUNKTIONEN
ZURÜCKZUSETZEN.
FUNKTIONEN
•SCANNEN SIE DIE REIHENFOLGE DER ANZEIGE:TMR→SPD→ DST→CAL→PULSE: DRÜCKEN SIE IM SCAN-MODUS DIE
MODUS-TASTE, UM EINE ANDERE FUNKTION ZU WÄHLEN.
ALLE 6 SEKUNDEN WERDEN DIE EINZELNEN MODI AUTOMATISCH NACHEINANDER DURCHLAUFEN.
•ZEIT TRAININGSZEIT VON 0:00 BIS 99:00
•DIST AKKUMULIERT DIE GESAMTENTFERNUNG VON 0,0 BIS 999,9 KM.
•CAL AKKUMULIERT DEN KALORIENVERBRAUCH WÄHREND DES TRAININGS VON 0,0 CAL BIS ZUM MAXIMUM VON
999,9 CAL.(DIESE DATEN SIND EIN GROBER RICHTWERT FÜR DEN VERGLEICH VERSCHIEDENER TRAININGSEINHEITEN,
DER NICHT FÜR DIE MEDIZINISCHE BEHANDLUNG VERWENDET WERDEN KANN).
•PULS MIT PULSSIGNAL IN FÜR 5 SEKUNDEN, DER AKTUELLE PULS WIRD ANGEZEIGT. OHNE IMPULSSIGNAL IN 5
SEKUNDEN, ZEIGT ES "P" AN
HINWEIS:
1. WENN 4 MINUTEN LANG KEIN SIGNAL IN DEN COMPUTER ÜBERTRAGEN WIRD, SCHALTET DER COMPUTER DAS LCD-
DISPLAY AUTOMATISCH AB, UND ALLE FUNKTIONSWERTE WERDEN GESPECIHERT
2. MONITOR-BATTERIE-SPEZIFIKATION: 1,5 V UM-4 ODER AAA (2 STK.)
3. WENN DIE ANZEIGE VON LCD SCHWACH WIRD, BEDEUTET ES, DASS DIE BATTERIEN GEWECHSELT WERDEN MÜSSEN.
4. DRÜCKDN SIE DIE MODE TASTE NICHT; WENN SIE DIE BATTERIEN WECHSELN. FALLS DIE ANZEIGE ABNORMAL IST;
LEGEN SIE DIE BATTERIEN ERNEUT EIN

15
B OPERATING INSTRUCTIONS
SAFETY INSTRUCTIONS
31. Read the entire manual carefully before mounting or operating
the device.
32. Only use the device as described in the instructions.
33. Check that all screws and bolts are properly tightened before
using the device.
34. Keep hands away from moving parts.
35. Keep children and pets away from the device. Never leave
children alone with the device.
36. Before training, check that all parts of the device are properly
assembled.
37. The device may only be used by one person at a time.
38. Mount and operate the device on a solid, level surface. Always
leave a free passage of one meter around the device.
39. Do not use the device near water or outdoors.
40. Make sure that liquid never enters the device.
41. Keep sharp objects away from the device.
42. Never use the device if it is not working properly.
43. Do not attempt to repair the device yourself without first
consulting our service center.
44. The device is intended for home use only and must not be used
in the commercial sector. The device complies with the EN
957-1/5 HC standard and is not suitable for therapeutic use.
45. The device is not suitable for persons with a body weight of
more than 130 kg.
CUSTOMER SERVICE: In case of breakage, damage or missing parts,
please contact our service center for original spare parts. In the
meantime, do not use the device.
SAFETY INSTRUCTIONS FOR TRAINING
CAUTION Before you start training, consult your physician. This is
especially important for users with existing health problems.
21. Warm up well before starting the workout.
22. To brake or stop the flywheel, press firmly on the stop button
23. When exercising, always wear appropriate clothing that
cannot get caught in the equipment. Do not use the equipment
barefoot, always wear sneakers. Do not wear untied shoes,
with dangling laces or shoes with leather soles.
24. Keep all hanging garments and towels away from the running
belt. If an object gets stuck, switch off the device
immediately.
25. Never operate the device when someone is on it.
26. Do not swing or jump on the treadmill.
27. If nausea, dizziness, pain, or other unusual physical
symptoms occur, discontinue exercise immediately and seek
medical attention.
28. Disabled persons may use the device only in the presence of
qualified personnel or their physician.
29. Children should only use the device in the presence of an
adult.
30. In case of malaise, nausea, chest pain or other abnormal
symptoms, stop training immediately and consult a doctor.
DISPOSAL INSTRUCTIONS
The packaging materials are recyclable.
Please dispose of the packaging in an
environmentally friendly manner.
Do not dispose of electrical equipment in
household waste. According to the European
Directive 2002/96/EC on waste electrical and
electronic equipment and its implementation in
national law, the following must be disposed of
used electrical equipment must be collected separately and
recycled in an environmentally friendly manner. If the products
contain batteries or rechargeable batteries that are not
permanently installed, these must be removed before disposal
and disposed of separately as batteries

16
B OPERATING INSTRUCTIONS
ASSEMBLY INSTRUCTIONS
Before you start assembling the unit, please check that all the specified parts are present. Some of the assembly steps
require heavy lifting. It is recommended that you have another person assist you in setting up this product.
STEP 1: The front cross support (2) is fastened to the frame (1) with carriage bolts (16), washers (17) and cap nuts (18) and
fixed with an open-end wrench (25). Note: The transport wheels of the front cross support (2) are directed forward as shown.
Likewise, the rear cross support (3) is fastened to the frame (1) with carriage bolts (16), washers (17) and cap nuts (18) and
fixed with an open-end wrench (25).
The machine can be adjusted to uneven ground using the adjustable feet on the rear cross support (3).
STEP 2: Attach the right pedal (12) with the R mark to the right crank and fasten it with an open-end wrench (25). Note:
Tighten it clockwise. Attach the left pedal (13) with the L marking to the left crank and fasten it with an open-end wrench
(25). Note: tighten counterclockwise. Attach the adjustment knobs (14) to the front and rear of the frame (1) respectively.
Note that they do not need to be tightened at this time.
13
25
12
25
25#
14
14
1
3
17
162
17
16
1
25#
18# 4pcs
17# 4pcs
16# 4pcs

17
B OPERATING INSTRUCTIONS
STEP 3: Insert the seat post (4) into the frame (1) and pull out the adjustment knob (14) so that the adjustment knob (14)
automatically engages in the corresponding hole of the seat post (4).
Similarly, the handlebar support (5) is inserted into the frame (1) and the adjustment knob (14) is pulled out so that the
adjustment knob (14) automatically engages in the corresponding hole in the handlebar (5).
Note: Pull out the adjustment knob (14) to adjust the height of the seat post (4) or the handle post (5). After the adjustment,
you must tighten the adjustment knobs (14) again.
Step 4: Mount the horizontal saddle adjuster (7) to the seat post (4) and secure it with a washer (19) and adjusting nut (15).
Note: Loosen the adjusting nut (15) to adjust the position of the horizontal saddle adjuster (7) back and forth to the appropriate
position. The adjusting nut (15) must be tightened before use.
1
4
5
14
14
15
19
7
4

18
B OPERATING INSTRUCTIONS
Step 5: Attach the handlebar (6) to the handlebar support (5) using the washers (17), spring washers (21) and capscrews (20)
and tighten using an Allen wrench (26).
Step 6: Connect the cable (22) to the cable (#9a) on the back of the monitor (#9). Connect the signal cable (23) to the cable
(#9b) on the back of the monitor (#9). Taking care not to pinch any wires, route the connected wires down the opening and
attach the monitor (9) to the bracket on the handlebar (#6). Fasten it with two round-head screws (10) and tighten them with
the Allen key (26).
5
17
21
20 66
22
17# 4pcs
21# 4pcs
20# 4pcs
26#
10
9
66
22
23
10# 2pcs
26# 9a 9b
23
22

19
B OPERATING INSTRUCTIONS
Step 7: Aach the cell phone holder (11) to the handlebar (6).
CAUTION! Before use, make sure that all parts are firmly mounted and that the device stands securely on the floor.
SPARE PARTS LIST
11
6
No. Description SizePiece No. Description Size Piece
85.8ØrehsaW711emarF1
2 Front cross support 1 18 Cap nut M8 4
3 Rear cross support 1 19 Washer Ø10.5 1
461X8MwercS021tsoptaeS4
5 Handlebar support 1 21 Spring washerØ8.5 4
1elbacreppU221rabeldnaH6
1elbacrednU321tsoptaeS7
204X02pacebuterauqS421elddaS8
151-31hcnerW521rotinoM9
10 Screws M5 2 26 Hexagon socket wrenc
h
6 mm 1
2sgulpwolloH72152ØobutrepenohpllecrofredloH11
1revocleehwylF821RladepthgiR21
1egacelttoB921LladeptfeL31
1revocevitcetorP03261MbonktnemtsujdA41
1knarctfeL13101MleehwdnaH51
1knarcthgiR23402X8MwercstekcosnogaxeH61
Table of contents
Languages:
Other Bcube Exercise Bike manuals


