BE Agri Ease GS7.2R User manual

7.2V LITHIUM-ION CORDLESS SPRAYER
GS7.2R
operation manual

2
PARTS LIST
1. SPRAY GUN
2. EXTENSION NOZZLE
3. SPRING HOSE
4a. FIRST NOZZLE
4b. SECOND NOZZLE
5. SHOULDER STRAP
6. HANGING HOOK
7. TANK
8. SPRING CLIP
9. TANK LID
10. COUNTER FLOW DEVICE
11. CHARGER
12. ON/OFF AND SAFETY TRIGGER
13. MODE CHANGING SWITCH
14. CHARGING SOCKET
15. LED CHARGING INDICATOR
16. ON/OFF SWITCH
17. TROLLEY BASE
18. HANDLE
19. SPRAYER MACHINE STORAGE
20. METAL TUBE

3
PRODUCT SPECIFICATIONS
Model No.: GS7.2R
Input: 7.2V
Battery type: Lithium-ion
Lithium-ion battery capacity: 2600mAH
Charger/adaptor input: 100~240V, 50~60Hz AC
Battery charging time: 2 to 2.5 Hrs
Tank capacity: 4 Gallons (15 Liters)
QUALITY STATEMENT
This product has been engineered and manufactured to our high stadard for dependability,
ease of operation, and operator safety. Properly cared for, it will give you years of
rugged, trouble-free performance.
WARNING: READ MANUAL BEFORE USE
WARNING: To reduce the risk of injury, the user must read and understand the operator’s
manual before using this product. Battery must be fully charged before first use.
RETAIN THIS MANUAL FOR FUTURE REFERENCE.
Thank you for your purchase.
IMPORTANT SAFETY SYMBOLS AND EXPLANATION
Warning notice
Read the Owner’s Manual
Do not expose the sprayer to rain or submersion
Only use the battery charger indoors
Battery charger contains a safety transformer
If you need assistance with the
assembly or operation of this Sprayer please visit
BRABEREQ.COM

4
SAFETY PRECAUTIONS
WARNING: Failure to read and follow all
safety Warnings and all Instructions may
result in electric shock, fire and serious
injury. Save all warnings and instructions for
future reference. The term "power tool" in
the warnings refers to your mains-operated
(corded) power tool or battery-operated
(cordless) power tool.
WORK AREA SAFETY
a) Keep work area clean and well lit.
Cluttered or dark areas invite accidents.
b) Do not operate power tools in explosive
atmosphere, such as in the presence
of flammable liquids, gases or dust.
Power tools create sparks which may
ignite the dust or fumes.
c) Keep children and bystanders away
while operating a power tool. Distractions
can cause you to lose control.
ELECTRICAL SAFETY
a) Power tool plugs must match the outlet.
Never modify the plug in any way.
Do not use any adapter plugs with
earthed (grounded) power tools.
b) Avoid body contact with earthed or
grounded surfaces, such as pipes,
radiators, ranges and refrigerators.
There is an increased risk of electric shock
if your body is earthed or grounded.
c) Do not expose power tools to rain or wet
conditions. Water entering a power tool
will increase the risk of electric shock.
d) Do not abuse the cord. Never use the
cord for carrying, pulling or unplugging
the power tool. Keep cord away from
heat, oil, sharp edges or moving parts.
Damaged or entangled cords increase
the risk of electric shock.
e) When operating a power tool oudoors,
use an extension cord suitable for
outdoor use. Use of a cord suitable
for outdoor use reduces the risk of
electric shock.
CHARGING THE BATTERY
The battery should be fully charged before
using for the first time. The charging time
is about 2-2,5 hours. The battery charger
supplied matches the lithium battery installed
in the Roll & Spray garden sprayer.
Therefore DO NOT USE any other
charger to recharge the garden sprayer.
In order, to protect the lithium battery
against deep discharging, when the
battery is flat, the Roll & Spray garden
sprayer will automatically switch off via
a protective circuit.
WARNING: If the trigger is used continually
at this point, the lithium battery can be
damaged. Do not try to continue to use
the Roll & Spray garden sprayer before
recharging the battery.
CHARGING PROCEDURE
I. Insert the charger cable into charging
inlet (14) on the sprauer gun.
2. Making sure the wall outlet in your
home is normal household voltage
(CACI20V 60Hz).Insert the battery
charger plug into themainspower supply.
3. The red LED charging Indicator (15)
lights up to tell yuou that the battery
pack is on charge.
The battery is fully charged when the red
LED charging Indicator (15) turns off.
During the charging process, the spray
gun assembly will warm up, but this is
perfectly normal. When not using the
spray gun for extended periods, disconnect
the battery charger from the socket.
When the Roll & Spray garden sprayer is
charging, you MUST NOT ATTEMPT TO
USE the product.
Only charge the battery between 50ºF -110ºF
(IOºC-45ºC).
After prolonged use, allow battery to
cool down first before recharging.
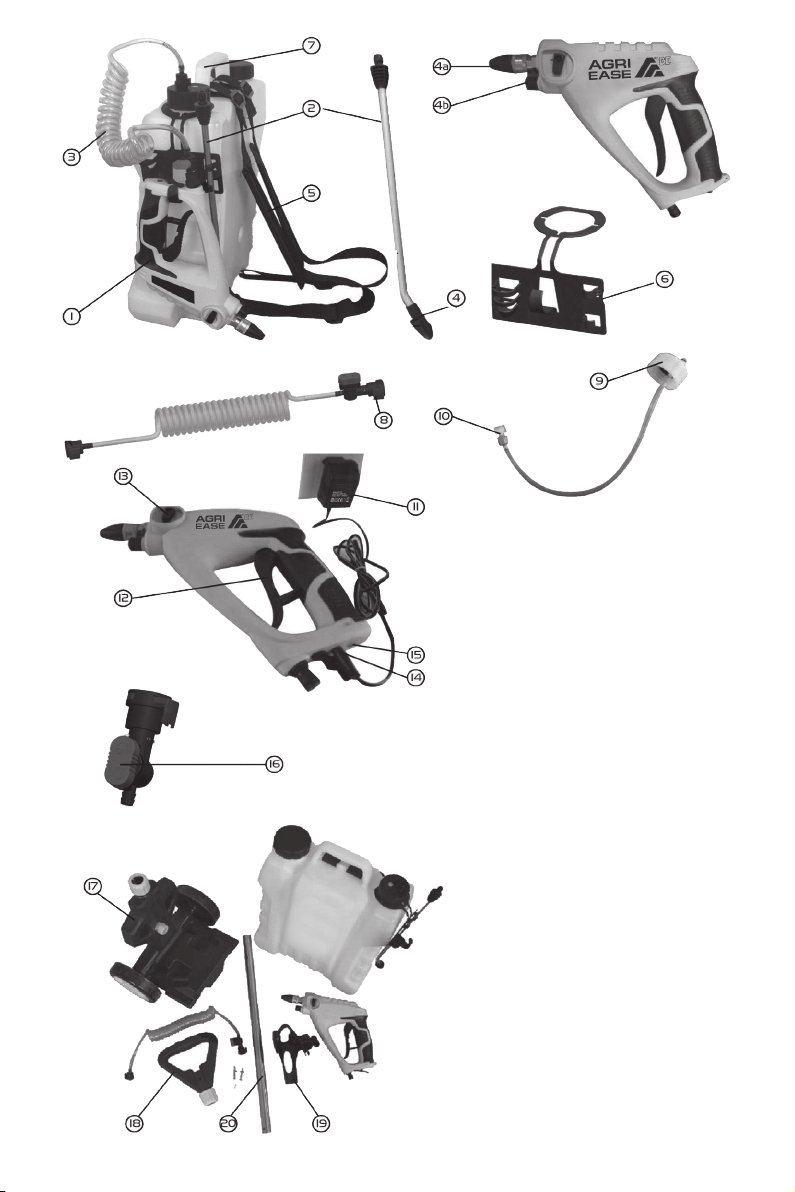
NOTE: Numbers in brackets ( ) reference
the parts list in manual.

5
ELECTRICAL SAFETY
f) If operating a power tool in a damp
location is unavoidable, use a residual
current device (RCD) protected supply.
Use of an RCD reduces the risk of
electric shock.
PERSONAL SAFETY
a) Stay alert, watch what you are doing
and use common sense when operating
a powertool. Do not use a power tool
while you are tired or under the influence
of drugs, alcohol or medication.
A moment of inattention while operating
power tools may result in serious
personal injury.
b) Use personal protective equipment.
Always wear eye protection. Protective
equipment such as dust mask, non-skid
safety shoes, hard hat, or hearing
protection used for appropriate conditions
will reduce personal injuries.
c) Prevent unintentional starting. Ensure
the switch is in the off-position before
connecting to power source and/or
battery pack, picking up or carrying
the tool. Carrying power tools with
your finger on the switch or energising
power tools that have the switch on
invites accidents.
d) Remove any adjusting key or wrench
before turning the power tool on.
A wrench or a key left attached to a
rotating part of the power tool may
result in personal injury.
e) Do not overreach. Keep proper
footing and balance at all times. This
enables better control of the power
tool in unexpected situations.
f) Dress properly. Do not wear loose
clothing or jewellery. Keep your hair,
clothing and gloves away from moving
parts. Loose clothes, jewellery or long
hair can be caught in moving parts.
BATTERY TOOL USE AND CARE
a) Recharge only with the charger specified
by the manufacturer. A charger that is
suitable for one type of battery pack
may create a risk of fire when used
with another battery pack.
b) Use power tools only with specifically
designated battery packs. Use of any
other battery packs may create a risk
of injury and fire.
c) When battery pack is not in use,
keep it away from other metal objects,
like paper clips, coins, keys, nails,
screws or other small metal objects,
that can make a connection from
one terminal to another. Shorting the
battery terminals together may cause
burns or a fire.
d) Under abusive conditions, liquid may
be ejected from the battery; avoid contact
with this fluid. If contact accidentally
occurs, flush with water. If liquid contacts
eyes, additionally seek urgent medical
help. Liquid ejected from the battery
may cause irritation or burns.
SERVICE
a) Have your power tool serviced by
a qualified repair person using only
identical replacement parts. This will
ensure that the safety of the power
tool is maintained.

6
Capacity scales
in liter Capacity
scales
in gallons
Water Inlet
with filter net
inside
Positions for
extension
nozzle
Position
for nozzle
Gun hook
HOOKS FOR SPRAYER GUN AND NOZZLES
ATTENTION: Pesticide or liquid fertilizer must be dissolved completely before pouring
into the tank in case that any solid material will block off the spraying.
Remove any solids on the filter after injection.
INTRODUCTION AND INSTALLATION
HOW TO USE THE WATER TANK
Rotate the lid of the water inlet as the photo shown below.
Pour the water, pesticide or liquid fertilizer, then tighten the lid.
Air valve
Outlet hole

7
Connect to the
sprayer gun
On
position Off
position
Connect to tank
ATTENTION: There are two same spring clips on both ends of the hose, each of
them will be connected to the sprayer gun and outlet hole of the tank. Press the clip
push in for connecting and pull out for detaching. Before use, you must open the
ON/OFF fluid valve first. Make sure to provide the sprayer fluid from the tank. When
you stop spraying turn the switch to the OFF position to avoid fluid back flow.
On/Off
Spring clip
Spring clip
Bend resistance spring
QUICK ADAPTOR SPRING HOSE
HOW TO USE THE SPRAYER GUN
This machine was designed with dual nozzles and can be switched for 3 different
modes: Mist, Jet and Fan shaped for different uses.
The first nozzle can spray 2 modes: mist and jet, these two modes are alternatively
changed by rotating the nozzle. Mist mode is mainly for large area spray job in close
distance. Jet mode is mainly for shooting to long distance. The second nozzle is for
Fan shaped spraying mode, this mode is especially suitable for large area spraying in
long distance, it can spray by max 6 meters distance. The two nozzles are convertible
randomly by rotate the changing switch in clockwise direction.
SPRING HOSE AND ON/OFF FLUID SWITCH DETAIL

8
OPERATION OF THE SPRAYER
ATTENTION: Please keep the safety lock in place when not in use to prevent from
switching the machine unintentionally. The LED light (shown below) can be used for
night time and low light areas.
LED light
ON/OFF
trigger
Safety lock
Extension nozzle
Changing
switch
Second
nozzle
First
nozzle
Quick
change
adapter
HOW TO USE THE EXTENSION NOZZLE
The extension nozzle is 40cm long, and also have to spray modes: Mist and Jet,
same as the first nozzle. Assemble it acording to above descriptions and adjust the
spray as intended. The extension nozzle can be rotated by 360 degrees making it
easier to get to hard to reach places.
EXTENSION NOZZLE ASSEMBLY
Press the copper nut same as above and then insert the extension nozzle in and lock it in place.
HOW TO CHANGE THE NOZZLES
The nozzles on this machine can be quickly changed. One can change the nozzle to extension
nozzle at any time. To detach the short nozzle: press the copper nut (quich change adapter) as
shown in below photo and then pull out the short nozzle.

9
INSTALLATION INSTRUCTIONS
FOR TROLLEY
1. Open the package of handle, sprayer
machine storage, metal tube, lockbolt
and lockout..
2. Release fixed knob, take down the
water tank.
3. Release handle of trolley, put metal tube
in the hole of handle, alignment screw hole
and tightening the knob clockwise.
4. Put lockbolt in the hole as shown in
the diagram direction and lock the nut.
5. Put the sprayer machine storage in metal
tube as shown in the diagram direction.
6. Release fixed knob of base, put metal
tube in trolley base, align the screw hole
and tight the knob clockwise.
Adjust
height

10
7. Put lockbolt in the hole as shown in
the diagram direction and lock the nut.
8. Adjustment the sprayer machine storage
as show in the diagram position. Then
fixe to the tube by screw.
9. Take off extension nozzle, put it in the
opposite hole of trolley hanging hook.
10. Take out sprayer machine and spring
hose to connect to the water outlet lid of
tank securely. Put the sprayer machine in
sprayer machine storage.
OPERATION OF THE SPRAYER
1. Starting:
Push the safety lock down and squeeze
the trigger on the spray gun.
2. Stopping:
Release the trigger. Push the safety lock
up in the lock position when not in use.
3. Adjust nozzle:
Twist the nozzle to get stream or spray
functions.

11
MAINTENANCE
ATTENTION: Please keep the safety lock in the place when not in use to prevent
from switching on unintentionally. Do not switch chemicals used in the garden
sprayer without proper cleaning. Do not store liquids in the tank. Follow chemical
manufacturer’s directions for storage and disposal. Make sure caps on the tank are
tight and secured at all times. Clean the filter periodically to guarantee good performance.
CLEANING/STORAGE
After use, rinse out spray gun and tank with clean water. Run water through the
spray gun for 30 seconds while pressing trigger. If necessary you may remove both
nozzles for cleaning if clogged.
ATTENTION: Please detach the spring hose from the water tank and switch on
the sprayer to make sure that there is no water in the hose to prevent the water from
overflowing caused by the differential pressure. Always charge the battery 2 to 2.5 hours
before storing. During storage, charge the battery at least once every three months
to protect it from damage. Store the garden sprayer in a dry indoors, secure place
out of reach of children. Do not place any other objects on top of the garden sprayer.
The sprayer must not be stored in temperatures higher than 35°C (95 °F) or in
direct sunlight. Do not store the garden sprayer in places with static electricity.
PRODUCT DISPOSAL
Waste electrical products should not be disposed of with household waste.
Please recycle where facilities exist.
Check with your Local Authority or retailer for recycling advice.
This product contains a lithiumion battery. Do not dispose of battery powered spray gun
in household waste, water or fire.
Spray gun must be collected, recycled or disposed of in an enviromentally friendly way.
Please dispose of properly at a public recycling facility.
Li
LI-Ion

12
LIMITED WARRANTY FOR CORDLESS ROLL & SPRAY
Braber Equipment, Inc. agrees to repair or replace under this warranty any defec-
tive product or part from the original date of purchase for one (1) year except for the
conditions and circumstances listed below.
Proof of purchase (original dated sales receipt) must accompany all warranty claims.
THIS WARRANTY IS NOT TRANSFERABLE and does not cover products sold damaged
or incomplete, sold “as is”, sold reconditioned, or used as rental equipment. Expendable
items that become worn during normal use. Delivery, installation, or normal adjustments
explained in the operator’s manual. Cosmetic defects that do not interfere with
product functionality.
Damage or liability caused by shipping, improper handling, improper installation,
incorrect voltage or improper wiring, improper maintenance, improper modification, or the
use of accessories and/or attachments not specifically recommended.
Freight costs from customer to vendor. Repair and transportation costs of products
or parts determined not to be defective. Repairs necessary because of operator abuse
or negligence, or the failure to install, operate, maintain or store the product according
to the instructions in the operator’s manual.
ANY INCIDENTAL, INDIRECT, OR CONSEQUENTIAL LOSS, DAMAGE,
OR EXPENSE THAT MAY RESULT FROM ANY DEFECT, FAILURE, OR
MALFUNCTION OF THE PRODUCT.
Some states do not allow the exclusion or limitation on how long an implied warranty
lasts, so the above limitations may not apply to you. Damage caused by cold, heat,
rain, excessive humidity, corrosive environments and materials, or other contaminants.
ANY NON-RESIDENTIAL USE OR COMMERCIAL USE VOIDS ALL WARRANTIES.

12
GARANTIE LIMITÉE
PULVÉRISATEUR SANS FIL AVEC PILE AU LITHIUM-ION
Braber Equipment, Inc. s’engage à réparer ou remplacer, sous cette garantie, tout
produit défectueux, ou les composantes, à partir de la date d’achat pour un (1) ans,
sauf pour les conditions et les circonstances énumérées ci-dessous. Une preuve
d’achat (reçu de caisse original) doit accompagner toute demande de garantie.
CETTE GARANTIE N’EST PAS TRANSFÉRABLE et ne couvre pas les produits vendus
endommagés ou incomplets, vendus en état modifié, ou utilisés comme équipement
de location. Les articles consommables qui s’usent en utilisation normale. Livraison,
installation, ou les ajustements normaux expliqués dans le manuel de l’opérateur.
Les défauts esthétiques qui n’interfèrent pas avec la fonctionnalité du produit.
Dommages ou la responsabilité causés par l’expédition, une mauvaise manipulation,
de mauvaise installation, une tension incorrecte ou un mauvais câblage, un mauvais
entretien, la modification inappropriée ou l’utilisation d’accessoires et / ou les pièces
jointes ne sont pas spécifiquement recommandés. Les frais de transport de client
à fournisseur. Les coûts de réparation et de transport de produits ou composantes
nécessitant réparation. Les réparations nécessaires en raison de l’abus ou de la
négligence de l’opérateur, ou le défaut d’installer, exploiter, entretenir ou entreposer
le produit selon les instructions données dans le manuel de l’opérateur.
TOUTE PERTE ACCESSOIRE, DO MAGE OU FRAIS POUVANT ENTRAI ER UN
DÉFAUT, PANNE OU MAUVAIS FONCTIONNEMENT DU PRODUIT.
Certains pays ne permettent pas l’exclusion ou la limitation de la durée d’une garantie
implicite, les limitations ci-dessus peuvent ne pas vous concerner. Les dommages
causés par le froid, le gèle, la chaleur, la pluie, l’humidité excessive, un environnement
et des matériaux corrosifs ou d’autres contaminants.
TOUT UTILISATION NON RÉSIDENTIEL OU D’UNE UTILISATION DITE
COMMERCIALE ANNULE TOUTES GARANTIES.

11
DISPOSITION DU PRODUIT
Les produits tels que les déchets électriques ne doivent pas être jetés avec les ordures
ménagères. Il s’agit d’un produit avec pile, s’il vous plaît recycler le produitlà où les
installations le permettent. Vérifiez auprès de votre municipalité ou votre revendeur
concernant le recyclage. Ce produit contient une batterie au lithium-ion. Ne jetez pas le
pistolet à piles dans les ordures ménagères, l’eau ou le feu. Le pistolet doit être recyclé
ou éliminé de façon écologique. S’il vous plaît éliminer de façon appropriée à une
installation de recyclage publique.
Li
LI-Ion
ENTRETIEN
ATTENTION: S’il vous plaît garder le verrou de sécurité en fonction lorsque vous
n’utilisez pas l’appareil afin de prévenir de la mise en marche par inadvertance.
Lorsque vous changez de produits dans le réservoir du pulvérisateur, toujours
procéder à unnettoyage interne complet du réservoir. Ne pas entreposer le réservoir
contenant des liquides. Suivez les instructions du fabricant de produits chimiques
pour l’entreposage et l’élimination. Assurez-vous que les caps sur le réservoir sont
bien serrés et protégés en tout temps. Nettoyez le filtre périodiquement pour garantir
une bonne performance.
NETTOYAGE / ENTREPOSAGE
Après usage, bien rincer le pistolet et le réservoir avec de l’eau propre. Laisser couler
l’eau à travers le pistolet de pulvérisation pendant 30 secondes tout en appuyant sur
la gâchette. Si nécessaire, vous pouvez retirer les deux buses pour le nettoyage.
ATTENTION: Toujours charger la batterie 2 à 2,5 heures avant de le ranger. Pendant
l’entreposage, rechargez la batterie au moins une fois tous les trois mois afin de la
protéger contre les dommages. Rangez le pulvérisateur de jardin dans un endroit sec
à l’intérieur, sécuriser endroit hors de portée des enfants. Ne pas placer d’autres objets
sur le de sus du pulvérisateur de jardin. Le pulvérisateur doit pas être entreposé à des
températures supérieures 35°C (95°F) ou directement au soleil. Ne pas entreposer le
pulvérisateur de jardin dans des endroits où il peut y avoir de l’électricité statique.

10
FONCTIONNEMENT DU PULVÉRISATEUR
1. Démarrage:
Vous assurez qu’il y a du liquide dans le
réservoir et que la pile est bien chargée.
Pour pouvoir presser la gâchette de
démarrage du pistolet, vous devez abaisser
la tige de sécurité.
2. Arrêt:
Simplement relâchez la gâchette. Pousser
la sécurité afin de verrouiller le pistolet
lorsqu’il n’est pas utilisé.
3. Réglage de la buse:
Tournez la buse afin d’obtenir les différentes
fonctions de pulvérisation.
9. La buse d’extension se range sur le
même support.
10. Reliez le tuyau à ressort au pistolet
pulvérisateur ainsi que sur le réservoir tel
qu’indiqué ci-contre. Déposer le pistolet
de pulvérisation sur son support installé
précédemment sur la tige.
7. Prenez soin d’installer la vis qui servira
à barrer la tige sur le chariot.
8. Ajuster la hauteur voulu du support de
pulvérisateur sur la tige et installer la vis
qui servira à barrer le support du
pulvérisateur sur le tige.

9
4. Prenez soin d’installer la vis qui servira
à barrer la poignée sur la tige.
5. Glisser le support de pulvérisateur sur la tige.
6. Déserrer la bague de serrage situé sur
la base du chariot afin d’y insérer la tige
aisément. Revisser par la suite dans le
sens horaire.
AJUSTEMENT
/ HAUTEUR
INSTRUCTIONS D’INSTALLATION
POUR LE CHARIOT
1. Déballer toutes les composantes
soigneusement.
2. Dévisser le bouton situé sur le chariot
afin d’y installer le reservoir.
3. Montez la poignée du chariot sur la tige
de métal et visser la vis de serrage dans le
sens horaire.

8
FONCTIONNEMENT DUPULVÉRISATEUR
ATTENTION: Garder le verrou de sécurité en place lorsque le pistolet n’est pas utilisé
afin d’éviter de mettre le pulvérisateur en marche de façon non intentionnelle.
La lumière LED (ci-dessous) peut être utilisée pour les zones à faible luminosité.
Lumière
LED
ON/OFF
Déclencheur
Serrure
sécurité
Tuyau d’extension
Changement
de buse
Seconde
buse
Première
buse
Adaptateur
rapide
COMMENT CHANGER DE BUSE
Les buses peuvent être rapidement interchangées. Pour détacher le bec
court: Appuyez sur l’écrou de cuivre (adaptateur de changement rapide),
comme illustré ci-dessous, puis retirez la buse courte. Pour assembler la buse
d’extension: Appuyez sur l’écrou de cuivre comme ci-dessus, puis insérez la buse
d’extension et verrouillez-la en place.
TUYAU À RESSORT ET VALVE DE LIQUIDE
COMMENT UTILISER LA BUSE D’EXTENSION
La buse d’extension mesure 40cm de long, et sert aussi à pulvériser en modes
brouillard et Jet, identique à la première buse. Assembler selon les descriptions
ci-dessus et ajuster selon le jet désiré. La buse d’extension peut être tourné de 360
degrés, ce qui rend plus facile l’accès à des endroits difficilement accessibles.

7
Connecter le
tuyau à resort
sur le pistolet
Position
“On” Position
“Off”
Au réservoir
On/Off
Pince à ressort
Pince à ressort
Résistance
pince à ressort
RAPIDE TUYAU ADAPTATEUR DE PRINTEMPS
ATTENTION: Il existe deux mêmes pinces à ressort sur les deux extrémités du tuyau,
chacune d’elle sera connectée au pistolet de pulvérisation et à l’orifice de sortie du
réservoir. Appuyez sur le bouton de la pince à ressort le raccordement et le détachement.
L’assemblage est très facile et rapide. Avant toute utilisation, vous devez ouvrir la valve
rouge. Assurez-vous de la présence de liquide dans le réservoir avant de débuter la
pulvérisation. Quand vous arrêtez la pulvérisation, tourner l’interrupteur sur la position
OFF pour éviter un reflux de liquide.
COMMENT UTILISER LE PULVÉRISATEUR
Cette machine a été conçue avec des buses doubles et peut être activée avec 3 modes
différents: Brume, Jet direct et en Jet en forme d’éventail pour différents usages.
La première buse peut pulvériser 2 modes: Brouillard et Jet direct, ces deux modes
s’alternent en tournant simplement la buse. Le mode Brouillard est principalement pour les
gros travail de pulvérisation sur surface à courte distance. Le mode Jet est principalement
pour de longue distance (hauteur). La seconde buse est en mode pulvérisation en
forme d’éventail, ce mode est particulièrement adapté pour les grandes zone de pulvérisation
en longue distance, il peut pulvériser jusqu’à 6 mètres de distance. Les deux
buses peuvent être converties de manière aléatoire par rotation du commutateur de
changement dans le sens horaire.

6
CROCHETS POUR LE PISTOLET ET LES BUSES
Trou de
sortie
Valve d’air
Échelle de
Capacité (Litre) Échelle de
Capacité
(Gallon)
Entrée du
liquide
& filtre
interne
Compartiment
de buse
Emplacement
pour la tige de
rallonge
Crochet
pistolet
ATTENTION: Tout pesticide ou engrais liquides doivent être complètement dissous
avant d’être versé dans le réservoir, car le échéant le cas, toute matière solide va
bloquer la pulvérisation. Retirez toutes les matières solides s’étant déposé sur le
filtre après le remplissage du réservoir.
INTRODUCTION & INSTALLATION
COMMENT UTILISER LE RÉSERVOIR
Tournez le couvercle de l’entrée d’eau comme le montre la photo ci-dessous, versez
l’eau, pesticides ou engrais liquide, puis serrer le couvercle.

5
SÉCURITÉ ÉLECTRIQUE
d) Ne pas maltraiter le cordon. Ne jamais
utiliser le cordon pour transporter,
tirer ou débrancher l’outil électrique.
Garder le cordon loin de la chaleur, de
l’huile, des pièces pouvant le sectionner
ou l’endommager.
e) Lorsqu’on utilise un outil à l’extérieur,
utilisez un cordon de rallonge adapté
à un usage extérieur. L’utilisation
d’un cordon adapté à une utilisation
extérieure réduit le risque de choc
électrique.
f) Si vous utilisez un outil électrique dans
un endroit humide, utilisez un dispositif
différentiel à courant résiduel (DDR).
L’utilisation d’un DDR réduit le risque
de choc électrique.
SÉCURITÉ PERSONNELLE
a) Restez vigilant, surveillez ce que vous
faites et faites preuve de bon sens
lorsque vous utilisez un outil électrique.
Ne pas utiliser un outil lorsque vous
êtes fatigué ou sous l’influence de
drogues, d’alcool ou de médicaments.
Un moment d’inattention pendant
l’utilisation d’outils peut entraîner des
blessures graves.
b) Utiliser un équipement de protection
individuelle. Toujours porter des lu-
nettes de protection. Équipements de
protection personnels tels que masque
anti-poussière, des chaussures de
sécurité antidérapantes, un casque
ou une protection auditive dans des
conditions appropriées réduiront les
blessures personnelles.
c) Eviter tout démarrage non intentionel.
Assurez-vous que l’interrupteur est en
position arrêt avant de le brancher à
une source d’alimentation ou de trans-
porter l’outil.
d) Retirer toute clé de réglage avant de
mettre l’outil en marche. Un outil ou
une clé laissée sur une pièce rotative
de l’outil peut entraîner des blessures.
e) Soyez attentif à vos manipulations.
Gardez une bonne position et un bon
équilibre à tout moment. Cela permet
un meilleur contrôle de l’outil dans des
situations inconfortables .
f ) S’habiller correctement . Ne pas por-
ter de vêtements amples ou de bijoux.
Gardez vos cheveux , vêtements et
gants éloignés des pièces mobiles.
UTILISATION DE L’OUTIL ET ETRETIEN
DE LA BATTERIE
a) Ne recharger la pile qu’avec le chargeur
spécifié par le fabricant. Un chargeur pre-
scrit pour un type de batterie peut créer
un risque d’incendie lorsqu’il est utilisé
avec un autre type de batterie.
b) Utiliser les outils uniquement avec les
batteries spécifiquement désignés.
L’utilisation de toute autre batterie
peut créer un risque de blessure et/ou
d’incendie.
c) Lorsque la batterie n’est pas en cours
d’utilisation, le tenir éloigné des objets
métalliques comme des trombones,
pièces de monnaie, clés, clous, vis ou
autres petits objets métalliques, qui
peuvent établir une connexion d’un
terminal à un autre. Court-circuiter les
bornes de la batterie peut provoquer
des brûlures ou un incendie.
d) Dans des conditions extrêmes, du
liquide peut être éjecté de la batte-
rie; éviter tout contact de ce liquide.
Advenant un contact accidentel, rincez
avec de l’eau. Si le liquide vient en
contact avec les yeux, Veuillez com-
muniquer immédiatement avec une
aide médicale d’urgence. Du liquide
de batterie peut causer des irritations
ou des brûlures.
SERVICE
Faire entretenir l’outil par un réparateur
qualifié utilisant uniquement des pièces
de rechange compatibles. Cela permettra
d’assurer que la performance et la sécurité
de l’outil soit maintenue.
Table of contents
Popular Paint Sprayer manuals by other brands

Carlisle
Carlisle IS40 Intro guide

Clarke
Clarke CHHSB1 Operating & maintenance instructions

Craftsman
Craftsman 919.150020 owner's manual

Neilsen
Neilsen CT5417 Original instructions

Smithco
Smithco Sprayer Star 3180 SmarTrax MD installation manual

W.R. BROWN
W.R. BROWN Speedy Sprayer 331-A operating instructions