BEACMED evoStim UG User manual

evoStim®UG
Dual channel therapy unit !
for perineal electrical stimulation (PES)
using intra-vaginal or intra-anal probes
User guide
of D.M. REF: evoStim UG
(Rev. 7-2020)

2
BEACMED s.r.l. - Via Monte Bianco, 12 - 27040 Portalbera PV (Italia)

evoStim®UG - User guide 3
CONTENTS
1 Description and intended use 5____________
2 Introducing P.E.S. 6______________________
3 Indications of P.E.S. 7____________________
3.1 - Stress incontinence, 7______________________
3.2 - Urge incontinence, 7________________________
3.3 - Mixed Incontinence, 7_______________________
4 CONTRAINDICATIONS 9__________________
5 WARNINGS and PRECAUTIONS 10__________
6 CHECKING THE PACKAGE 13______________
7 HOW TO ASSEMBLE the unit 14_____________
7.1 - BATTERIES 14______________________________
7.2 – LEAD WIRES 14_____________________________
7.3 - CONNECT THE PROBE 15____________________
7.4 - PLACEMENT OF THE PROBE 15_______________
7.5 - USING THE UNIT 15__________________________
8 OPERATION 16___________________________
Controls Reference 16_____________________________
The upper knob 16________________________________
The backlight of the display 17______________________
8.1 - QUICK START 20____________________________
8.1.1 - Switch-ON the unit 20________________________
8.1.2 - Quickly select a programme 20_________________
8.1.3 - The probe type selection 20___________________
8.1.4 - Set the stimulation level and start 20____________
8.1.5 - Open-circuit safety cutout 21___________________
8.1.6 - Adjust the stimulation level during the session 21___
8.1.7 - Temporarily stopping the session (PAUSE) 21_____
8.1.8 - Enable/Disable the “buzzer” 22_________________
8.1.9 - Change the backlight intensity 22_______________
8.1.10 - Switch-OFF the unit 22______________________
8.1.11 - Replacement of batteries 22__________________
8.2 - ADVANCED OPERATION 23____________________
8.2.1 - ON/OFF + Pause 23_________________________
8.2.2 - Programme Preview sequence 23______________
8.2.3 - Visualise Cycle-steps values 24________________
8.2.4 - Edit one or more cycle-steps time 24____________
8.2.5 - Visualise Frequency or Pulse-width values 25_____
8.2.6 - Edit Frequency a/o Pulse-width 25______________
8.2.7 - Change the session time. 26___________________

4
8.2.8 - Select a programme 27_______________________
8.2.9 - Select a programme outside the “aims” allowed
range 27________________________________________
8.2.10 - Adjust the stimulation level 28_________________
8.2.11 - Start the session 29_________________________
8.2.12 - Restore the factory settings 29________________
9 THE PROGRAMMES 31____________________
9.1 - Grouping of programmes 31____________________
9.2 - Key list of symbols used in the programme tables. 32_
9.3 - Programmes for URGE incontinence (URGE touch-
button) 33_______________________________________
9.4 - Programmes for STREss incontinence (STRE touch-
button) 34_______________________________________
9.5 - Programmes for MIXed incontinence (MIX touch-
button) 35_______________________________________
9.6 - Programmes for PAIN (PAIN touch-button) 36_______
9.7 - Programme for RELAXATION (RELX touch-button)
37
10 Technical features: 38____________________
11 Labelling and symbols 39_________________
12 Trouble-shooting table 41_________________
13 CLEANING AND MAINTENANCE 45_________
13.1 Clean the unit 45_____________________________
13.2 Maintenance of the unit 45______________________
13.3 Cleaning and maintenance of perineal probes 45____
14 Information for disposal of the product. 46___
BEACMED s.r.l. - Via Monte Bianco, 12 - 27040 Portalbera PV (Italia)

evoStim®UG - User guide 5
1Description and
intended use
evoStim®UG is a dual channel electrical
stimulator specifically designed for perineal
stimulation with vaginal or anal probes. It is ease to
use without sacrificing the flexibility and
performance.
The touch-screen and the unique rotating knob offer
a friendly interface either for professional or home
use.
evoStim®UG offers a further advancement in the
effectiveness and the comfort of perineal stimulation.
The automatic wave-shape, independent for two
channels, according to the type of probe selected
(with ring or lateral electrodes), allows the best
comfort and optimal therapeutic results with any kind
of probe on the market. The Intellistim®function on
the 5 default programmes enables the user the
ability to change the operating frequency without
having to vary all the other parameters. Up to 10
pre-set editable programmes may be associated to
each-one of the 5 touch-buttons. Pelvic floor or
perineal stimulation is a popular method for treating
incontinence.
Pelvic floor electrostimulation successfully restores
continence, especially in female patients.
Pelvic floor electrostimulation is normally applied
using vaginal electrodes (probes), characterised by
at least two electrodes, often in the form of rings.
The aim is to stimulate the group of perineal
muscles, especially the pubo-coccygeal and pubo-
rectal muscles.
Intended use
evoStim®UG is a unit for perineal stimulation
(PES), with dual-channel output, for professional use
or usable directly by the patient on the advice of a
professional operator.
Indications: Prevention or treatment of
incontinence, in the treatment of pain and spasticity
of the pelvic muscles, using perineal probes or
surface electrodes.

6
2Introducing P.E.S.
Perineal Electrical Stimulation (P.E.S.) has been
observed and demonstrated by many researchers:
•S t r e n g t h e n i n g t h e p e l v i c f l o o r -
Electrostimulation improves muscle activity. When
the Oxford score (pubococcygeal test) gives a
value of 1 or 2 (1= just perceptible contraction, 2=
weak contraction), vaginal electrostimulation has
been found to be very effective, quickly producing
an improvement by at least 2 points. P.E.S.
improves in two ways, by increasing muscle tone
and improving circulation in the pelvic area.
•Effect on the urethral closure pressure – A
significant increase of the urethral closure
pressure has been reported by some researchers
(Dr. PIGNE’ - BOURCIER).
•Effect on the vesical tone - A significant
improvement of vesical compliance has been
observed, along with a considerable reduction of
the non-inhibited contractions of the detrusor. An
improvement of the cystometric capacity has also
been observed.
BEACMED s.r.l. - Via Monte Bianco, 12 - 27040 Portalbera PV (Italia)

evoStim®UG - User guide 7
3Indications of P.E.S.
3.1 - Stress incontinence,
frequently due to sphincter deficiency. Symptoms
include leaking of urine, caused by a strain (such as
coughing, rising from a chair, etc), in absence of
detrusor activity. Stress incontinence is usually
treated with relatively high frequency electrical
pulses (from 35 to 100 pulses per sec. (p.p.s.)
depending on patients and therapist preference),
this exercises the phasic components of the muscle
fibres which provide strong but short contractions.
The treatment should be performed for about 20
minutes daily starting with relatively short work
periods and gradually building up endurance by
increasing the contraction time as the muscles
strengthen. Pulse widths may be selected between
100 to 400 microseconds, depending on the patient.
3.2 - Urge incontinence,
caused by detrusor instability. Here the most
appropriate frequency is between 5 and 10 Hz, with
a pulse-width of between 250 and 400
microseconds. The treatment is best performed on a
daily basis for the first week, then 2 to 3 sessions
per week for the next 3 or 4 weeks. The therapy may
be conducted at home.
3.3 - Mixed Incontinence,
accounts for about 40% of all cases of incontinence
and is characterised by episodes of incontinence
when straining, along with or alternating with
episodes of incontinence due to detrusor instability
causing urgency.
Depending on the predominance of the first or the
second kind of incontinence, one can decide to use
a relatively high frequency for greater effect on the
muscle tone or lower frequencies to give greatest
effect on detrusor inhibition. Urge incontinence
usually responds more quickly than stress so this is
usually treated first. Alternatively two treatments per
day, one for urge and the other for stress may be
carried out.

8
This page is intentionally free of text
BEACMED s.r.l. - Via Monte Bianco, 12 - 27040 Portalbera PV (Italia)

evoStim®UG - User guide 9
4CONTRAINDICATIONS
PLEASE READ CAREFULLY:
In the following circumstances, evoStim®UG
must NOT be used:
•During pregnancy.
•If you have a heart pacemaker or serious heart
rhythm problems.
•If you are driving or using machinery.
In the following circumstances, evoStim®UG can
be used with caution:
1. If you have epilepsy, consult your doctor before
using.
2. On children under 12, apply only under medical
supervision.
Apart from the general contraindications of
electrostimulation, we must consider the
following criteria:
Specific contraindications of the
perineal electrostimulation.
absolute:
pregnancy, kidney disease, lower urinary
tract infections, tumours, post-void residual
urine greater than 100 ml, vesicoureteral
reflux.
subjective:
Reluctance of the patient, hyper-sensitivity
to electrical stimulation.
3. .
IF IN DOUBT, CONSULT YOUR PHYSICIAN.

10
5WARNINGS and
PRECAUTIONS
1. Carefully read the User’s manual before starting
to use the unit.
2. This user guide is an integral part of the medical
device; store it in a safe and protected place,
possibly together with the device, to ensure
availability and readability.
3. Only use batteries AAA 1.5Volt Alkaline (LR03).
The use of any other battery may damage the
unit.
4. Remove the batteries when not used for
prolonged periods (leaking battery acid may
irreparably damage the unit).
5. The unit must not be used to treat painful
symptoms of unknown origin or which have
been insufficiently diagnosed.
6. Do not use the device during sleep.
7. Be careful when using the unit on a patient with
reduced sensitivity.
8. Keep the device and its accessories out of reach
of children, the mentally impaired people or
pets.
9. DO NOT apply electrodes on the throat or larynx
nor over the carotid sinus or the sides of the
neck, (the area of heartbeat detection). May
increase the risk of abnormalities of blood
pressure or heart rhythm.
10. DO NOT place any surface electrodes for
stimulation in a TRANS-THORACIC WAY. The
application of the electrodes close to the thorax
may increase the risk of arrhythmias or cardiac
fibrillation.
11. DO NOT place any surface electrodes for
stimulation in a TRANS-CEREBRAL WAY. It
could cause symptoms such as dizziness,
nausea, vomiting, headache.
12. Do NOT apply the electrodes on the eyelids or
around the eyes. It could affect intra-ocular
pressure
13. DO NOT place electrodes on/in the mouth. In
case of inappropriate contractions may increase
the risk of suffocation.
BEACMED s.r.l. - Via Monte Bianco, 12 - 27040 Portalbera PV (Italia)

evoStim®UG - User guide 11
14. Avoid placing surface electrodes over any area
affected by acute phlebitis.
15. DO NOT use the unit at a distance lower than 3
metres from any high frequency therapy unit
(short wave or microwave) or close to a
microwave oven.
16. DO NOT use the unit at a distance less than
those indicated in the table on page 47, respect
to a radio frequency communication device (RF
transmitters, mobile phones, remote controls).
17. DO NOT use the unit on a patient on which it is
used simultaneously an electrosurgical high
frequency device. It may increase the risk of
instability of the device and / or burns under the
electrodes.
18. Do not use the appliance on a patient on which
it is used simultaneously a monitoring
instrument of physiological parameters (ECG or
other type). It could be affected by
electrostimulation.
19. The equipment can deliver electrical pulses with
a current density higher than 2mArms / cm2.
20. Store the unit and accessories in the pouch for
storage and transportation.
21. Avoid violent impact and any improper
solicitation of the unit.
22. Do not expose the unit or accessories to
temperature levels higher or lower than those
recommended in the technical characteristics.
23. DO NOT use the unit in an ambient temperature
above or below the recommended operating
range.
24. DO NOT touch the unit in any way with wet
hands, in order to prevent possible penetration
of liquids.
25. Ke ep the unit dr y and protec t from
condensation.
26. If in doubt whether liquids have penetrated
inside the unit, it is advisable not to use the
instrument and to send it to the manufacturer for
testing.
27. Prevent the formation of condensation due to
thermal sudden change.
28. In presence of condensation, avoid switching on
the unit because it could be damaged.

12
29. In case of an evident or suspected defective
operation of the unit, the user is advised to send
the unit to a BEACMED authorised technical
after sale Servicing Centre, for testing.
30. No repair or modification of this device or its
accessories is allowed unless previously
authorised in writing by the Manufacturer.
31. Avoid using the unit on more than one patient
per session.
32. Use only original accessories, if supplied. If the
device is used with commercially available
probes, they must be CE marked, as a class IIa
medical device, according to Directive 93/42/
EEC MDD. Before using these special
accessories, it is mandatory to carefully read the
instructions for use and cleaning, which must be
included in their packaging.
BEACMED s.r.l. - Via Monte Bianco, 12 - 27040 Portalbera PV (Italia)

evoStim®UG - User guide 13
6CHECKING THE
PACKAGE
The therapy unit evoStim®UG has been
designed for a friendly but effective use. Before
using it, you should carefully read the chapters:
4 - CONTRAINDICATIONS and 5-WARNINGS and
PRECAUTIONS.
PERSONAL USE OF THE PROBES!
Do not use perineal probes (vaginal or anal) on
different patients. The probes are for personal use.
This is to avoid the transmission of venereal
diseases or other far more serious diseases.
The evoStim®UG package should contain the
following parts:
After verifying that the contents correspond to
what is listed above, you can proceed to
prepare your unit for the session.
Q.ty
Code
Description
1
EVO-UG
Unit evoStim® UG
1
CV/evoStim_kit_T-
UG
2 Gray bipolar cables with protected 2mm
banana termination and mini axial
connector. Length 99cm.
1
BAT/LR03-03
Kit 3 AAA alkaline batteries 1.5 V. (LR03)
1
ESTIM-KEY
Key for battery compartment opening
1
ESTIM-SUPP-PGB
Interlocking stand for vertical support of
the unit on a horizontal surface
1
evoPouch
PVC carrying bag with necklace (IP02)
1
EStim_bag
Padded bag.
1
ISTRU-evoStim UG
Ures manual for MD evoStim UG.
1
Sonda perineale.
The vaginal probe model PERIPROBE
Minima (RU/VMINIMA) is normally supplied,
unless otherwise requested by the
customer.
14
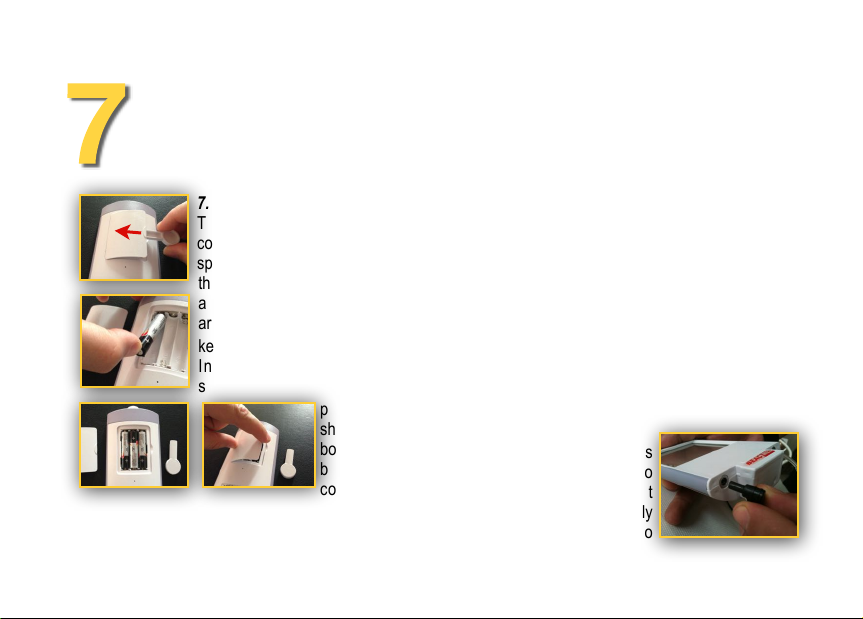
7HOW TO ASSEMBLE
the unit
7.1 - BATTERIES
To remove the battery-
compartment cover, insert the
special plastic key provided in
the slot on the side of the cover
and push in the direction of
arrow ⓐ(DO NOT turn the
key!); Lift-off the battery cover;
Insert the three batteries
supplied ⓑ, observing the
polarity
shown on the
bottom of the
battery
compartment
ⓒ. Close the battery-compartment with the cover
ⓓ.
Note: The unit may not work if one or more batteries
are inserted in reverse. To test, press the ON / OFF
button ①"for 2 seconds, the LCD screen will switch-
ON and will show some numbers and characters.
Try then to press the ON / OFF button, holding it
down for 2 seconds to check that the unit turns off.
CAUTION!: There is a risk of explosion if the
batteries are fitted incorrectly. Replace only with AAA
Alkaline 1.5 volt batteries (LR03). Do not use other
batteries. Do not mix old and new batteries. Do not
dispose of the batteries in a fire and keep them out
of reach of children. The batteries must be removed
from the device before it is scrapped and disposed
of safely. When the unit is not used for a long time,
you must remove the batteries to avoid deterioration
and leaking battery acid. This could irreparably
damage the unit’s electronics.
7.2 – LEAD WIRES
Unravel one or both lead wires
and insert the plug(s) into
either of the outlets, located at
the base of the unit. If only
using one lead wire, insert into
BEACMED s.r.l. - Via Monte Bianco, 12 - 27040 Portalbera PV (Italia)
ⓐ
ⓑ
ⓒ
ⓓ

evoStim®UG - User guide 15
the CH1 outlet as marked on the unit ( )
7.3 - CONNECT THE PROBE
Remove the probe from the
bag, rinse under tap water if
it is a new probe, then
connect to the leads. Each
lead wires should be
connected as shown in the
picture or according to the
instruction leaflet included in the package of the
probe. Also read paragraph 7.6.
7.4 - PLACEMENT OF THE PROBE
Moisten the insertable body of the probe with tap
water or water based gel, to improve the conductivity
of electrodes. Gently insert the probe in the vagina
or anus (according to the probe model), following the
instructions included in the package of the probe or
the doctor's suggestions.
7.5 - USING THE UNIT
Read the chapter 8 and use the unit according to the
therapeutic aims.
7.6 - Type of probe Vs. wave-shape
The lead wire of each channel has two terminations
with 2mm plugs, one RED, one BLACK. Using
“symmetrical bi-phasic pulses” ( ), the greater
effect will be felt at the electrode connected with the
RED plug. If the waveform is selected with “bi-phasic
alternated pulses” ( ), there will be no
predominance of any of the two electrodes.
If you are using a probe with 2 electrodes only,
consider the followings:
• if the probe has ring-like electrodes, the RED
output of CH1 lead must be connected to the RED
connector of the probe and the suitable wave shape
is “symmetrical bi-phasic pulses” ( ).
• if the probe has lateral electrodes, the suitable
wave-shape is “bi-phasic alternated pulses” ( ).

16
8OPERATION
Controls Reference
The ergonomics of evoStim®UG unit is based on the
rotation of the upper knob ①(to change the stimulation
intensity or the value of various parameters) and the press
of the button integrated in the same (to turn on, turn off or
pause the unit). Increase or decrease of the intensity or
any other parameter must first be enabled by touching the
appropriate area of the touch display (touch-screen).
The upper knob
Functions of the encoder (the knob) is to allow selecting
programmes, as well as setting and adjusting any
parameters of the selected programme.
The push-button integrated in the knob allows the following
operations:
•switch-ON/OFF the unit (push and hold for 2 seconds);
BEACMED s.r.l. - Via Monte Bianco, 12 - 27040 Portalbera PV (Italia)

evoStim®UG - User guide 17
•Pause the unit (by briefly pushing down the button,
then push again to resume), also useful as
emergency push-button;
•Start the session. Push the button, provided that at
least one channel intensity is set to an intensity
different from zero;
•Resume the started session when an electrode
alarm (open-circuit) has been solved (restored the
output circuit/connection);
•Restore the factory parameters, when pushed-and-
held for 2 seconds in combination with one of the
touch-areas ⑪"or", as described in 8.2.13
(only before starting a session).
The backlight of the display
An RGB or multi-colour backlight helps reading the LCD
display in low light environments and helps the patient to
understand the different situations, provided that it has
been enabled through the touch-button .
Here below the different situations/colour of backlight:
A BLUE light for 10 seconds when the units is switched-
ON and every time the screen is touched, when the
environment is dark. It means that, when the ambient light
is not enough to read the display, the first touch of a button
will not apply the normal operation of such button rather it
will light-ON the backlight for 10 seconds.
Continuous short RED flashes when open-circuit is
detected in the output.
Continuous short GREEN flashes when the unit is paused.
Continuous short YELLOW flashes when the unit is in
editing.

18
Description of the commands (with reference to the
paragraphs of chapters 8.1 and 8.2):
①"-"Upper"rotating knob with push button;
②- Label stimulation LEVEL of CH1 (§ 8.1.4.);
③- Stimulation level CH1 (touch-area) (§ 8.1.5.);
④- Label stimulation LEVEL of CH2 (§ 8.1.4.);
⑤- Stimulation level CH2 (touch-area) (§ 8.1.5.);
⑥- Symbol mA (touch-area). (§ 8.1.4.);
⑦- Symbol wave-shape CH1 (touch-area) (§ 8.1.3);
⑧- Type of probe connected to CH1 (touch-area)
(§ 8.1.3);
⑨- Symbol Freq. (Hz) and Pulse-width (µs)
(§ 8.2.5, § 8.2.6);
⑩- Value Freq. / Pulse-width (touch-area)
(§ 8.2.5, § 8.2.6);
⑪- Number of programme in use (touch-area) (§ 8.2.8.);
⑫- Sub-programmes ⒶⒷⒸ (touch-area) (§ 8.2.12.);
⑬- Symbol low battery indicator (§ 8.1.11);
⑭- Symbol of PAUSE state (§ 8.1.7);
⑮- Symbol wave-shape CH2 (touch-area) (§ 8.1.3);
⑯- Type of probe connected to CH2 (touch-area)
(§ 8.1.3);
⑰- Time of stimulation cycles steps (touch-area)
(§ 8.2.3 and § 8.2.4);
⑱- Symbol of “clock” (§ 8.2.7);
⑲- Session time display (touch-area) (§ 8.2.7);
⑳- Symbol “min’” (§ 8.2.11);
- Buzzer enabling touch-area (§ 8.1.8);
- Symbol “edit” (touch-area) (§ 8.2.6, § 8.2.7);
- Symbol LOCK state (§ 8.1.6);
- Steps of stimulation cycle (touch-area)
(§ 8.2.3 / § 8.2.4.);
- Back-light adjusting (touch-area) (§ 8.1.10);
- Quick selection Buttons (5 touch-area) QB (§ 8.1.3);
- Channel 1 outlet CH1
- Channel 2 outlet CH2
BEACMED s.r.l. - Via Monte Bianco, 12 - 27040 Portalbera PV (Italia)

evoStim®UG - User guide 19
"
①
②
⑤
④
⑥
⑧
⑦
⑨
⑫
③
⑮
⑰
⑱
⑲
㉒
⑬
⑭
⑳
⑩
⑪
㉑
⑯
㉖
㉓
㉗
㉘
㉔
㉕
⬇ON/OFF
DECREASE
Main functions of the upper knob: Press-and-hold down to switch ON/OFF.
Press to START THE SESSION, PAUSE/RESUME. Turn to INCREASE or
DECREASE the selected parameter or UNLOCK commands during the
session.
⤵INCREASE

20
8.1 - QUICK START
8.1.1 - Switch-ON the unit
Press for 2 seconds the button integrated in the
upper knob ①. When the unit is ON, if the session
does not start, the unit automatically turns off within
5 min.
8.1.2 - Quickly select a programme
Tap one of the five rectangular areas (QB) at the
lower side of the display. The name of the selected
QB will appear in reverse (with a dark background).
Willing to change the programme linked to the
selected button, read the section 8.2.8.
Every time the unit is turned ON, it will
automatically load the last used programme.
8.1.3 - The probe type selection
The type of probe selected defines the waveform
administered on each channel. By touching the area
⑧"or"⑯, you can select the type of probe (or the
position of electrodes of the probe) for either CH1 or
CH2. The wave-shape will accordingly change and
symbols ⑦" or" ⑮ will show the wave-shape
operating respectively on CH1 and CH2 (see also
section 7.6).
The same probe type used in the last session,
will be automatically selected when the unit is
switched-ON again.
8.1.4 - Set the stimulation level and start
After selecting a programme, (URGE - STREss -
MIXed - PAIN - RELaX), and after connecting the
cables and applied the probe, tap the area ③;
Setting will remain enabled for 3 seconds while the
label ②will flash. Then turn the knob clockwise to
attain a strong but not bothering stimulation. If you
are also using CH2, repeat the operation by
touching the area ⑤. In this case, wishing to
simultaneously adjust the levels of CH1 and CH2
(only if the same type of probe has been selected),
instead of touching the areas ③and ⑤, touch the
symbol "mA" ⑥, both labels ②and ④will flash to
indicate that the rotation of the knob will act on both
BEACMED s.r.l. - Via Monte Bianco, 12 - 27040 Portalbera PV (Italia)
Table of contents
Other BEACMED Measuring Instrument manuals


Popular Measuring Instrument manuals by other brands


YOKOGAWA
YOKOGAWA 51011 user manual

Cooper
Cooper TC100A operating instructions

Leica Geosystems
Leica Geosystems DISTO WH15 Technical reference manual

PRECISION DIGITAL
PRECISION DIGITAL ProtEx Pro PD6800-0L1 manual

Vaisala
Vaisala K-PATENTS PR-23-SD Generation 1 Best practices guide

Siemens
Siemens SITRANS FC330 operating instructions

Badger Meter
Badger Meter Blancett QuickSert B131C-038 user manual

TSI Instruments
TSI Instruments 3080 Series Operation and service manual

AST
AST AL30 user manual

LOVATO ELECTRIC
LOVATO ELECTRIC EXP10 16 instruction manual

KSV
KSV Surface Potential Meter user manual

Microtrac
Microtrac S3500 Operation and maintenance manual