Beaumont POSTE HOBBY SB230 User manual


OPERATING INSTRUCTION
In association with the installation and safety instructions for the
electric fencers
General Safety Instructions
Switch off the pasture fencer before coming into contact with it!
Operating manual information
The operating manual has some important instructions on handling the energizer. All technical details in the manual
have been prepared and compiled with the greatest possible care. Even so, errors cannot be excluded. We wish to point
out that we cannot assume any guarantee, legal responsibility or any liability for consequences attributable to possible lack
of details. We would, at all times, welcome any notifi cation of possible errors. Safe working depends on the indicated safety
and handling instructions being adhered to. Also to be adhered to are those local accident prevention provisions which are in
force where the energizer is used as well as the general safety requirements.
The operating manual is to be studied carefully before any work begins!
As an integral part of the overall product it is to be securely kept right next to the energizer and for ease of consultation by
the personnel.
Do hand over this manual should this product be sold or passed on to another party. For a better understanding of what is
involved, some of the diagrams in this manual may not be true-to-scale and may deviate slightly from the actual construction-
al design.
1. Description and Construction of the Product
The energizer transmits voltage pulses to a connected pasture fence.
Caution! Only the optional additional parts prescribed by the manu-
facturer are to be used.
2. Installation
Installation:
The energizer can either be mounted on a wall or on a stable post. The
earthing rod (longitudinal rod) must be driven as deeply as possible into the
ground at a moist location and connected by a corrosion-resistant wire to the
earthing terminal ( ) of the energizer.
Connect the fence cable to the terminal with the lightning symbols ( ) .
The energizer is only protected against moisture if it is properly installed.
Shield the energizer from direct solar irradiation. Do not operate the energiz-
er when it lies on the ground. Set the energizer up in a location where there
is no fi re hazard.
Earthing:
Good earthing of the fence is extremely important for trouble-free operation
and optimum performance of the energizer; therefore it should be earthed at
a preferably moist and overgrown location.
If the ground is dry and the fence is long, an additional earth conductor with
intermediate earths (every 50 m) should be installed along the fence.
CAUTION!
The energizer has an AUTO-ON function. As such, the energizer
starts following connection to the mains network.
3. Commissioning
Operation 12V :
Connect the controller to a 12V wet battery ( red + / black - ), ensure that the
terminals are absolutely clean and the polarity is correct. Use only rechar-
geable 12V- lead-acid batteries, during charging lead-acid batteries must
be placed in a well-ventilated area. After a few seconds a slight tic-tac can
be heard. The fence voltage level fl ashes with the pulses. In case of wrong
polarity the controller will not operate.
The battery should be recharged at a voltage of 11.9 volts (corresponding
to a discharge of approx. 60%). Do not discharge the battery deeper than a
voltage of 11.7 volts (corresponding to a disharge of approx. 80 %).
Operation 230V:
For the connection with mains (230V) use only the delivered Power
Supply 47PSU0009EU/UK or an alternative 47PSU0008EU/UK as indicated
on the front of the electric fence energizer.
After a few seconds a slight tic-tac can be heard. The fence voltage level fl as-
hes with the pulses. In case of wrong polarity the controller will not operate.
Caution!
When using a solar system
Only carry out a battery or rechargeable battery test at start of the day ( no solar power supplied - cover panel )
6. Disassembly, Dismantling, Storage and Transport
Disassembly, Dismantling
Before starting disassembly:
●Switch off energizer
●Disconnect entire energy supply from the energizer.
●Remove operating/auxiliary materials and any remaining working materials and dispose of in an environmentally-compati-
ble manner.
Then properly clean sub-assemblies and parts and disassemble them in taking account of the local industrial safety &
environmental protection provisions in force.

Storage, Transport
Ensure that the energizer is both stored and transported only when switched off.
NOTE!
Ensure that rechargeable batteries are stored in ventilated and dry rooms.
7. Faults and Repairs
WARNING!
Repairs may only be carried out by qualifi ed persons.
Only the spare parts prescribed by the manufacturer may be used.
Subject to technical alterations!
MANUEL D´UTILISATION
en liaison avec les instructions d'installation et les consignes de
sécurité pour électrifi cateurs de clôture
Instructions générales de sécurité
L'appareil de clôture électrique doit être coupé avant chaque intervention !
Informations relatives à la notice d'instructions
La notice d'instructions contient d'importantes consignes relatives au maniement de l'appareil. Tous les renseignements tech-
niques fi gurant dans la notice d'instructions ont été élaborés et compilés avec le plus grand soin. Néanmoins, des erreurs
ne sont pas à exclure. Nous attirons votre attention sur le fait qu'aucune garantie ni aucune responsabilité juridique ou res-
ponsabilité quelconque ne peut être endossée au titre de conséquences imputables à des indications erronées. Nous vous
remercions d'avance de nous signaler d'éventuelles erreurs constatées. La condition préalable à un travail sûr est le respect
des consignes de sécurité et instructions de manipulation fournies. En outre, il faut respecter les prescriptions préventives
des accidents en vigueur sur le lieu de mise en œuvre de l'appareil, ainsi que les dispositions de sécurité générales.
Avant d'entamer tous travaux, il faut lire attentivement la notice d'instructions !
Elle fait partie intégrante du produit et doit être rangée soigneusement à proximité immédiate de l'appareil pour que le
personnel puisse la consulter à tout moment.
Si vous revendez ou transmettez ce produit, remettez impérativement la présente notice d'instructions au destinataire. Afi n
de mieux illustrer des situations, les fi gures que contient cette notice d'instructions ne sont pas forcément à l'échelle et
peuvent différer légèrement de l'exécution réelle.
1. Description et composition du produit
L’appareil émet des impulsions de tension destinées à une clôture de pâtu-
rage qui lui est raccordée.
Attention ! N’utiliser que les composants supplémentaires en
option prescrits par le fabricant.
2. Montage et installation
Montage :
L’appareil peut être monté contre un mur ou un pieu solide. Le piquet de terre
(piquet longiligne) doit être enfoncé le plus profondément possible dans le
sol à un endroit humide et relié par un fi l résistant à la corrosion à la borne de
terre ( ) de l’appareil.
Raccorder le câble de clôture à la borne arborant le symbole d’éclair ( ) .
L’appareil n’est protégé contre l’humidité que s’il a été monté correctement.
Ne pas exposer au rayonnement direct du soleil. Ne pas exploiter l’appareil
posé sur le sol. Ne pas installer l’appareil dans un endroit à risque d’incendie.

Mise à la terre :
Pour que l’appareil fonctionne impeccablement et offre une performance
optimale, il est extrêmement important que la clôture soit bien reliée à la terre
; pour cette raison, le raccordement à la terre doit avoir lieu à un endroit de
préférence bien humide et couvert de végétation.
En cas de sol sec et de clôture longue, poser une ligne de terre supplémen-
taire avec piquets de terre intermédiaires (tous les 50 m) le long de la clôture.
PRUDENCE !
L’appareil dispose d’une fonction AUTO-ON faisant que l’appareil
démarre une fois relié au secteur.
3. Mise en service
PUESTA EN MARCHA CON ACUMULADOR DE 12 VOLT:
Conectar a un acumulador de 12V (rojo+ / negro-), en este caso se debe
cuidar de la polaridad correcta y la limpieza de los bornes de los polos. Tras
algunos segundos se escucha un tic-tac uniforme, el aparato está en ser-
vicio. En caso de polaridad errónea el aparato no funciona. La lámpara de
control de la valla se enciende en el mismo tiempo que el del ritmo de los
impulsos eléctricos.
El acumulador debería ser recargado encuanto el voltaje alcance los 11,9 V
( corresponde a una descarga de 60%). No deje descargar el acumulador a
un voltaje de menos de 11,7 V ( corresponde a una descarga de 80%).
Inbetriebnahme 230 V Netz :
¡Utilice para el servicio en la red de 230V exclusivamente la fuente de
alimentación 47PSU0009EU/UK o 47PSU0010EU/UK, así como está
indicado delante sobre el dispositivo! Tras algunos segundos se escucha un
tic-tac uniforme, el aparato está en servicio. La lámpara de control de la
valla se enciende en el mismo tiempo que el del ritmo de los impulsos
eléctricos.

6. Dépose, démontage, stockage et transport
Dépose, démontage
Avant d’entamer le démontage :
●Éteindre l’appareil.
●Débrancher toute l’alimentation énergétique de l’appareil.
●Retirer les matières d’exploitation et auxiliaires ainsi que les matériaux de transformation résiduels et les recycler en
respectant l’environnement.
Ensuite, nettoyer correctement les sous-ensembles et composants en respectant les prescriptions locales en vigueur visant
la protection au travail et le respect de l’environnement.
Stockage, transport
Il faut veiller à stocker ou transporter l’appareil à l’état éteint.
REMARQUE !
Il faut veiller à stocker les accus dans des locaux aérés et secs.
7. Dérangement et réparation
AVERTISSEMENT !
Seul un personnel qualifi é peut procéder aux réparations.
N’utiliser que les pièces de rechange prescrites par le fabricant.
Sous réserve de modifi cations techniques !

Originalbetriebsanleitung
in Verbindung mit den Errichtungs- und Sicherheitshinweisen für
Elektrozaungeräte
Allgemeine Sicherheitsanweisungen
Das Weidezaungerät muss vor jedem Eingriff ausgeschaltet werden!
Informationen zur Betriebsanleitung
Die Betriebsanleitung gibt wichtige Hinweise zum Umgang mit dem Gerät. Alle technischen Angaben in der Anleitung
wurden mit größter Sorgfalt erarbeitet bzw. zusammengestellt. Trotzdem sind Fehler nicht auszuschließen. Wir weisen
darauf hin, dass weder eine Garantie, noch eine juristische Verantwortung oder irgendeine Haftung für Folgen, die auf
fehlerhafte Angaben zurückgehen, übernommen werden kann. Für die Mitteilung eventueller Fehler sind wir jederzeit
dankbar. Voraussetzung für sicheres Arbeiten ist die Einhaltung der angegebenen Sicherheitshinweise und Handlungs-
anweisungen. Darüber hinaus sind die am Einsatzort des Gerätes geltenden örtlichen Unfallverhütungsvorschriften und
allgemeinen Sicherheitsbestimmungen einzuhalten.
Die Betriebsanleitung ist vor Beginn aller Arbeiten sorgfältig durchzulesen!
Sie ist Produktbestandteil und in unmittelbarer Nähe des Gerätes, jederzeit zugänglich für das Personal, sorgfältig
aufzubewahren.
Wenn Sie dieses Produkt verkaufen oder weitergeben, händigen Sie unbedingt auch diese Anleitung aus. Die Abbildungen
in dieser Anleitung sind zur besseren Darstellung der Sachverhalte nicht unbedingt maßstabsgerecht und können von der
tatsächlichen Ausführung geringfügig abweichen.
1. Beschreibung und Zusammensetzung des Produktes
Das Gerät gibt Spannungsimpulse an einen angeschlossenen Weidezaun
ab.
Achtung! Es sind nur die vom Hersteller vorgegebenen
optionalen Zusatzkomponenten zu verwenden!
2. Montage und Installation
Montage:
Das Gerät kann wahlweise an einer Wand oder einem soliden Pfahl montiert
werden. Der Erdungsstab (Längsstab) muss an einer feuchten Stelle
möglichst tief in den Boden eingeschlagen und mit einem korrosionsfesten
Draht mit der Erdklemme ( ) des Gerätes verbunden werden.
Die Zaunleitung an die Klemme mit den Blitzzeichen ( ) anschließen.
Das Gerät ist nur bei ordnungsgemäßer Montage gegen Feuchtigkeit ge-

schützt. Vor direkter Sonneneinstrahlung schützen. Gerät nicht auf dem Bo-
den liegend betreiben. Gerät an einem nicht feuergefährdeten Ort aufstellen.
Erdung:
Eine gute Erdung des Zaunes ist äußerst wichtig für den einwandfreien
Betrieb und die optimale Leistung des Gerätes, deshalb sollte die Erdung an
einer möglichst feuchten und bewachsenen Stelle vorgenommen werden.
Bei trockenem Boden und langem Zaun sollte ein zusätzlicher Erdleiter mit
Zwischenerdern (alle 50m) am Zaun entlang verlegt werden.
VORSICHT!
Das Gerät verfügt über eine AUTO-ON Funktion, sodass das Gerät
nach der Verbindung mit dem Versorgungsnetz startet.
3. Inbetriebnahme
Inbetriebnahme 12 V Akku:
Gerät an 12V Akku anschließen ( rot + / schwarz - ), dabei auf saubere
Polklemmen und richtige Polarität achten. Nur aufl adbare 12V-Blei-Batterien
verwenden, Bleibatterien nur in gut belüfteten Räumen laden. Nach einigen
Sekunden hört man ein gleichmäßiges Ticken, das Gerät ist in Betrieb. Bei
falscher Polarität läuft das Gerät nicht an. Eine Control LED leuchtet im Takt
der Impulse auf.
Der Akku sollte bei einer Spannung von 11,9 Volt (entspricht einer Entla-
dung von etwa 60%) nachgeladen werden. Entladen Sie den Akku nicht
tiefer als bis zu einer Spannung von 11,7 Volt (entspricht einer Entladung
von etwa 80%).
Inbetriebnahme 230 V Netz:
Verwenden Sie für den Betrieb im 230V Netz ausschließlich das
mitgelieferte Netzteil 47PSU0009EU/UK oder als Alternative 47PSU-
0008EU/UK, so wie es vorne auf dem Gerät angegeben ist! Nach einigen
Sekunden hört man ein gleichmäßiges Ticken, das Gerät ist in Betrieb. Eine
Control LED leuchtet im Takt der Impulse auf.
6. Demontage, Zerlegung, Lagerung und Transport
Demontage, Zerlegung
Vor Beginn der Demontage:
●Gerät ausschalten.
●Gesamte Energieversorgung vom Gerät trennen.
●Betriebs- und Hilfsstoffe sowie restliche Verarbeitungsmaterialien entfernen und umweltgerecht entsorgen.
Anschließend Baugruppen und Bauteile fachgerecht reinigen und unter Beachtung geltender örtlicher Arbeitsschutz- und
Umweltschutzvorschriften zerlegen.

Lagerung, Transport
Es ist darauf zu achten das Gerät im ausgeschalteten Betrieb zu lagern oder zu transportieren.
HINWEIS!
Es ist darauf zu achten, dass Akkus in belüfteten und trockenen Räumen zu lagern sind.
7. Störung und Reparatur
WARNUNG!
Reparaturen dürfen nur von qualifi zierten Personen durchgeführt werden.
Es sind nur die vom Hersteller vorgeschriebenen Ersatzbauteile zu verwenden.
Technische Änderungen vorbehalten!

Spare parts Pièces détachées Ersatzteile
Fig. 1
47PSU0008EU
47PSU0008UK
47BL1.2

For 230V operation the energizer should be and the
adapter must be installed in a room protected from
moisture.
Bei 230V Betrieb sollte das Gerät und muss der Netz-
adapter in einem vor Feuchtigkeit geschützten Raum
installiert werden.
Pour un bon fonctionnement sur le 230V, l‘électrificateur
et l‘adaptateur doivent être installés dans une pièce à
l‘abri de l‘humidité.
Installation and connection
Montage et raccordement
Montage und Anschluss
Fig. 2

1,0 kg
Total Weight Poids total Gewicht
Fig. 3
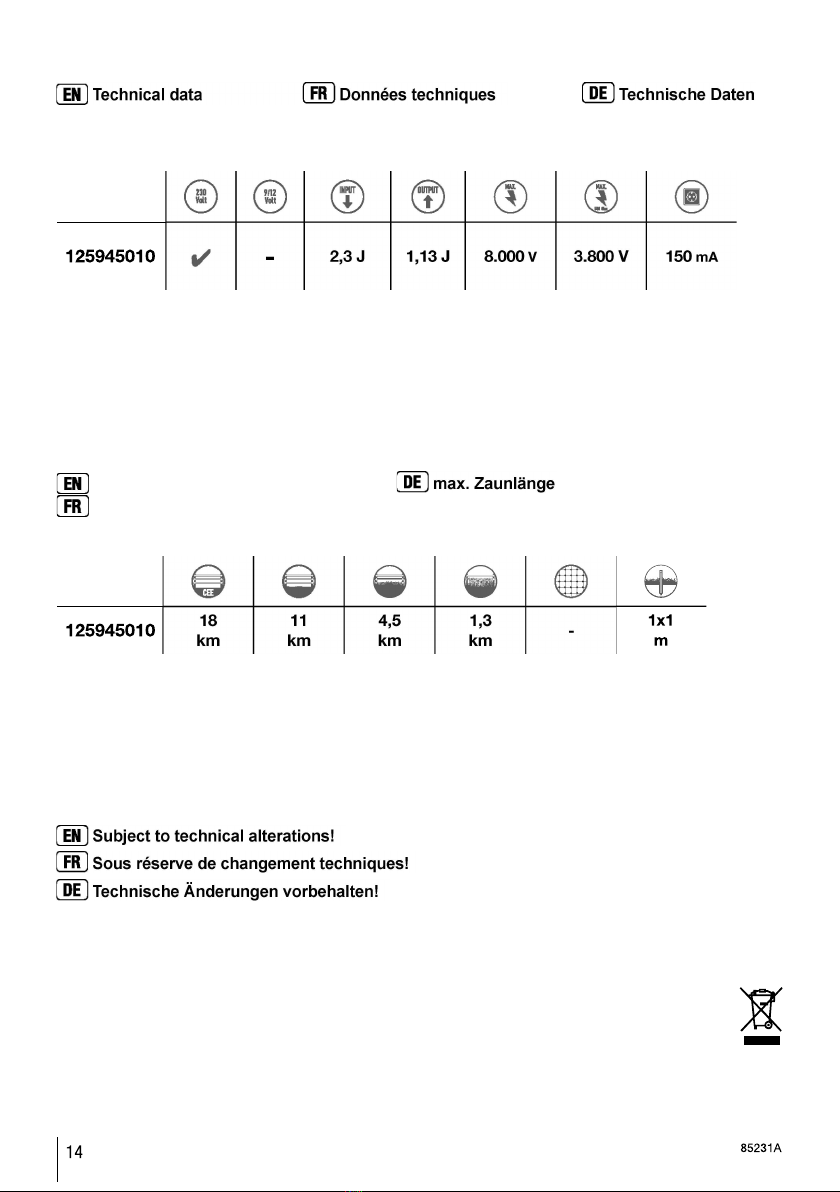
Fig. 4
Technical data Données techniques Technische Daten
Fig. 4
Subject to technical alterations!
Sous réserve de changement techniques!
Technische Änderungen vorbehalten!
CEE:
max. fence line length max. Zaunlänge
longueur électrifée

This manual suits for next models
1
Table of contents
Languages:
Other Beaumont Power Supply manuals


