Beautiful 19030 User manual

FRONT Cover
High Performance Blender with Touch-Activated Display
Instruction Manual
Licuadora de alto rendimiento con pantalla toque
Manual de instrucciones
19030, 19035, 19040, 19020 Beautifu Blender IM R7.indd 119030, 19035, 19040, 19020 Beautifu Blender IM R7.indd 1 2021-04-07 9:19 AM2021-04-07 9:19 AM

The kitchen is my family’s happy
place. It’s where we cook and eat
and bake and laugh and share our
most beautiful moments together.
That’s what inspired the creation
of Beautiful, my new collection
of easy-to-use kitchenware that
you’ll want to keep out on your
kitchen counter. So whether
your kitchen has flour all over
the place from a kid's baking
session or you’re throwing an adult
dinner party, I hope every step will
be simple, delicious and beautiful!
www.cookwithbeautiful.com
19030, 19035, 19040, 19020 Beautifu Blender IM R7.indd 219030, 19035, 19040, 19020 Beautifu Blender IM R7.indd 2 2021-04-07 9:19 AM2021-04-07 9:19 AM

Section 1: Safety
Important Safeguards............................................ 2-6
Additional Important Safeguards................................. 7-8
Notes on the Plug ................................................ 8
Notes on the Cord .............................................. 8-9
Plasticizer Warning ............................................... 9
Electric Power .................................................... 9
Section 2: Instructions
Getting to Know Your High Performance Blender ................... 11
Touch-Activated Display Control Panel ......................... 12-14
Before Using for the First Time.................................. 15
Jar Assem bly..................................................... 16
Operation..................................................... 16-18
Function Selection Guide ......................................... 19
Beautiful Blender Notes .......................................... 20
Beautiful Food Prep Tips......................................... 20
User Maintenance Instructions .................................... 20
Care & Cleaning Instructions ..................................... 21
Storing Instructions ............................................. 21
Troubleshooting .................................................. 20
Warranty ...................................................... 22-23
Table of Contents
19030, 19035, 19040, 19020 Beautifu Blender IM R7.indd 119030, 19035, 19040, 19020 Beautifu Blender IM R7.indd 1 2021-04-07 9:19 AM2021-04-07 9:19 AM

The kitchen is my family’s happy
place. It’s where we cook and eat
and bake and laugh and share our
most beautiful moments together.
That’s what inspired the creation
of Beautiful, my new collection
of easy-to-use kitchenware that
you’ll want to keep out on your
kitchen counter. So whether
your kitchen has flour all over
the place from a kid's baking
session or you’re throwing an adult
dinner party, I hope every step will
be simple, delicious and beautiful!
www.cookwithbeautiful.com
Table of Contents
Section 1: Safety
Medidas de seguridad importantes ............................. 26-28
Otras medidas de seguridad importantes ....................... 29-30
Enchufe de 3 conductores con conexión a tierra .................. 30
Notas sobre el cable ............................................ 31
Advertencia sobre plasticados ................................... 32
Potencia eléctrica ............................................... 32
Section 2: Instructions
Descripción de la licuadora de alto rendimiento.................. 34
Panel de control de pantalla activado por toqu ............... 35-38
Antes de usar por primera vez ................................... 39
Montaje de la jarra.............................................. 40
Funcionamiento ................................................ 41-43
Guía de selección de funciones .............................. 44- 45
Notas sobre la licuadora beautiful............................... 45
Consejos beautiful de preparación de alimentos................... 45
Troubleshooting .................................................. 20
Instrucciones de mantenimiento para el usuario ................... 46
Instrucciones de cuidado y limpieza.............................. 46
Instrucciones de almacenamiento.................................. 47
Resolución de problemas ......................................... 48
Garantía ...................................................... 49-50
19030, 19035, 19040, 19020 Beautifu Blender IM R7.indd 219030, 19035, 19040, 19020 Beautifu Blender IM R7.indd 2 2021-04-07 9:19 AM2021-04-07 9:19 AM

Section 1
Safety
1
19030, 19035, 19040, 19020 Beautifu Blender IM R7.indd 319030, 19035, 19040, 19020 Beautifu Blender IM R7.indd 3 2021-04-07 9:19 AM2021-04-07 9:19 AM

4
IMPORTANT SAFEGUARDS
When using electrical appliances, basic safety precautions
should always be followed including the following:
1. READ ALL INSTRUCTIONS.
2. To protect against risk of electrical shock do not put
cord, plugs, or appliance in water or other liquid.
3. This appliance is not intended for use by persons
(including children) with reduced physical, sensory
or mental capabilities, or lack of experience and
knowledge, unless they have been given supervision
or instruction concerning use of the appliances
by a person responsible for their safety.
4. Close supervision is necessary when any appliance
is used by or near children.
5. This Blender is not a toy. Children should be
supervised to ensure they do not play with the
appliance.
6. Unplug from outlet when not in use, before putting
on or taking off parts and before cleaning.
Flashing light (or identify other means used)
indicates ready to operate. Avoid inadvertent contact
with the touch screen.
19030, 19035, 19040, 19020 Beautifu Blender IM R7.indd 419030, 19035, 19040, 19020 Beautifu Blender IM R7.indd 4 2021-04-07 9:19 AM2021-04-07 9:19 AM

5
7. Flashing light indicates ready to operate. Avoid any
contact with blades or moveable parts.
8. Do not operate any appliance with a damaged cord or plug
or after the appliance malfunctions, or it is dropped,
or has been damaged in any manner. If the manufacturer
has authorized service facilities, instruction to
return the appliance to the nearest authorized service
facility may be used instead of instructing the user
to contact the manufacturer at the customer service
phone number: 1-866-832-4843.
NOTE: DO NOT ATTEMPT TO REPAIR THE UNIT YOURSELF.
THIS WILL VOID THE WARRANTY.
9. The use of attachments, including canning jars,
not recommended by the manufacturer may cause a risk
of injury to persons.
10. Do not use outdoors.
11. Do not let cord hang over edge of table or counter.
12. Do not let cord contact hot surfaces, including
the stove.
13. Blades are sharp. Handle carefully.
14. Do not blend hot liquids.
15. Never use the blender jar to process ingredients
without the lid and measuring cap properly locked
in place.
16. Never place any Blender attachments into a microwave
oven.
17. Keep hands and utensils out of the jar while blending
19030, 19035, 19040, 19020 Beautifu Blender IM R7.indd 519030, 19035, 19040, 19020 Beautifu Blender IM R7.indd 5 2021-04-07 9:19 AM2021-04-07 9:19 AM

6
to reduce the risk of severe injury to persons or damage
to the unit.
18. Always operate the Blender with its lid in place.
A scraper may be used ONLY when the Blender is
not running.
19. Never add ingredients to the jar while the Blender
is operating.
FOR HOUSEHOLD
USE ONLY
SAVE THESE
INSTRUCTIONS
19030, 19035, 19040, 19020 Beautifu Blender IM R7.indd 619030, 19035, 19040, 19020 Beautifu Blender IM R7.indd 6 2021-04-07 9:19 AM2021-04-07 9:19 AM

7
ADDITIONAL IMPORTANT
SAFEGUARDS
1. All users of this appliance must read and understand
this instruction manual before operating or cleaning
this appliance.
2. The cord to this appliance should be plugged into a
3-prong 120V AC electrical outlet only.
3. If this appliance begins to malfunction during use,
immediately press or any illuminated SPEED or PRESET
button to turn the Blender OFF, then unplug the cord.
Do not use or attempt to repair the malfunctioning
appliance. Contact Consumer Service: 1-866-832-4843.
4. If this appliance falls or accidentally becomes
immersed in water, unplug it immediately. Do not reach
into the water!
5. Do not use this appliance after it has fallen into
or becomes immersed in water.
6. To reduce the risk of injury to persons or property,
never use this appliance in an unstable position
7. Do not use this appliance for other than its intended
use.
19030, 19035, 19040, 19020 Beautifu Blender IM R7.indd 719030, 19035, 19040, 19020 Beautifu Blender IM R7.indd 7 2021-04-07 9:19 AM2021-04-07 9:19 AM

8
8. Do not use if the jar is cracked or chipped.
IMPORTANT: Do not overll beyond the jar’s MAX line.
WARNING: To avoid spills, make sure the lid is properly
locked in place on the jar with the measuring cap
in position before pressing any button.
GROUNDED 3-CONDUCTOR PLUG
This appliance is equipped with a grounded-type 3-wire
cord (3-prong plug). This plug will only t into an
electrical outlet made for a 3-prong plug. This is a
safety feature. If the plug should fail to t the outlet,
contact an electrician to replace the obsolete outlet.
Do not attempt to defeat this safety feature.
NOTES ON THE CORD
a) A short power-supply cord (or detachable power-supply
cord) is to be provided to reduce risks resulting from
becoming entangled in or tripping over a longer cord.
b) Longer detachable power-supply cords or extension cords
are available and may be used if care is exercised in
their use.
c) If a long detachable power-supply cord or extension
cord is used:
1) The marked electrical rating of the detachable power-
supply cord or extension cord should be at least as
great as the electrical rating of the appliance;
19030, 19035, 19040, 19020 Beautifu Blender IM R7.indd 819030, 19035, 19040, 19020 Beautifu Blender IM R7.indd 8 2021-04-07 9:19 AM2021-04-07 9:19 AM

9
2) If the appliance is of the grounded type, the extension
cord should be a grounding- type 3-wire cord; and
3) The longer cord should be arranged so that it will not
drape over the counter top or table top where it can be
pulled on by children or tripped over.
PLASTICIZER WARNING
CAUTION: To prevent Plasticizers from migrating to the
nish of the counter top or table top or other furniture,
place NON-PLASTIC coasters or place mats between the
appliance and the nish of the counter top or table top.
Failure to do so may cause the nish to darken; permanent
blemishes may occur, or stains can appear.
ELECTRIC POWER
If the electrical circuit is overloaded with other
appliances, your appliance may not operate properly.
It should be operated on a separate electrical circuit
from other appliances.
19030, 19035, 19040, 19020 Beautifu Blender IM R7.indd 919030, 19035, 19040, 19020 Beautifu Blender IM R7.indd 9 2021-04-07 9:19 AM2021-04-07 9:19 AM

Section 2
Instructions
2
19030, 19035, 19040, 19020 Beautifu Blender IM R7.indd 1019030, 19035, 19040, 19020 Beautifu Blender IM R7.indd 10 2021-04-07 9:19 AM2021-04-07 9:19 AM

2
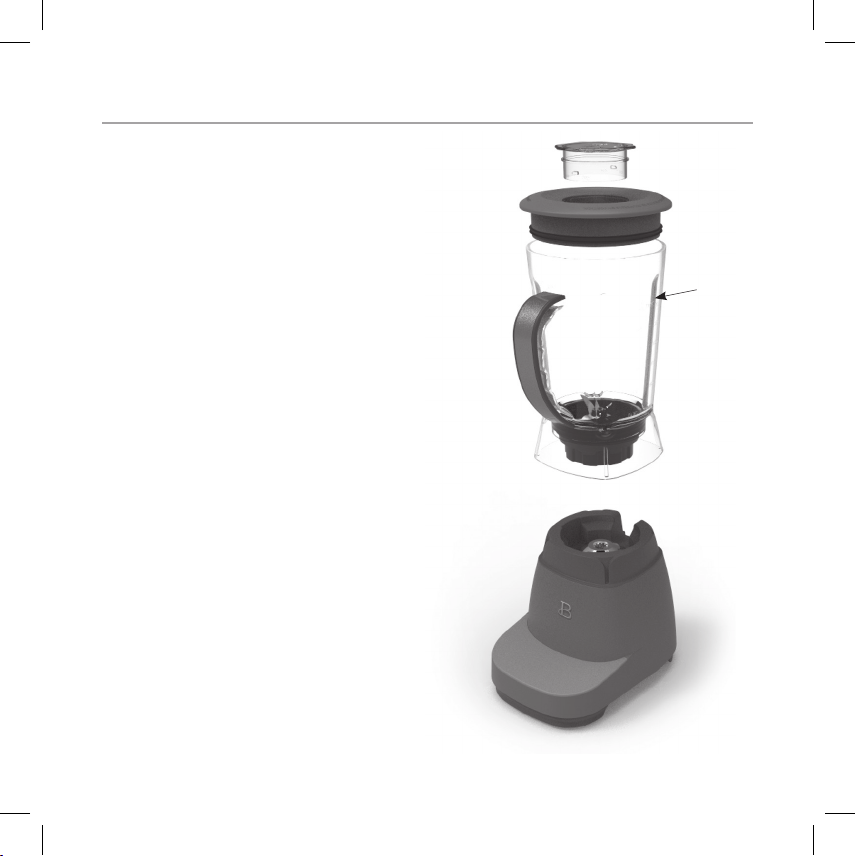
Getting To Know Your High Performance Blender
Product may vary slightly from illustration
1. 2 oz. Measuring Cap
2. Jar Lid
3. 50 oz. Tritan™ Jar
4. 4 Tip Stainless Steel Blade
5. Motor Base with
Soft Matte Premium Finish
6. Touch-Activated Display Control Panel
7. 3-Prong Plug (not shown)
8. Cord Storage (not shown)
9. Non-Skid Feet
1
2
3
4
5
6
7
8
9
11
19030, 19035, 19040, 19020 Beautifu Blender IM R7.indd 1119030, 19035, 19040, 19020 Beautifu Blender IM R7.indd 11 2021-04-07 9:19 AM2021-04-07 9:19 AM

12
Touch-Activated Display Control Panel
A screen that only shows up when you need it.
3 SPEED buttons: LOW, HIGH, PULSE as well as 4 PRESET blending functions:
PUREE, LIQUIFY, ICE CRUSH, SMOOTHIE/CLEAN illuminate when active and disappear
when not in use.
• When the Blender is plugged in, all buttons will illuminate and
a tone will sound, the button will illuminate and then pulse slowly
on and off.
• When is pressed, a tone will sound, and the control panel will
illuminate and the power button will begin to ash.
• Press to STOP any operation.
• Select LOW when a slower speed is required; to begin mixing, to prevent
over-mixing, and when working with heavier batters.
• Press to turn the function OFF.
1.
2. LOW
3. HIGH
4. PULSE
5. PUREE
6. LIQUIFY
7. ICE CRUSH
8. SMOOTHIE/CLEAN
19030, 19035, 19040, 19020 Beautifu Blender IM R7.indd 1219030, 19035, 19040, 19020 Beautifu Blender IM R7.indd 12 2021-04-07 9:19 AM2021-04-07 9:19 AM

13
Touch-Activated Display Control Panel
A screen that only shows up when you need it.
3 SPEED buttons: LOW, HIGH, PULSE as well as 4 PRESET blending functions:
PUREE, LIQUIFY, ICE CRUSH, SMOOTHIE/CLEAN illuminate when active and disappear
when not in use.
• LOW speed blending will automatically turn OFF after 60 seconds.
• Select HIGH to blend ingredients to the desired consistency when a
faster speed is required.
• Press to turn the function OFF.
• HIGH speed blending will automatically turn OFF after 60 seconds.
• Select PULSE to blend ingredients through controlled bursts of power.
• Use PULSE to dislodge ingredients clumped around the blade and at the
bottom of the jar.
• PULSE is activated as the button is pressed. Release the PULSE button
to turn the Blender OFF.
• For best results, time the pulses to ensure that blades come
to a complete stop before pulsing again.
• Use PUREE to prepare smooth soups and spreads, and to puree fruits
and vegetables. All ingredients should be blended cold or at room
temperature.
• Make sure sufcient liquid is added to create a smooth and even
consistency. Add small amounts of stock, yogurt, milk, or water through
the measuring cap, until the desired consistency is achieved.
• Press to turn the function OFF.
• PUREE has a preset cycle time and will automatically turn OFF after 60
seconds.
19030, 19035, 19040, 19020 Beautifu Blender IM R7.indd 1319030, 19035, 19040, 19020 Beautifu Blender IM R7.indd 13 2021-04-07 9:19 AM2021-04-07 9:19 AM

14
• Ideal for preparing soups and to blend thick or dense foods.
• When LIQUIFY is pressed, a tone will sound, the button will illuminate
and the Blender will begin blending at lower speeds, then progressively
increase to high speed.
• Press to turn the function OFF.
• LIQUIFY has a preset cycle time and will automatically turn OFF after
60 seconds.
• ICE CRUSH quickly crushes up to 10 ice cubes and is perfect
for preparing frozen drink recipes such as margaritas and daiquiris.
• Press to turn the function OFF.
• ICE CRUSH has a preset cycle time and will automatically turn OFF after
26 seconds.
• Blends fresh or frozen fruits and vegetables into the perfect smoothie.
• Press to turn the function OFF.
• SMOOTHIE/CLEAN has a preset cycle time and will automatically turn OFF
after 60 seconds.
• To best automatically clean the Blender jar, rst ll jar with water
to the 24 oz line and add a small amount of liquid dish soap.
Press SMOOTHIE/CLEAN. The initial cleaning will continue for 60 seconds.
• Rinse the jar thoroughly with warm water. Repeat procedure without soap.
Add room temperature water to the blender jar MAX line. Press SMOOTHIE/
CLEAN and run once again. Rinse well. Then place the clean jar upside
down on a rack to dry.
• Always clean jar and blade immediately after use to prevent food
from hardening.
• The Tritan™ Jar is top rack dishwasher safe.
19030, 19035, 19040, 19020 Beautifu Blender IM R7.indd 1419030, 19035, 19040, 19020 Beautifu Blender IM R7.indd 14 2021-04-07 9:19 AM2021-04-07 9:19 AM
15
Before Using for the First Time
Carefully unpack the Blender and
remove all packaging materials.
Check the contents to ensure that
all attachments (50 oz. jar, lid and
measuring cap) are present (see Figure
1), and have been received in good
condition.
1. Wash the jar, lid, and measuring
cap in warm, soapy water before
rst use. Rinse thoroughly.
WARNING: Do not touch blade.
Blending blades are very sharp.
Use extreme care when handling.
Failure to do so can result in
personal injury.
2. Wipe the motor base with a
damp cloth.
WARNING: DO NOT IMMERSE THE MOTOR
BASE IN WATER.
Never ll
jar beyond
the MAX line
19030, 19035, 19040, 19020 Beautifu Blender IM R7.indd 1519030, 19035, 19040, 19020 Beautifu Blender IM R7.indd 15 2021-04-07 9:19 AM2021-04-07 9:19 AM

16
Jar Assembly
1. Always check to be sure the blade collar is properly tted into the jar
before use.
2. To avoid spills, ensure that the lid is rmly secured to the jar.
Press the lid down on the top portion of the jar until it rests rmly
in place. Place the measuring cap into the center of the lid and twist
clockwise to secure it safely in place.
3. Use the measuring cap to measure and add ingredients before and
while blending.
4. Add ingredients to the jar.
NOTE: When blending, foods or liquids tend to expand as they rise up
the side of the jar. Do not ll jar past its MAX line.
WARNING: Pay close attention while processing. Never operate the Blender
when the jar is empty.
Operation
1. Place the motor base on a at, clean, dry counter top or table.
2. Plug the power cord into a 3-prong 120V AC electrical outlet. A tone
will sound. The will illuminate and then pulse slowly on and off.
3. Add ingredients to the jar (Figure 1).
WARNING: Never overll the jar. To avoid personal injury, leakage,
or damage to the Blender, make sure that ingredients do not surpass
the MAX line. Place the jar securely onto the motor base.
IMPORTANT: When adding Smoothie ingredients to the jar, add liquids
and/or yogurt to the blender jar rst. Then layer smaller chopped
ingredients, both fresh and frozen. Larger chunks and ice should be
added last. To avoid spinning blades and ensure a successful, creamy
Smoothie, do not try to process too many frozen chunks.
4. Make sure the measuring cap is in position in the lid.
19030, 19035, 19040, 19020 Beautifu Blender IM R7.indd 1619030, 19035, 19040, 19020 Beautifu Blender IM R7.indd 16 2021-04-07 9:19 AM2021-04-07 9:19 AM

17
5. Add the lid onto the jar. Press to seal. Check before blending.
WARNING: To avoid spills, make sure the lid is locked securely before
pressing any SPEED or PRESET buttons.
WARNING: Do not blend hot liquids.
6. When the pulsing is pressed, a tone will sound as the control panel
illuminates, the button will ash and remains active for 20 seconds.
7. Press the desired SPEED or PRESET button to begin blending (Figure 2).
A tone will sound. The button will illuminate and selected SPEED or
PRESET will begin to ash. All other buttons will disappear when not in
use. Press the desired SPEED or PRESET once more to activate the setting
and begin blending. (Figure 3)
NOTE: If no buttons are pressed in 20 seconds, the control panel
will darken and the button will illuminate and begin to pulse.
8. When using the PULSE function, the PULSE button will illuminate when
pressed. When the button is released, the control panel will remain
active for 20 seconds.
9. When blending HIGH or LOW SPEED, press to STOP blending when desired
consistency is reached.
10. HIGH or LOW speed blending will automatically turn OFF after 60 seconds.
11. PUREE, LIQUIFY, ICE CRUSH, SMOOTHIE/CLEAN times and speeds are PRESET
and will STOP automatically when cycles are complete.
12. Press to STOP blending. Check results and if necessary,
stir in liquid, water, juice, or stock to thin food until
the desired consistency is reached.
WARNING: Do not operate the motor continuously for more than 1 minute
at a time.
13. After processing food in the jar, pull the lid up and off jar to remove.
The spouted jar makes pouring easy. (Figure 4)
HINT! A small spatula is helpful for removing thicker processed foods.
14. Unplug the Blender when not in use and before cleaning.
19030, 19035, 19040, 19020 Beautifu Blender IM R7.indd 1719030, 19035, 19040, 19020 Beautifu Blender IM R7.indd 17 2021-04-07 9:19 AM2021-04-07 9:19 AM

18
Fig. 1
Fig. 3
Fig. 2
Fig. 4
19030, 19035, 19040, 19020 Beautifu Blender IM R7.indd 1819030, 19035, 19040, 19020 Beautifu Blender IM R7.indd 18 2021-04-07 9:19 AM2021-04-07 9:19 AM
This manual suits for next models
3
Table of contents
Languages:
Other Beautiful Blender manuals


