Beautiful 19109 User manual

FRONT Cover
6-Speed Hand Mixer
Instruction Manual
batidora de mano de 6 velocidades
Manual de instrucciones
19109, 19110, 19111, 19112, 19131 BTFL Hand Mixer 6 Speed IM r8.indd 119109, 19110, 19111, 19112, 19131 BTFL Hand Mixer 6 Speed IM r8.indd 1 2022-01-05 12:21 PM2022-01-05 12:21 PM

The kitchen is my family’s happy
place. It’s where we cook and eat
and bake and laugh and share our
most beautiful moments together.
That’s what inspired the creation
of Beautiful, my new collection
of easy-to-use kitchenware that
you’ll want to keep out on your
kitchen counter. So whether
your kitchen has flour all over
the place from a kid's baking
session or you’re throwing an adult
dinner party, I hope every step will
be simple, delicious and beautiful!
www.cookwithbeautiful.com
19109, 19110, 19111, 19112, 19131 BTFL Hand Mixer 6 Speed IM r8.indd 219109, 19110, 19111, 19112, 19131 BTFL Hand Mixer 6 Speed IM r8.indd 2 2022-01-05 12:21 PM2022-01-05 12:21 PM

Table of Contents
Section 1: Safety
Important Safeguards............................................ 4-5
Additional Important Safeguards................................... 6
Notes on the Plug ................................................ 7
Notes on the Cord ................................................ 7
Electric Power .................................................... 8
Section 2: Instructions
Getting to Know Your 6-Speed Hand Mixer ...................... 1 0-11
Before Using for the First Time.................................. 11
Attaching Beaters ............................................... 11
Attaching Dough Hooks .......................................... 12
Attaching the Whisk ............................................. 12
Operation..................................................... 13-14
6 Speed Settings plus TURBO! .................................... 14
Beautiful Mixing Chart: Choosing Mixing Speeds & Attachments ..... 15
Beautiful Mixing Hints ........................................... 16
Removing Attachments: Beaters, Dough Hooks or Whisk.............. 16
User Maintenance Instructions .................................... 16
Care & Cleaning Instructions ..................................... 17
Storing Instructions ............................................. 17
Warranty ...................................................... 18-19
19109, 19110, 19111, 19112, 19131 BTFL Hand Mixer 6 Speed IM r8.indd 119109, 19110, 19111, 19112, 19131 BTFL Hand Mixer 6 Speed IM r8.indd 1 2022-01-05 12:21 PM2022-01-05 12:21 PM

Índice
Sección 1: Seguridad
Medidas de seguridad importantes ............................. 21-2 2
Otras medidas de seguridad importantes ....................... 23-25
Notas sobre el enchufe .......................................... 25
NOTAS SOBRE EL CABLE.......................................... 25-26
Potencia eléctrica ............................................... 26
Sección 2: Instrucciones
Conozca su batidora de mano de 6 velocidades ................. 28-29
Antes del primer uso ............................................ 29
Montaje de los batidores......................................... 29
Montaje de los ganchos para masa ................................ 30
Montaje del batidor de globo .................................... 31
Funcionamiento ................................................... 32
¡Ajustes de 6 velocidades más TURBO! ............................. 33
Tabla de mezcla de Beautiful:
cómo elegir la velocidad de mezcla y los accesorios .......... 33-34
Consejos de mezcla de Beautiful.................................. 34
Cómo quitar los accesorios: batidores, ganchos para masa
o batidor de globo .............................................. 35
Instrucciones de mantenimiento para el usuario ................... 36
Instrucciones de limpieza y cuidado.............................. 36
Instrucciones de almacenamiento.................................. 37
Garantía ...................................................... 38-39
19109, 19110, 19111, 19112, 19131 BTFL Hand Mixer 6 Speed IM r8.indd 219109, 19110, 19111, 19112, 19131 BTFL Hand Mixer 6 Speed IM r8.indd 2 2022-01-05 12:21 PM2022-01-05 12:21 PM

Section 1
Safety
1
19109, 19110, 19111, 19112, 19131 BTFL Hand Mixer 6 Speed IM r8.indd 319109, 19110, 19111, 19112, 19131 BTFL Hand Mixer 6 Speed IM r8.indd 3 2022-01-05 12:21 PM2022-01-05 12:21 PM

4
IMPORTANT SAFEGUARDS
When using electrical appliances, basic safety precautions
should always be followed including the following:
1. READ ALL INSTRUCTIONS.
2. To protect against risk of electrical shock do not put
cord, plugs, or appliance in water or other liquid.
3. The appliance is not intended for use by Children
or by persons with reduced physical, sensory, or mental
capabilities, or lack of experience and knowledge.
4. Close supervision is necessary when any appliance is
used by or near children. Children should be supervised
to ensure that they do not play with the appliance.
5. Turn the appliance OFF, then unplug from the outlet
when not in use, before assembling or disassembling
parts and before cleaning. To unplug,grasp the plug and
pull from the outlet. Never pull from the power cord.
6. Avoid contacting moving parts.
7. Do not operate any appliance with a damaged cord
or plug or after the appliance malfunctions, or has
been damaged in any manner. Contact Consumer Service.
NOTE: DO NOT ATTEMPT TO REPAIR THE UNIT YOURSELF.
THIS WILL VOID THE WARRANTY.
8. The use of attachments not recommended or sold by the
manufacturer may cause re, electric shock or injury.
19109, 19110, 19111, 19112, 19131 BTFL Hand Mixer 6 Speed IM r8.indd 419109, 19110, 19111, 19112, 19131 BTFL Hand Mixer 6 Speed IM r8.indd 4 2022-01-05 12:21 PM2022-01-05 12:21 PM

5
9. Do not use outdoors.
10. Do not let cord hang over edge of table or counter.
11. Do not let cord contact hot surface, including
the stove.
12. Keep hands, hair, clothing, as well as spatulas
and other utensils away from beaters, dough hooks
or whisk during operation to reduce the risk of injury
to persons, and/or damage to the Hand Mixer.
13. Remove beaters, dough hooks or whisk from the Hand
Mixer before washing.
FOR HOUSEHOLD USE
ONLY
SAVE THESE
INSTRUCTIONS
19109, 19110, 19111, 19112, 19131 BTFL Hand Mixer 6 Speed IM r8.indd 519109, 19110, 19111, 19112, 19131 BTFL Hand Mixer 6 Speed IM r8.indd 5 2022-01-05 12:21 PM2022-01-05 12:21 PM

6
ADDITIONAL IMPORTANT
SAFEGUARDS
1. All users of this appliance must read and understand
this Instruction Manual before operating or cleaning
this appliance.
2. The cord to this appliance should be plugged into
a 120V AC electrical outlet only.
3. Do not leave this appliance unattended during use.
4. If this appliance begins to malfunction during use,
immediately slide the speed control lever to 0(OFF)
and unplug the cord. Do not use or attempt to repair
the malfunctioning appliance.
5. If this appliance falls or accidentally becomes
immersed in water, unplug it immediately. Do not reach
into the water! Do not use this appliance after it has
fallen into or becomes immersed in water.
6. To reduce the risk of injury to persons or property,
never use this appliance in an unstable position.
7. Do not use this appliance for other than its intended
use.
19109, 19110, 19111, 19112, 19131 BTFL Hand Mixer 6 Speed IM r8.indd 619109, 19110, 19111, 19112, 19131 BTFL Hand Mixer 6 Speed IM r8.indd 6 2022-01-05 12:21 PM2022-01-05 12:21 PM

7
NOTES ON THE PLUG
This appliance has a polarized plug (one blade is wider
than the other). To reduce the risk of electric shock, this
plug will t in a polarized outlet only one way. If the
plug does not t fully into the outlet, reverse the plug.
If it still does not t, contact a qualied electrician. Do
not modify the plug in any way
NOTES ON THE CORD
a) A short power-supply cord (or detachable power-supply
cord) is to be provided to reduce risks resulting from
becoming entangled in or tripping over a longer cord.
b) Longer detachable power-supply cords or extension cords
are available and may be used if care is exercised in
their use.
c) If a long detachable power-supply cord or extension
cord is used:
1) The marked electrical rating of the detachable power-
supply cord or extension cord should be at least as
great as the electrical rating of the appliance;
2) If the appliance is of the grounded type, the extension
cord should be a UL polarized plug 2-wire cord;
3) The longer cord should be arranged so that it will not
drape over the countertop or table top where it can be
pulled on by children or tripped over.
19109, 19110, 19111, 19112, 19131 BTFL Hand Mixer 6 Speed IM r8.indd 719109, 19110, 19111, 19112, 19131 BTFL Hand Mixer 6 Speed IM r8.indd 7 2022-01-05 12:21 PM2022-01-05 12:21 PM

8
ELECTRIC POWER
If the electrical circuit is overloaded with other
appliances, your appliance may not operate properly.
It should be operated on a separate electrical circuit
from other appliances.
19109, 19110, 19111, 19112, 19131 BTFL Hand Mixer 6 Speed IM r8.indd 819109, 19110, 19111, 19112, 19131 BTFL Hand Mixer 6 Speed IM r8.indd 8 2022-01-05 12:21 PM2022-01-05 12:21 PM
9
Section 2
Instructions
2
19109, 19110, 19111, 19112, 19131 BTFL Hand Mixer 6 Speed IM r8.indd 919109, 19110, 19111, 19112, 19131 BTFL Hand Mixer 6 Speed IM r8.indd 9 2022-01-05 12:21 PM2022-01-05 12:21 PM

10
Getting to Know Your 6-Speed Hand Mixer
Product may vary slightly from illustration
1. Dough Hooks (2)
2. Collar
3. Beaters (2)
4. Whisk
5. Storage Case
6. EJECT Button
7. Handle
8. TURBO Button
9. Speed Control Lever
10. Motor Housing
11. Cord with Polarized Plug
3
1
2
10
11
8
7
9
6
5
4
19109, 19110, 19111, 19112, 19131 BTFL Hand Mixer 6 Speed IM r8.indd 1019109, 19110, 19111, 19112, 19131 BTFL Hand Mixer 6 Speed IM r8.indd 10 2022-01-05 12:21 PM2022-01-05 12:21 PM

11
1. Beaters: Designed for all-purpose mixing. Cut through thick or thin batters
with ease.
2. Whisk: Use the single whisk to whip air into mixtures such as egg whites,
egg yolks or cream,
3. Dough Hooks: Spiral dough hooks are designed to mix or knead heavier
yeast batters or bread dough. Hooks may also be used for gently mixing
pastry dough.
4. Storage Case:
Your Beautiful Hand Mixer sits and locks on top
of the storage case for compact storage.
Before Using for the First Time
Carefully unpack the 6-Speed Hand Mixer. Wash beaters, dough hooks and whisk
in warm, soapy water. Rinse well and dry thoroughly. Wipe motor housing with a
soft, clean cloth or sponge. Never immerse the Hand Mixer motor housing in water
or any other liquid.
Attaching Beaters
1. Make sure the Hand Mixer is unplugged and the
speed control lever is set to 0(OFF).
2. Align notches on beaters with holes/slots on the
bottom of the motor housing, and push until each
clicks and locks into place. (Figure 1)
NOTE: Beaters are identical and may be inserted
into either hole.
CAUTION: Always unplug Hand Mixer before attaching
or ejecting beaters.
Fig. 1
19109, 19110, 19111, 19112, 19131 BTFL Hand Mixer 6 Speed IM r8.indd 1119109, 19110, 19111, 19112, 19131 BTFL Hand Mixer 6 Speed IM r8.indd 11 2022-01-05 12:21 PM2022-01-05 12:21 PM
12
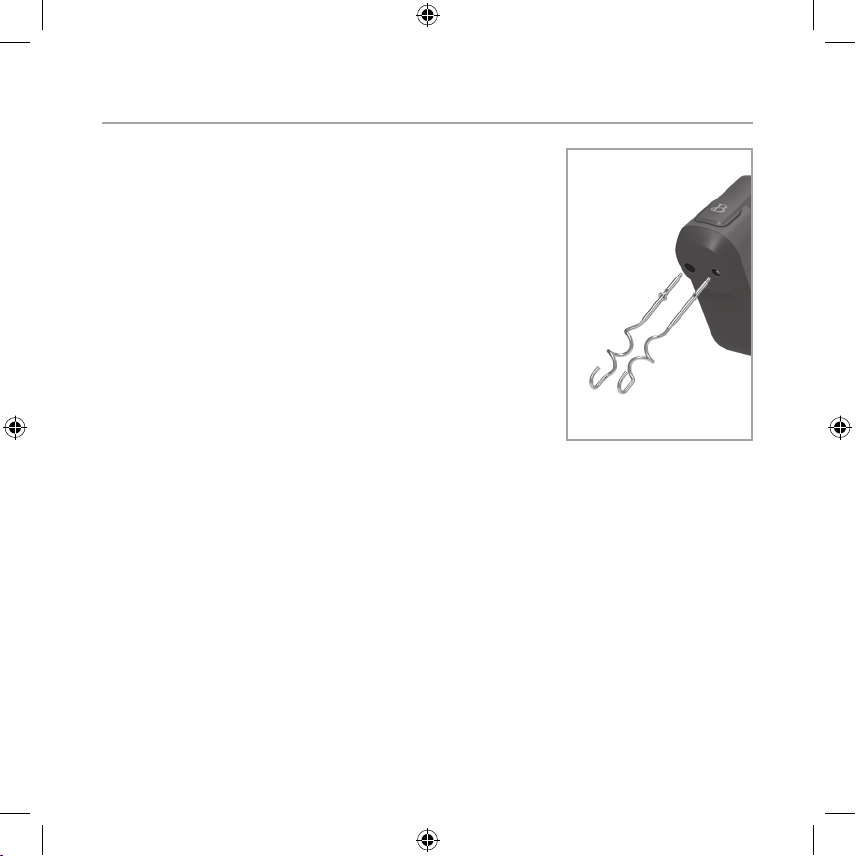
Attaching Dough Hooks
1. Make sure the Hand Mixer is unplugged and the
speed control lever is set to 0(OFF).
2. Align notches on the collared dough hook
and insert into the larger hole on the bottom
of the motor housing. Push until it clicks
and locks into place.
3. Align notches on the second dough hook and insert
into the smaller hole. Push until it clicks
and locks into place. (Figure 2)
CAUTION: Always unplug the Hand Mixer before
attaching or ejecting dough hooks.
NOTE: The collared dough hook will ONLY t into
the larger hole. Do not try to force it into the
incorrect hole. This could damage the Hand Mixer.
CAUTION: Use either both beaters or both dough
hooks. Do not attempt to use one dough hook with
one beater. This could damage the Hand Mixer.
Fig. 2
19109, 19110, 19111, 19112, 19131 BTFL Hand Mixer 6 Speed IM r8.indd 1219109, 19110, 19111, 19112, 19131 BTFL Hand Mixer 6 Speed IM r8.indd 12 2022-01-05 12:21 PM2022-01-05 12:21 PM

13
Attaching the Whisk
1. Make sure the Hand Mixer is unplugged
and the speed control lever is set to 0(OFF).
2. Align notches on the single whisk and insert
into the larger hole on the bottom of the motor
housing. Push until it clicks and locks
into place. (Figure 3)
CAUTION: Always unplug the Hand Mixer before
attaching or ejecting the single whisk.
NOTE: The collared whisk will t and lock properly
into the larger hole ONLY. Do not try to force
it into the smaller hole. This could damage
the Hand Mixer.
CAUTION: The whisk is designed to be used
on its own. When using the whisk, never use any
other beater or dough hook. This could damage
the Hand Mixer.
Operation
1. Be sure to unplug the power cord when the Hand Mixer is not in use.
Make sure the speed control lever is set to 0(OFF).
2. Attach 2 beaters, 2 dough hooks or 1 single whisk following
the procedures previously described.
3. Plug the cord into a 120V AC electrical outlet.
4. Place beaters, dough hooks, or whisk directly into container holding
ingredients to be mixed.
5. Slide the speed control lever from Speed 1 to 6 to adjust speed to match
the mixing task. (See Beautiful Mixing Chart.)
6. Mix ingredients to desired consistency.
CAUTION: When kneading yeast dough, set the speed to the lowest setting,
increase speed gradually until the highest speed is achieved.
Fig. 3
19109, 19110, 19111, 19112, 19131 BTFL Hand Mixer 6 Speed IM r8.indd 1319109, 19110, 19111, 19112, 19131 BTFL Hand Mixer 6 Speed IM r8.indd 13 2022-01-05 12:21 PM2022-01-05 12:21 PM

14
7. Press the TURBO button from any speed setting to give the Hand Mixer
a short boost of power.
CAUTION: To avoid damage to the Hand Mixer, DO NOT use the TURBO boost
feature for more than 2 minutes at a time.
CAUTION: To avoid damage to the Hand Mixer, DO NOT use the Hand Mixer
for more than 5 minutes continuously.
8. After mixing is complete, slide the speed control lever to 0(OFF),
and unplug the appliance.
9. Press down rmly on the EJECT button to release beaters, dough hooks
or whisk. (Figure 4)
10. Scrape excess batter off the beaters using a rubber or plastic spatula.
CAUTION: DO NOT strike beaters, dough hooks or whisk on the rim
of the bowl. This could damage the attachments.
6 Speed Settings plus TURBO!
1. Slide the speed control lever to begin mixing
from Speed 1 (LOW) to Speed 6 (HIGH).
(Figure 4)
2. Press the TURBO button for a burst of power
at any speed setting. Resume the previously
selected speed by releasing TURBO button.
CAUTION: DO NOT use the TURBO boost feature
for more than 2 minutes at a time as the motor
may overheat and cause damage to the unit.
Fig. 4
Eject button
Speed control lever
TURBO button
19109, 19110, 19111, 19112, 19131 BTFL Hand Mixer 6 Speed IM r8.indd 1419109, 19110, 19111, 19112, 19131 BTFL Hand Mixer 6 Speed IM r8.indd 14 2022-01-05 12:21 PM2022-01-05 12:21 PM

15
Beautiful Mixing Chart: Choosing Mixing Speeds & Attachments
These are general guidelines for selecting the best speed to stir, blend,
mix, beat, whip or knead ingredients with your 6-Speed Hand Mixer and the best
attachments to use. Refer to recipes for suggested Hand Mixer speeds and times.
If your Hand Mixer slows down, switch speed control to a higher speed,
press the TURBO feature for a brief surge of mixing power or divide the quantity
of ingredients being mixed.
SPEED FUNCTION USE ATTACHMENT
1 STIR Blend liquids, combine dry
ingredients. Stir one ingredient
into another.
Beaters/Whisk
2 BLEND Blend liquids and dry ingredients
at a slightly higher speed
Add in nuts, chips, shredded
cheeses, onions, olives.
Prepare sauces and puddings
Beaters/Whisk
3 MIX Mix cake batters, mixes
and frosting.
Mash potatoes, mix cream cheese
spreads.
Mix yeast pastry dough.
Beaters/Whisk
Dough Hooks
4 BEAT/
CREAM
Beat whole eggs and frosting.
Cream butter and sugar.
Beaters
5 - 6 FINISH/
WHIP/
KNEAD
Finish cookie dough or other
heavy batters.
Whip/beat potatoes.
Prepare light and uffy mixtures.
Whisk dressings, sauces, egg whites.
Knead yeast doughs and breads.
Beaters
Beaters/Whisk
Dough Hooks
19109, 19110, 19111, 19112, 19131 BTFL Hand Mixer 6 Speed IM r8.indd 1519109, 19110, 19111, 19112, 19131 BTFL Hand Mixer 6 Speed IM r8.indd 15 2022-01-05 12:21 PM2022-01-05 12:21 PM

16
Beautiful Mixing Hints
1. Climatic conditions, seasonal temperature changes, temperature
of ingredients are factors that may cause food textures to vary from
area to area and all play a part in the required mixing time and
the results achieved.
2. Measure ingredients and set aside before blending.
3. Always begin mixing at lower speeds, then gradually increase
to the recommended speed called for in the recipe.
4. To avoid mixing messes, use low speeds when adding dry ingredients.
5. Refrigerated ingredients, such as cream cheese, butter and eggs,
should be at room temperature before beating or whipping.
6. When whipping cream, chill clean bowl and whisk in the freezer
and use cold, heavy cream.
7. To eliminate the possibility of egg shells in the mixture, always break
eggs into a separate container before adding to the mixing container.
8. When whipping egg whites, use a copper mixing bowl, if available.
A spotlessly clean stainless steel or glass mixing bowl can be used.
NOTE: Plastic mixing bowls are not recommended.
9. Do not over-beat. Follow recipe instructions.
Removing Attachments: Beaters, Dough Hooks or Whisk
1. Make sure Hand Mixer is unplugged.
2. Slide the speed control lever to 0(OFF).
3. Press down rmly on the EJECT button to release beaters, dough hooks
or whisk. (Figure 4)
CAUTION: Always unplug Hand Mixer before attaching or ejecting beaters,
dough hooks or whisk.
User Maintenance Instructions
This appliance requires little maintenance. It contains no user serviceable
parts. Do not try to repair it yourself. Any servicing that requires disassembly
other than cleaning must be performed by a qualied appliance repair technician.
19109, 19110, 19111, 19112, 19131 BTFL Hand Mixer 6 Speed IM r8.indd 1619109, 19110, 19111, 19112, 19131 BTFL Hand Mixer 6 Speed IM r8.indd 16 2022-01-05 12:21 PM2022-01-05 12:21 PM

17
Care & Cleaning Instructions
CAUTION: NEVER IMMERSE MOTOR HOUSING IN WATER.
CAUTION: Always unplug Hand Mixer before removing attachments and before
cleaning. Severe injury can result if the Hand Mixer is accidentally turned ON.
1. Press down rmly on the EJECT button to release beaters, dough hooks
or whisk. (Figure 4)
2. Wash in warm, soapy water. Rinse well and dry thoroughly.
NOTE: All attachments: 2 beaters, 2 dough hooks, and 1 whisk
are dishwasher-safe.
3. Wipe motor housing with a damp cloth or sponge.
Storing Instructions
1. Make sure the Hand Mixer is unplugged and the
speed control lever is set to 0(OFF).
2. Cord may be loosely wrapped around motor housing.
Never wrap cord tightly around the appliance. Do
not put any stress on the cord where
it enters the unit, as it could cause the cord to
fray and break.
3. Store Hand Mixer and attachments into the storage
case. Your Beautiful Hand Mixer sits and locks
on top of the storage case for compact storage.
(Figure 5)
4. Store in a clean, dry place.
Fig. 5
19109, 19110, 19111, 19112, 19131 BTFL Hand Mixer 6 Speed IM r8.indd 1719109, 19110, 19111, 19112, 19131 BTFL Hand Mixer 6 Speed IM r8.indd 17 2022-01-05 12:21 PM2022-01-05 12:21 PM

18
Limited Two-Year Warranty
Sensio Inc. dba Made by Gather™
hereby warrants that for a period
of TWO YEARS from the date of
purchase, this product will be free
from mechanical defects in material
and workmanship, and for 90 days in
respect to non-mechanical parts. At
its sole discretion, Sensio Inc. dba
Made by Gather™ will either repair
or replace the product found to be
defective, or issue a refund on the
product during the warranty period.
The warranty is only valid for
the original retail purchaser from
the date of initial retail purchase
and is not transferable.
Keep the original sales receipt,
as proof of purchase isrequired
to obtain warranty validation.
Retail stores selling this product
do not have the right to alter,
modify, or in any way revise the
terms and conditions of the warranty.
Exclusions:
The warranty does not cover normal
wear of parts or damage resulting
from any of thefollowing: negligent
use of the product, use of improper
voltage or current, improper routine
maintenance, use contrary to the
operating instructions, disassembly,
repair, or alteration by anyone
other than qualied Sensio Inc.
dba Made by Gather™ personnel.
Also, the warranty does not cover
Acts of God such as re, oods,
hurricanes, or tornadoes.
Sensio Inc. dba Made by Gather™ shall
not be liable for any incidental or
consequential damages caused by the
breach of any express or implied
warranty. Apart from the extent
prohibited by applicable law, any
implied warranty of merchantability
or tness for a particular purpose
is limited in time to the duration
of the warranty. Some states,
provinces or jurisdictions do not
allow the exclusion or limitation
of incidental or consequential
damages, or limitations on how
long an implied warranty lasts,
and therefore, the above exclusions
or limitations may not apply to you.
The warranty covers specic legal
rights which may vary by state,
province and/or jurisdiction.
19109, 19110, 19111, 19112, 19131 BTFL Hand Mixer 6 Speed IM r8.indd 1819109, 19110, 19111, 19112, 19131 BTFL Hand Mixer 6 Speed IM r8.indd 18 2022-01-05 12:21 PM2022-01-05 12:21 PM
This manual suits for next models
4
Table of contents
Languages:


